
164 Implementing WebSphere BI Express for Item Synchronization
9.1 Create application tables and event tables
Event delivery to the InterChange Server may be accomplished in a variety of
ways. For a database application such as ours, which has no API, a database
trigger mechanism is a good mechanism to use. We now create the tables
required to handle event processing. We also create our application, which is a
DB2 database called SUPPLIER.
1. Open a DB2 command window by selecting Start
→ Programs → IBM DB2
→ Command Line Tools → Command Window.
2. Locate the ddl files in Appendix C, “Additional material” on page 259.
3. Edit each of the ddl files to add the correct password for the db2admin user.
4. Type the following command to create the application database and tables:
db2 -tvf database.ddl
5. Next, we create the event tables that are used by the JDBC Connector to
detect events in the application table. Type the command:
db2 -tvf eventtables.ddl
9.2 Create and test the database trigger
1. Now, we define the trigger on the application table so that the database
system generates an event when a new record is inserted in the table. Start
the DB2 Control Center by selecting Start
→ Programs → IBM DB2 →
General Administration Tools
→ Control Center.
2. Expand the tree structure in the left pane. You should now find two
databases. SMB_DB is the repository for the WebSphere BI Express product.
SUPPLIER is the application database created in the previous section.
Expand the tree structure for database SUPPLIER, and locate the folder
Triggers for this database.
3. Right-click the folder Triggers and click Create.
4. This will bring up a new window (see Figure 9-1 on page 165). Set the field
Trigger schema to SMBADMIN. Set the Table or view schema to SMBADMIN
as well.
5. Select the table ITEM_CATALOG and name the trigger ITEM_CREATE.
Attention: The database design for our scenario uses the UPC.EAN code as
the item number (and therefore key). We do this intentionally because the
UPC.EAN code from the GBO will be used as the key value for the destination
app retrieve downstream in the CIN processing.

Chapter 9. Configuration for integration of back-end system 165
6. Select After as the value for Time of trigger action. See the configured dialog
box in Figure 9-1.
Figure 9-1 Create trigger: Step 1
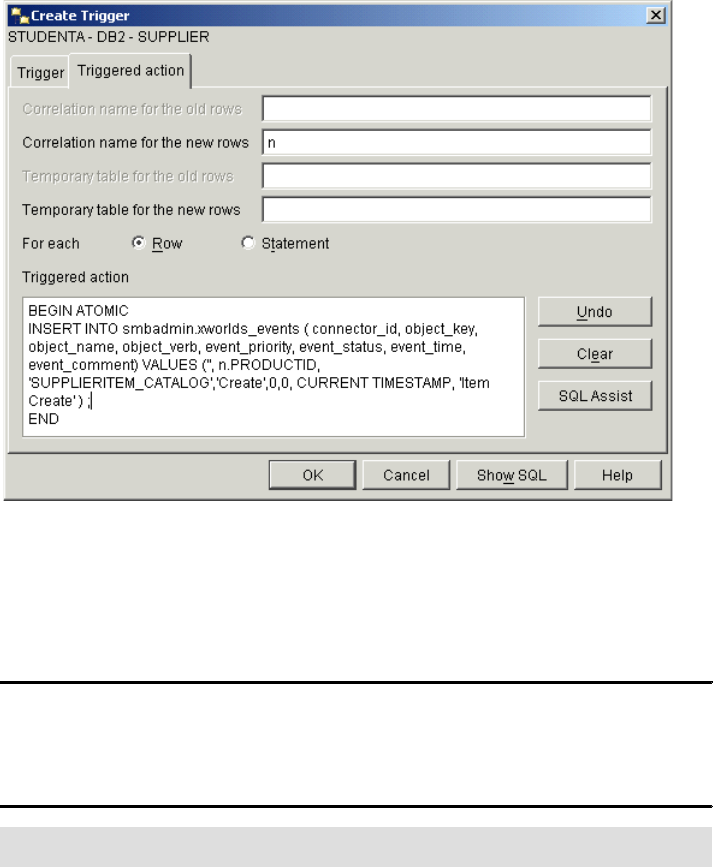
7. Click Triggered action, shown in Figure 9-2 on page 166. Set the correlation
name to n.
8. Edit the triggered action field. The SQL statement is shown below in
Example 9-1.
Example 9-1 Triggered action
BEGIN ATOMIC
INSERT INTO smbadmin.xworlds_events ( connector_id, object_key, object_name,
object_verb, event_priority, event_status, event_time, event_comment) VALUES
('', n.PRODUCTID, 'SUPPLIER_ITEM_CATALOG','Create',0,0, CURRENT TIMESTAMP,
'Item Create');
END;
166 Implementing WebSphere BI Express for Item Synchronization
Figure 9-2 Create trigger: Step 2
9. Click OK to complete this step.
10.To test the generation of events by the trigger, open a DB2 command window
again and type the following SQL commands:
Example 9-2 Testing trigger
db2 connect to supplier user smbadmin using smbP4$$word
db2 insert into ITEM_CATALOG
(productid,Unitof_wgt,description,descriptionshort,upceancode)
values(‘12345678901234’,'1','First item description','FID','12345678901234')
db2 select * from xworlds_events
The output of the select should have an event record. If the events table does
not contain an event record, the trigger has not worked.
Note: The second command should be typed on a single line.
Chapter 9. Configuration for integration of back-end system 167
9.2.1 Create the Application-Specific Business Object
We now need to create the ASBO that defines the ITEM_CATALOG records. We
do this using the Object Discovery Agent (ODA) for JDBC.
1. In Notepad, open the file start_JDBCODA.bat located in the folder
C:\IBM\WebSphereItemSync\ODA\JDBC.
2. Locate the SET statement for the environment variable DRIVERPATH. Add
C:\<DB2 Root directory> \Java\DB2java.zip to the definition of the
environment variable:
set DRIVERPATH=C:\SQLLIB\Java\DB2Java.zip;"%CROSSWORLDS%"\lib...
3. Locate the SET statement for the environment variable DRIVERLIB. This
environment variable should have the value C:\<DB2 Root directory>\bin.
set DRIVERLIB=C:\SQLLIB\bin
4. Save the file and close the editor.
5. Now, start the JDBC ODA by selecting Start
→ Programs → IBM
WebSphere BI Express...
→ Adapters → Object Discovery Agents →
JDBC Object Discovery Agent.
This will start a console window.
6. Start the System Manager now. Right-click the folder Business Objects in
the ICL ItemSyncLibrary and click Create New Business Object.
7. A New Business Object window will appear. Click Cancel and then select File
→ New Using ODA.
8. A new wizard will start. Click Find Agents to populate the list of available
agents. See Figure 9-3 on page 168.
Get Implementing WebSphere Business Integration Express for Item Synchronization now with the O’Reilly learning platform.
O’Reilly members experience books, live events, courses curated by job role, and more from O’Reilly and nearly 200 top publishers.

