Chapter 5. SVG for Publishers
SVG stands for Scalable Vector Graphics, and the name basically says it all. SVG is a vector-based graphics system, where you can scale images to any desired size, without any loss in quality. While bitmap graphic formats (like JPEG or PNG) store image data as a series of pixels, vector formats like SVG instead store image data geometrically, as a series of lines, curves, and/or shapes. Because image data isn’t tied to a specific number of pixels, the graphic resolution can be as high as the screen allows. Like MathML, SVG is an XML vocabulary, and can be styled with CSS and scripted with JavaScript, which opens the door to using SVG for animations, interactive graphics, and much more.
While there has been longstanding support for SVG graphics in major Web browsers for a long time, SVG is formally a part of the HTML5 specification, and is now a first-class citizen in HTML5 pages. In this chapter, you’ll get a brief introduction to SVG, put together an interactive SVG coloring book, and learn more about SVG compatibility in the ereader ecosystem.
A Ten-Minute Introduction to SVG
In order to become familiar with SVG, let’s start by building an SVG image from scratch. We’ll take our Canvas “smiley” image from Drawing on your <canvas> and reimplement it as an SVG image. Here are the SVG elements we’ll use:
<svg>All SVG images must have a root element of
<svg>, which contains all the other elements you use to compose your graphic. The<svg>element should have the namespace declarationxmlns="http://www.w3.org/2000/svg"and a version attribute (in this chapter, we’re writing SVG 1.1) to ensure browsers and reading systems parse the content properly:<svgxmlns="http://www.w3.org/2000/svg"version="1.1"><!-- All your SVG content will go here --></svg><rect>As its name suggests,
<rect>is used to construct a rectangle shape. The four key attributes you need to supply on<rect>are:xThe x-coordinate of the top-left corner of the rectangle, assuming the origin is the top-left corner of the page and has the coordinates (0,0)—with positive values moving to the right of the origin, and negative values moving to the left of the origin.
yThe y-coordinate of the top-left corner of the rectangle, assuming the origin is the top-left corner of the page and has the coordinates (0,0)—with positive values moving below the origin, and negative values moving above the origin.
widthThe rectangle’s width (horizontal)
heightThe rectangle’s height (vertical)
Both
xandyare optional, and will default to 0 if omitted. If you omitwidthorheight, the rectangle will not be drawn at all.Other optional elements you can supply on
<rect>that are not specific to the element arestroke(which lets you specify the color of the rectangle border),stroke-width(the thickness of the rectangle border), andfill(the color that fills the rectangle interior; specifytransparentfor a transparent interior).Here is a sample
<rect>element that will draw a rectange with top-left-corner coordinates of (10, 50), width of 60, height of 30, a blue border of thickness 3px, and a yellow interior:<rectx="10"y="50"width="60"height="30"stroke="blue"stroke-width="3px"fill="yellow"/>The shape will render like this (10 pixels right and 50 pixels down from the top-left corner of the page):

<circle>Again, intuitively,
<circle>draws a circle.<circle>takes three attributes:cxThe x-coordinate of the center of the circle, assuming the origin is the top-left corner of the page and has the coordinates (0,0)—with positive values moving to the right of the origin, and negative values moving to the left of the origin.
cyThe y-coordinate of the center of the circle, assuming the origin is the top-left corner of the page and has the coordinates (0,0)—with positive values moving below the origin, and negative values moving above the origin.
crThe length of the circle’s radius.
Both
cxandcyare optional, and will default to 0 if omitted. If you omitcr, the circle will not be drawn at all. As with<rect>, you can specifystroke,stroke-width, andfillattributes on a<circle>element.Here is a sample
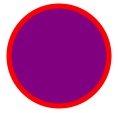
<circle>element that will draw a circle with center coordinates (200, 200), radius of 50, a red border of thickness 5px, and a purple interior.<circlecx="200"cy="200"r="50"stroke="red"stroke-width="5px"fill="purple"/>The shape will render like this (with the center 200 pixels from the top and left of the page):
<path><path>is an extremely flexible SVG element that allows you to draw your own custom shapes by specifying the coordinates and lengths of its component lines and arcs. The key attribute<path>takes isd, which contains all the path data for the shape’s outline. There are numerous types of instructions you can supply in adattribute. Here are just some of the instructions available:MA “moveto” instruction, which takes an x- and y-coordinate where the cursor will be moved to instate a new starting point for the next drawing instruction. The following “moveto” will reposition the cursor at (50,50):
M50,50
HA horizontal “lineto” instruction, which draws a horizontal line from the current cursor position to a specified x-coordinate. For example, if the current postion is (30, 30), the following instruction:
H10
will draw a horizontal line from (30,30) to (10,30). The location (10,30) will become the new cursor position.
VA vertical “lineto” instruction, which draws a vertical line from the current cursor position to a specified y-coordinate. For example, if the current postion is (30, 30), the following instruction:
V10
will draw a vertical line from (30,30) to (30,10). The location (30,10) will become the new cursor position.
LA more generic “lineto” instruction, for lines that are neither vertical nor horizontal.
Ldraws a line from the current cursor position to a specified x- and y-coordinate. For example, if the current postion is (30, 30), the following instruction:L10,10
Will draw a line from (30,30) to (10,10). The location (10,10) will become the new cursor position.
AAn “elliptical arc” instruction. Will draw an arc from the current cursor position, based on several parameters separated by spaces, specified in this order:
thex-radius and the y-radius (separated by a comma), the x-axis rotation (in degrees), the “large-arc-flag” and the “sweep-flag” (separated by a comma; both parameters take a value of0or1), and the ending-point x-coordinate and the ending-point y-coordinate (separated by a comma). The “large-arc-flag” and the “sweep-flag” indicate how to draw the arc between the starting and ending point. If the “large-arc-flag” is 0, the smaller-possible arc between the two points will be drawn; if “large-arc-flag” is 1, the larger-possible arc between the two points will be drawn. If “sweep-flag” is 0, the arc will be drawn at a “negative-angle” direction (e.g., sweeping through the bottom-left space between the points); if “sweep-flag” is 1, the arc will be drawn in a “positive-angle” direction (e.g., sweeping through the top-right space between the points).Note
Detailed discussion of the mathematics and SVG mechanics of elliptical arcs is beyond the scope of this book, but for a good introductory tutorial with a bit more depth, see this elliptical arc tutorial on Illinois State’s site.
The following instruction—where we start at (0,0) and end at (30,30)—will draw the upper-right quadrant of a circle with a radius of 30.
M0,0 A30,30 0 0,1 30,30
Note
All x- and y-coordinates referenced above are considered to be absolute, which means they are relative to an origin at the top-left corner of the page with the coordinates (0,0)—with positive x- and y- values moving to the right and down, respectively, and negative x- and y- values moving to the left and up, respectively.
If you’d prefer to use coordinates that are relative, based on the current cursor position and not the origin, you can use the lowercase version of any of the above commands instead—i.e.,
m,h,v,l, ora.As with
<rect>and<circle>, the<path>element can takestroke,stroke-width, andfillattributes.Putting together all of the above, here’s a
<path>element that will draw the top half of a circle centered at (100,100) with a radius of 20, a black border with a thickness of 2px, and a green fill:<pathd="M80,100 A20,20 0 0,1 120,100 H80"stroke="black"stroke-width="2px"fill="green"/>This shape will render like this (with the bottom left corner 80 pixels to the right and 100 pixels down from the top-left of the page):

<text>The
<text>element is used to add text characters to the image. While<text>can accept a myriad of attributes for fine-tuned placement and rendering of each character in a block of text, in its simplest form, you can just supply the following two attributes to indicate the placement of the text:xThe x-coordinate for the starting point of the text. This coordinate is absolute, relative to the origin of the page (0,0).
yThe y-coordinate for the starting point of the text. This coordinate is absolute, relative to the origin of the page (0,0).
Note
If you choose, you can supply multiple coordinates for either
xory(separated by a comma or space), in which case the nth coordinate in the list will indicate the placement of the nth character in the text to be rendered.<text>also accepts several attributes related to the text font, includingfont-family(font family to use),font-size(font size; supports both absolute and relative sizes), andfont-style(e.g., italic)The text to be rendered should be included inside the
<text>tag.The following example prints the text “I just learned SVG!” at the position (50,50) in an italic serif font:
<textx="50"y="50"font-family="serif"font-style="italic">I just learned SVG</text>
Note
As you’ve seen in this section, once you start doing complex drawings in SVG, the markup quickly gets very intricate and potentially quite difficult to write manually. Most people who create SVG graphics do not write the markup by hand; instead, they use a drawing program that can output to SVG format. If you’re interesting in creating your own SVG images, you may want to take a look at Inkscape, an open source editor that specializes in SVG.
An SVG “Smiley”
The SVG basics covered in A Ten-Minute Introduction to SVG are all we need to know in order to redraw our smiley in native SVG. Here’s the code, with each line preceded by an annotation describing its function:
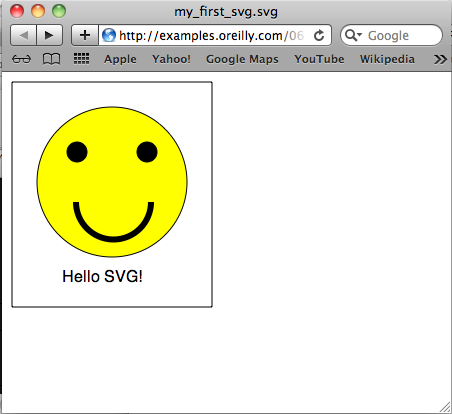
<svgxmlns="http://www.w3.org/2000/svg"version="1.1"><!-- To start, draw a border --><rectx="10"y="10"width="200"height="225"stroke="black"fill="transparent"stroke-width="1px"/><!-- Now, draw face: a circle at (110,110) with radius of 75, a black border,and a yellow fill --><circlecx="110"cy="110"r="75"stroke="black"fill="yellow"/><!-- Now draw left eye: a circle at (75,80) with radius of 10, a black borderand a black fill --><circlecx="75"cy="80"r="10"stroke="black"fill="black"/><!-- Now draw right eye: a circle at (145,80) with radius of 10, a black borderand a black fill --><circlecx="145"cy="80"r="10"stroke="black"fill="black"/><!-- Now draw smile: an arc starting at (74,130) with an x/y radius of 35,and ending at 149,130 --><pathd="M74,130 A35,35 0 0,0 149,130"stroke="black"stroke-width="6px"fill="transparent"/><!-- Smiley speaks: write text starting at (60,210) --><textx="60"y="210"font-family="sans-serif">Hello SVG!</text></svg>
First, we use a <rect> element to draw a
rectangular, black border that will contain the smiley. Then we draw a
large <circle> (yellow, with black border)
representing the smiley’s face. Next, we draw two smaller
<circle>s (filled in black) for the eyes,
followed by a <path> that contains an arc for
the actual smile. Lastly, we write “Hello SVG” below the face.
Figure 5-1 shows the masterful result, rendered in Safari for Mac.
Now that we’ve mastered the SVG fundamentals, in the next section, we’ll explore how to use JavaScript to dynamically modify SVG content in order to create an interactive graphic.
An SVG Coloring Book
In Canvas Finger Painting, we took advantage of
the interactivity possible with <canvas> to make
a simple drawing program for the screen. As a variation on this theme,
let’s implement a “coloring book” in SVG, where instead of drawing on a
black canvas, we’ll instead fill in the sections of an existing sketch.
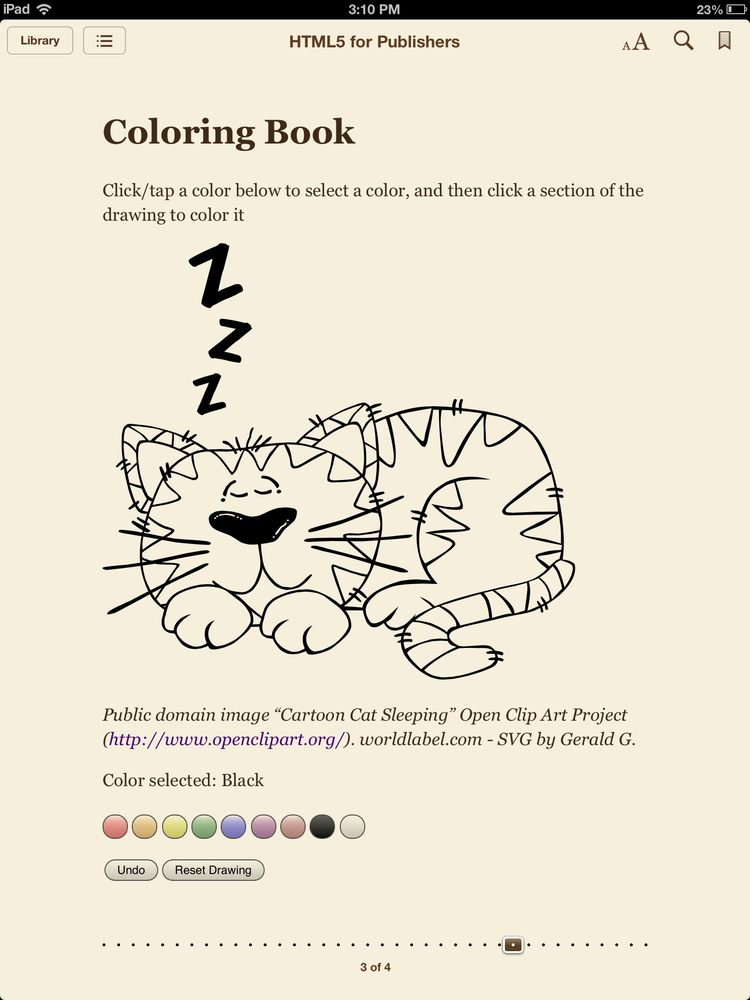
Because everyone loves cats, we’ll
take the public-domain SVG shown in Figure 5-2 (available from the Open Clip Art Library), and adapt it
for our coloring book.

Example 5-1 shows brief snippet of the SVG
XML markup that underlies the image in Canvas Finger Painting, which consists largely of some quite
complex <path>s, so you can get an idea of what
the code looks like (the full contents is more than 500 lengthy,
jam-packed lines).
<gid="g5"><pathd="M 100.885,160.976C 100.375,161.18 99.966,161.486 99.659,161.794C 99.25,162.1 99.046,162.303 98.74,162.303C 98.025,162.61 97.003,162.201 95.675,161.179C 94.347,160.157 93.633,159.443 93.427,158.728C 93.324,158.42 94.039,156.684 95.368,153.518C 96.798,150.453 98.024,147.694 99.045,145.243C 99.965,142.996 101.089,140.134 102.622,136.763C 104.052,133.494 104.767,131.655 104.665,131.349C 104.665,131.349 104.665,131.45 104.767,131.553C 104.869,131.553 104.767,131.655 104.561,131.655C 101.498,132.677 98.432,133.494 95.674,134.312C 95.162,134.414 94.959,134.414 94.856,134.414C 94.753,134.516 94.55,134.619 94.244,134.721C 93.937,134.925 93.733,135.028 93.529,135.129C 92.712,135.334 91.997,135.028 91.179,134.211C 90.361,133.393 89.851,132.678 89.543,131.963C 89.442,131.554 89.442,131.146 89.442,130.737C 89.543,130.328 89.851,130.125 90.157,129.818C 90.77,129.613 91.893,129.103 93.631,128.489C 95.265,127.877 97.001,127.263 98.533,126.753C 101.598,125.833 104.664,124.915 107.831,124.097C 108.24,124.097 108.546,123.994 108.648,123.891C 108.955,123.891 109.261,123.688 109.669,123.279C 110.078,122.973 110.383,122.87 110.587,122.768C 110.792,122.666 111.302,122.768 112.12,122.871C 112.937,123.076 113.448,123.177 113.653,123.28C 114.062,123.383 114.368,123.689 114.777,124.098C 115.082,124.404 115.186,124.608 115.288,124.608L 115.288,124.608C 115.288,124.711 115.491,124.711 115.798,124.813C 116.004,124.813 116.207,124.916 116.31,125.12C 116.413,125.325 115.798,126.755 114.674,129.412C 113.55,132.169 112.121,135.643 110.384,139.73C 110.179,140.139 109.975,140.547 109.67,140.956C 106.502,148.823 104.969,152.807 104.969,153.012C 104.969,152.807 105.583,152.603 106.808,152.195C 107.014,152.195 107.116,152.092 107.116,152.092C 109.158,151.582 111.099,151.071 112.939,150.662C 114.779,150.253 115.698,150.05 115.596,150.05C 116.822,149.744 117.946,149.744 118.763,150.152C 119.681,150.663 120.294,151.071 120.498,151.684C 120.703,152.604 120.805,153.319 120.805,153.932C 120.805,154.546 120.498,154.954 119.784,155.158C 119.578,155.261 119.375,155.363 119.171,155.363C 118.863,155.465 118.66,155.465 118.556,155.567C 118.251,155.567 117.842,155.772 117.127,156.078C 116.31,156.385 115.697,156.588 115.186,156.793C 114.369,156.997 112.938,157.405 111.099,157.917C 109.158,158.427 107.625,158.835 106.501,159.143C 105.889,159.347 104.968,159.653 103.948,160.062C 102.824,160.471 102.109,160.674 101.7,160.777C 101.499,160.771 101.191,160.874 100.885,160.976L 100.885,160.976 z "style="fill:#a16121;fill-rule:evenodd" id="path7" /><!-- SVG continues on...-->
Believe it or not, that’s just one <path>
element above, with a series of line and curve instructions for just one
of the shapes that compose the cat (one of the Zs above its head). (The
first line is a <g> element, which is just used
for grouping purpose.) Note that instead of styling the interior color in
a fill attribute, a style attribute
containing CSS was used, which is an equally acceptable alternative. The
style fill-rule:evenodd designates which portion of the
path should be considered the “interior”; for more details, see the “Fill
Properties” section of the W3C SVG specification.
To revise this SVG graphic to make it “colorable” for our coloring
book, all we need to do is remove the fill color from those
<path>s that have them, so that just the outlines
of the shapes remain; we’ll also need a method of indicating which paths
should be colorable, and which should not. To accomplish this, we’ll strip
all the fill properties from the
<path> style tags, and replace
them with a separate fill="white" attribute (as it will
be helpful later on to have our fill-color information in a distinct
attribute from the rest of the styling). We’ll also add a new class
attribute, class="colorable", which will distinguish
those paths that should be able to be colored (e.g., full shapes like the
triangles encircling the cat’s face) from those that cannot (e.g., the
cat’s whiskers).
Example 5-2 shows our new SVG snippet.
<gid="g5"><pathd="M 100.885,160.976C 100.375,161.18 99.966,161.486 99.659,161.794C 99.25,162.1 99.046,162.303 98.74,162.303C 98.025,162.61 97.003,162.201 95.675,161.179C 94.347,160.157 93.633,159.443 93.427,158.728C 93.324,158.42 94.039,156.684 95.368,153.518C 96.798,150.453 98.024,147.694 99.045,145.243C 99.965,142.996 101.089,140.134 102.622,136.763C 104.052,133.494 104.767,131.655 104.665,131.349C 104.665,131.349 104.665,131.45 104.767,131.553C 104.869,131.553 104.767,131.655 104.561,131.655C 101.498,132.677 98.432,133.494 95.674,134.312C 95.162,134.414 94.959,134.414 94.856,134.414C 94.753,134.516 94.55,134.619 94.244,134.721C 93.937,134.925 93.733,135.028 93.529,135.129C 92.712,135.334 91.997,135.028 91.179,134.211C 90.361,133.393 89.851,132.678 89.543,131.963C 89.442,131.554 89.442,131.146 89.442,130.737C 89.543,130.328 89.851,130.125 90.157,129.818C 90.77,129.613 91.893,129.103 93.631,128.489C 95.265,127.877 97.001,127.263 98.533,126.753C 101.598,125.833 104.664,124.915 107.831,124.097C 108.24,124.097 108.546,123.994 108.648,123.891C 108.955,123.891 109.261,123.688 109.669,123.279C 110.078,122.973 110.383,122.87 110.587,122.768C 110.792,122.666 111.302,122.768 112.12,122.871C 112.937,123.076 113.448,123.177 113.653,123.28C 114.062,123.383 114.368,123.689 114.777,124.098C 115.082,124.404 115.186,124.608 115.288,124.608L 115.288,124.608C 115.288,124.711 115.491,124.711 115.798,124.813C 116.004,124.813 116.207,124.916 116.31,125.12C 116.413,125.325 115.798,126.755 114.674,129.412C 113.55,132.169 112.121,135.643 110.384,139.73C 110.179,140.139 109.975,140.547 109.67,140.956C 106.502,148.823 104.969,152.807 104.969,153.012C 104.969,152.807 105.583,152.603 106.808,152.195C 107.014,152.195 107.116,152.092 107.116,152.092C 109.158,151.582 111.099,151.071 112.939,150.662C 114.779,150.253 115.698,150.05 115.596,150.05C 116.822,149.744 117.946,149.744 118.763,150.152C 119.681,150.663 120.294,151.071 120.498,151.684C 120.703,152.604 120.805,153.319 120.805,153.932C 120.805,154.546 120.498,154.954 119.784,155.158C 119.578,155.261 119.375,155.363 119.171,155.363C 118.863,155.465 118.66,155.465 118.556,155.567C 118.251,155.567 117.842,155.772 117.127,156.078C 116.31,156.385 115.697,156.588 115.186,156.793C 114.369,156.997 112.938,157.405 111.099,157.917C 109.158,158.427 107.625,158.835 106.501,159.143C 105.889,159.347 104.968,159.653 103.948,160.062C 102.824,160.471 102.109,160.674 101.7,160.777C 101.499,160.771 101.191,160.874 100.885,160.976L 100.885,160.976 z "style="fill-rule:evenodd" fill="white" class="colorable" id="path7" /><!-- SVG continues on...-->
And Figure 5-3 shows our colorless sleeping cat, ready for insertion into the coloring book.

Next, we’ll construct our coloring-book interface in HTML and embed our colorless cat SVG within the page.
Constructing the Coloring Book HTML
For our coloring book page, we’ll just need a few elements:
Our sleepy-cat image
A palette for choosing the colors to fill the picture sections
A couple interface buttons: Undo/Redo and Reset Drawing
For our color palette, we can reuse the HTML we created in Canvas Finger Painting, and we can add a new “Undo” button to go along with the “Reset Drawing” button. Then all we’ll need to do is embed the SVG markup for the cat within the page. Example 5-3 shows the HTML.
Note
The full SVG content is redacted in order to save space. The full HTML code is available for download from the HTML5 for Publishers GitHub repo.
<?xml version="1.0" encoding="UTF-8" standalone="no"?> <!DOCTYPE html> <html xmlns="http://www.w3.org/1999/xhtml"> <head> <title>Coloring Book</title> <script src="jquery-1.6.2.min.js"></script> <script src="coloring_book.js"></script> </head> <body> <h1>Coloring Book</h1> <p>Click/tap a color below to select a color, and then click a section of the drawing to color it</p> <div id="coloring_book_image"> <!-- Embedding SVG directly in HTML for maximum compatibility across browsers/ereaders --> <svg xmlns:svg="http://www.w3.org/2000/svg" xmlns="http://www.w3.org/2000/svg" version="1.1" style="width: 87%;" viewBox="0 0 446.379 412.104" id="Layer_1" xml:space="preserve"> <!-- Full SVG redacted for space; see https://github.com/sandersk/HTML5-for-Publishers/blob/master/svg_coloring_book/coloring_book.html for full code listing --> </svg> </div> <p><em>Public domain image “Cartoon Cat Sleeping” Open Clip Art Project (<a href="http://openclipart.org/people/Gerald_G/Gerald_G_Cartoon_Cat_Sleeping.svg"> http://www.openclipart.org/</a>). worldlabel.com - SVG by Gerald G.</em></p> <p>Color selected: <span id="color_chosen">Black</span></p> <p> <input type="button" class="color_choice" id="Red" style="background-color: red; width: 25px; height: 25px;"/> <input type="button" class="color_choice" id="Orange" style="background-color: orange; width: 25px; height: 25px;"/> <input type="button" class="color_choice" id="Yellow" style="background-color: yellow; width: 25px; height: 25px;"/> <input type="button" class="color_choice" id="Green" style="background-color: green; width: 25px; height: 25px;"/> <input type="button" class="color_choice" id="Blue" style="background-color: blue; width: 25px; height: 25px;"/> <input type="button" class="color_choice" id="Purple" style="background-color: purple; width: 25px; height: 25px;"/> <input type="button" class="color_choice" id="Brown" style="background-color: brown; width: 25px; height: 25px;"/> <input type="button" class="color_choice" id="Black" style="background-color: black; width: 25px; height: 25px;"/> <input type="button" class="color_choice" id="White" style="background-color: white; width: 25px; height: 25px;"/> </p> <p><input type="button" id="undo_redo" value="Undo"/><input type="button" id="reset_image" value="Reset Drawing"/></p> </body> </html>
Figure 5-4 shows the Coloring Book page in the iBooks reader for iPad.
Constructing the Coloring Book JavaScript
As with our MathML equation solver, we’ll use jQuery to simplify our code for scripting our sleepy-cat SVG to make it a “colorable” image. Four key pieces of functionality we need to write:
Code that lets the user click/tap a “colorable” section of the SVG graphic and fill it with the currently selected color
Code to let the user select a new color from the palette below the drawing
Code for the Undo/Redo button to let the user “undo” or “redo” their previous color action
Code for the Reset Drawing button to “reset” the entire drawing, reverting the color of every section back to white.
Example 5-4 shows the complete coloring book JavaScript, with each of the above steps annotated with an explication of the code.
window.addEventListener('load',eventWindowLoaded,false);
varundo_element=$('path[class="colorable"]')[0];varundo_to_color="white";functioneventWindowLoaded(){add_coloring_book_events();}functionadd_coloring_book_events(){// Add click events for colorable portions of drawing// Oddly, the selector $('path.colorable') does not work in iBooks reader,// although it does in Mobile Safari$('path[class="colorable"]').bind("click",function(event){
// Suppress default; helpful on touchscreen devicesevent.preventDefault();// Get the current element and color and save it in undo_element// and undo_to_color variablesundo_element=this;undo_to_color=$(this).attr("fill");// Toggle the "Undo" button to make sure it says "Undo" (it might say "Redo")$('#undo_redo').attr("value","Undo");// Set the fill of clicked portion of drawing to the color chosen// in palette belowcolor_chosen=$("#color_chosen").html();$(this).attr("fill",color_chosen);});// Add click events for color palette$('.color_choice').bind("click",function(event){
// Get button id, which is the color namecolor_chosen=$(this).attr("id");// Set color_chosen text to the name of color clicked$("#color_chosen").html(color_chosen);});// Add click events for reset button, which reverts the fill of the entire// drawing to white$('#reset_image').bind("click",function(event){
// Get all the colorable elements and set fill back to white$('path[class="colorable"]').attr("fill","white");// Resetting the drawing clears all undo information$('#undo_redo').attr("value","Undo");undo_element=$('path[class="colorable"]')[0];undo_to_color="white";});$('#undo_redo').bind("click",function(event){
// First, save the existing color of the element we're going to undoexisting_color=$(undo_element).attr("fill");// Now revert the color back to the undo_to_color$(undo_element).attr("fill",undo_to_color);// Finally, make existing_color the new undo_to_color,// to support "Redo" functionalityundo_to_color=existing_color;// If the button is named "Undo", rename it "Redo" and vice versaif($(this).attr("value")=="Undo"){$(this).attr("value","Redo");}else{$(this).attr("value","Undo");}});}
-
The first two blocks are setup code. We set up an event listener to trigger the
add_coloring_book_events()function when the page has finished loading, and we set default values for theundo_elementandundo_to_colorvariables, which will later be used to track “undo” data as the user starts coloring in the cat.-
In this block, we bind a
clickevent[8] (see Scripting the Equation Solver with JavaScript for more on event binding with jQuery) to all<path>elements in the SVG that have a class value ofcolorable(via the selector$('path[class="colorable"]')). We call thepreventDefault()function to suppress any default browser behaviors that would otherwise be associated with the click (helpful in iBooks, specifically, where a tap would normally trigger display of the reader menu up top).To support our Undo/Redo button, we store the element just clicked (
this) in theundo_elementvariable, and its current color inundo_to_color. Since the user triggered a “color” action by clicking on a fillable path in the image, we update the Undo/Redo button’s text to say “Undo”, so he will know he can undo this action if he desires.With the “undo” data now stored, we’re ready to color the clicked section of the cat with the current color. The current color is stored in the element with
idcolor_chosen, so we grab that color and then set thefillattribute on the clicked element (again,this) to this color. This will fill the interior of the<path>with the current color.-
In this block, we bind
clickevents to all the buttons in our color palette (which all have a class value ofcolor_choice). When a click is triggered on a button, we get the name of the color (which corresponds to theidon the button) and then update thecolor_chosenelement text with the color name, so that the user will see which color is currently selected, and the function bound to the<path>elements can query thecolor_chosenfield to get the current color.-
In this block, we bind a
clickevent to the Reset Drawing button (withidofreset_image). When Reset Drawing is pressed, we want to revert the fill of all colorable<path>s in the drawing back to white, so we use the selector$('path[class="colorable"]')to get those elements and then callattr()on them to set theirfillattributes back towhite. When we reset the drawing, for simplicity, we’ll also purge all existing “undo” information and revert theundo_elementandundo_to_colorvariables back to their default values.-
This last block binds a
clickevent to the Undo/Redo button (withidofundo_redo). The desired functionality of the Undo/Redo button is as follows:The button starts out being labeled as “Undo”. When the user clicks the Undo button after coloring a section of the cat, we want to revert the color of that section back to the color it was prior to being clicked. (e.g., if the cat’s face was white, and then the user colored it yellow, clicking Undo should revert it back to white). Then we want to change the label on the button to Redo, to give the user an opportunity to override his last Undo (e.g., switch the face back to give it a yellow fill again)
When the button is labeled “Redo”, we want to swap the color of the clicked section back to its color prior to clicking Undo (i.e., redoing the change that was just undone). After Redo is clicked, we want to switch the button back to being labeled Undo again, in case the user wants to Undo the change again; effectively, he can toggle back and forth between the current and previous states by clicking Undo and then Redo in succession.
As discussed previously, when the user clicks a new section in the image (whether after pressing Undo/Redo or not), we switch the label on the button back to “Undo” and update the “undo” information stored in
undo_elementandundo_to_color. This effectively means we’re storing just one level of “undo” information for our image, meaning the user can only undo his most recent coloring action.To accomplish the above specs, the first thing we do is store the existing color of the
undo_elementinexisting_color. Next we revert theundo_element’s fill color back to theundo_to_color. Then, to support “redo” functionality, we store theexisting_colorvariable asundo_to_color, which effectively makes the color prior to the “undo” the new “undo color.” Lastly, if the button is currently labeled “Undo”, we change it to say “Redo”, and vice versa. If the user were to click Undo/Redo again in succession, the fill color andundo_to_colorwill also be flip-flopped again, reversing their previous Undo/Redo action.
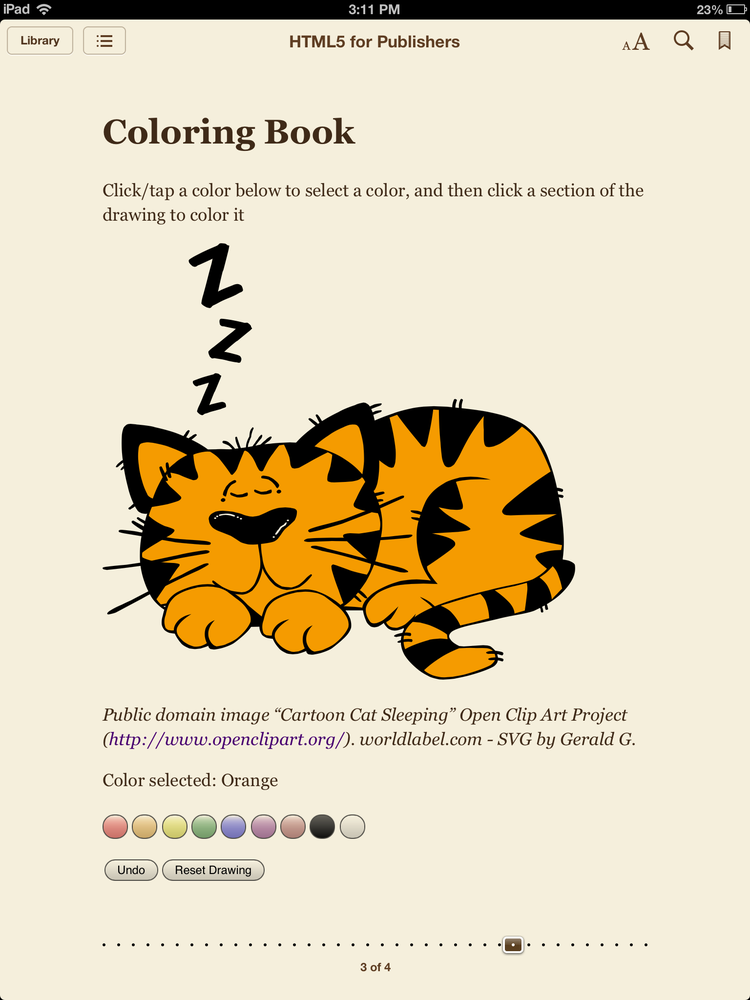
Figure 5-5 shows a colored-in sleepy cat in iBooks for iPad. You can download the full example code from the HTML5 for Publishers GitHub repo. and try out the example for yourself in your ereader; it’s at the end of this chapter.
SVG, EPUB, and Ereader Compatibility
While SVG rendering is supported in all major modern desktop browsers (including Internet Explorer, Safari, Firefox, and Google Chrome), support in the major ereaders is a little more spotty. Per the latest data compiled by the Book Industry Study Group (BISG), as of January 2013, SVG image rendering is supported in iBooks, Adobe Digital Editions, Kinde Fire, the latest Kindle eInk readers that support the KF8 format, NOOK tablet and NOOK apps (but not NOOK Simple Touch), and the Google Play app. However, it’s important to make a distinction between the capability to simply render SVG (as the aforementioned readers can) and the ability to both render and script SVG via JavaScript. Currently, iBooks is the only major ereading platform that supports SVG scriptability via JavaScript, but hopefully this is something that will change with more widespread EPUB 3 adoption in the future.
Bibliography/Additional SVG Resources
Here are some additional recommended resources if you are interested in learning more about the SVG topics discussed in this chapter:
- W3C “Scalable Vector Graphics (SVG) 1.1” specification
The definitive source of information about the SVG specification. A clear, well-written reference to exactly what’s formally supported in the SVG specification, with descriptions of all SVG elements and their syntax, containing occasional examples as appropriate.
- SVG Essentials by J. David Eisenberg (O’Reilly Media)
A comprehensive guide to the SVG standard, which discusses all SVG elements in detail, SVG scripting and animation, and methods for generating SVG content programmatically.
- “Elliptical Curves”
A brief but detailed tutorial from the site for Illinois State’s School of Technology on drawing elliptical curves in SVG. If you’re looking to learn more about drawing arcs in your SVG
<path>s, check out this reference.- “SVG In HTML Pages”
Another concise, detailed tutorial on the various options for embedding SVG in HTML. Worth a read for anyone planning to script SVG.
- SVG “Animation”, from the W3C 1.1 Specification
Worth calling out separately is the “Animation” section of the W3C SVG spec, which discusses SVG’s native animation support (no JavaScript needed) via the
<animate>element.<animate>was not covered in this chapter, but if you’re interested in exploring the animation possibilities with SVG, definitely check out this portion of the spec.- Inkscape
An open source editor that specializes in SVG. Check out this application if you’re looking to create your own SVG graphics.
[8] The click event corresponds to either a
click of the mouse, or a tap on a touchscreen device. For
conciseness, references to “click” in this section mean “click
or tap”.
Get HTML5 for Publishers now with the O’Reilly learning platform.
O’Reilly members experience books, live events, courses curated by job role, and more from O’Reilly and nearly 200 top publishers.

