Chapter 7. Working with Audio
You can’t physically manipulate audio with HTML5 Canvas as directly as
you can video, but many canvas applications can use that extra dimension of
sound. Audio is represented by the HTMLAudioElement object manipulated through
JavaScript, and by the <audio> tag
in HTML5. There is no Canvas API for audio nor, really, is one necessary.
However, there are many ways that you might want to use audio with HTML5
Canvas.
The Basic <audio> Tag
The basic usage of the <audio> tag in HTML5 is very similar to
that of the <video> tag. The only
required property is src, which needs
to point to an existing audio file to play in the browser. Of course, it’s
always nice to show some audio controls on the page, and this can be
accomplished using the controls
Boolean, just as we did with <video>.
The code in Example 7-1 will load and play song1.ogg in a web browser that supports .ogg file playback, as shown in Figure 7-1. (Reminder: not all browsers support all formats.)
Audio Formats
Similar to video formats, which we learned about in Chapter 6, not every web browser supports every audio format. In fact, audio support appears to be in worse shape than video. As you will soon discover in this chapter, audio is one place where HTML5 needs some serious work. However, we will show you some strategies and workarounds for making audio easier to use in your applications.
Supported Formats
Here is a quick chart to show you which audio formats are supported by which browsers. We are not going to use version numbers here because we assume the latest version of each product:
Platform | .ogg | .mp3 | .wav |
Chrome | X | X | |
Firefox | X | X | |
Safari | X | X | |
Opera | X | X | |
Internet Explorer 9 | X | X |
The situation is much like that of the <video> tag. To support <audio> we will need to use multiple
separate formats for each piece of audio we want to play. To be on the
safe side, we will use three formats: .mp3, .ogg, and .wav.
Audacity
Fortunately, there is a great free audio tool available that will help you convert audio into any format. In our case, we need to convert to .mp3, .ogg, and .wav.
Audacity (http://audacity.sourceforge.net/) is an open source, cross-platform project designed to bring sophisticated audio editing to the desktop. The current version works on Mac, Windows, and Linux.
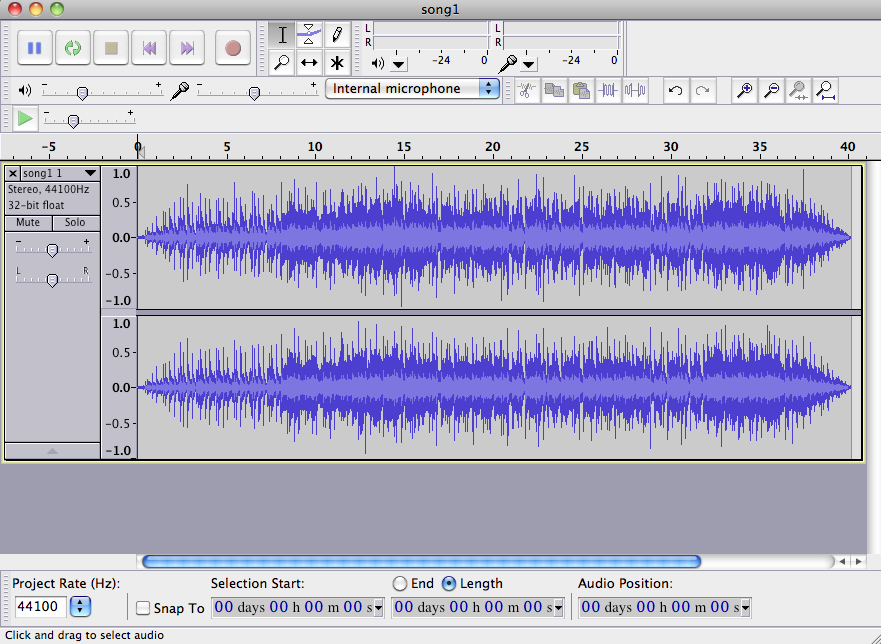
Figure 7-2 shows a sample screen from Audacity. When you load a sound into Audacity, it displays the waveform of the sound. You can manipulate the sound in many ways, including trimming, splitting, and duplicating, and then add effects such as fade, echo, reverse, etc. After editing a sound, you export it to the sound format you would like to create. In our case, that would be .ogg, .wav, and .mp3.
Note
We don’t have the space here to fully describe how to use an audio tool like Audacity, but we do need to give you one caveat: the distributed version of Audacity does not support the export of audio in the .mp3 format. To export .mp3 audio, you will need to download the LAME .mp3 encoder from http://lame.sourceforge.net/. LAME is also an open source project.
Example: Using All Three Formats
In Example 7-2, we are going to
embed a 40-second song, song1, in
an HTML5 page and play it. To make sure song1 can
play in as many browsers as possible, we are going to embed it with
three different sources. For this example, we are also going to set the
autoplay, loop, and controls properties so the song will start
automatically, replay when it reaches the end, and display the default
browser audio controls. Here is the code to embed
song1:
<audio controls autoplay loop>
<source src="song1.mp3" type="audio/mp3">
<source src="song1.wav" type="audio/wav">
<source src="song1.ogg" type="audio/ogg">
</audio>
Note
Just as we did with video, we have placed the audio type with the broadest support for iOS devices first in the list. This is because handheld devices do not do well with multiple embedded sources.
We created .ogg, .wav, and .mp3 versions of the song using Audacity. Example 7-2 gives the full code.
<!doctype html>
<html lang="en">
<head>
<meta charset="UTF-8">
<title>CH7EX2: Basic HTML5 Audio Revisited</title>
</head>
<body>
<div>
<audio controls autoplay loop>
<source src="song1.mp3" type="audio/mp3">
<source src="song1.ogg" type="audio/ogg">
<source src="song1.wav" type="audio/wav">
Your browser does not support the audio element.
</audio>
</div>
</body>
</html>
Note
song1 was created 10 years ago using Sonic Foundry’s Acid music-looping software. Acid is an amazing tool for creating soundtracks because it can help even the musically inept (read: us) create songs that sound perfect for games and applications. Acid is now sold by Sony for Windows only. Songs can be created on the Mac in a similar way using GarageBand.
Audio Tag Properties, Functions, and Events
Similar to the <video> tag, the <audio> tag in HTML5 is based on the
HTMLAudioElement DOM object, which
is derived from HTMLMediaElement.
Audio Functions
load()Starts loading the sound file specified by the
srcproperty of the<audio>tag.play()Starts playing the sound file specified by the
srcproperty of the<audio>tag. If the file is not ready, it will be loaded.pause()canPlayType()Accepts a MIME type as a parameter, and returns the value
maybeorprobablyif the browser can play that type of audio file. It returns“”(an empty string) if it cannot.
Important Audio Properties
There are many properties defined for the audio element in HTML5. We are going to focus
on the following because they are the most useful for the applications
we will build:
durationThe total length, in seconds, of the sound represented by the
audioobject.currentTimeThe current playing position, in seconds, of the playing audio file.
looptrueorfalse: whether the audio clip should start playing at the beginning whencurrentTimereaches theduration.autoplaytrueorfalse: whether the audio should start playing automatically when it has loaded.mutedtrueorfalse. Setting this totruesilences theaudioobject regardless ofvolumesettingscontrolstrueorfalse. Displays controls for anaudioobject in an HTML page. Controls will not display on the canvas unless they are created in HTML (for example, with a<div>overlay).volumeThe volume level of the
audioobject; the value must be between0and1.pausedtrueorfalse: whether theaudioobject is paused. Set with a call to thepause()function.endedtrueorfalse. Set when anaudioobject has played through its entireduration.currentSrcpreloadSpecifies whether the media file should be loaded before the page is displayed. At the time of this writing, this property has not been implemented across all browsers.
Note
To see which properties and events of the HTMLMediaObject are supported in which
browsers, visit http://www.w3.org/2010/05/video/mediaevents.html.
Important Audio Events
Many events are defined for the HTML5 audio element. We are going to focus on the
following events because they have proven to work when building audio
applications:
progressRaised when the browser is retrieving data while loading the file. (This still has spotty support in browsers, so be careful with it.)
canplaythroughRaised when the browser calculates that the media element could be played from beginning to end if started immediately.
playingvolumechangeSet when either the
volumeproperty or themutedproperty changes.endedSet when playback reaches the
durationof the audio file and the file stops being played.
Loading and Playing the Audio
We are going to use the canplaythrough and progress events to load <audio> before we try to play it. Here
is how we embed the audio for song1:
<audio id="theAudio" controls>
<source src="song1.mp3" type="audio/mp3">
<source src="song1.wav" type="audio/wav">
<source src="song1.ogg" type="audio/ogg">
Your browser does not support the audio element.
</audio>
Similar to most of the applications we have built thus far in this
book, we will create event handlers for progress and canplaythrough once the window DOM object has finished loading, and
then call the load() method of
audioElement to force the audio file
to start loading:
window.addEventListener('load', eventWindowLoaded, false);
function eventWindowLoaded() {
   var audioElement = document.getElementById("theAudio");
   audioElement.addEventListener('progress',updateLoadingStatus,false);
   audioElement.addEventListener('canplaythrough',audioLoaded,false);
   audioElement.load();

}
When the canplaythrough event
is dispatched, canvasApp() is called.
Then, we start playing the audio by retrieving a reference to the
audio element in the HTML page
through the DOM, with a call to getElementById(). (We will create a variable
named audioElement that we will use
throughout the canvas application to reference the audio element in the HTML page.) We then call
the play() function of audioElement:
var audioElement = document.getElementById("theAudio");
audioElement.play();
You may be wondering why we didn’t use the preload attribute of HTMLAudioElement instead of forcing it to load
by listening for the canplaythrough
event. There are two reasons for this, and both apply to the video element as well. First, you want to
preload so that you are sure the assets you need are available to your
program at runtime. Second, preloading ensures that the user will see
something useful or interesting while everything is loading. By using
the standard preload attribute, you
(in theory) force your audio assets to load before the page loads.
Because canvas apps are interactive and may require many more assets
than those loaded when the page loads, we avoid the preload attribute and load the assets within
the application.
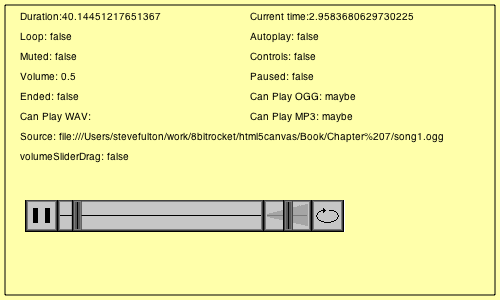
Displaying Attributes on the Canvas
Now we are going to display the attribute values of an audio element playing on an HTML page. In this
example (CH7EX3.html), we are also
going to display the audio element in
the HTML page so you can see the relationship between what is shown on
the canvas and the state of the <audio> tag in the page.
In the drawScreen() function we
will add the following code to display the attributes of the audioElement variable:
context.fillStyle = "#000000";
context.fillText  ("Duration:" + audioElement.duration,  20 ,20);
context.fillText  ("Current time:" + audioElement.currentTime,  20 ,40);
context.fillText  ("Loop: " + audioElement.loop,  20 ,60);
context.fillText  ("Autoplay: " +audioElement.autoplay,  20 ,80);
context.fillText  ("Muted: " + audioElement.muted,  20 ,100);
context.fillText  ("Controls: " + audioElement.controls,  20 ,120);
context.fillText  ("Volume: " + audioElement.volume,  20 ,140);
context.fillText  ("Paused: " + audioElement.paused,  20 ,160);
context.fillText  ("Ended: " + audioElement.ended,  20 ,180);
context.fillText  ("Source: " + audioElement.currentSrc,  20 ,200);
context.fillText  ("Can Play OGG: " + audioElement.canPlayType("audio/ogg"),
                  20 ,220);
context.fillText  ("Can Play WAV: " + audioElement.canPlayType("audio/wav"),
                  20 ,240);
context.fillText  ("Can Play MP3: " + audioElement.canPlayType("audio/mp3"),
                  20 ,260);
You should already be familiar with most of these attributes. When
you launch Example 7-3 (CH7EX3.html), play with the audio controls in
the browser. You will notice that the changes are reflected by the
attribute values displayed on the canvas. This is just our first step
toward integrating audio with the canvas, but it should give you a good
idea of how we will start to use audio elements and manipulate them through
JavaScript.
Figure 7-3 shows what this application looks like when it is executed in a web browser.
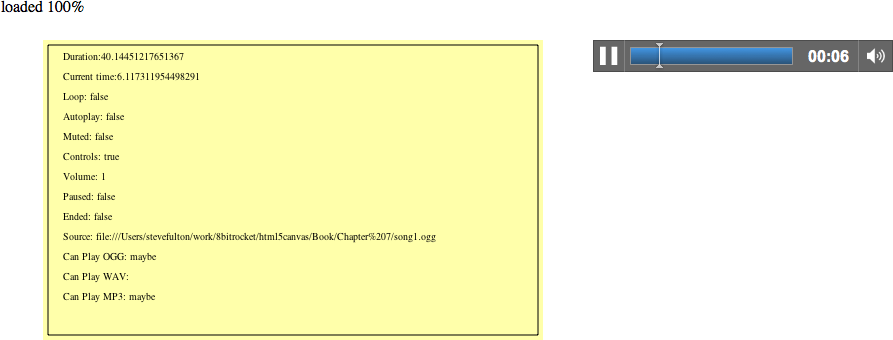
There are also a few attributes displayed at the bottom of this
list that we have not discussed. They all
come from calls to the canPlayType()
function of HTMLAudioElement. We are only displaying these
right now, but in Example 7-3 we
will make use of this function to help us decide which sound to
dynamically load in JavaScript.
<!doctype html>
<html lang="en">
<head>
<meta charset="UTF-8">
<title>CH7EX3: Audio Properties And The Canvas</title>
<script src="modernizr-1.6.min.js"></script>
<script type="text/javascript">
window.addEventListener('load', eventWindowLoaded, false);
function eventWindowLoaded() {
   var audioElement = document.getElementById("theAudio");
   audioElement.addEventListener("progress",updateLoadingStatus,false);
   audioElement.addEventListener("canplaythrough",audioLoaded,false);
   audioElement.load();

}

function canvasSupport () {
     return Modernizr.canvas;
}

function updateLoadingStatus() {
   var loadingStatus = document.getElementById("loadingStatus");
   var audioElement = document.getElementById("theAudio");
   var percentLoaded = parseInt(((audioElement.buffered.end(0) /
      audioElement.duration) * 100));
    document.getElementById("loadingStatus").innerHTML =   'loaded '
      + percentLoaded + '%';

}

function audioLoaded() {

   canvasApp();

}

function canvasApp() {

  if (!canvasSupport()) {
          return;
        }

  function  drawScreen () {


      //Background
      context.fillStyle = "#ffffaa";
      context.fillRect(0, 0, theCanvas.width, theCanvas.height);

      //Box
      context.strokeStyle = "#000000";
      context.strokeRect(5,  5, theCanvas.width−10, theCanvas.height−10);

      // Text
      context.fillStyle  = "#000000";
      context.fillText  ("Duration:" + audioElement.duration,  20 ,20);
      context.fillText  ("Current time:" + audioElement.currentTime,  20 ,40);
      context.fillText  ("Loop: " + audioElement.loop,  20 ,60);
      context.fillText  ("Autoplay: " +audioElement.autoplay,  20 ,80);
      context.fillText  ("Muted: " + audioElement.muted,  20 ,100);
      context.fillText  ("Controls: " + audioElement.controls,  20 ,120);
      context.fillText  ("Volume: " + audioElement.volume,  20 ,140);
      context.fillText  ("Paused: " + audioElement.paused,  20 ,160);
      context.fillText  ("Ended: " + audioElement.ended,  20 ,180);
      context.fillText  ("Source: " + audioElement.currentSrc,  20 ,200);
      context.fillText  ("Can Play OGG: " + audioElement.canPlayType("audio/ogg"),
                        20 ,220);
      context.fillText  ("Can Play WAV: " + audioElement.canPlayType("audio/wav"),
                        20 ,240);
      context.fillText  ("Can Play MP3: " + audioElement.canPlayType("audio/mp3"),
                        20 ,260);

   }

   var theCanvas = document.getElementById("canvasOne");
   var context = theCanvas.getContext("2d");
   var audioElement = document.getElementById("theAudio");
   audioElement.play();

   setInterval(drawScreen, 33);

}

</script>

</head>
<body>
<div style="position: absolute; top: 50px; left: 50px;">

<canvas id="canvasOne" width="500" height="300">
 Your browser does not support HTML5 Canvas.
</canvas>
</div>

<div id="loadingStatus">
0%
</div>

<div style="position: absolute; top: 50px; left: 600px; ">
<audio id="theAudio" controls >
<source src="song1.mp3" type="audio/mp3">
<source src="song1.ogg" type="audio/ogg">
<source src="song1.wav" type="audio/wav">

Your browser does not support the audio element.
</audio>

</div>
</body>
</html>
Note
This process is explained in detail in Chapter 6, where we warned that some
browsers do not fire events for embedded <video> tags. That does not appear to
be the case for <audio>, but
it could happen in the future. We still believe the best bet for
loading audio and video is the technique developed in the next
section.
Playing a Sound with No Audio Tag
Now that we have a sound playing in an HTML5 page and we are
tracking the properties of the audio
element on the canvas, it is time to step up their integration. The next
step is to do away with the <audio> tag embedded in the HTML
page.
If you recall from Chapter 6,
we created a video element dynamically
in the HTML page and then used the canPlayType() method of the HTMLVideoElement object to figure out what video
file type to load for a particular browser. We will do something very
similar for audio.
Dynamically Creating an Audio Element in JavaScript
The first step to dynamically creating audio elements is to create a global variable
named audioElement. This variable
will hold an instance of HTMLAudioElement that we will use in our
canvas application. Recall that audio
elements in an HTML page are instances of the HTMLAudioElement DOM object. We refer to them
as audio objects when embedded in an
HTML page, and as instances of HTMLAudioElement when created dynamically in
JavaScript. However, they are essentially the same.
Note
Don’t fret if you don’t like using global variables. By the end of this chapter, we will show you a way to make these variables local to your canvas application.
Next, we create our event handler for
the window load event named eventWindowLoaded(). Inside that function, we call
the createElement() function of the
DOM document
object, passing the value audio as
the type of element to create. This will dynamically create an audio object and put it into the DOM. By
placing that object in the audioElement variable, we can then dynamically
place it onto the HTML page with a call to the appendChild() method of the document.body DOM object:
window.addEventListener('load', eventWindowLoaded, false);
var audioElement;
function eventWindowLoaded() {
   audioElement = document.createElement("audio");
   document.body.appendChild(audioElement);
However, just having a dynamically created audio element is not enough. We also need to
set the src attribute of the HTMLAudioElement object represented by
audioElement to a valid audio file to
load and play. But the problem is that we don’t yet know what type of
audio file the current browser supports. We will get that information
from a function we will create named supportedAudioFormat(). We will define this
function so that it returns a string value representing the extension of
the file type we want to load. When we have that extension, we
concatenate it with the name of the sound we want to load, and set the
src with a call to the setAttribute() method of the HTMLAudioElement object:
var audioType = supportedAudioFormat(audioElement);
If a valid extension from supportedAudioFormat() is not returned,
something has gone wrong and we need to halt execution. To handle this
condition in a simple way we create an alert() message and then return from the function, effectively halting
execution. While this is not a very robust form of error handling, it
will work for the sake of this example:
if (audioType == "") {
   alert("no audio support");
   return;
}
audioElement.setAttribute("src", "song1." + audioType);
Finally, like we did with video, we
will listen for the canplaythrough
event of audioElement so that we know
when the sound is ready to play:
audioElement.addEventListener("canplaythrough",audioLoaded,false);Finding the Supported Audio Format
Before the code in the previous
section will work, we need to define the supportedAudioFormat() function. Since we are
adding audio objects dynamically to
the HTML page, we do not have a way to define multiple <source> tags like we can in HTML.
Instead, we are going to use the canPlayType() method of the audio object to tell us which type of audio
file to load. We already introduced you to the canPlayType() method in Chapter 6, but to refresh your memory,
canPlayType() takes a single parameter—a MIME type. It returns a text
string of maybe, probably, or “” (nothing). We are going to use
these values to figure out which media type to load and play. Just like
in Chapter 6, and for the sake of
this exercise, we are going to assume that both maybe and probably equate to yes. If we encounter either result with any of
our three MIME types (audio/ogg,
audio/wav, audio/mp3), we will
return the extension associated with that MIME type so the sound file
can be loaded.
Note
The next function is essentially the same as the one we created in Chapter 6 to handle video formats. The obvious changes here are with the MIME types for audio.
In the function below, audio
represents the instance of HTMLAudioElement that we will test. The
returnExtension variable represents
that valid extension for the first MIME type found that has the value of
maybe or probably returned:
function supportedAudioFormat(audio) {
   var returnExtension = "";
   if (audio.canPlayType("audio/ogg") =="probably" ||
       audio.canPlayType("audio/ogg") == "maybe") {
         returnExtension = "ogg";   } else if(audio.canPlayType("audio/wav") =="probably" ||
       audio.canPlayType("audio/wav") == "maybe") {
         returnExtension = "wav";
   } else if(audio.canPlayType("audio/mp3") == "probably" ||
       audio.canPlayType("audio/mp3") == "maybe") {
         returnExtension = "mp3";
   }

   return returnExtension;

}
Notice that we do not check for a condition when no valid audio
format is found and the return value is “”. If that
is the case, the code that has called this function might need to be
written in a way to catch that condition and alter the program
execution. We did that with the test of the return value and the alert() message, which we described in the
previous section.
Note
If you want to test the error condition with no valid return value from this function, simply add
an extra character to the MIME type (e.g.,
audio/oggx) to make sure an
empty string is always returned.
Alternatively, you can use Modernizr to test for audio support. If
you have included the Modernizr JavaScript library in your HTML page (as
we have done in every application we have written thus far), you can
access the static values of Modernizr.audio.ogg, Modernizr.audio.wav, and Modernizr.audio.mp3 to test to see whether
those types are valid. These are not Booleans—they evaluate to the same
probably, maybe, and “” values that
we get from a call to canPlayType().
If you are comfortable using Modernizr for all your tests, you can
replace the test in the code with tests of these Modernizr static
values.
Playing the Sound
Finally, we get to the point where we can play a sound inside our
canvasApp() function. Since we
preloaded the sound originally outside the context of this function into
a variable with a global scope, we just need to call the play() function audioElement to start playing the
sound:
audioElement.play();
Figure 7-4 shows what this canvas application will look like when executed in an HTML5-compliant web browser (notice that we have left the display of the audio properties in this application).
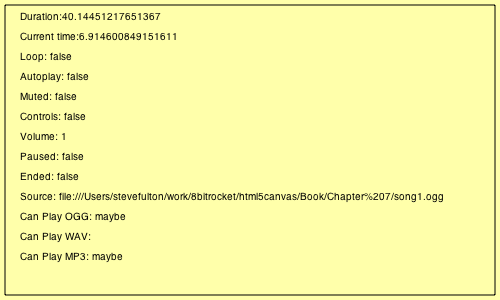
Look Ma, No Tag!
Now, check out the full application in Example 7-4. Notice that there is no
<audio> tag defined in the
HTML, but the sound still plays. This is our first step toward
integrating HTMLAudioElement objects
with HTML5 Canvas.
<!doctype html>
<html lang="en">
<head>
<meta charset="UTF-8">
<title>CH7EX4: Playing A Sound With No Tag</title>
<script src="modernizr-1.6.min.js"></script>
<script type="text/javascript">
window.addEventListener('load', eventWindowLoaded, false);
var audioElement;
function eventWindowLoaded() {

   audioElement = document.createElement("audio");
   document.body.appendChild(audioElement);
   var audioType = supportedAudioFormat(audioElement);
   if (audioType == "") {
      alert("no audio support");
      return;
   }
   audioElement.setAttribute("src", "song1." + audioType);
   audioElement.addEventListener("canplaythrough",audioLoaded,false);

}

function supportedAudioFormat(audio) {
   var returnExtension = "";
   if (audio.canPlayType("audio/ogg") =="probably" ||
       audio.canPlayType("audio/ogg") == "maybe") {
         returnExtension = "ogg";
   } else if(audio.canPlayType("audio/wav") =="probably" ||
       audio.canPlayType("audio/wav") == "maybe") {
         returnExtension = "wav";
   } else if(audio.canPlayType("audio/mp3") == "probably" ||
       audio.canPlayType("audio/mp3") == "maybe") {
         returnExtension = "mp3";
   }

   return returnExtension;

}

function canvasSupport () {
     return Modernizr.canvas;
}


function audioLoaded(event) {

   canvasApp();

}

function canvasApp() {

  if (!canvasSupport()) {
          return;
        }

  function  drawScreen () {

      //Background
      context.fillStyle = '#ffffaa';
      context.fillRect(0, 0, theCanvas.width, theCanvas.height);

      //Box
      context.strokeStyle = '#000000';
      context.strokeRect(5,  5, theCanvas.width−10, theCanvas.height−10);

      // Text
      context.fillStyle = "#000000";
      context.fillText  ("Duration:" + audioElement.duration,  20 ,20);
      context.fillText  ("Current time:" + audioElement.currentTime,  20 ,40);
      context.fillText  ("Loop: " + audioElement.loop,  20 ,60);
      context.fillText  ("Autoplay: " +audioElement.autoplay,  20 ,80);
      context.fillText  ("Muted: " + audioElement.muted,  20 ,100);
      context.fillText  ("Controls: " + audioElement.controls,  20 ,120);
      context.fillText  ("Volume: " + audioElement.volume,  20 ,140);
      context.fillText  ("Paused: " + audioElement.paused,  20 ,160);
      context.fillText  ("Ended: " + audioElement.ended,  20 ,180);
      context.fillText  ("Source: " + audioElement.currentSrc,  20 ,200);
      context.fillText  ("Can Play OGG: " + audioElement.canPlayType("audio/ogg"),
                        20 ,220);
      context.fillText  ("Can Play WAV: " + audioElement.canPlayType("audio/wav"),
                        20 ,240);
      context.fillText  ("Can Play MP3: " + audioElement.canPlayType("audio/mp3"),
                        20 ,260);

   }

   var theCanvas = document.getElementById("canvasOne");
   var context = theCanvas.getContext("2d");
   audioElement.play()

   setInterval(drawScreen, 33);

}

</script>

</head>
<body>
<div style="position: absolute; top: 50px; left: 50px;">

<canvas id="canvasOne" width="500" height="300">
 Your browser does not support HTML5 Canvas.
</canvas>
</div>
</body>
</html>
Creating a Canvas Audio Player
Now that we can play an audio file directly in an HTML page using
the <audio> tag, or through
JavaScript by creating a dynamic HTMLAudioElement object, it’s time to step up
our game. We are going to create an audio player on the canvas that we can
use to control dynamically loaded audio files. Why do we want to do this?
Well, while the audio controls baked into HTML5-compliant browsers might
look decent, it is often necessary for developers to implement a design
that more closely matches a particular website. HTML5 Canvas provides a
way to create a dynamic set of audio controls with nearly any
look-and-feel you desire.
However, this flexibility comes at a cost. HTML5 Canvas does not natively support common GUI controls such as push buttons, toggle buttons, and sliders. So to create a decent audio player, we need to make these types of GUI user controls from scratch. We could create these controls in HTML and JavaScript, but we have already covered communication between HTML and Canvas via form controls several times in this book. You wanted to know how to make HTML5 Canvas apps when you started reading, so we won’t pull any punches in this chapter.
Creating Custom User Controls on the Canvas
For this application we are going to create four elements:
- Play/pause push button
The audio file is either playing or is paused. Whichever state it is currently in, we show the other button (i.e., show pause when playing).
- A sliding progress bar
This is a noninteractive slider. It displays how much of the audio track has played and how much is left to play. The movement of this bar needs to be dynamic and based on the
durationandcurrentTimeproperties of theHTMLAudioElementobject.- An interactive volume slider
We want to create a sliding volume control that the user can manipulate with a click-and-drag operation. This is the trickiest control we will build because Canvas has no native support for click-and-drag.
- A loop toggle button
This is a bonus. Most of the default embedded HTML5 audio players do not have a loop/no-loop toggle button, but we are going to add one. Already, we are outstripping the functionality of standard HTML5!
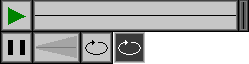
Figure 7-5 shows the audiocontrols.png image that we created. It holds all the images we will use for the audio player. The top row consists of:
The play state of the play/pause button
The background of the play slider
The moving slider we will use for the play and volume sliders
The second row consists of:
The pause state of the play/pause button
The background of the volume slider
The “off” state of the loop button
The “on” state of the loop button
Loading the Button Assets
Since we are going to load in both an audio file and an image file
for this application, we need to employ a strategy that will allow us to
preload two assets instead of just one. This process is much like the
one we employed in Chapter 6 when
we created controls for a video. Previously
in this chapter, we used a function named audioLoaded() to make sure the audio was
loaded before we started use it. However, that strategy will not work
when we have two assets to load. We could create two separate event
listeners, but then what if we need to load 3, 4, or 10 assets? What we
need is a simple way to ensure that we can preload any number of assets
before our application executes.
We will start this process by creating some variables that are
global in scope to all the functions in the applications. First, outside
of all the JavaScript functions, we will create three new
variables—loadCount, itemsToLoad, and buttonSheet:
loadCountThis variable will be used as a counter. When an asset has preloaded we will increment this value.
itemsToLoadThis is a numeric value that represents the number of assets we need to load before we can execute the application in the HTML page.
buttonSheetThis variable will hold a reference to the audiocontrols.png image shown in Figure 7-5. We will use it to create our audio controls.
Here is the code with values included:
var loadCount = 0;
var itemsToLoad = 2;
var buttonSheet;
var audioElement;
Note
To make these variables scope only to the Canvas app and not
globally to all of JavaScript, you can encapsulate this code in a
function(). The final version of
the code in Example 7-6 shows that
process.
Inside the eventWindowLoaded()
function we now need to set the event handlers for the assets to load.
For the audioElement, we will change
the handler from audioLoaded to
itemLoaded:
audioElement.addEventListener("canplaythrough",itemLoaded,false);To load and use the audiocontrols.png image, we first create a
new Image() object and place a
reference to it into the buttonSheet
variable. Next, we set the src
attribute of the new Image object to
the image file we want to load—in this case, audiocontrols.png. We then set the onload event handler of the Image object to itemLoaded, which is the same event handler we
used for the audio file:
buttonSheet = new Image();
buttonSheet.onload = itemLoaded;
buttonSheet.src = "audiocontrols.png";
Now we need to create the itemLoaded() event handler. This function is
quite simple. Every time it is called, we increment the loadCount variable. We then test loadCount to see whether it is equal to or has
surpassed the number of items we want to preload, which is represented
by the itemsToLoad variable. If so,
we call the canvasApp() function to
start our application:
function itemLoaded(event) {

   loadCount++;
   if (loadCount >= itemsToLoad) {
      canvasApp();

   }

}
Setting Up the Audio Player Values
Inside the canvasApp() function
we need to create some values to help us place all the various buttons
and sliders on the canvas.
First, bH represents the height
of all the controls; bW represents
the width of a standard button (play/pause, loop/not loop):
var bW = 32;
var bH = 32;
Next, we set the width of the playback area, playBackW, and the width of the volume
background, volBackW. We also set the
slider’s width (sliderW) and height
(sliderH):
var playBackW = 206;
var volBackW = 50;
var sliderW = 10;
var sliderH = 32;
We also need a couple variables to represent the x and y
locations on the canvas where we will start to build our audio controls.
We will define those as controlStartX
and controlStartY:
var controlStartX = 25;
var controlStartY = 200;
Finally, we need to specify the x and y
locations for the play/pause button (playX, playY), the playing slider background (playBackX, playBackY), the volume slider background
(volBackX, volBackY), and the location of the loop/no
loop toggle button (loopX, loopY):
var playX = controlStartX;
var playY = controlStartY;
var playBackX = controlStartX+bW
var playBackY = controlStartY;
var volBackX = controlStartX+bW+playBackW;
var volBackY = controlStartY;
var loopX = controlStartX+bW+playBackW+volBackW
var loopY = controlStartY;
We are going to use all of these values to help design and add functionality to our audio controls. It may seem like overkill to create so many variables, but when trying to “roll your own” collision detection and drag-and-drop functionality into the canvas, having variable names to manipulate instead of literals makes the job much easier.
Mouse Events
Since we are going to create our own functions for interactivity between the mouse and our custom canvas audio controls, we need to add some event handlers for certain common mouse events.
First, we need to create a couple variables—mouseX and mouseY—that will hold the current x and y
locations of the mouse pointer:
var mouseX;
var mouseY;
Next, we need to create the event handlers. First, we listen for
the mouseup event. This event fires
when a user stops pressing the mouse button. We will listen for this
event when we are trying to determine whether we should stop dragging
the volume slider:
theCanvas.addEventListener("mouseup",eventMouseUp, false);We also need to listen for the mousedown event to determine whether the
play/pause button was pressed, the loop on/off toggle button was
pressed, and/or the volume slider was clicked so we can start dragging
it:
theCanvas.addEventListener("mousedown",eventMouseDown, false);Finally, we listen for mousemove so we can figure out the current
x and y locations of the mouse pointer. We use this
value to determine whether buttons have been pressed, as well as whether
the volume slider has been clicked and/or dragged:
theCanvas.addEventListener("mousemove",eventMouseMove, false);Sliding Play Indicator
The sliding play indicator is the simplest control we are going to draw onto the canvas. It is not interactive—it just gives the user a visual indication of how much of the audio clip is left to play.
First of all, in canvasApp() we
need to make sure that we call the drawScreen() function on an interval, so our
updated controls will be displayed:
setInterval(drawScreen, 33);
Note
Unlike when displaying video on the canvas, we do not have to
call drawScreen() to update the
playing audio. In JavaScript, audio plays completely separate from the
canvas. Our need to call drawScreen() on an interval is necessary
because the audio controls we are creating need to be updated as the
audio plays.
In the drawScreen() function we
need to draw the slider and background on the canvas. We are going to
“cut” all the images we display from the single buttonSheet image we loaded from audiocontrols.png. To draw the background, we
use the values we set up earlier. We use literals (i.e., 32,0) to locate the starting point of the
image because those values do not change on the buttonSheet image. However, we use the
variables we created to find the width and height, and to locate the
final position of the background on the canvas:
context.drawImage(buttonSheet, 32,0,playBackW,bH,playBackX,playBackY,playBackW,bH);
Drawing the play slider is only a bit more complicated. Before we
draw it, we need to create a variable that represents the relationship
between the length of playing audio and the width of slider area. This
is so we will know how far on the x-axis to move the slider based on how
much of the song has played. This may sound complicated, but it’s just a
simple fraction. Divide the width of the play background (playBackW) by the duration of the playing
audio (audioElement.duration). We
will store that ratio in sliderIncrement and use it to place the play
slider on the canvas:
var slideIncrement = playBackW/audioElement.duration;
Now we need to calculate the x
position of the slider. The x
position is the sum of the slider’s starting position (the place on the
canvas where the controls start plus the width of the play/pause button:
controlStartX+bW) plus the audio’s
current play position. We calculate the play position by taking the
ratio we just created, sliderIncrement, and multiplying it by the
current play time of the audio clip (audioElement.currentTime). That’s it!
var sliderX = (playBackW,bH,controlStartX+bW) +
    (slideIncrement*audioElement.currentTime);
Now all we need to do is draw the image onto the canvas, and then
test to see whether the audio clip has ended. If it has ended, we put
the play position back to the beginning of the playback area and call
audioElement.pause() to pause the
audio clip. That is, unless the loop
property is sent, in which case we start playing the audio clip from the
beginning by setting the currentTime
property to 0:
context.drawImage(buttonSheet, 238,0,sliderW,bH,sliderX,controlStartY,sliderW,bH);

if (audioElement.ended && !audioElement.loop) {
   audioElement.currentTime = 0;
   audioElement.pause();
}
This leads us right into our next topic, handling the play/pause button.
Play/Pause Push Button: Hit Test Point Revisited
The first thing we need to do when implementing the play/pause
button is create the event handler for the mousemove event. The function really is just
the standard cross-browser code we introduced earlier in the book for
tracking the mouse position, depending on which properties the DOM in
browsers supports: layerX/layerY or offsetX/offsetY. This function is called every time
the mouse is moved on the canvas to update the mouseX and mouseY variables. Those variables are scoped
to canvasApp() so all functions
defined inside of it can access them:
function eventMouseMove(event) {
      if ( event.layerX ||  event.layerX == 0) { // Firefox
            mouseX = event.layerX ;
         mouseY = event.layerY;
        } else if (event.offsetX || event.offsetX == 0) { // Opera
          mouseX = event.offsetX;
         mouseY = event.offsetY;
        }

   }
Now we need to create the eventMouseUp() handler function. This function
is called when the user releases the mouse button after clicking. Why
after and not when the mouse is clicked? Well, one
reason is because we generally use the mousedown event for the start of a “dragging”
operation, which we will show you shortly.
The heart of this function is a hit test point-style collision
detection check for the buttons. We discussed this in depth in Chapter 6 when we created the buttons
for the video puzzle game (CH6EX10.html). Notice that here we are using
the variables we create to represent the x and y
locations of the button (playX,
playY) and the width and height of a
button (bW, bH) to form the bounds of the area we will
test. If the mouse pointer is within those bounds, we know the button
has been clicked:
function eventMouseUp(event) {

if ( (mouseY >= playY) && (mouseY <= playY+bH) && (mouseX >= playX) &&
     (mouseX <= playX+bW) ) {
Note
If you had images stacked on top of one another, you would need to store some kind of stacking value or z-index to know which item was on top and was clicked at any one time. Because the canvas works in immediate mode, you would have to “roll your own” just like the other functionality we have discussed.
After a hit is detected, we need to determine whether we are going
to call the play() or pause() method of the HTMLAudioElement object represented by the
audioElement variable. To figure out
which method to call, we simply test to see whether the audio is paused
by checking the audioElement.paused
property. If so, we call the play()
method; if not, we call pause().
Recall that the HTMLAudioElement.paused property is set to
true if the audio is not playing,
regardless of whether the paused()
function was called. This means that when the application starts but we
have not set autoplay, we can easily
display the proper button (play or pause) just by testing this
property:
      if (audioElement.paused) {
         audioElement.play();

      } else {
         audioElement.pause();

      }

   }
}
Now, in drawScreen() we need to
choose which button to display: the one representing play (green
triangle) or pause (two horizontal boxes). The play button is displayed
when the audio is paused, and the pause button is displayed when the
audio is playing. This button is a “call to action,” so it displays what
will happen when you click on it, not the status of the audio element
that is playing. This inverse
relationship exists because it is the standard way audio
players work.
If the audioElement is paused,
we display the graphic from the top row of the audiocontrols.png image represented by
buttonSheet (see Figure 7-5). If it is not paused, we display the
button on the second row right below it. Since that button starts at the
y position of 32, we use that literal value in the call to
drawImage():
if (audioElement.paused) {
   context.drawImage(buttonSheet, 0,0,bW,bH,playX,playY,bW,bH);//show play

} else {
   context.drawImage(buttonSheet, 0,32,bW,bH,playX,playY,bW,bH); //show pause

}
Note
Again, we could have represented the literal values of locations
in the buttonSheet with variables,
but we decided to use literals to show you the difference between how
we specify buttonSheet pixel
locations, and how we calculate widths and distances for placing those
elements.
Loop/No Loop Toggle Button
Implementing the loop/no loop toggle button is nearly identical to implementing the play/pause button. In Figure 7-5, you can see that the last two buttons on the bottom row represent the “on” and “off” states of the loop/no loop button. Unlike the play/pause button, this button shows the “state” of looping: the lighter, 3D-looking “out” button is displayed when the audio is not set to loop. The inverse, darker button is displayed when the audio is set to loop (because it looks like the button has been pressed).
In the eventMouseUp() function,
we need to add support for loop/no loop. First, we test for a hit test
point on the button with the current location of the mouse pointer. This
is identical to the test we did for the play/pause button, except that
we use loopX and loopY to find the current location of the
loop/no loop button.
Next, we check the value of audioElement.loop. We need to update the value
to the opposite of the current setting. If loop is true, we set it to false; if it is false, we set it to true:
if ( (mouseY >=loopY) && (mouseY <= loopY+bH) && (mouseX >= loopX) &&
     (mouseX <= loopX+bW) ) {
   if (audioElement.loop) {
            audioElement.loop = false;

         } else {
            audioElement.loop = true;

         }
Finally, in drawScreen() we
will display the proper part of the buttonSheet image for whichever state of
loop/no loop is currently set. Unlike play/pause, we display the “off”
state when loop is false and the “on” state when it is set to
true because, again, there is not an
inverse relationship to the states of the button:
if (audioElement.loop) {
         context.drawImage(buttonSheet, 114,32,bW,bH,loopX,loopY,bW,bH);//loop

      } else {
         context.drawImage(buttonSheet, 82,32,bW,bH,loopX,loopY,bW,bH); // no loop
      }
Click-and-Drag Volume Slider
So now we make it to the last, but certainly not least, piece of functionality for the audio player: the volume slider. The volume slider is an interactive control allowing the user to manipulate it by sliding it right or left to control the volume of the playing audio element. Before we create the volume slider, we need to define some boundaries for its usage:
The slider never moves on the y-axis; it will always keep a constant
yvalue.The farther the volume slider is to the right (the greater the
xvalue), the higher the volume.The slider moves on the x-axis but is bounded by the starting
xvalue of the volume slider image—volumeSliderStarton the left andvolumeSliderEndon the right.When the user clicks on the volume slider, we will assume that the user wants to set the volume, so we will start “dragging” the slider. This means that if the user moves the mouse on the x-axis, we will move the slider accordingly.
When the user takes his finger off the mouse button, we will assume that he no longer wishes to set the volume, and we still stop “dragging” the slider.
The volume will be set based on the slider’s position on the x-axis in relation to the
volumeSliderStartplus a ratio (volumeIncrement) that we create describing how much volume to increase or decrease based on where the slider rests.
Volume slider variables
OK, now that we have thoroughly confused you, let’s talk about
the process in depth. First, we start with the canvasApp() function. In canvasApp() we need to set up some variables
to set the rules we defined in the list above.
The starting x position for
the volume slider is volumeSliderStart. When the application
starts, it is equal to the x
position of the volume background, or volBackX. This means it will start at the
leftmost edge of the volume slider where the volume will be set to 0. We will update this to the correct
position based on the volume as
soon as we calculate that value:
var volumeSliderStart = volBackX;
The final x position for the
volume slider is volumeSliderEnd,
which is the rightmost position. It is the position where the volume
will be set to 100% (or 1). This
position lies at the x position of
volumeSliderStart plus the width of
the volume slider background (volBackW), less the width of the volume
slider itself (sliderW):
var volumeSliderEnd = volumeSliderStart + volBackW - sliderW;
volumeSliderX and volumeSliderY are the slider’s x and y
positions on the canvas. The y
position is the same as the other elements in the audio player,
controlStartY. However, the
x position is calculated in quite a
different way. First, we take the value of volumeSliderStart and add the difference
between slider volume background width and the slider width (volBackW – sliderW), multiplied by the
volume property of the audioElement, which is a number between
0 and 1. This will give us the position relative
to the starting point from which we want to draw the volume slider for
any given volume setting:
var volumeSliderX  = volumeSliderStart + (audioElement.volume*
    (volBackW - sliderW));
var volumeSliderY  = controlStartY;
Next, we create the volumeSliderDrag variable, which we will use
as a switch to tell us whether the volume slider is being dragged by
the user at any given moment:
var volumeSliderDrag = false;
Finally, we create the volumeIncrement variable. This variable
tells us how much volume to increase or decrease on the audioElement.volume property based on where
the slider is positioned on the volume background. Since the maximum
value of the volume is 1, we simply
find the total width that the volume slider can move on the x-axis
(volBackW - sliderW) and divide
1 by that value. This will give us
a product that we can multiply by the x position of the slider, relative to
volumeSliderStart, to give us the
volume we should set for the audioElement:
var volumeIncrement = 1/(volBackW - sliderW);
Volume slider functionality
Now that we have discussed the variables we need for the volume slider, we will talk about how we use them in the various functions of the audio player. The good news is that the implementation is simple now that you know how the variables work.
In the eventMouseDown()
handler, we perform a hit test point-style test, just like we did with
the play/pause and loop/no loop buttons to see whether the volume
slider was clicked. If so, we set the volumeSliderDrag variable to true. This means that the volume slider will
now to move to the x position of
the mouse when we call drawScreen():
function eventMouseDown(event) {

if ( (mouseY >= volumeSliderY) && (mouseY <=volumeSliderY+sliderH) &&
     (mouseX >= volumeSliderX) && (mouseX <= volumeSliderX+sliderW) ) {
         volumeSliderDrag = true;

      }

   }
In the eventMouseUp()
handler, we test to see whether the volumeSliderDrag is set to true. If so, it means that the user has
released the mouse button and no longer wants to drag the volume
slider. We set volumeSliderDrag to
false so the slider will not move
with the mouse:
if (volumeSliderDrag) {
         volumeSliderDrag = false;
      }
In drawScreen() we actually
put the pixels to the canvas, so to speak, with the volume slider.
First, we draw the background image from buttonSheet:
//vol Background
      context.drawImage(buttonSheet, 32,32,volBackW,bH,volBackX,volBackY,volBackW,bH);
Next, we check to see whether
volumeSliderDrag is true. If so, we make the volumeSliderX variable equal to the mouse’s
x position. Then, we drop in a
couple more tests to determine whether the x position of the volume slider falls
outside the bounds of the volume background. These two tests make sure
that the volume slider does not move past the rightmost or leftmost
sides of the volume slider background, and in turn, the volume property of audioElement is not calculated to be more
than 1 or less than 0:
if (volumeSliderDrag) {
   volumeSliderX = mouseX;
   if (volumeSliderX > volumeSliderEnd) {
      volumeSliderX = volumeSliderEnd;
   }
   if (volumeSliderX < volumeSliderStart) {
      volumeSliderX = volumeSliderStart;
   }
If the volumeSliderDrag is
false, we still need an x position at which to draw the slider
graphic. We get this the same way we calculated the volumeSliderX when we initialized the
variable in the canvasApp()
function:
} else {
   volumeSliderX = volumeSliderStart + (audioElement.volume*
    (volBackW -sliderW));
}
Finally, we draw the slider onto the canvas:
context.drawImage(buttonSheet, 238,0,sliderW,bH,volumeSliderX,
    volumeSliderY, sliderW,bH);
audioElement.volume = (volumeSliderX-volumeSliderStart) * volumeIncrement;
Figure 7-6 displays the custom controls in the browser.
So there you have it. You can test the audio player as CH7EX5.html in the source code. The full code listing for the HTML5 Canvas audio player is shown in Example 7-5.
<!doctype html>
<html lang="en">
<head>
<meta charset="UTF-8">
<title>CH7EX5: A Custom Sound Player On The Canvas</title>
<script src="modernizr-1.6.min.js"></script>
<script type="text/javascript">
window.addEventListener('load', eventWindowLoaded, false);
var loadCount = 0;
var itemsToLoad = 2;
var buttonSheet;
var audioElement;
function eventWindowLoaded() {

   audioElement = document.createElement("audio");
   document.body.appendChild(audioElement);
   var audioType = supportedAudioFormat(audioElement);
   if (audioType == "") {
      alert("no audio support");
      return;
   }
   audioElement.setAttribute("src", "song1." + audioType);
   audioElement.addEventListener("canplaythrough",itemLoaded,false);

   buttonSheet = new Image();
   buttonSheet.onload = itemLoaded;
   buttonSheet.src = "audiocontrols.png";

}

function supportedAudioFormat(audio) {
   var returnExtension = "";
   if (audio.canPlayType("audio/ogg") =="probably" ||
       audio.canPlayType("audio/ogg") == "maybe") {
         returnExtension = "ogg";
   } else if(audio.canPlayType("audio/wav") =="probably" ||
       audio.canPlayType("audio/wav") == "maybe") {
         returnExtension = "wav";
   } else if(audio.canPlayType("audio/mp3") == "probably" ||
       audio.canPlayType("audio/mp3") == "maybe") {
         returnExtension = "mp3";
   }

   return returnExtension;

}

function canvasSupport () {
    return Modernizr.canvas;
}

function itemLoaded(event) {

   loadCount++;
   if (loadCount >= itemsToLoad) {
      canvasApp();

   }

}

function canvasApp() {

  if (!canvasSupport()) {
          return;
        }

  function  drawScreen () {

      //Background

      context.fillStyle = "#ffffaa";
      context.fillRect(0, 0, theCanvas.width, theCanvas.height);

      //Box
      context.strokeStyle = "#000000";
      context.strokeRect(5,  5, theCanvas.width−10, theCanvas.height−10);

      // Text
      context.fillStyle = "#000000";
      context.fillText  ("Duration:" + audioElement.duration,  20 ,20);
      context.fillText  ("Current time:" + audioElement.currentTime,  250 ,20);
      context.fillText  ("Loop: " + audioElement.loop,  20 ,40);
      context.fillText  ("Autoplay: " +audioElement.autoplay,  250 ,40);
      context.fillText  ("Muted: " + audioElement.muted,  20 ,60);
      context.fillText  ("Controls: " + audioElement.controls,  250 ,60);
      context.fillText  ("Volume: " + audioElement.volume,  20 ,80);
      context.fillText  ("Paused: " + audioElement.paused,  250 ,80);
      context.fillText  ("Ended: " + audioElement.ended,  20 ,100);
      context.fillText  ("Can Play OGG: " + audioElement.canPlayType("audio/ogg"),
                        250 ,100);
      context.fillText  ("Can Play WAV: " + audioElement.canPlayType("audio/wav"),
                        20 ,120);
      context.fillText  ("Can Play MP3: " + audioElement.canPlayType("audio/mp3"),
                        250 ,120);
      context.fillText  ("Source: " + audioElement.currentSrc, 20 ,140);
      context.fillText  ("volumeSliderDrag: " + volumeSliderDrag, 20 ,160);

      //Draw Controls

      //play or pause

      if (audioElement.paused) {
         context.drawImage(buttonSheet, 0,0,bW,bH,playX,playY,bW,bH);//show play

      } else {
         context.drawImage(buttonSheet, 0,32,bW,bH,playX,playY,bW,bH); //show pause

      }

      //loop

      if (audioElement.loop) {
         context.drawImage(buttonSheet, 114,32,bW,bH,loopX,loopY,bW,bH);//show loop
      } else {
         context.drawImage(buttonSheet, 82,32,bW,bH,loopX,loopY,bW,bH); //show no loop
      }

      //play background
      context.drawImage(buttonSheet, 32,0,playBackW,bH,playBackX,playBackY,playBackW,bH);

      //vol Background
      context.drawImage(buttonSheet, 32,32,volBackW,bH,volBackX,volBackY,volBackW,bH);

      //play slider
      var slideIncrement = playBackW/audioElement.duration;
      var sliderX = (playBackW,bH,controlStartX+bW) +
          (slideIncrement*audioElement.currentTime);
      context.drawImage(buttonSheet, 238,0,sliderW,bH,sliderX,controlStartY,sliderW,bH);

      //Go back to start
      if (audioElement.ended && !audioElement.loop) {
         audioElement.currentTime = 0;
         audioElement.pause();
      }

      //Volume slider
      //Test Volume Drag

      if (volumeSliderDrag) {
         volumeSliderX = mouseX;
         if (volumeSliderX > volumeSliderEnd) {
            volumeSliderX = volumeSliderEnd;
         }
         if (volumeSliderX < volumeSliderStart) {
            volumeSliderX = volumeSliderStart;
         }
      } else {
         volumeSliderX = volumeSliderStart + (audioElement.volume*(volBackW -sliderW));
      }

      context.drawImage(buttonSheet, 238,0,sliderW,bH,volumeSliderX,volumeSliderY,
          sliderW,bH);
      audioElement.volume = (volumeSliderX-volumeSliderStart) * volumeIncrement;

   }

   function eventMouseDown(event) {

      //Hit Volume Slider
      if ( (mouseY >= volumeSliderY) && (mouseY <=volumeSliderY+sliderH) &&
           (mouseX >= volumeSliderX) && (mouseX <= volumeSliderX+sliderW) ) {
         volumeSliderDrag = true;

      }

   }

   function eventMouseMove(event) {
      if ( event.layerX ||  event.layerX == 0) {
            mouseX = event.layerX ;
         mouseY = event.layerY;
        } else if (event.offsetX || event.offsetX == 0) {
          mouseX = event.offsetX;
         mouseY = event.offsetY;
        }

   }

   function eventMouseUp(event) {

      //Hit Play
      if ( (mouseY >= playY) && (mouseY <= playY+bH) && (mouseX >= playX) &&
           (mouseX <= playX+bW) ) {
         if (audioElement.paused) {
            audioElement.play();

         } else {
            audioElement.pause();

         }

      }

      //Hit loop
      if ( (mouseY >=loopY) && (mouseY <= loopY+bH) && (mouseX >= loopX) &&
           (mouseX <= loopX+bW) ) {
         if (audioElement.loop) {
            audioElement.loop=false;

         } else {
            audioElement.loop = true;

         }

      }

      if (volumeSliderDrag) {
         volumeSliderDrag = false;
      }

   }

   var theCanvas = document.getElementById("canvasOne");
   var context = theCanvas.getContext("2d");

   var bW = 32;
   var bH = 32;
   var playBackW = 206;
   var volBackW = 50;
   var sliderW = 10;
   var sliderH = 32;
   var controlStartX = 25;
   var controlStartY =200;
   var playX = controlStartX;
   var playY = controlStartY;
   var playBackX = controlStartX+bW;
   var playBackY = controlStartY;
   var volBackX = controlStartX+bW+playBackW;
   var volBackY = controlStartY;
   var loopX = controlStartX+bW+playBackW+volBackW;
   var loopY = controlStartY;
   var mouseX;
   var mouseY;

   theCanvas.addEventListener("mouseup",eventMouseUp, false);
   theCanvas.addEventListener("mousedown",eventMouseDown, false);
   theCanvas.addEventListener("mousemove",eventMouseMove, false);

   audioElement.play();
   audioElement.loop = false;
   audioElement.volume = .5;
   var volumeSliderStart = volBackX;
   var volumeSliderEnd = volumeSliderStart + volBackW -sliderW;
   var volumeSliderX = volumeSliderStart + (audioElement.volume*(volBackW -sliderW));
   var volumeSliderY = controlStartY;
   var volumeSliderDrag = false;
   var volumeIncrement = 1/(volBackW -sliderW);

   setInterval(drawScreen, 33);

}

</script>

</head>
<body>
<div style="position: absolute; top: 50px; left: 50px;">

<canvas id="canvasOne" width="500" height="300">
 Your browser does not support HTML5 Canvas.
</canvas>
</div>
</body>
</html>
Case Study in Audio: Space Raiders Game
If we were writing a book about standard HTML5, we might be able to stop here and continue on with another topic. However, there is a lot more to playing audio in an application than simply getting a song to play and tracking its progress. In the last part of this chapter, we will look at a case study: Space Raiders. We will iterate through several ideas and attempts to get audio working in an efficient way in conjunction with action on HTML5 Canvas.
Why Sounds in Apps Are Different: Event Sounds
Why make a game as an example for playing sounds in HTML5? Well, a game is a perfect example because it is difficult to predict how many sounds might be playing at any one time.
If you can imagine, games are some of the most demanding applications when it comes to sound. In most games, sounds are played based on user interactions, and those interactions are usually both asynchronous and unpredictable. Because of those factors, we need to create a strategy for playing sounds that is flexible and resource-efficient.
To demonstrate how tricky sounds can be when using JavaScript and HTML5 with a canvas game, we will iterate this game several times until we have a working model.
Here are some assumptions we will make regarding sound in
Space Raiders based on what we know
about the HTML5 audio object.
After loading a sound, you can make another object with the same source and “load” it without having to wait for it to load. (Flash sort of works this way.)
Playing sounds locally is the same as playing them on a remotely hosted web page.
It turns out that both of these assumptions are wrong. As we continue through this case study, we will show you why, as well as how to accommodate them.
Since this is not a chapter about making games, Space Raiders is only going to be a façade. In Hollywood, a façade is a structure built for filming, containing only the parts the camera will see. For example, a building façade might have only the front wall and windows—with nothing behind them. Space Raiders is like this because we are only going to create the parts necessary to include the dynamic sounds we will be using. It will be most of a game, leading you into Chapters 8 and 9, which take a deep dive into making complete games with HTML5 Canvas.
Iterations
In this case study, we will create four iterations of Space Raiders. Each one will attempt to solve a dynamic audio problem in a different way. First, we will show you the basics of the Space Raiders game structure, and then we will discuss how to solve the audio problem.
Space Raiders Game Structure
Space Raiders is an iconic action game where a swarm of alien invaders attack from the top of the screen, and the player’s job is to defend the world. The raiders move in horizontal lines near the top of the screen. When each raider reaches the side of the playfield, it moves down the screen and then switches direction.
The player controls a spaceship by moving the mouse, and fires missiles using the left mouse button. We need to play a “shoot” sound every time the player fires a missile. When the missiles hit the enemy space raiders, we need to remove them from the screen, and then play an “explosion” sound. We are not limiting the number of shots the player can fire, which means that there could be any number of shoot and explode sounds playing simultaneously. Our goal is to manage all these dynamic sounds.
State machine
This game runs using a very simple state machine. A state machine is a construct that allows an application to exist in only one state at a time, which means it is only doing one thing. This kind of construct is great for single-player games because it removes the need to hold a bunch of Booleans describing what is going on at any one moment.
Space Raiders has four
states plus a variable named appState that holds the value of the current
state. Those states include:
STATE_INITA state to set up the loading of assets:
const STATE_INIT = 10;
STATE_LOADINGA wait state that has the application sleep until all assets have been loaded:
const STATE_LOADING = 20;
STATE_RESETA state to set up the initial game values:
const STATE_RESET = 30;
STATE_PLAYINGA state that handles all game-play logic:
const STATE_PLAYING = 40;
Note
A final game of this type might have a few more states, such
as STATE_END_GAME and STATE_NEXT_LEVEL, but our case study does
not require them.
The heart of our state machine is the run() function, which is called on an
interval every 33 milliseconds. The appState variable determines what function
to call at any given time using a switch() statement. appState is updated to a different state any
time the program is ready to move on and do something else. The
process of calling a function such as run() on an interval and switching states is
commonly known as a game loop:
function run() {
      switch(appState) {       case STATE_INIT:
         initApp();
         break;
      case STATE_LOADING:
         //wait for call backs
         break;
      case STATE_RESET:
         resetApp();
         break;
      case STATE_PLAYING:
         drawScreen();
         break;

   }
}
Initializing the game: no global variables
Now that we know a bit about the state machine construct we will use for this game, it’s time to set up the preload for our assets. As we mentioned previously, this game has two sounds, shoot and explode, but it also has three images: a player, an alien, and a missile.
Remember how we kept saying we’d do away with global variables
in these applications? Well, here’s where it happens. With the state
machine, we now have a mechanism to allow our application to wait for
loading assets instead of leveraging only the DOM’s window load event.
In the canvasApp() function,
we set up the following variables to use in the game.
The appState variable holds
the current state constant:
var appState = STATE_INIT;
We use the loadCount and
itemsToLoad variables in exactly
the same way we used them in the audio player application—except here
we will be loading more items:
var loadCount= 0;
var itemsToLoad = 0;
The variables alienImage,
missileImage, and playerImage will hold the loaded images we
use in the game:
var alienImage = new Image();
var missileImage = new Image();
var playerImage = new Image();
explodeSound and shootSound will hold the references to the
HTMLAudioElement objects we will
load:
var explodeSound ;
var shootSound;
The audioType variable will
hold the extension of the valid audio file type for the browser
displaying the application:
var audioType;
The mouseX and mouseY variables will hold the current
x and y location of the mouse:
var mouseX;
var mouseY;
The player variable will hold
a dynamic object with the x and
y location of the player ship
(controlled with the mouse):
var player = {x:250,y:475};Both the aliens and missiles arrays will hold lists of dynamic
objects for displaying aliens and missiles on the canvas:
var aliens = new Array();
var missiles = new Array();
The next five constants set the number of aliens (ALIEN_ROWS, ALIEN_COLS), their starting location
(ALIEN_START_X, ALIEN_START_Y), and their spacing on screen
(ALIEN_SPACING):
const ALIEN_START_X = 25;
const ALIEN_START_Y = 25;
const ALIEN_ROWS = 5;
const ALIEN_COLS = 8;
const ALIEN_SPACING = 40;
Also in the canvasApp()
function, we need to set up event handlers for mouseup and mousemove. To create the game loop, we need
to set up our interval to call the run() function:
theCanvas.addEventListener("mouseup",eventMouseUp, false);
theCanvas.addEventListener("mousemove",eventMouseMove, false);

setInterval(run, 33);
At this point, run() will be
called and our game loop will start by calling the function associated
with the value of appState.
Preloading all assets without global variables
We just showed that the appState variable was initialized to
STATE_INIT, which means that when
the run() function is called for
the first time, the initApp()
function will be called. The good news (at least for this discussion)
is that initApp() does very little
that we have not already seen—it just does it in the context of the
Canvas application. The result? Now we don’t need any global
variables.
In the code below, notice that we are using the same strategy.
We have a single event handler for all loaded assets (itemLoaded()),we set itemsToLoad to 5 (three graphics and two sounds), and we
set the appState to STATE_LOADING at the end of the function.
The rest of the code is all simple review:
function initApp() {
   loadCount=0;
   itemsToLoad = 5;
   explodeSound = document.createElement("audio");
   document.body.appendChild(explodeSound);
   audioType = supportedAudioFormat(explodeSound);
   explodeSound.setAttribute("src", "explode1." + audioType);
   explodeSound.addEventListener("canplaythrough",itemLoaded,false);

   shootSound = document.createElement("audio");
   document.body.appendChild(shootSound);
   shootSound.setAttribute("src", "shoot1." + audioType);
   shootSound.addEventListener("canplaythrough",itemLoaded,false);

   alienImage = new Image();
   alienImage.onload = itemLoaded;
   alienImage.src = "alien.png";
   playerImage = new Image();
   playerImage.onload = itemLoaded;
   playerImage.src = "player.png";
   missileImage = new Image();
   missileImage.onload = itemLoaded;
   missileImage.src = "missile.png"; appState = STATE_LOADING;
   }
If you recall, STATE_LOADING
does nothing in our run() function;
it just waits for all events to occur. The action here is handled by
the itemLoaded() event handler,
which works exactly like the itemLoaded() function we wrote for the audio
player, except that it has two additional functions:
It must remove the event listeners from the two
soundobjects we created. This is because, in some browsers, calling theplay()method of anHTMLAudioElementobject—or changing thesrcattribute of anHTMLAudioElementobject—initiates aloadoperation, which will then call theitemLoadedevent handler a second time. This will cause unexpected results in your application. Furthermore, it is always a good idea to remove unneeded event handlers from your objects.We set the
appStatetoSTATE_RESET, which will initialize the game the next time therun()function is called on the interval.
Here is the code with the two additional functions:
function itemLoaded(event) {

   loadCount++;
   if (loadCount >= itemsToLoad) {

      shootSound.removeEventListener("canplaythrough",itemLoaded, false);
      explodeSound.removeEventListener("canplaythrough",itemLoaded,false);

      appState = STATE_RESET;

   }

  }
Resetting the game
In the run() function, the
STATE_RESET state calls the
resetApp() function, which in turn
calls startLevel(). It also sets
the volume of our two sounds to 50% (.5) before setting the appState to STATE_PLAYING:
function resetApp() {

   startLevel();
   shootSound.volume = .5;
   explodeSound.valume = .5;
   appState = STATE_PLAYING;

  }
The startLevel() function
traverses through two nested for:next loops, creating the rows of aliens
by column. Each time we create an alien, we push a dynamic object into
the aliens array with the following
properties:
speedThe number of pixels the aliens will move left or right on each call to
drawScreen().xThe starting
xposition of the alien on the screen. This value is set by the column (c) multiplied byALIEN_SPACING, added toALIEN_START_X.yThe starting
yposition of the alien on the screen. This is set by the row (r) multiplied byALIEN_SPACING, added toALIEN_START_X.widthThe width of the alien image.
heightThe height of the alien image.
Here is the code for the startLevel() function:
function startLevel() {

      for (var r = 0; r < ALIEN_ROWS; r++) {
         for( var c= 0; c < ALIEN_COLS; c++) {
            aliens.push({speed:2,x:ALIEN_START_X+c*ALIEN_SPACING, y:ALIEN_START_Y+r*
               ALIEN_SPACING,width:alienImage.width, height:alienImage.height});
         }
      }
   }
Mouse control
Before we talk about the game play itself, let’s quickly discuss
mouse event handlers, which will collect all user input for the game.
When the player moves the mouse, the eventMouseMove() handler is called. This
function operates just like the same function we created for the audio
player, except for the last two lines. Those two lines set the
x and y properties of the player object we created back in the
variable definition section of canvasApp(). We will use these two
properties to position the playerImage on the canvas in the drawScreen() function:
function eventMouseMove(event) {
      if ( event.layerX ||  event.layerX == 0) { // Firefox
            mouseX = event.layerX ;
         mouseY = event.layerY;
        } else if (event.offsetX || event.offsetX == 0) { // Opera
          mouseX = event.offsetX;
         mouseY = event.offsetY;
        }
      player.x = mouseX;
      player.y = mouseY;

   }
The eventMouseUp() handler is
called when the player presses and releases the left mouse button.
When this event occurs, a missile will fire. The missile object is almost identical to the
alien object, as it includes
speed, x, y,
width, and height properties. Since the player is
firing the missile, we set the missile’s x and y
positions to the center of the player’s ship on the x-axis (player.x+.5*playerImage.width), and to the
y position of the player’s ship,
minus the height of the missile (player.y -
missileImage.height):
function eventMouseUp(event) {

   missiles.push({speed:5, x: player.x+.5*playerImage.width,
      y:player.y-missileImage.height,width:missileImage.width,
      height:missileImage.height});
Next is the first really critical line of code for the subject
at hand: audio. For this first iteration of Space Raiders, we simply call the play() function of shootSound. This will play the shoot sound
as often as the player presses the left mouse button (in
theory):
   shootSound.play();
}
Bounding box collision detection
Before we get to the main part of the game logic, we should
discuss bounding box collision detection. We need to detect collisions
between the missiles the player fires and the aliens the player is
firing upon. To do this, we will create a function that tests to see
whether two objects are overlapping. For lack of a better name, we
call this function hitTest().
The type of hit test we are going to perform is called a bounding box collision test. This means that we are going to ignore the intricate details of the bitmapped graphics and simply test to see whether an invisible “box” drawn around the bounds of each object overlaps with a similar box drawn around the other objects.
Recall that both the alien
and missile dynamic objects were
created with similar properties: x,
y, width, height. This was so the hitTest() function could test them as
generic objects, unspecific to the type of on-screen object that they
represent. This means that we can add any other type of object to this
game (boss alien, power-ups, enemy missiles, etc.), and if it is
created with similar properties, we can use the same function to test
collisions against it.
The function works by finding the top, left, bottom, and right values for each object, and then testing to see whether any of those values overlap. Bounding box collision detection will be discussed in detail in Chapter 8, but we just wanted to give you a preview of what it looks like for Space Raiders:
function hitTest(image1,image2)  {
      r1left = image1.x;
      r1top = image1.y;
      r1right = image1.x + image1.width;
      r1bottom = image1.y + image1.height;
      r2left = image2.x;
      r2top = image2.y;
      r2right = image2.x + image2.width;
      r2bottom = image2.y + image2.height;
      retval = false;

      if ( (r1left > r2right) || (r1right < r2left) || (r1bottom < r2top) ||
           (r1top > r2bottom) ) {
         retval = false;
      } else {
         retval = true;
      }


      return retval;
   }
Playing the game
Now the game is ready to play. STATE_PLAYING calls the drawScreen() function, which is the heart of
Space Raiders. The first part of
this function simply moves the missiles and aliens on the screen.
Moving the missiles is quite easy. We loop through the array
(backward), updating the y property
of each with the speed property. If
they move off the top of the screen, we remove them from the array. We
move through the array backward so that we can splice() array elements out of the array and
not affect loop length. If we did not do this, elements would be
skipped after we splice() the
array:
for (var i=missiles.length-1; i>= 0;i−−) {
   missiles[i].y −= missiles[i].speed;
   if (missiles[i].y < (0-missiles[i].height)) {
      missiles.splice(i,1);
   }

}
Drawing the aliens is similar to drawing missiles—with a few
exceptions. Aliens move left and right, and when they reach the side
of the canvas, they move down 20
pixels and then reverse direction. To achieve the reversal in
direction, multiply the speed
property by -1. If the aliens are
moving to the right (speed = 2),
this will make the speed = -2,
which will subtract from the x
position and move the aliens to the left. If the aliens hit the left
side of the canvas, the speed
property will again be multiplied by -1 (-2 *
-1), which will equal 2.
The alien will then move to the right because 2 will be added to the x value for the alien each time drawScreen() is called:
//Move Aliens
      for (var i=aliens.length−1; i>= 0;i−−) {
         aliens[i].x += aliens[i].speed;
         if (aliens[i].x > (theCanvas.width-aliens[i].width) || aliens[i].x < 0) {
            aliens[i].speed *= -1;
            aliens[i].y += 20;
         }
         if (aliens[i].y > theCanvas.height) {
            aliens.splice(i,1);
         }

      }
The next step in drawScreen()
is to detect collisions between the aliens and the missiles. This part
of the code loops through the missiles array backward while nesting a loop
through the aliens array. It will
test every missile against every alien to determine whether there is a
collision. Since we have already covered the hitTest() function, we only need to discuss
what happens if a collision is detected. First, we call the play() function of the explodeSound. This is the second critical
line of code in this iteration of Space
Raiders, as it plays (or attempts to play) the explosion
sound every time a collision is detected. After that, it splices the
alien and missile objects out of their respective
arrays, and then breaks out of the nested for:next loop. If there are no aliens left
to shoot, we set the appState to
STATE_RESET, which will add more
aliens to the canvas so the player can continue shooting:
missile: for (var i=missiles.length−1; i>= 0;i−−) {
         var tempMissile = missiles[i]
         for (var j=aliens.length-1; j>= 0;j−−) {
            var tempAlien =aliens[j];
            if (hitTest(tempMissile,tempAlien)) {
               explodeSound.play();
               missiles.splice(i,1);
               aliens.splice(j,1);
               break missile;
             }
         }

         if (aliens.length <=0) {
            appState = STATE_RESET;
         }
      }
The last few lines of code in drawScreen() loop through the missiles and aliens arrays, and draw them onto the
canvas. This is done using the drawImage() method of the context object, and the x and y
properties we calculated earlier. Finally, it draws the playerImage on the canvas, and the function
is finished:
//Draw Missiles
      for (var i=missiles.length−1; i>= 0;i−−) {
         context.drawImage(missileImage,missiles[i].x,missiles[i].y);

      }
//draw aliens
      for (var i=aliens.length−1; i>= 0;i−−) {
         context.drawImage(alienImage,aliens[i].x,aliens[i].y);

      }

//Draw Player
         context.drawImage(playerImage,player.x,player.y);
Like we stated previously, Space Raiders is not a full game. We have only implemented enough to get the player to shoot missiles so we can play the shoot sound, and to detect collisions so we can play the explode sound.
Iteration #1: Playing Sounds Using a Single Object
We just described the first iteration of the dynamic audio code.
It works by attempting to call the play() function of both shootSound and explodeSound as often as necessary. This
appears to work at first, but if you listen carefully (and this is
apparent on some browsers more than others), the sounds start to play
“off,” or not play at all. This is because we are using a single object
and attempting to play and replay the same sound over and over. A single
HTMLAudioElement was not designed to
operate this way. You can test this example in the code distribution by
running CH7EX6.html in your
HTML5-compliant web browser. Press the fire button as quickly as
possible and listen to when and how the sounds play. After a bit, they
start to play at the wrong time, don’t finish, or don’t play at all.
Figure 7-7 shows what
the first iteration of Space
Raiders looks like in a web browser.
Iteration #2: Creating Unlimited Dynamic Sound Objects
So, we almost got what we wanted with the first iteration, but we
ran into some oddities when calling the play() function on a single HTMLAudioElement multiple times before the
sound had finished playing.
For our second iteration, we are going to try something different.
Let’s see what happens when you simply create a new HTMLAudioElement object every time you want to
play a sound. If this doesn’t sound like an efficient use of memory or
resources in the web browser, you are a keen observer. It’s actually a
horrible idea. However, let’s proceed just to see what happens.
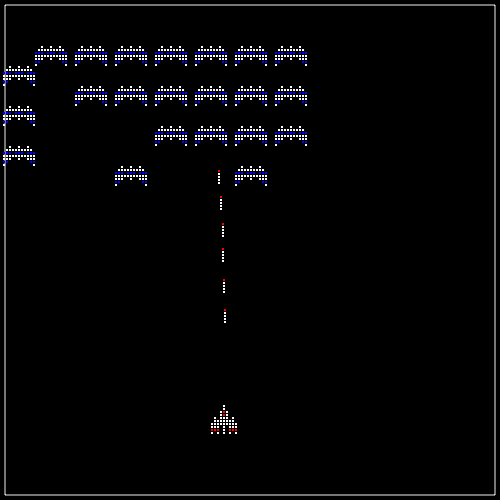
In canvasApp(), we will create
a couple constants that represent the filenames of the sounds we want to
play, but without the associated extension. We will still retrieve the
extension with a call to supportedAudioFormat(), just as we did in the
first iteration, and store that value in the audioType variable.
We will also create an array named
sounds that we will use to hold all
the HTMLAudioElement objects we
create. This array will tell us how many objects we have created so we
can visually see when all hell breaks loose:
const SOUND_EXPLODE = "explode1";
const SOUND_SHOOT  = "shoot1";
var sounds = new Array();
Instead of calling the play()
function of each sound directly, we are going to create a function named
playSound(). This function accepts
two parameters:
soundOne of the constants we created above that contains the name of the sound file
volumeA number between
0and1that represents the volume of the sound to play
The function here creates a new sound object every time it is called by
calling the createElement() function
of the document DOM object. It then
sets the properties (src, loop, volume) and attempts to play the sound. Just
for fun, let’s push the object into the sounds array:
function playSound(sound,volume) {
   var tempSound = document.createElement("audio");
   tempSound.setAttribute("src", sound + "." + audioType);
   tempSound.loop = false;
   tempSound.volume = volume;
   tempSound.play();
   sounds.push(tempSound);
}
To play the sounds, we call playSound(), passing the proper
parameters.
The call in eventMouseUp()
looks like this:
playSound(SOUND_SHOOT,.5);
And in drawScreen() it looks
like this:
playSound(SOUND_EXPLODE,.5);
To display on the canvas how many sounds we have created, we add
this code to the drawScreen()
function:
context.fillStyle  = "#FFFFFF";
context.fillText  ("Active Sounds: " + sounds.length,  200 ,480);
Now, go ahead and try this example (CH7EX7.html in the code distribution). Figure 7-8 shows what Space Raiders iteration #2 looks like. Notice we have added some display text at the bottom of the screen to show how many sounds are in the sounds array. You will discover two issues with this iteration:
The sounds play with almost no pauses when loaded from a local drive. But when the page is loaded from a remote website, there is a defined pause before each sound is loaded and played.
The number of
soundobjects created is a huge problem. For some browsers, such as Chrome, the number of active sounds caps out at about 50. After that, no sounds play at all.
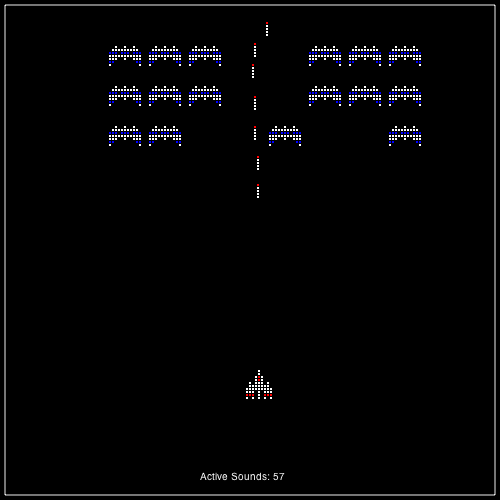
Iteration #3: Creating a Sound Pool
So, now we know we don’t want to play an HTMLAudioElement repeatedly, or create
unlimited sound objects on the fly.
However, what if we cap the number of audio objects we create, and put those objects
in a pool so we can use them over and over? This will save us memory,
and after the sounds are loaded, we shouldn’t see any loading pause
before they are played, right?
We will implement a solution that uses HTMLAudioElement objects as general-purpose
sound objects. We will keep a pool of
them, and change the src attribute to
whatever sound we want to play. This appears to be an elegant solution
that reuses as much as possible, in addition to giving us a lot of
flexibility as to which sounds we want to play.
In canvasApp(), we will create
a new constant named MAX_SOUNDS. This
will represent the maximum number of sound objects we can create at any one time.
We will also rename our sounds array
to soundPool to better describe its
purpose:
const MAX_SOUNDS = 8;
var soundPool = new Array();
The big change here is the playSound() function. It uses the same
parameters as the one from iteration #2, but the functionality is very
different:
function playSound(sound,volume) {The first half of the function loops through the soundPool array to see whether any of the
HTMLAudioElement objects in the pool
are available to play a sound. We determine this by checking the
ended property. Since only HTMLAudioElement objects that have previously
been used to play a sound are put into the pool, the ended property will be set to true once the sound has finished playing. By
replaying sounds that have finished, we remove the issue of trying to
reuse an HTMLAudioElement object to
play a sound while it is already in use:
var soundFound = false;
var soundIndex = 0;
var tempSound;

if (soundPool.length> 0) {
   while (!soundFound && soundIndex < soundPool.length) {

      var tSound = soundPool[soundIndex];

      if (tSound.ended) {
         soundFound = true;
      } else {
        soundIndex++;
      }

   }
}
if (soundFound) {
   tempSound = soundPool[soundIndex];
   tempSound.setAttribute("src", sound + "." + audioType);
   tempSound.loop = false;
   tempSound.volume = volume;
   tempSound.play();
If we don’t find a sound, and the size of the pool is less than
MAX_SOUNDS, we go ahead and create a
new HTMLAudioElement, call its
play() function, and push it into the
sound pool. This keeps the pool from getting too large, while making
sure there are not too many HTMLAudioElement objects in the browser at any
one time:
   } else if (soundPool.length < MAX_SOUNDS){
      tempSound = document.createElement("audio");
      tempSound.setAttribute("src", sound + "." + audioType);
      tempSound.volume = volume;
      tempSound.play();
      soundPool.push(tempSound);
   }

}
You can go ahead and try this iteration by loading CH7EX8.html in your HTML5-compliant web browser. In this case, it works! You hear every sound, and the browser doesn’t die like it would with iteration #2.
Unfortunately, there are some issues. On some browsers, there is still a pause before a sound plays, just like with iteration #2. Again, this happens more often when the page is loaded from an external website than when it is loaded locally in a web browser.
The worst manifestation of this comes in Google Chrome, where the
sounds pause every time they are played. Also, in Firefox, the src doesn’t change for all the objects, making
the shoot sound play when the explode sound should play, and vice
versa.
Uh-oh, it looks like we need another iteration. Figure 7-9 shows Space Raiders playing with a pool size
governed by MAX_SOUNDS.

Iteration #4: Reusing Preloaded Sounds
Even though the code in iteration #3 was pretty clean, it simply did not work for us. Instead, we need to compromise and implement a solution that is less elegant, but that works to play sounds nearly every time they are needed. This solution must also work both locally and when loaded from a website.
For this final iteration, we are going to use a sound pool just
like in iteration #3, but it will operate in a different way. We will
not reuse sound objects for different
sound files. Instead, we will load all our sounds up front, and simply
play a sound object that is currently
not being used. In effect, we will “prime the pump,” creating three
sound objects for each of our two
sounds for a total of six sound
objects when we start the application. While this may not seem like the
perfect solution, it appears to work fairly well in all browsers and
plays sounds in the most effective way.
In canvasApp(), we set our
MAX_SOUNDS constant to 6. We could make it higher, but for this
example we will limit it to the number of sounds we will create and
preload:
const MAX_SOUNDS = 6;
We then create six variables to hold our HTMLAudioElement objects: three for the
explode sound…
var explodeSound ;
var explodeSound2 ;
var explodeSound3 ;
…and three for the shoot sound:
var shootSound;
var shootSound2;
var shootSound3;
In the initApp() function, we
preload all of these sound objects.
Yes, we load the same object multiple times:
explodeSound = document.createElement("audio");
document.body.appendChild(explodeSound);
audioType = supportedAudioFormat(explodeSound);
explodeSound.setAttribute("src", "explode1." + audioType);
explodeSound.addEventListener("canplaythrough",itemLoaded,false);

explodeSound2 = document.createElement("audio");
document.body.appendChild(explodeSound2);
explodeSound2.setAttribute("src", "explode1." + audioType);
explodeSound2.addEventListener("canplaythrough",itemLoaded,false);

explodeSound3 = document.createElement("audio");
document.body.appendChild(explodeSound3);
explodeSound3.setAttribute("src", "explode1." + audioType);
explodeSound3.addEventListener("canplaythrough",itemLoaded,false);

shootSound = document.createElement("audio");
document.body.appendChild(shootSound);
shootSound.setAttribute("src", "shoot1." + audioType);
shootSound.addEventListener("canplaythrough",itemLoaded,false);

shootSound2 = document.createElement("audio");
document.body.appendChild(shootSound2);
shootSound2.setAttribute("src", "shoot1." + audioType);
shootSound2.addEventListener("canplaythrough",itemLoaded,false);

shootSound3 = document.createElement("audio");
document.body.appendChild(shootSound3);
shootSound3.setAttribute("src", "shoot1." + audioType);
shootSound3.addEventListener("canplaythrough",itemLoaded,false);
In the itemLoaded() function,
we remove the event listeners for all six loaded sounds:
shootSound.removeEventListener("canplaythrough",itemLoaded, false);
shootSound2.removeEventListener("canplaythrough",itemLoaded, false);
shootSound3.removeEventListener("canplaythrough",itemLoaded, false);
explodeSound.removeEventListener("canplaythrough",itemLoaded,false);
explodeSound2.removeEventListener("canplaythrough",itemLoaded,false);
explodeSound3.removeEventListener("canplaythrough",itemLoaded,false);
Then, we push each sound into our soundPool array. However, this time, we push
them as dynamic objects so we can set the following properties, which
don’t exist in the HTMLAudioElement
object:
nameThe name of the sound file to play (again, without the extension).
elementThe reference to the
HTMLAudioElementobject.playedA Boolean that tells us whether this sound has played once or not. We need this property because we are putting all of these
soundobjects into our array, but they have not been played yet. That means theirendedproperty has not yet been set totrue. Theplayedproperty tells us whether the sound is ready to play—that is, it has not been played yet. We will set this totrueafter we play the sound once:
soundPool.push({name:"explode1", element:explodeSound, played:false});
soundPool.push({name:"explode1", element:explodeSound2, played:false});
soundPool.push({name:"explode1", element:explodeSound3, played:false});
soundPool.push({name:"shoot1", element:shootSound, played:false});
soundPool.push({name:"shoot1", element:shootSound2, played:false});
soundPool.push({name:"shoot1", element:shootSound3, played:false});
Now we need to make a change in our resetApp() function. This change is to support
sounds playing in Chrome, which appears to be the only browser that has
a slight issue with loading sounds in this manner. The first time you
play a sound in Chrome, there is a pause before it starts. To alleviate
this, we play each sound type once but set the volume to 0. This will make sure a sound is loaded and
ready to play the first time we call playSound() in Chrome:
function resetApp() {

   playSound(SOUND_EXPLODE,0);
   playSound(SOUND_SHOOT,0);
   startLevel();
   appState = STATE_PLAYING;


  }
The playSound() function
operates in a similar way to iteration #3. It loops through the soundPool array looking for a sound that it
can play. However, in this version, we check to see whether the HTMLAudioElement has ended (tSound.element.ended) or if it has not been
played (!tSound.played) yet. We also
check whether the value in the sound
parameter matches the name property
of the sound object in soundPool (tSound.name == sound):
function playSound(sound,volume) {

      var soundFound = false;
      var soundIndex = 0;
      var tempSound;

      if (soundPool.length > 0) {
         while (!soundFound && soundIndex < soundPool.length) {

            var tSound = soundPool[soundIndex];
            if ((tSound.element.ended || !tSound.played) && tSound.name == sound) {
               soundFound = true;
               tSound.played = true;
            } else {
               soundIndex++;
            }

         }
      }
Using this method, we play a sound only if it has not been played,
it has ended, and it already has the sound file loaded that we need to
play. There is no pause to load (most of the time), and sounds play at
pretty much the time we need them to play. If we need more sounds, we
can load more up front, or set MAX_SOUNDS to a number greater than the number
of preloaded sounds. If we do that, we will create new sound objects on the fly (although this might
still give you a pause when loading from a web server):
if (soundFound) {
         tempSound = soundPool[soundIndex].element;
         tempSound.volume = volume;
         tempSound.play();

      } else if (soundPool.length < MAX_SOUNDS){
         tempSound = document.createElement("audio");
         tempSound.setAttribute("src", sound + "." + audioType);
         tempSound.volume = volume;
         tempSound.play();
         soundPool.push({name:sound, element:tempSound, type:audioType, played:true});
      }
Go ahead and try this code. It is CH7EX9.html in the code distribution, or you can type in the program listing.
Other stuff you could do to improve the game
Since the next couple chapters introduce game concepts, we really shouldn’t go much further with Space Raiders. Still, if you were going to finish this game, these are the things you might consider doing:
Add a score.
Increase the aliens’ speed on each new level.
Collision-detect the aliens and the player.
Make an object pool for missiles and aliens.
Slow down firing with a
wait()state or frame counter.Add explosions.
Include a title sequence, level sequence, and end game sequence.
Add a looping soundtrack.
The final code for Space Raiders
Example 7-6 shows the final code for the Space Raiders game (CH7EX9.html).
<!doctype html>
<html lang="en">
<head>
<meta charset="UTF-8">
<title>CH7EX9: Space Raiders With Optimized Dynamic Network Sound And State Loader</title>
<script src="modernizr-1.6.min.js"></script>
<script type="text/javascript">
window.addEventListener('load', eventWindowLoaded, false);

function eventWindowLoaded() {

   canvasApp();

}

function supportedAudioFormat(audio) {
   var returnExtension = "";
   if (audio.canPlayType("audio/ogg") =="probably" ||
       audio.canPlayType("audio/ogg") == "maybe") {
         returnExtension = "ogg";   } else if(audio.canPlayType("audio/wav") =="probably" ||
       audio.canPlayType("audio/wav") == "maybe") {
         returnExtension = "wav";
   } else if(audio.canPlayType("audio/mp3") == "probably" ||
       audio.canPlayType("audio/mp3") == "maybe") {
         returnExtension = "mp3";
   }

   return returnExtension;

}

function canvasSupport () {
     return Modernizr.canvas;
}

function canvasApp() {

   const STATE_INIT  = 10;
   const STATE_LOADING = 20;
   const STATE_RESET  = 30;
   const STATE_PLAYING = 40;
   var appState = STATE_INIT;
   var loadCount= 0;
   var itemsToLoad = 0;
   var alienImage = new Image();
   var missileImage = new Image();
   var playerImage = new Image();

   const SOUND_EXPLODE = "explode1";
   const SOUND_SHOOT  = "shoot1";
   const MAX_SOUNDS = 6;
   var soundPool = new Array();
   var explodeSound ;
   var explodeSound2 ;
   var explodeSound3 ;
   var shootSound;
   var shootSound2;
   var shootSound3;
   var audioType;

   var mouseX;
   var mouseY;
   var player = {x:250,y:475};
   var aliens = new Array();
   var missiles = new Array();

   const ALIEN_START_X = 25;
   const ALIEN_START_Y = 25;
   const ALIEN_ROWS = 5;
   const ALIEN_COLS = 8;
   const ALIEN_SPACING = 40;

   if (!canvasSupport()) {
          return;
        }

   var theCanvas = document.getElementById("canvasOne");
   var context = theCanvas.getContext("2d");

  function itemLoaded(event) {

   loadCount++;
   if (loadCount >= itemsToLoad) {

      shootSound.removeEventListener("canplaythrough",itemLoaded, false);
      shootSound2.removeEventListener("canplaythrough",itemLoaded, false);
      shootSound3.removeEventListener("canplaythrough",itemLoaded, false);
      explodeSound.removeEventListener("canplaythrough",itemLoaded,false);
      explodeSound2.removeEventListener("canplaythrough",itemLoaded,false);
      explodeSound3.removeEventListener("canplaythrough",itemLoaded,false);
      soundPool.push({name:"explode1", element:explodeSound, played:false});
      soundPool.push({name:"explode1", element:explodeSound2, played:false});
      soundPool.push({name:"explode1", element:explodeSound3, played:false});
      soundPool.push({name:"shoot1", element:shootSound, played:false});
      soundPool.push({name:"shoot1", element:shootSound2, played:false});
      soundPool.push({name:"shoot1", element:shootSound3, played:false});

      appState = STATE_RESET;

   }

  }

  function initApp() {
   loadCount=0;
   itemsToLoad = 9;
   explodeSound = document.createElement("audio");
   document.body.appendChild(explodeSound);
   audioType = supportedAudioFormat(explodeSound);
   explodeSound.setAttribute("src", "explode1." + audioType);
   explodeSound.addEventListener("canplaythrough",itemLoaded,false);

   explodeSound2 = document.createElement("audio");
   document.body.appendChild(explodeSound2);
   explodeSound2.setAttribute("src", "explode1." + audioType);
   explodeSound2.addEventListener("canplaythrough",itemLoaded,false);

   explodeSound3 = document.createElement("audio");
   document.body.appendChild(explodeSound3);
   explodeSound3.setAttribute("src", "explode1." + audioType);
   explodeSound3.addEventListener("canplaythrough",itemLoaded,false);

   shootSound = document.createElement("audio");
   document.body.appendChild(shootSound);
   shootSound.setAttribute("src", "shoot1." + audioType);
   shootSound.addEventListener("canplaythrough",itemLoaded,false);

   shootSound2 = document.createElement("audio");
   document.body.appendChild(shootSound2);
   shootSound2.setAttribute("src", "shoot1." + audioType);
   shootSound2.addEventListener("canplaythrough",itemLoaded,false);

   shootSound3 = document.createElement("audio");
   document.body.appendChild(shootSound3);
   shootSound3.setAttribute("src", "shoot1." + audioType);
   shootSound3.addEventListener("canplaythrough",itemLoaded,false);

   alienImage = new Image();
   alienImage.onload = itemLoaded;
   alienImage.src = "alien.png";
   playerImage = new Image();
   playerImage.onload = itemLoaded;
   playerImage.src = "player.png";
   missileImage = new Image();
   missileImage.onload = itemLoaded;
   missileImage.src = "missile.png";
   appState = STATE_LOADING;
   }

  function startLevel() {

      for (var r = 0; r < ALIEN_ROWS; r++) {
         for( var c= 0; c < ALIEN_COLS; c++) {
            aliens.push({speed:2,x:ALIEN_START_X+c*ALIEN_SPACING, y:ALIEN_START_Y+r*
                ALIEN_SPACING,width:alienImage.width, height:alienImage.height});
         }
      }
   }

  function resetApp() {

   playSound(SOUND_EXPLODE,0);
   playSound(SOUND_SHOOT,0);
   startLevel();
   appState = STATE_PLAYING;

  }

  function  drawScreen () {

      //Move missiles
      for (var i=missiles.length−1; i>= 0;i−−) {
         missiles[i].y −= missiles[i].speed;
         if (missiles[i].y < (0-missiles[i].height)) {
            missiles.splice(i,1);
         }

      }

      //Move Aliens
      for (var i=aliens.length−1; i>= 0;i−−) {
         aliens[i].x += aliens[i].speed;
         if (aliens[i].x > (theCanvas.width-aliens[i].width) || aliens[i].x < 0) {
            aliens[i].speed *= -1;
            aliens[i].y += 20;
         }
         if (aliens[i].y > theCanvas.height) {
            aliens.splice(i,1);
         }

      }

      //Detect Collisions
      missile: for (var i=missiles.length−1; i>= 0;i−−) {
         var tempMissile = missiles[i]
         for (var j=aliens.length−1; j>= 0;j−−) {
            var tempAlien =aliens[j];
            if (hitTest(tempMissile,tempAlien)) {
               playSound(SOUND_EXPLODE,.5);
               missiles.splice(i,1);
               aliens.splice(j,1);
               break missile;
             }
         }

         if (aliens.length <=0) {
            appState = STATE_RESET;
         }
      }

      //Background
      context.fillStyle = "#000000";
      context.fillRect(0, 0, theCanvas.width, theCanvas.height);
      //Box
      context.strokeStyle = "#EEEEEE";
      context.strokeRect(5,  5, theCanvas.width−10, theCanvas.height−10);

      //Draw Player
      context.drawImage(playerImage,player.x,player.y);

      //Draw Missiles
      for (var i=missiles.length−1; i>= 0;i−−) {
         context.drawImage(missileImage,missiles[i].x,missiles[i].y);

      }

      //draw aliens
      for (var i=aliens.length−1; i>= 0;i−−) {
         context.drawImage(alienImage,aliens[i].x,aliens[i].y);

      }

      //Draw Text
      context.fillStyle = "#FFFFFF";
      context.fillText  ("Active Sounds: " + soundPool.length,  200 ,480);

   }

   function hitTest(image1,image2)  {
      r1left = image1.x;
      r1top = image1.y;
      r1right = image1.x + image1.width;
      r1bottom = image1.y + image1.height;
      r2left = image2.x;
      r2top = image2.y;
      r2right = image2.x + image2.width;
      r2bottom = image2.y + image2.height;
      retval = false;

      if ( (r1left > r2right) || (r1right < r2left) || (r1bottom < r2top) ||
           (r1top > r2bottom) ) {
         retval = false;
      } else {
         retval = true;
      }

      return retval;
   }

   function eventMouseMove(event) {
      if ( event.layerX ||  event.layerX == 0) { // Firefox
            mouseX = event.layerX ;
         mouseY = event.layerY;
        } else if (event.offsetX || event.offsetX == 0) { // Opera
          mouseX = event.offsetX;
         mouseY = event.offsetY;
        }

      player.x = mouseX;
      player.y = mouseY;

   }

   function eventMouseUp(event) {

      missiles.push({speed:5, x: player.x+.5*playerImage.width,
         y:player.y-missileImage.height,width:missileImage.width,
         height:missileImage.height});

      playSound(SOUND_SHOOT,.5);
   }

   function playSound(sound,volume) {

      var soundFound = false;
      var soundIndex = 0;
      var tempSound;

      if (soundPool.length> 0) {
         while (!soundFound && soundIndex < soundPool.length) {

            var tSound = soundPool[soundIndex];
            if ((tSound.element.ended || !tSound.played) && tSound.name == sound) {
               soundFound = true;
               tSound.played = true;
            } else {
               soundIndex++;
            }

         }
      }
      if (soundFound) {
         tempSound = soundPool[soundIndex].element;
         tempSound.volume = volume;
         tempSound.play();

      } else if (soundPool.length < MAX_SOUNDS){
         tempSound = document.createElement("audio");
         tempSound.setAttribute("src", sound + "." + audioType);
         tempSound.volume = volume;
         tempSound.play();
         soundPool.push({name:sound, element:tempSound, type:audioType, played:true});
      }

   }

   function run() {
      switch(appState) {
      case STATE_INIT:
         initApp();
         break;
      case STATE_LOADING:
         //wait for call backs
         break;
      case STATE_RESET:
         resetApp();
         break;
      case STATE_PLAYING:
         drawScreen();
         break;

   }

  }

   theCanvas.addEventListener("mouseup",eventMouseUp, false);
   theCanvas.addEventListener("mousemove",eventMouseMove, false);

   setInterval(run, 33);

}


</script>
</head>

<body>
<div style="position: absolute; top: 50px; left: 50px;">

<canvas id="canvasOne" width="500" height="500">
 Your browser does not support HTML5 Canvas.
</canvas>
</div>
</body>
</html>
What’s Next
Since this is not a book about the HTML5 <audio> tag, we did not cover every aspect
of that new feature. Instead, we focused on the elements of audio that could be used with HTML5 Canvas. We
created two in-depth applications that make use of sound with HTML5 Canvas
in very different ways: an audio player that plays one song, and a game
that plays many sounds dynamically. During that process we learned that
audio in HTML, while being a wonderful new feature, is not without its
pitfalls and gotchas.
In the next two chapters we will expand upon the last section we presented here, and discuss how to implement games on HTML5 Canvas.
Get HTML5 Canvas now with the O’Reilly learning platform.
O’Reilly members experience books, live events, courses curated by job role, and more from O’Reilly and nearly 200 top publishers.

