
Sometimes you have to be realistic and rethink your plans.
Or plan more carefully in the first place. When your application’s out there on the Web, you may discover that you haven’t planned well enough. Things that you thought would work aren’t good enough in the real world. This chapter takes a look at some real-world problems that can occur as you move your application from testing to a live site. Along the way, we’ll show you more important PHP and SQL code.
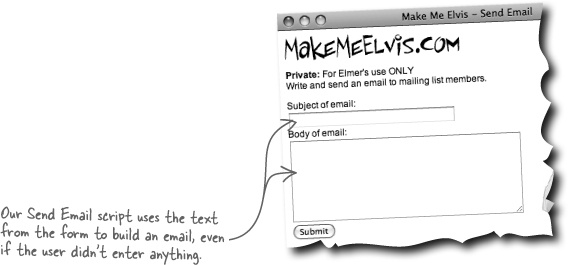
Elmer’s customer mailing list has grown by leaps and bounds, but his emails have generated some complaints. The complaints vary, but they all seem to involve customers receiving blank email messages or multiple messages, neither of which is good. Elmer needs to figure out what’s gone wrong and fix it. His business depends on it.
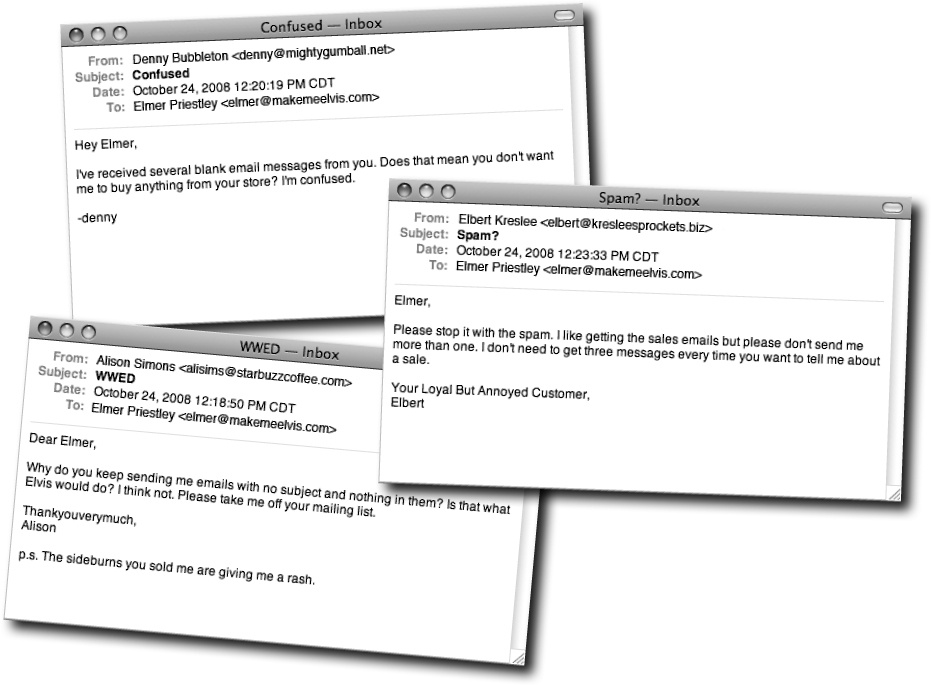
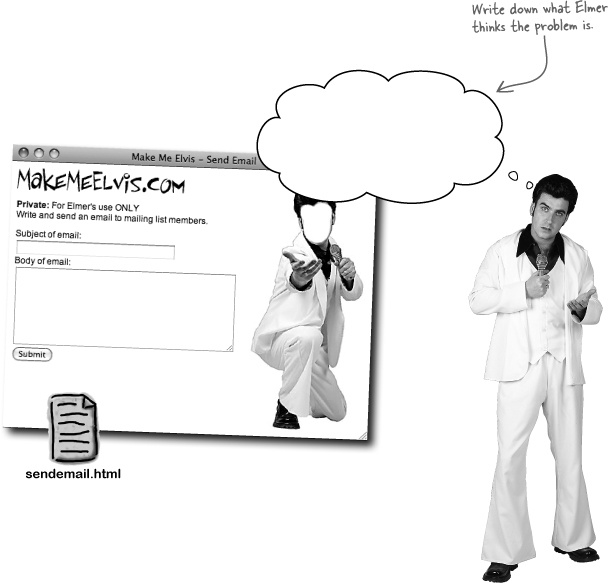
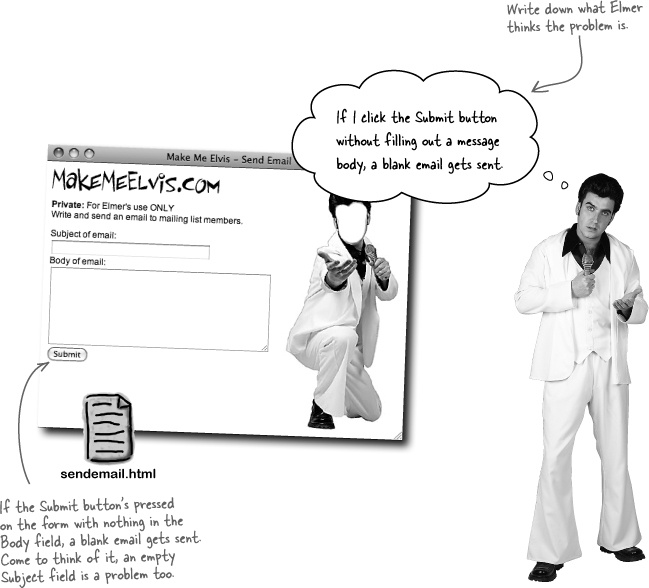
So “operator error’ is really the problem here—Elmer inadvertently clicks Submit without entering the email information, and blank emails get sent to the entire list. It’s never safe to assume a web form will be used exactly the way it was intended. That’s why it’s up to you, the vigilant PHP scripter, to try and head off these kinds of problems by anticipating that some users will misuse your forms.
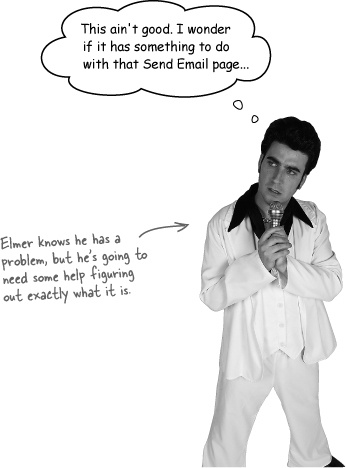
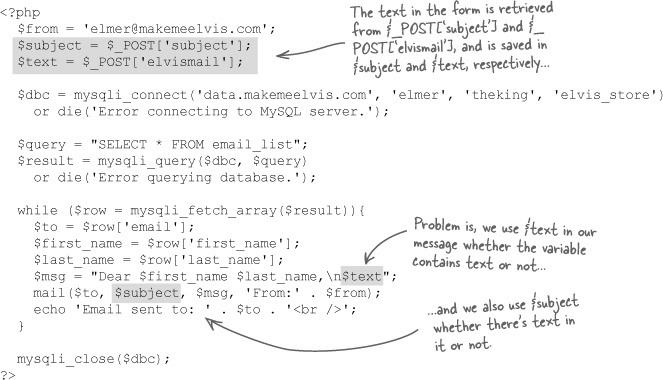
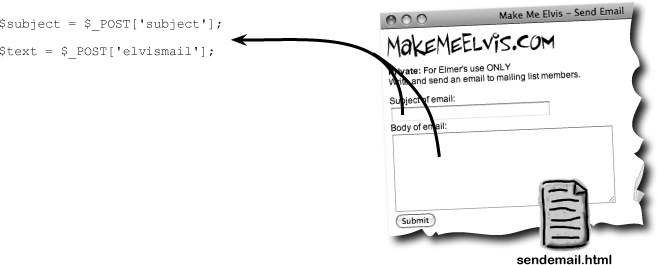
Let’s take a look at the code in our current sendemail.php script to see how Elmer’s empty email messages are getting created.
Write down what you think should be changed in the sendemail.php script code to fix the blank email problem:
__________________________________________
__________________________________________
Elmer’s Send Email form’s in need of validation, which is the process of checking to make sure form data is OK before doing anything with it. Elmer already uses validation even though he doesn’t call it that. Whenever he receives an order for Elvis gear, he doesn’t just immediately fill it and send it out... he validates it first!
In the case of an order, Elmer first checks to see if the customer’s credit card is valid. If so, he fills the order and gets it ready to ship. But then he has to check if the customer’s shipping address is complete. If that checks out, then Elmer goes ahead and sends out the order. A successful order for Elmer’s store always hinges on the validation of the order data.
Validation means making sure the data you get is the data you expect.

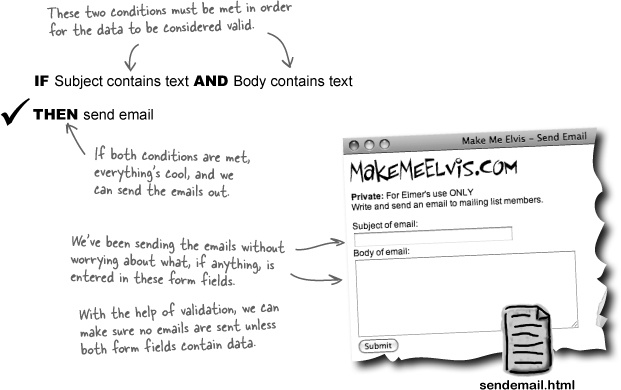
To solve Elmer’s blank email problem, we need to validate the form data delivered to the sendemail.php script. This means the form data is submitted from the client web page (sendemail.html) to the server, and the server (sendemail.php) checks to make sure all the data is present. We can add code to sendemail.php that examines the values in the text boxes and checks to make sure they aren’t empty. If everything checks out OK, the script sends out the emails.

Elmer needs to validate the data he gets from the sendemail.html form before he sends any emails. In fact, sending the emails should completely hinge on the data validation. What we really need PHP to do is make a decision based on the validity of the form data received by the sendemail.php script. We need code that says, “if the data is valid, go ahead and send the emails.”
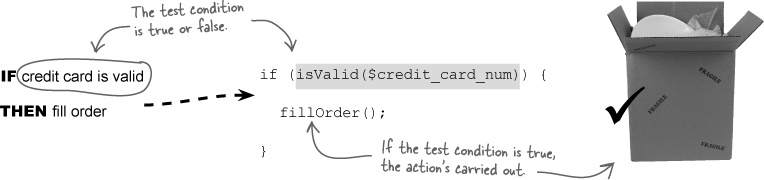
The PHP if statement lets your code make decisions based on whether or not something is true. Consider Elmer’s orders again. Before filling an order, Elmer must get paid, which means charging the customer’s credit card. If the customer gave Elmer the wrong card number, he can’t fill the order. So Elmer performs a kind of real-world validation on every order that goes like this:
If the customer’s credit card checks out, go ahead and fill the order.
We can translate this scenario to PHP code using the if statement, which is designed to handle just this kind of decision making.
The basic if statement has three parts:
The
ifkeywordThis starts off the statement.
The test condition
The test condition, or conditional expression, is located in parentheses right after the
ifkeyword. Here’s where you put the statement that you want to determine the validity, or truth, of.The action
The action of an
ifstatement directly follows the test condition and is enclosed in curly braces. Here’s where you put the PHP code you want to execute if the condition is, in fact,true.
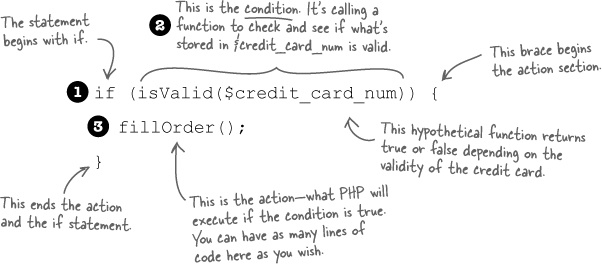
The heart of the if statement is its test condition, which is always interpreted as either true or false. The test condition can be a variable, a function call, or a comparison of one thing to another, as a few examples. Elmer’s credit card validation relies on a function call as the test condition, which means the value returned by the function is either true or false.
It’s quite common to use a comparison as a test condition, which typically involves comparing a variable to some value. For example, maybe Elmer wants to give a discount to customers who live in Nevada. He could create an if statement that carries out a comparison on part of the shipping address, like this:
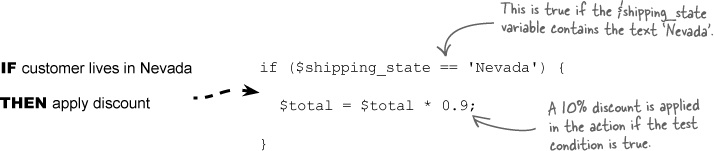
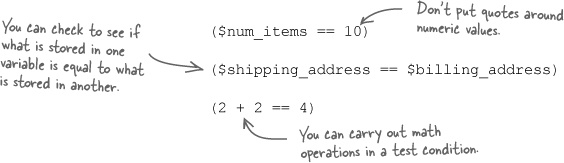
This test condition performs a comparison for equality, which involves two equal signs (==). Equality comparisons aren’t just for variables and strings. You can compare variables to numbers, variables to variables, and even perform calculations.
An if statement can check for more than just equality. The test condition in your if statement can also check to see if a value is greater than another one. If it is, the result of the condition is true, and the action code is executed. Here are a few more tests you can use to control the decision of an if statement.
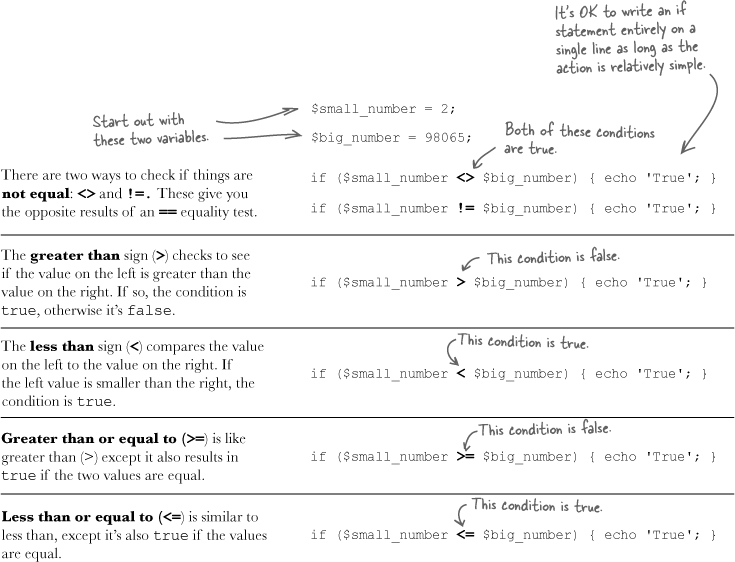
Yes, you can compare strings in if test conditions.
They work based on the alphabet, with a being considered smaller than (less than) z. Using greater than and less than can help you when you need to present information in alphabetical order.

Elmer needs to validate the data he gets from the sendemail.html form before he sends any emails. In fact, sending the emails should completely hinge on the data validation. What we really need PHP to do is make a decision based on the validity of the form data received by the sendemail.php script. We need code that says, “if the data is valid, go ahead and send the emails.”
But first we need to grab the form data and store it in a couple of variables:
This form data is all we need to check and see if there is data in each of the form fields. The logic might look something like this:
IF $subject contains text AND $body contains text
THEN send email
Or we could take the opposite approach and check to see if the form fields are both empty, in which case we could display a warning to the user:
IF $subject is empty AND $body is empty
THEN echo error message
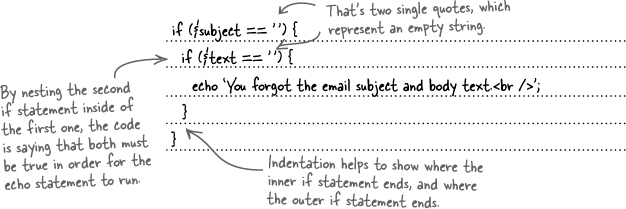
Both of these examples have a problem in that their logic requires us to make two comparisons in a single if statement. One possible solution is to use two if statements...
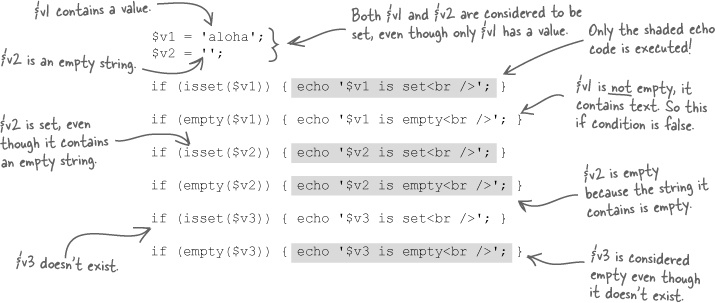
Using == to check for an empty string works, but there’s a better way that involves built-in PHP functions. The isset() function tests to see if a variable exists, which means that it’s been assigned a value. The empty() function takes things one step further and determines whether a variable contains an empty value, which PHP defines as 0, an empty string ('' or ""), or the values false or NULL. So isset() only returns true if a variable has been assigned a value, while empty() only returns true if a variable has been set to 0, an empty string, false, or NULL.
Let’s take a look at how these functions work:
That’s half right. We’re really just checking to make sure the form data isn’t empty, so empty() is what we need.
The $subject and $text variables are assigned values from the $_POST['subject'] and $_POST['elvismail'] superglobals. If you test these variables with isset(), it will always return true regardless of whether or not they hold any actual text. In other words, isset() doesn’t show you the difference between a blank form field and a filled out one. The empty() function checks to see if a variable is actually empty, which is what we need for form validation.
isset() checks that a variable exists and is set.
empty() checks to see if a variable has any contents.
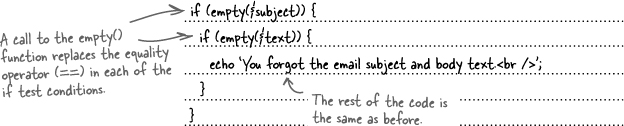
Sharpen your pencil Solution
Rewrite the two if statements that check to see if both the subject and message body of Elmer’s Send Email form are empty, but this time, use the empty() function instead of == in the test conditions.

No, but there’s an easy way to reverse the logic of any test condition... the negation operator.
We know the test condition that controls an if statement always results in a value of true or false. But what if our logic dictates that we need to check for the reverse of what a condition gives us? For example, it would be helpful to know if Elmer’s form fields are not empty before sending a bunch of emails with the form data. Problem is, there is no notempty() function. The solution is the negation operator (!), which turns true into false, or false into true. So !empty() literally calls the empty() function and reverses its result, like this:

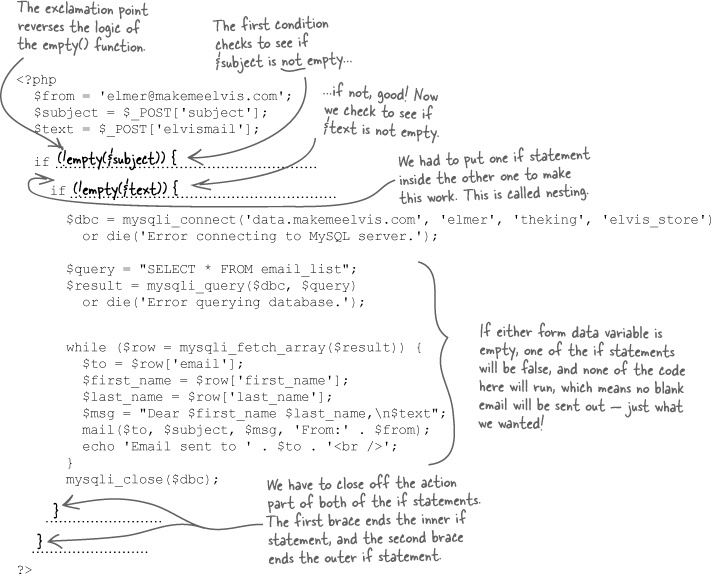
Exercise
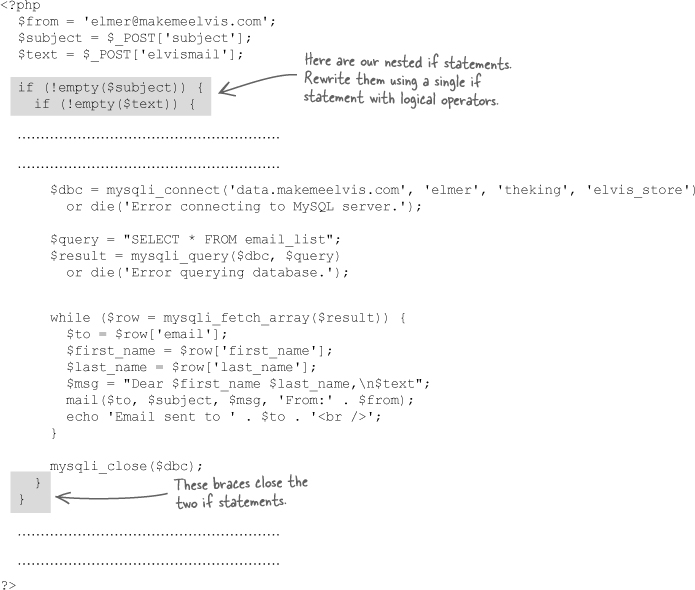
Fill in the blanks in Elmer’s sendemail.php code so that email only gets sent when both $subject and $text are not empty. Use if statements and the empty() function.

<?php
   $from = 'elmer@makemeelvis.com';
   $subject = $_POST['subject'];
   $text = $_POST['elvismail'];

   if ______________________________
    if ________________________________
      $dbc = mysqli_connect('data.makemeelvis.com', 'elmer', 'theking', 'elvis_store')
         or die('Error connecting to MySQL server.');

       $query = "SELECT * FROM email_list";
       $result = mysqli_query($dbc, $query)
         or die('Error querying database.');

       while ($row = mysqli_fetch_array($result)) {
         $to = $row['email'];
         $first_name = $row['first_name'];
         $last_name = $row['last_name'];
         $msg = "Dear $first_name $last_name,\n$text";
         mail($to, $subject, $msg, 'From:' . $from);
         echo 'Email sent to ' . $to . '<br />';
       }
       mysqli_close($dbc);
      _____________
  ______________
?>
Exercise Solution
Fill in the blanks in Elmer’s sendemail.php code so that email only gets sent when both $subject and $text are not empty. Use if statements and the empty() function.

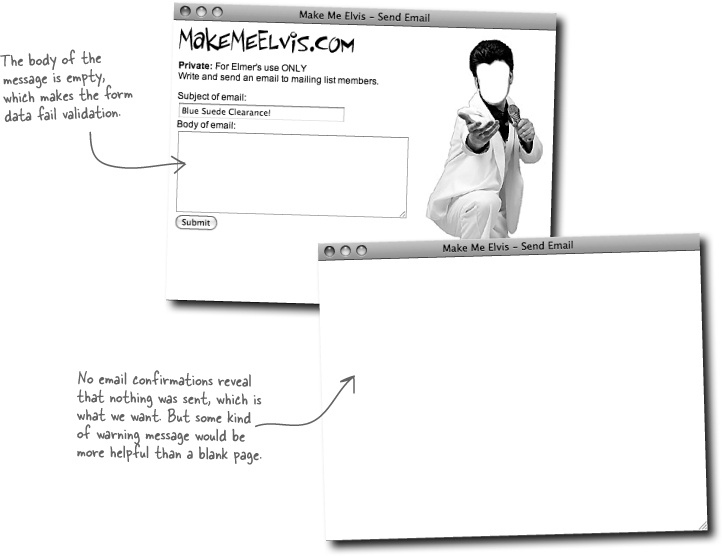
Test Drive
See if the empty form field validation works.
Modify the code in sendemail.php to use if statements that check the form field data before sending email messages. Upload the new version of the script to your web server and open the sendemail.html page in a web browser. Make sure to leave at least one of the form fields blank, and click Submit.
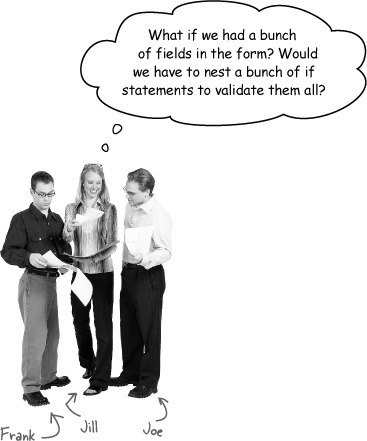
Joe: I think you’re right. If we want to make sure all those fields are not empty, we’ll have to nest an if statement for each field.
Frank: As long as we indent each line of code for each if statement, aren’t we OK?
Jill: Technically, yes. I mean, the code will certainly work no matter how many if’s we nest, but I’m worried about it getting hard to understand with so much nesting. Just matching up curly braces accurately could be a problem.
Frank: That’s true. I think it’d also be a pain having to indent the action code so far... let’s see, that’s ten form fields, giving us ten nested ifs with ten levels of indentation. Even if we just indent each if two spaces, that’s 20 spaces before every line of action code. Yuck.
Joe: But if we indent with tabs, it cuts that in half—10 tabs versus 20 spaces isn’t so bad.
Jill: Guys, the issue isn’t really about the specific code used to indent the nested if’s. It’s just not a good coding practice to nest if statements so deep. Think about it like this—we’re really talking about one logical test condition, “are all our form fields non-empty?” The problem is, that test condition involves ten different pieces of data, causing us to have to break it into ten separate if statements.
Frank: Ah, I see. So what we need is a way to test all ten pieces of form data in a single test condition, right?
Jill: Yup.
Joe: Then we could write one big test condition that checks all the form fields at once. Awesome!
Jill: Yeah, but we’re still missing the piece of the puzzle that lets us combine multiple comparisons within a single test condition...
You can build a test condition for an if statement with multiple checks by connecting them with a logical operator. Let’s look at how it works with two familiar conditions, !empty($subject) and !empty($text). This first example involves two expressions joined by the logical AND operator, which is coded using &&.
PHP logic operators make it possible to structure more elegant if statements.
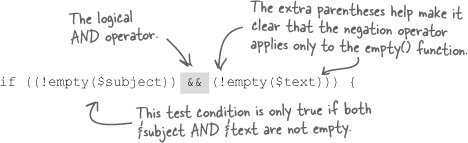
The AND operator takes two true/false values and gives you true only if they are both true; otherwise the result is false. So in this case both form fields must be non-empty in order for the test condition to be true and the action code for the if statement to run.
The logical OR operator, coded as ||, is similar to AND except that it results in true if either of the true/false values is true. Here’s an example:
Logical AND is coded as &&, while logical OR is coded as ||.
Note
That’s not the number eleven, it’s two vertical pipes ||—just above backslash (\) on your keyboard.

So the action code for this if statement is executed if either one of the form fields is not empty. Things get even more interesting if you want to isolate one form field as being empty but the other having data, like this:

Since this test condition uses AND, both expressions inside of the test condition must be true in order for the action code to be run. This means the Subject form field must be empty, but the Body field must have data. You can reverse this check by moving the negation operator (!) to the other empty() function:
The AND (&&) and OR (||) logical operators make it possible to structure much more powerful test conditions that would otherwise require additional, often messy, if statements.

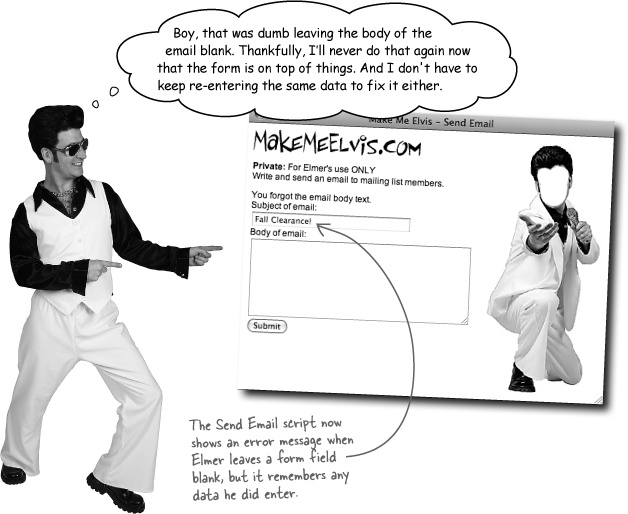
Our sendemail.php code does a great job of validating the form data so that no mail gets sent out if either the Subject or Body fields are left blank. But when the validation fails, and no emails are sent out, the script doesn’t tell Elmer what happened. He just gets a blank web page.
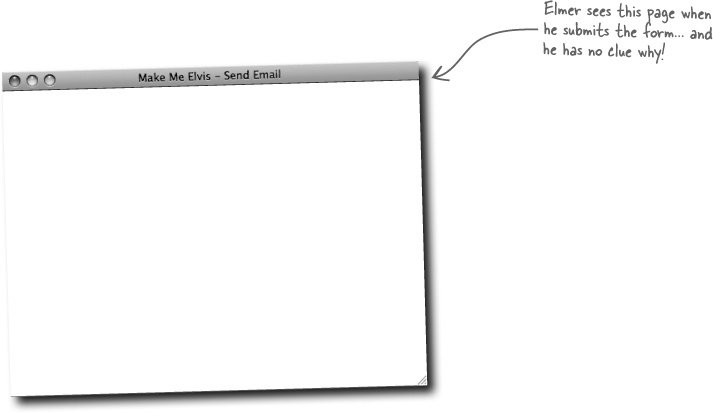

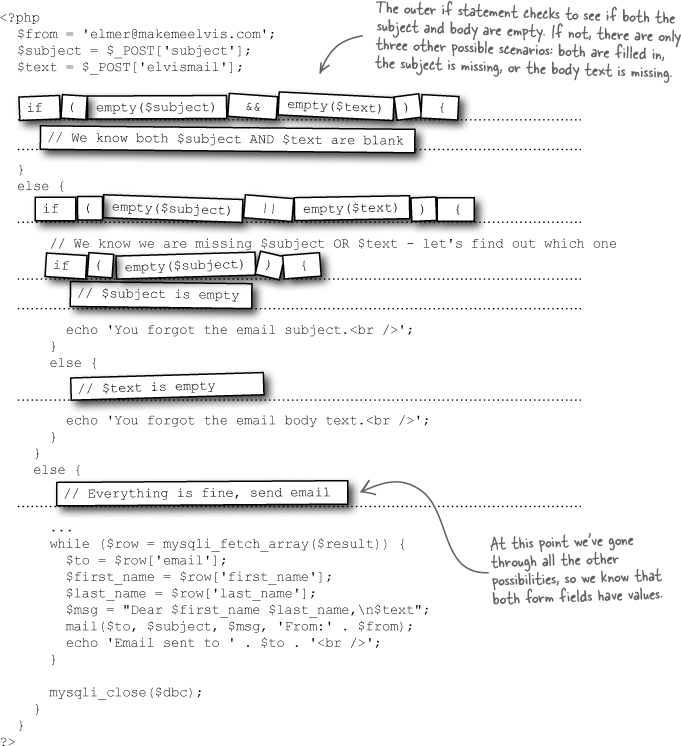
The problem is that our code only reacts to a successful validation, in which case it sends the email messages. But if the if statement turns out being false (invalid form data), the code doesn’t do anything, leaving Elmer in the dark about whether any emails were sent or what went wrong. Here’s the abbreviated script code, which reveals the blank page problem:
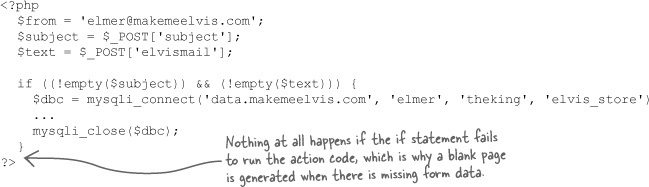
We need to let Elmer know that there was a problem, ideally telling him what form fields were blank so that he can try entering the message again.

That won’t work because code after the if statement will always be executed.
Placing the echo statement after the if statement just means it runs after the if statement, but it always runs regardless of the outcome of the if. That’s not what we need. We need the echo statement to show an error message only if the test condition of the if statement is false. You could express our logic as this:
IF subject contains text AND body contains text
The if statement offers an optional else clause that runs code in the event that the test condition is false. So our error message echo code can go in an else clause, in which case it only gets run when one of the form fields is left empty. Just place the word else after the if statement, and then stick the action code for it inside curly braces:
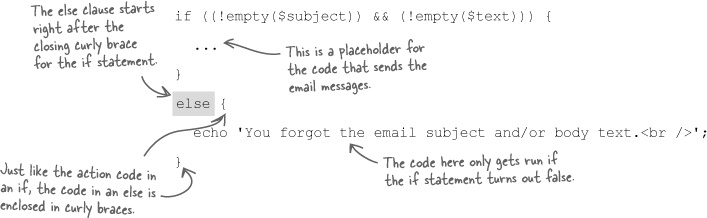
The else clause executes code when an if test condition is false.
Exercise
Below is new code for Elmer’s sendemail.php script that uses if statements and else clauses to provide feedback, but some of the code has gotten misplaced. Use the magnets to replace the missing code.
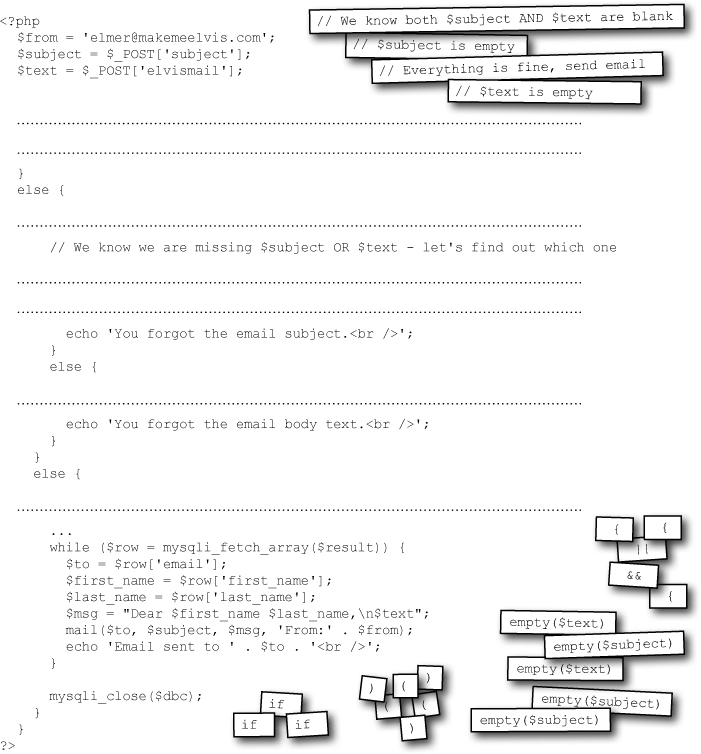
Exercise Solution
Below is new code for Elmer’s sendemail.php script that uses if statements and else clauses to provide feedback, but some of the code has fallen off. Use the magnets to replace the missing code.
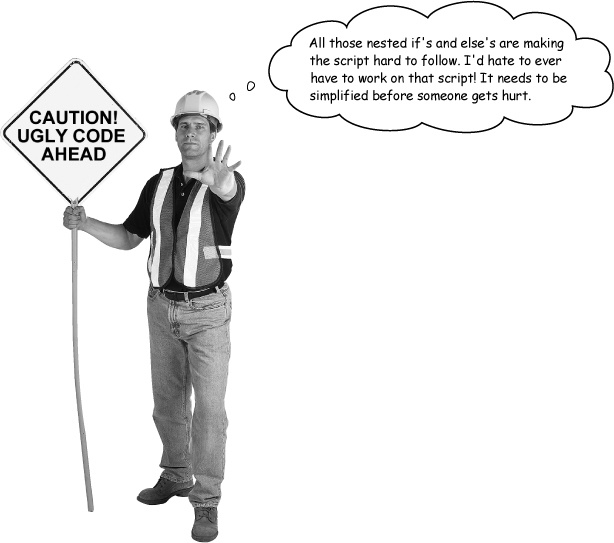
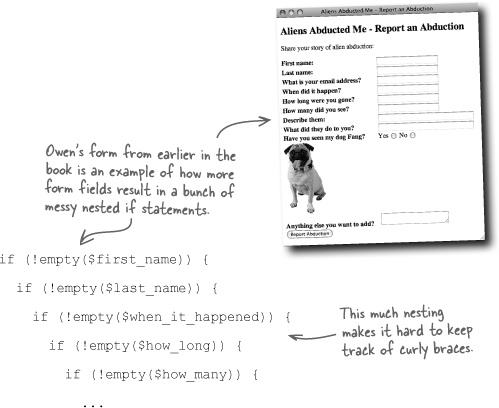
It’s always a good idea to simplify code whenever possible, especially nested code that gets too deep.
Too many else clauses with nested if statements can make your code hard to follow. Maybe that wouldn’t matter if we never had to look at it again, but that’s unlikely. If we ever needed to change the form and add another field, validating it would be trickier than it needed to be because it would be hard to read the code and figure out where the changes need to go.
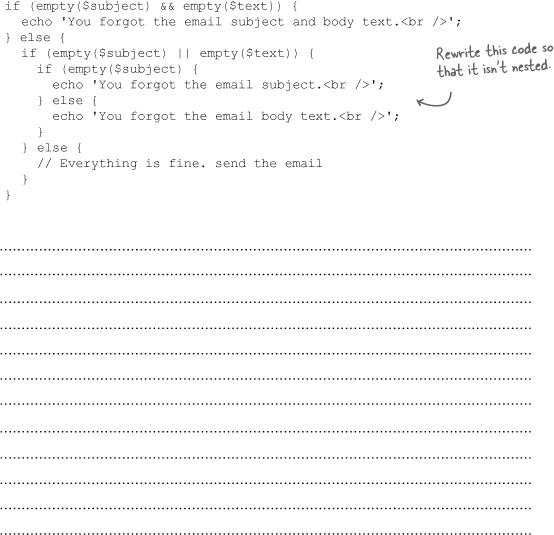
BE the cleaner IF code
Your job is to play IF code and clean up the messy nested IF’s and ELSE’s. Rewrite the code to get rid of the nesting, but make sure it still works correctly.
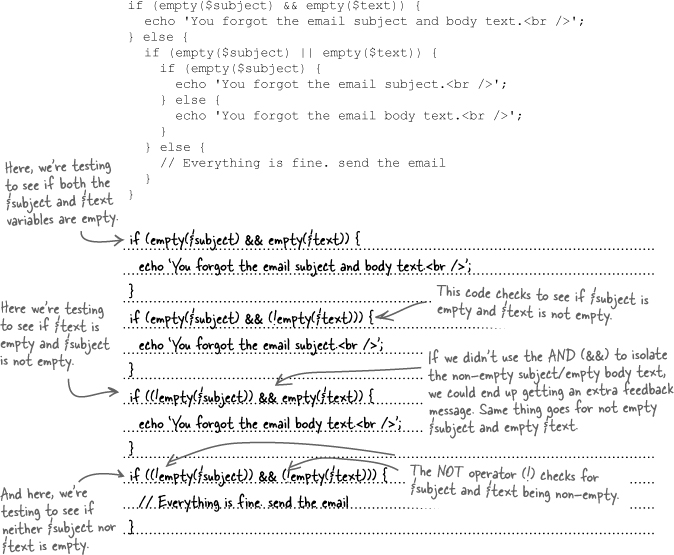
BE the cleaner IF code Solution
Your job is to play IF code and clean up the messy nested IF’s and ELSE’s. RRewrite the code to get rid of the nesting, but make sure it still works correctly.
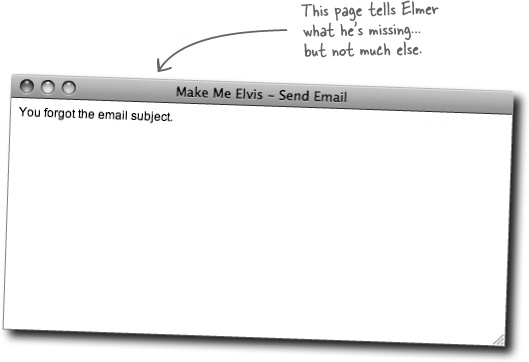
Validation in Elmer’s Send Email script is working but it could be a lot more helpful.
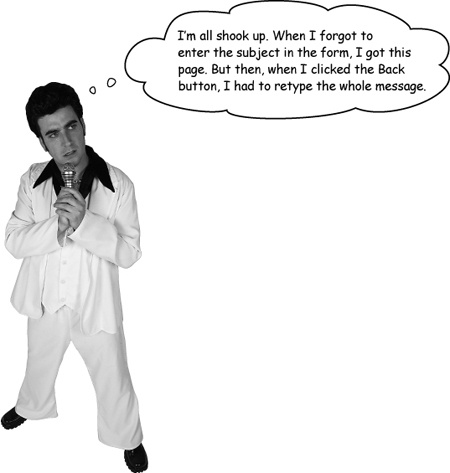
When the sendemail.php script detects missing form data, it displays a message that information is missing, but that’s it. There’s no link back to the original form, for example. And even worse, when Elmer navigates back to the original form, the information he did enter is no longer there. He has to retype both the subject and body of his email message.
Brain Power
What would you do to improve the error handling of the Send Email script to make it more helpful?.

Displaying the form would definitely be helpful, as it would save Elmer having to navigate back in his browser.
So in addition to echoing an error message when one of the form fields is empty, we also need to regenerate the HTML form code from PHP by echoing it to the browser. This code shows that PHP is capable of generating some fairly complex HTML code:
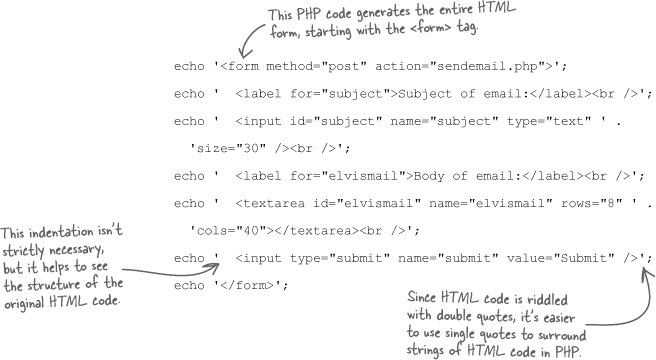
If you’re thinking this code looks a bit chaotic, that’s because it is. Just because you can do something in PHP doesn’t mean you should. In this case, the added complexity of echoing all that HTML code is a problem. This is a big enough chunk of code that generating it via PHP with echo is really not a good option...
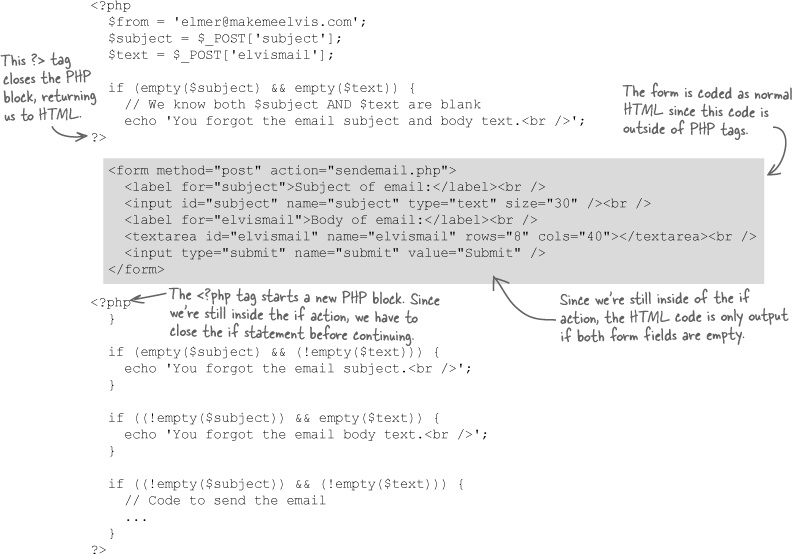
It’s sometimes easy to forget that a PHP script is really just an HTML web page that is capable of holding PHP code. Any code in a PHP script that isn’t enclosed by the <?php and ?> tags is assumed to be HTML. This means you can close a block of PHP code and revert to HTML as needed, and then pick back up with a new block of PHP code. This is an extremely handy technique for outputting a chunk of HTML code that is unwieldy to generate through PHP echo statements... like our Send Email form code.
You can close and open blocks of PHP code to output chunks of HTML code in a PHP script.
Write down anything you think might be limiting about this code. How would you fix it?
__________________________________________
__________________________________________
__________________________________________
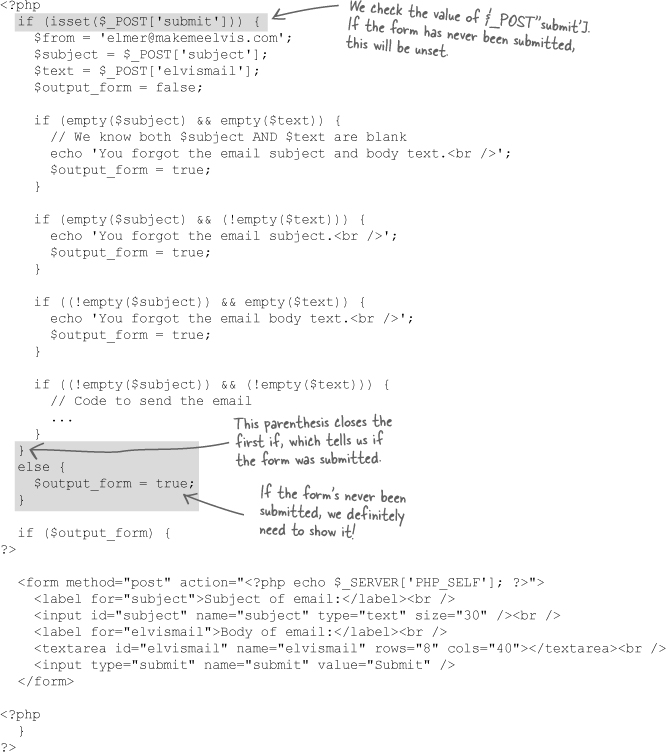
The problem with the previous code is that it will have to drop out of PHP and duplicate the form code in three different places (once for each validation error). We can use a true/false variable known as a flag to keep track of whether or not we need to output the form. Let’s call it $output_form. Then we can check the variable later in the code and display the form if the variable is true.
So we need to start out the script with $output_form set to false, and then only change it to true if a form field is empty and we need to show the form:
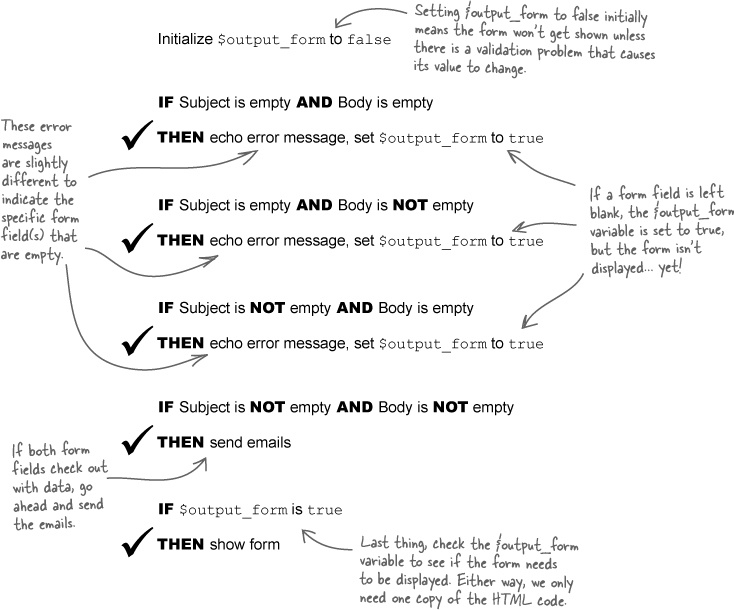
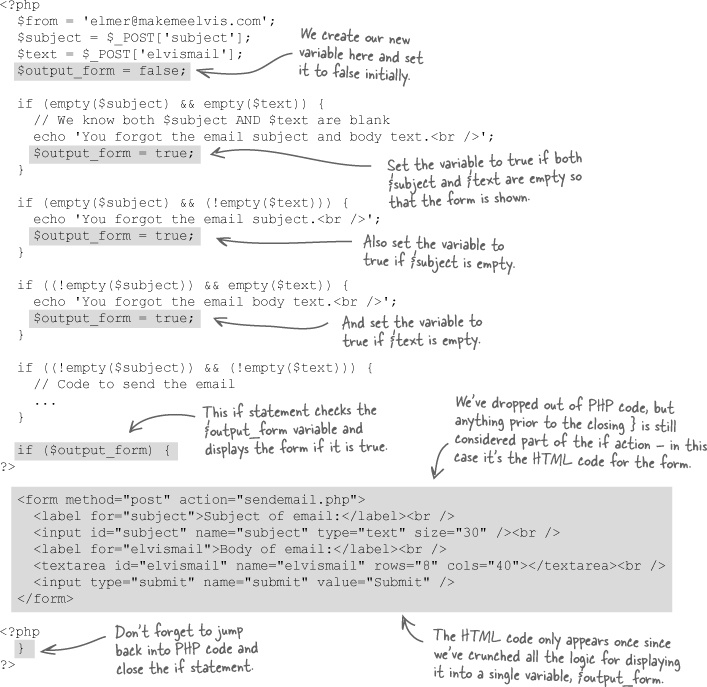
Turning the new validation logic into PHP code involves creating and initializing the new $output_form variable, and then making sure to set it throughout the validation code. Most important is the new if statement at the end of the code that only displays the form if $output_form is set to true.
By making HTML code dependent on an IF statement, we avoid duplicate code in our script.

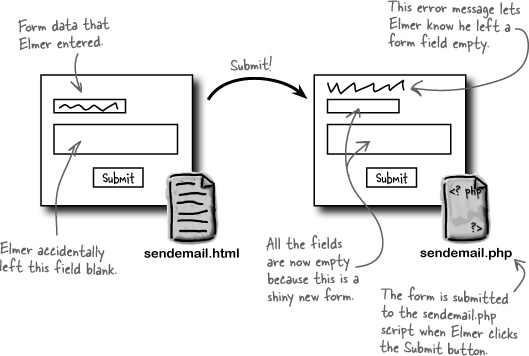
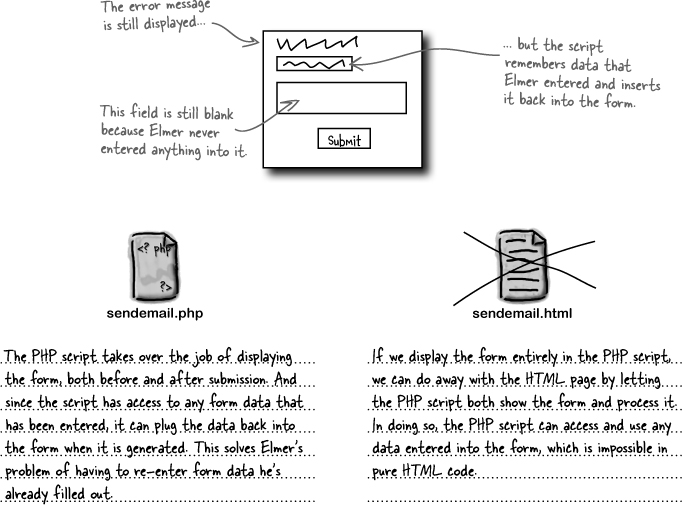
HTML alone can’t preserve form data.
When Elmer submits the Send Email form with an empty field, the sendemail.php script catches the error and generates a new form. But the new form is pure HTML code, which can’t possibly know anything about any data Elmer might have entered earlier. So we’re generating a clean new form as part of the validation, which is wiping out any data Elmer might have entered.
Ack. We can’t get around the fact that a new form will have to be generated in the PHP script. But we need a way to remember any data Elmer might have already entered, and plug it back into the new form so that Elmer can focus solely on filling out the form field that he accidentally left empty...


How can it be possible to remove sendemail.html from the Send Email form equation? The answer is that we’re not actually eliminating any HTML code, we’re just moving it to the PHP script. This is made possible by the fact that a PHP script can contain HTML code just like a normal web page. So we can structure our script so that it not only processes the form on submission but also displays the form initially, which is all sendemail.html was doing.
The key to the sendemail.php script being able to fill the role left by sendemail.html is the form action. Since the script itself now contains the HTML form, the form action leads back to the script... a self-referencing form.
An HTML form that is part of the PHP script that processes it is known as self-referencing.
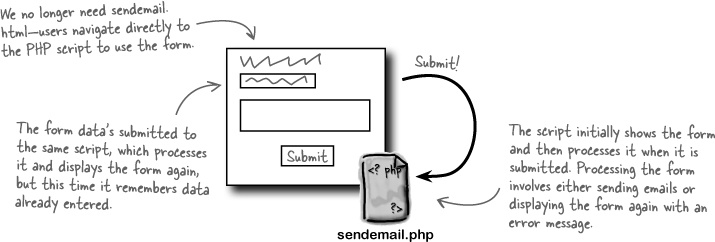
To understand what’s going on here, think about the first time Elmer visits the page (script). An empty form is generated as HTML code and displayed. Elmer fills out a field of the form and clicks Submit. The script processes its own form, and displays an error message if any data’s missing. More importantly, the script displays the form again, but this time it includes any data Elmer has already entered. When a form’s smart enough to remember data entered into it in prior submissions, it’s known as a sticky form... the data sticks to it!
Sticky forms remember the data the user has already correctly entered.
As we’ve seen several times, the action attribute of the <form> tag is what connects a form to a PHP script that processes it. Setting the action of Elmer’s form to sendemail.php works just fine in allowing it to process itself, which is the first step toward form stickiness. In fact, the form already has its action attribute set to the script:
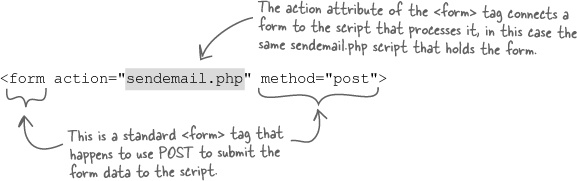
This code works, assuming you don’t ever rename the script and forget to update the code. But there’s a better way that works no matter what because it doesn’t rely on a specific script filename. It’s the built-in PHP superglobal variable $_SERVER['PHP_SELF'], which stores the name of the current script. You can replace the script URL in the form action to $_SERVER['PHP_SELF'], and not ever have to worry about updating anything if you ever need to rename the script.
The only catch is that $_SERVER['PHP_SELF'] is PHP code, which means you have to echo its value so that it is output as part of the HTML code, like this:

Granted, using $_SERVER['PHP_SELF'] instead of the script name isn’t an earth shattering improvement but it’s one of the many little things you can do to make your scripts easier to maintain over time.
$_SERVER[‘PHP_SELF’] stores away the name of the current script.
Test Drive
Try out the new self-referencing script with improved form validation logic.
Modify the code in sendemail.php to use the $output_form variable to selectively display the form as shown a few pages back. Also change the action attribute of the <form> tag so that the form is self-referencing.
You no longer need the sendemail.html page on your web server, so feel free to delete it. Then upload the new version of the sendemail.php script to your web server and open the script in a web browser. How does it look?
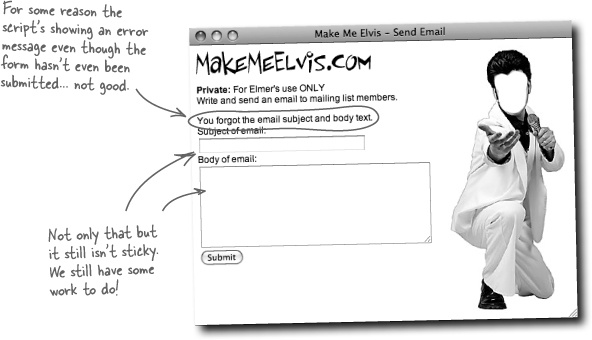
Write down why you think the script is displaying an error message the first time the form is shown:
__________________________________________
__________________________________________
__________________________________________
The problem is that the script can’t distinguish between the form being displayed for the first time and it being submitted with incomplete data. So the script reports missing data the very first time the form is displayed, which is confusing. The question is, how can we check to see if the form is being submitted? If we know that, we can make sure we only validate data on a submission.
Remember how, when a form is submitted using the POST method, its data is stored away in the $_POST array? If the form hasn’t been submitted, then the $_POST array isn’t filled with any data. Or to put it another way, the $_POST array hasn’t been set. Any guess what function we could call to see if the $_POST array’s been set?
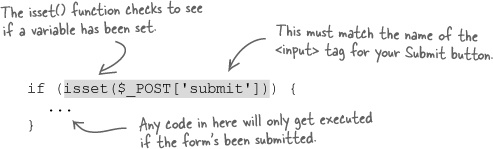
The $_POST superglobal allows us to check and see if a form has been submitted.
Since every form has a Submit button, an easy way to check to see if a form has been submitted is to see if there’s $_POST data for the Submit button. The data’s just the label on the button, which isn’t important. What’s important is simply the existence of $_POST['submit'], which tells us that the form has been submitted. Just make sure that 'submit' matches up with the id attribute of the Submit button in the form code.
That’s right. Detecting the form submission is important, but we still need to plug the sticky form data back into the form.
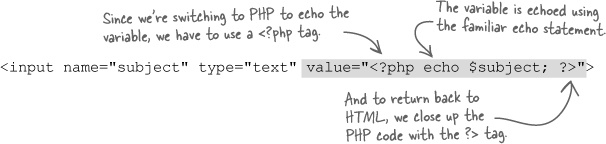
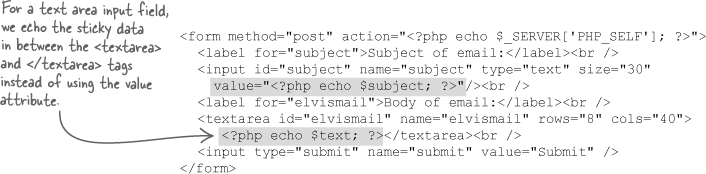
Knowing if the form’s been submitted is an important part of making it sticky, but it isn’t the only part. The part we’re missing is taking any form data that was submitted and plugging it back into the form as the form is being output. You can set an input form field using the value attribute of the HTML <input> tag. For example, this code presets the value of an input field using the value attribute:

But we don’t want to hardcode a specific value. We want to insert a piece of data from a PHP variable. How is that possible? Remember that we’ve used echo to dynamically generate HTML code from PHP in other situations. In this case, we can use echo to generate a value for the value attribute from a PHP variable, like this:
Elmer’s form can then be modified similarly to take advantage of sticky data:
Form validation has gone a long way toward dealing with Elmer’s frustrated customers, particularly those who were receiving blank emails. But not everyone is happy. It seems a few people are receiving duplicate emails... remember this guy from earlier in the chapter?
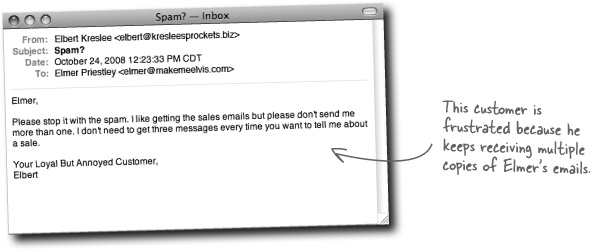
Elmer knows he didn’t send a message more than once, leading him to suspect that maybe some users have accidentally subscribed to his email list more than once. Not a problem, just use the Remove Email page/script from the last chapter to remove the user, right?
Unfortunately, it’s not that simple. Removing Elbert using his email address will completely delete him from the email_list table, causing him to no longer receive any email messages from Elmer. We need a way to only delete Elbert’s extra rows from the table, making sure to leave one.

Brain Power
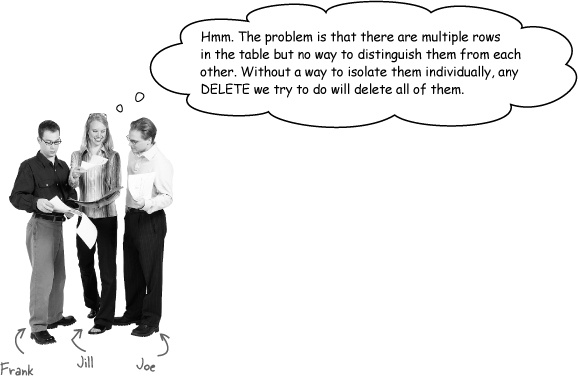
How can Elmer delete all but one of the multiple rows in his table that have identical email addresses?
Joe: Maybe our Add Email form should check for duplicate email addresses before adding new users. That would fix it, right?
Frank: Excellent idea.
Jill: Yes, that would solve the problem moving forward, but it doesn’t help us deal with duplicate email addresses that are already in the database.
Frank: Right. What if we tried to use a different column in the table to delete the extra rows, like last_name?
Jill: I wondered about that, but using a last name is potentially even worse than an email address. What if we wanted to delete someone named John Smith from our mailing list, and we ran the following SQL code:
DELETE FROM email_list WHERE last_name = 'Smith'
Joe: We wouldn’t just delete John Smith from our table; we’d be deleting Will Smith, Maggie Smith, Emmitt Smith...
Frank: Wow, that wouldn’t be good. Last names are more likely to be common across rows than email addresses, and first names would be even worse than that. We could lose dozens and dozens of rows with one simple query.
Jill: Exactly. We can’t risk using a WHERE clause that will delete rows we need to keep. We need to be certain we can pinpoint just the ones we want to remove.
Joe: So what the heck do we do? We can’t use email, last_name, or first_name in our WHERE clause.
Frank: We’re out of columns in our table to use. Looks like we’re out of luck.
Jill: Not necessarily. What we really need is something to make each row of the table unique—then we could pinpoint rows without any trouble. And just because we don’t currently have a column that has a unique value for each row doesn’t mean we can’t add one.
Joe: A new column? But we’ve already decided on our table structure.
Frank: Yeah, but what we’ve got isn’t meeting our needs. You’re right that it would be better if we had realized this beforehand, so we could have designed our table accordingly, but it’s not too late to fix what we’ve got.
Joe: OK, but what would we call our new column? What data would we put into it?
Jill: Well, since its purpose would be to uniquely identify each row in the table, we could call it identifier, or maybe just id for short.
Frank: Nice, and we can fill the id column with a different ID number for each row, so when we execute our DELETE, we’ll be removing rows based on a unique number, instead of an email address or surname.
Joe: Exactly. It’s really a great idea, isn’t it? I’m so glad I thought of it.
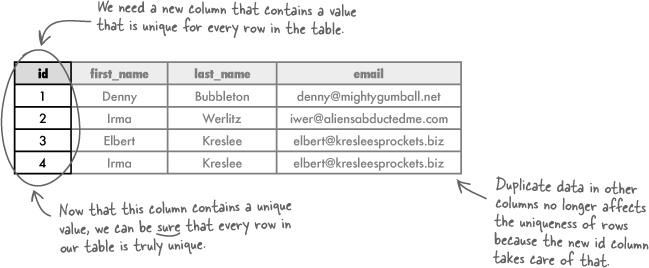
Part of the whole idea of sticking something in a database is that later on you’d like to look it up and do something with it. Knowing this, it’s incredibly important for each row in a table to be uniquely identifiable, meaning that you can specifically access one row (and only that row!). Elmer’s email_list table makes a dangerous assumption that email addresses are unique. That assumption works as long as no one accidentally subscribes to the mailing list twice, but when they do (and they will!), their email address gets stored in the table twice... no more uniqueness!
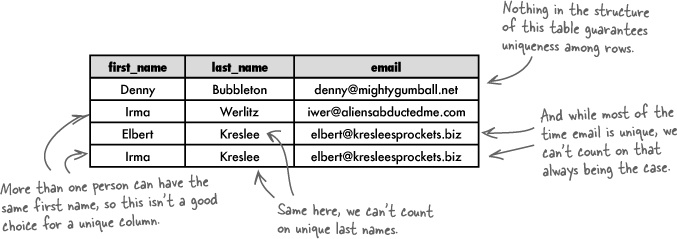
When you don’t have a column of truly unique values in a table, you should create one. MySQL gives you a way to add a unique integer column, also called a primary key, for each row in your table.
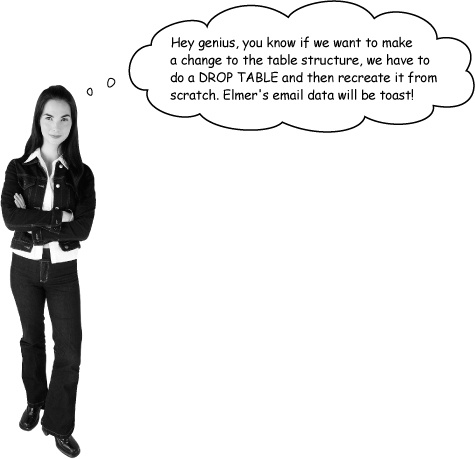
It’s true that DROP TABLE would destroy Elmer’s data. But SQL has a another command that lets you make changes to an existing table without losing any data.
It’s called ALTER TABLE, and we can use it to create a new column without having to drop the table and destroy its data. Here’s what the general format of an ALTER TABLE statement looks like for adding a new column to a table:
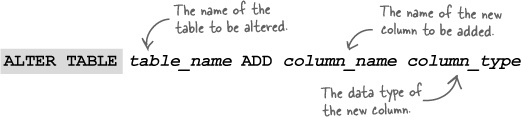
We can use the ALTER TABLE command to add a new column to the email_list table, which we’ll name id. We’ll give the id column a data type of INT, since integers work great for establishing uniqueness. Some other information is also required, as this code reveals:
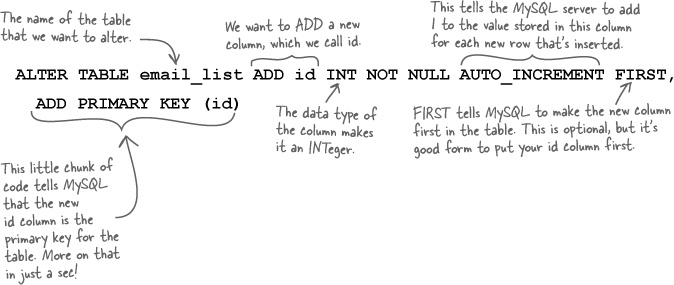
This ALTER TABLE statement has a lot going on because primary keys have to be created with very specific features. For example, NOT NULL tells MySQL that there must be a value in the id column—you can never leave it blank. AUTO_INCREMENT further describes the traits of the id column by causing it to automatically get set to a unique numeric value when a new row is inserted. As its name suggests, AUTO_INCREMENT automatically adds one to the last id value used in a row and places this value into the id column when you INSERT a new row into your table. Finally, PRIMARY KEY tells MySQL that each value in the id column is unique, but there’s more to it than just uniqueness...
A primary key is a column in a table that distinguishes each row in that table as unique. Unlike normal columns, which could also be designed to be unique, only one column can be made the primary key. This provides a clear choice for what column to use in any queries that need to pinpoint specific rows.
In order to ensure this uniqueness for primary keys, MySQL imposes a bunch of restrictions on the column that has been declared as PRIMARY KEY. You can think of these restrictions as rules to be followed as you work with primary keys:


Test Drive
Alter Elmer’s table and try out inserting a new row of data with a primary key.
Using a MySQL tool such as the MySQL terminal or the SQL tab of phpMyAdmin, enter the ALTER TABLE statement to add a primary key column named id:
ALTER TABLE email_list ADD id INT NOT NULL AUTO_INCREMENT FIRST,
  ADD PRIMARY KEY (id)
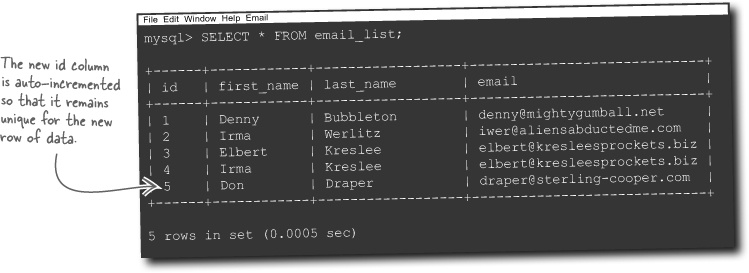
Now insert a new customer to the database to see if the id column is automatically set for the new row. Here’s an example of an INSERT statement to use (notice the primary key isn’t mentioned):
INSERT INTO email_list (first_name, last_name, email)
  VALUES ('Don', 'Draper', 'draper@sterling-cooper.com')
Finally, issue a SELECT statement to view the contents of the table and see the new primary key in all its glory! Just in case you’ve forgotten, here’s the SELECT statement:
SELECT * FROM email_list
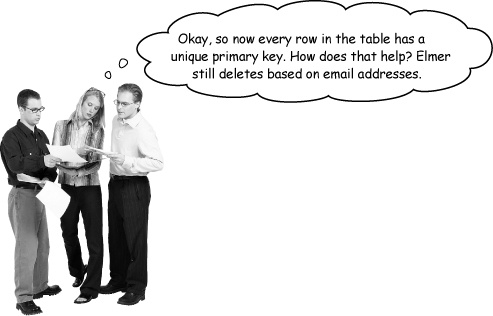
Joe: The problem is that the user needs to pinpoint rows of data using the primary key instead of the email address.
Frank: That’s right! So we just need to change the form so that the user enters the ID of a customer instead of their email address. No problemo!
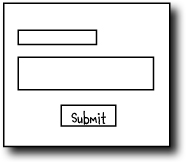
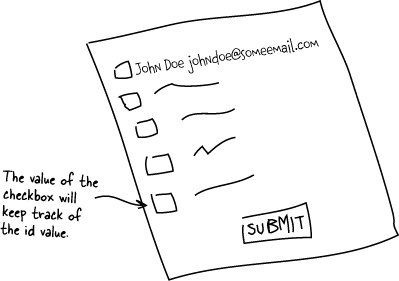
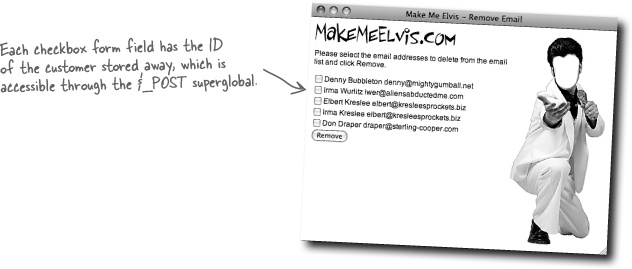
Jill: Actually, big problemo. The user has no way of knowing the ID of a customer without somehow finding them in the database. In fact, the user doesn’t know anything about the database structure. Maybe what we need is to rethink the form so that it lists out all the names and email addresses in a list with checkboxes next to each one. Here, I’ll sketch it for you.
Frank: Nice sketch, but how does that help Elmer isolate a customer for deletion using their ID?
Joe: Hmm. What if we stored the customer ID in the value of the checkbox. That way it isn’t actually visible, but the script can get to it.
Jill: That’s a great idea. So we could generate the form automatically in a loop by doing a SELECT to get all the data, and then creating each checkbox input field from a row of query data.
Joe: Cool. But what happens when the Submit button is pressed? What does $_POST have in it?
Frank: Hang on, Joe, we’ll get there in a minute. Let’s just start by building this part of the script, the part that displays all the data from the table and writes out those checkboxes...
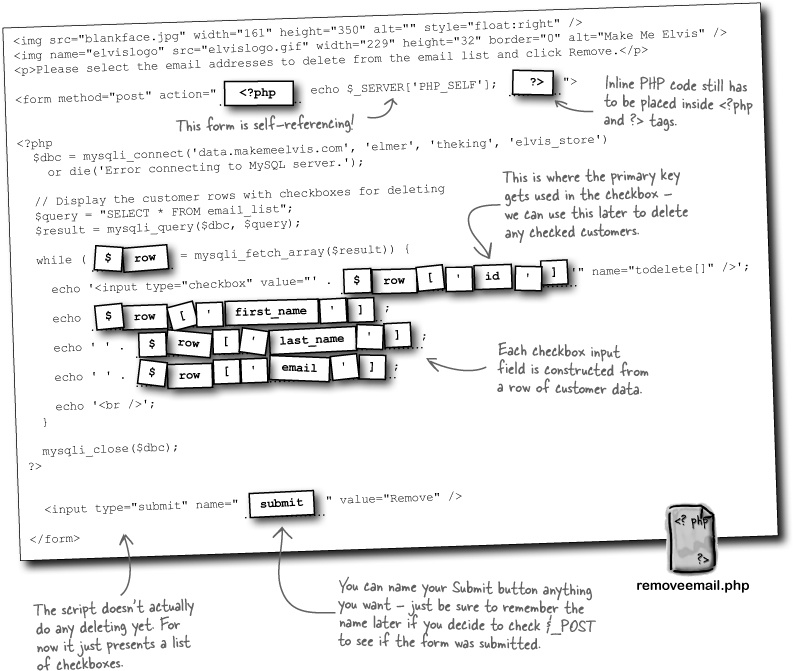
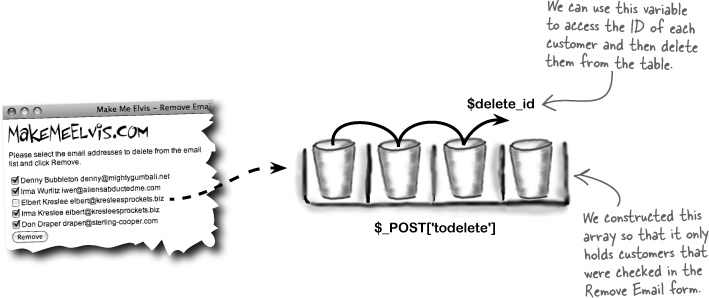
The checkbox code generated by the Remove Email script is simple HTML with our primary key (id) stuffed into the value attribute of the <input> tag. There’s one small, but very important change from ordinary checkbox HTML code, though. You might have noticed square brackets ([]) at the end of the checkbox name—they serve a vital purpose.
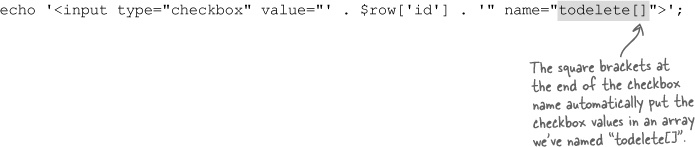
The square brackets result in the creation of an array within $_POST that stores the contents of the value attribute of every checked checkbox in the form. Since each checkbox’s value attribute contains a primary key, each value in the todelete array is the ID of the row in our table that needs to be deleted. This makes it possible for us to loop through the todelete array and issue an SQL query to delete each customer that is checked in the form.
We could use a while loop but there’s a more elegant solution using a different kind of loop.
The foreach loop is a special kind of loop designed specifically for cycling through values stored in an array. All you need to do is specify the array you’d like to loop through and a variable to store the values in, and PHP will take care of iterating over them one by one... no test condition required!
Write down how you think a foreach loop might loop through an array of Elmer’s customer IDs:
__________________________________________
__________________________________________
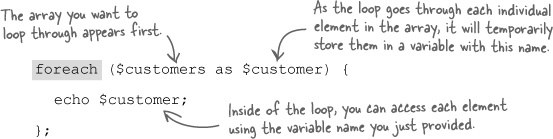
The foreach loop takes an array and loops through each element in the array without the need for a test condition or loop counter. As it steps through each element in the array, it temporarily stores the value of that element in a variable. Assuming an array is stored in a variable named $customers, this code steps through each one:
So if we want to loop through the customer IDs stored in the $_POST array in the Remove Email script, we can use the following foreach code:
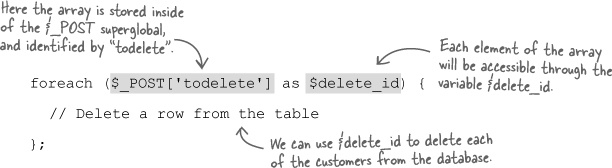
The $delete_id variable holds the value of each array element as the loop progresses through them one at a time.
With the foreach loop now stepping through each of the checked checkboxes in the Remove Email form, we just need to add code inside of the loop to issue a DELETE query and actually delete each row from the email_list table.
Exercise
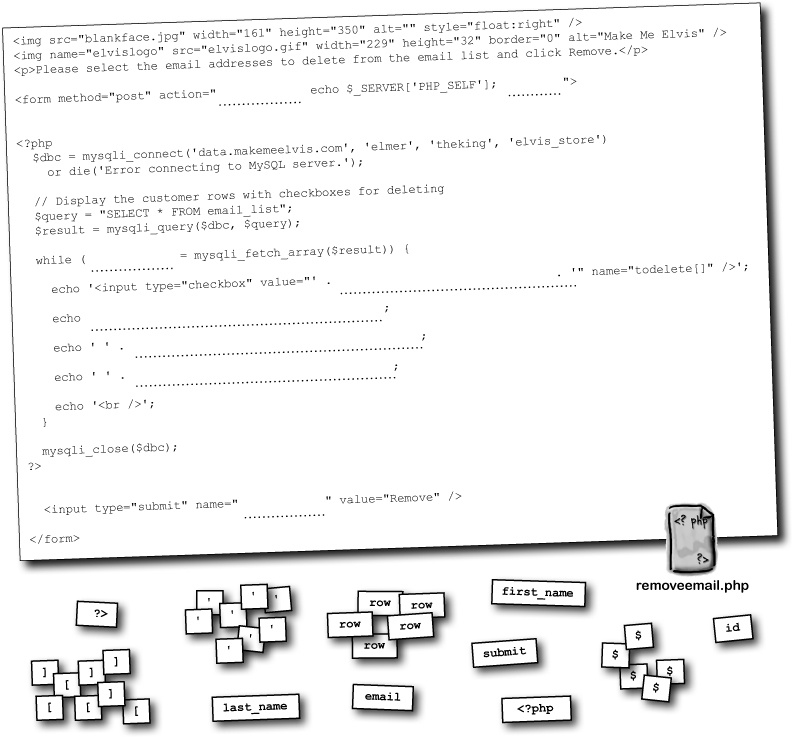
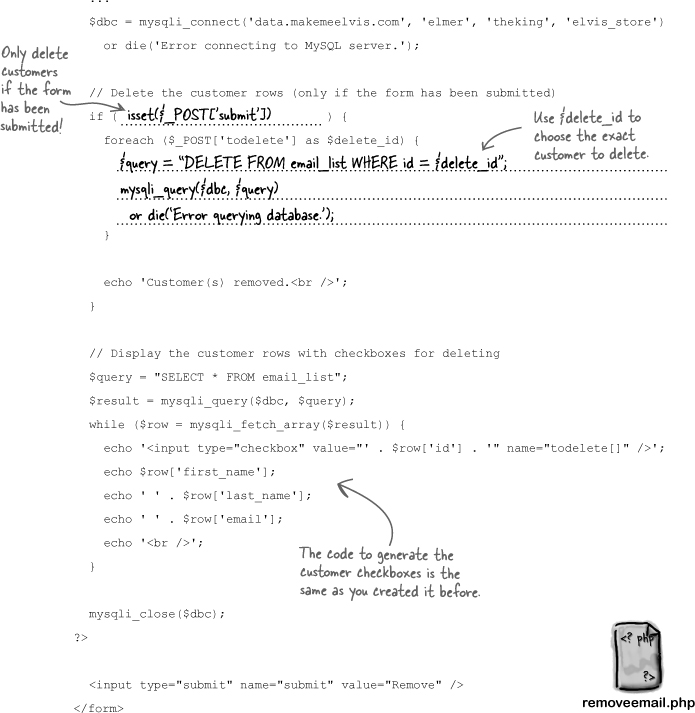
Finish the code for Elmer’s new and improved removeemail.php script so that it deletes customers that have been checked in the form when the form is submitted.
  ...
  $dbc = mysqli_connect('data.makemeelvis.com', 'elmer', 'theking', 'elvis_store')
    or die('Error connecting to MySQL server.');

  // Delete the customer rows (only if the form has been submitted)
  if (____________________________ ) {
    foreach ($_POST['todelete'] as $delete_id) {
    _______________________________________________________________________________
    _______________________________________________________________________________
    _______________________________________________________________________________
    }

    echo 'Customer(s) removed.<br />';
  }

  // Display the customer rows with checkboxes for deleting
  $query = "SELECT * FROM email_list";
  $result = mysqli_query($dbc, $query);
  while ($row = mysqli_fetch_array($result)) {
    echo '<input type="checkbox" value="' . $row['id'] . '" name="todelete[]" />';
    echo $row['first_name'];
    echo ' ' . $row['last_name'];
    echo ' ' . $row['email'];
    echo '<br />';
  }

  mysqli_close($dbc);
?>

  <input type="submit" name="submit" value="Remove" />
</form>
Exercise Solution
Finish the code for Elmer’s new and improved removeemail.php script so that it deletes customers that have been checked in the form when the form is submitted.
Test Drive
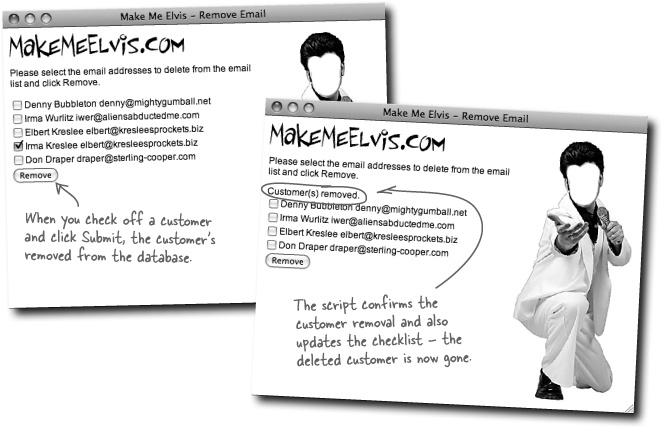
Take Elmer’s newly revamped Remove Email script for a spin.
Modify the code in the removeemail.php script so that it generates customer checkboxes instead of using the old email text field. Then add the code to delete customers whenever the form’s submitted. Also change the action attribute of the <form> tag so that the form’s self-referencing.
Now that removeemail.php uses a self-referencing form, you no longer need the removeemail.html page on your web server, so feel free to delete it. Then upload the new version of removeemail.php to your web server and open the script in a web browser. Check off a few customers and click Submit. The form immediately changes to reflect the customer removal.

Get Head First PHP & MySQL now with the O’Reilly learning platform.
O’Reilly members experience books, live events, courses curated by job role, and more from O’Reilly and nearly 200 top publishers.

