Most iOS apps have more than one view.
We’ve written a cool app with one view, but anyone who’s used a smartphone knows that most apps aren’t like that. Some of the more impressive iOS apps out there do a great job of working with complex information by using multiple views. We’re going to start with navigation controllers and table views, like the kind you see in your Mail and Contacts apps. Only we’re going to do it with a twist...

Brain Barbell
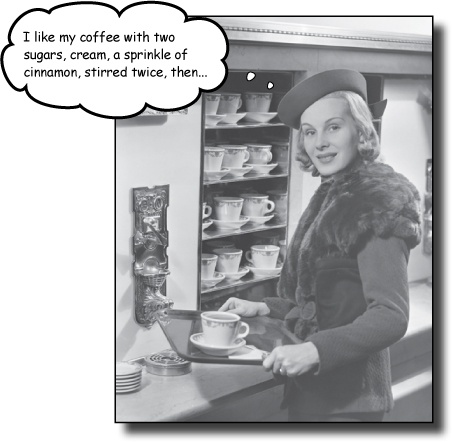
This chapter is about apps with more than one view. What views would you need to have for a bartending app?
____________________________________________________________________________________
____________________________________________________________________________________
____________________________________________________________________________________
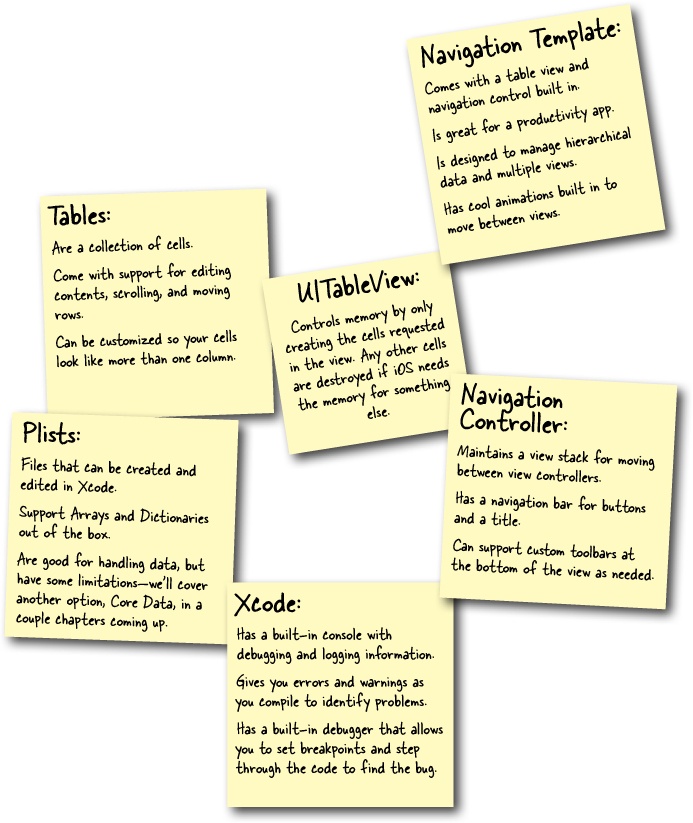
UI Design Magnets
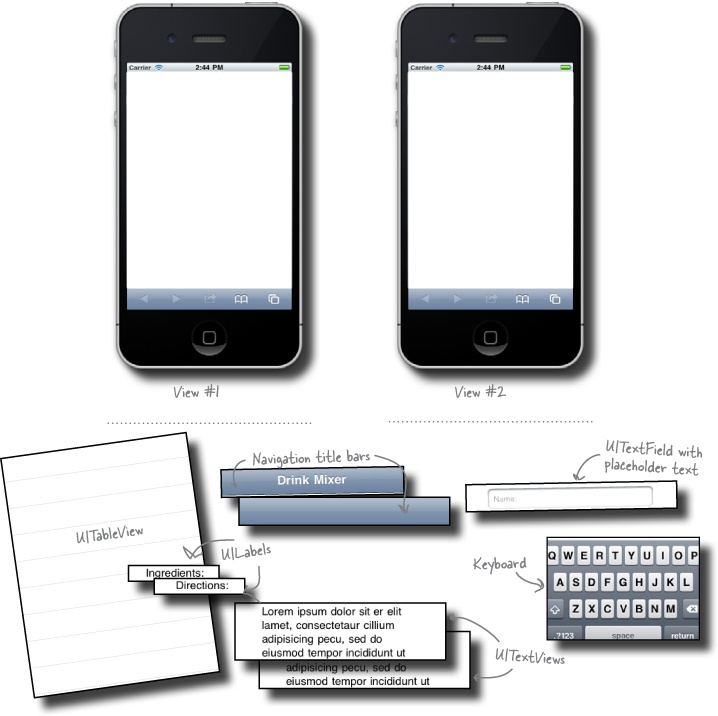
Using the components shown below, lay out the two views we’ll be using for the app.
UI Design Magnets Solution
Using the components shown below, lay out the two views we’ll be using for the app.
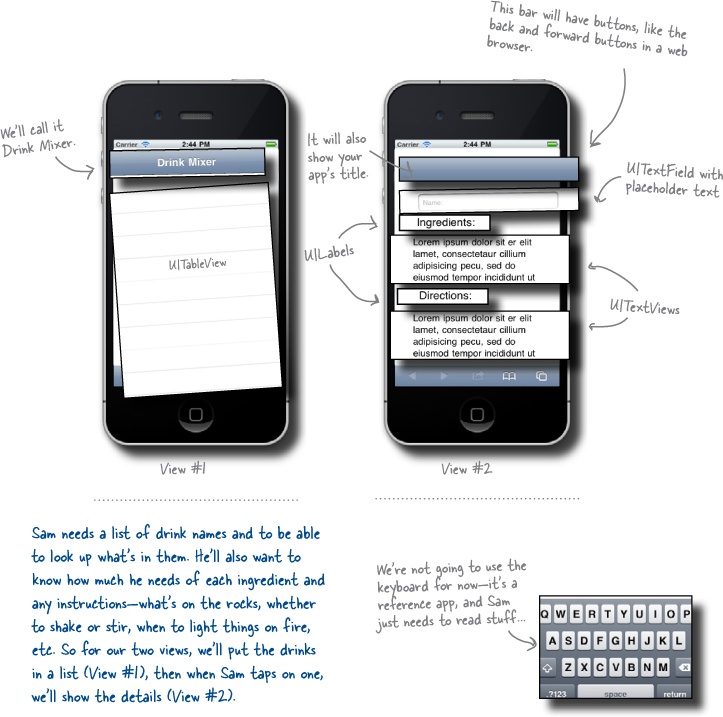
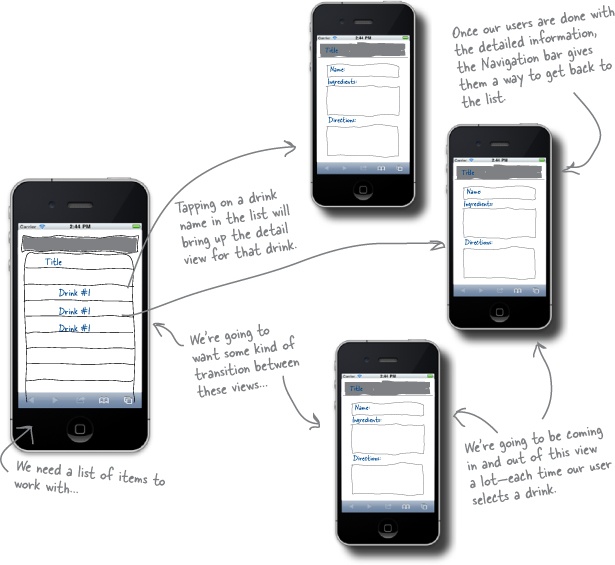
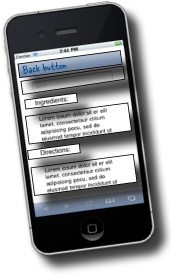
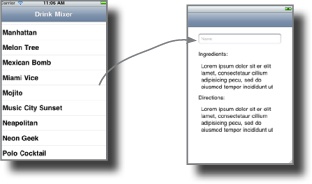
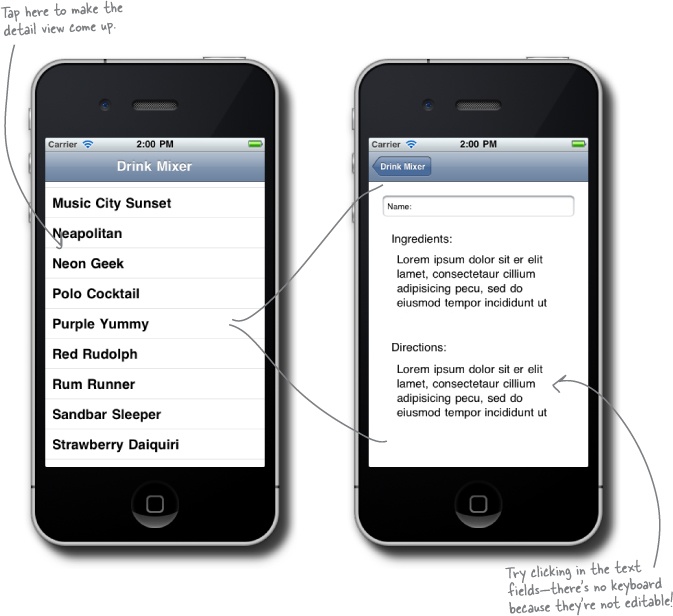
Before you pick the template for our bartending app, take a minute to look at how you want the user to interact with the drink information. We’re going to have a scrollable list of drink names, and when the user taps on a row, we’ll show the detailed drink information using view #2, our detail view. Once our user has seen enough, they’re going to want to go back to the drink list.
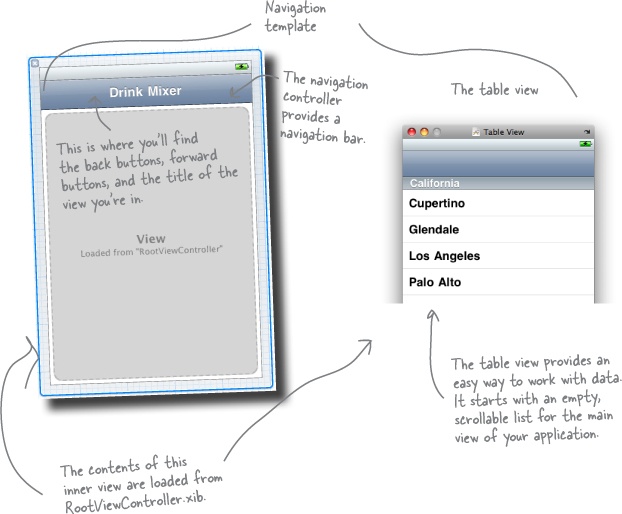
For this app, we’re going to use a Navigation-based project. The navigation template comes with a lot of functionality built in, including a navigation controller, which handles transitions between views, and the ability to deal with hierarchical data. Hierarchical data means there’s layers to it, and each view gives you more detail than the previous one.

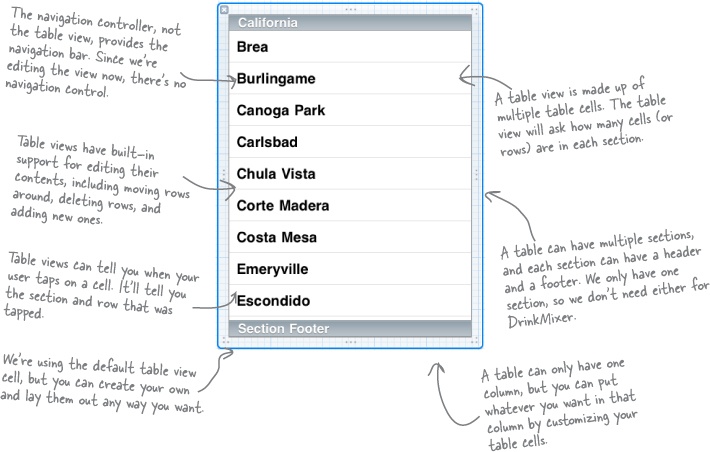
The navigation template comes with a navigation controller and a root view that the controller displays on startup. That root view is set up with a table view by default, and that works great for our app, so we’ll keep it that way. A table view is typically used for listing items, one of which can then be selected for more details about that item.
Test Drive
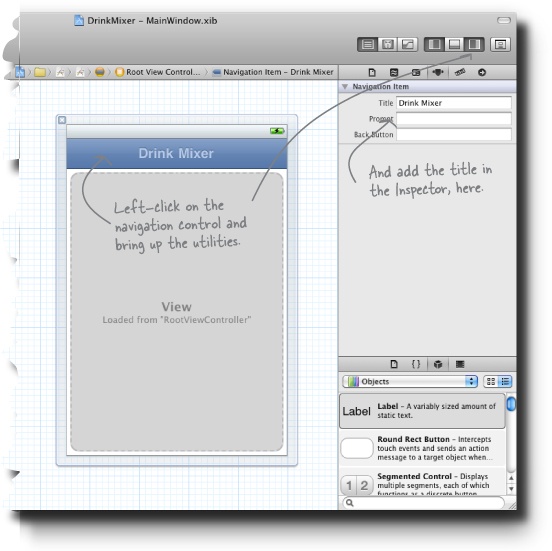
Add a title to the main view, and take a look at what your empty table view will look like. Open up MainWindow.xib in Interface Builder.
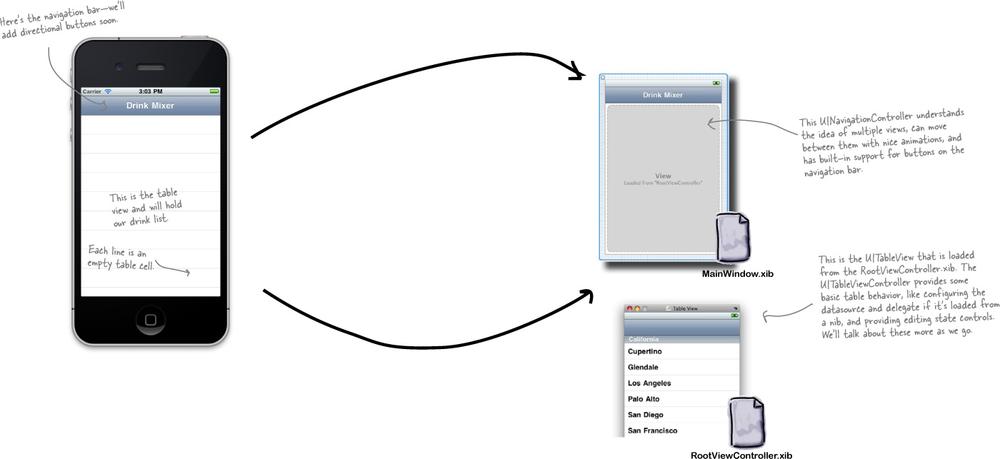
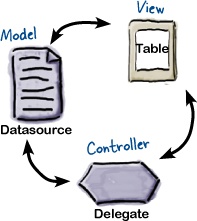
The UITableView provides a lot of the functionality we need right away, but it still needs to know what data we’re actually trying to show and what to do when the user interacts with that data. This is where the datasource and delegate come in. A table view is easy to customize and is set up by the template to talk to the datasource and delegate to see what it needs to show, how many rows, what table cells to use, etc.
Note
Remember that MVC pattern from Chapter 1? Now we’re adding in the Model piece with a datasource for our drinks list.
Brain Power
Look through some of the apps you have on your device. What are some of the most customized table views you can find? Are they using sections? Are they grouped? How did they lay out their cells?
Table Cell Code Up Close
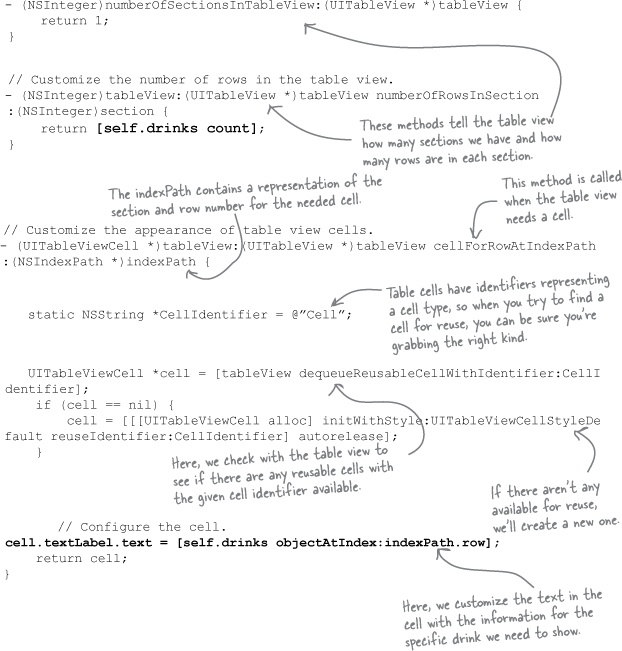
Below is an excerpt from our updated RootViewController.m file. This is where we create table cells and populate them with the drink list information.
Sharpen your pencil
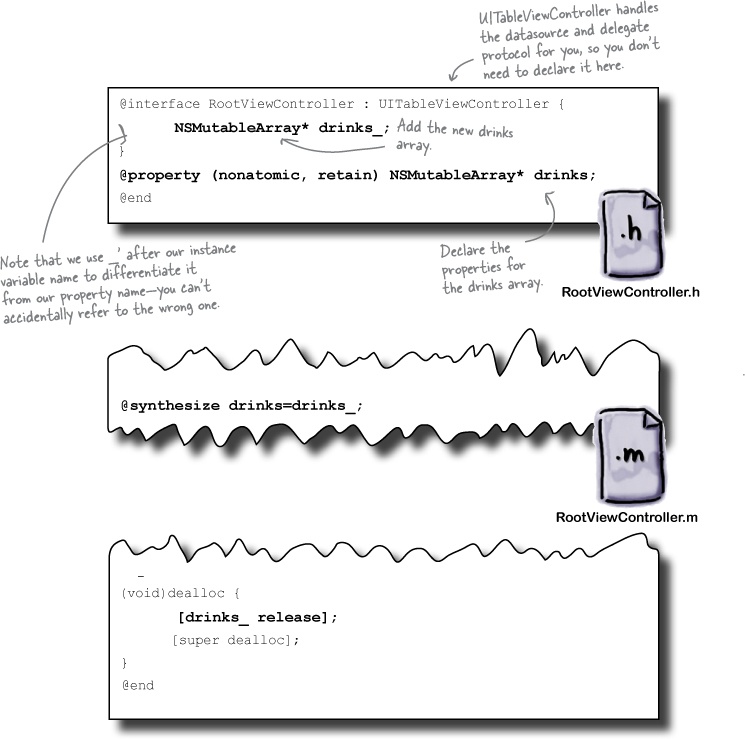
It’s time to start displaying some drinks. You’ll need to make some modifications to both the RootViewController.h and RootViewController.m files.
Declare the drinks array.
Using syntax similar to what we used for the picker, declare an array called “drinks” in RootViewController.h with the necessary properties declaration.
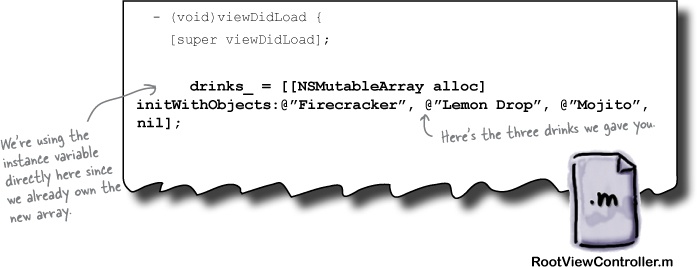
Implement and populate the array.
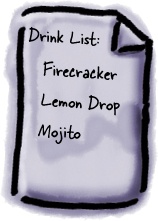
In RootViewController.m, uncomment and expand the viewDidLoad method to create the array with the three drinks from the drink list here.
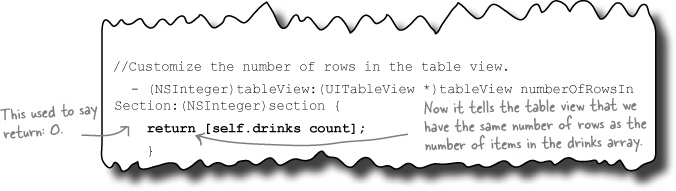
Tell the table how many rows you have.
The auto-generated code needs to be modified to tell the table that it will have the same number of rows as there are drinks in the array. Modify the implementation file under this line: // Customize the number of rows in the table view.
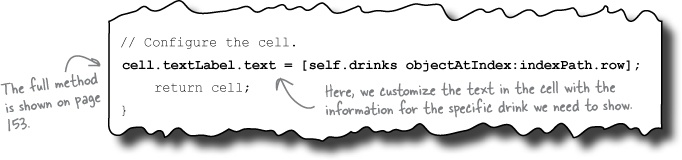
Populate the table cells.
Implement the code that we talked about in “Table Cell Code Up Close” so that the table gets populated with the items from the array.
You’re right. Like everything else on iOS, the UITableView does have to worry about memory.
So, how does it balance concerns about memory with an unknown amount of data to display? It breaks things up into cells.
The UITableView only has to display enough data to fill an iPhone screen—it doesn’t really matter how much data you might have in total. The UITableView does this by reusing cells that scrolled off the screen.
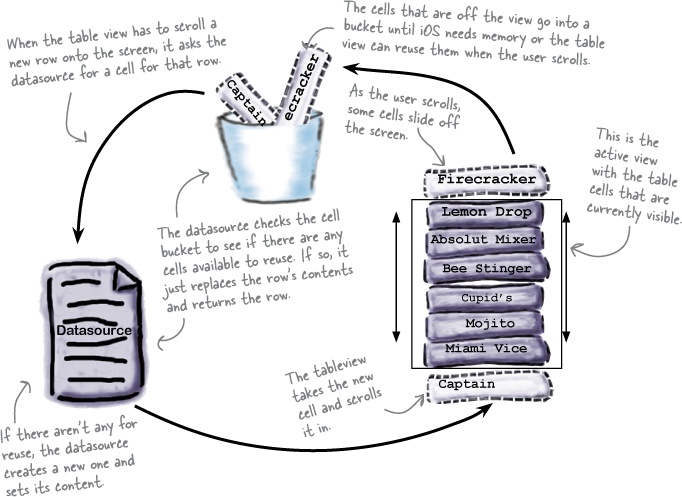
In this part of the MVC pattern, the datasource (M) updates the view (V) whenever it has to scroll to a new row.

Get ready to start typing...
We could, but not the way we’re set up now.
Since the drinks are populated with an array that’s hardcoded into the implementation file, we can’t import anything.
What would work well is a standardized way to read and import data; then we would be able to quickly get that drink list loaded.
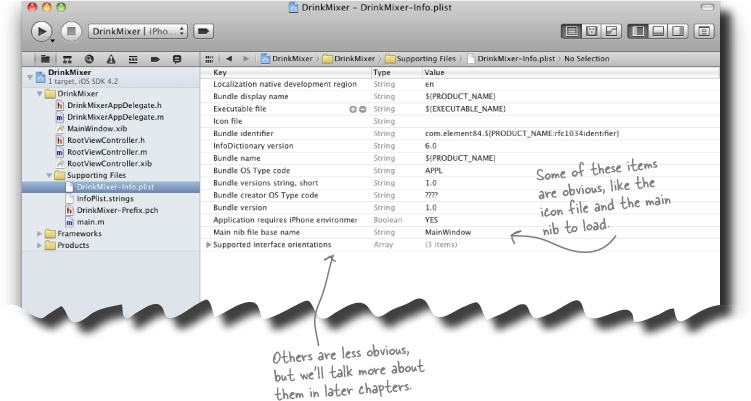
Plist stands for “property list” and has been around for quite a while with OS X. In fact, there are a number of plists already in use in your application. We’ve already worked with the most important plist, DrinkMixer-Info.plist. This is created by Xcode when you first create your project, and besides the app icons, it stores things like the main nib file to load when the application starts, the application version, and more. Xcode can create and edit these plists like any other file. Click on DrinkMixer-Info.plist to take a look at what’s inside.
All of the built-in types we’ve been using, like NSArray and NSString, can be loaded or saved from plists automatically. They do this through the NSCoding protocol. We can take advantage of this and move our drink list out of our source code and into a plist.

Exercise
Before you import Sam’s list, let’s create a sample plist that’s the same format. We’ll make sure we get that working properly, and then pull in Sam’s list.
Create the empty plist.
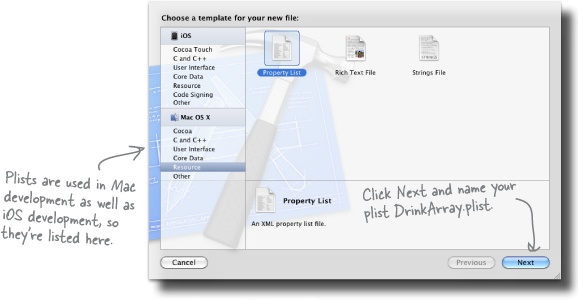
Go back into Xcode and expand the Supporting Files folder. Right-click on Resources and select New file→Mac OS X Resource, and Property List. Call the new list DrinkArray.plist.
Format and populate the plist.
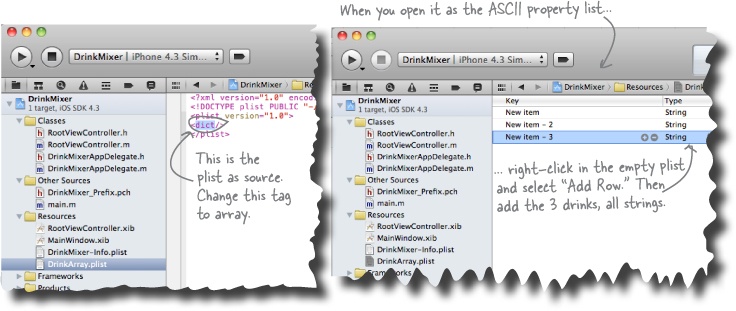
Open up the file using the Open As→Source Code and change the <dict/> to <array/> and save. Then right-click and use the Open As→ASCII Property List option. Right-click inside the plist editor and click Add Row. You will need three string items. Then you can populate the names for the drinks.
Exercise Solution
With the sample list created, we can use it for testing before we get the big list.
Create the empty plist.
Go back into Xcode and expand the Supporting Files folder. Right-click on Resources and select New file→Mac OS X Resource, and Property List. Call the new list DrinkArray.plist.
Format and populate the plist.
Open up the file using the Open As→Source Code and change the <dict/> to <array/> and save. Then right-click and use the Open As→ASCII Property List option. Right-click inside the plist editor and click Add Row. You will need three string items. Then you can populate the names for the drinks.
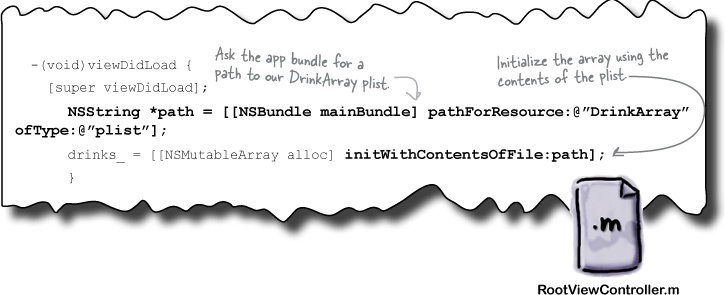
Changing the array initialization code to use the plist is remarkably easy. Most Cocoa collection types like NSArray and NSDictionary have built-in support for serializing to and from a plist. As long as you’re using built-in types (like other collections, NSStrings, etc.), you can just ask an array to initialize itself from a plist.
The only piece missing is telling the array which plist to use. To do that, we’ll use the project’s resource bundle, which acts as a handle to application-specific information and files. Add the bolded code below to your RootViewController.m file.
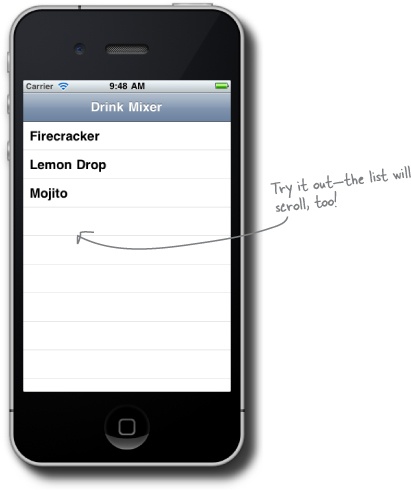
Test Drive
After you’ve finished up these two things, go ahead and build and run. It should look the same, with just the three drinks.
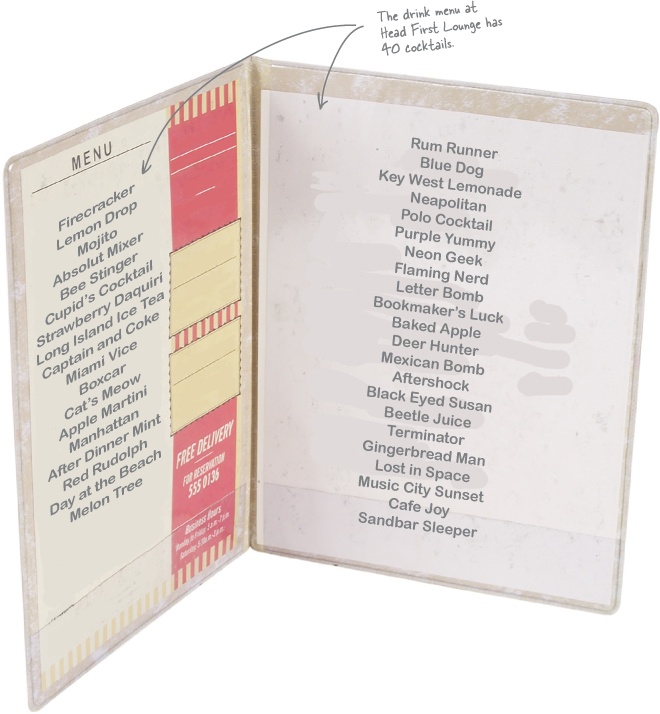
Ready Bake plist

Once this list works, head over to http://www.headfirstlabs.com/books/hfiphonedev/ and download the DrinkArray.plist file. It has the complete list of the drinks from the Head First Lounge. Drop this in on top of your test plist, rebuild DrinkMixer, and try it out!


Creating your detail view will complete the app.
The entire list of drinks is great, but Sam still needs to know what goes in those views and how to make them. That information is going to go in the detail view that we sketched up earlier.
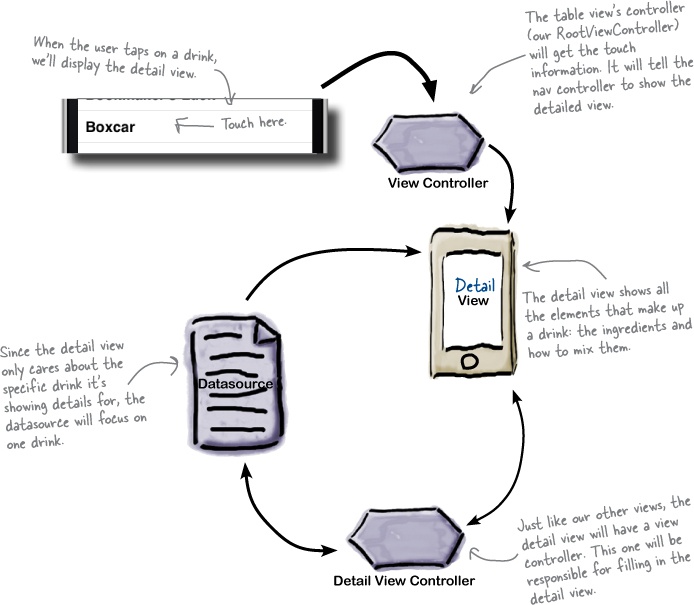
Earlier, we classified DrinkMixer as a productivity app and we chose a navigation controller because we have hierarchical data. We have a great big list of drinks loaded, but what Sam needs now is the detailed information for each drink: what are the ingredients, how do you mix them, etc. Now we’ll use that navigation controller to display a more detailed view of a drink from the list.
The standard pattern for table views is that you show more information about an item when a user taps on a table cell. We’ll use that to let the user select a drink and then show our detailed view. The detail view follows the same MVC pattern as our other views.
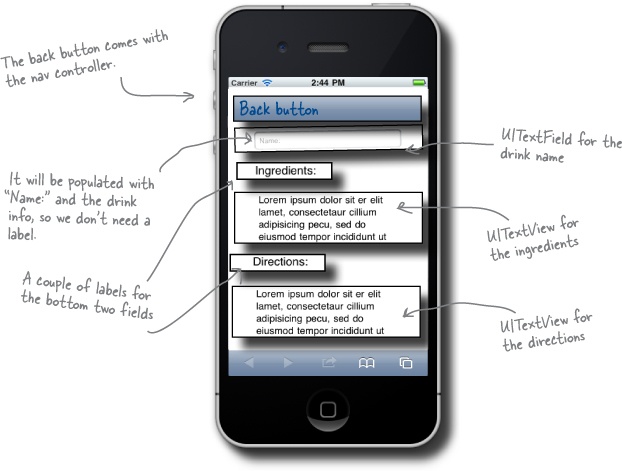
We sketched out the detail view earlier—but let’s look more closely at what we’re about to build.
Let’s start building...
Long Exercise
You’ve got the hang of this now. Start building your detail view by creating the files and code you’ll need, then put it together in Interface Builder and wire it up. Get to it!
Create the files you’ll need.
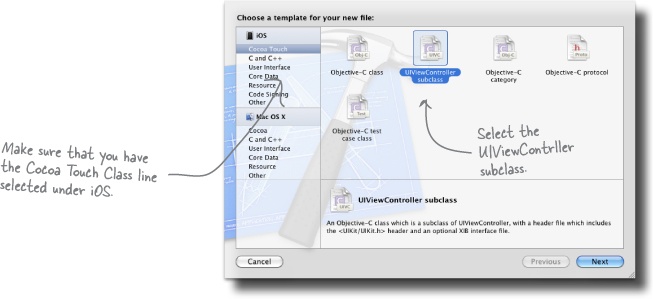
To create the new view, you need a new *.xib file, as well as the supporting header and implementation files. The file type is a Cocoa Touch Class type, and it’s a UIViewController subclass.
Lay out the new view in Xcode.
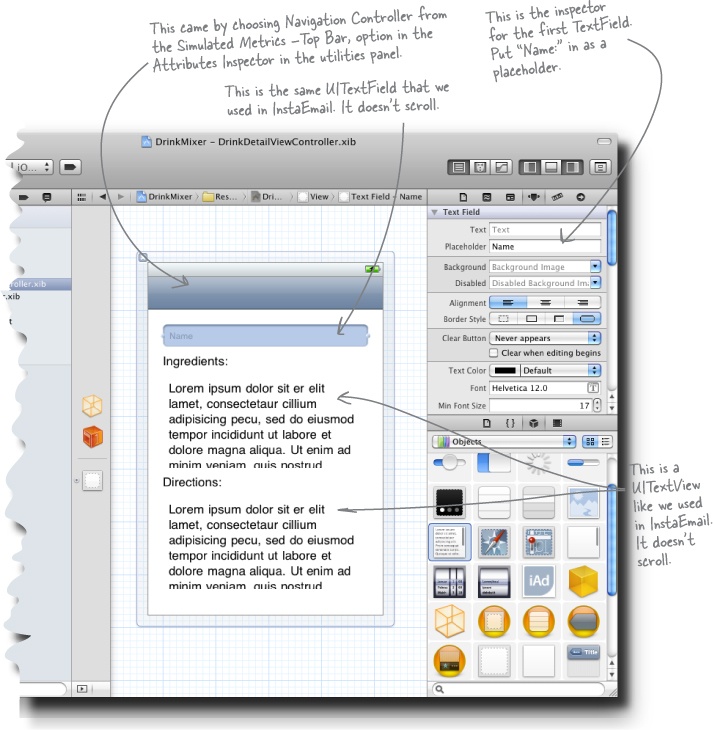
Use the object library to drag and drop the elements that you need and build the view we sketched out earlier.
Hint: to reserve the space for the navigation controller, just bring up the Utilities Panel and choose the Attributes Inspector. Under Simulated Metrics, Top Bar, select Navigation Controller. That will make sure that you lay out your view below the navigation bar.
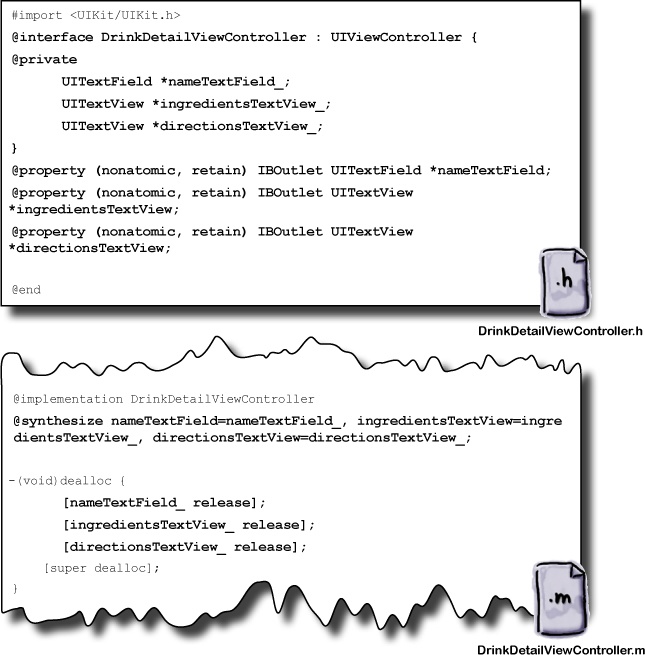
Write the code to handle the declarations and outlets for the new properties.
You’ll need to work in both DetailViewController.h and DetailViewController.m. Call the new properties nameTextField, ingredientsTextView, and directionsTextView. Don’t forget to create the instance variables then synthesize and release everything.
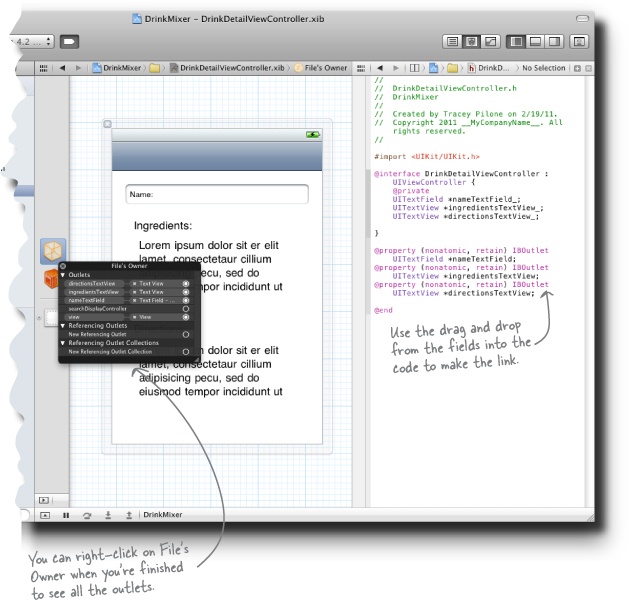
Connect the detail view to the new outlets.
Just like we did for InstaEmail, use Interface Builder to link the controls to the properties.
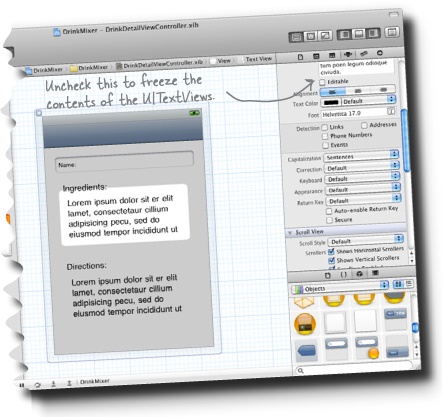
Make the text fields uneditable.
Using the inspector, find the checkbox that makes the fields uneditable.
Long Exercise Solution
Here’s all the info for the new detail view. After this, you should have a working (but still empty) detail view.
Create the files you’ll need.
We need a new .xib for the detail view. To create one from scratch, go back into Xcode and click on the File→New→New File menu option.
After clicking Next, you can confirm the subclass of UIViewController. In our case, we need both the nib and the supporting files, so leave the “With XIB for user interface” box checked and click Next.
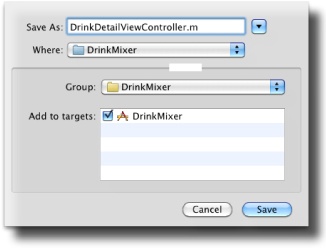
One more thing. Xcode will create all your files in the DrinkMixer group, keeping them with the other class files. Name the file “DrinkDetailViewController.m.”
Lay out the new view in Xcode.
Write the code to handle the declarations and outlets for the new fields.
Connect the detail view to the new outlets.
All three outlets—the directionsTextView, the ingredientsTextView, and the nameTextField—need to be connected to their control on the new view.
Make the text fields un-editable.
We need to disable both the UITextField and the two UITextViews to prevent the user from making changes. Simply click on each field and toggle the Enabled or Editable checkboxes to off.
Once those changes are made, the keyboard issue goes away, because there won’t be one!
Test Drive
Build and run your app. You just put in a lot of work, and it’s a good time to check for errors. You won’t see a difference yet, just the drinks list again...
Sharpen your pencil
When your users browse through the drink information, they’re going to need to switch between the list and detail views. Take a few minutes to think about how to do that while keeping the user from getting lost.
How does the user navigate between views?
_______________________________________________
_______________________________________________
How can we keep track of what view to show?
_______________________________________________
_______________________________________________
How does the detail view know what drink to show?
_______________________________________________
_______________________________________________
How do you get the user back to the table view?
_______________________________________________
_______________________________________________
Sharpen your pencil Solution
When your users browse through the drink information, they’re going to need to switch between our list and detail views. Think about how we do that and keep the user from getting lost.
How does the user navigate between views? The user is going to tap on the cell of the drink name that they want to see.
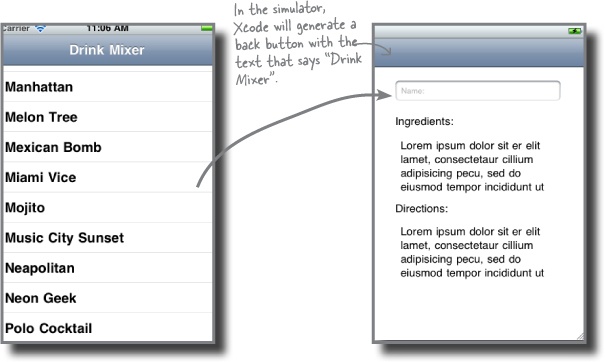
How can we keep track of what view to show? The Navigation Controller will keep track with back buttons and the title of the pane.
How does the detail view know what drink to show? That’s based on the table cell that the user selects.
How do you get the user back to the table view? The Navigation Controller can supply a back button that can get us back to the main view.
Now that we’ve got the table view populated and the detail view built, it’s time to manage moving between the two views. The navigation-based template comes preloaded with the functionality we need:
A view stack for moving between views
As users move back and forth, you can ask the Navigation Controller to display the appropriate view. The Navigation Controller keeps track of where the users are and gives them buttons to go back.
A navigation bar for buttons and a title
The Navigation Controller interacts with the navigation bar to display buttons that interact with the view being shown, along with a title to help the users know where they are.
A navigation toolbar for view-specific buttons
The Navigation Controller can display a toolbar at the bottom of the screen that shows custom buttons for its current view.
The UINavigationController supports a delegate, called the UINavigationControllerDelegate, that gets told when the controller is about to switch views, but for DrinkMixer, we won’t need this information. Since the views get told when they’re shown and hidden, that’s all we need for our app.
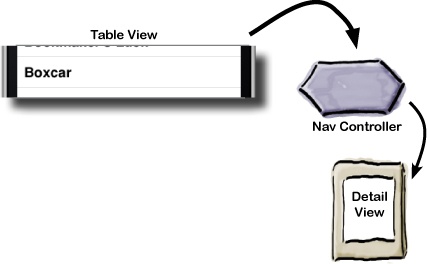
Now we need to get the Table View and Nav Controller working together to display the detail view.
We’ve been dragging the Navigation Controller along since the beginning of this project, and now we finally get to put it to use. The Navigation Controller maintains a stack of views and displays the one on top. It will also automatically provide a back button, as well as the cool slide-in and-out animations. We’re going to talk more about the whole Navigation Controller stack in the next chapter, but for now, we’re just going to push our new view onto the stack and let the controller take care of the rest. We just need to figure out how to get that new view.
Brain Power
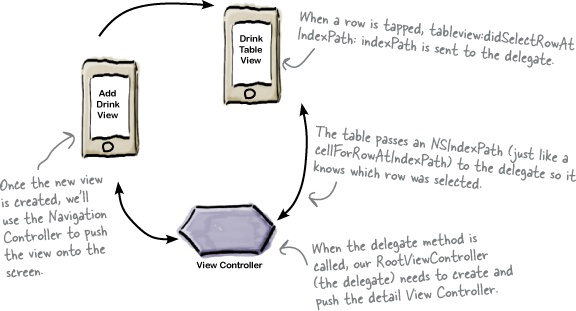
Here’s where things get interesting: our RootViewController is our delegate, so it needs to hand off control to a new View Controller to push the detail view onto the screen. How do you think we should handle that?
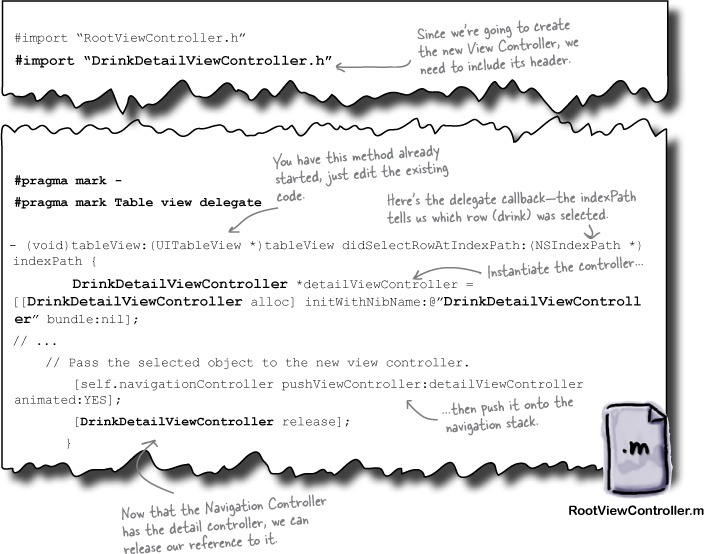
The only piece left to create is the View Controller for the detail view. Instantiating a View Controller is no different than instantiating any other class, with the exception that you can pass in the nib file it should load its view from:
[[DrinkDetailViewController alloc] initWithNibName:@"DrinkDetailView
Controller" bundle:nil];
Once we’ve created the detail View Controller, we’ll ask the NavigationController to push the new View Controller onto the view stack. Let’s put all of this together by implementing the callback in the delegate and creating the new View Controller to push onto the stack:
Let’s try this out...

Yep, we’ve outgrown our array.
All that’s left is to get the ingredients and directions in the detail view, and we’ll have a bartender’s brain. To save you from having to type in the ingredients and directions, we put together a new file with all the extra information. The problem is we can’t just jam that information into an array. To add the drink details to this version, we need a different data model.
Sharpen your pencil
Which options below are possible ways to load the drink data?
Create a database with drink information | Use dictionaries in our plist to hold the drink details | ||
Use an XML file to hold the drink details | Create multiple arrays in our plist |
Which of these options is the best for DrinkMixer? Why? __________________
__________________________________________________________________________
__________________________________________________________________________
__________________________________________________________________________
Sharpen your pencil Solution
Which options below are possible ways to load the drink data?
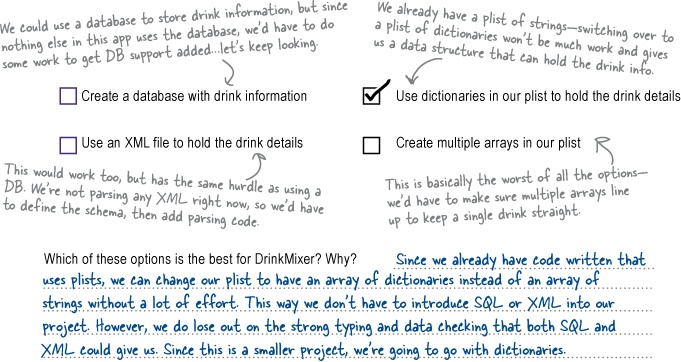
Which of these options is the best for DrinkMixer? Why? Since we already have code written that uses plists, we can change our plist to have an array of dictionaries instead of an array of strings without a lot of effort. This way we don’t have to introduce SQL or XML into our project. However, we do lose out on the strong typing and data checking that both SQL and XML could give us. Since this is a smaller project, we’re going to go with dictionaries.
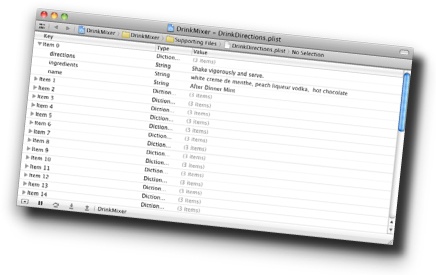
Our current drink plist is just a single array of drink names. That worked great for populating the table view with just drink names, but doesn’t help us at all with drink details. For this plist, instead of an array of strings, we created an array of dictionaries. Within each dictionary are three keys: name, ingredients, and directions. Each of these have string values with the corresponding information. Since NSDictionary adopts the NSCoding protocol, it can be saved and loaded in plists just like our basic array from before.
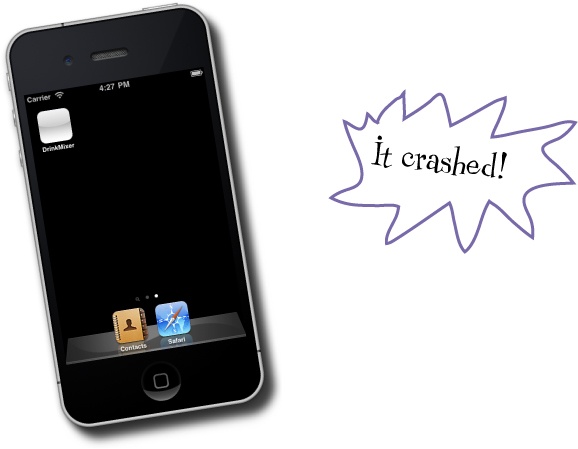
Something has gone wrong, but honestly, this is a pretty normal part of the development process. There are lots of things that could cause our application to crash, so we need to figure out what the problem is.
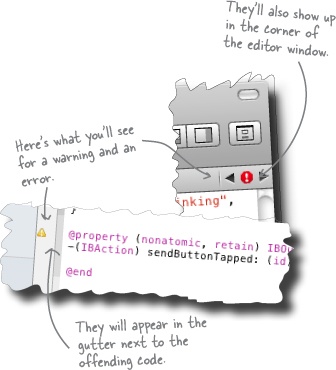
In general, if your application doesn’t build, Xcode won’t launch it—but that’s not true for warnings. Xcode will happily compile and run an application with warnings and your only indication will be a little yellow yield signs in the gutter of the Xcode editor. Two minutes spent investigating a warning can save hours of debugging time later.
Geek Bits
Some common warning culprits:
Now that iOS 4.3 is out, code that uses deprecated 2.0 or 3.0 properties triggers warnings.
Sending a message to an object that it doesn’t claim to understand (from a typo or an autocompletion error) will trigger warnings. Your app will compile, but will likely end up in a runtime exception when that code is executed.
That’s not our problem, though: at this point our code is (at least it should be) warning and compile-error-free. The good news is that when an app crashes in the Simulator, it doesn’t go away completely (like it would on a real device). Xcode stops the app right before the OS would normally shut it down. Let’s use that to see what’s going on.
Time for some debugging...
We need to figure out why our app crashed, and thankfully, Xcode has a lot of strong debugging capabilities. For now we’re just going to look at the information it gave us about the crash, but later in the book, we’ll talk about some of the more advanced debugging features.
Since you ran the program in the simulator, Xcode is going to bring up the debugging pane at the bottom of the editor. You’ll probably want to resize it to make the log easier to review.
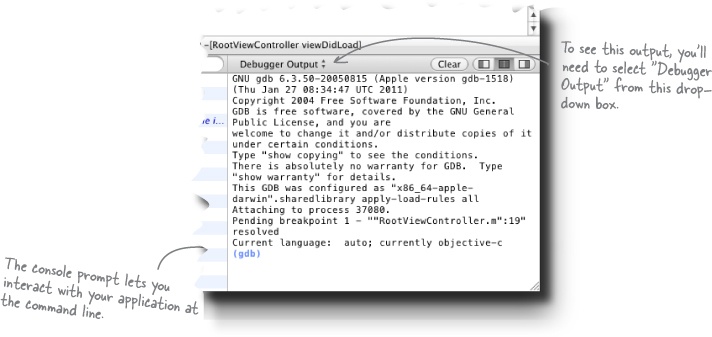
Xcode 4 is a very powerful debugging tool. Some of the best debugging techniques involve well-placed logging messages using NSLog(...). This information is printed into the console and can help you diagnose problems quickly. The console isn’t just read-only, though; it is your window into your running application. We’ll see log messages displayed in the console, and when your application hits a breakpoint, you’ll be placed at the console prompt. From there you can use debugging commands like print, continue, where, up, and down to inspect the state of your application.
Note
The console debugger is actually the gdb (GNU debugger) prompt, so nearly all gdb commands work here.
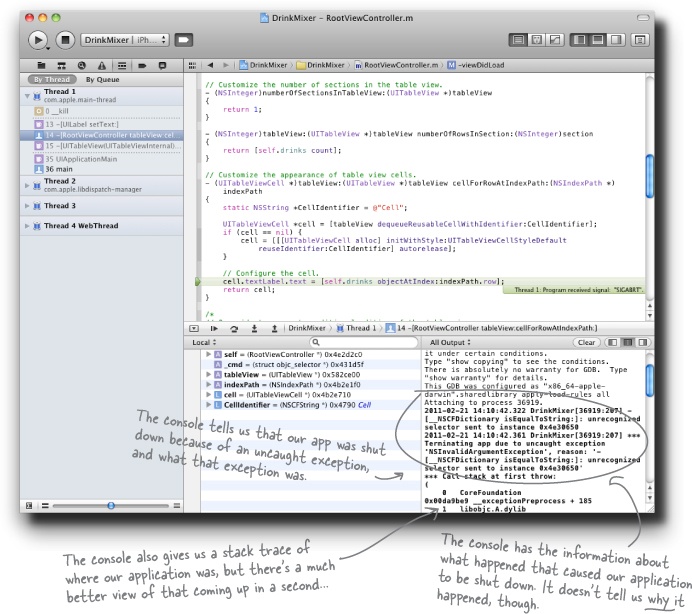
In this case, we’re dealing with a nearly dead application, but the idea is the same. Since DrinkMixer has crashed, Xcode provides you with the basic information of what went wrong. In our case, an “unrecognized selector” was sent to an object. Remember that a selector is basically a method call—it means that some code is trying to invoke methods on an object and those methods don’t exist.
But Xcode doesn’t stop at the command line. It has a full GUI debugger built right in. Let’s take a look...
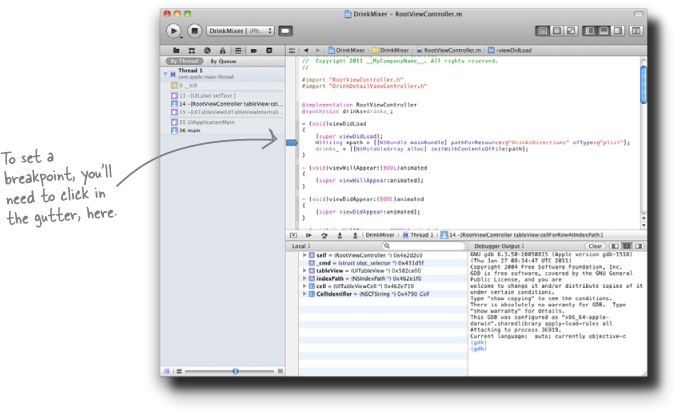
So far we’ve used Xcode to write code and compile and launch our applications. Its usefulness doesn’t stop once we hit the “Build and Debug” button. First, we can set breakpoints in our code to let us keep an eye on what’s going on. Simply click in the gutter next to the line where you want to set a breakpoint. Xcode will put a small blue arrow next to the line and when your application gets to that line of code, it will stop and let you poke around using the console.
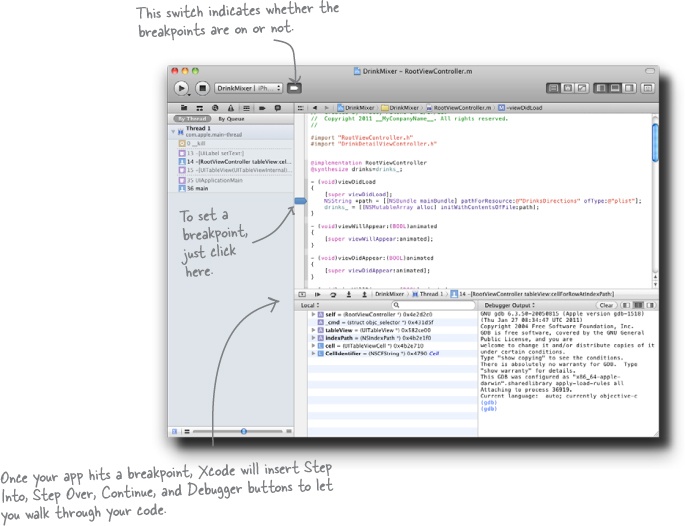
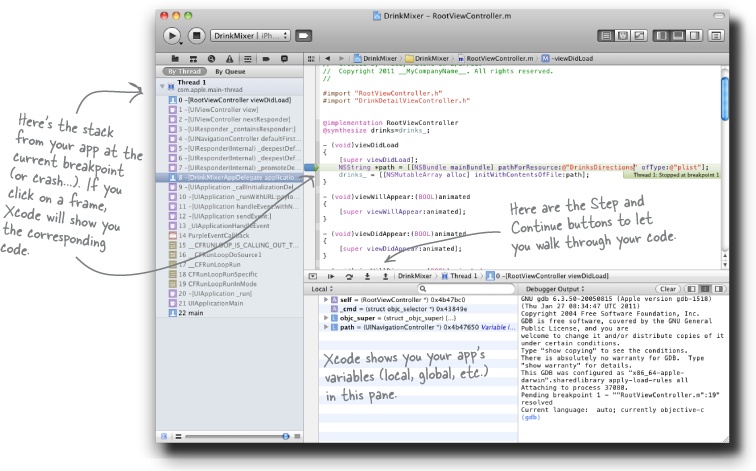
Slide the scrubber all the way to the right to see the full stack from the app...
The debugger shows your code and also adds a stack view and a window to inspect variables and memory. When you click on a stack frame, Xcode will show you the line of code associated with that frame and set up the corresponding local variables. There isn’t anything in the debugger window you couldn’t do with the console, but this provides a nice GUI on top of it.
Test Drive
When you step over the breakpoint at the point where you load the array, everything is OK:
But hit continue and...
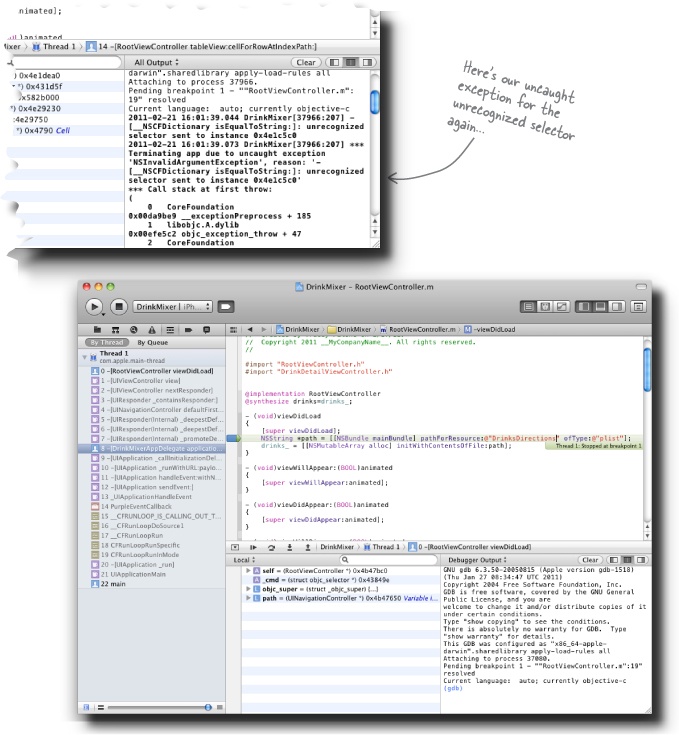
Our application is crashing, and it’s not at the array loading code, so get back into Xcode. It will show you the line that’s causing the problem, can you see what’s wrong?
To be continued...
MultipleViews cross
Take what you’ve learned about the Navigation Controller and multiple views to fill in the blanks.
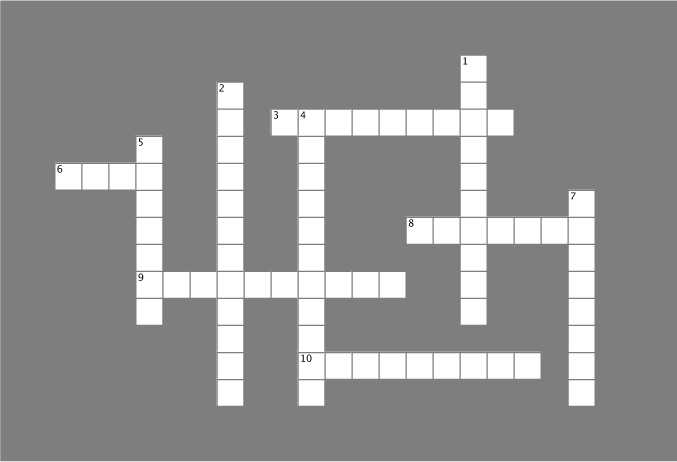
Across | Down | ||
|---|---|---|---|
3. | The set of views that the nav controller deals with. | 1. | A more versatile way to manage data beyond an array. |
6. | Dictionaries use __________ to organize data. | 2. | DrinkMixer is this type of app. |
8. | The screen that gives you output from the app. | 4. | To use a new class you need to ___________ it. |
9. | A template that combines a table view and nav controls. | 5. | The @ symbol is shorthand for creating one of these. |
10. | Has cells that need to be customized to work. | 7. | A tool in Xcode to help fix broken code. |
You’ve got Chapter 4 under your belt and now you’ve added multiple views and the Navigation Controller to your toolbox.
MultipleViews cross Solution
Take what you’ve learned about the navigation controller and multiple views to fill in the blanks.
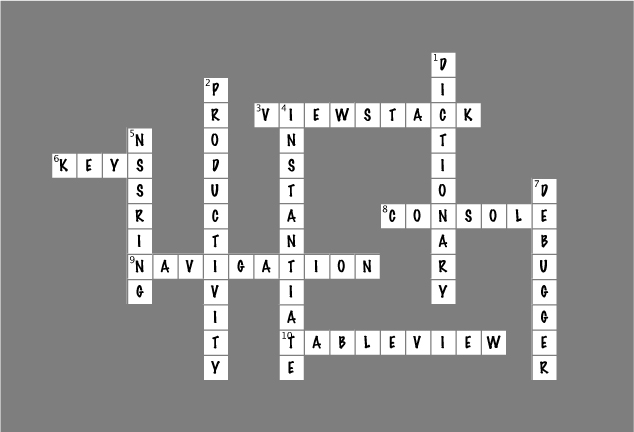
Across | Down | ||
|---|---|---|---|
3. | The set of views that the nav controller deals with. [VIEWSTACK] | 1. | A more versatile way to manage data beyond an array. [DICTIONARY] |
6. | Dictionaries use __________ to organize data. [KEYS] | 2. | DrinkMixer is this type of app. [PRODUCTIVITY] |
8. | The screen that gives you output from the app. [CONSOLE] | 4. | To use a new class you need to ___________ it. [INSTANTIATE] |
9. | A template that combines a table view and nav controls. [NAVIGATION] | 5. | The @ symbol is shorthand for creating one of these. [NSSRING] |
10. | Has cells that need to be customized to work. [TABLEVIEW] | 7. | A tool in Xcode to help fix broken code. [DEBUGGER] |
Get Head First iPhone and iPad Development, 2nd Edition now with the O’Reilly learning platform.
O’Reilly members experience books, live events, courses curated by job role, and more from O’Reilly and nearly 200 top publishers.

