
The iPhone changed everything.
The iPhone 4 “changed everything, again.” And now you’ve got the iPad to contend with, too. iOS devices are now capable word processors, e-readers, and video cameras. They are being used in business and medicine as enterprise devices, and the App Store is a platform for every developer to use, from one-man shows to big-name companies. Apple provides the software and we’ll help you with the knowledge—we’re sure you’ve got the enthusiasm covered.
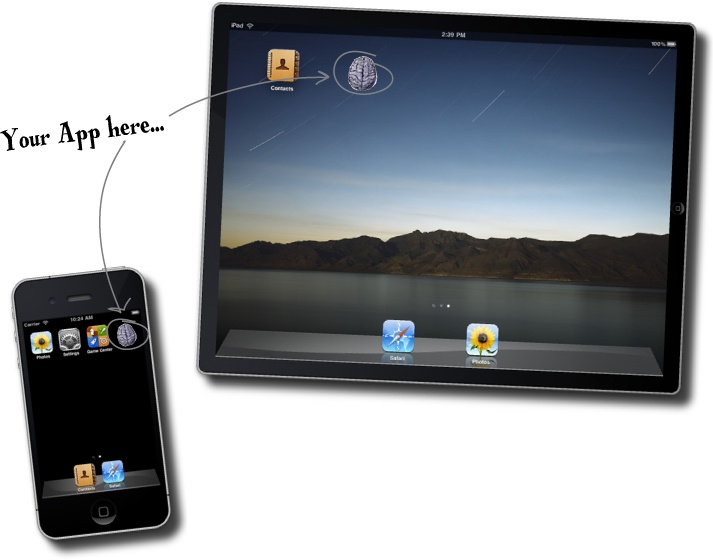
Maybe you use an iPhone all the time and wish “it could do that.” Maybe you have an app you love that could be so much better. You might have a business that wants to leverage computing power that fits in your customers’ hands. Or perhaps you have an idea for an app that could start a business. There are a lot of motivations to want to code for iPhone and iPad, and lots of customers, too.
There’s a big market out there for iPhone and iPad developers. iOS apps are rapidly becoming advertising tools that non-tech businesses want to use, like websites. Enterprises are starting to use iPhones, iPads, and iPod Touches for employees to perform work that they once did with a clipboard or even a laptop.
But while there’s a lot of opportunity, there’s also plenty for you to learn, even as an experienced OO developer. Most companies are choosing to outsource iOS development work, making it a great opportunity for freelancers, too.
At the time this book went to print, there were over 500,000 different apps available for download from the App Store. More than that, the percentage of apps for sale that are games has held steady, while the gross number of apps continues to rise.
That means that the number of apps for sale that allow users to perform a task is going up; people are integrating mobile computing into their lives for more than just playing.
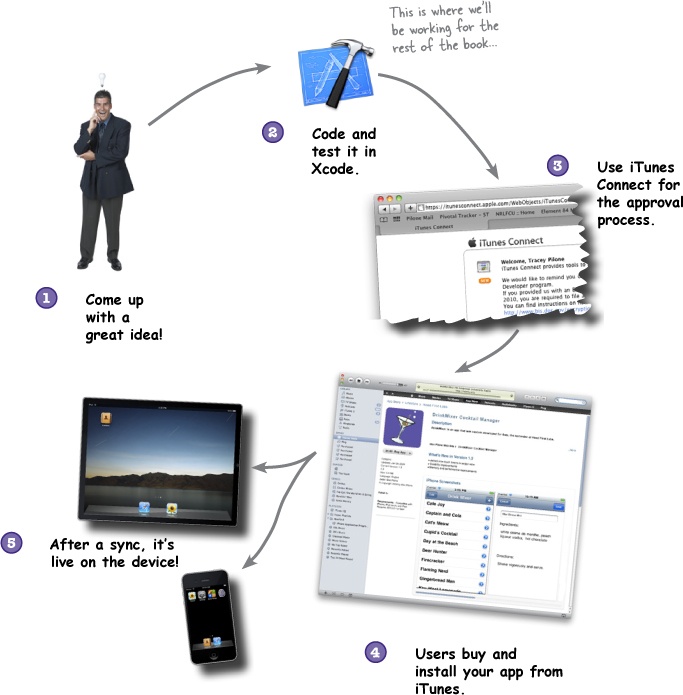
Let’s start with how an app gets from your head to a device...
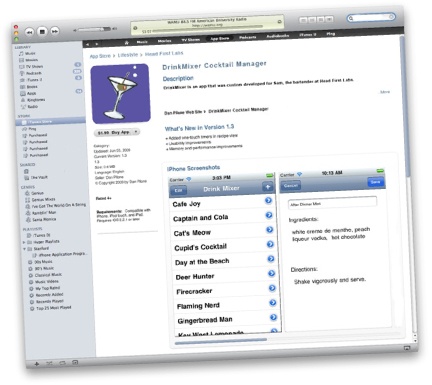
To get an app approved, sold, distributed, or installed, you need to work with the Apple iOS SDK before getting your app into the iTunes App Store. Here’s a quick picture of the cycle of which you’re going to be a part.
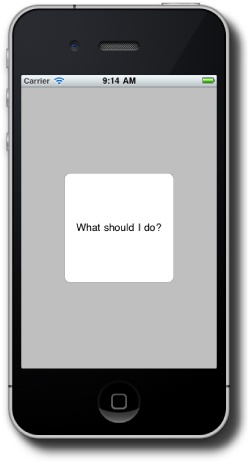
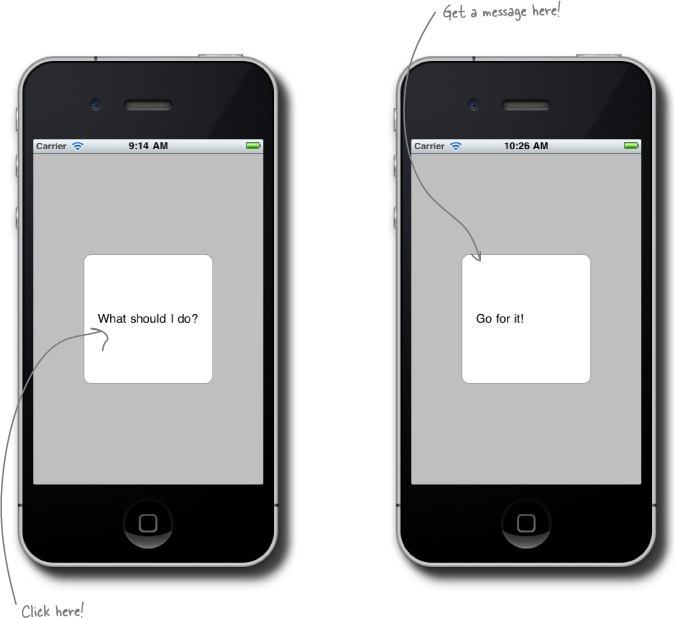
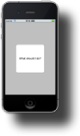
You’re probably brimming with app ideas, but for this first one, we’re going to start simple. Our first application is pretty straightforward: it is going to be a single view with a button that the user can push to make a decision. For now we’ll build this just for iPhone; we’ll get into iPads a bit later in the book.
When users start up your application, the first thing they see is a view. It’s essentially the user interface, and it needs to be easy to use and focused on what your application is supposed to do. Throughout this book, whenever we start a new application, we’re going to take a little time to sketch up what we want our views to look like.

We know what our app should look like, now we just need the tools to build it...
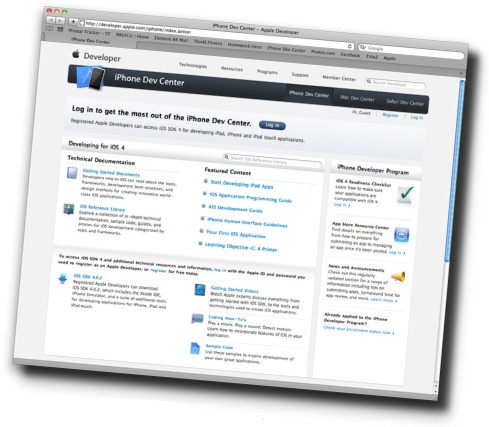
Head over to http://developer.apple.com/ios. You can download the SDK (and other useful Apple development resources) for free with the basic registration—but to distribute a completed app in the App Store or install your app on an iPhone, iPod Touch, or iPad for testing, you’ll need to become a paid Standard or Enterprise Developer. The basic registration provides the SDK with a simulator for testing directly on your Mac, so you can go the free route for now to get started.
Register as a developer at http://developer.apple.com/ios. | |
Download the latest SDK; this book is based on the 4.3 SDK. Just look for the Download button at the top of the page. | |
Install the SDK. Once the Installation completes, you can find Xcode.app in /Developer/Applications. |
Navigate over to the install directory, which is /Developer/Applications by default. If your installation went right, the install directory should have a few key things.
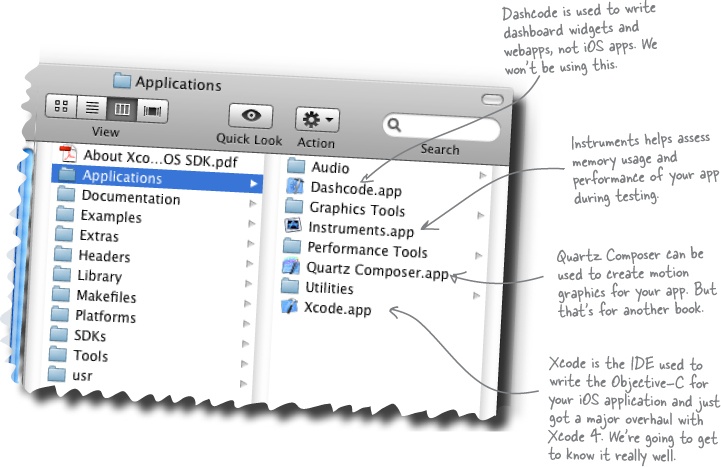
The iPhone Simulator ( installed in /Developer/Platforms/iPhoneSimulator.platform/Developer/Applications/iPhoneSimulator.App) lets you run iOS in a simulated device on your Mac for simplified app testing while you’re writing code. We’ll be firing this up shortly, too. |

Now that you have everything installed, go ahead and double-click on Xcode to get it started.
When you start Xcode, you’ll get a welcome screen where you can select Create a New Project. Each project is a collection of files (a.k.a. a template) that have some info and code already populated based on the type of project.
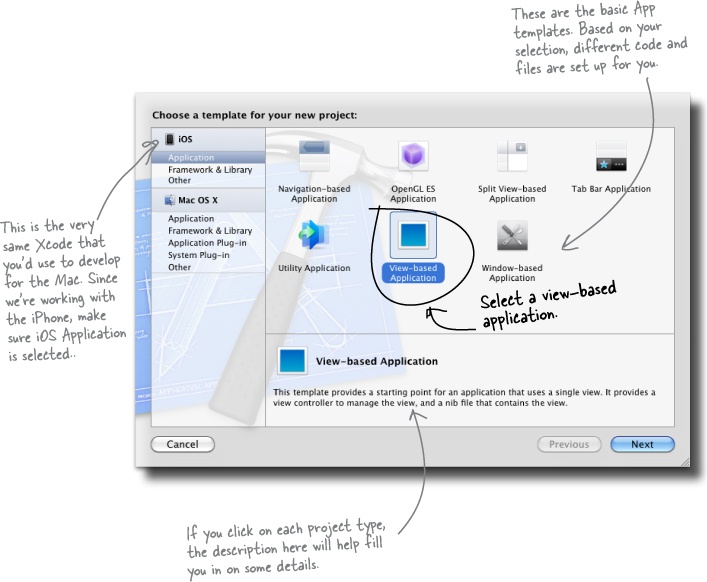
As we go through the book, we’ll use different types of projects and discuss why you’d choose one over another for each app. For iDecide, we have just one screen (or view), so start with the View-based Application and give it the Product Name iDecide. Leave the Device Family as iPhone and uncheck the box for Include Unit Tests. In the final dialog box, uncheck the box for Create Local Git Repository.
Xcode is much more than just a text editor. As you’ve already seen, Xcode includes templates to get you started developing an application. Depending on your application, you may use all of a template or just parts of it, but you’ll almost always start with one of them. Once you get your basic app template in place, you’ll use Xcode for a lot more:
Maintaining your project resources
Xcode will create a new directory for your project and sort the various files into subdirectories. You don’t have to stick with the default layout, but if you decide to reorganize, do it from within Xcode. Xcode also has built-in support for version control tools like Git and Subversion and can be used to check out and commit your project changes.
Editing your code and resources
You’ll use Xcode to edit your application code, and it supports a variety of languages beyond just Objective-C. Xcode also has a number of built-in editors for resource files like plists and xib and nib files (we’ll talk more about these later on). For resources Xcode doesn’t handle natively, double-clicking on one of those files in Xcode will launch the appropriate editor. Some file types Xcode can only view, like pictures, or it will merely list, like sound files.
Building and testing your application
Xcode comes with all of the compilers necessary to build your code and generate a working application. Once your application is compiled, Xcode can install it on the iOS Simulator or a real device. Xcode includes LLVM and GDB debuggers with both graphical and command-line interfaces to let you debug your application. You can also launch profiling tools like Instruments to check for memory or performance issues.
Prepare your application for sale
Once you get your application thoroughly tested and you’re ready to sell it, Xcode manages your provisioning profiles and code signing certificates that let you put your application on real devices or upload it to the iTunes App Store for sale. We’ve got more info on this process in the Appendix.
Turn the page to see what Xcode looks like.
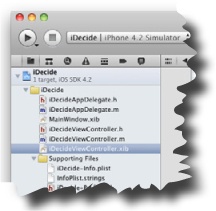
When Xcode opens your new View-based project, it is populated with all of the files that you see here, but we’ve changed the view a bit. By expanding the project and selecting a .xib file (which is your view, more on that in a minute), the GUI editor is open on the left. To open the side-by-side assistant view, click the Assistant Editor button on the upper right of the editor.
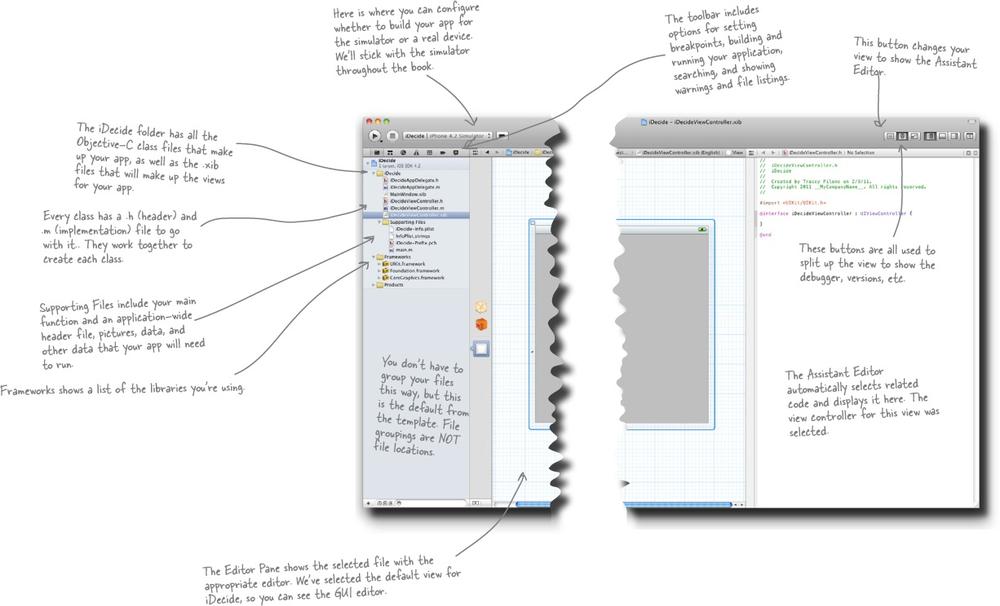
We’ll be using some of the other tools that came with the SDK (especially the Simulator), but they are all working with the files that are included here.
The files and frameworks shown were stubbed out based on our selection of a View-based application. As we go forward, we’ll use different types of apps, and that will lead to different defaults.
For our app, the template includes iDecideViewController.h and iDecideViewController.m. Every Objective-C class in the template has both a header (.h) and an implementation (.m) file. When the app is compiled, they work together to create a class. We’ll dive into the view controller shortly.
Geek Bits
Frameworks are what libraries are called in Objective-C. UIKit, CoreGraphics, and Foundation are loaded by default, but we’ll show you how to add more later.
Xcode Files Up Close

If you take a closer look at the files that were generated by Xcode, you’ll see iDecideViewController.h and iDecideViewController.m, as well as iDecideAppDelegate.h and iDecideAppDelegate.m. Those .h and .m pairs work together to create a class.
You’ll also see the iDecideViewController.xib file. It creates the first view for the app.
Sort of—the GUI editor in XCode handles .xib files.
Those .xib files (also called “nibs”) are XML documents that are loaded by the Cocoa Touch framework when the app starts up. We’ll talk a lot more about this in the next chapter, but for now it’s just important to understand that the GUI editor in XCode (often also called Interface Builder) is not creating Objective-C code. It’s creating an XML description of the GUI you’re building, and the Cocoa Touch framework uses that to actually create the buttons and whatnot for your application at runtime. Everything we do in Interface Builder could be done in pure Objective-C code, but as you’ll see, there are some things that are really just easier to lay out with a GUI builder.
Do this!
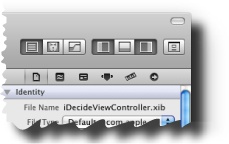
To edit the view files in Xcode, you’ll need to open up the .xib file and change some settings in the workspace.
Highlight the iDecideViewController.xib file.
Close the Assistant Editor by clicking this button.
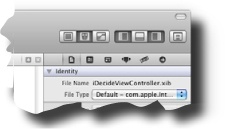
Show the library by opening the Utilities Pane, here.
Show the Objects Library for the views by clicking on this button.
Adjust the size of the library by dragging this bar up.
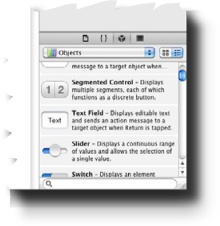
When you open up any .xib file in Xcode, the GUI editor will be launched in the main window. With the view tweaking you just finished on the previous page, Xcode will be ready to work with the views. Now it shows an overview of items in your nib, your view, and a library of UI elements (on the right). You can drag and drop any of the basic library elements into your view, edit them, and work with the connections between the code and these elements, using the assistant editor. All of these elements come from the Cocoa Touch framework, a custom UI framework for iOS devices.
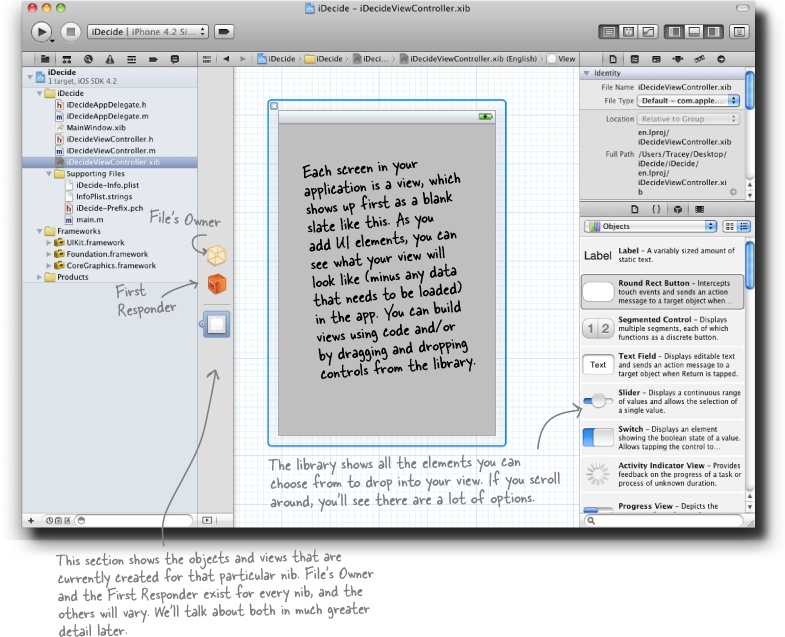
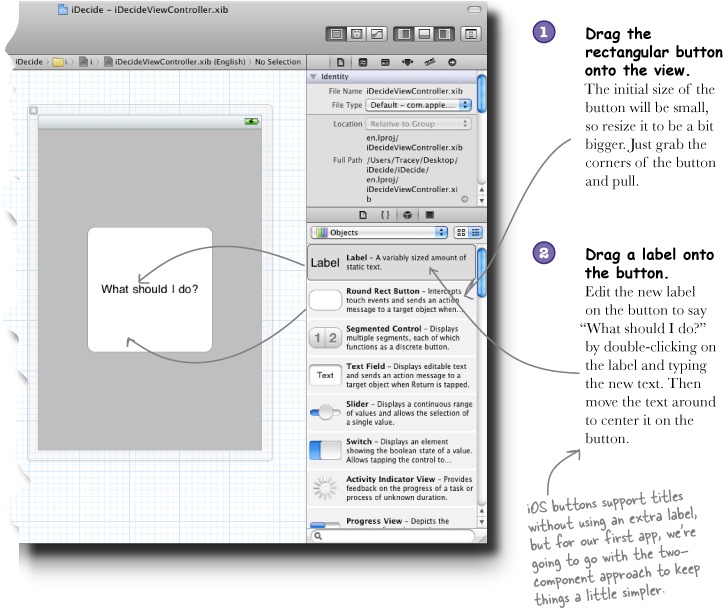
To add elements, all you need to do is drag and drop the elements you want onto your view. For our app, we just need a button with text that can be changed.
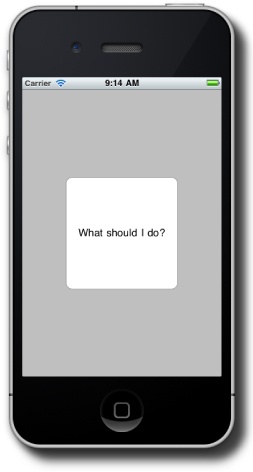
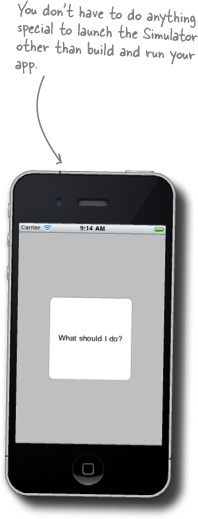
The Simulator is a great tool for testing your apps quickly and for free. It doesn’t come with all the applications that a real device does, but for the most part, it behaves the same way. When you first start the simulator, you see the springboard—just like on a real iPhone (it’s the initial screen that shows all your app icons)—with iDecide installed (and a default icon that you can change later). Xcode then opens the app and your code is running.
There are some differences between using the Simulator and your iPhone. For starters, shaking and rotating your Mac won’t accomplish anything, so those don’t work in the Simulator. To approximate rotation and check landscape and portrait views, there are some commands under the Hardware menu. You also have limited gesture support, CPU and memory usage don’t represent reality, and hardware capabilities like tilt sensors (or the accelerometer or gyroscope) don’t exist at all.
Even with these issues, testing on the simulator is just so much quicker and easier than a real device that you’ll find you use it for major portions of your development. You can always start with the Simulator and then move to a real device as your application (or hardware needs) mature.
Watch it!
The Simulator has limitations.
Memory, performance, camera, GPS, and other characteristics cannot be reliably tested using the Simulator. We’ll talk more about these later, but memory usage and performance are tough to test on the simulator simply because your Mac has so many more resources than the iPhone or iPad. To test these things, you need to install on an actual device (which means joining one of the paid development programs).
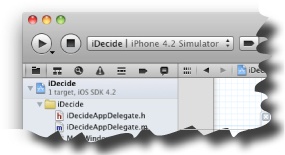
So, you probably want to push this button right now and see what happens, right? Go ahead...
UI behavior is implemented in Objective-C.
Interface Builder creates your button, but to make that button actually do something, you’ll need to write some code that tells the button how to behave.
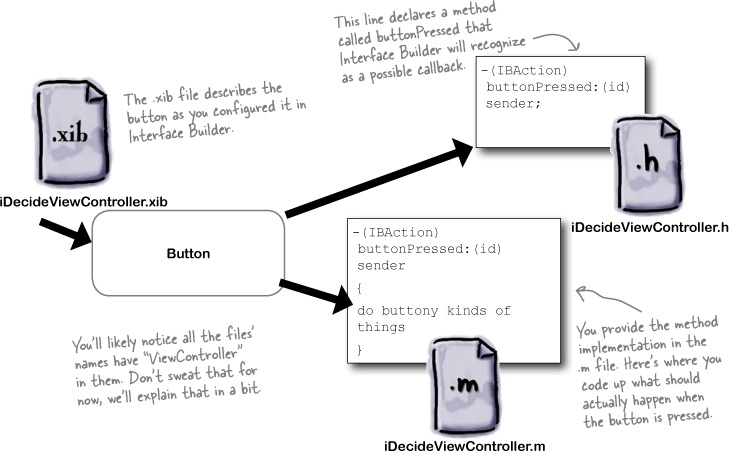
Controls—which are the UI elements like the button you just added—trigger events when things happen to them, like the button being pressed. For events like button presses, Interface Builder can connect the view controls with code in your controller class for action methods, tagged with IBAction (for Interface Builder Action). We’ll talk more about the Objective-C syntax for actions a bit later, but for now, you’ll need to declare a method in your header (.h) file and implement it in the .m.
Any controls you create need a method that Interface Builder can use to connect the control to behaviors specified in the implementation file.
You know that the button is going to need an IBAction to respond to the button press and that we write up what the button should do in the implementation file. But just what is it that the button should do?
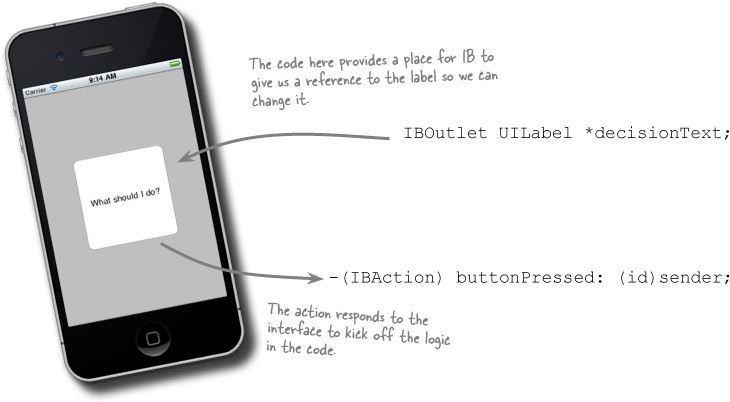
We want to change the text in the button to provide an answer. So that means we need some way to reach back “out” to the interface and change the label text. We’ll use an IBOutlet to do that.
Relax
We’ll get into actions and outlets more later.
IBActions and IBOutlets are both key for understanding how to work with controls, and we’ll go into a lot more detail on both in the next chapter. For now, just remember that actions are used to react to events in the interface, and outlets are used to reach out from the code to change the interface.
Sharpen your pencil
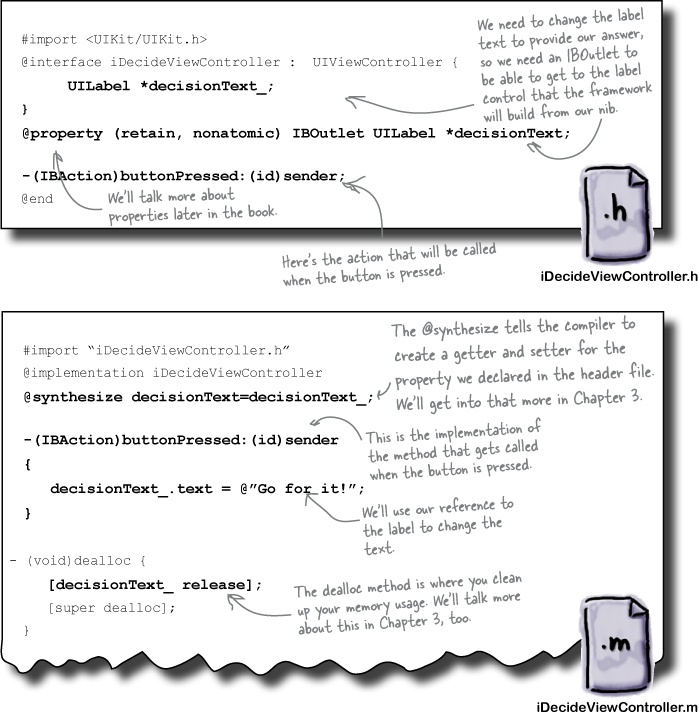
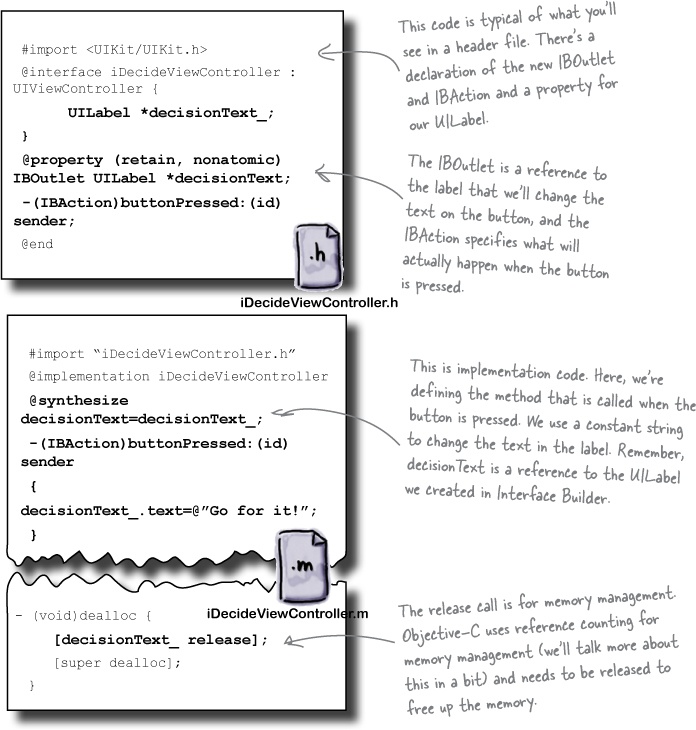
Below is the code for when the button gets tapped. Add the bolded code to the iDecideViewController.h and iDecideViewController.m files. We are creating three things: the UILabel property, the IBAction to respond to the button press, and the IBOutlet to change the label when the button is pressed.
Model View Controller (MVC) is a pattern that is discussed at length in Head First Design Patterns. You see it used a lot with GUI applications, and it’s all over the Cocoa Touch framework. The short version is that as much as possible, you want to separate out your logic from your view and data. It’s especially key when you want to write one set of logic to support both iPhone and iPad UIs, which we’ll do later in the book.
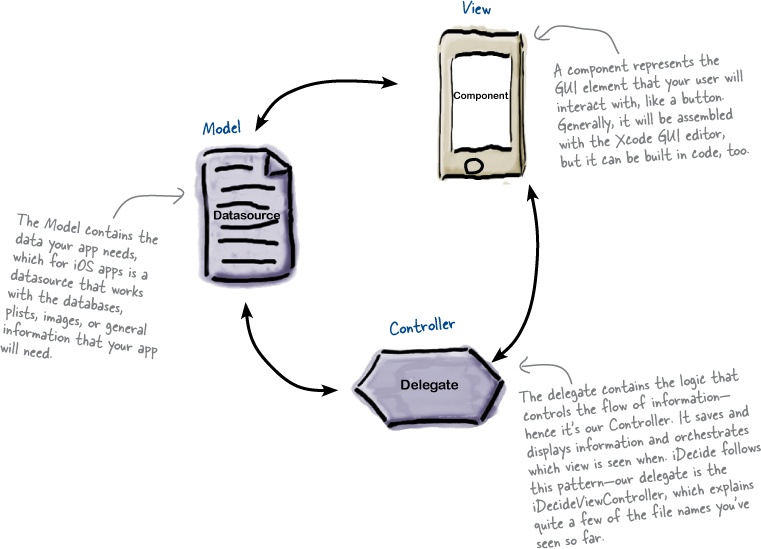
For iDecide, we don’t have a datasource we’re dealing with—there’s nothing to store since we’re just changing the text label and can specify that in one line in iDecideViewController.m. So iDecide is simplified to more of a View - View Controller pattern. You can think of it like the MVC pattern without an M—we don’t need a model here.
If you only have room in your brain for one thing from this chapter, this is what should fill that space: the Model-View-Controller pattern and the View-ViewController pattern are really just specific examples of a general Delegation pattern used everywhere in iOS development. Something delegates responsibility out to another class that’s responsible for actually performing an action as a result. In this case, the view needs to delegate out to the ViewController (through UI events) and let the ViewController know that something happened.
The ViewController (or delegate) then picks up the responsibility of reacting to that event and doing whatever the app has to do next. Sometimes setting up delegates is an explicit thing where you actually tell an object what its delegate is. Sometimes it’s a little more indirect and you do it by linking controls up to methods, like Interface Builder does.
The Objective-C that we wrote is all set to handle things when the button is pressed, but the view hasn’t been set up to connect the button to that code. We need to use the GUI editor to hook up our button to the buttonPressed method we just wrote. Then when the .xib file is loaded by the framework, it will connect the button object it creates with our code.
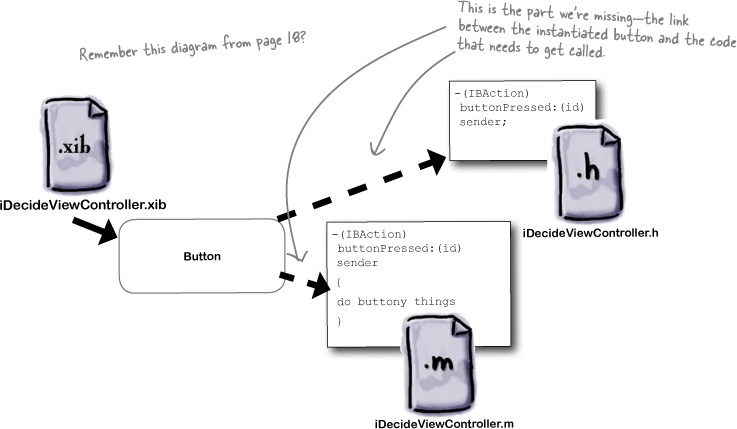
We need to connect the button’s “Hey, I just got pressed” event to our buttonPressed action method. That will get our method called when the user taps on the button. We then need to get a reference to the UILabel that the framework is going to create for us when the nib is loaded—that’s where the IBOutlet comes in. Let’s start with the outlet so we can change the UILabel text when the button is pressed.
Highlight iDecideViewController.xib to bring up the GUI editor, and open the Assistant Editor so you can see iDecideViewController.h alongside. Now let’s hook up the button to our new code.
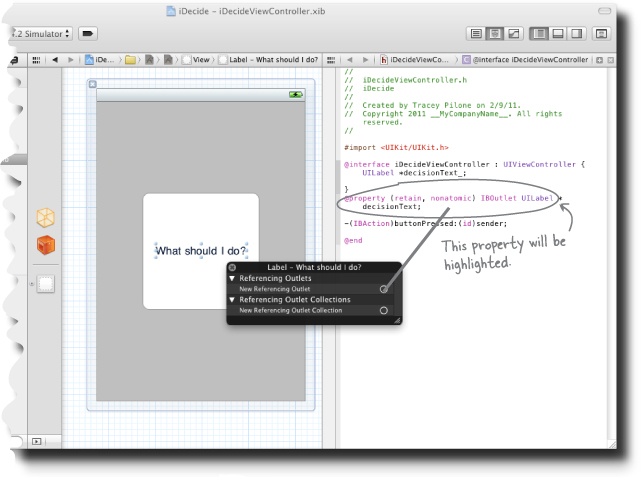
Right-click on the label you dropped on the button. This will bring up a list of events and references.
Click on the circle next to New Referencing Outlet and drag it to the @property statement for the Outlet in the .h file on the right. Now when the decisionText UILabel is generated, our decisionText property will reference the control, through the IBOutlet.
We need to attach the right component event to our code. Remember that action method you wrote earlier that you can connect the button to?

Now we need to pick the event that should trigger this method. If you right-click on the button in the editor, you’ll see a list of events it could dispatch. We want the TouchUpInside event.
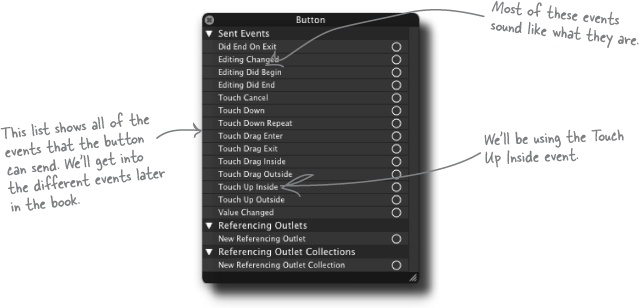
Whenever something happens to a component—for instance, a button gets tapped—the component dispatches one or more events. What we need to do is tell the button to notify us when that event gets raised. We’ll be using the TouchUpInside event. If you think about how you click a button on an iPhone or iPad, the actual click inside the button isn’t what matters: it’s when you remove your finger (or “touch up”) that the actual tap occurs. Connecting an event to a method is just like connecting an element to an outlet, which you just did on the previous page.
Just like with outlets, you drag the connection from the button event to the - (IBAction) code in iDecideViewController.h and select the action that should be called.

All the pieces are fitting together:
The nibs (*.xib) describe the interface.
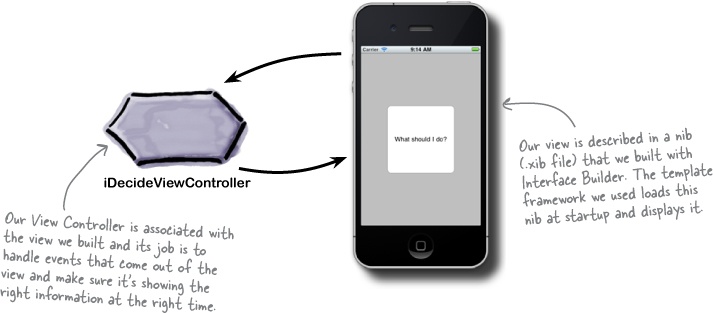
iDecide is made up of two nibs: the MainWindow.xib and our iDecideViewController.xib. Together, these describe the UI the user sees.
The views are connected to the code in the View Controller.
Our views are connected to the implementation code through Interface Builder using IBOutlets and IBActions. IBOutlets give us references to UI components, and IBActions are called when events happen.
Our application behavior is implemented in our View Controller.
Following the MVC pattern (or really, just the VC pattern), we have all of our behavior implemented in our View Controller, cleanly separated from the view itself. The View Controller uses IBOutlets to get back to our actual UI controls if it needs to update them.
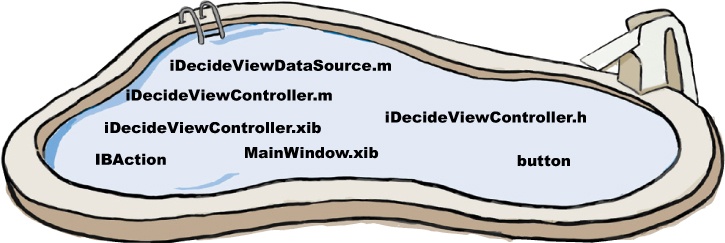
Pool Puzzle
Your job is to take filenames from the pool and place them into the blank lines pointing to the diagram. You may not use the same filename more than once, and you won’t need to use all the names. Your goal is to make a complete diagram that will show the design of iDecide.
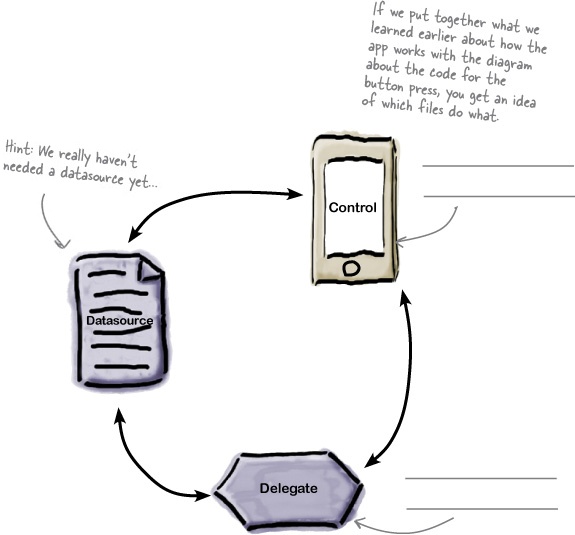
Note: each thing from the pool can only be used once!
Pool Puzzle Solution
Your job is to take filenames from the pool and place them into the blank lines pointing to the diagram. You may not use the same filename more than once, and you won’t need to use all the names. Your goal is to make a complete diagram that will show the design of iDecide.
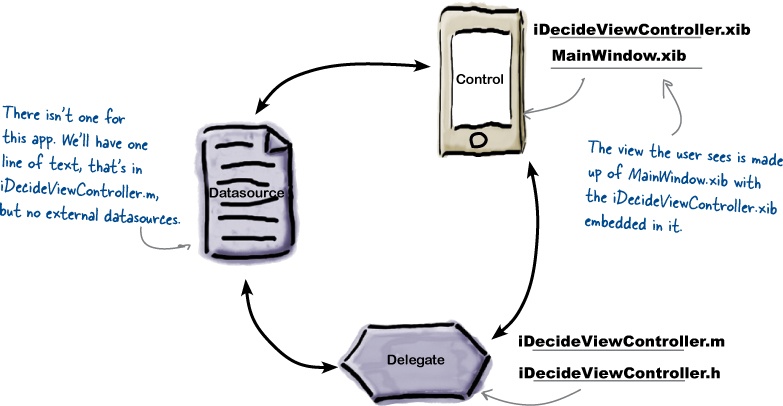
Note: each thing from the pool can only be used once!
iOS cross
Bend your brain around terminology we used in this chapter.

Across | Down | ||
|---|---|---|---|
4. | Something that the simulator cannot reliably test. | 1. | The language used to write iPhone apps. |
5. | This is used to set up an outgoing connection from the implementation code to the view. | 2. | This is used on a desktop to test an app. |
7. | The term to describe each screen of an iPhone app. | 3. | This is used to recieve an event in code and trigger something. |
8. | The framework used to write iPhone apps. | 6. | This is the name of the editor used for Objective-C. |
10. | The folder used to organize the images for the app. | 9. | The iPhone is this kind of device. |
12. | The name of the IDE for iPhone apps. | 11. | The name of a file used to create a view. |
13. | These are used in Xcode to provide classes to be accessed. | ||
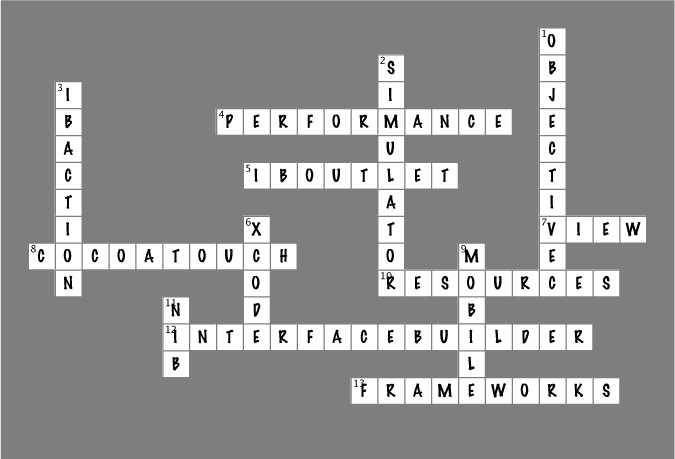
iOS cross Solution
Bend your brain around some of the new terminology we used in this chapter.
Across | Down | ||
|---|---|---|---|
4. | Something that the simulator cannot reliably test. [PERFORMANCE] | 1. | The language used to write iPhone apps. [OBJECTIVEC] |
5. | This is used to set up an outgoing connection from the implementation code to the view. [IBOUTLET] | 2. | This is used on a desktop to test an app. [SIMULATOR] |
7. | The term to describe each screen of an iPhone app. [VIEW] | 3. | This is used to recieve an event in code and trigger something. [IBACTION] |
8. | The framework used to write iPhone apps. [COCOATOUCH] | 6. | This is the name of the editor used for Objective-C. [XCODE] |
10. | The folder used to organize the images for the app. [RESOURCES] | 9. | The iPhone is this kind of device. [MOBILE] |
12. | The name of the IDE for iPhone apps. [INTERFACEBUILDER] | 11. | The name of a file used to create a view. [NIB] |
13. | These are used in Xcode to provide classes to be accessed. [FRAMEWORKS] | ||
You’ve got Chapter 1 under your belt and now you’ve added basic iOS app interactions to your tool box.


Get Head First iPhone and iPad Development, 2nd Edition now with the O’Reilly learning platform.
O’Reilly members experience books, live events, courses curated by job role, and more from O’Reilly and nearly 200 top publishers.

