
The only thing that is standing between you and getting yourself on the Web is learning to speak the lingo:
HyperText Markup Language, or HTML for short. So, get ready for some language lessons. After this chapter, not only are you going to understand some basic elements of HTML, but you’ll also be able to speak HTML with a little style. Heck, by the end of this book you’ll be talking HTML like you grew up in Webville.
Want to get an idea out there? Sell something? Just need a creative outlet? Turn to the Web—we don’t need to tell you it has become the universal form of communication. Even better, it’s a form of communication YOU can participate in.
But if you really want to use the Web effectively, you’ve got to know a few things about HTML—not to mention, a few things about how the Web works too. Let’s take a look from 30,000 feet:

Web servers have a full-time job on the Internet, tirelessly waiting for requests from web browsers. What kinds of requests? Requests for web pages, images, sounds, or maybe even a video. When a server gets a request for any of these resources, the server finds the resource, and then sends it back to the browser.
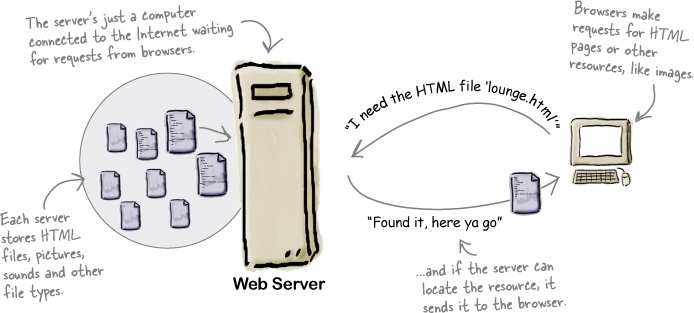
You already know how a browser works: you’re surfing around the Web and you click on a link to visit a page. That click causes your browser to request an HTML page from a web server, retrieve it, and display the page in your browser window.
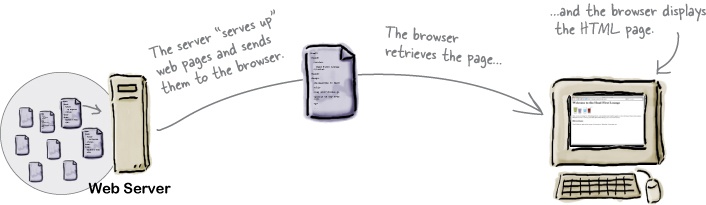
But how does the browser know how to display a page? That’s where HTML comes in. HTML tells the browser all about the content and structure of the page. Let’s see how that works...
So, you know HTML is the key to getting a browser to display your pages, but what exactly does HTML look like? And what does it do?
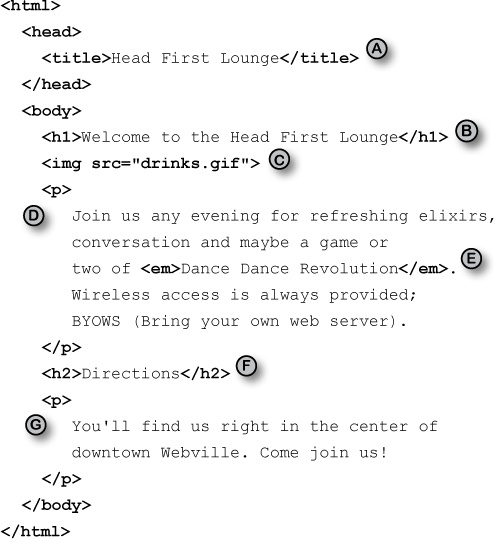
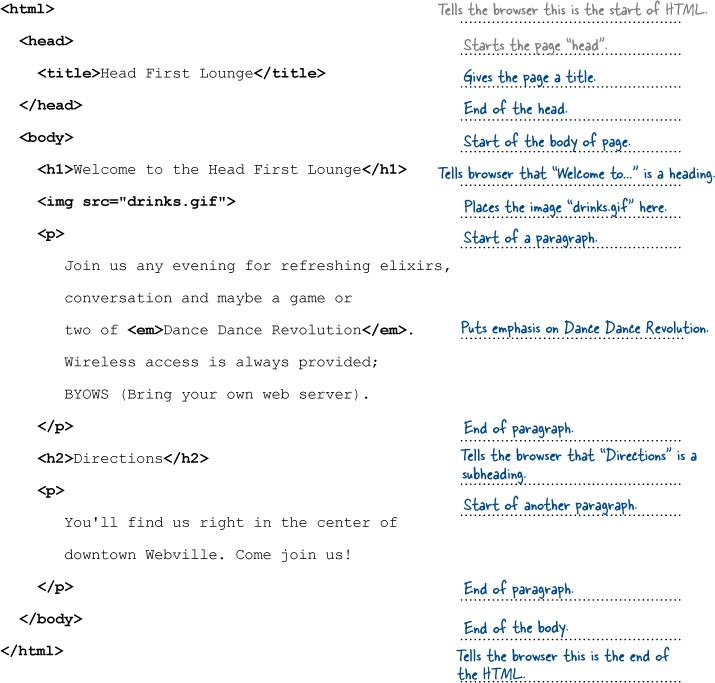
Let’s have a look at a little HTML...imagine you’re going to create a web page to advertise the Head First Lounge, a local hangout with some good tunes, refreshing elixirs, and wireless access. Here’s what you’d write in HTML:
Relax
We don’t expect you to know HTML yet.
At this point you should just be getting a feel for what HTML looks like; we’re going to cover everything in detail in a bit. For now, study the HTML and see how it gets represented in the browser on the next page. Be sure to pay careful attention to each letter annotation and how and where it is displayed in the browser.
When the browser reads your HTML, it interprets all the tags that surround your text. Tags are just words or characters in angle brackets, like <head>, <p>, <h1>, and so on. The tags tell the browser about the structure and meaning of your text. So rather than just giving the browser a bunch of text, with HTML you can use tags to tell the browser what text is in a heading, what text is a paragraph, what text needs to be emphasized, or even where images need to be placed.
Let’s check out how the browser interprets the tags in the Head First Lounge:

Sharpen your pencil
You’re closer to learning HTML than you think...
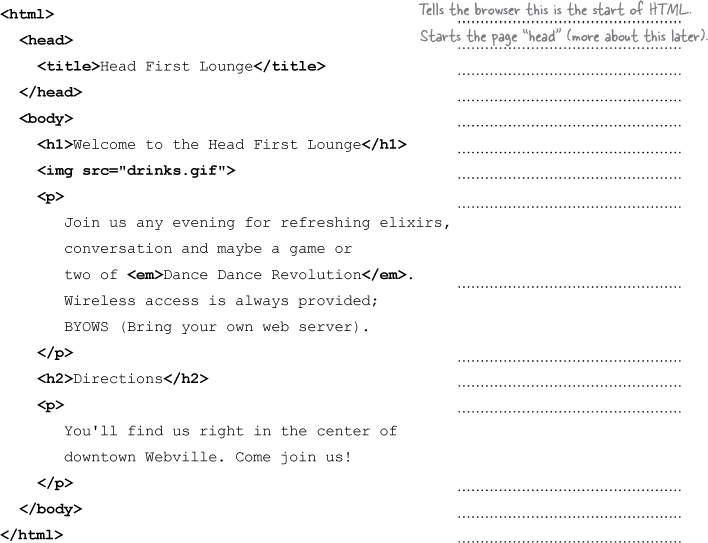
Here’s the HTML for the Head First Lounge again. Take a look at the tags and see if you can guess what they tell the browser about the content. Write your answers in the space on the right; we’ve already done the first couple for you.
Starbuzz Coffee has made a name for itself as the fastest growing coffee shop around. If you’ve seen one on your local corner, look across the street—you’ll see another one.

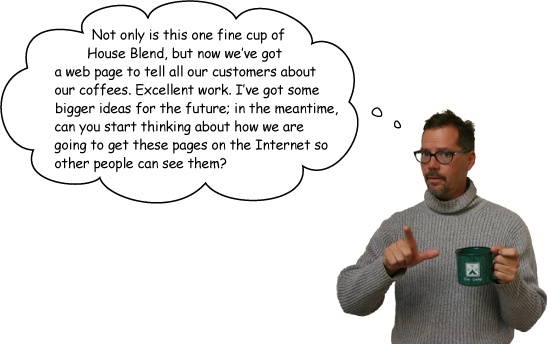
In fact, they’ve grown so quickly, they haven’t even managed to put up a web page yet...and therein lies your big break: By chance, while buying your Starbuzz Chai Tea, you run into the Starbuzz CEO...


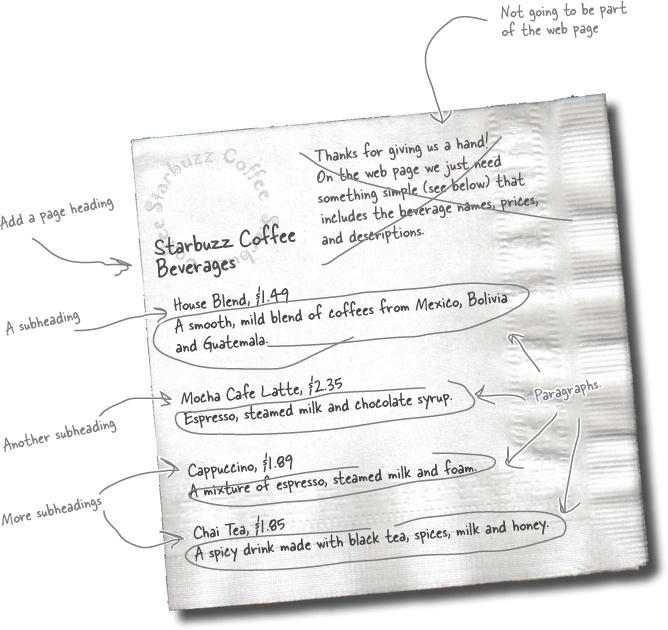
Thanks for giving us a hand! On the web page we just need something simple (see below) that includes the beverage names, prices, and descriptions.
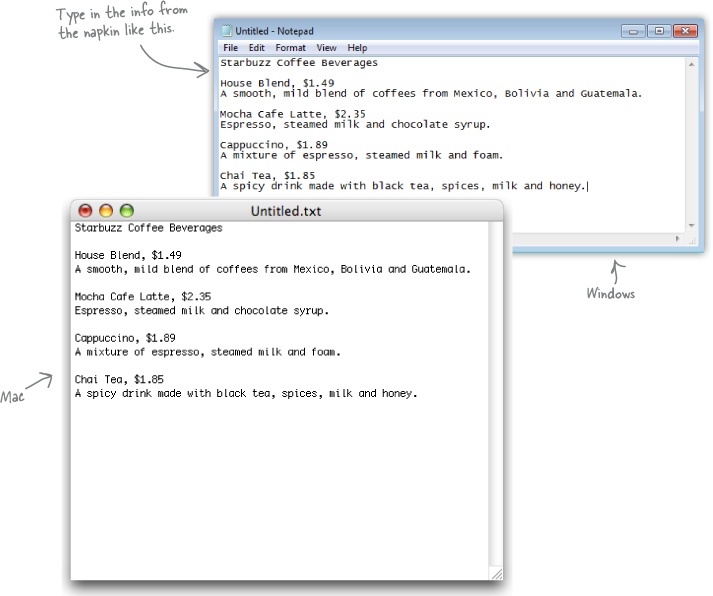
House Blend, $1.49
A smooth, mild blend of coffees from Mexico, Bolivia and Guatemala.
Mocha Cafe Latte, $2.35
Espresso, steamed milk and chocolate syrup.
Cappuccino, $1.89
A mixture of espresso, steamed milk and foam.
Chai Tea, $1.85
A spicy drink made with black tea, spices, milk and honey.
Of course, the only problem with all this is that you haven’t actually created any web pages yet. But that’s why you decided to dive head first into HTML, right?
No worries, here’s what you’re going to do on the next few pages:
Create an HTML file using your favorite text editor.
Type in the menu the Starbuzz CEO wrote on the napkin.
Save the file as “index.html”.
Open the file “index.html” in your favorite browser, step back, and watch the magic happen.
All HTML files are text files. To create a text file, you need an application that allows you to create plain text without throwing in a lot of fancy formatting and special characters. You just need plain, pure text.
We’ll use TextEdit on the Mac in this book; however, if you prefer another text editor, that should work fine as well. And, if you’re running Windows, you’ll want to skip ahead a couple of pages to the Windows instructions.
Step one:
Navigate to your Applications folder
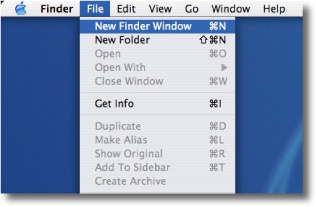
The TextEdit application is in the Applications folder. The easiest way to get there is to choose New Finder Window from the Finder’s File menu and then look for the Application directly in your shortcuts. When you’ve found it, click on Applications.
Step two:
Locate and run TextEdit
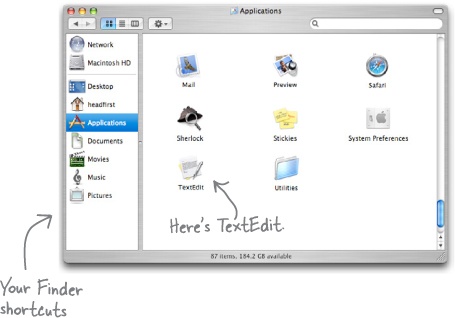
You’ll probably have lots of applications listed in your Applications folder, so scroll down until you see TextEdit. To run the application, double-click on the TextEdit icon.
Step three (optional):
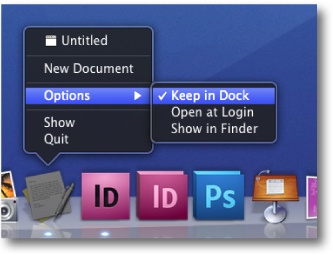
Keep TextEdit in your Dock
If you want to make your life easier, click and hold on the TextEdit icon in the Dock (this icon appears once the application is running). When it displays a pop-up menu, choose Options, then “Keep in Dock.” That way, the TextEdit icon will always appear in your Dock and you won’t have to hunt it down in the Applications folder every time you need to use it.
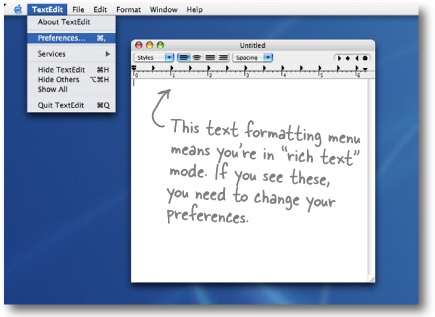
Change your TextEdit Preferences
By default, TextEdit is in “rich text” mode, which means it will add its own formatting and special characters to your file when you save it—not what you want. So, you’ll need to change your TextEdit Preferences so that TextEdit saves your work as a pure text file. To do this, first choose the Preferences menu item from the TextEdit menu.
Step five:
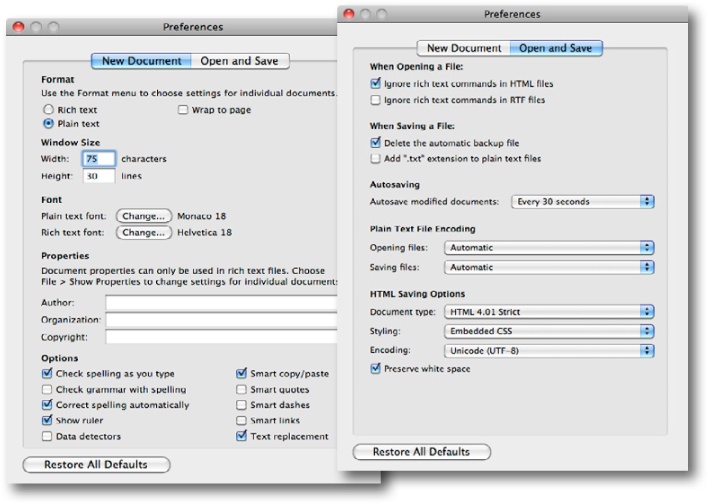
Set Preferences for Plain text
Once you see the Preferences dialog box, there are three things you need to do.
First, choose “Plain text” as the default editor mode in the New Document tab.
In the “Open and Save” tab, make sure “Ignore rich text commands in HTML files” is checked.
Last, make sure that the “Add .txt extension to plain text files” is unchecked.
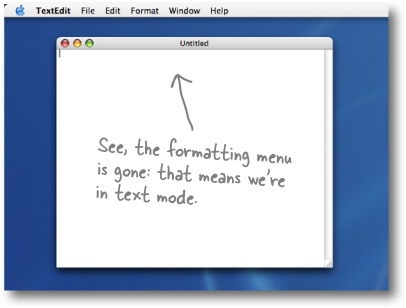
That’s it; to close the dialog box, click on the red button in the top-left corner.
Step six:
If you’re reading this page you must be a Windows 7 user. If you’re not, you might want to skip a couple of pages ahead. Or, if you just want to sit in the back and not ask questions, we’re okay with that too.
To create HTML files in Windows 7, we’re going to use Notepad—it ships with every copy of Windows, the price is right, and it’s easy to use. If you’ve got your own favorite editor that runs on Windows 7, that’s fine too; just make sure you can create a plain-text file with an “.html” extension.
Assuming you’re using Notepad, here’s how you’re going to create your first HTML file.
Step one:
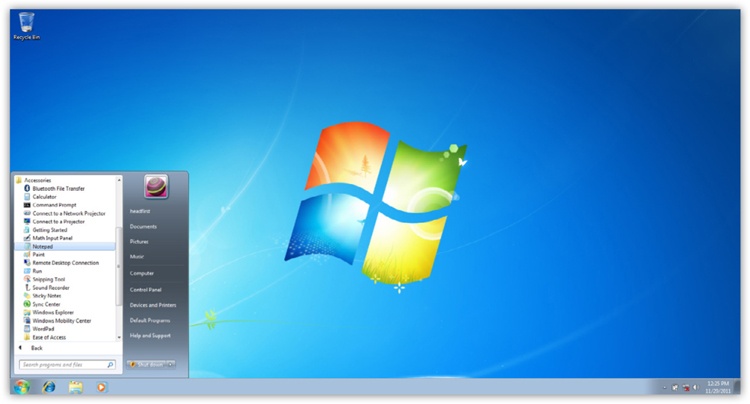
Open the Start menu and navigate to Notepad.
You’ll find the Notepad application in Accessories. The easiest way to get there is to click on the Start menu, then on All Programs, then Accessories. You’ll see Notepad listed there.
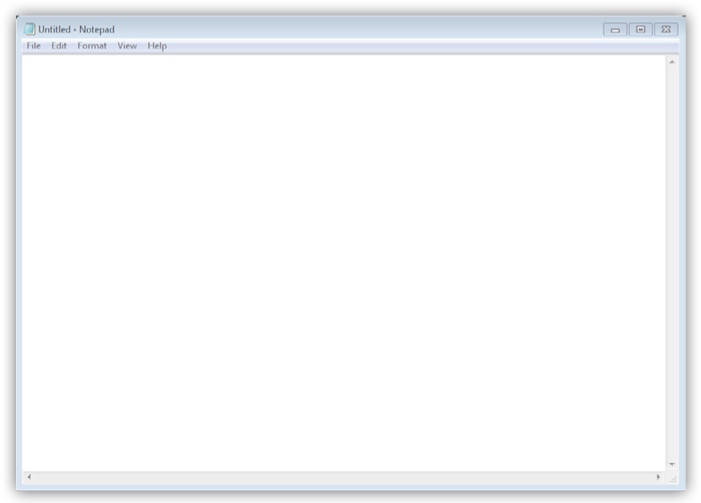
Open Notepad.
Once you’ve located Notepad in the Accessories folder, go ahead and click on it. You’ll see a blank window ready for you to start typing HTML.
Step three (optional):
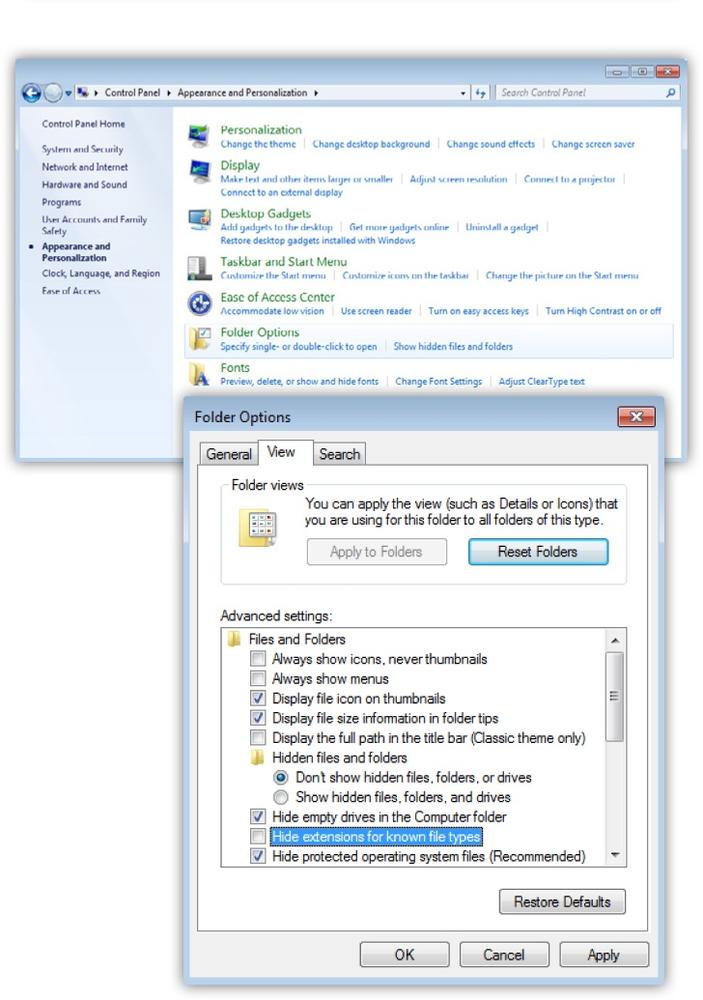
Don’t hide extensions of well-known file types.
By default, Windows File Explorer hides the file extensions of well-known file types. For example, a file named “Irule.html” will be shown in the Explorer as “Irule” without its “.html” extension.
It’s much less confusing if Windows shows you these extensions, so let’s change your folder options so you can see them.
First, open Folder Options by clicking the Start button, clicking Control Panel, clicking “Appearance and Personalization,” and then clicking Folder Options.
Next, in the View tab, under “Advanced settings,” scroll down until you see “Hide extensions for known file types” and uncheck this option.
That’s it. Click on the OK button to save the preference and you’ll now see the file extensions in the Explorer.
Okay, now that you know the basics of creating a plain-text file, you just need to get some content into your text editor, save it, and then load it into your browser.

Start by typing in the beverages straight from the CEO’s napkin; these beverages are the content for your page. You’ll be adding some HTML markup to give the content some structure in a bit, but for now, just get the basic content typed in. While you’re at it, go ahead and add “Starbuzz Coffee Beverages” at the top of the file.
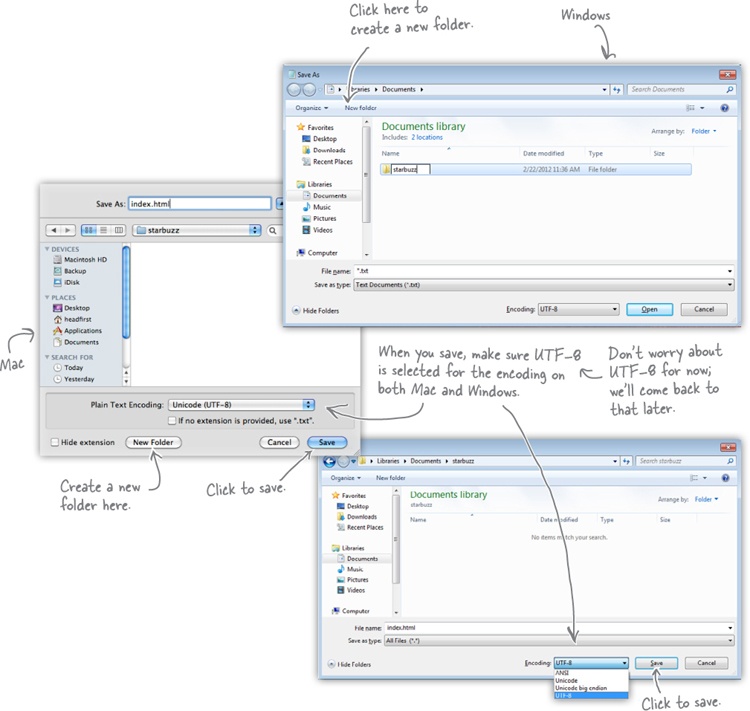
Once you’ve typed in the beverages from the CEO’s napkin, you’re going to save your work in a file called “index.html”. Before you do that, you’ll want to create a folder named “starbuzz” to hold the site’s files.
To get this all started, choose Save from the File menu and you’ll see a Save As dialog box. Then, here’s what you need to do:
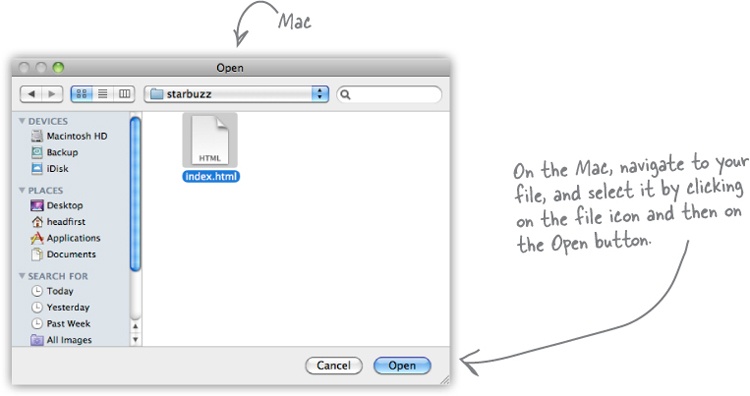
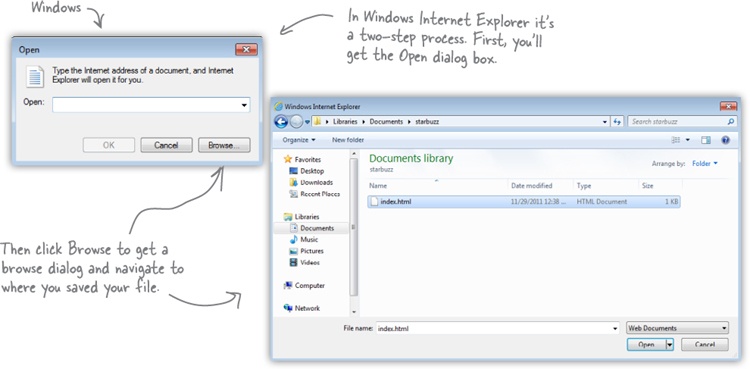
Are you ready to open your first web page? Using your favorite browser, choose “Open File...” (or “Open...” using Windows 7 and Internet Explorer) from the File menu and navigate to your “index.html” file. Select it and click Open.

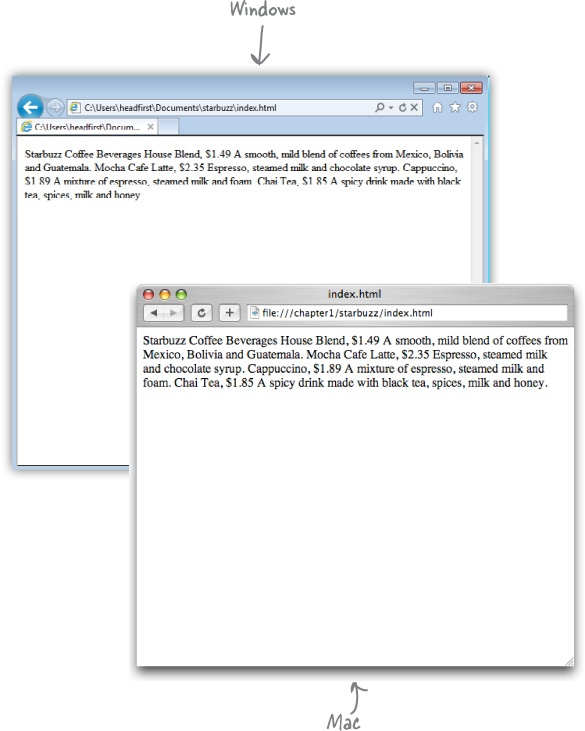
Success! You’ve got the page loaded in the browser, although the results are a little...uh...unsatisfying. But that’s just because all you’ve done so far is go through the mechanics of creating a page and viewing it in the browser. And so far, you’ve only typed in the content of the web page. That’s where HTML comes in. HTML gives you a way to tell the browser about the structure of your page. What’s structure? As you’ve already seen, it is a way of marking up your text so that the browser knows what’s a heading, what text is in a paragraph, what text is a subheading, and so on. Once the browser knows a little about the structure, it can display your page in a more meaningful and readable manner.
Markup Magnets
So, let’s add that structure...
Your job is to add structure to the text from the Starbuzz napkin. Use the fridge magnets at the bottom of the page to mark up the text so that you’ve indicated which parts are headings, subheadings and paragraph text. We’ve already done a few to get you started. You won’t need all the magnets below to complete the job; some will be left over.


You have an HTML file with markup—does that make a web page? Almost. You’ve already seen the <html>, <head>, <title>, and <body> tags, and we just need to add those to make this a first-class HTML page...
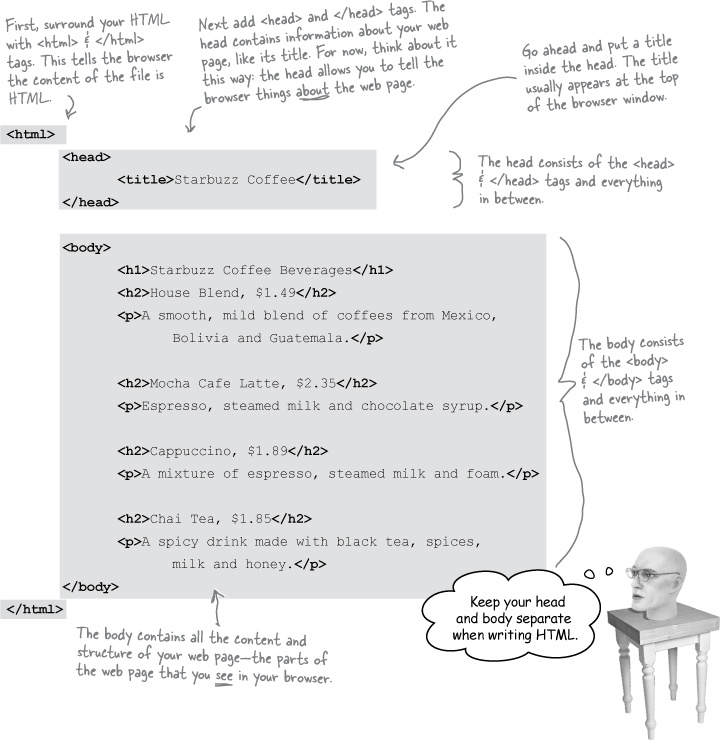
Go ahead and change your “index.html” file by adding in the <head>, </head>, <title>, </title>, <body> and </body> tags. Once you’ve done that, save your changes and reload the file into your browser.

Okay, you’ve seen a bit of markup, so let’s zoom in and take a look at how tags really work.
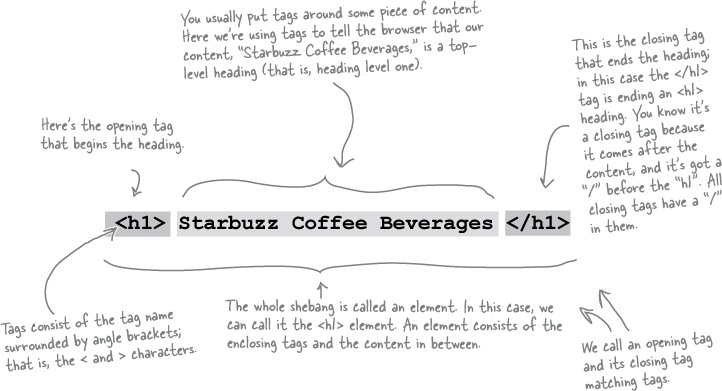
Note
To tell the browser about the structure of your page, use pairs of tags around your content.
Remember:
Element = Opening Tag + Content + Closing Tag
Brain Power
Tags can be a little more interesting than what you’ve seen so far. Here’s the paragraph tag with a little extra added to it. What do you think this does?
<p id="houseblend">A smooth, mild
blend of coffees from Mexico, Bolivia
and Guatemala.</p>
Exercise

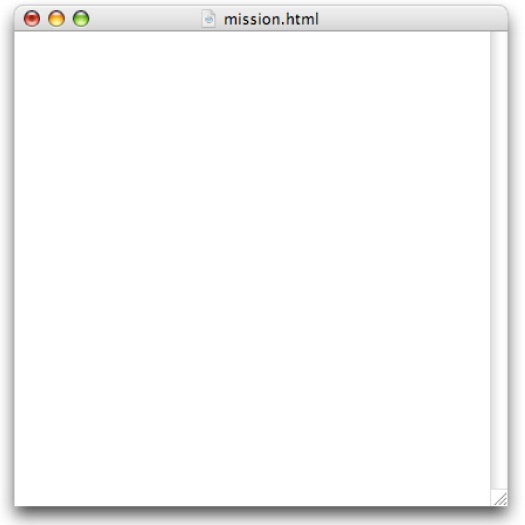
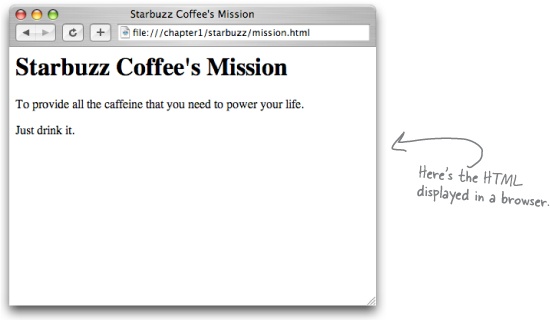
Write the HTML for the new “mission.html” page here.
Type in your HTML using a text editor, and save it as “mission.html” in the same folder as your “index.html” file.
Once you’ve done that, open “mission.html” in your browser.
Check your work at the end of the chapter before moving on...

Right. We have the structure down, so now we’re going to concentrate on its presentation.
You already know that HTML gives you a way to describe the structure of the content in your files. When the browser displays your HTML, it uses its own built-in default style to present this structure. But relying on the browser for style obviously isn’t going to win you any “designer of the month” awards.
That’s where CSS comes in. CSS gives you a way to describe how your content should be presented. Let’s get our feet wet by creating some CSS that makes the Starbuzz page look a little more presentable (and launch your web career in the process).
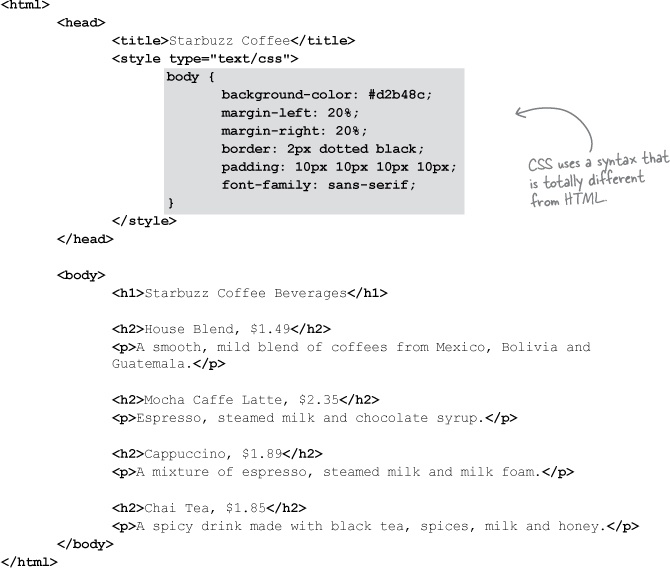
To add style, you add a new (say it with us) E-L-E-M-E-N-T to your page—the <style> element. Let’s go back to the main Starbuzz page and add some style. Check it out...
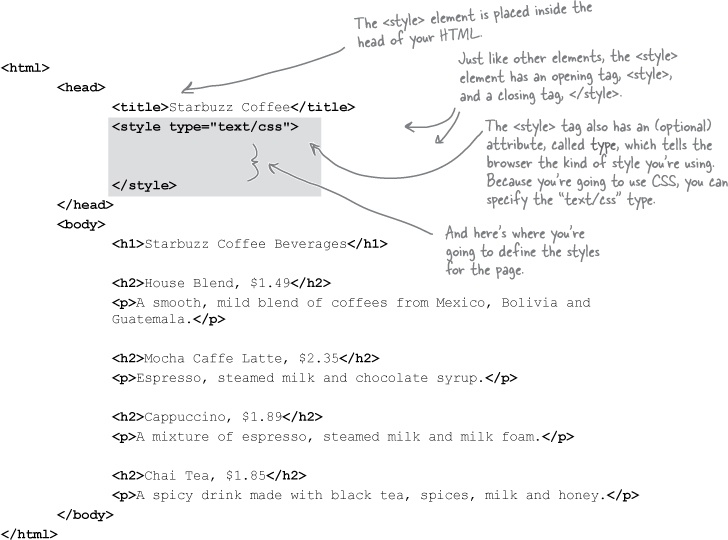
Now that you’ve got a <style> element in the HTML head, all you need to do is supply some CSS to give the page a little pizzazz. Below you’ll find some CSS already “baked” for you. Whenever you see the ![]() logo, you’re seeing HTML and CSS that you should type in as-is. Trust us. You’ll learn how the markup works later, after you’ve seen what it can do.
logo, you’re seeing HTML and CSS that you should type in as-is. Trust us. You’ll learn how the markup works later, after you’ve seen what it can do.
So, take a look at the CSS and then add it to your “index.html” file. Once you’ve got it typed in, save your file.
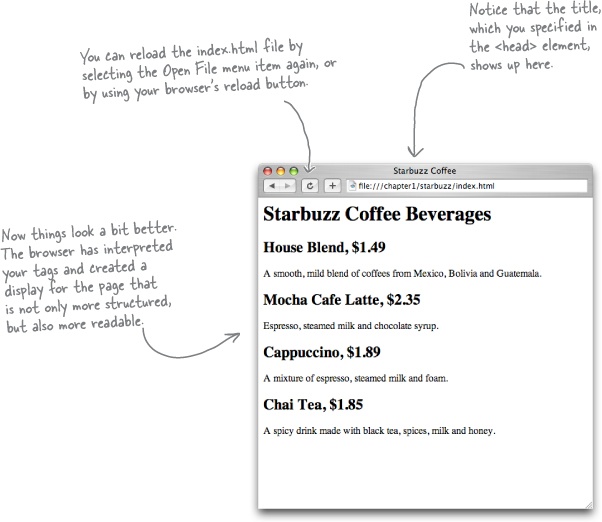
It’s time for another test drive, so reload your “index.html” file again. This time, you’ll see the Starbuzz web page has a whole new look.
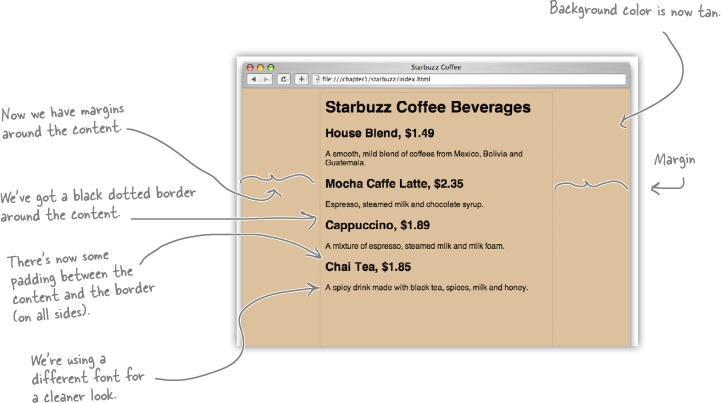
Watch it!
If you’re using IE, you might not see the border.
Internet Explorer does not display the border around the body correctly. Try loading the page in Firefox, Chrome or Safari to see the border.

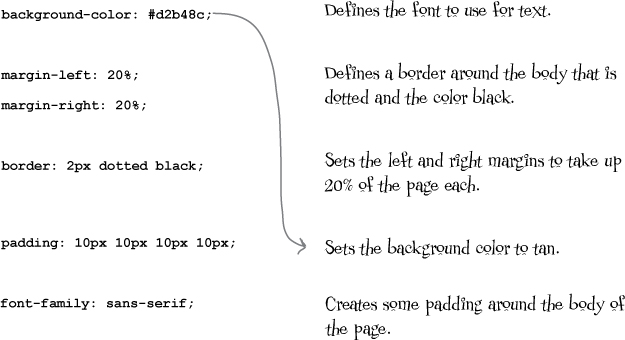
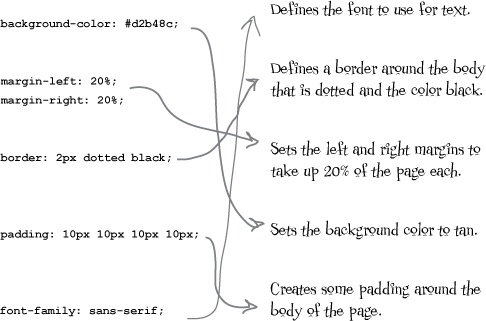
Who Does What?
Even though you’ve just glanced at CSS, you’ve already begun to see what it can do. Match each line in the style definition to what it does.
Exercise
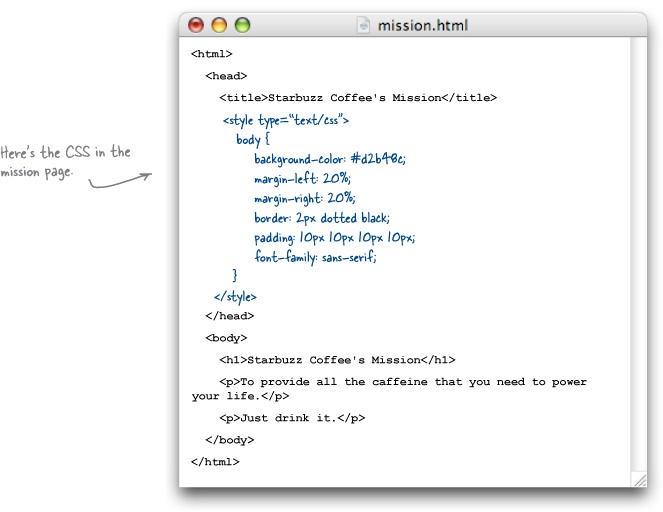
Now that you’ve put a little style in the Starbuzz “index.html” page, go ahead and update your “mission.html” page to have the same style.
Write the HTML for the “mission.html” page below, and then add the new CSS.
Update your “mission.html” file to include the new CSS.
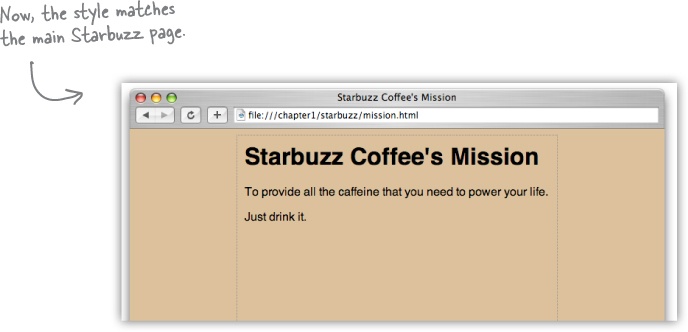
Once you’ve done that, reload “mission.html” in your browser.
Make sure your mission page looks like ours at the end of the chapter.
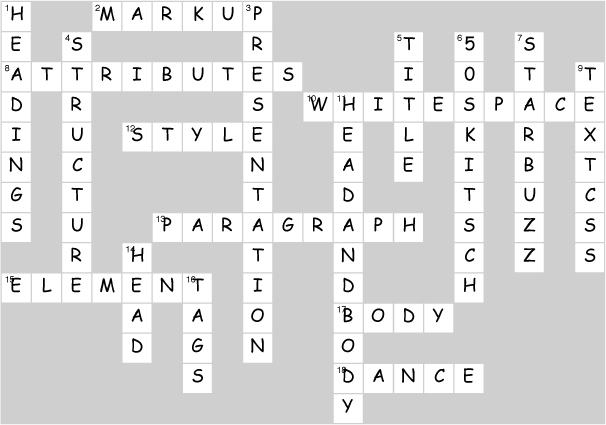
HTMLcross
It’s time to sit back and give your left brain something to do. It’s your standard crossword; all of the solution words are from this chapter.
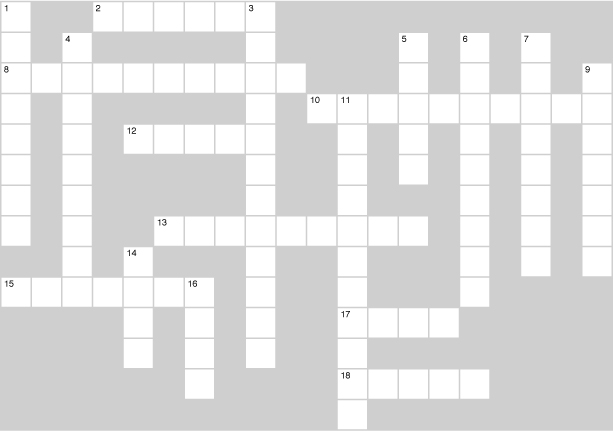
Across | Down |
|---|---|
2. The “M” in HTML. 8. Tags can have these to provide additional information. 10. Browsers ignore this. 12. You define presentation through this element. 13. Purpose of <p> element. 15. Two tags and content. 17. What you see in your page. 18. We emphasized Dance _____ Revolution. | 1. There are six of these. 3. CSS is used when you need to control this. 4. You mark up content to provide this. 5. Appears at the top of the browser for each page. 6. Style we wish we could have had. 7. Company that launched your web career. 9. Only type of style available. 11. Always separate these in HTML. 14. About your web page. 16. Opening and closing. |
Sharpen your pencil Solution
Go ahead and mark up the napkin (using your pencil) with any structure you see, and add anything that is missing.
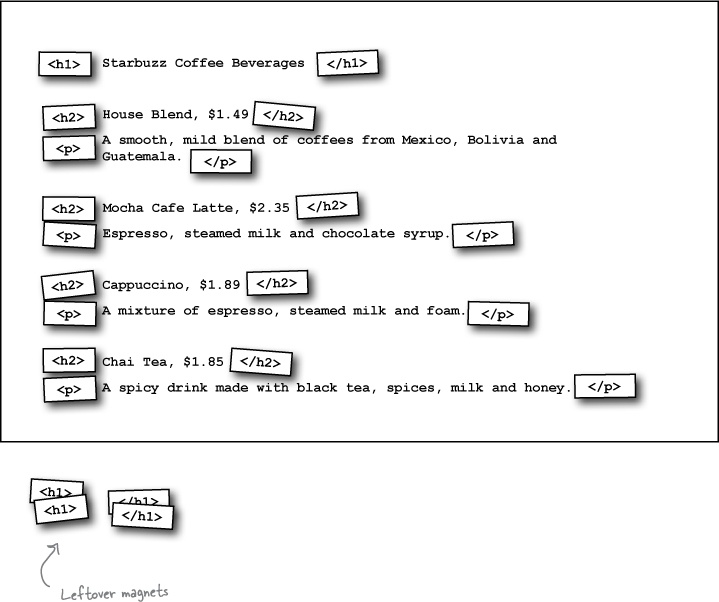
Markup Magnets Solution
Your job was to add some structure to the text from the Starbuzz napkin. Use the fridge magnets at the bottom of the page to mark up the text so that you’ve indicated which parts are headings, subheadings, and paragraph text. Here’s our solution.


Get Head First HTML and CSS, 2nd Edition now with the O’Reilly learning platform.
O’Reilly members experience books, live events, courses curated by job role, and more from O’Reilly and nearly 200 top publishers.

