Chapter 1. Getting Started: Diving In

Android has taken the world by storm.
Everybody wants a smartphone or tablet, and Android devices are hugely popular. In this book, we’ll teach you how to develop your own apps, and we’ll start by getting you to build a basic app and run it on an Android Virtual Device. Along the way, you’ll meet some of the basic components of all Android apps, such as activities and layouts. All you need is a little Java know-how...
Welcome to Androidville
Android is the world’s most popular mobile platform. At the last count, there were over one billion active Android devices worldwide, and that number is growing rapidly.
Android is a comprehensive open source platform based on Linux and championed by Google. It’s a powerful development framework that includes everything you need to build great apps using a mix of Java and XML. What’s more, it enables you to deploy those apps to a wide variety of devices—phones, tablets and more.
So what makes up a typical Android app?
We’re going to build our Android apps using a mixture of Java and XML. We’ll explain things along the way, but you’ll need to have a fair understanding of Java to get the most out of this book.
Layouts define what each screen looks like
A typical Android app is comprised of one or more screens. You define what each screen looks like using a layout to define its appearance. Layouts are usually defined using XML, and can include GUI components such as buttons, text fields, and labels.
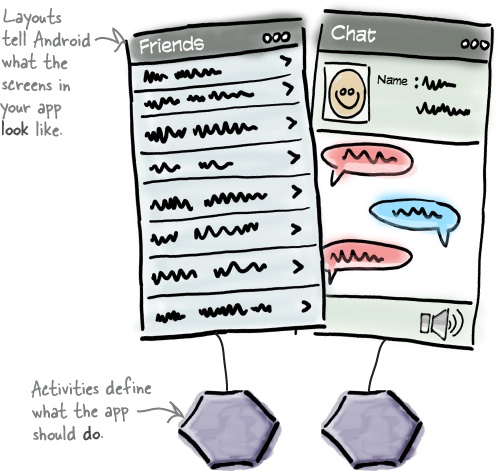
Java code defines what the app should do
Layouts only define the appearance of the app. You define what the app does by writing Java code. A special Java class called an activity decides which layout to use and tells the app how to respond to the user. As an example, if a layout includes a button, you need to write Java code in the activity to define what the button should do when you press it.
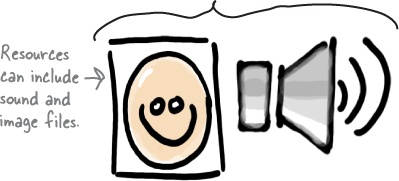
Sometimes extra resources are needed too
In addition to Java code and layouts, Android apps often need extra resources such as image files and application data. You can add any extra files you need to the app.
Android apps are really just a bunch of files in particular directories. When you build your app, all of these files get bundled together, giving you an app you can run on your device.
The Android platform dissected
The Android platform is made up of a number of different components. It includes core applications such as Contacts, a set of APIs to help you control what your app looks like and how it behaves, and a whole load of supporting files and libraries. Here’s a quick look at how they all fit together:
Relax
Don’t worry if this seems like a lot to take in.
At this stage, we’re just giving you an overview of what’s included in the Android platform. We’ll explain the different components in more detail as and when we need to.
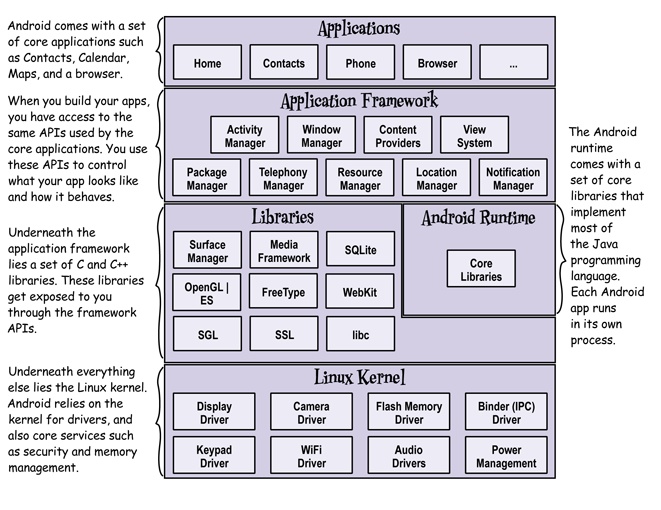
The great news is that all of the powerful Android libraries are exposed through the APIs in the application framework, and it’s these APIs that you use to create great Android apps. All you need to begin is some Java knowledge and a great idea for an app.
Here’s what we’re going to do
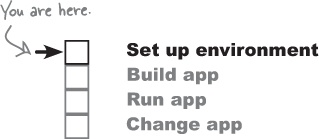
So let’s dive in and create a basic Android app. There are just a few things we need to do:
Set up a development environment.
We need to install Android Studio, which includes all the tools you need to develop your Android apps.
Build a basic app.
We’ll build a simple app using Android Studio that will display some sample text on the screen.
Run the app in the Android emulator.
We’ll use the built-in emulator to see the app up and running.
Change the app.
Finally, we’ll make a few tweaks to the app we created in step 2, and run it again.
Your development environment
Java is the most popular language used to develop Android applications. Android devices don’t run .class and .jar files. Instead, to improve speed and battery performance, Android devices use their own optimized formats for compiled code. That means that you can’t use an ordinary Java development environment—you also need special tools to convert your compiled code into an Android format, to deploy them to an Android device and to let you debug the app once it’s running.
All of these come as part of the Android SDK. Let’s take a look at what’s included.
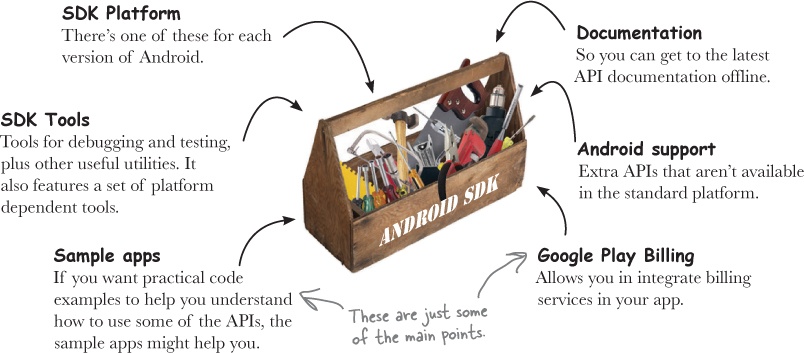
The Android SDK
The Android Software Development Kit contains the libraries and tools you need to develop Android apps:
Android Studio is a special version of IntelliJ IDEA
IntelliJ IDEA is one of the most popular IDEs for Java development. Android Studio is a version of IDEA that includes a version of the Android SDK and extra GUI tools to help you with your app development.
In addition to providing you with an editor and access to the tools and libraries in the Android SDK, Android Studio gives you templates you can use to help you create new apps and classes, and it makes it easy to do things such as package your apps and run them.
Install Java

Android Studio is a Java development environment, so you need to make sure the right version of Java is installed on your machine.
First, check the Android Studio system requirements to see which versions of the Java Development Kit (JDK) and Java Runtime Edition (JRE) you need. You can see the system requirements here:
When you know which versions of the JDK and JRE you need, you can get them from here and install them:
Then install Android Studio
Once you have Java up and running, you can download Android Studio from here:
This page also includes installation instructions. Follow the instructions to install Android Studio on your computer. Once you’ve installed Android Studio, open it and follow the instructions to add the latest SDK tools and support libraries.
Note
We’re not including installation instructions in this book as they can get out of date pretty quickly. Follow the online instructions and you’ll be fine.
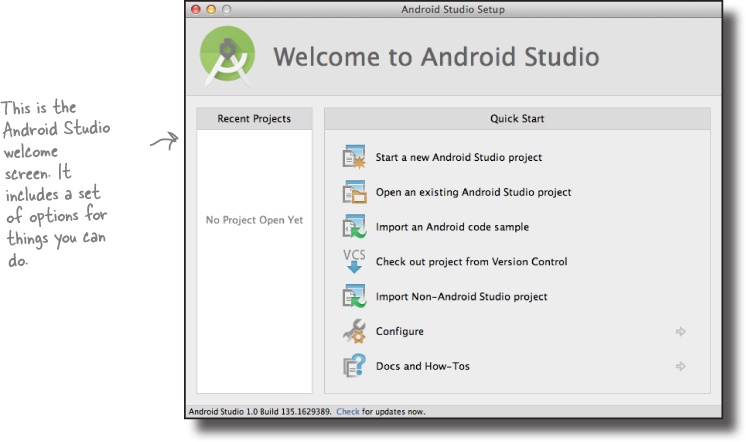
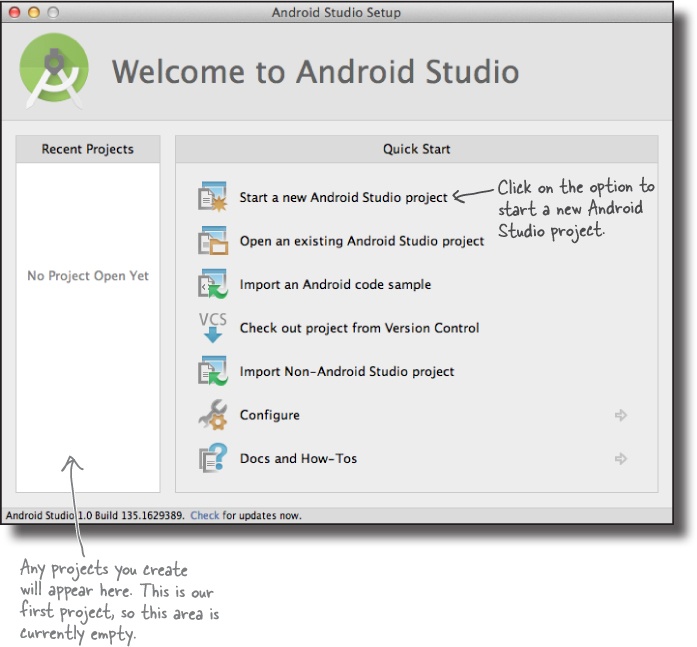
When you’re done, you should see the Android Studio welcome screen. You’re ready to build your first Android app.
Build a basic app
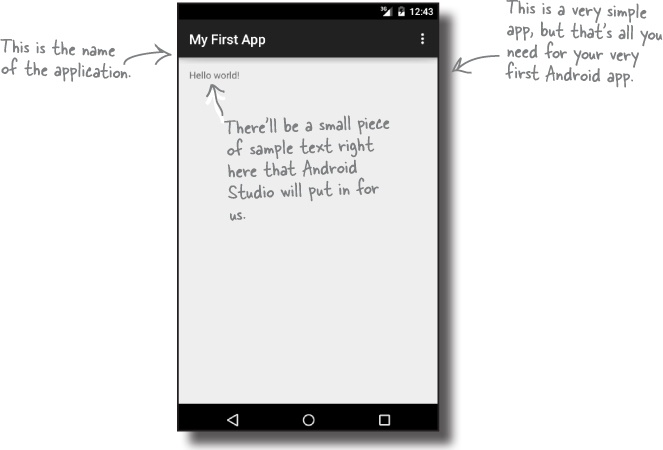
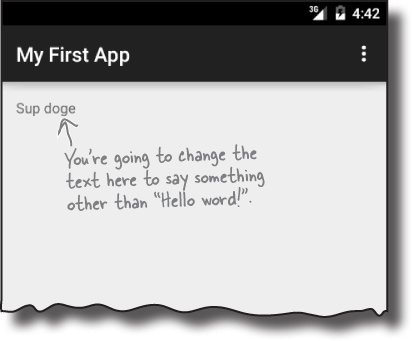
Now that you’ve set up your development environment, you’re ready to create your first Android app. Here’s what the app will look like:
Let’s build the basic app

Whenever you create a new app, you need to create a new project for it. Make sure you have Android Studio open, and follow along with us.
1. Create a new project
The Android Studio welcome screen gives you a number of options for what you want to do. We want to create a new project, so click on the option for “Start a new Android Studio project”.
2. Configure the project

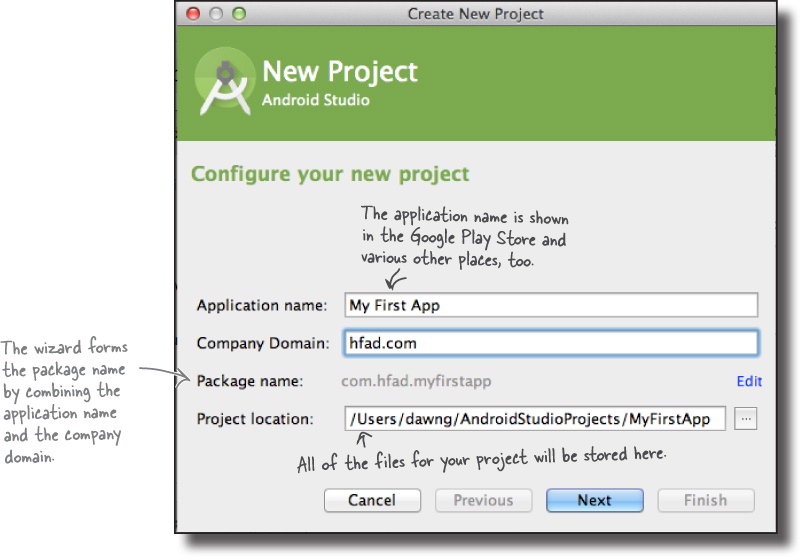
You now need to configure the app by saying what you want to call it, what company domain to use, and where you would like to store the files.
Android Studio uses the company domain and application name to form the name of the package that will be used for your app. As an example, if you give your app a name of “My First App” and use a company domain of “hfad.com”, Android Studio will derive a package name of com.hfad.myfirstapp. The package name is really important in Android, as it’s used by Android devices to uniquely identify your app.
Enter an application name of “My First App”, a company name of “hfad.com”, and accept the default project location. Then click on the Next button.
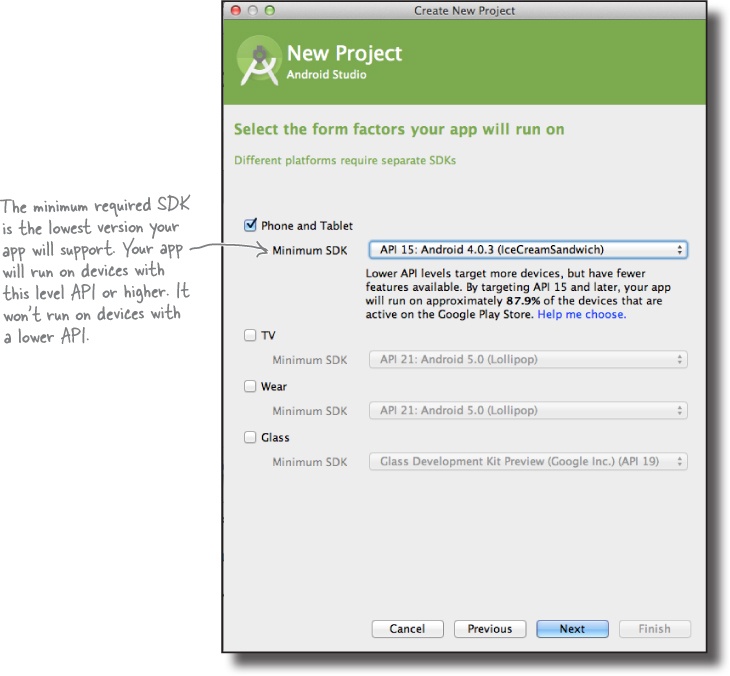
3. Specify the API level

You now need to indicate which API level of Android your app will use. API levels increase with every new version of Android. Unless you only want your app to run on the very newest devices, you probably want to specify one of the older APIs.
Here, we’re choosing API level 15, which means it will be able to run on most devices. Also, we’re only going to create a version of our app to run on phones and tablets, so we’ll leave the other options unchecked.
When you’ve done this, click on the Next button.
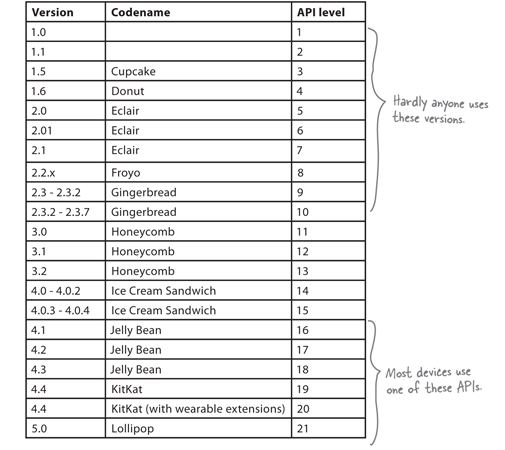
You’ve probably heard a lot of things about Android that sound tasty. Things like Ice Cream Sandwich, Jelly Bean, KitKat, and Lollipop. So what’s with all the confectionary?
Android versions have a version number and a codename. The version number gives the precise version of Android (e.g., 5.0), while the codename is a slightly more generic “friendly” name that may cover several versions of Android (e.g., Lollipop). The API level refers to the version of the APIs used by applications. As an example, the equivalent API level for Android version 5.0 is 21.
When you develop Android apps, you really need to consider which versions of Android you want your app to be compatible with. If you specify that your app is only compatible with the very latest version of the SDK, you might find that it can’t be run on many devices in the first instance. You can find out the percentage of devices running particular versions here: https://developer.android.com/about/dashboards/index.html.
Activities and layouts from 50,000 feet

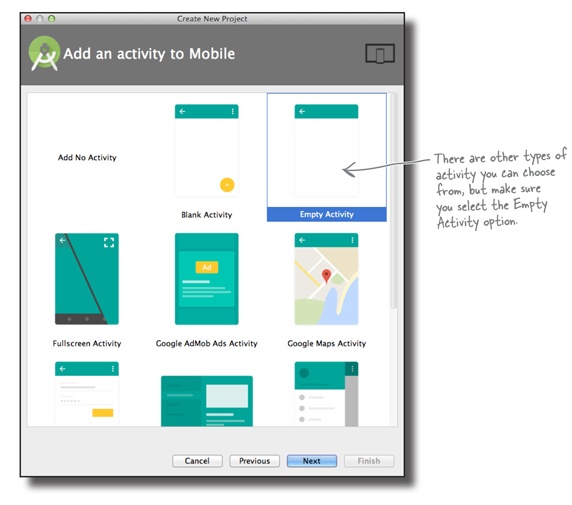
The next thing you’ll be prompted to do is add an activity to your project. Every Android app is a collection of screens, and each screen is comprised of an activity and a layout.
An activity is a single, defined thing that your user can do. You might have an activity to compose an email, take a photo, or find a contact. Activities are usually associated with one screen, and they’re written in Java.
A layout describes the appearance of the screen. Layouts are written as XML files and they tell Android how the different screen elements are arranged.
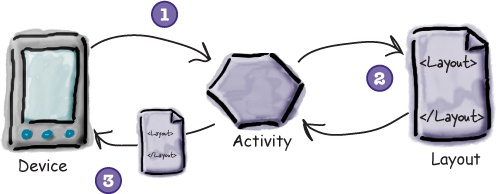
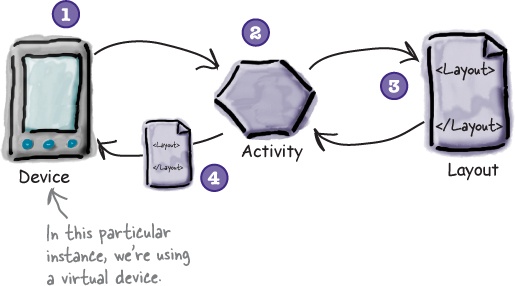
Let’s look in more detail at how activities and layouts work together to create a user interface:
Layouts define how the user interface is presented.
Activities define actions.
The device launches your app and creates an activity object.
The activity object specifies a layout.
The activity tells Android to display the layout on screen.
The user interacts with the layout that’s displayed on the device.
The activity responds to these interactions by running application code.
The activity updates the display...
...which the user sees on the device.

Now that you know a bit more about what activities and layouts are, let’s go through the last couple of steps in the wizard and get it to create a basic activity and layout.
Building a basic app (continued)

Building a basic app (continued)
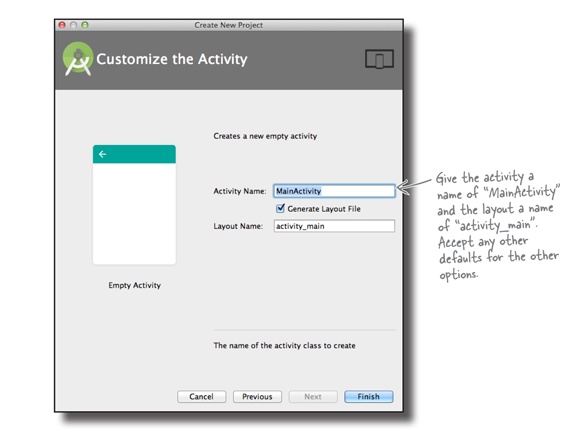
5. Configure the activity

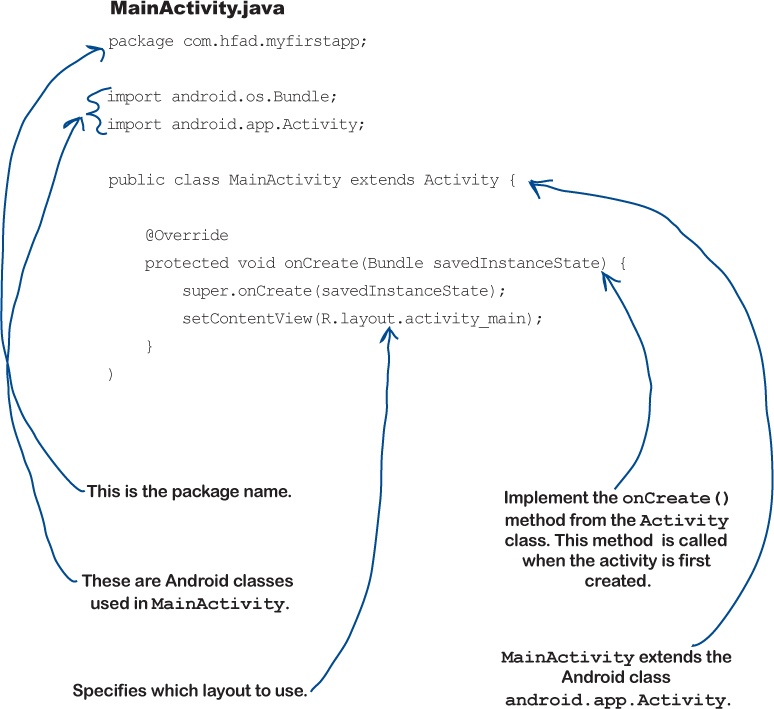
You will now be asked what you want to call the screen’s activity and layout. You will also need to say what the title of the screen will be, and specify a menu resource name. Enter an activity name of “MainActivity”, and a layout name of “activity_main”. The activity is a Java class, and the layout is an XML file, so the names we’ve given here will create a Java class file called MainActivity.java and an XML file called activity_main.xml.
When you click on the Finish button, Android Studio will build your app.
You’ve just created your first Android app

The Android Studio wizard created a project for your app, configured to your specifications.
You defined which versions of Android the app should be compatible with, and the wizard created all of the files and folders needed for a basic valid app.
It created a basic activity and layout with template code.
The template code includes layout XML and activity Java code, with sample “Hello world!” text in the layout. You can change this code.
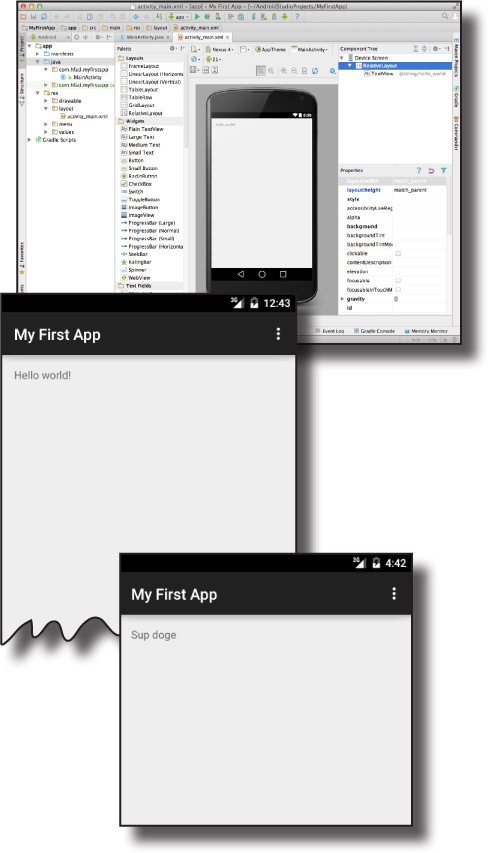
When you finish creating your project by going through the wizard, Android Studio automatically displays the project for you.
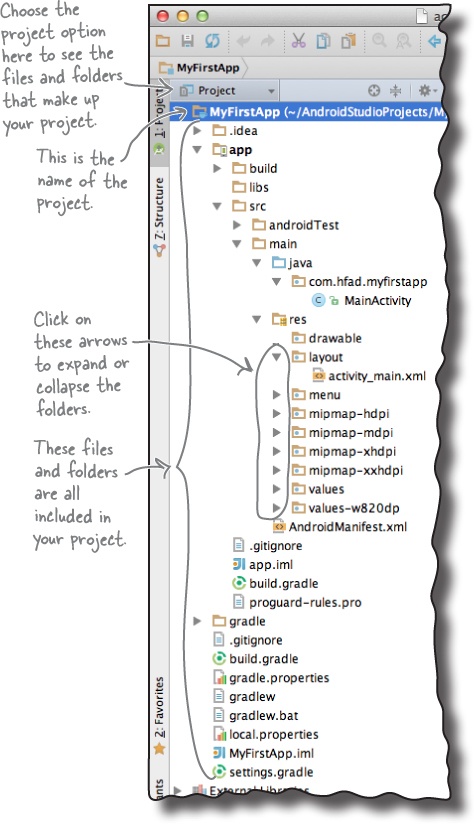
Here’s what our project looks like (don’t worry if it looks complicated right now, we’ll break it down over the next few pages):
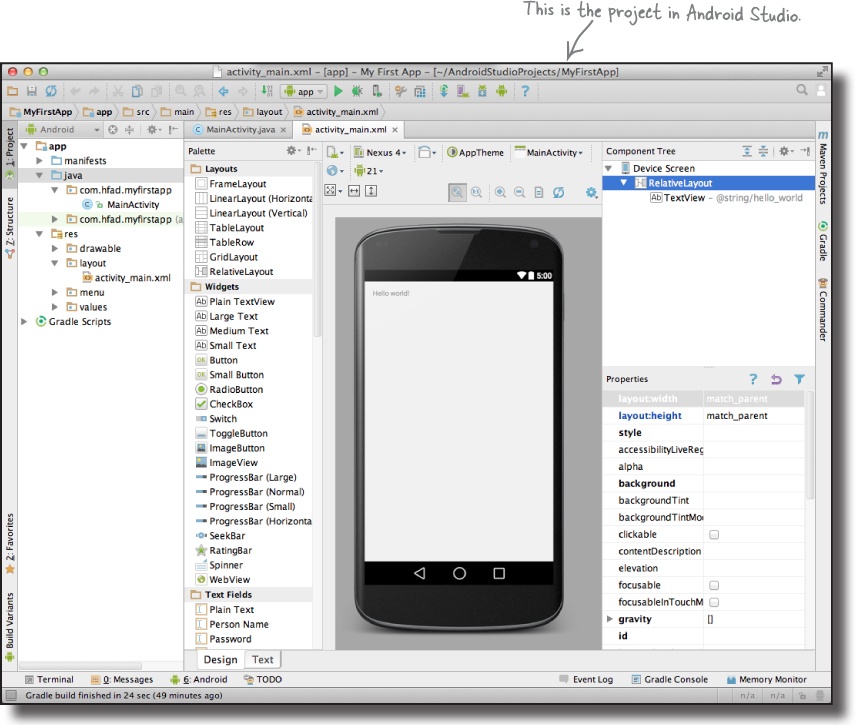
Android Studio creates a complete folder structure for you

An Android app is really just a bunch of valid files in a particular folder structure, and Android Studio sets all of this up for you when you create a new app. The easiest way of looking at this folder structure is with the explorer in the leftmost column of Android Studio.
The explorer contains all of the projects that you currently have open. To expand or collapse folders, just click on the arrows to the left of the folder icons.
The folder structure includes different types of files
If you browse through the folder structure, you’ll see that the wizard has created various types of files and folders for you:
Java and XML source files
These are the activity and layout files the wizard created for you.
Android-generated Java files
There are some extra Java files you don’t need to touch which Android Studio generates for you automatically.
Resource files
These include default image files for icons, styles your app might use, and any common String values your app might want to look up.
Android libraries
In the wizard, you specified the minimum SDK version you want your app to be compatible with. Android Studio makes sure it includes the relevant Android libraries for this version.
Configuration files
The configuration files tell Android what’s actually in the app and how it should run.
Let’s take a closer look at some of the key files and folders in Androidville.
Useful files in your project

Android Studio projects use the gradle build system to compile and deploy your apps. Gradle projects have a standard layout. Here are some of the key files and folders you’ll be working with:

Edit code with the Android Studio editors

You view and edit files using the Android Studio editors. Double-click on the file you want to work with, and the file contents will appear in the middle of the Android Studio window.
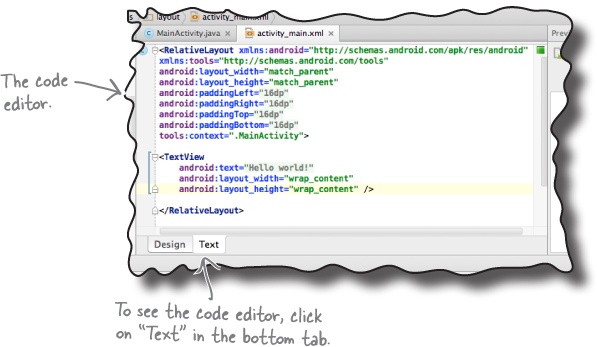
The code editor
Most files get displayed in the code editor. The code editor is just like a text editor, but with extra features such as color coding and code checking.
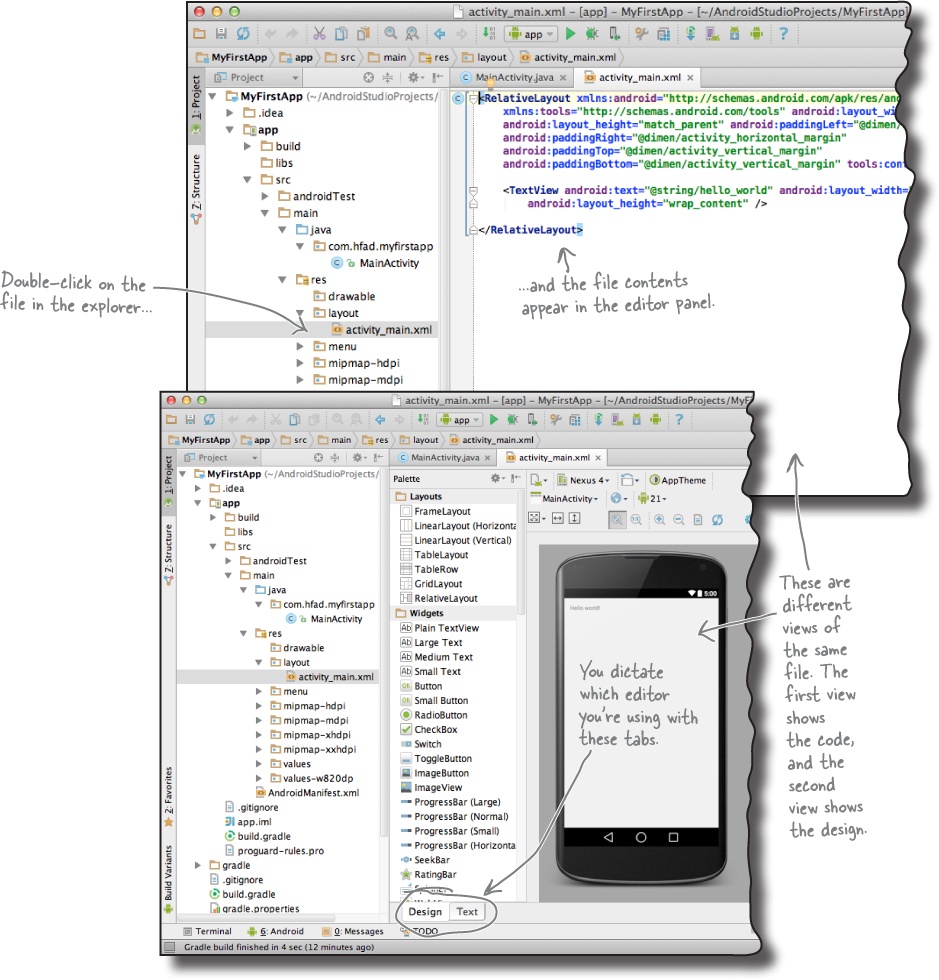
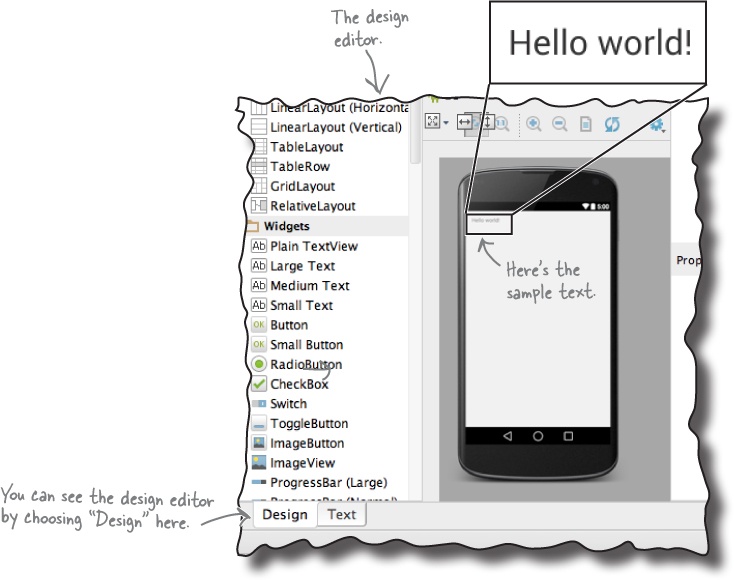
The design editor
If you’re editing a layout, you have an extra option. Rather than edit the XML, you can use the design editor. The design editor allows you to drag GUI components onto your layout, and arrange them how you want. The code editor and design editor give different views of the same file, so you can switch back and forth between the two.
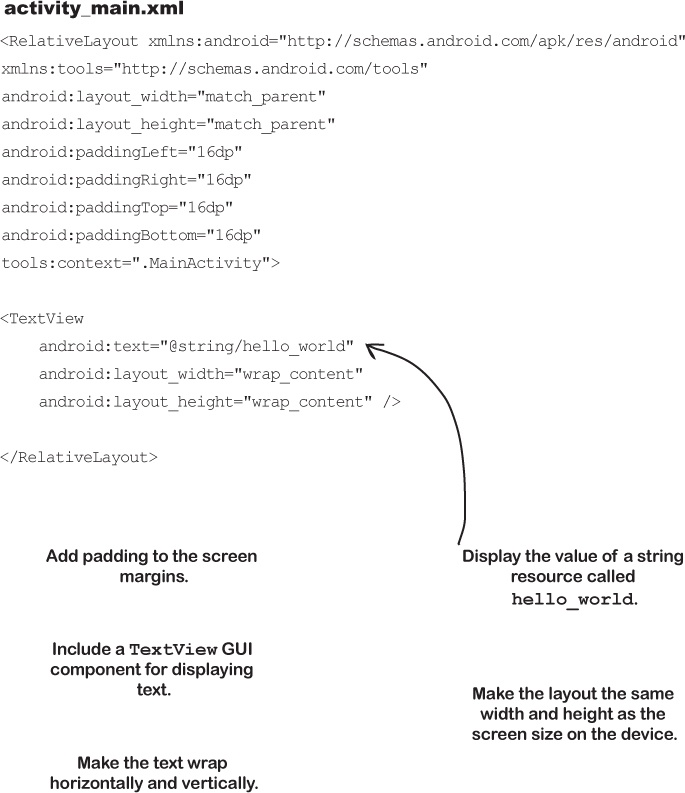
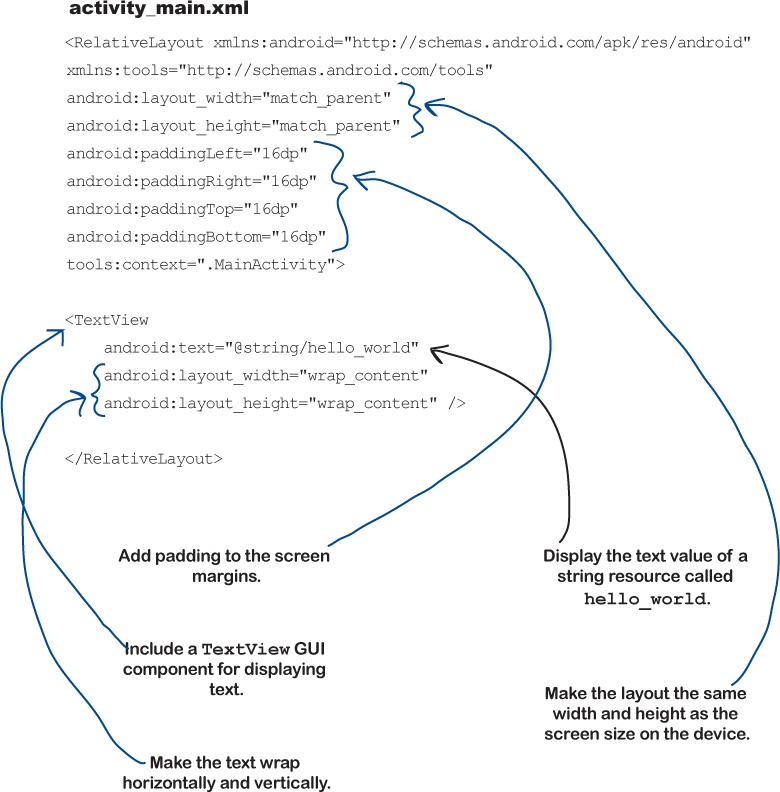
Here’s the code from a layout file Android Studio generated for us. We know you’ve not seen layout code before, but just see if you can match each of the descriptions at the bottom of the page to the correct lines of code. We’ve done one to get you started.
Run the app in the Android emulator

So far you’ve seen what your Android app looks like in Android Studio and got a feel for how it hangs together. But what you really want to do is see it running, right?
You have a couple of options when it comes to running your apps. The first option is to run them on a physical device. But what if you don’t have one with you, or you want to see how it looks on a type of device you don’t have?
An alternative option is to use the Android emulator that’s built into the Android SDK. The emulator enables you to set up one or more Android virtual devices (AVDs) and then run your app in the emulator as though it’s running on a physical device.
The Android emulator allows you to run your app on an Android virtual device (AVD). The AVD behaves just like a physical Android device. You can set up numerous AVDs, each emulating a different type of device.
So what does the emulator look like?
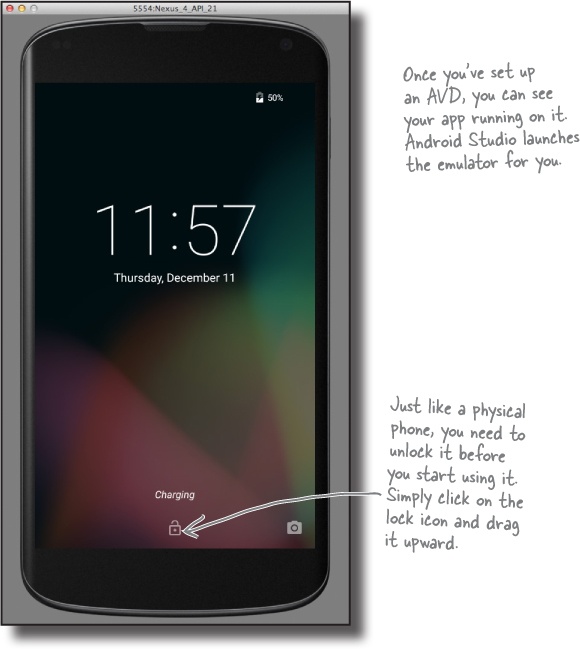
Here’s an AVD running in the Android emulator. It looks just like a phone running on your computer.
The emulator is an application that re-creates the exact hardware environment of an Android device: from its CPU and memory, through to the sound chips and the video display. The emulator is built on an existing emulator called QEMU, which is similar to other virtual machine applications you may have used, like VirtualBox or VMWare.
The exact appearance and behavior of the AVD depends on how you’ve set up the AVD in the first place. The AVD here is set up to mimic a Nexus 4, so it will look and behave just like a Nexus 4 on your computer.
Let’s set up an AVD so that you can see your app running in the emulator.
Creating an Android Virtual Device

There are a few steps you need to go through in order to set up an AVD within Android Studio. We’ll set up a Nexus 4 AVD running API level 21 so that you can see how your app looks and behaves running on this type of device. The steps are pretty much identical no matter what type of device you want to set up.
Open the Android Virtual Device Manager
The AVD Manager allows you to set up new AVDs, and view and edit ones you’ve already created. Open it by selecting Android on the Tools menu and choosing AVD Manager.
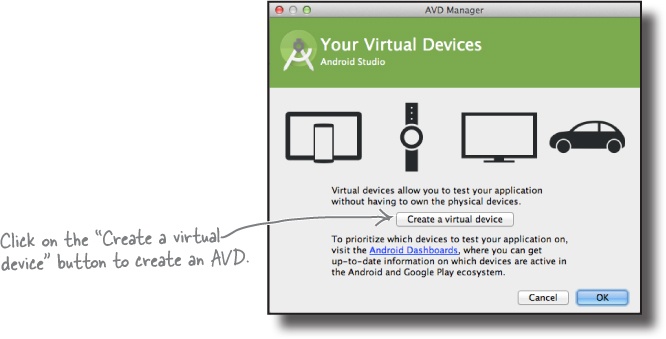
If you have no AVDs set up already, you’ll be presented with a screen prompting you to create one. Click on the “Create a virtual device” button.
Select the hardware
On the next screen, you’ll be prompted to choose a device definition. This is the type of device your AVD will emulate. You can choose a variety of phone, tablet, wear, or TV devices.
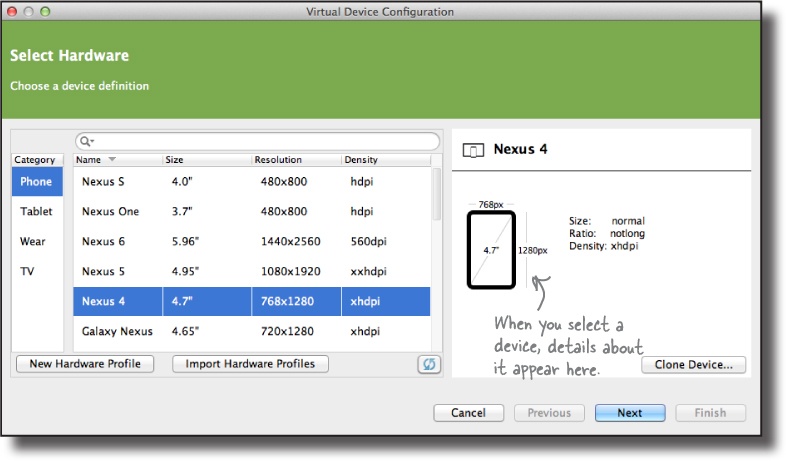
We’re going to see what our app looks like running on a Nexus 4 phone. Choose Phone from the Category menu and Nexus 4 from the list. Then click the Next button.

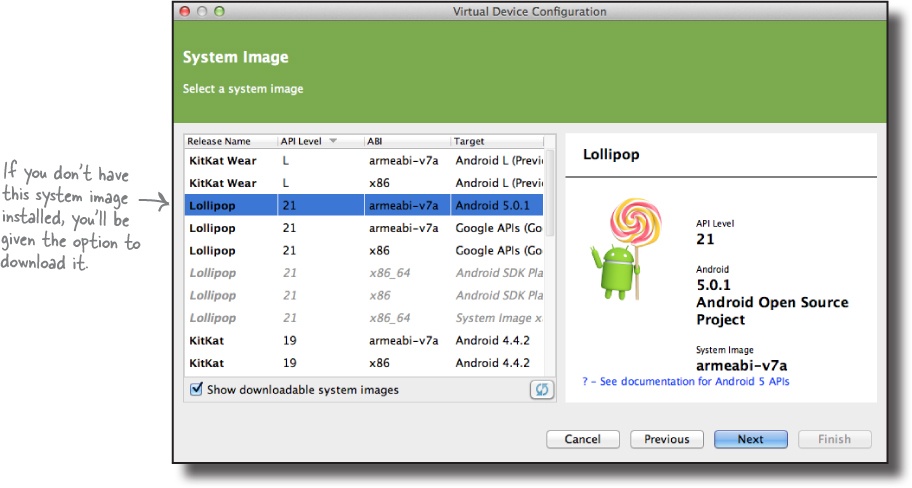
Select a system image
Next, you need to select a system image. The system image gives you an installed version of the Android operating system. You can choose the version of Android you want to be on your AVD, and what type of CPU (ARM or x86).
You need to choose a system image for an API level that’s compatible with the app you’re building. As an example, if you want your app to work on a minimum of API level 15, choose a system image for at least API level 15. We’re going to use a system image for API level 21. Choose the option for Lollipop 21 armeabi-v7a with a target of Android 5.0.1. Then click on the Next button.
We’ll continue setting up the AVD on the next page.

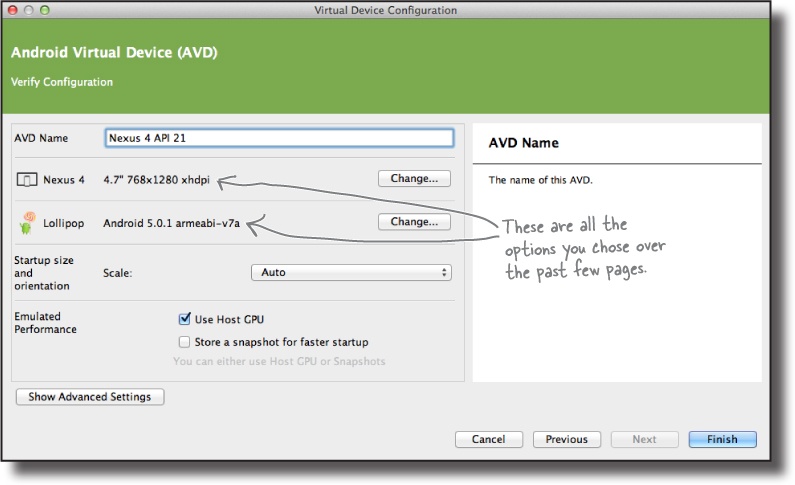
Verify the AVD configuration
On the next screen, you’ll be asked to verify the AVD configuration. This screen summarizes the options you chose over the last few screens, and gives you the option of changing them. Accept the options, and click on the Finish button.
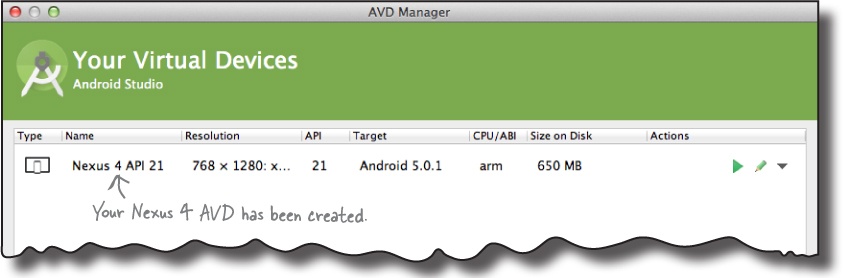
The AVD Manager will create the AVD for you, and when it’s done, display it in the AVD Manager list of devices. You may now close the AVD Manager.
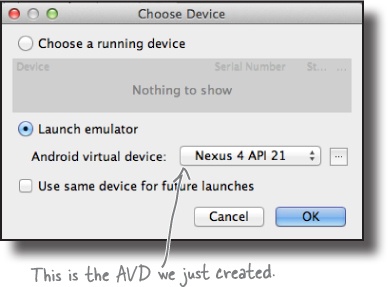
Run the app in the emulator

Now that you’ve set up your AVD, let’s run the app on it. To do this, choose the “Run ‘app’” command from the Run menu. When you’re asked to choose a device, make sure the “Launch emulator” option is selected, along with the Nexus 4 AVD you just created. Then click on the OK button.
While we wait patiently for the AVD to appear, let’s take a look at what happens when you choose Run.
Compile, package, deploy and run
Choosing the Run option doesn’t just run your app. It also deals with all the preliminary tasks that are needed for the app to run:
An APK file is an Android application package. It’s basically a JAR or ZIP file for Android applications.
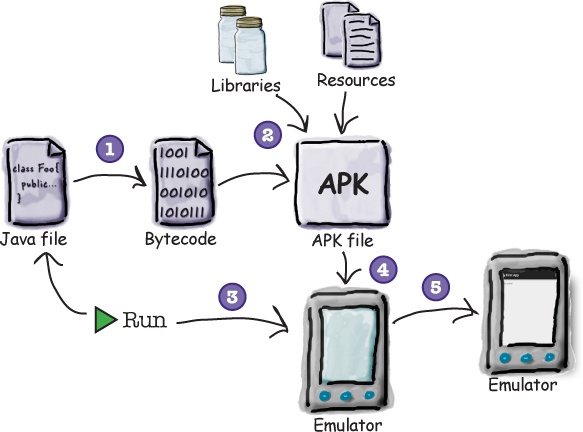
The Java source files get compiled to bytecode.
An Android application package, or APK file, gets created.
The APK file includes the compiled Java files, along with any libraries and resources needed by your app.
Assuming there’s not one already running, the emulator gets launched with the AVD.
Once the emulator has been launched and the AVD is active, the APK file is uploaded to the AVD and installed.
The AVD starts the main activity associated with the app.
Your app gets displayed on the AVD screen, and it’s all ready for you to test out.
You can watch progress in the console

It can sometimes take quite a while for the emulator to launch with your AVD—often several minutes. The great news is that you can see what’s happening using the Android Studio console. The console gives you a blow-by-blow account of what the gradle build system is doing, and if it encounters any errors, you’ll see them highlighted in the text.
Note
We suggest finding something else to do while waiting for the emulator to start. Like quilting, or cooking a small meal.
You can find the console at the bottom of the Android Studio screen:
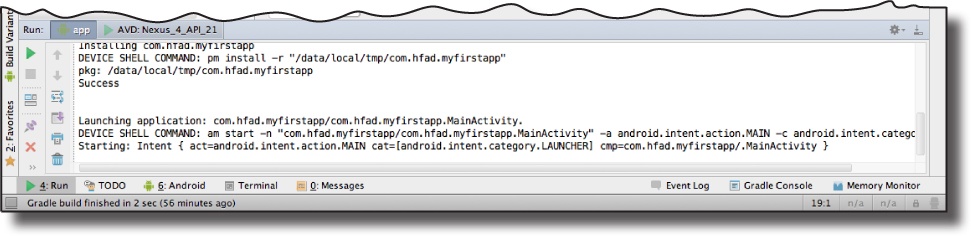
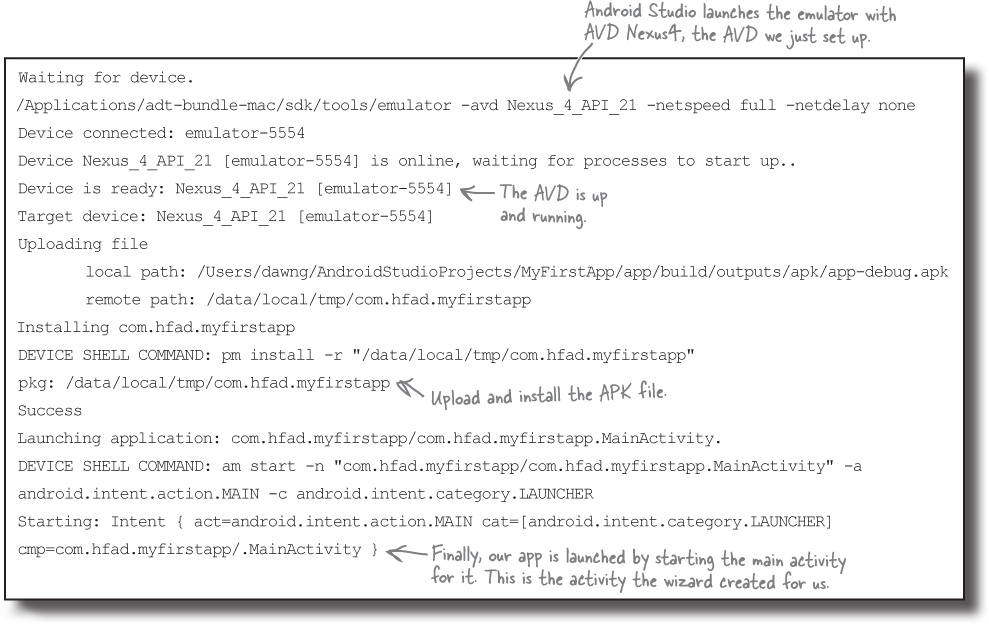
Here’s the output from our console window when we ran our app:
Test drive

So let’s look at what actually happens on screen when you run your app.
First, the emulator fires up in a separate window. The emulator takes a while to load the AVD, but then after a bit you see the locked screen of the AVD.
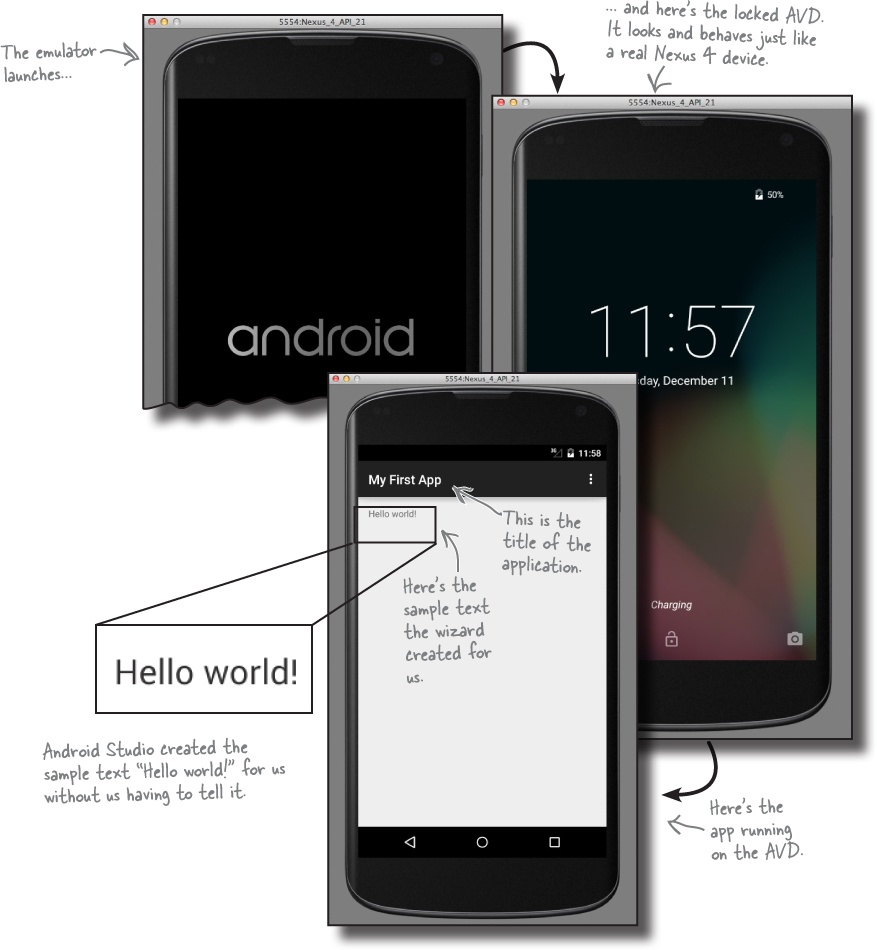
When you unlock the AVD screen by swiping the padlock icon upward, you see the app you just created. The application name appears at the top of the screen, and the default sample text “Hello world!” is displayed in the screen.
What just happened?

Let’s break down what happens when you run the app:
Android Studio launches the emulator, loads the AVD, and installs the app.
When the app gets launched, an activity object is created from MainActivity.java.
The activity specifies that it uses the layout activity_main.xml.
The activity tells Android to display the layout on the screen. The text “Hello world!” gets displayed.
Refining the app

Over the past few pages, you’ve built a basic Android app and seen it running in the emulator. Next, we’re going to refine the app you’ve built.
At the moment, the app displays the sample text “Hello world!” that the wizard put in for us as a placeholder. You’re going to change that text to say something else instead. So what do we need to change in order to achieve that? To answer that, let’s take a step back and look at how the app is currently built.
The app has one activity and one layout
When we built the app, we told Android Studio how to configure it, and the wizard did the rest. The wizard created a basic activity for us, and also a default layout.
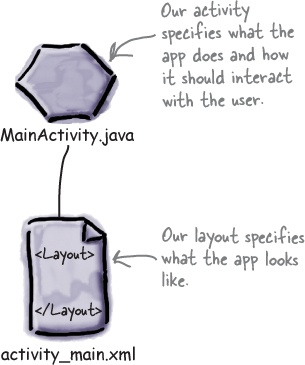
The activity controls what the app does
Android Studio created an activity for us called MainActivity.java. The activity specifies what the app does and how it should respond to the user.
The layout controls the app appearance
MainActivity.java specifies that it uses the layout Android Studio created for us called activity_main.xml. The layout specifies what the app looks like.
We want to change the appearance of the app by changing the text that’s displayed. This means that we need to deal with the Android component that controls what the app looks like. We need to take a closer look at the layout.
What’s in the layout?

We need to change the sample “Hello world!” text that Android Studio created for us, so let’s start with the layout file activity_main.xml. If it isn’t already open in an editor, open it now by finding the file in the app/src/main/res/layout folder in the explorer and double-clicking on it.
The design editor
There are two ways of viewing and editing layout files in Android Studio: through the design editor and through the code editor.
When you choose the design option, you can see that the sample text “Hello world!” appears in the layout as you might expect. But what’s in the underlying XML?
Let’s see by switching to the code editor.
activity_main.xml has two elements

Here’s the code from activity_main.xml that Android Studio generated for us.
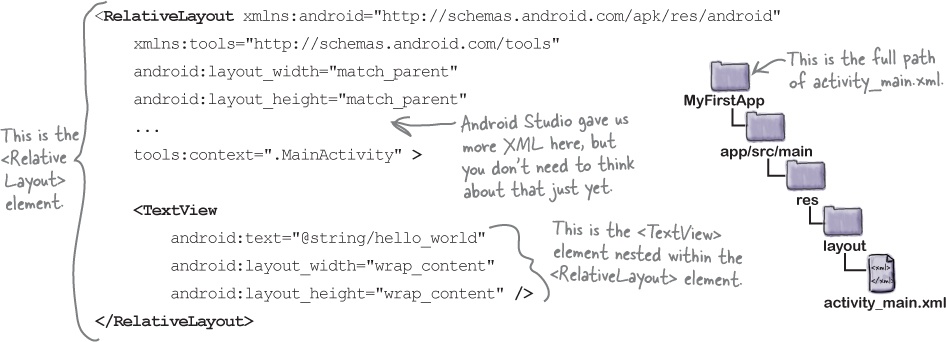
The code contains two elements.
The first element is the <RelativeLayout> element. This element tells Android to display items on the layout in relative positions. You can use <RelativeLayout>, for instance, to center items in the middle of the layout, align them to the bottom of the screen on your Android device, or position them relative to other items.
Watch it!
Android Studio sometimes displays the values of references in place of actual code.
As an example, it may display "Hello world!" instead of the real code "@string/hello_world". Any such substitutions should be highlighted in the code editor, and clicking on them or hovering over them with your mouse will reveal the true code.

The second element is the <TextView> element. This element is used to display text to the user. It’s nested within the <RelativeLayout>, and in our case it’s being used to display the sample text “Hello world!”.
The key part of the code within the <TextView> element is the first line. What do you notice?

The layout file contains a reference to a string, not the string itself
The key part of the <TextView> element is the first line:
android:text="@string/hello_world" />android:text means that this is the text property of the <TextView> element, so it specifies which text should be displayed in the layout. But why does it say "@string/hello world" rather than “Hello world!”? What does this actually mean?
Let’s start with the first part, @string. This is just a way of telling Android to look up a text value from a string resource file. In our case, Android Studio created a string resource file for us called strings.xml, located in the app/src/main/res/values folder.
Put string values in strings.xml rather than hardcoding them. strings. xml is a resource file used to hold name/value pairs of strings. Layouts and activities can look up string values using their name.
The second part, hello_world, tells Android to look up the value of a resource with the name hello_world. So @string/hello_world means “look up the string resource with the name hello_world, and use the associated text value.”

There’s one key reason: localization
Say you’ve created an app and it’s a big hit on your local Google Play Store. But you don’t want to limit yourself to just one country or language—you want to make it available internationally and for different languages.
Separating out text values into strings.xml makes dealing with issues like this much easier. Rather than having to change hardcoded text values in a whole host of different activity and layout files, you can simply replace the strings.xml file with an internationalized version.
Using strings.xml as a central resource for text values also makes it easier to make global changes to text across your whole application. If your boss needs you to change the wording in an app because the company’s changed its name, only strings.xml needs to be changed.

Let’s look in the strings.xml file

Android Studio created a string resource file for us called strings.xml, so let’s see if it contains a hello_world resource. Use the explorer to find it in the app/src/main/res/values folder, and open it by double-clicking on it.
Here’s what our code in the strings.xml file looks like:
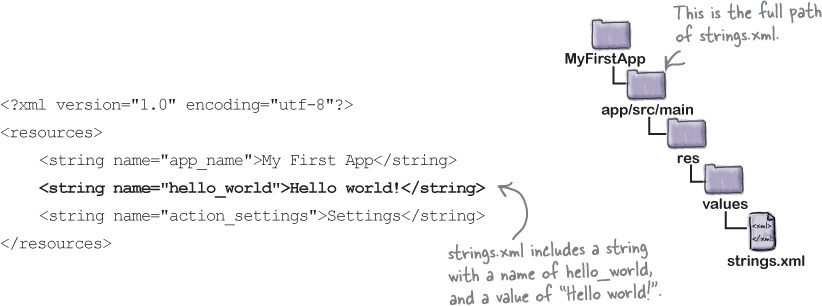
As you can see, there’s a line of code that looks just like what we are looking for. It describes a string resource with a name of hello_world, and a value of “Hello world!”:
<string name="hello_world">Hello world!</string>
Update strings.xml to change the text
So let’s change the sample text in the app. If you’ve not already done so, find the file strings.xml in the Android Studio explorer, and double-click on it to open it.
Here’s the code from the file. You need to look for the string with the name “hello_world”, and change its corresponding text value from “Hello world!” to “Sup doge”:

Once you’ve updated the file, go to the File menu and choose the Save All option to save your change.
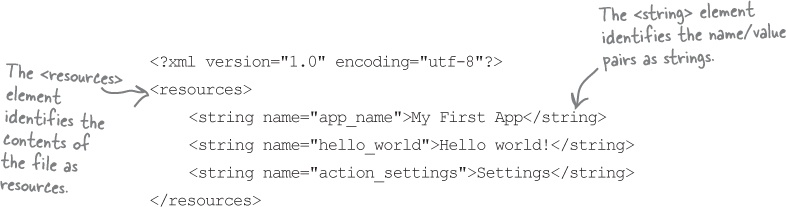
strings.xml is the default resource file used to hold name/value pairs of strings so that they can be referenced throughout your app. It has the following format:
There are two things that allow Android to recognize strings.xml as being a string resource file:
The file is held in the folder app/src/main/res/values.
XML files held in this folder contain simple values, such as strings and colors.
The file has a <resources> element, which contains one or more <string> elements.
The format of the file itself indicates that it’s a resource file containing Strings. The
<resources>element tells Android that the file contains resources, and the<string>element identifies each String resource.
This means that you don’t need to call your String resource file strings.xml; if you want, you can call it something else, or split your Strings into multiple files.
Each name/value pair takes the form
<string name="string_name">string_value</string>
where string_name is the identifier of the string, and string_value is the String value itself.
A layout can retrieve the value of the String using

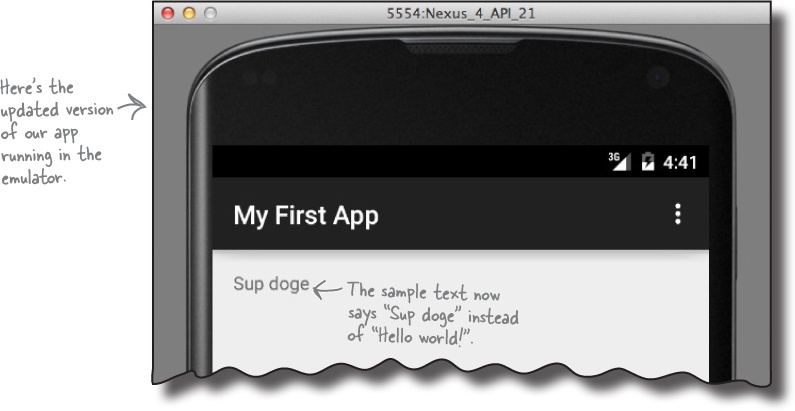
Take the app for a test drive

Once you’ve edited the file, try running your app in the emulator again by choosing the “Run ‘app’” command from the Run menu. You should see that your app now says “Sup doge” instead of “Hello world!”.
Your Android Toolbox
You’ve got Chapter 1 under your belt and now you’ve added Android basic concepts to your toolbox.
Note
You can download the full code for the chapter from https://tinyurl.com/HeadFirstAndroid.
Get Head First Android Development now with the O’Reilly learning platform.
O’Reilly members experience books, live events, courses curated by job role, and more from O’Reilly and nearly 200 top publishers.

