
Tired of waiting around for your page to reload?
Frustrated by clunky web application interfaces? It’s time to give your web apps that slick, responsive desktop feel. And how do you do that? With Ajax, your ticket to building Internet applications that are more interactive, more responsive, and easier to use. So skip your nap; it’s time to put some polish on your web apps. It’s time to get rid of unnecessary and slow full-page refreshes forever.
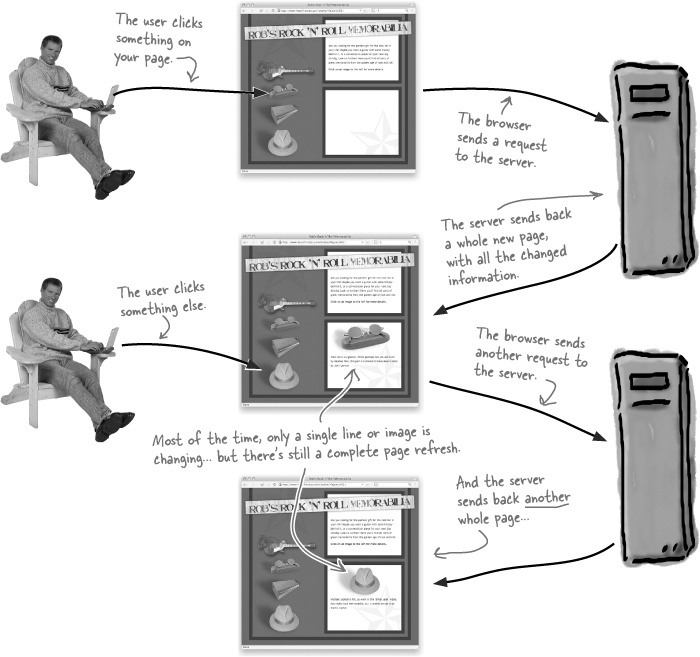
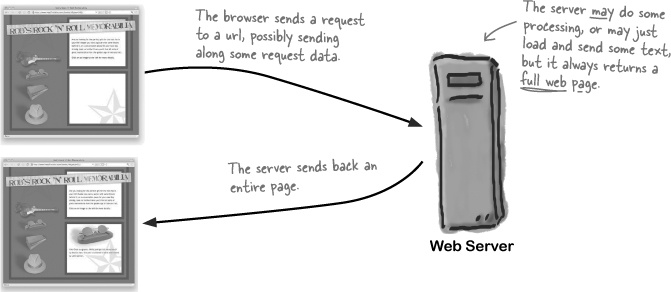
With traditional web pages and applications, every time a user clicks on something, the browser sends a request to the server, and the server responds with a whole new page. Even if your user’s web browser is smart about caching things like images and cascading style sheets, that’s a lot of traffic going back and forth between their browser and your server... and a lot of time that the user sits around waiting for full page refreshes.
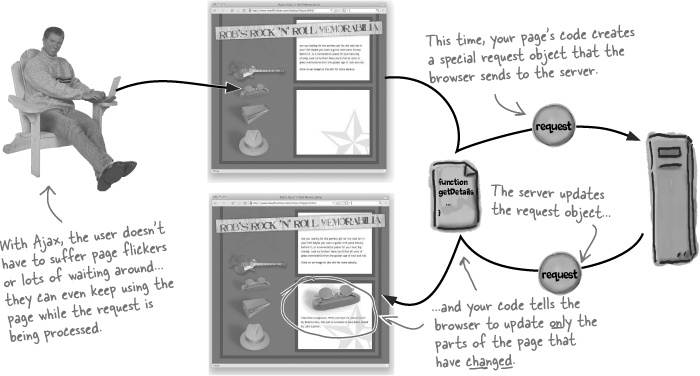
Using Ajax, your pages and applications only ask the server for what they really need—just the parts of a page that need to change, and just the parts that the server has to provide. That means less traffic, smaller updates, and less time sitting around waiting for page refreshes.
With Ajax, the browser only sends and receives the parts of a page that need to change.
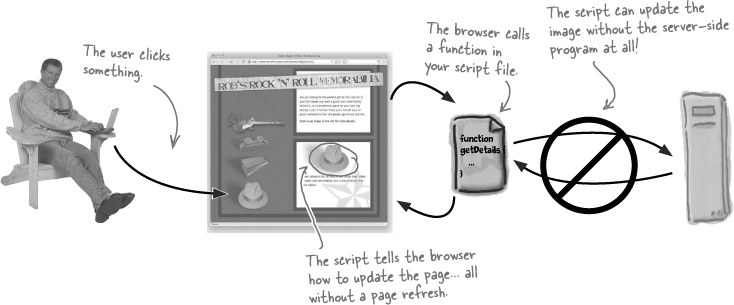
Sometimes the browser doesn’t have to talk to the server at all.

Ajax is a new way of using existing technologies.
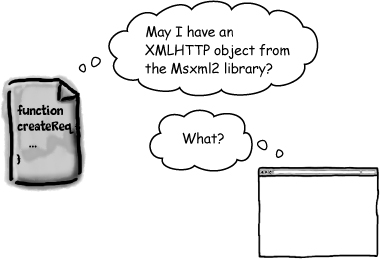
Ajax isn’t a whole new technology that you have to learn, like CSS or JavaScript, or a set of graphics techniques you’ll need to crack open PhotoShop to accomplish. Ajax is just a new way of thinking about how to do what you’re already doing, using technologies you probably already know.

Ajax is a way of designing and building web pages that are as interactive and responsive as desktop applications. So what does that mean for you? You handle things at the client’s browser whenever you can. Your pages make asynchronous requests that allow the user to keep working instead of waiting for a response. You only update the things on your pages that actually change. And best of all, an Ajax page is built using standard Internet technologies, things you probably already know how to use, like:
XHTML
Cascading Style Sheets
JavaScript
An asynchronous request is a request that occurs behind the scenes.
Ajax applications also use a few things that have been around for a while but may be new to you, like:
Your users can keep working while the request is taking place.
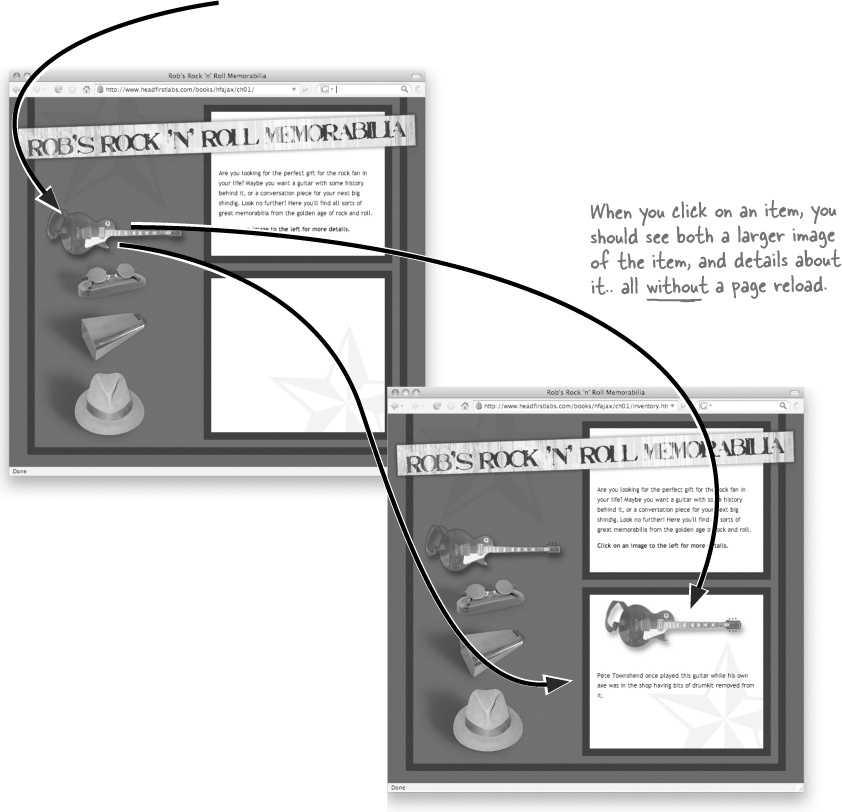
Meet Rob. He’s put all his savings into an online rock n’ roll memorabilia store. The site looks great, but he’s still been getting tons of complaints. Customers are clicking on the thumbnail images on the inventory page, but the customers’ browsers are taking forever before they show information about the selected item. Some of Rob’s users are hanging around, but most have just stopped coming to Rob’s online shop altogether.
Ajax pages only talk to the server when they have to... and only about what the server knows.

The problem with Rob’s site isn’t that his server is too slow, but that his pages are sending requests to the server all the time... even when they don’t need to.
Sharpen your pencil
Here’s what Rob’s online store does right now. What’s wrong with this picture?
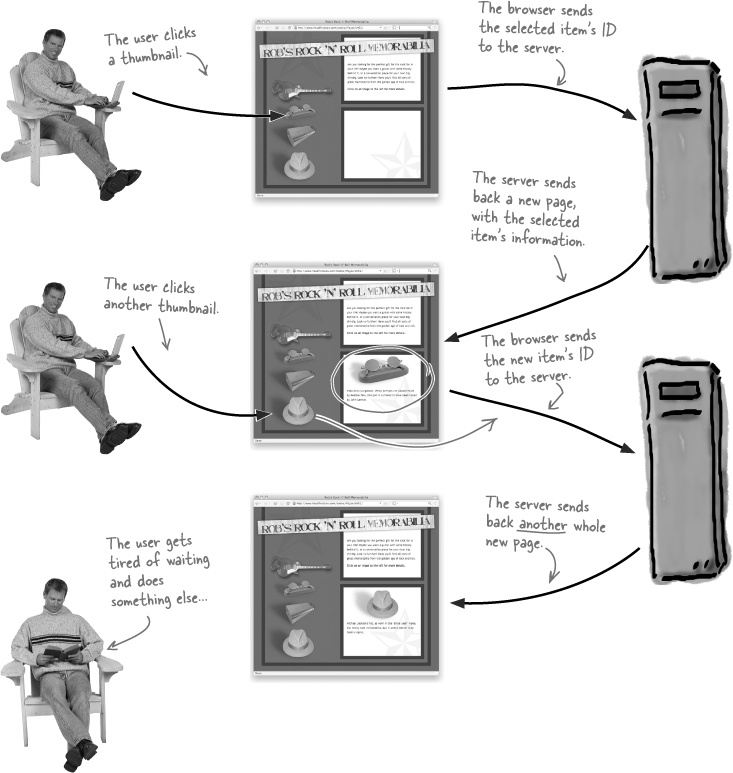
How would Ajax change this diagram? Write down what you think should happen on Rob’s site.
_____________________________________
_____________________________________
_____________________________________
Sharpen your pencil Solution
Your job was to think about how Ajax could help save Rob’s site... and his business. With Ajax, we can completely remove all the page refreshes on his inventory page. Here’s what that would look like:
Sharpen your pencil
Put a checkmark next to the benefits that you think Ajax can provide to your web applications.
The browser can request multiple things from the server at the same time. | |
Browser requests return a lot faster. | |
Colors are rendered more faithfully. | |
Only the parts of the page that actually change are updated. | |
Server traffic is reduced. | |
Pages are less vulnerable to compatibility issues. | |
The user can keep working while the page updates. | |
Some changes can be handled without a server round-trip. | |
Your boss will love you. | |
Only the parts of the page that actually change are updated. |
Brain Barbell
Not all pages will reap every benefit of Ajax. In fact, some pages wouldn’t benefit from Ajax at all. Which of the benefits that you checked off above do you think Rob’s page will see?
Sharpen your pencil Solution
Remember, not every page is going to see all these benefits...
The browser can request multiple things from the server at the same time. | |
Browser requests return a lot faster. | |
Colors are rendered more faithfully. | |
Only the parts of the page that actually change are updated. | |
Server traffic is reduced. | |
Pages are less vulnerable to compatibility issues. | |
The user can keep working while the page updates. NoteSometimes you want a user to wait on the server’s response, but that doesn’t mean you can’t still use Ajax. We’ll look at synchronous vs. asynchronous requests more in Chapter 5. | |
Some changes can be handled without a server round-trip. | |
Your boss will love you. | |
Only the parts of the page that actually change are updated. |
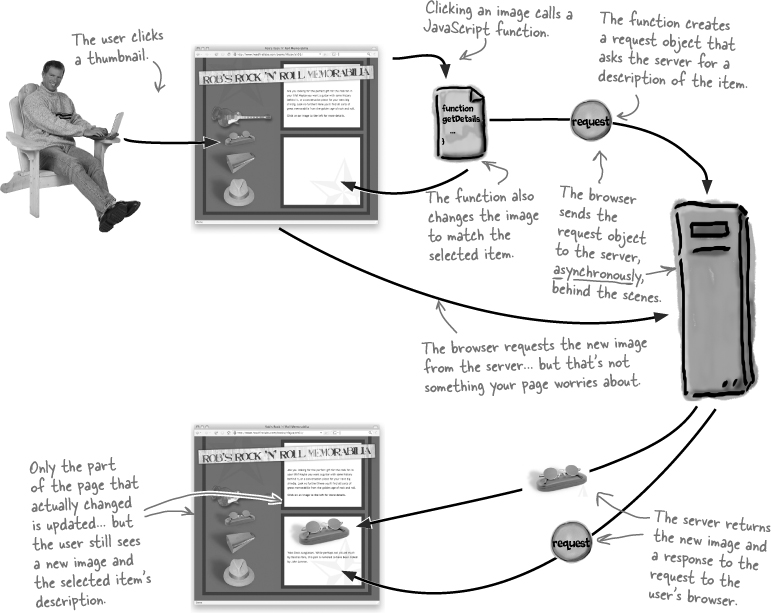
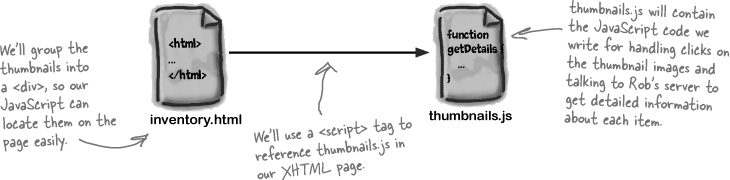
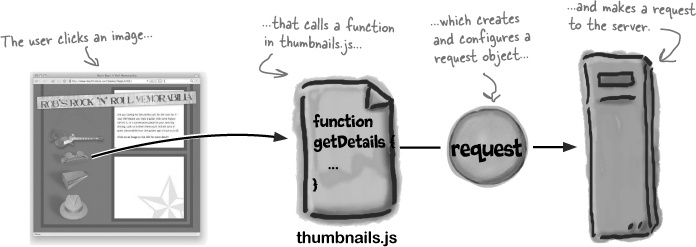
Let’s use Ajax to fix up Rob’s online store, and get his impatient customers back. We’ll need to make some changes to the existing XHTML page, code some JavaScript, and then reference the script in our XHTML. When we’re done, the page won’t need to reload at all, and only the things that need to change will get updated when users click on the thumbnail images.
Here’s what we’re going to do:
Modify the XHTML web page
We need to include the JavaScript file we’re going to write and add some
divs andids, so our JavaScript can find and work with different parts of the web page.Write a function to initialize the page
When the inventory page first loads, we’ll need to run some JavaScript to set up the images, get a request object ready, and make sure the page is ready to use.
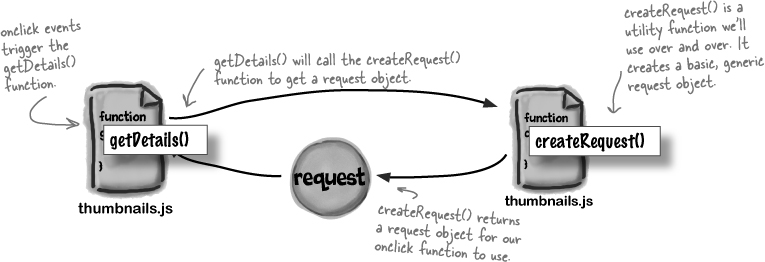
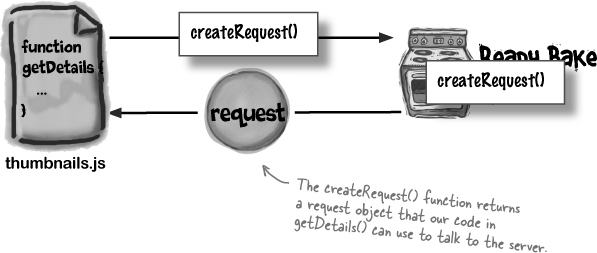
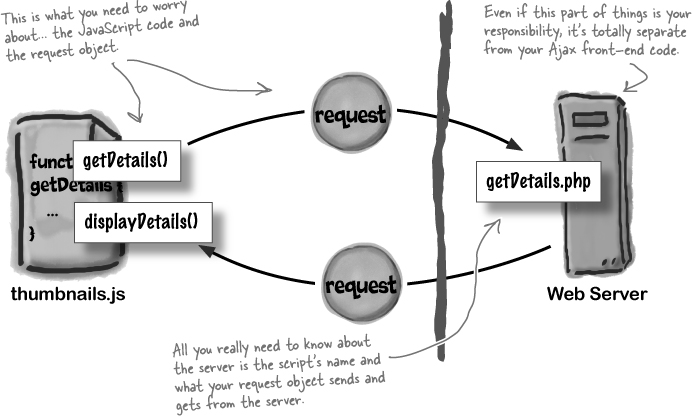
Write a function to create a request object
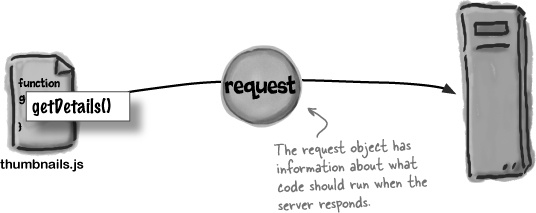
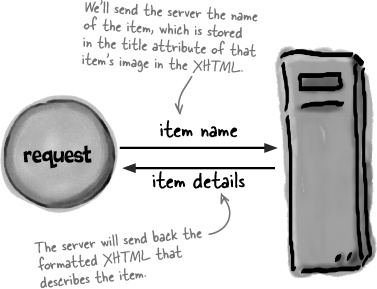
We need a way to talk to the server and get details about each piece of memorabilia in Rob’s inventory. We’ll write a function to create a request object to let our code talk to the server; let’s call it
createRequest(). We can use that function whenever a thumbnail is clicked to get a new request started.Get an item’s details from the server
We’ll send a request to Rob’s server in
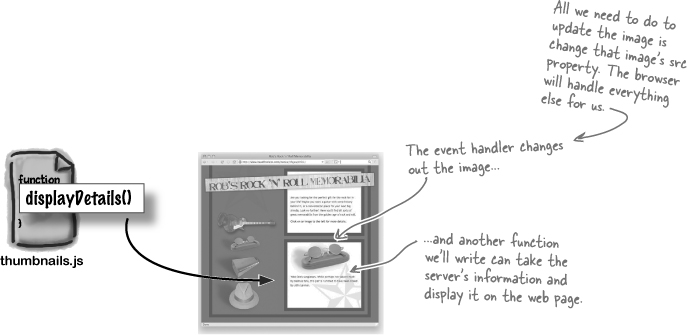
getDetails(), telling the browser what to do when the server responds.Display the item’s details
We can change the image to display in
getDetails(). Then, we need another function,displayDetails(), to update the item’s description when the server responds to our requests.

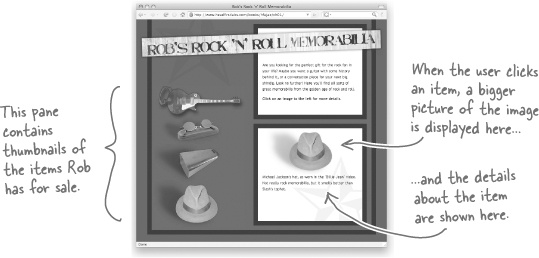
Let’s start with the easy part, the XHTML and CSS that create the page. Here’s Rob’s current version of the inventory page with a few additions we’ll need:

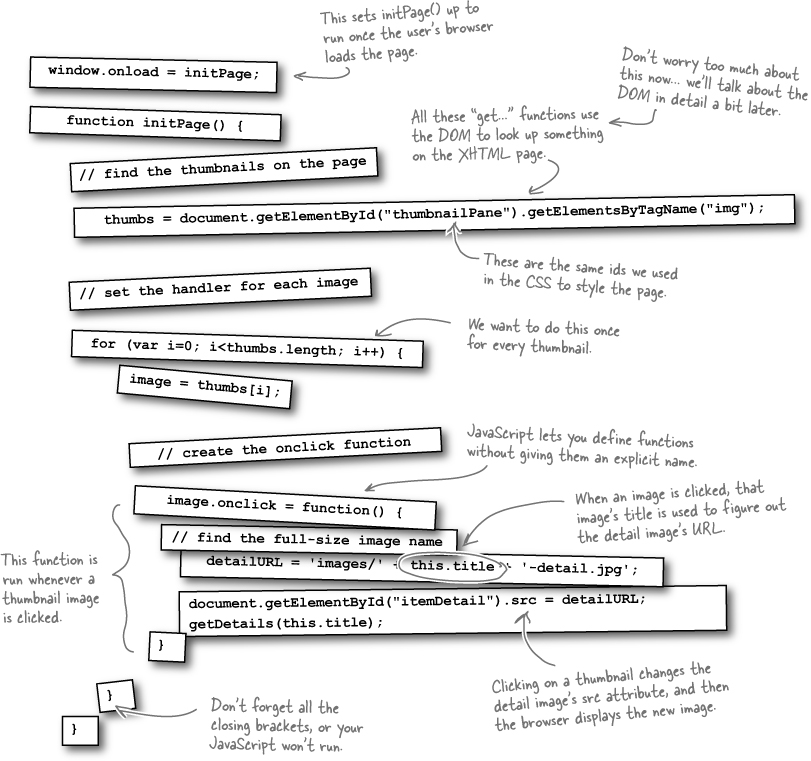
We need to create the thumbnails.js file, and add a JavaScript function to set up the initial event handlers for each thumbnail image in the inventory. Let’s call that function initPage(), and set it to run as soon as the user’s window loads the inventory page.
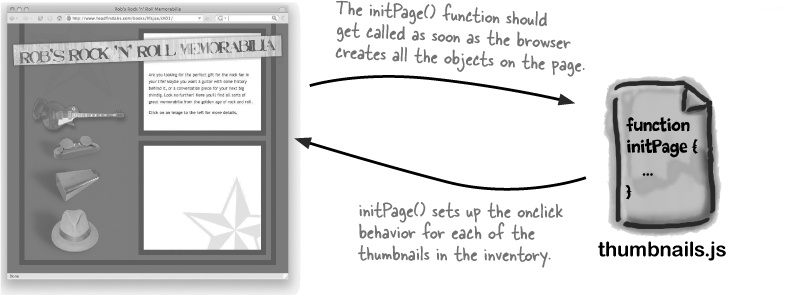
Find the thumbnails on the page
The thumbnails are contained in a
divcalled “thumbnailPane,” so we can find thatdiv,and then find each image within it.Build the onclick event handler for each thumbnail
Each item’s full-size image is named with the title of the thumbnail image plus “-detail”. For example, the detail image for the thumbnail with the title
FenderGuitarisFenderGuitar-detail.png. That lets us work out the name of the image in our JavaScript.The event handler for each thumbnail should set the
srctag for the detail image (the one with an id of “itemDetail”) to the detail image (for example,FenderGuitar-detail.png). Once you’ve done that, the browser will automatically display the new image using the name you supplied.
Code Magnets
The code for the initPage function is all scrambled up on the fridge. Can you put back the pieces that fell off? Remember to set an event handler to run the initPage() function when the user’s window loads, too.

Test Drive
Create thumbnails.js, add the initPage() function, and give the inventory page a whirl.
Create a file named thumbnails.js in a text editor. Add the code shown in Code Magnet Solution, and then load inventory.html in your browser. initPage() should run when the page loads, and you’re ready to try out the detail images...

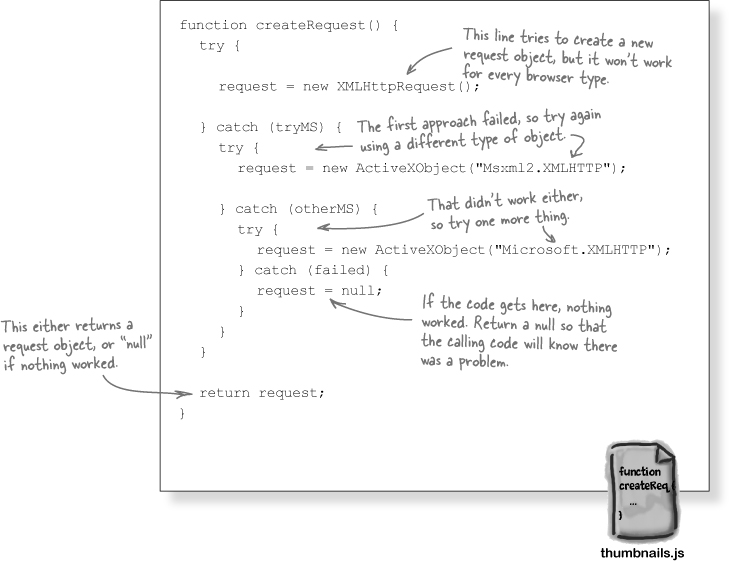
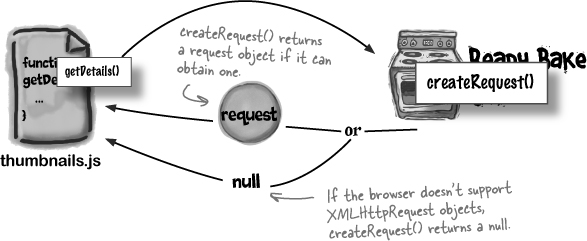
When users click on an item’s image, we also need to send a request to the server asking for that item’s detailed information. But before we can send a request, we need to create the request object.
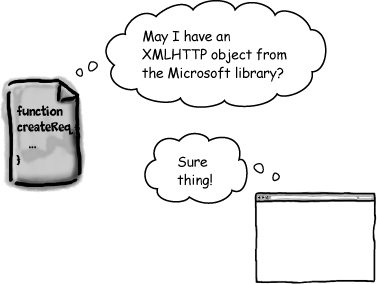
The bad news is that this is a bit tricky because different browsers create request objects in different ways. The good news is that we can create a function that handles all the browser-specific bits.
Go ahead and create a new function in thumbnails.js called createRequest(), and add this code:
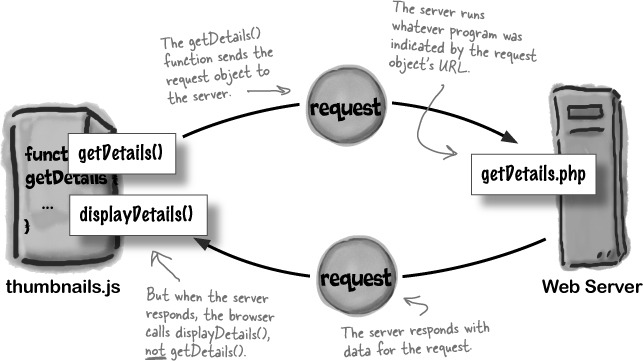
Once a user clicks on an item in the inventory, we need to send a request to the server and ask for the description and details for that item. We’ve got a request object, so here is where we can use that.
And it turns out that no matter what data you need from the server, the basic process for making an Ajax request always follows the same pattern:
Get a request object
We’ve already done the work here. We just need to call
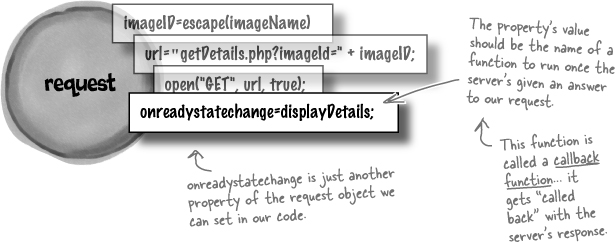
createRequest()to get an instance of the request object and assign it to a variable.Configure the request object’s properties
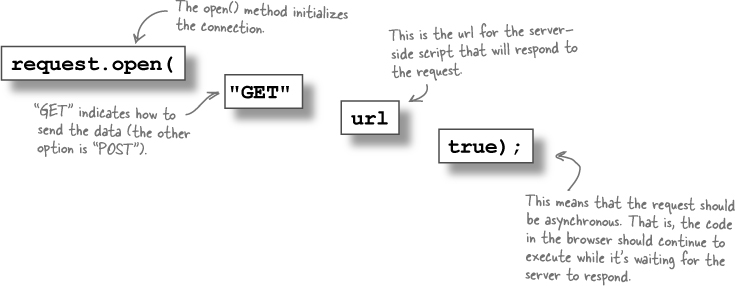
The request object has several properties you’ll need to set. You can tell it what URL to connect to, whether to use GET or POST, and a lot more... you need to set this all up before you make your request to the server.
Tell the request object what to do when the server responds
So what happens when the server responds? The browser looks at another property of the request object, called
onreadystatechange. This lets us assign a callback function that should run when the server responds to our request.Make the request
Now we’re ready to send the request off to the server and get a response.
Once we know what our function needs to do, it’s pretty easy to write the code. Here’s how the steps map to actual JavaScript in thumbnails.js:

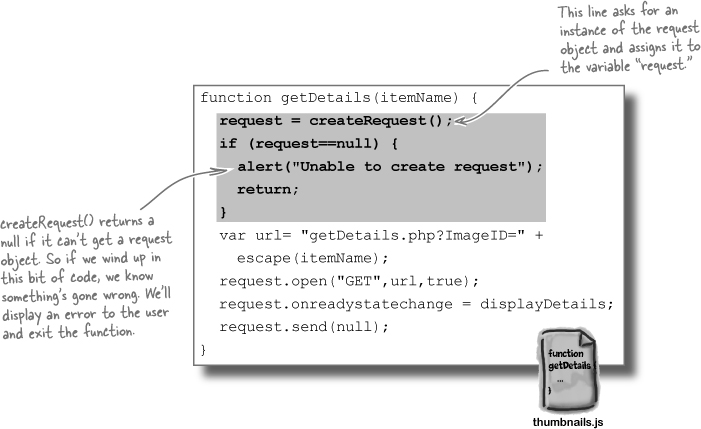
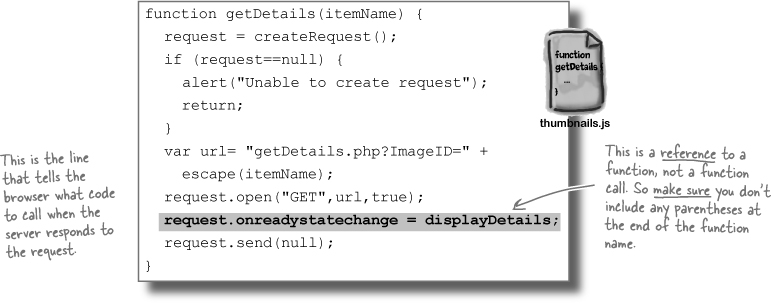
The first thing getDetails() does is call createRequest() to get a request object. But you’ve still got to make sure that object was actually created, even though the details of that creation are abstracted away in the createRequest() function:
A request object is just a “normal” JavaScript object, and that means you can set properties on it and call methods. We can talk to the server by putting information in the request object.
We’re still working on getting the details for an item.
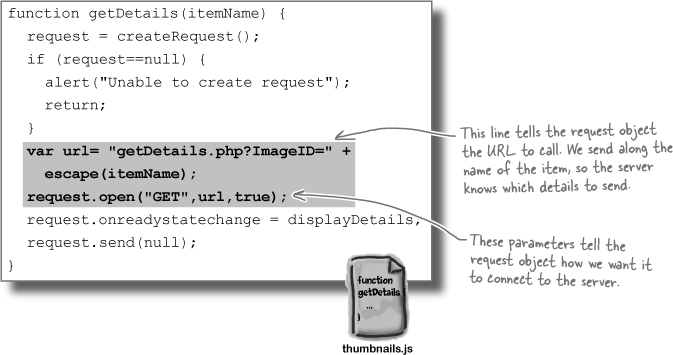
The properties of the request object tell the server what to do when it receives the request. One of the most important is the onreadystatechange property, which we’re setting to the name of a function. This function, referred to as a callback, tells the browser what code to call when the server sends back information.
All that’s left to do is actually send the request, and that’s easy... just use the send() method on the request object.
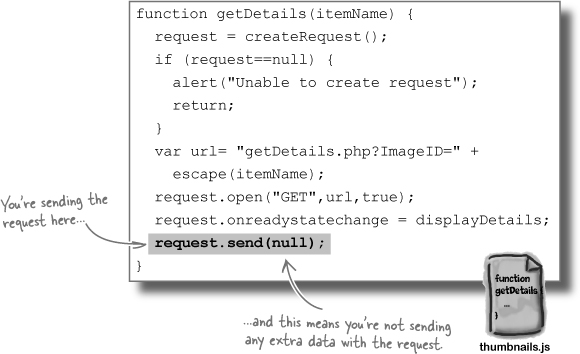

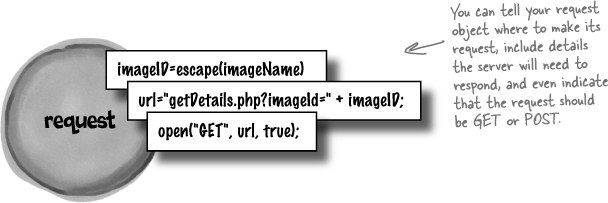
You can send data in your URL string.
The request object allows us to send all kinds of data in a variety of ways. In getDetails(), the item name is part of the URL string:
var url= "getDetails.php?ImageID=" +
  escape(itemName);
Since that’s part of the URL sent to the server, we don’t need to send anything else to the server in the send() method. Instead, we just pass null... which means “nothing.”
Asynchronous apps make requests using a JavaScript object, not a form submit.

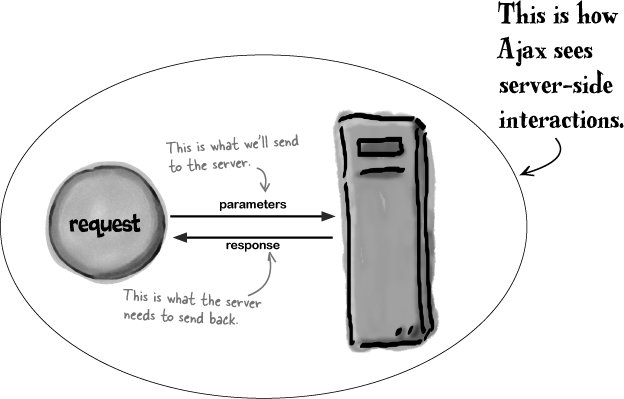
The server-side code is... ...on the server.
That sounds obvious, but lots of times, you don’t have to (or even get to) write the code your web application is talking to. Instead, you work with an existing program, where you know the inputs and outputs, or tell another group what you need.
Not only that, but you might also have one server-side program that’s written in PHP, and another in ASP.NET... and other than the URL, you don’t have to change your JavaScript code at all. Take a look:
In a traditional web app, the server always responds to a request from the browser by sending back a new page. The browser throws away anything that’s already displayed (including any fields the user has filled in) when that new page arrives.
Ajax doesn’t require any particular server technology. You can use Active Server Pages (ASP), PHP, or whatever you need and have access to. In fact, there’s no need to get into the details of the server-side technology because it doesn’t change how you build your Ajax apps.
Here’s all that Ajax really sees:

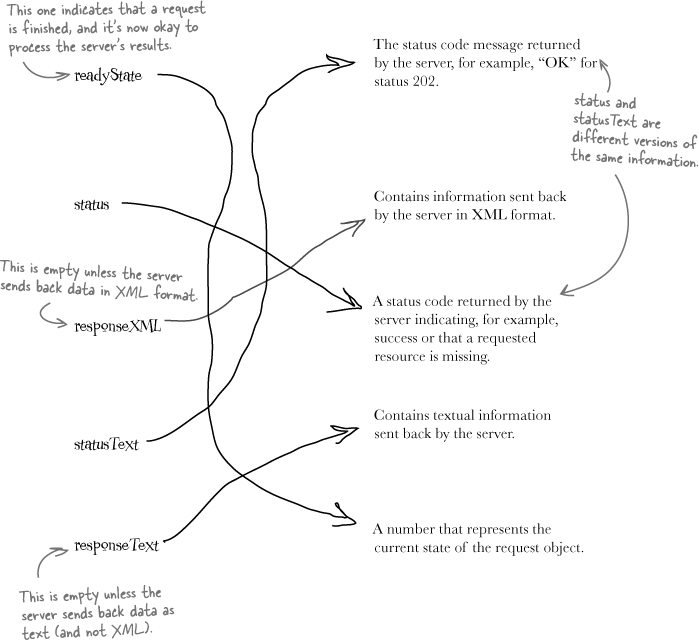
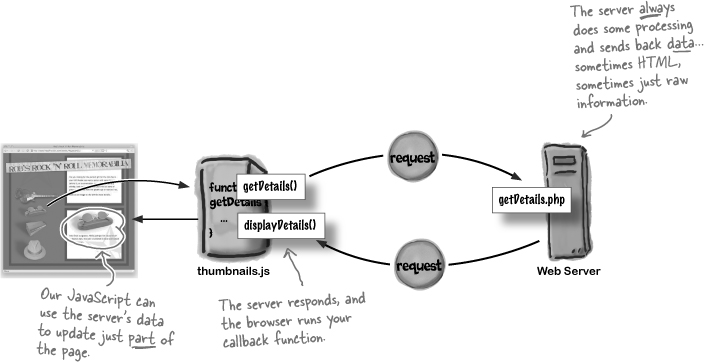
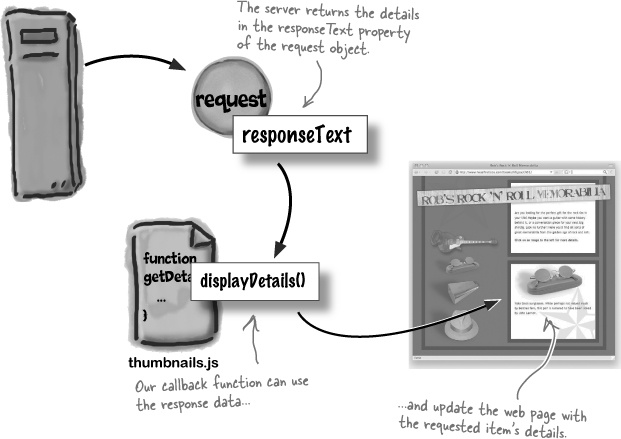
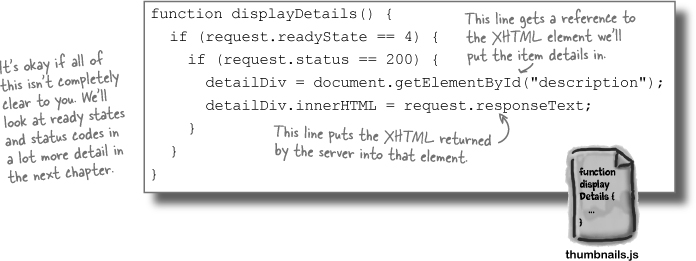
How do we show the textual description for each item? Let’s assume the server will send the details about an item as pre-formatted text in the responseText property of the request object. So we just need to get that data and display it.
Our callback function, displayDetails(), needs to find the XHTML element that will contain the detail information, and then set its innerHTML property to the value returned by the server.
The data we want is in the request object. Now we just need to get that data and use it. Here’s what we need:
Test Drive
Code your callback, and test out the inventory page.
Add displayDetails() to your thumbnails.js file. You should also make sure that the server-side program with the inputs and outputs detailed in The server usually returns data to Ajax requests is running, and that the URL in your getDetails() method is pointing to that program. Then fire up the inventory page and click on an item.
Relax
Confused about getting your server-side program working?
Flip to Appendix A for some help on getting things working on the server. There are also some helpful server-side resources for the book online at http://www.headfirstlabs.com.
Rob’s page is working more smoothly now, customers are coming back in droves, and you’ve helped pair vintage leather with the next-generation web.
Rob’s old, traditional web app:
...reloaded the entire page when a user clicked on an item’s thumbnail image.
...took a long time to load because the entire page had to be rendered by the browser on every click.
...felt unresponsive because the user had to wait on all those page refreshes.
...lost Rob business, annoyed his customers, and drained his bank account.
Rob’s new, Ajax app:
...only changed the part of the page that needed to be updated.
Note
Compare these benefits with the list in Sharpen your pencil Solution... they should look pretty similar.
...lets users keep viewing the page while images and descriptions are loaded behind the scenes, asynchronously.
...reduced the need for his users to have super-fast connections to use his site.

AjaxAcrostic
Take some time to sit back and give your right brain something to do. Answer the questions in the top, then use the letters to fill in the secret message.
This is the language you use to script Ajax pages.
This type of function gets called when a process completes.
This request object property tells us when the server has finished processing.
If something goes wrong at the server, this property will tell us what.
The browser will put text that the server returns in this property.
If there’s a problem, we can get a description of it in this property.
Sharpen your pencil Solution From Sharpen your pencil
What parameter and response do we need to implement Rob’s page?
AjaxAcrostic Solution
Take some time to sit back and give your right brain something to do. Answer the questions in the top, then use the letters to fill in the secret message.
This is the language you use to script Ajax pages.
This type of function get called when a process completes.
This request object property tells us when the server has finished processing.
If something goes wrong at the server, this property will tell us what.
The browser will put text that the server returns in this property.
If there’s a problem, we can get a description of it in this property.

Get Head First Ajax now with the O’Reilly learning platform.
O’Reilly members experience books, live events, courses curated by job role, and more from O’Reilly and nearly 200 top publishers.

