234
Part II: Advanced Hacks, Tools, and Techniques
Project Overview
This hack uses the APRS technology developed in the amateur radio com-
munity. Depending on the PDA or laptop and operating system you use for
this project, you should find a large number of software packages.
You will be putting together a position transmitter package and a data
receiver package. The transmitter gathers GPS data and sends it out using
an integrated two-way radio. The receiver package listens for the data
packets sent by the transmitter using a second integrated two-way radio
and then displays the decoded position of the transmitter on its screen.
More than one transmitter can be picked up on the receiver. Each position
transmitter has its own identification information, so you can easily track
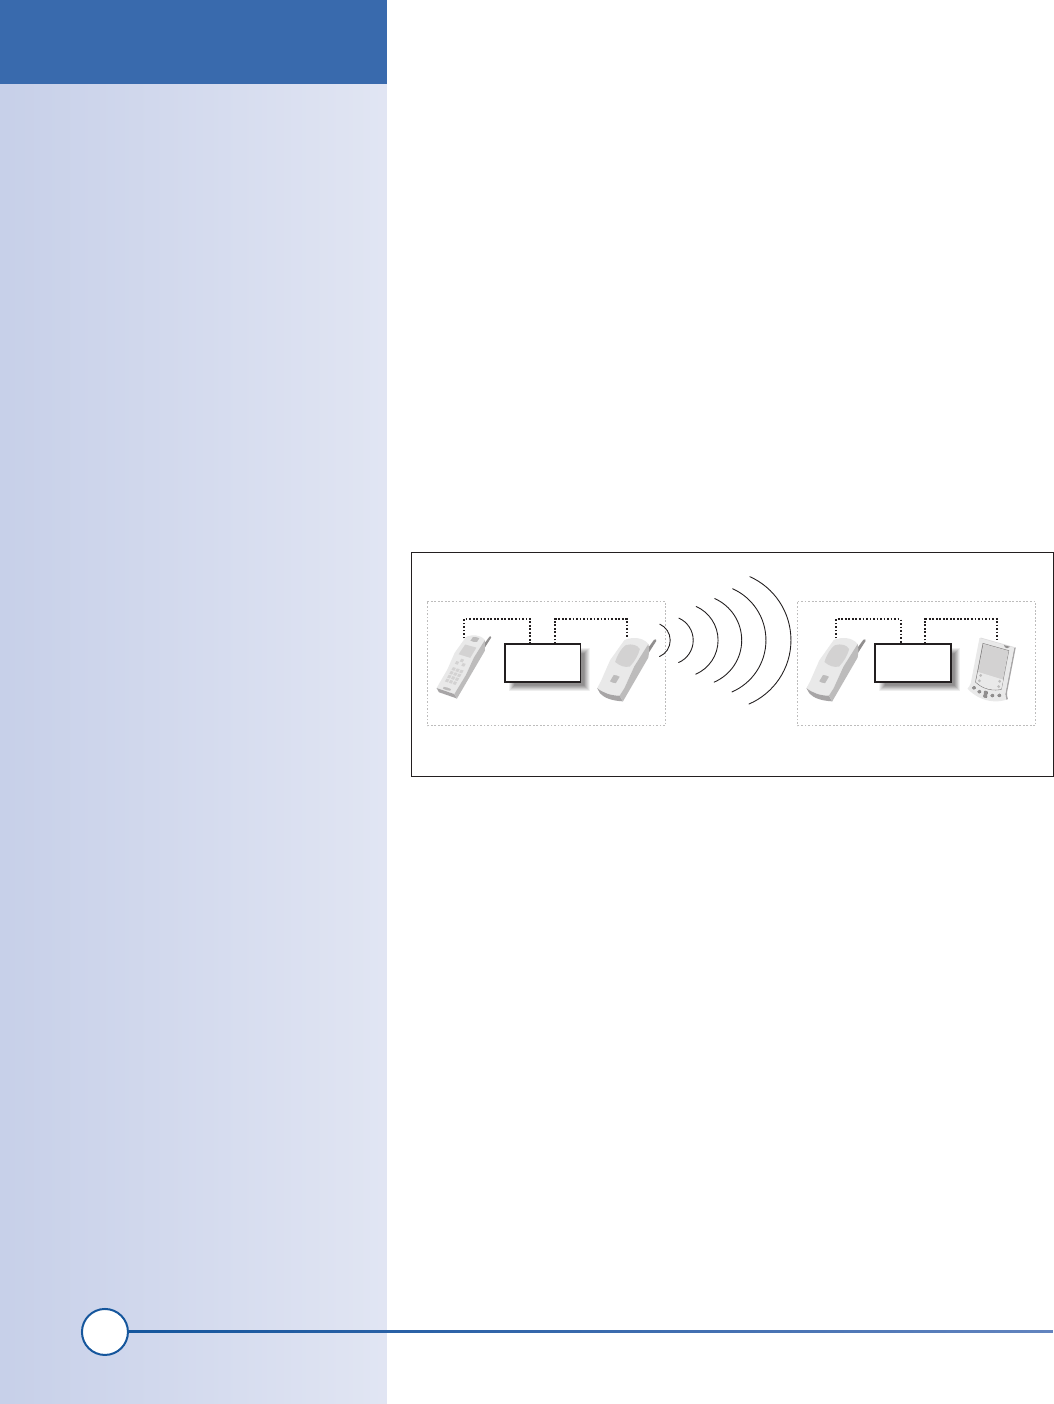
hundreds of objects. You can see an overview of how the transmitter and
tracker work in the diagram in Figure 12-2.
You will construct the transmitter electronics and receiver electronics, and
connect them to the FRS radios and one GPS unit.
Hardware Assembly Instructions
The following instructions walk you through the construction of the trans-
mitter and the receiver for your remote object tracker.
1. Build a transmitter
You will first assemble the transmitter out of a TinyTrack electronics kit,
a low-cost GPS receiver, and a two-way radio. The kit includes all the
required electronic components and a circuit board, which means the total
assembly time should be only a few hours. The GPS receiver connects to this
circuit board via a serial port. Finally, you’ll connect the two-way radio to
the circuit board through its built-in headset and microphone ports.
APRS
In November of 1992, Bob Bruniga
(WB4APR) showed a DOS version of
an APRS system at the ARRL Digital
Communications Conference (DCC) in
New Jersey. Bob created the system
to report position, weather, and mes-
sages between people.
Figure 12-2: Tracking system overview
FRS radio
TinyTrack 3
GPS
Position transmitter
PDA
TNC
FRS radio
Position receiver and mapping software
Project Overview
ch12_tracker.indd 234
1/22/2002 4:42:02 PM

235
Chapter 12, How to Build a Remote Object Tracker
Locate a GPS receiver
There are many inexpensive new and used GPS receivers available on the
market today. You should choose one that supports NMEA (National
Marine Electronics Association) output from an RS-232 interface. Some
appropriate models are:
• Any modern Garmin, including the eTrex, GPS12, or GPS V
• Any modern Magellan, including the Meridian and Sportrak series
• DeLorme Tripmate (with a slight modification)
• DeLorme Earthmate (with a data converter)
The modern units from Garmin and Magellan have an RS-232 compatible
serial output. A cable from the manufacturer is all that is needed for the
external connections.
The DeLorme Tripmate can be used if it is slightly modified. To modify the
Tripmate for use with this hack, simply wire up two DB9 male connectors as
shown in Exhibit C. The Tripmate operates off of four AA batteries that you
install inside the case. If you want to run it from an external power source,
add a connector to the DB9 connector on the right side labeled J1. J1 will
accept a voltage from 5V to 6V, so you can connect an external battery pack
of four AA or larger batteries.
The DeLorme Earthmate cannot be modified in the same way. It sends out
data in a format incompatible with NMEA. However, its data output can
be converted using the GST-1 NMEA “sentence converter” available from
http://www.byonics.com. This sentence converter changes the non-NMEA
data that the Earthmate sends out into the standard NMEA data required
by this project.
I used a Garmin eTrex Vista with PC interface cable, which I bought
on eBay, for my system. This eTrex unit requires a special serial port
cable, which I also bought on eBay.
Obtain and build a TinyTrack
The TinyTrack is a small GPS position encoder that will transmit GPS
data over a radio. A complete kit that includes all the necessary parts
as well as a programmed control is available from http://www.byonics.
com.
Build the kit according to the instructions. It should take an hour or
two to solder all of the parts into place. After you put the kit together
it should look like Figure 12-3.
Figure 12-3: Assembled TinyTrack
Hardware Assembly Instructions
ch12_tracker.indd 235
1/22/2002 4:42:02 PM
Get Hardware Hacking Projects for Geeks now with the O’Reilly learning platform.
O’Reilly members experience books, live events, courses curated by job role, and more from O’Reilly and nearly 200 top publishers.

