Chapter 4. Custom Tasks
4.1 Writing Your Own Custom Tasks
Solution
Add task elements to the Gradle build files. Use the extra properties supplied with the Android plug-in to make development easier.
Discussion
The Gradle DSL supports a task block for defining your own custom tasks. The API includes a wide range of existing tasks (like Copy, Wrapper, and Exec) that you can use simply by setting properties.
For example, the Copy task includes from and into properties, and the from block can be configured to exclude specified filename patterns. To copy all the APKs into a new folder, excluding those that are either unsigned or unaligned, add the task in Example 4-1 to the module build.
Example 4-1. Copy APKs to another folder
taskcopyApks(type:Copy){from("$buildDir/outputs/apk"){exclude'**/*unsigned.apk','**/*unaligned.apk'}into'../apks'}
The buildDir property refers to the default build directory (app/build), and the dollar sign is used to inject it into a Groovy string (with double quotes). The documentation for the Copy task shows that the exclude block inside from supports an Ant-style directory name, meaning that ** matches all descendent directories.
If you don’t want to simply configure an existing Gradle task, you need to understand the distinction between the configuration and execution phases of Gradle. During the configuration phase, Gradle builds a DAG based on their dependencies. It then executes the desired task, along with its dependencies. All tasks are configured before any are executed.
Gradle prefers declarative tasks, like the Example 4-1 task, where you specify what you want done but not how to do it. If you need to execute commands, however, add a doLast block to your Gradle task.
The task shown in Example 4-2, from Recipe 3.2, is repeated here.
Example 4-2. A custom task to print available variants
taskprintVariantNames(){doLast{android.applicationVariants.all{variant->printlnvariant.name}}}
Anything done in the task either before or after the doLast block would be run during configuration time. The code in the doLast block itself runs at execution time.
The Android plug-in adds an android property, which in turn has an applicationVariants property that returns all the buildType/flavor combinations. In this case, they are all being printed to the console.
Note
The applicationVariants property is only available for the com.android.application plug-in. A libraryVariants property is available in Android libraries. A testVariants property is available in both.
To install all the debug flavors onto a single device (assuming they all have unique applicationId values), use the task in Example 4-3.
Example 4-3. Install all the debug flavors on a single device
taskinstallDebugFlavors(){android.applicationVariants.all{v->if(v.name.endsWith('Debug')){Stringname=v.name.capitalize()dependsOn"install$name"}}}
In this case, the dependsOn method shows that this is part of the configuration process rather than execution. Each variant name, like friendlyDebug, is capitalized (FriendlyDebug) and then the corresponding installation task (installFriendlyDebug) is added as a dependency to the installDebugFlavors task.
The result is during the configuration process, installArrogantDebug, installFriendlyDebug, and installObsequiousDebug are all added as dependencies to installDebugFlavors. Therefore, executing installDebugFlavors at the command line requires all three flavor installs.
Example 4-4. Installing all the debug flavors
./gradlew instDebFl
:app:preBuild UP-TO-DATE
:app:preArrogantDebugBuild UP-TO-DATE
:app:checkArrogantDebugManifest
// ... lots of tasks ...
:app:assembleArrogantDebug UP-TO-DATE
:app:installArrogantDebug
Installing APK 'app-arrogant-debug.apk' on 'Nexus_5_API_23(AVD) - 6.0'
Installed on 1 device.
:app:checkFriendlyDebugManifest
// ... lots of tasks ...
:app:assembleFriendlyDebug UP-TO-DATE
:app:installFriendlyDebug
Installing APK 'app-friendly-debug.apk' on 'Nexus_5_API_23(AVD) - 6.0'
Installed on 1 device.
:app:checkObsequiousDebugManifest
// ... lots of tasks ...
:app:assembleObsequiousDebug UP-TO-DATE
:app:installObsequiousDebug
Installing APK 'app-obsequious-debug.apk' on 'Nexus_5_API_23(AVD) - 6.0'
Installed on 1 device.
:app:installDebugFlavors

BUILD SUCCESSFUL
You can see that writing your own custom tasks requires at least some knowledge of Groovy. An extensive discussion is therefore a bit beyond the scope of this book, but there are several good Groovy resources available. Additional Groovy concepts are defined in this book as they occur.
See Also
The Gradle plug-in User Guide (see Recipe 6.2) shows available properties in the android object. The documentation for the Copy, Zip, or other Gradle tasks is found on the Gradle website. Appendix A and Appendix B have background information on the Groovy programming language and basic Gradle information, respectively.
4.2 Adding Custom Tasks to the Build Process
Discussion
During the initialization phase, Gradle assembles the tasks into a sequence according to their dependencies. The result is a DAG. For example, the Gradle documentation forms a DAG for the Java plug-in, as shown in Figure 4-1.
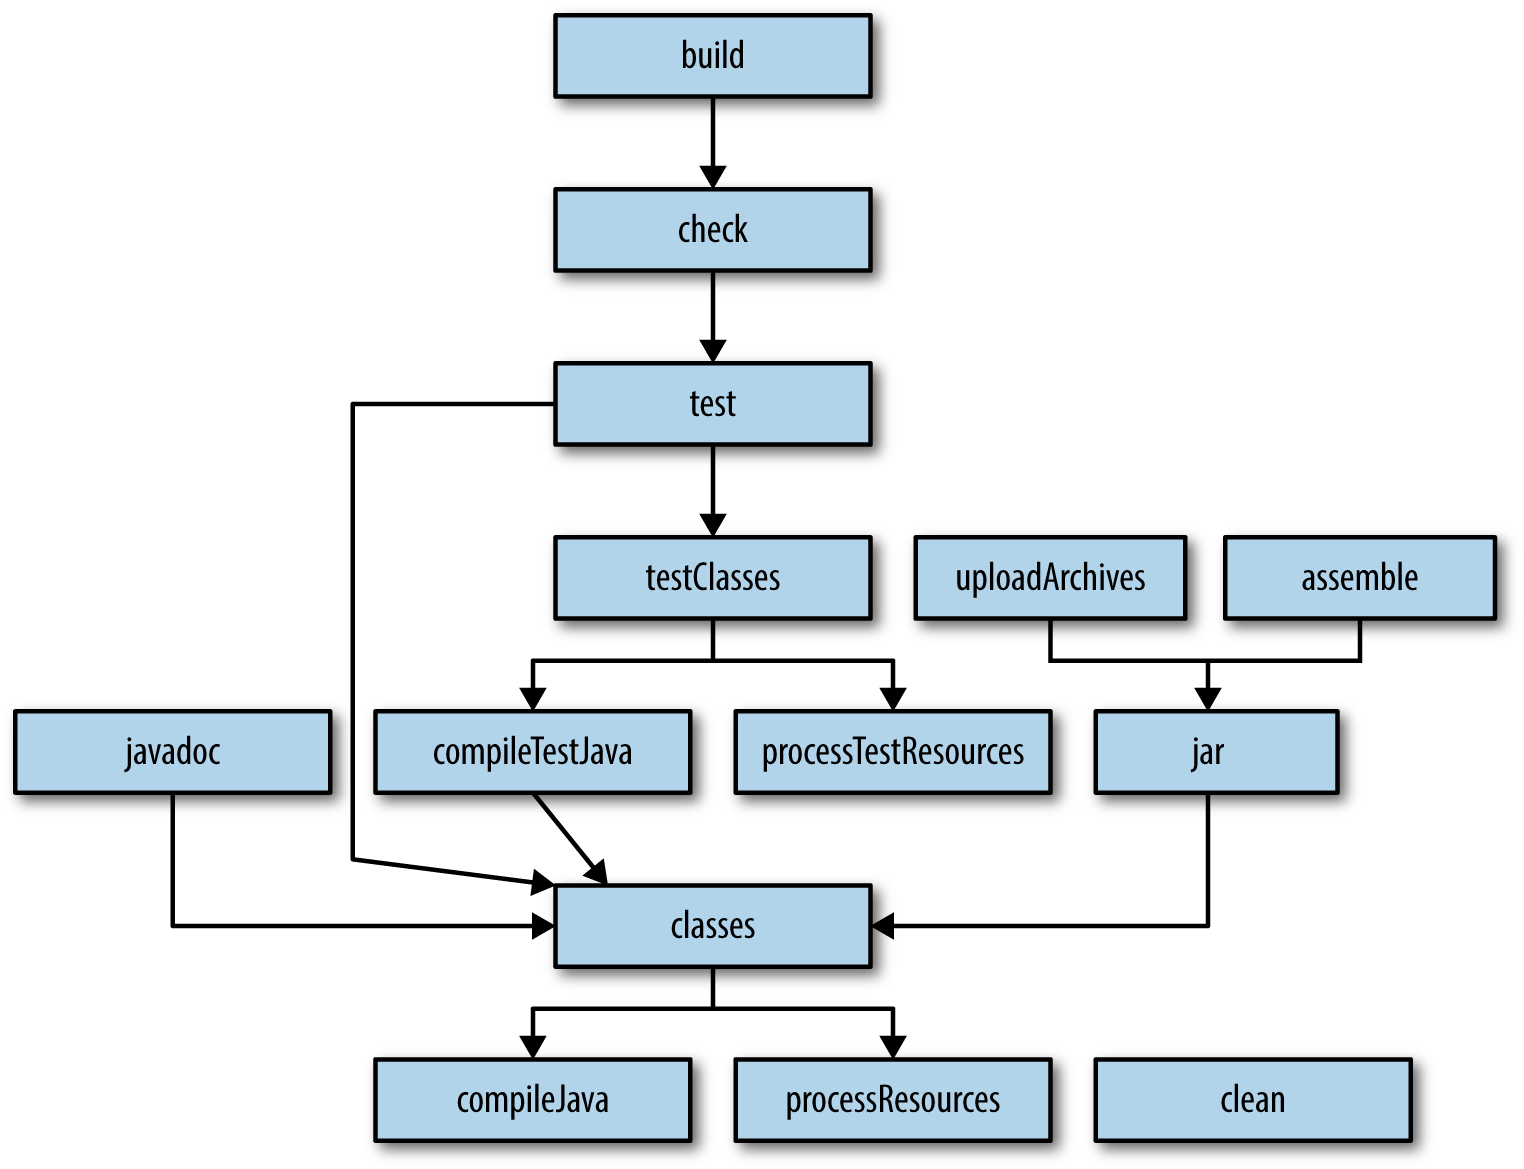
Figure 4-1. Directed acyclic graph for the Java plug-in tasks
The “directed” term means each dependency arrow goes in one direction. “Acyclic” means that there are no loops in the graph.
Adding your own custom task to the process means inserting your task into the graph at the proper location.
In Recipe 4.1, the copyApks task was defined to copy all the generated APKs into a separate directory. That task is reproduced in Example 4-6 for convenience.
Example 4-6. Copy APKs to another folder
taskcopyApks(type:Copy){from("$buildDir/outputs/apk"){exclude'**/*unsigned.apk','**/*unaligned.apk'}into'../apks'}
That task isn’t very useful, however, if the APKs have not yet been generated. The assemble task builds the APKs, so make it a dependency of the copyApks task, as in Example 4-7.
Example 4-7. Updated copy task to generate them first
taskcopyApks(type:Copy,dependsOn:assembleDebug){from("$buildDir/outputs/apk"){exclude'**/*unsigned.apk','**/*unaligned.apk'}into'../apks'}

Run
assembleDebugfirst
The dependency on assembleDebug means all the debug APKs will be generated before the copy task runs. You can use assemble instead if you want the release APKs as well.
If you would like the copyApks task to run every time you do a build, make it a dependency of the build task, as in Example 4-8.
Example 4-8. Making copyApks a part of the build
build.dependsOncopyApks
Now running the build task will also copy the APKs into the separate folder. You have inserted the copyApks task into the DAG with the correct dependency information.
Removing the generated apks folder containing all the APKs can be done in a similar fashion, but as shown in Recipe 1.1, the top-level Gradle build file already has a clean task that we can modify, as shown in Example 4-9.
Example 4-9. clean task generated by Android Studio
taskclean(type:Delete){deleterootProject.buildDir}
The delete task in Gradle accepts a list of files or folders, so rather than make a special task to remove the apks folder, it’s easy enough to modify this task, as shown in Example 4-10.
Example 4-10. Modified clean task to remove the apks directory
taskclean(type:Delete){deleterootProject.buildDir,'apks'}
Any custom task can be inserted into the build process using this mechanism.
See Also
Recipe 4.1 discusses creating custom tasks in Android builds. The topic of custom tasks is part of Appendix B.
4.3 Excluding Tasks
Discussion
The Gradle build process involves a lot of tasks executed sequentially. Most of them depend on tasks executed earlier in the process, but there are some that can be excluded if time is critical.
As an example, the lint task is useful for determining how closely your project adheres to Google’s recommended practices for Android apps, but you don’t necessarily have to run it every time.
Recall that the -x flag (short for --exclude-task) in Gradle excludes a given task. Therefore, when running a build, use the flag to skip the lint task (or any others you don’t want), as shown in Example 4-11.
Example 4-11. Excluding the lint task
> ./gradlew build -x lint
This excludes the lint task and any of its dependencies. Any task that need its result will not run either, so be sure that any task you exclude is not required later in the process.
The only problem is that if your project involves multiple variants, there is a lint task for each. In principle you could exclude them all manually, but you might prefer to exclude the whole set as part of the build.
When Gradle runs, it assembles a directed acyclic graph, known as a task graph. You can get a reference to it inside your build file through the gradle object. Any manipulation of the graph needs to be done after it has been formed, so you want to use the whenReady property before applying any changes.
The result is you can write code inside the build file like that shown in Example 4-12.
Example 4-12. Disabling all tasks that start with the word lint
gradle.taskGraph.whenReady{graph->graph.allTasks.findAll{it.name==~/lint.*/}*.enabled=false}
The allTasks property of the task graph invokes the getAllTasks method, using the normal Groovy idiom. That returns a java.util.List of tasks. Groovy adds a findAll method to List that returns only the tasks that satisfy the supplied closure. In this case, the closure says access the name property of each task and check whether or not it exactly matches the regular expression. Applying the “spread-dot” operator to the resulting list disables each task in the list.
The result is that all tasks that have a name that starts with the letters lint have their enabled property set to false, so none of them will run.
Since you may not want to always exclude all the lint tasks, you can check whether or not a project property has been set before doing this, as in Example 4-13.
Example 4-13. Only disable the lint tasks if the noLint property is set
gradle.taskGraph.whenReady{graph->if(project.hasProperty('noLint')){graph.allTasks.findAll{it.name==~/lint.*/}*.enabled=false}}
You can set a project property from the command line using the -P flag, as in Example 4-14.
Example 4-14. Setting a project property
> ./gradlew build -PnoLint | grep lint
:app:lintVitalArrogantRelease SKIPPED
:app:lintVitalFriendlyRelease SKIPPED
:app:lintVitalObsequiousRelease SKIPPED
:app:lint SKIPPED
Clearly there’s a fair amount of Groovy knowledge involved in this approach, but the idea of manipulating the task graph after it has been assembled is a very powerful one.
See Also
Recipe 2.1 discusses how to set project properties. Excluding tasks as a means of improving build performance is part of Recipe 6.1.
4.4 Custom Source Sets
Discussion
The samples that come with the Android distribution are configured to use multiple source folders, in order to separate common files from the main sample code.
Consider an arbitrary example from the API 23 (Android 6.0, Marshmallow) distribution, called Basic Gesture Detect, which is found in the input/BasicGestureDetect folder of the samples section. The details of the application itself are not important—it’s the Gradle build that shows the source set modifications.
Example 4-15 shows the Gradle build file from the Application subdirectory (note that the samples commonly use Application instead of app for the main subproject).
Example 4-15. Gradle build file with source sets
// The sample build uses multiple directories to// keep boilerplate and common code separate from// the main sample code.List<String>dirs=['main',// main sample code; look here for the interesting stuff.'common',// components that are reused by multiple samples'template']// boilerplate code that is generated by the sample template processandroid{// ... code omitted ...sourceSets{main{dirs.each{dir->java.srcDirs"src/${dir}/java"res.srcDirs"src/${dir}/res"}}androidTest.setRoot('tests')androidTest.java.srcDirs=['tests/src']}}
The build file defines a List<String> called dirs to represent the source directories. Groovy supports a native syntax for lists, using square brackets with values separated by commas. In this case, the values are main, common, and template.
Inside the android block, the sourceSets property is used to add the relevant source directories to the classpath. Focusing on the section inside the main block, Groovy’s each iterator supplies each entry in the list to the closure argument in Example 4-16.
Example 4-16. Groovy each with a closure
dirs.each{dir->java.srcDirs"src/${dir}/java"res.srcDirs"src/${dir}/res"}
The each method comes from Groovy. It iterates over every element of a collection, passing it into the closure argument. The closure here labels each element as dir and substitutes it into the Groovy strings.
The standard project layout defines a default source tree src/main/java and a resource tree src/main/res. In this case, however, additional directories are added to those collections by using the srcDirs property. The result in this case is that the folders src/main/java, src/common/java, and src/template/java are all added to the compile classpath, and the folders src/main/res, src/common/res, and src/template/res are all considered resource directories.
The real irony, however, is that this particular sample doesn’t have any of the additional folders in it. All the Java sources are under src/main/java and all the resources are under src/main/res. In fact, none of the samples actually use the defined structure. They all restrict their Java source code and resources to the standard directories. The structure just defined is therefore either something planned for the future, or a holdover from something older, or maybe just evidence that the Google Android developers have a sense of humor.
There is one section of the sourceSets property that is used, however. Instead of putting all the tests under the predefined src/androidTest/java folder, the Gradle build file changes that location (Example 4-17).
Example 4-17. Changing the root directory for tests
androidTest.setRoot('tests')androidTest.java.srcDirs=['tests/src']
The test root is now the tests folder, and the tests themselves are placed in the tests/src folder. Each sample project has two folders underneath the Application directory: src and tests, and the tests folder contains a subdirectory called src. The basic project layout for the ActivityInstrumentation example contains an Application directory, whose contents are structured like that in Example 4-18.
Example 4-18. Directory layout for sample project
.
├── build.gradle
├── src
│   └── main
│       ├── AndroidManifest.xml
│       ├── java
│       │   └── com
│       │       └── example
│       │           └── android
│       │               ├── activityinstrumentation
│       │               │   └── MainActivity.java
│       │               ...  // more
│       └── res
│           ├── drawable-hdpi
│           │   ├── ic_launcher.png
│           │   └── tile.9.png
│           ... // more
│           ├── values-v11
│           │   └── template-styles.xml
│           └── values-v21
│               ├── base-colors.xml
│               └── base-template-styles.xml
└── tests
    ├── AndroidManifest.xml
    └── src
        └── com
            └── example
                └── android
                    └── activityinstrumentation
                        └── SampleTests.java
As you can see, the Java code goes under src/main/java, the resources go under src/main/res, and the tests go under tests/src of all places.
Where does the sourceSets property get used? Legacy Android apps (e.g., those written before the conversion to the Gradle build system) used a different project structure. Android Studio can import those apps, but it will rewrite the structure when doing so. See Recipe 2.2 and Recipe 2.3 for details.
See Also
The sourceSets property is often used with legacy apps.
4.5 Using Android Libraries
Solution
Use the library plug-in and add the library module as a dependency.
Discussion
You can add a lot of additional functionality to an app by using Java libraries, which come in the form of jar files. Recipe 1.5 discusses this in detail, showing how to use the dependencies block. For example, to use Google’s Gson library for parsing JSON data, add the dependency to the module build file, as shown in Example 4-19.
Example 4-19. Adding Google’s Gson library
dependencies{compile'com.google.code.gson:gson:2.6.2'}
Android libraries go beyond Java libraries, in that they include either classes from the Android API, any needed resources, or both. When the project is built, Gradle assembles Android libraries into aar (Android Archive) files, which are like jar files but include the Android dependencies.
From a Gradle perspective, Android libraries are subprojects from the root. That means they are like Android applications, but in a subdirectory. The name of the added module (Android Studio calls them modules) is therefore added to the settings.gradle file, as in Example 4-20.
Example 4-20. A settings.gradle file with an added module
include':app',':icndb'
In this case, the Android library module is called icndb, which stands for the Internet Chuck Norris Database, which serves up Chuck Norris jokes in the form of JSON responses. The API page on the website is shown in Figure 4-2.
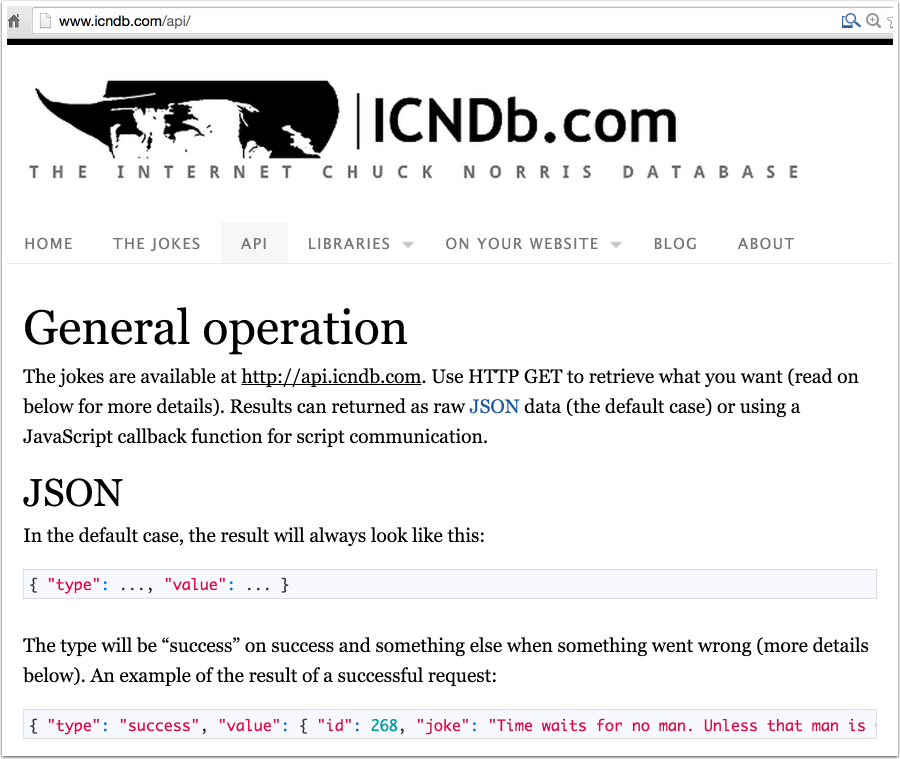
Figure 4-2. The API page for the ICNDB site
As an example of an Android library, this site will be accessed as a RESTful web service, the returned JSON data will be parsed, and the resulting joke will be added to the Welcome activity in a TextView.
To create a library module in Android Studio, use the “New Module” wizard and select the “Android Library” type, as in Figure 4-3.
Note
Other options on the New Module wizard include Java Library and Import .JAR/.AAR Package, among others.
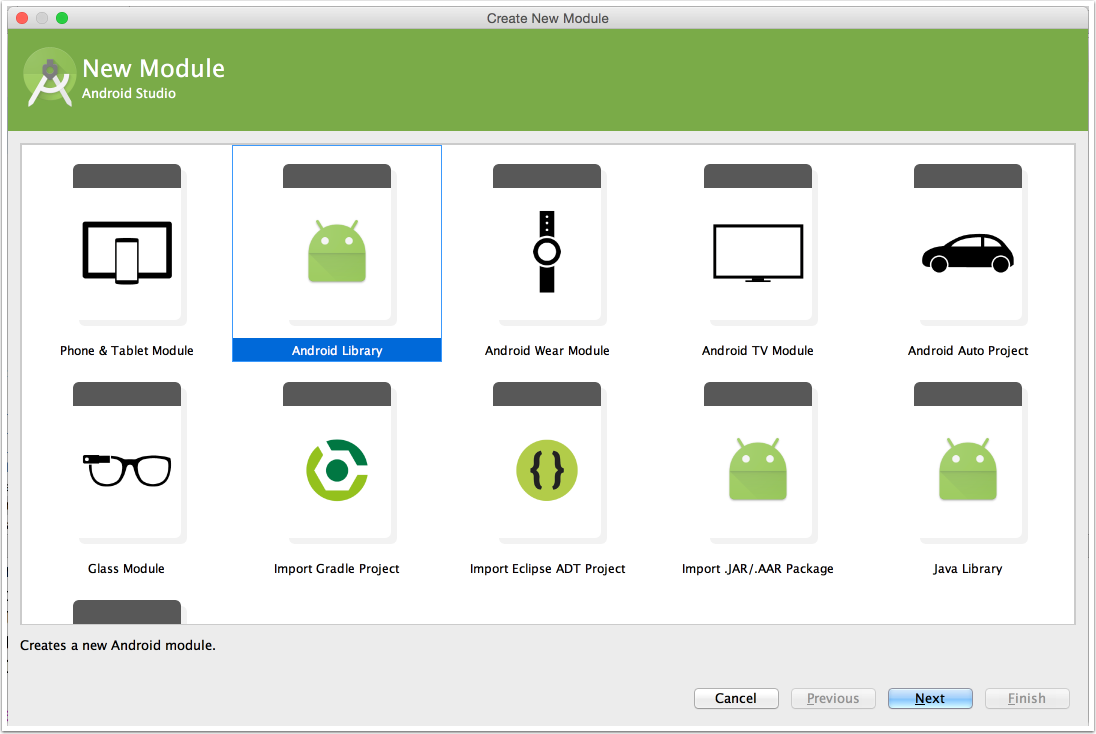
Figure 4-3. The Android Library option in the New Module wizard
After giving the library a name, you can then add whatever type of activity you want, if any. Completing the wizard creates the library directory and adds it to the settings.gradle file in the root project.
Each library has its own Gradle build file, which supports the same settings as the root project. You can specify minimum and target SDK versions, customize build types, add flavors, and modify dependencies however you like. The important difference is that the Gradle build uses a different plug-in, as shown in Example 4-21.
Example 4-21. The build.gradle file for the ICNDB library module
applyplugin:'com.android.library'android{compileSdkVersion23buildToolsVersion"23.0.3"packagingOptions{exclude'META-INF/notice.txt'exclude'META-INF/license.txt'exclude'LICENSE.txt'}defaultConfig{minSdkVersion16targetSdkVersion23versionCode1versionName"1.0"}buildTypes{release{minifyEnabledfalseproguardFilesgetDefaultProguardFile('proguard-android.txt'),'proguard-rules.pro'}}}dependencies{compile'com.google.code.gson:gson:2.6.2'compile'com.squareup.retrofit2:retrofit:2.0.1'compile'com.squareup.retrofit2:converter-gson:2.0.1'}
Use the library plug-in

Exclude conflicting files from multiple dependencies
The build file adds the Retrofit 2 project as a dependency, and its Gson converter for the JSON messages, as well as the Gson library discussed earlier.
Note also the use of the packagingOptions block. That allows you to exclude files of the same name that appear in multiple dependencies.
If you use these libraries, the implementation of the ICNDB library becomes simple, as shown in Example 4-22.
Example 4-22. The JokeFinder class, which does all the work
publicclassJokeFinder{privateTextViewjokeView;privateRetrofitretrofit;privateAsyncTask<String,Void,String>task;publicinterfaceICNDB{@GET("/jokes/random")Call<IcndbJoke>getJoke(@Query("firstName")StringfirstName,@Query("lastName")StringlastName,@Query("limitTo")StringlimitTo);}publicJokeFinder(){retrofit=newRetrofit.Builder().baseUrl("http://api.icndb.com").addConverterFactory(GsonConverterFactory.create()).build();}publicvoidgetJoke(TextViewtextView,Stringfirst,Stringlast){this.textView=textView;newJokeTask().execute(first,last);}privateclassJokeTaskextendsAsyncTask<String,Void,String>{@OverrideprotectedStringdoInBackground(String...params){ICNDBicndb=retrofit.create(ICNDB.class);Call<IcndbJoke>icndbJoke=icndb.getJoke(params[0],params[1],"[nerdy]");Stringjoke="";try{joke=icndbJoke.execute().body().getJoke();}catch(IOExceptione){e.printStackTrace();}returnjoke;}@OverrideprotectedvoidonPostExecute(Stringresult){jokeView.setText(result);}}}
Interface for Retrofit GET request access
Building the Retrofit instance with Gson converter

Asynchronous task to access web service off the UI thread
The JokeFinder class accesses the ICNDB web service using the supplied first and last names for the hero, using an asynchronous task so that the operation is performed off the UI thread. The getJoke method includes an argument for a TextView, which the JokeTask updates once parsing of the result is complete.
The IcndbJoke task is a simple POJO that maps the the JSON response. The form of the response is shown in Figure 4-4.
The JSON response is quite small, so the corresponding IcndbJoke class is also simple, as shown in Example 4-23.
Example 4-23. The IcndbJoke class POJO, which maps to the JSON format
publicclassIcndbJoke{privateStringtype;privateJokevalue;publicStringgetJoke(){returnvalue.getJoke();}publicStringgetType(){returntype;}publicvoidsetType(Stringtype){this.type=type;}publicJokegetValue(){returnvalue;}publicvoidsetValue(Jokevalue){this.value=value;}privatestaticclassJoke{privateintID;privateStringjoke;privateString[]categories;publicintgetId(){returnID;}publicvoidsetId(intID){this.id=ID;}publicStringgetJoke(){returnjoke;}publicvoidsetJoke(Stringjoke){this.joke=joke;}publicString[]getCategories(){returncategories;}publicvoidsetCategories(String[]categories){this.categories=categories;}}}
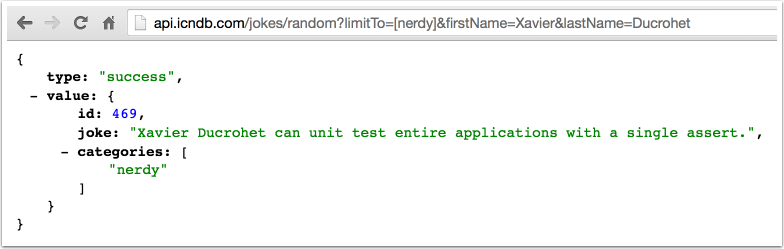
Figure 4-4. JSON response from the ICNDB service
That’s it for the library. The app uses the library through its JokeFinder class. This is made available using a project dependency in the module build file, as shown in Example 4-24.
Example 4-24. Using the ICNDB module in the app
applyplug-in:'com.android.application'android{compileSdkVersion23buildToolsVersion"23.0.3"// ... all the regular settings ...}dependencies{compileproject(':icndb')}
Use the
icndblibrary at compile time
The compile dependency uses the project method, which takes the subdirectory containing the module as an argument. The result is that Gradle knows to build the ICNDB module before building the app, and to make its classes available at compile time.
The WelcomeActivity calls the getJoke method in the JokeFinder, supplying a reference to the TextView to be updated, along with a first and last name supplied from a SharedPreferences object, as seen in Example 4-25, where all the other parts have been omitted.
Example 4-25. Invoking the getJoke method from the WelcomeActivity
publicclassWelcomeActivityextendsActivity{privateTextViewjokeText;@OverrideprotectedvoidonCreate(BundlesavedInstanceState){super.onCreate(savedInstanceState);setContentView(R.layout.activity_welcome);jokeText=(TextView)findViewById(R.id.joke_text);finalSharedPreferencesprefs=PreferenceManager.getDefaultSharedPreferences(this);newJokeFinder().getJoke(jokeText,prefs.getString("first","Xavier"),prefs.getString("last","Ducrohet"));}}
Note
Xavier Ducrohet is the head of the Gradle plug-in for Android project and head of the Android Studio development team at Google.
A sample run is shown in Figure 4-5.
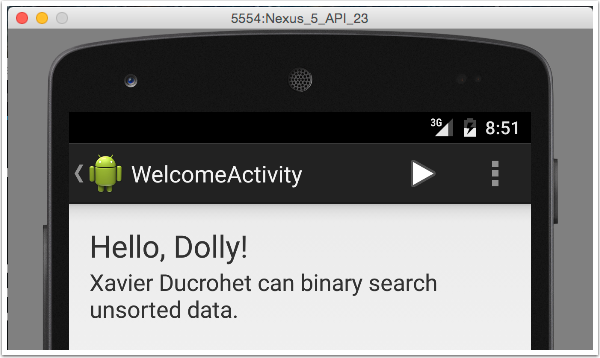
Figure 4-5. Running the app
The build process itself generates both debug and release versions of the library in the icndb/build/outputs/arr directory, shown in Example 4-26.
Example 4-26. Output Android library archive files
> ./gradlew build
> ls icndb/build/outputs/aar
icndb-debug.aar     icndb-release.aar
The aar files can be published to repositories for later use by other apps.
To summarize:
-
Android library projects are Java projects that need Android dependencies, like classes from the Android API or resources or both
-
Gradle uses subdirectories for multiproject builds, where each subproject is added to the top-level settings.gradle file
-
In Android Studio, use the “Android Library” option in the “New Module” wizard to create an Android library project
-
The library project uses the
com.android.libraryplug-in -
The app build file uses the
project(":library")dependency to access the library classes from the app
Following this pattern, you can add functionality to Android libraries and reuse them in other applications.
Get Gradle Recipes for Android now with the O’Reilly learning platform.
O’Reilly members experience books, live events, courses curated by job role, and more from O’Reilly and nearly 200 top publishers.

