Chapter 4. Notifications
LOTS OF STUFF CAN HAPPEN on Google+ when you’re not looking. In between your visits to the site, people can +1 or comment on your posts and photos, or share them with their own circles. People you’ve never met can add you to their circles and folks you’ve added to your circles can add you back. And people can mention and tag you in posts and photos, send you messages, and so on. Google+ doesn’t want you to miss any of this, so it uses notifications to let you know about these happenings even when you’re not logged into the site.
When you first join Google+, you’ll probably smile and get a little self-esteem boost every time you see a notification. But as your circles grow and your stream gets busier, you’ll want to manage and scale back these notifications, or at least make them less intrusive. This chapter explains all the notifications you can get, where you can get them, and how to fine-tune them to hit the sweet spot of not missing anything important yet not feeling overwhelmed.
Where You Get Notifications
GOOGLE NOTIFICATIONS CAN TAKE several different forms, and they reach you in different places. The following sections explain the various ways Google+can let you know about what’s happening in your circles and streams.
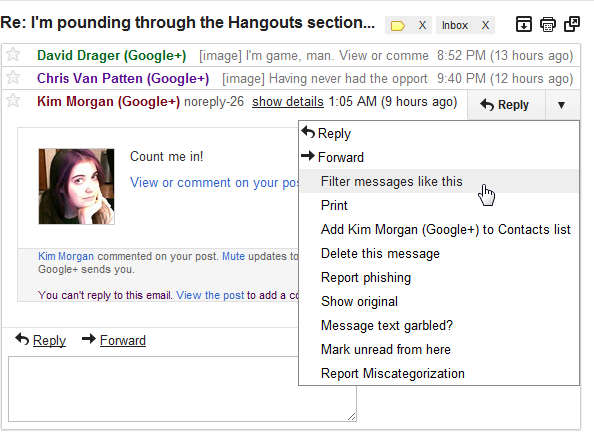
When you first sign up for Google+, before you’ve changed any settings (or installed the Google+ app on your smartphone), Google+ notifies you about pretty much everything by email. When something happens on the site that involves you, it sends an email to the address associated with your Google account. For example, when someone mentions you in a post, you’ll receive an email like the one here.
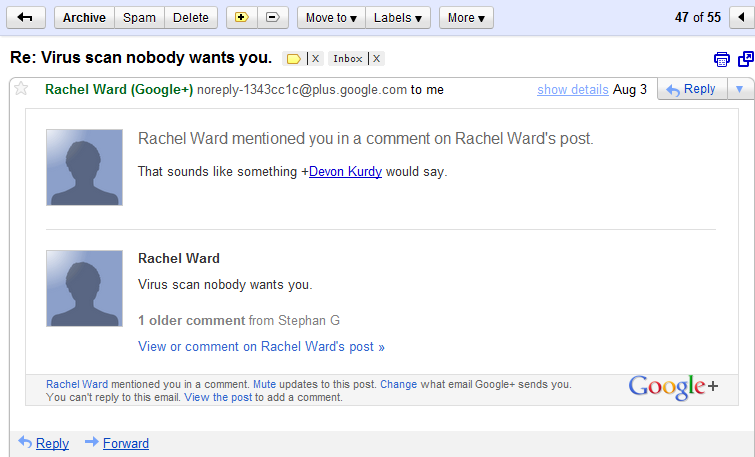
That image shows a notification email in Gmail, but the message should look about the same in Outlook or any other email program. The subject of the email is “Re: Virus scan nobody wants you” because that’s the full text of the original post. (Most posts aren’t that short, of course, so for longer posts you’d see a truncated version in the subject line, like “Virus scan, nobody wants you, because…”) The top part of the email explains what happened—“Rachel Ward mentioned you in a comment on Rachel Ward’s post”—and, below that, the mention itself, with the names linked to Google+ profiles. Beneath that is the text of the original post (which may be truncated if it’s longer than a sentence or two), a sentence that tells you how many other comments the post had when this email was sent, and a link to the post itself. Below all that, there are a few useful links.

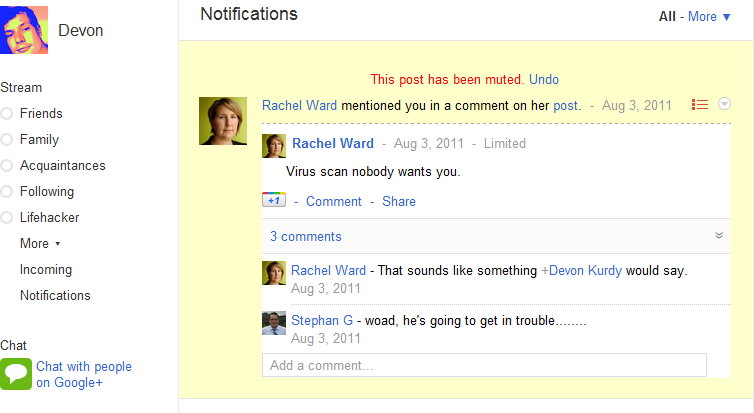
The first link (“Rachel Ward,” in this example) goes straight to the profile of the person who mentioned you. The Mute link is really handy, especially if you’re getting a lot of emails about this particular post. When you click it, you’ll hop straight to your Notifications stream (Writing a post while viewing a circle’s stream), where you’ll see a notice that that the post has been muted. After you do that, you won’t receive any further notifications about activity in that post, and it won’t bounce up near the top of any streams even if it starts getting lots of +1s, comments, or edits—just as if you’d manually muted the post in your stream (as explained on Blocking, Muting, and Reporting Posts).
Click the Change link to open your browser to your Google+ settings page, which is covered in detail starting on Controlling Which Notifications You Receive. Finally, the “View the post” link opens your browser to the post itself.
These email notifications change in a few subtle ways depending on what you’re being notified about. When someone you haven’t added to one of your circle adds you to one of theirs, for example, the email looks as shown on the next page.
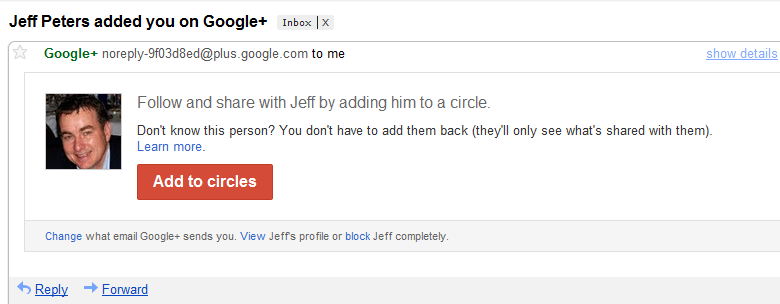
There’s a thumbnail pic of the person who added you that links to his profile, a big red button for quickly adding him back, and links to change your notification settings, view the person’s profile, and block that person to prevent him from seeing anything from you (see Blocking, Muting, and Reporting Posts).
If someone is already in your circles but they add you to one of their circles, the email notification just includes her profile picture, a “View profile” button that links to her profile, and the ever-present Change link.
Tip
If you haven’t received any email notifications (you should have gotten one when you joined the site, for example), check your email program’s spam folder. Some web-based email services, like Yahoo and Hotmail, can also file notifications in a folder named something like Notifications or Bulk. To make sure your Google+ notifications end up in your main inbox, check your email settings, and click the Not Spam or similar button.
The Notifications Panel
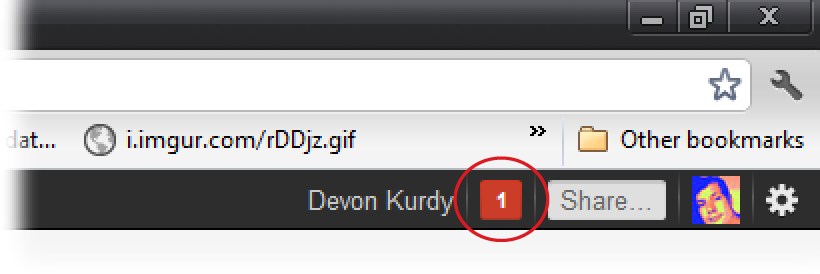
Once you’ve signed up for Google+, you’ll notice that whenever you’re logged into your Google account and you view nearly any Google site—such as Google. com, Gmail, Google Calendar, or Google Docs—you’ll see a black bar across the very top of the page. (If you’ve selected a Gmail theme, the bar could be white or gray instead). This is the Google toolbar. The left side of this bar contains a series of links to Google services, including, at the far left, a “+[Your Name]” link that takes you to your Google+ Home page. On the right side of the bar, just to the right of your full name, is a small box that’s either gray with a 0 inside, or red with a number between one and nine (or “9+” if you’re really popular) in it. Click that gray or red box to see a list of your notifications.
Note
As this book went to press, Google announced they were changing the Google toolbar, so don’t be alarmed if it looks different on your screen than in these pages. To learn about the new design, watch the video here: http://tinyurl.com/googtoolbar
A panel drops down, showing your nine most recent Google+ notifications (or fewer, if you haven’t received many yet). If you have new notifications, they show up at the top and have a white background, while notifications you’ve seen before have a bluish-gray background. People’s profile pictures are on the left side of the panel, the notification messages are in the middle, and icons indicating the type of notification are on the right: a circle icon means someone added you to a circle, three list-like dots mean the notification relates to a post, and so on. There’s a “View all >>” link at the bottom of the panel, which takes you to your Notifications stream. But you know what’s even better? Click one of the notifications in the panel.

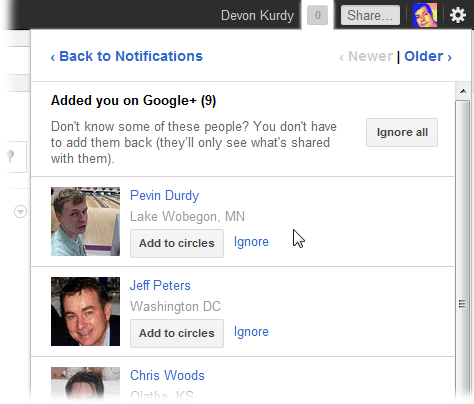
When you click, the panel changes to display detailed info about whatever it is you’re being notified about. Clicking a notification about being added to a circle, for example, displays slightly bigger profile pictures and “Add to circles” buttons so you can click someone’s name to view his profile or click the Add button to put him in one of your circles, no matter which Google page you’re looking at. (Clicking the Ignore link dismisses that notification so you won’t see this person the next time you click this box.) The Newer and Older links at the top-right of the panel let you advance through all your notifications, so you can skip from an added-to-circle one, over to one letting you know you’ve been tagged in a photo (Tagging Photos), and then to one about a +1 on your post. (The “Back to Notifications” link takes you back to the list you saw when you first opened this panel.) Pretty nifty, huh?
Tip
When you have the notifications panel open, you can navigate it using the same keyboard shortcuts that work in Google+. Tap J and K to move up and down the list of notifications (a tiny arrow on the left indicates which item you’ve selected), then hit O (that’s the letter o, not the number zero) or your space bar to display the details of that notification (think “O for open”). When you’re looking at a notification, J and K work just like the Newer and Older links, respectively, and pressing U brings you back to the main list of notifications.
When you view the details of a notification, the panel includes some reminders of how circles work—noting that you don’t have to add people to your circles even if they’ve put you in theirs, that they’ll only see stuff you share with them (meaning your public posts, posts where you specifically mention that person, and posts you share with them), and that people you’ve already added to your circles can now see items you post to “Your circles” or the circle you placed them in.
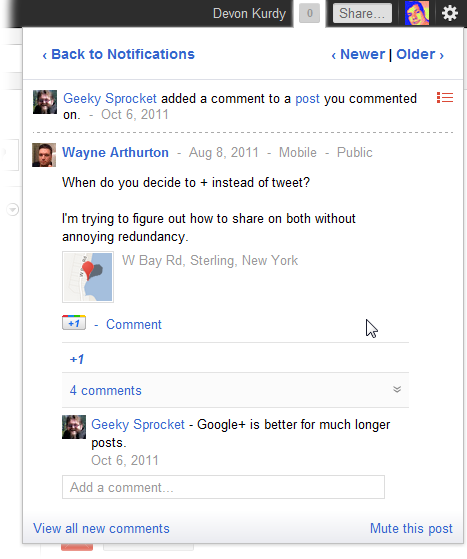
But wait, there’s more! When you get a notification about a comment or +1, you can interact with the post right in the notifications panel, no matter what Google page you’re on. You see the post that got a comment or +1, along with the comment or +1 itself. Click the “# comments” section to see all the comments, or click the number of +1s (“+4,” for example) to see who else +1’d the post. You can even comment on the post or mute it—even if just happened to be searching Google or checking your email when you clicked that little red or gray box.
The Notifications Stream
The Notifications stream is similar to the notifications panel, so it should look pretty familiar. You can get to this stream in several different ways. If you’re logged into Google+, you can click the Google+ logo, the Home button (its icon looks like a house), or the “+[First Name]” link in the Google toolbar, and then click Notifications in the left-hand list of streams. If you’re on some other Google site, open the notifications panel by clicking the red or gray box in your Google toolbar and the click the “View all” link that appears. Phew!
This stream is almost exactly like the notifications, just with a bit more room to maneuver. And just like any other Google+ stream, the Notifications stream will load more items if you scroll all the way to the bottom.
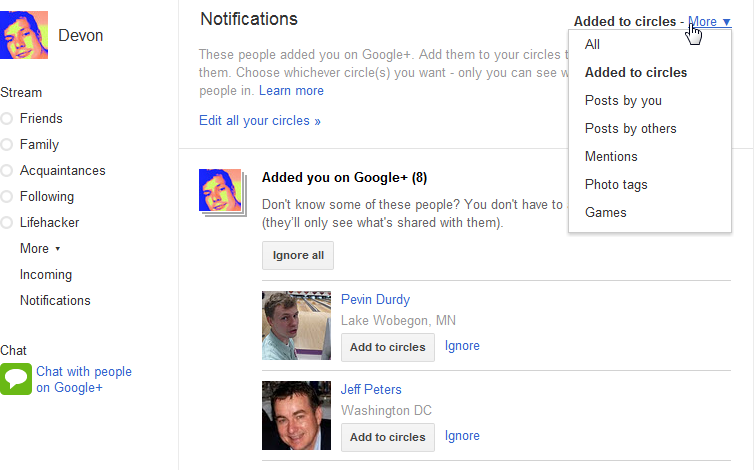
Notifications about posts include a little arrow button in their upper-right corners that’s similar to the button that appears in streams (Blocking, Muting, and Reporting Posts). It lets you report an abusive message, mute a post that’s too busy and keeps dominating your stream, or—if it’s a notification about a particular post—offer a “Link to this post” that opens the post in its own tab or window so it’s easy to copy that post’s web address. The More link near the top of the page lets you sort your notifications: Click it and then select an item from the menu that appears to see only circle-related notifications, photo tags, or whatever.
Text Messages
Google+ can send you text-message notifications, but that’s a good idea only if you have an unlimited text-messaging plan for your cellphone, and if you’re planning to use Google+ only occasionally. As explained on The Other Notification Settings, you can choose to have only very select notifications sent to your phone, but then you may as well just have them sent to your email or, if you have an iPhone or Android cellphone, install the Google+ app (see Chapter 8 for details) and receive the notifications that way instead.
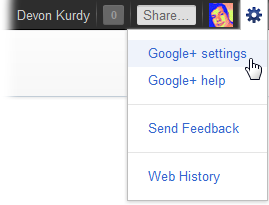
That disclosure aside, if you really did want to have Google+ text you about certain happenings, head to the Google+ settings by clicking the gear icon on the right end of the Google toolbar, and then choosing “Google+ settings” from the drop-down menu.
On the settings page, you’ll see a whole bunch of options, which are all covered in the relevant parts of this book. Look for the “Set delivery preferences” header, and click the “Add phone number” link just below it. In the blue box that appears, select your country and enter your cellphone number, then click “Send verification code.” After that, check your phone—you should get a text message that reads “Your Google verification code is 123456.” Back on your computer, enter that code into the Verification Code field, and then click Confirm.
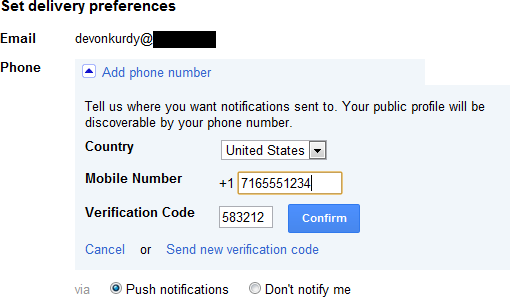
Now that you’ve verified your phone number with Google+, you’ll see an SMS radio button in the “Set delivery preferences” section of the page. (SMS stands for “short message service,” and it’s just a fancy way to refer to text messaging.) Turn on this radio button to tell Google+ to send all your notifications as text messages. If you’ve installed the Google+ mobile app for iPhone or Android, you’ll also see a “Push notifications” option for sending updates through those apps; Chapter 8 has the details.
There’s another option in this section: “Add SMS security PIN.” Click this link to add a numerical password to your account. Why would you want to do that? Because with your phone number verified, you can now update Google+ by sending texts to a particular number (33669 in the U.S.). Adding a PIN makes it so that text messages sent to Google+ won’t get posted unless the text includes your PIN. That prevents you from accidentally posting a text that you meant to send to your significant other (“You looked great after yoga today!”), and prevents your friends from playing practical jokes when you leave your phone unattended.
Tip
Once you’ve verified your cellphone number, you’ll see a “More sharing options” link in the “Set delivery preferences” section of the settings page that you should definitely click. It leads to Google’s help page for posting to Google+ by text message, which details some neat tricks. For example, posts you send via SMS are normally shared with “Your circles” (see Choosing Who Sees Your Posts), but you can share them publicly by adding “+public” at the end of the message, or “+[circle name]” to share with a particular circle.
Below the blue box for setting up your phone is the “Receive notifications” section, which includes a bunch of checkboxes in two columns: Email and Phone (if you’ve activated SMS notifications as explained above, or have installed the Google+ mobile app). You can turn on the appropriate checkbox to tell Google+ how you want to be notified when someone mentions you in a post, adds you to a circle, tags you in a photo, and so on. Controlling Which Notifications You Receive explains each of these notification settings in detail.
Smartphone Notifications
If you carry around an iPhone, iPod Touch, or any kind of Android phone, you can get updates about what’s happening on Google+ contacts right on your device, the same way you’d get a notification about a new email, text message, or whatever.
Note
The Google+ app works just the same on an iPod Touch as on an iPhone—except that you can’t connect to Google+ when you don’t have WiFi connection. So wherever this chapter refers to iPhones, the same instructions and tips apply to an iPod Touch.
Android
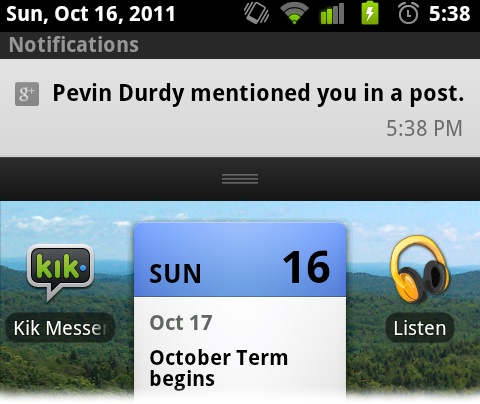
Once you’ve installed the Google+ app on your Android phone (see Chapter 8), Google+ notifications show up in the notification tray at the very top of your screen (the tray is either gray or black, depending on your version of Android). On an Android tablet, Google+ notifications show up in the lower-right corner of the screen. As with any other Android notification, you can pull down the top tray with your finger to see more details about what Google+ is notifying you about.

You also see your notifications at the top-right corner of the Google+ app itself. As with the Google toolbar, they appear as a number inside a red square (or 0 inside a gray square, if you don’t have any new ones). Tapping or dragging up on this bar displays the same screen you see if you tap the notification in your Android device’s topmost notification tray.
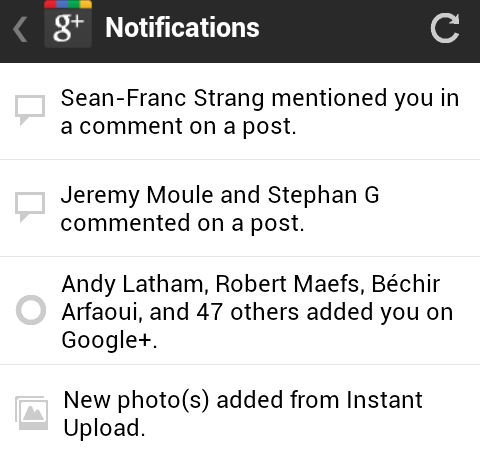
The screen that appears is similar to your Notifications stream and notifications panel. It includes a list of recent happenings, an icon next to each one, and a description of what happened. And, like the Notifications stream, you can keep scrolling down to the bottom of the list, and the list will refresh itself, showing you older notifications. Clicking a notification displays the relevant bit of Google+: a post, a list of people who recently added you, and so on.
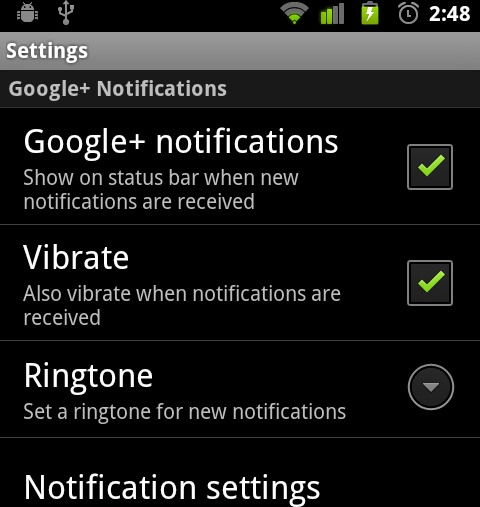
Unlike on the iPhone, you can control your notifications right from the Google+ Android app. While viewing the app’s main page or the Notifications list, hit your Android device’s Menu button, and then choose Settings from the black tray that pops up. You’ll see a list of settings that lets you can choose if and how Google+ gets your attention. You can set the app to vibrate (or not), give Google+ its own ringtone to distinguish it from text messages and other notifications, or turn notifications off entirely.
Tap the “Notification settings” entry, and you’ll be taken to a more detailed menu, where you can decide which types of actions you want to be notified about on your phone. Making these changes on your Android phone is the same as making them on the Google+ settings page (Controlling Which Notifications You Receive), and you’ll see them reflected when you next check your Google+ settings.

iPhone
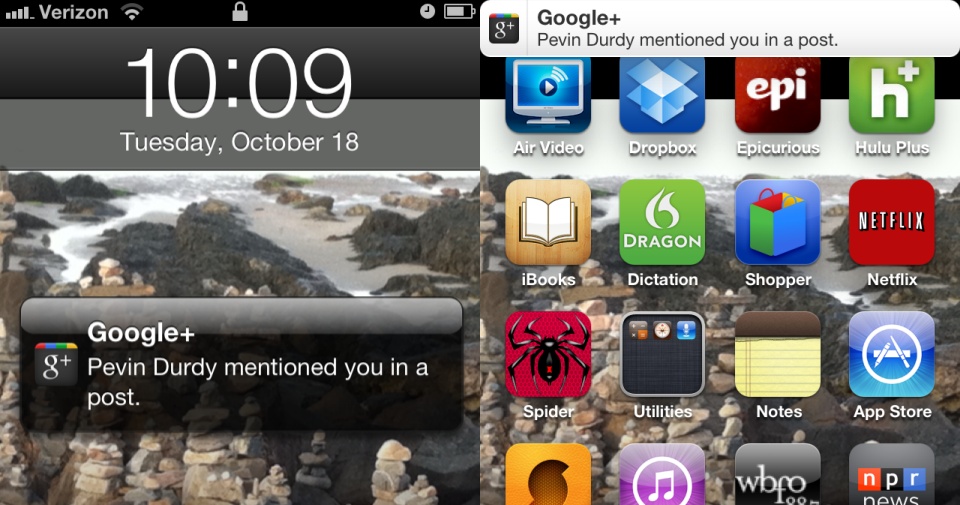
On an iPhone running the latest software (iOS 5, which was released in October 2011), you’ll see notifications on the “Slide to unlock” screen that appears when you turn your iPhone on. If you happen to be looking at your phone when a Google+ notification arrives, it appears in a small white bar that drops down from the top of the screen. You can then swipe down on this bar with your finger to bring up the Notifications screen to see, among other things, the latest Google+ activity.
If you’re running the slightly older iOS 4 software, you’ll get notifications the more traditional (and, to many minds, distracting) way: in a translucent blue pop-up window showing a preview of the notification, with options to View the details or Close the window.
As discussed in the previous section, the settings that control which notifications you receive on your iPhone are on the Google+ settings page, and they’re described in detail in the next section. The settings icon on the main screen of the Google+ iPhone app (iPhone/iPod Touch) doesn’t give you any notification options, or even an on/off switch—you have to control notifications from the Web.
Note
As of this printing, Google+ doesn’t have an app specifically designed for the iPad (though this will probably change soon). You could install the iPhone app on your iPad, but you probably shouldn’t, because it looks funky and isn’t easy to use. The notifications do work, but they’ll just open in the iPhone-sized app.
Controlling Which Notifications You Receive
GOOGLE+ CAN NOTIFY YOU of just about everything that happens on the site that involves you: when people respond to your posts, tag photos with you in them, and so on. But you can also tweak Google+ so it only gives you a tap on the shoulder when something really worthwhile happens. This section explains how to tweak the number and frequency of notifications to your liking. You make all these adjustments from the Google+ settings page (to get there, click the gear icon in the upper right of any Google+ page and then choose “Google+ settings”).
The Most Important Setting
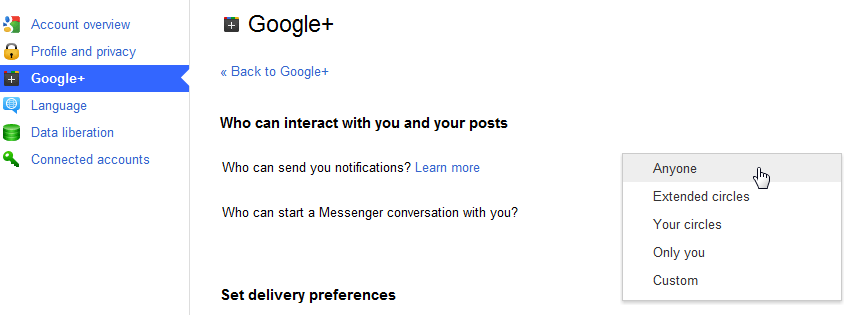
Not surprisingly, the most important option on the Google+ settings page is the first one: “Who can send you notifications?” This setting is the only way you can control which notifications appear in your Google toolbar and Notifications stream, whereas you can use the settings described starting on The Other Notification Settings to fine-tune the notifications you get via email and cellphone.
You might not think this setting is all that vital if you only use Google+ to share news with a small group of friends, family members, and acquaintances. They’re the only people who can see your posts, so who else could you be notified about?
As you learned Chapter 2, anyone can add you to one of their circles, even if you haven’t added them to a circle of yours. And anyone you haven’t blocked (Blocking, Muting, and Reporting Posts) can mention you in a post, share a post specifically with you, or tag you in a photo. So unless you adjust this setting, you might get notifications about that annoying guy you only knew in seventh grade when he writes posts about you, uploads embarrassing pictures from your adolescence, and so on. Then again, you might like knowing when people are talking about you and pointing you out in pictures.
To adjust this setting, click the box to the right of “Who can send you notifications?” In the list that appears choose the minimum amount of acquaintance you want to have with the people whose actions result in you receiving a Google+ notification. For example, if you want to know about every single mention of you on the site, choose Anyone.
Note
You may be wondering about the “Only you” setting—how could Google+ work so that only you can send yourself notifications? Based on experiments and searching, it seems “Only you” is basically equivalent to “Nobody can send me notifications”—in other words, it’s a weirdly named Off setting.
If you’re using Google+ to interact with particular circles and you rarely (if ever) post items using the Public or Extended Circles options (Choosing Who Sees Your Posts), it’s probably okay to leave this setting as it is (it’s automatically set to “Extended circles”; flip to Writing a post while viewing your main stream for a reminder of what that means). If you post things publicly or seem to attract a lot of unknown commenters and sharers who bother you, scale back to Your Circles instead.
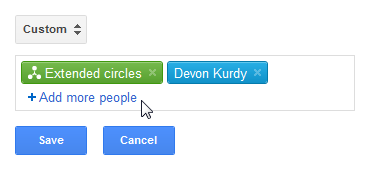
If you’d like, you can pick out certain circles and people who can trigger notifications by choosing Custom. In the box that appears, select the circles and people you want using the same techniques you use to select who sees your posts (Choosing Who Sees Your Posts). When you’re done, click Save.
Note
If you’ve installed the Google+ app on an iPhone or Android device, your Google+ settings page will include a “Who can start a Messenger conversation with you?” setting (shown previously). This relates to the Google+ group-message feature called Messenger; you can get the details on Starting a Messenger Session (Apps Only).
The Other Notification Settings
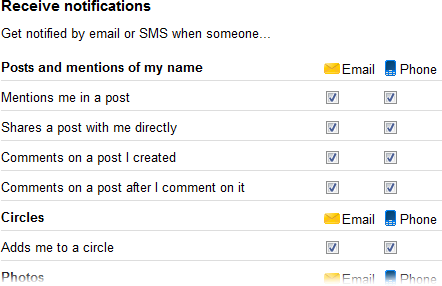
Farther down the Google+ settings page is the “Receive notifications” section, where you can turn checkboxes on or off for each of the things that could trigger a notification.
Note
If you haven’t set up a cellphone to work with Google+ (Text Messages) or installed the Google+mobile app, you won’t see the Phone column pictured here. If you have set up a cellphone to work with Google+, you need to turn on the SMS radio button in the “Set delivery preferences” section of the settings page before you can turn on checkboxes to make Google+ notify you via text message.
The settings are divided into four categories. Here’s what each setting means, and a few suggestions on whether to leave them on or turn them off:
Posts and mentions of my name. These control the notifications that get triggered when someone specifically refers to you or responds to your posts or comments:
Mentions me in a post. As you learned on Mentioning People in Posts, people can mention you in their posts by adding @ or + signs in front of your name. Only turn this setting off if you get a lot of strangers tagging you.
Shares a post with me directly. You’ll get this kind of notification if someone specifically enters your name in the +Add box (described on Other posting tips) before sharing a post. As with the previous setting, you’ll probably want to keep this one turned on unless you’re being spammed by more people than you care to block.
Comments on a post I created. Go ahead and leave this one on, since people can’t see your posts unless you share them that way (Writing a post while viewing your main stream).
Comments on a post after I comment on it. This notification setting is perhaps the trickiest. If you leave it turned on, you’ll get notifications when someone adds their two cents to a post you left a comment on—but not if you just left a +1. It’s safe to turn this setting off if such notifications annoy you, because if people really want you to notice their comments, they can mention you. If just one post you commented on is causing a flood of follow-up comment notifications, you can simply mute that post (Blocking, Muting, and Reporting Posts).
Circles. You guessed it—this category, which includes only one setting, controls notifications related to circles:
Adds me to a circle. This, more than any other notification, has the highest potential for making you say “Enough, already!” If you keep a low profile online, then you might only see notifications about friends and people you know adding you to their circles, which is fine, since the notification gives you an easy way to add those people to your circles. But if you’re getting so many of these types of notifications from strangers that they become distracting, turn this setting off; you can always find out who’s added you by heading to your Circles page and clicking the “People who’ve added you” heading (Adding People to Circles).
Photos. Since photos can fall anywhere on the spectrum between “worth a thousand words” and “incriminating,” you can have Google+ notify you about lots of photo-related actions:
Wants to tag me in a photo. People in your circles can tag you in photos without your permission (though there’s a way to change that; see Tagging Photos). And folks outside your circles can also tag you without permission, though the tags aren’t displayed for anyone else who’s looking until you approve them. You should almost certainly keep this setting turned on so you know what sorts of photos of you are floating around Google+. (You’ll learn all about uploading photos in Chapter 5.)
Tags me in a photo. It’s usually fine to keep this setting on because, even though only people in your circles can tag you in photos without your explicit approval, it’s nice to see pictures that people post of you.
Tags one of my photos. This is another one you’ll want to keep turned on so you can make sure the tagger got the right person and isn’t playing a mean joke. (Tagging Photos explains how to tag other people’s photos.)
Comments on a photo after I comment on it. Like the “Comments on a post after I comment on it” setting, these notifications can quickly get annoying if you comment on a popular photo. If someone really wants you to see their comment, they can mention you (Mentioning People in Posts), so you can probably turn this setting off.
Comments on a photo I am tagged in. Keep this turned on so you see both the funny and snarky responses to photos you’re in so you can do damage control, if necessary.
Comments on a photo I tagged. Like the previous setting, you’ll probably want to keep this one turned on.
Messenger. Messenger is a tool available through the Google+ app for cellphones and mobile devices (see Chapter 8). It gives people a way to quickly send notes to each other that’s much more convenient (and less awkward) than a chain of reply-all emails. You can read more about how Messenger works in Chapter 8 (Starting a Messenger Session (Apps Only)). There’s only one Messenger-related setting:
Starts a conversation with me. The Phone checkbox for this setting is turned on automatically, and you can’t turn it off because that’s how Messenger works: via your cellphone. You’ll probably want to keep the Email checkbox for this setting turned on, too, so you don’t miss any messages because you don’t have your phone handy. If you start getting intrusive Messenger requests from people you don’t know, there’s a separate setting to limit who can send those; flip to Starting a Messenger Session (Apps Only) for details.
Note
If you’ve created a Google+ Page for a brand, business, or other organization, you’ll also see a fifth category: “Communications about Pages.” You can find more info about Pages on this book’s Missing CD page at www.missingmanuals.com/cds.
Making Notifications Less Intrusive
SO FAR, YOU’VE LEARNED how to control whose actions result in notifications and how to turn on or off most of the notifications you can get by email or on your phone. But some notifications, like the ones you get when people add you to circles, will always show up in your Google+ notifications stream and in the little red box in the Google toolbar described on The Notifications Panel. And sometimes it just happens to rain activity on Google+, and your inbox, phone, or any web browser open to a Google-related page will keep making noise, vibrating, or displaying new red numbers, again and again. Here’s a few tricks you can try to limit the cacophony.
Filtering Email Notifications
Most email programs can filter incoming messages based on who they’re from. In desktop email programs like Microsoft Outlook and Apple’s Mail, you use rules to tell the program to put messages from a certain address into a particular folder. If you use a web-based email system like Gmail, Yahoo Mail, or Hotmail, you can use filters to send messages to a certain folder or, in Gmail, assign the message a label. (The exact details of setting up rules or filters depends on your email program; if you have trouble, the program’s help files can guide you.)
Using rules or filters, you can keep Google+ notifications out of your inbox, but still keep ’em around so you can check them at your convenience. Google+ notifications all come from different addresses (they start with “noreply-” followed by a string of random numbers and letters), but they all end with “@plus.google.com.” So you can set up your email program to filter messages that end with that.
Keeping the Red Box in Check
Google+ lets you determine exactly which notifications reach your inbox and phone, but if you spend a good part of your day in your web browser, especially on Google-related sites, that little red box in the Google toolbar (The Notifications Panel), and the way it rolls over when there’s a new notification, can be hard to resist.
You can get rid of that distraction (even just temporarily) if you use Google Chrome as your browser. (To learn more about Chrome, head to www.google.com/chrome.) To do so, install the free “Hide Google+ Notification” add-on from the Chrome Web Store (https://chrome.google.com/webstore), and the gray/red box is gone. If you want to get the red box back, head to the main menu in Chrome (click the wrench icon on the right side of the main toolbar), mouse over the Tools menu, and then choose Extensions to disable or uninstall Hide Google+ Notification.
Scaling Back Email and Mobile Notifications
A lot of people leave themselves far too open to distraction on their web-connected phones. As noted above, Google+ gives you different settings to control which notifications you receive on your Android device, iPhone, or by SMS, and which notifications you receive by email. (Those settings don’t have any effect on the master list of notifications that shows up in the notifications panel and Notifications stream in your computer’s web browser.) Don’t configure Google+ so that it sends you every kind of notification about every little thing that happens, or you’ll become dulled to all the bulletins and won’t notice when something you actually care about happens.
Here are some ways to keep the volume of notifications manageable: Head to the Google+ settings page and set things up so you only get phone notifications about posts where you’re mentioned, photos where you’re tagged, or posts specifically shared with you. Save notifications about comments and +1s on your posts, comments on posts you’ve commented on, and other non-direct happenings for email—and, as mentioned earlier (Making Notifications Less Intrusive), consider creating a filter so these notifications don’t constantly make your inbox look like it has unread messages. Finally, completely turn off notifications for things like “Comments on a photo after I comment on it.” You’ll still get these notifications in your notifications panel and Notifications stream, unless you’ve set things so you only get notifications from certain circles (Controlling Which Notifications You Receive)—and even then, it’s probably not vital that you see someone else’s comment on your comment, which probably wasn’t a deeply thought-out essay.
Now you’ve got a sense of how to keep in touch and up-to-date on Google+without having to quit your day job. Next up, you’ll learn how to add photos and tag the folks in them so you can give other people a little smile when they check their notifications.
Get Google+: The Missing Manual now with the O’Reilly learning platform.
O’Reilly members experience books, live events, courses curated by job role, and more from O’Reilly and nearly 200 top publishers.

