Chapter 1. Getting Set Up
In this chapter, we will guide you through the selection of hardware, installation of a base operating system, and development environment setup, as well as actually compiling and installing the components that compose the OpenBTS software suite. Several shortcuts can be taken along the way—for example, if you would prefer to use the official binary packages instead of compiling your own—but the entire process is detailed for those wishing to build from scratch.
Hardware Components
Although OpenBTS implements most of the complexity involved in building a mobile network in software, radio waves must still be transmitted and received somehow. This section details which hardware components you should procure to implement this capability in a development setting. The configuration of these components is covered in Chapter 2.
Linux Server
The first requirement is a standard commodity Linux server. Other architectures are beginning to be supported, but stick to an x86 processor running a 32-bit operating system for the best results for now. This computer can be a separate machine in your test environment or it can actually be a virtual machine on the laptop or desktop you use daily.
Minimum requirements for processing power and RAM are not clearly defined due to the many variables involved, such as the number of concurrent carrier signals, network load, network usage type, radio environment, etc. Each will affect the required resources.
A single carrier signal requires the OpenBTS software to generate downlink waveforms to transmit to the handset and demodulate the uplink waveforms received from the handset. OpenBTS supports the creation of multiple concurrent carrier signals on a single physical radio to linearly increase network capacity, but the processing demands are very high. For a stable lab setup with a single carrier signal (maximum of seven concurrent voice channels), an Intel i5 or something comparable with 2 GB of RAM is recommended. It must also have at least a USB2 interface, but USB3 is quickly becoming a requirement on newer software defined radios. It may be a good idea to start with USB3 now to avoid a future upgrade.
The need for increased throughput on the USB interface relates to the quantity and size of radio waveform samples being communicated through it. In a production environment, multiple simultaneous carrier signals can be utilized, which drastically increases the required sample bandwidth. Additionally, the algorithms used to demodulate signals can be configured to operate in a more robust manner (e.g., to rectify signal distortion due to the deployment environment). Thus, the processing power needed to generate and demodulate these signals could be an order of magnitude greater than in a lab setup.
Another thing to keep in mind is that as newer releases of OpenBTS are made available, new capabilities may require more processing power or memory. For example, OpenBTS in Global System for Mobile (GSM) mode can run smoothly on an Intel Atom processor but the new OpenBTS-UMTS (Universal Mobile Telephone System) requires at least an Intel i7. This sidenote is actually the main advantage of having a radio access network (RAN) defined in software. As new standards are released, they can be applied to a production RAN via a simple software update instead of swapping expensive hardware infrastructure.
Software Defined Radio
The software defined radio (SDR) is the key breakthrough that makes OpenBTS possible from a hardware perspective. SDRs have been used in military applications for about 20 years. Only recently have they become available to a wider audience due to the decreasing cost of the technology.
A modern SDR is a piece of hardware that connects to your computer via a USB cable or over Ethernet. They are typically as small as a deck of cards or as large as a stack of three DVDs and are powered either directly via the USB host connection or by a small external power supply. The SDR hardware implements a completely generic radio that can send and receive raw waveforms in a defined frequency range (i.e., 60 MHz to 4 GHz) with a host application. That host application could be an FM radio implementation that receives the raw waveforms, demodulates the signal, and plays back the audio. This means that radio hardware is no longer designed around a specific application; it is completely up to the host to define the implementation, allowing anyone to create radio applications purely in software.
OpenBTS supports SDRs from several vendors: Ettus Research, Fairwaves, Nuand, and Range Networks. These products range in price from approximately $500 to over $2500. If you choose a product that connects via Ethernet, make sure your Linux server has a dedicated Ethernet port for the radio (preferably gigabit Ethernet).
Tip
Most SDRs are completely generic hardware suitable for any radio project while some are specifically optimized for implementing mobile networks. Check with the vendor before purchasing.
Antennas
Many SDRs have enough transmit and receive sensitivity to operate without antennas in a small environment. Typically, a coverage area with a radius of 1 m can be achieved. This is a desirable setup for a lab environment, especially if multiple developers are using multiple radios. The coverage areas will not overlap and interfere with each other. Additionally, your network will not interfere with any carriers in the area.
Tip
Even if your coverage area is very small, the national regulator will still most likely require you to obtain a test license before using GSM frequencies. More information is in Spectrum Regulation.
In lab environments where a single OpenBTS instance is to be shared among multiple developers, the coverage area must be expanded. Adding a pair of small 5 dBi antennas can increase it dramatically, up to a 25 m radius in an unobstructed environment. These are usually rubber duck–style antennas with a SubMiniature version A (SMA) connector, similar in appearance to a typical home WiFi router antenna. An example is shown in Figure 1-1.
Antennas are tuned for a specific frequency, so choose one that most closely matches the GSM band you will be using (850, 900, 1800, or 1900 MHz).
The frequency also plays a role in the coverage area size. Low-frequency bands (850 and 900 MHz) propagate larger distances than high-frequency bands—sometimes nearly twice as far.
Test Phones
For testing, at least two GSM handsets compatible with the band you will be using (850, 900, 1800, or 1900 MHz) are needed. Most modern GSM handsets are “quad-band,” meaning that all bands are supported. There are also “tri-band” and “dual-band” handsets. The easiest way to determine if a handset will be band compatible with your network is to search for the model on GSM Arena. Complete technical specifications are listed there.

You must also make sure that the handset you are using is unlocked. If the handset is “locked,” it means that the manufacturer has programmed the hardware’s baseband processor to only work with a specific carrier. This restriction can be removed, usually by entering a sequence of numbers on the dialpad, but that is beyond the scope of this book. The easiest choice is to use an unlocked handset that will accept any carrier’s subscriber identity module (SIM) card.
Test SIMs
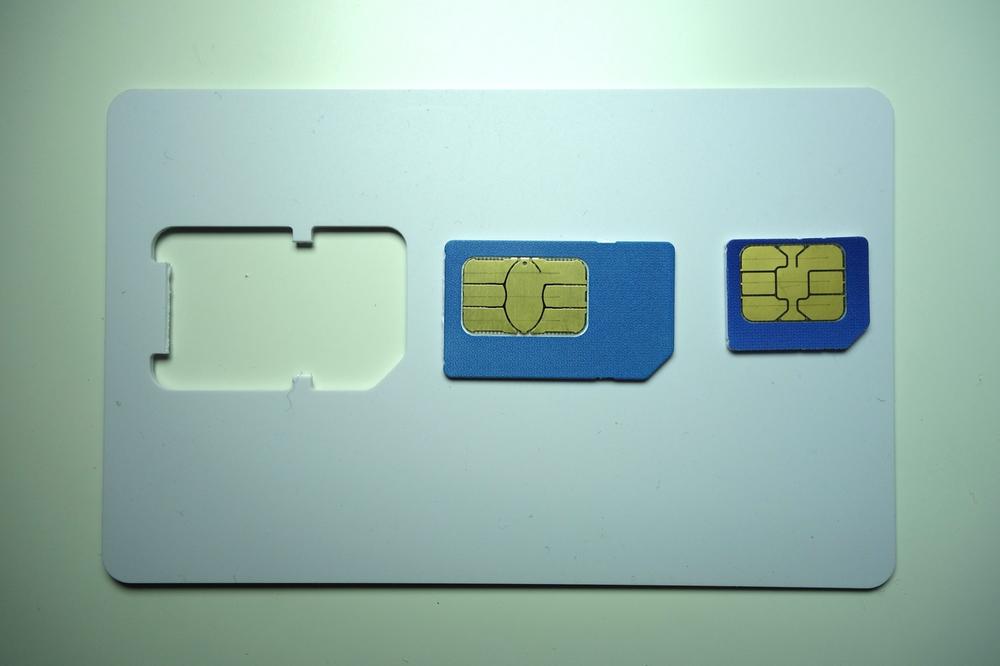
The SIM used in GSM handsets is nothing more than a trimmed-down smart card. Smart cards are also known as chip cards or integrated circuit cards (ICCs) and can be found in many authentication and identification applications. A full-size smart card has the same dimensions as a credit card; newer credit cards actually use smart card technology to increase security. SIM cards are programmed using standard smart card writers and, once written, are popped out of the full-size card frame so they fit into a GSM handset. Figure 1-2 shows the full-size smart card carrier, popped out full-size SIM card, and trimmed-down micro SIM card.
There are a couple of ways to procure SIMs for use in your test environment. Depending on your needs and future deployment plans, you can decide to utilize spare SIMS, create some new ones yourself, or contract a company to program them in bulk.
Using spare SIMs
For testing purposes, any SIM card that physically fits into the handset will probably work. However, using your existing SIM, an expired SIM, or a foreign country’s SIM has trade-offs, mainly concerning security features. There is a secret key, named “Ki,” stored in the SIM, which only the SIM issuer knows. It is stored in an unreadable portion of memory in the SIM and is not retrievable after the manufacturer places it there. This shared secret between operator and handset is what allows the network to determine cryptographically if the subscriber is valid.
Tip
OpenBTS has an alternative authentication method for this situation known as “Cache Based Auth.” It performs an initial authentication exchange with the handset and records the results. It uses this same request and expects the same answer in the future. The method is not as secure as unique exchanges for each request but is still better than completely disabling authentication.
Another key, named “Kc,” is used to support call encryption. When using another carrier’s SIM in your test environment you will lose these two features, but if you do not have access to a smart card writer and blank cards, this is your best option.
Warning
Some handsets are tricky when using another carrier’s SIM to connect to your own OpenBTS network. If the handset can detect its “home” carrier signal, the option to manually select another carrier may be hidden from the settings menu. This is commonly observed when using AT&T SIMs in unlocked iPhones.
DIY SIMs
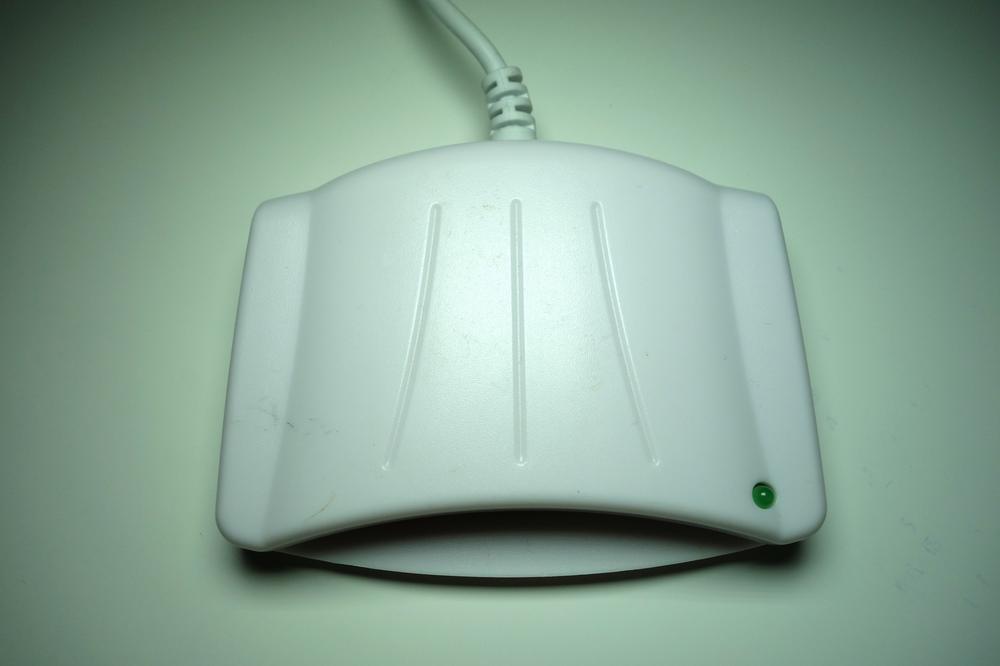
To create a small batch of SIM cards for your own test environment, you will need blank, rewritable “magic” SIMs and a smart card writer. Many products are available from several vendors on Alibaba’s website. An example writer connected via USB is pictured in Figure 1-3, but there are many different-looking writers on the market.
The software installation and write commands depend on which writer and cards have been selected. The most up-to-date information about writing SIM cards can be found on the OpenBTS wiki page.
Batch SIMs
SIM-writing companies are starting to offer lower quantity runs of cards for reasonable prices. You will typically submit some parameters about your order, such as card artwork, authentication algorithm needed, and card quantity, to receive a quotation. Once ordered, the finished product will be a box of your SIMs along with a separate document or file containing a list of IDs and encryption keys for each card.
This list can then be batch-imported into your subscriber database by using a script. Now all of your subscribers are provisioned into the system without manually burning 10,000 individual SIMs and you’re left with a nicely packaged SIM card for each user.
Full-size versus micro versus nano
Once you have a technically compatible SIM card (2G versus 3G versus 4G, etc.), it may still have an incompatible form factor. This is easily remedied by using a SIM cutter, something that carrier shops love to charge decent service fees to use. It’s a device that looks like a stapler but functions more like a cookie cutter, as illustrated in Figure 1-4. They can be purchased for less than $20 and will convert SIMs from standard to micro and from micro to nano. The only difference between these sizes is the amount of plastic surrounding the actual chip.

Operating System and Development Environment Setup
Now that the hardware has been gathered, you are ready to proceed with setting up a development environment. OpenBTS has traditionally been developed and tested on Ubuntu Long-Term Support (LTS) distributions. It has also been tested on Debian and CentOS distributions.
For this book, the most tested distribution and architecture will be used: Ubuntu Server 12.04 LTS 32-bit. Starting with OpenBTS 5.0, 64-bit systems are also supported but have not been as widely deployed. In addition to Ubuntu 12, the Ubuntu 13 and 14 systems have also been used successfully. Preliminary packaging for RPM-based systems (CentOS, Fedora, and Red Hat Enterprise Linux) is also available but will not be covered in this book. Please visit OpenBTS.org for more information.
If you do not yet have a compatible operating system installed, Appendix B has a complete step-by-step guide.
If you plan on using the official OpenBTS release packages, feel free to skip ahead to Installation.
Git Compatibility
Git is a version-control system that manages software source code changes. The OpenBTS project utilizes several new features in Git, such as submodule branch tracking. To make sure your client is compatible (e.g., newer than 1.8.2), it needs to be updated.
First, execute this command to add support for Personal Package Archives, an alternate way to distribute binary release packages:
$ sudo apt-get install software-properties-common python-software-properties
Then, execute the following command to add a repository for the latest Git builds to your system:
$ sudo add-apt-repository ppa:git-core/ppa
Now, you must simply refresh the list of packages and install Git again to update your system’s client:
$ sudo apt-get update
$ sudo apt-get install git
To confirm that the new Git client is installed properly, run the following command:
$ git --version
git version 1.9.1
Now that you have Git installed, you can proceed to downloading the development scripts.
Downloading the Code
The OpenBTS project consists of multiple software components hosted in separate development repositories on GitHub. Understanding the intricacies of Git should not be a barrier to using OpenBTS, so several development scripts have been written to make it easier to download the code, switch branches, and compile components. To download these development scripts into your new environment, run the following command:
$ git clone https://github.com/RangeNetworks/dev.git
Tip
The development scripts assume that you have Secure Shell (SSH) keys set up for GitHub. If you do not, please follow these instructions to set them up before proceeding.
Now, to download all of the components, simply run the clone.sh script:
$ cd dev
$ ./clone.sh
Each component’s repository will be cloned from GitHub into your development environment.
The clone.sh script also automatically initializes any submodules needed.
Now that the OpenBTS project sources are in your development environment, you can select a specific branch or release to compile. The switchto.sh script is used to toggle between build version targets.
For example, if you wanted to build the v4.0.0 release, run the following command:
$ ./switchto.sh v4.0.0
The current version target can be listed for each component by using the state.sh script.
This script also lists any outstanding local changes for each component.
$ ./state.sh
This book focuses on the 5.0 series branch. To target the latest, greatest code in 5.0, run the following command:
$ ./switchto.sh 5.0
Building the Code
Your development environment is now prepared to build the newest bits in the 5.0 series branch.
To compile binary packages, you will use the build.sh script.
It automatically installs the compiler and autoconfiguration tools as well as any required dependencies.
It also controls which radio transceiver application will be built.
As there are several different drivers available for the various radio types, build.sh requires an argument so it knows which hardware is being targeted (valid radio types are SDR1, USRP1, B100, B110, B200, B210, N200, and N210).
Tip
OpenBTS also supports the UmTRX hardware from Fairwaves. However, it uses a custom version of the UHD radio driver and the build.sh script has not yet automated its installation.
This book targets the Ettus Research N200. Run the build command now:
$ ./build.sh N200
This process can take a while (30–60 minutes) the first time it is run, depending on the hardware it is being executed on. Going forward, you will only need to recompile updated components. The following command, for example, recompiles just the OpenBTS package for an Ettus Research B100 radio:
$ ./build.sh B100 openbts
When the build script finishes, you will have a new directory named “BUILDS” containing a subdirectory with the build’s timestamp. An example listing of this directory follows:
$ ls dev/BUILDS/2014-07-29--20-44-51/*.deb
liba53_0.1_i386.deb                 range-asterisk-config_5.0_all.deb
libcoredumper1_1.2.1-1_i386.deb     range-configs_5.0_all.deb
libcoredumper-dev_1.2.1-1_i386.deb  sipauthserve_5.0_i386.deb
openbts_5.0_i386.deb                smqueue_5.0_i386.deb
range-asterisk_11.7.0.4_i386.deb
Congratulations! You can now move on to installing and starting each component, as well as learning what purpose each serves.
Installation
Now that you’ve downloaded a set of official release packages or compiled your own, they need to be installed and started. A bit of background for each component will be provided, followed by the installation procedure and any initializing configuration needed. As some components depend on others, they will be presented in the order needed to satisfy these interdependencies.
Change into your new build directory before continuing:
$ cd dev/BUILDS/2014-07-29--20-44-51/
Installing Dependencies
If you compiled your own set of packages in the previous section using the build.sh script, these dependencies have already been installed and this section can be skipped over. If you’re using a set of official release packages, you’ll need to install some additional system libraries and define an additional repository source so all dependencies can be found and installed.
Execute the following commands to define an additional repository source for ZeroMQ, a library that all the components use:
$ sudo apt-get install software-properties-common python-software-properties
$ sudo add-apt-repository ppa:chris-lea/zeromq
$ sudo apt-get update
Coredumper library
OpenBTS uses the coredumper shared library to produce meaningful debugging information if OpenBTS crashes. Google originally wrote it and there are actually two libcoredumper packages: libcoredumper-dev contains development files needed to compile programs that utilize the coredumper library, and libcoredumper contains the shared library that applications load at runtime:
$ sudo dpkg -i libcoredumper1_1.2.1-1_i386.deb
Tip
The exact version numbers found in the package names may have changed since the publishing of this book.
Installing Components
By installing all of the following components on a fresh system, you are guaranteed a functional GSM network-in-a-box. Everything needed for voice, SMS, and data will be running in a single system.
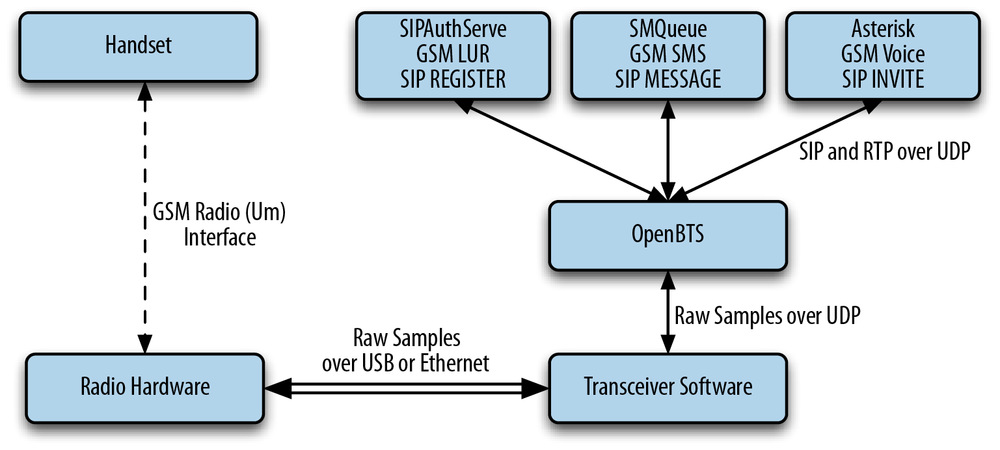
The overall architecture of what you will be installing is visible in Figure 1-5. The Session Initiation Protocol (SIP) and Real-time Transport Protocol (RTP) are the two protocols that OpenBTS uses to convert GSM traffic into VoIP.
System configs
This package contains a set of default configurations that will allow a fresh Ubuntu system to work out of the box when installed. It includes settings for the network interface, firewall rules, domain name system (DNS) configuration, logging, etc.
You may not want to install this package if you are already comfortable configuring a Linux distribution, but its contents can serve as a guide for the required changes. During installation, you will be prompted several times to confirm the overwriting of certain configuration files. If you are unsure what the file does, a safe answer is always “Y” when dealing with a fresh system:
$ sudo dpkg -i range-configs_5.0_all.deb
Warning
This package will overwrite your network interface configuration if you answer “Y” when asked about the /etc/network/interfaces change. You can answer “N” to this prompt and your configuration will be retained: however, GPRS will not function correctly until you have manually added the text detailed in Central Services to your interface definition. It is responsible for calling iptables-restore to automatically load firewall rules.
Asterisk
Asterisk is a VoIP switch responsible for handling SIP INVITE requests, establishing the individual legs of the call, and connecting them together. There are two packages responsible for setting up an Asterisk installation that works without any additional configuration: range-asterisk and range-asterisk-configs.
The range-asterisk package contains a confirmed-working version of the Asterisk SIP switch software and ensures that the appropriate modules needed for OpenBTS are already included. No other patches to Asterisk are included; it is simply intended to represent the latest confirmed-working version of Asterisk.
The range-asterisk-configs package contains a set of configuration files so Asterisk knows about and can communicate with the subscriber registry database. This database is where the various components store and update subscribers’ phone numbers, identities, authentications, caller IDs, and registration states. Also, by using this database, it is no longer necessary to manually edit Asterisk configuration files when adding new handsets to the network:
$ sudo dpkg -i range-asterisk*.deb
$ sudo apt-get install -f
SIPAuthServe
SIP Authorization Server (SIPAuthServe) is an application that processes SIP REGISTER requests that OpenBTS generates when a handset attempts to join the mobile network.
When a handset authenticates successfully, SIPAuthServe is responsible for updating the subscriber registry database with the IP address of the OpenBTS instance that initiated it, allowing other subscribers to call the handset:
$ sudo dpkg -i sipauthserve_5.0_i386.deb
$ sudo apt-get install -f
SMQueue
SIP MESSAGE Queue (SMQueue) is an application that processes SIP MESSAGE requests that OpenBTS generates when a handset sends an SMS. It stores the messages, schedules them for delivery in the network, and reschedules them if the target handset is unavailable:
$ sudo dpkg -i smqueue_5.0_i386.deb
$ sudo apt-get install -f
OpenBTS
Finally, we reach the star of the show. OpenBTS is responsible for implementing the GSM air interface in software and communicating directly with GSM handsets over it. This communication is converted into SIP and RTP on the IP network side and interacts with the components above to form the core network.
The GSM handsets see a fully compatible GSM radio access network and the core network sees standard SIP endpoints. Neither side must know that there is a layer between allowing the handsets to connect seamlessly to the IP world:
$ sudo dpkg -i openbts_5.0_i386.deb
$ sudo apt-get install -f
Starting/Stopping Components
Now that each component has been installed, you need to start them. Components are controlled on Ubuntu with a system named Upstart. Future releases of the OpenBTS suite will support other mechanisms such as systemd, but for now, Upstart is used.
To start all components, execute the following:
$ sudo start asterisk
$ sudo start sipauthserve
$ sudo start smqueue
$ sudo start openbts
Conversely, to stop all components, use:
$ sudo stop openbts
$ sudo stop asterisk
$ sudo stop sipauthserve
$ sudo stop smqueue
Tip
The order of startup and shutdown is not critical, but if OpenBTS is running without the other components, a GSM network will be visible but unusable.
Each component runs in the background and will automatically restart if a fault arises. To monitor the console output for the component once it is running in the background, the following log files can be used:
/var/log/upstart/asterisk.log
/var/log/upstart/sipauthserve.log
/var/log/upstart/smqueue.log
/var/log/upstart/openbts.log
The system components have been installed and are running. The next step will be to start testing and configuring them.
Get Getting Started with OpenBTS now with the O’Reilly learning platform.
O’Reilly members experience books, live events, courses curated by job role, and more from O’Reilly and nearly 200 top publishers.

