In this section, we are going to create a Gadgeteer Sketch Pad, before combining it with the Ethernet project to allow our drawings and messages to be served up over the network.
This project is available as a separate project without the Ethernet part and it doesn’t need the Ethernet module or multicolor LED. In fact, it is just a Mainboard and Display.

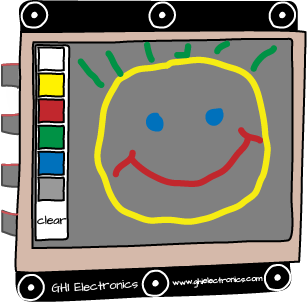
The SketchPad screen (see Figure 4-8) has two areas, a main drawing area on the right and a palette area on the left where you can select the drawing color, or click Clear to clear the drawing area. You can erase by selecting black as the drawing color.
In the discussion that follows, you should open the SketchPad project in Visual Studio so that you can see all the code.
This is another project where we use the WPFWindow class. As usual, the window has a
Canvas to contain our components. In
this case, the components are an Image
named background, which is used as the
drawing area, and a set of Border
objects that are used as the buttons in the palette area:
void SetupUI()
{
    Border whiteButton;
    Border yellowButton;
    Border redButton;
    Border greenButton;
    Border blueButton;
    Border blackButton;
    Text clearButton;
    // initialize window
    mainWindow = display.WPFWindow;

    // setup the layout
    layout = new Canvas();
    background = new Image();
    background.Bitmap = new Bitmap(320 - sideBarWidth, 240);
    background.Height = 240;
    background.Width = 320 - sideBarWidth;

    layout.Children.Add(background);
    Canvas.SetLeft(background, sideBarWidth);
    Canvas.SetTop(background, 0);

    whiteButton = new Border();
    SetupButton(whiteButton, Colors.White, 0);
    whiteButton.TouchUp += new Microsoft.SPOT.Input.TouchEventHandler(whiteButton_TouchUp);

        ......... other buttons not shown for clarity

        clearButton = SetupClearButton();

    mainWindow.Child = layout;
As you can see, the color buttons are set up using a separate method, since the initialization code is very similar for each button:
private void SetupButton(Border button, Color color, int position)
{
    button.Height = buttonHeight;
    button.Width = buttonWidth;
    button.Background = new SolidColorBrush(color);
    layout.Children.Add(button);
    Canvas.SetLeft(button, 2);
    Canvas.SetTop(button, 2 + position * (buttonHeight + 2));
}
Each of the color buttons has its own handler method that simply
changes the color of a member variable drawingColor:
void redButton_TouchUp(object sender, Microsoft.SPOT.Input.TouchEventArgs e)
{
    drawingColor = GT.Color.Red;
}
The actual drawing takes place in the following method:
void mainWindow_TouchMove(object sender, Microsoft.SPOT.Input.TouchEventArgs e)
{
    TouchInput[] touches = e.Touches;
    int oldX = -1;
    int oldY = -1;
    foreach (TouchInput touch in touches)
    {
        int x = touch.X - sideBarWidth;
        int y = touch.Y;
        if (oldX != -1)
        {
            background.Bitmap.DrawLine(drawingColor, 3, oldX, oldY, x, y);
        }
        oldX = x;
        oldY = y;
    }
    background.Invalidate();
}
The method mainWindow_TouchMove
is called every time you drag your finger around the screen. The result of
one of these events is an array of touch positions that are found
using:
TouchInput[] touches = e.Touches;
We can display such a sequence of points by drawing a line from the
previous touch position to the new position. We keep the previous position
in the variables oldX and oldY:
    if (oldX != -1)
    {
        background.Bitmap.DrawLine(drawingColor, 3, oldX, oldY, x, y);
    }
    oldX = x;
    oldY = y;
The if statement ensures that we don’t get a line from whatever
oldX and oldY start at to the first touch position.
Having drawn the line in the drawingColor, we must update oldX and oldY
to be the current position ready for next time round the loop.
The following line of code ensures that the screen is refreshed to show the drawing:
background.Invalidate();
Get Getting Started with .NET Gadgeteer now with the O’Reilly learning platform.
O’Reilly members experience books, live events, courses curated by job role, and more from O’Reilly and nearly 200 top publishers.

