Chapter 1. Python Basics
Many books and online tutorials about Python show you how to execute code in the Python shell. To run Python code in this way, you’ll open a Command Prompt window (in Windows) or a Terminal window (in macOS) and type “python” to get a Python prompt (which looks like >>>). Then simply type your commands one at a time; Python will execute them.
Here are two typical examples:
>>> 4 + 5
9

>>> print("I'm excited to learn Python.")
I'm excited to learn Python.
This method of executing code is fast and fun, but it doesn’t scale well as the number of lines of code grows. When what you want to accomplish requires many lines of code, it is easier to write all of the code in a text file as a Python script, and then run the script. The following section shows you how to create a Python script.
How to Create a Python Script
-
Open the Spyder IDE or a text editor (e.g., Notepad, Notepad++, or Sublime Text on Windows; TextMate, TextWrangler, or Sublime Text on macOS).
-
Write the following two lines of code in the text file:
#!/usr/bin/env python3print("Output #1: I'm excited to learn Python.")The first line is a special line called the shebang, which you should always include as the very first line in your Python scripts. Notice that the first character is the pound or hash character (
#). The#precedes a single-line comment, so the line of code isn’t read or executed on a Windows computer. However, Unix computers use the line to find the version of Python to use to execute the code in the file. Because Windows machines ignore this line and Unix-based systems such as macOS use it, including the line makes the script transferable among the different types of computers.The second line is a simple
printstatement. This line will print the text between the double quotes to the Command Prompt (Windows) or a Terminal window (macOS). -
Open the Save As dialog box.
-
In the location box, navigate to your Desktop so the file will be saved on your Desktop.
-
In the format box, select All Files so that the dialog box doesn’t select a file type.
-
In the Save As box or File Name box, type “first_script.py”. In the past, you’ve probably saved a text file as a .txt file. However, in this case you want to save it as a .py file to create a Python script.
-
Click Save.
You’ve now created a Python script. Figures 1-1, 1-2, and 1-3 show what it looks like in Anaconda Spyder, Notepad++ (Windows), and TextWrangler (macOS), respectively.
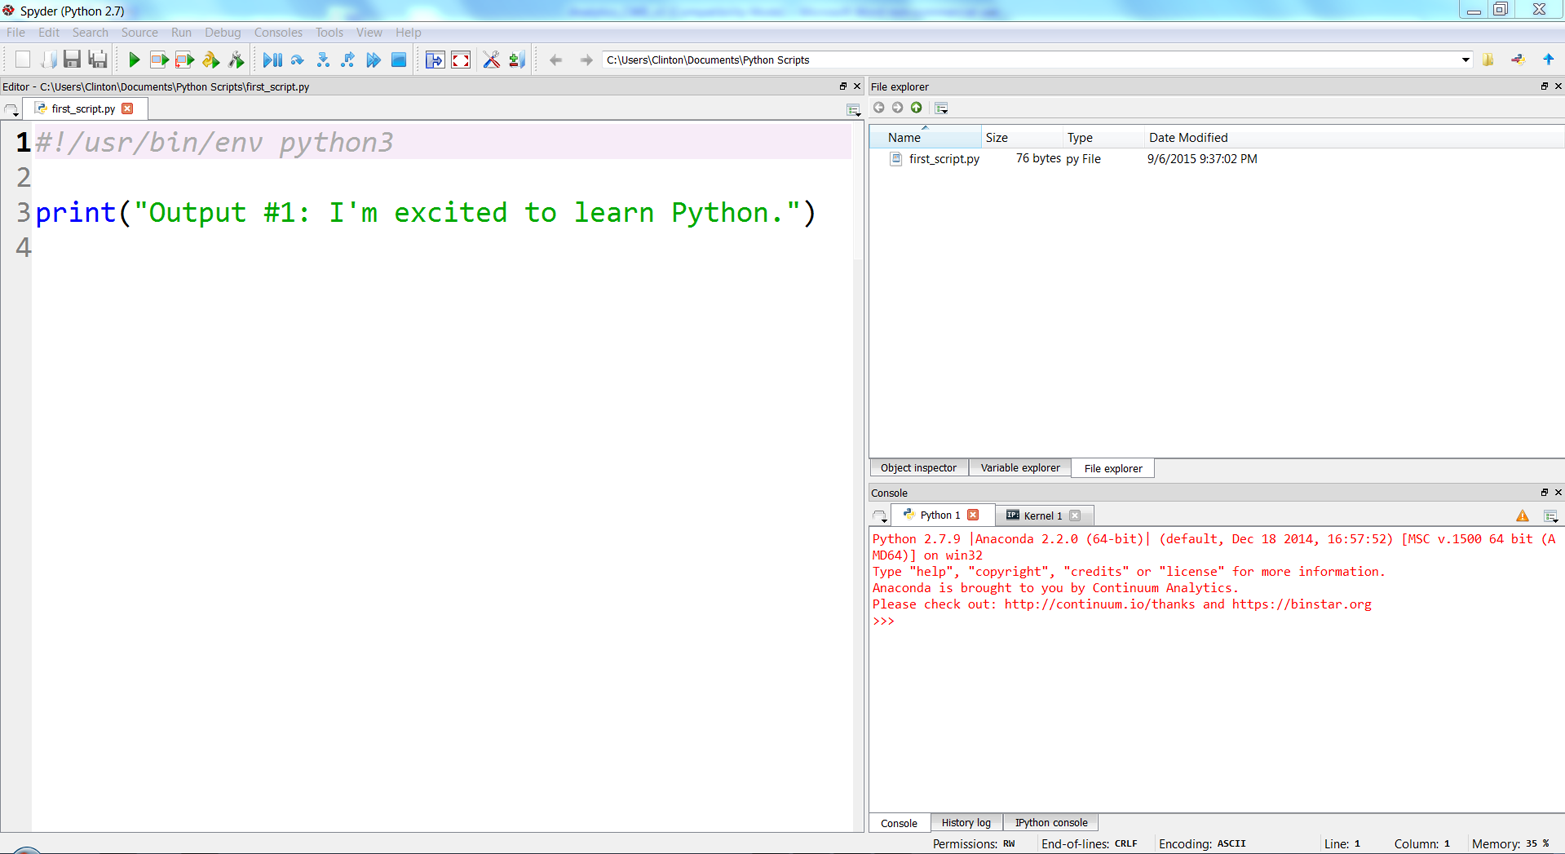
Figure 1-1. Python script, first_script.py, in Anaconda Spyder
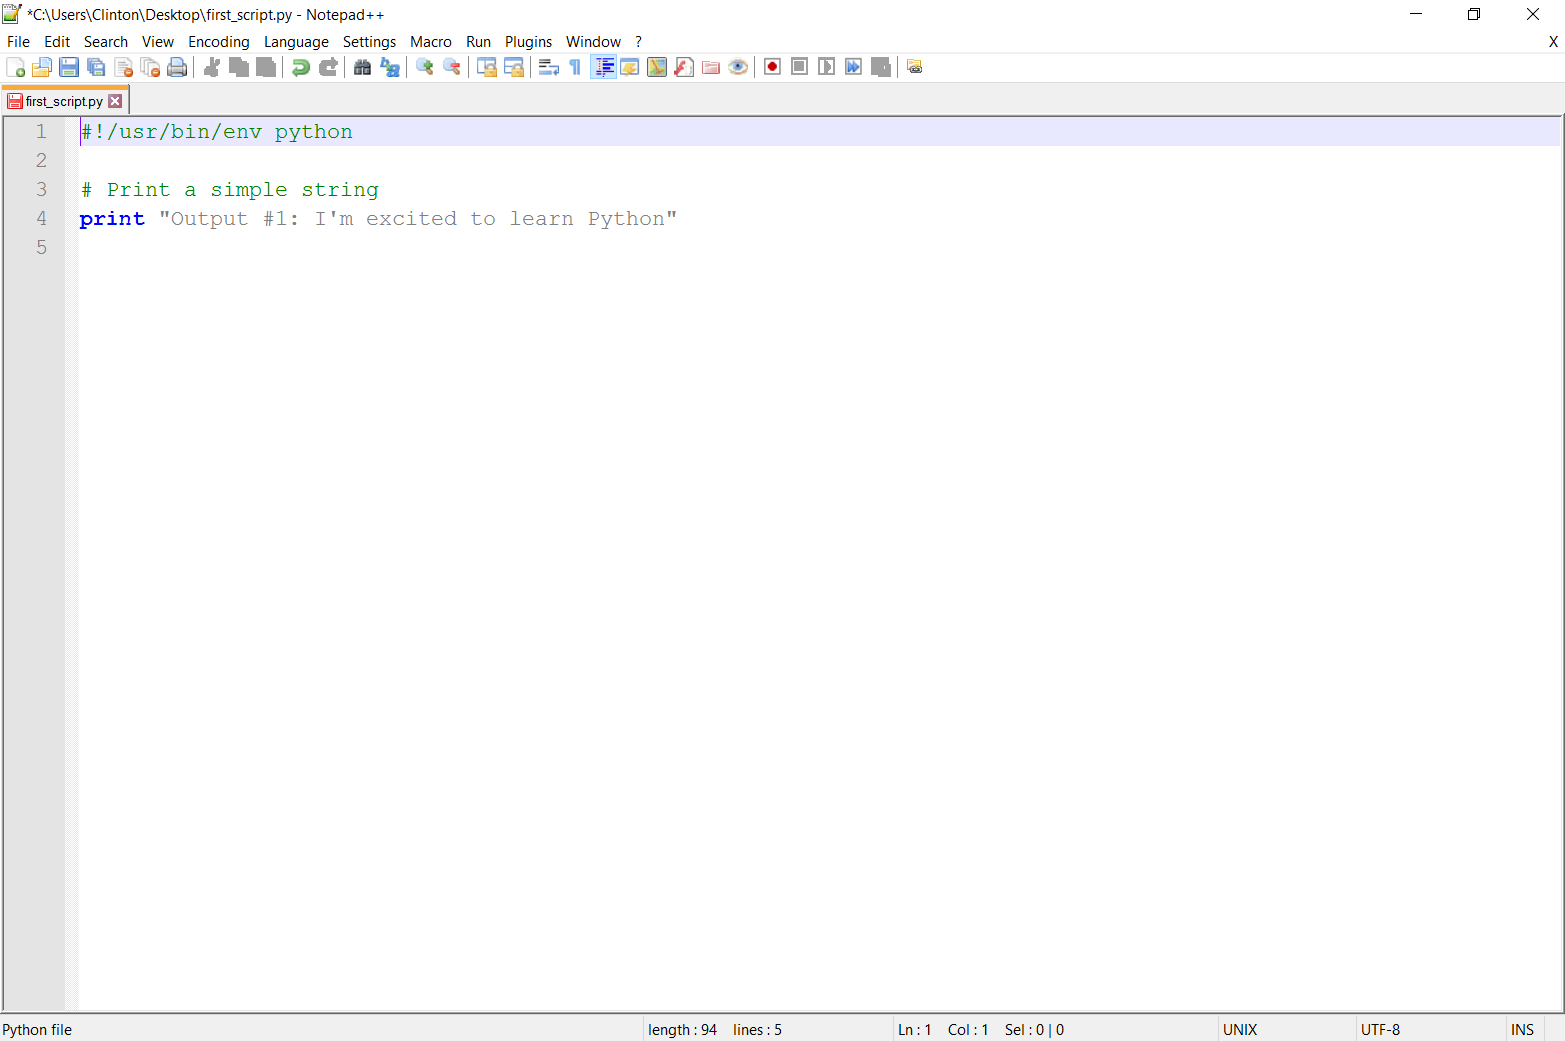
Figure 1-2. Python script in Notepad++ (Windows)
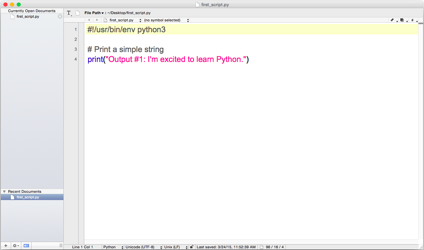
Figure 1-3. Python script in TextWrangler (macOS)
The next section will explain how to run the Python script in the Command Prompt or Terminal window. You’ll see that it’s as easy to run it as it was to create it.
How to Run a Python Script
If you created the file in the Anaconda Spyder IDE, you can run the script by clicking on the green triangle (the Run button) in the upper-lefthand corner of the IDE.
When you click the Run button, you’ll see the output displayed in the Python console in the lower-righthand pane of the IDE. The screenshot displays both the green run button and the output inside red boxes (see Figure 1-4). In this case, the output is “Output #1: I’m excited to learn Python.”
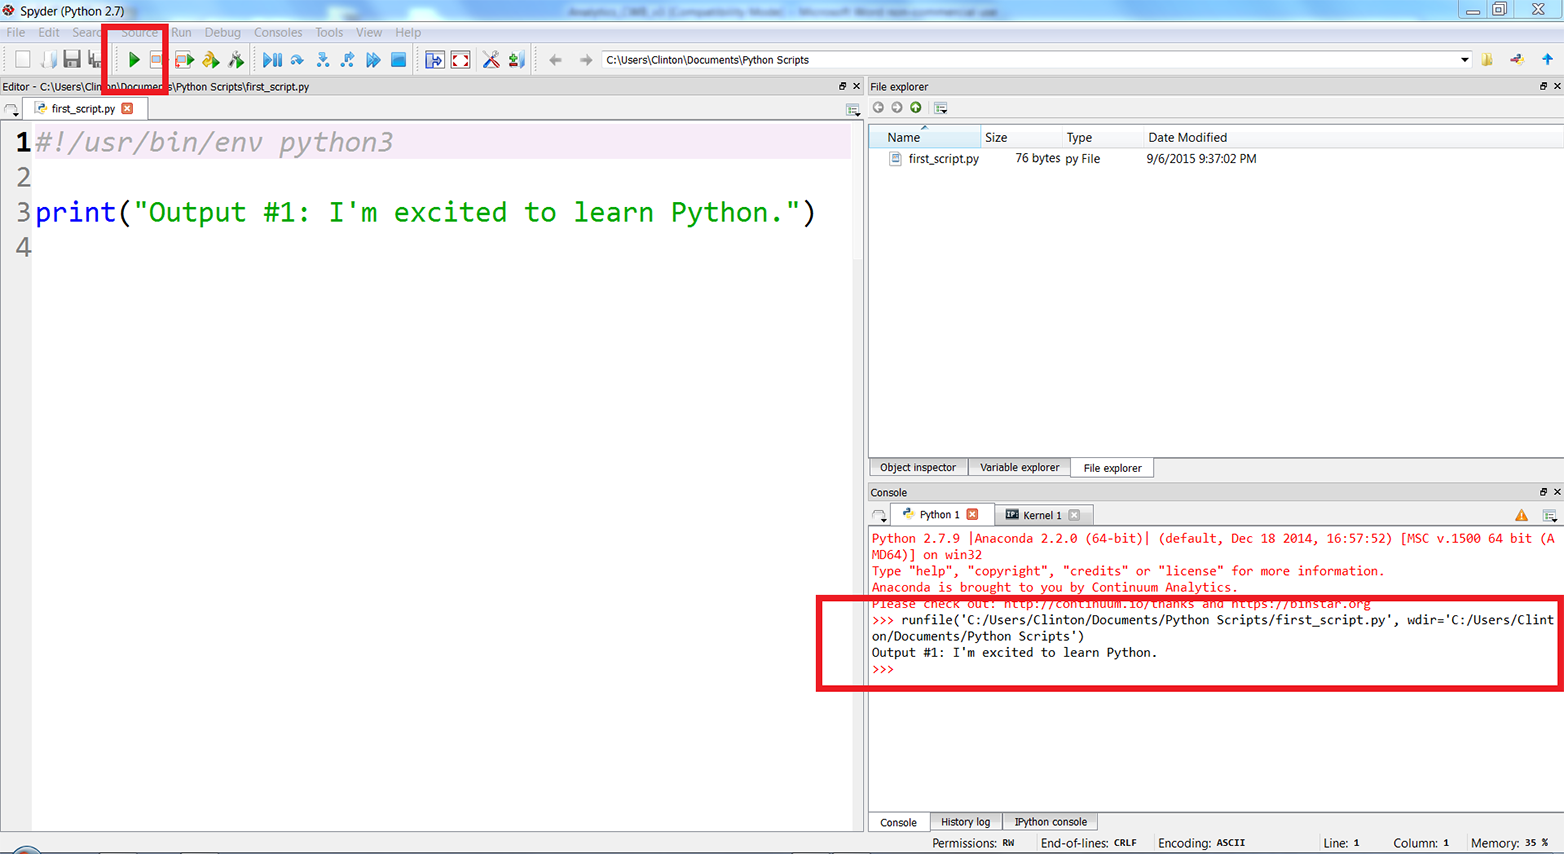
Figure 1-4. Running a Python script, first_script.py, in Anaconda Spyder
Alternatively, you can run the script in a Command Prompt (Windows) or Terminal window (macOS), as described next:
- Windows Command Prompt
-
-
Open a Command Prompt window.
When the window opens the prompt will be in a particular folder, also known as a directory (e.g., C:\Users\Clinton or C:\Users\Clinton\Documents).
-
Navigate to the Desktop (where we saved the Python script).
To do so, type the following line and then hit Enter:
cd "C:\Users\[Your Name]\Desktop"
Replace
[Your Name]with your computer account name, which is usually your name. For example, on my computer, I’d type:cd "C:\Users\Clinton\Desktop"
At this point, the prompt should look like
C:\Users\[Your Name]\Desktop, and we are exactly where we need to be, as this is where we saved the Python script. The last step is to run the script. -
Run the Python script.
To do so, type the following line and then hit Enter:
python first_script.pyYou should see the following output printed to the Command Prompt window, as in Figure 1-5:
Output #1: I'm excited to learn Python.
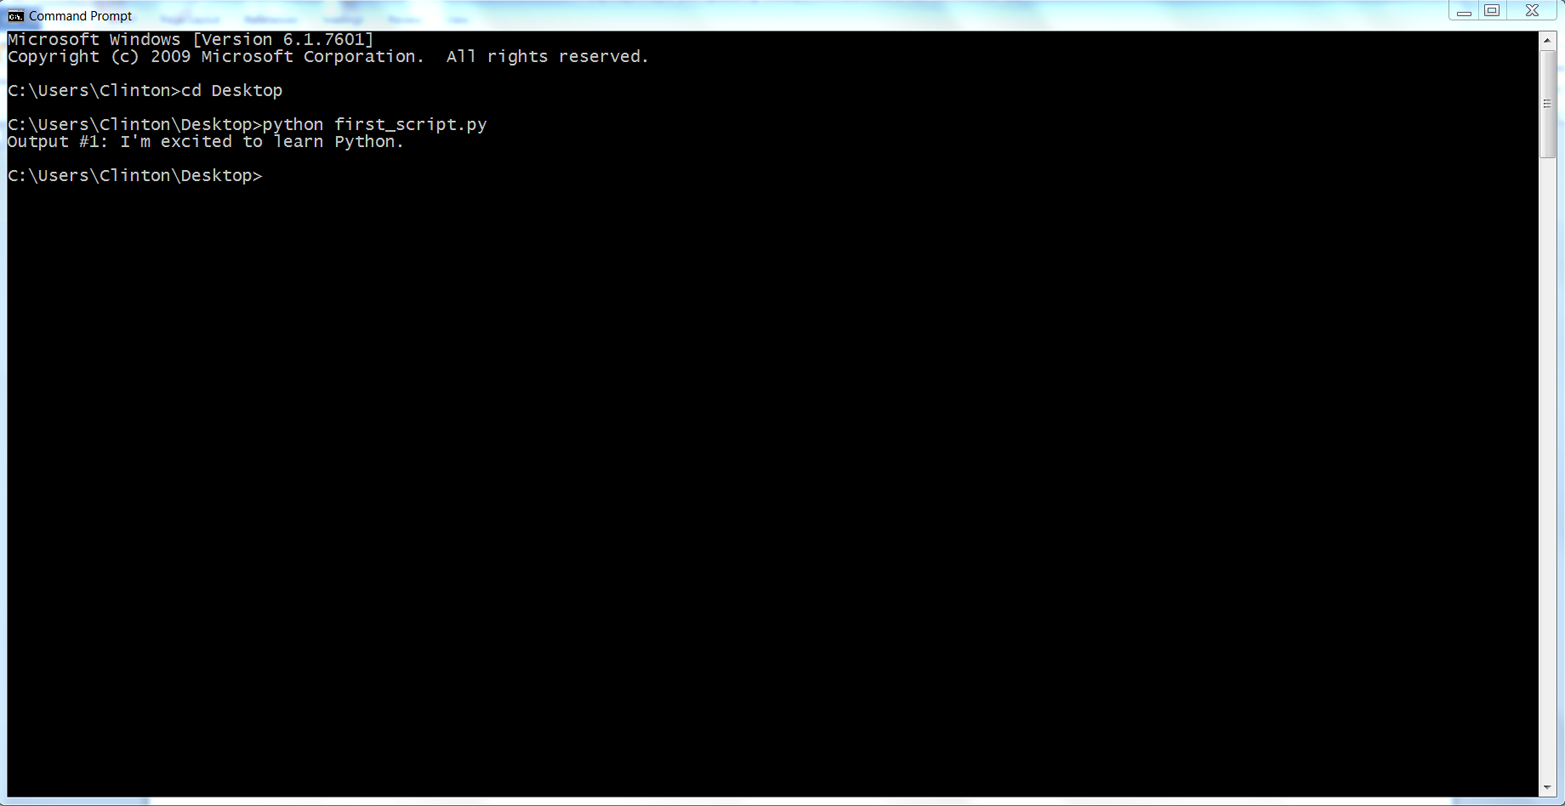
Figure 1-5. Running a Python script in a Command Prompt window (Windows)
-
- Terminal (Mac)
-
-
Open a Terminal window.
When the window opens, the prompt will be in a particular folder, also known as a directory (e.g., /Users/clinton or /Users/clinton/Documents).
-
Navigate to the Desktop, where we saved the Python script.
To do so, type the following line and then hit Enter:
cd /Users/[Your Name]/Desktop
Replace
[Your Name]with your computer account name, which is usually your name. For example, on my computer I’d type:cd /Users/clinton/Desktop
At this point, the prompt should look like
/Users/[Your Name]/Desktop, and we are exactly where we need to be, as this is where we saved the Python script. The next steps are to make the script executable and then to run the script. -
Make the Python script executable.
To do so, type the following line and then hit Enter:
chmod +x first_script.py
The
chmodcommand is a Unix command that stands for change access mode. The+xspecifies that you are adding the execute access mode, as opposed to the read or write access modes, to your access settings so Python can execute the code in the script. You have to run thechmodcommand once for each Python script you create to make the script executable. Once you’ve run thechmodcommand on a file, you can run the script as many times as you like without retyping thechmodcommand. -
Run the Python script.
To do so, type the following line and then hit Enter:
./first_script.py
You should see the following output printed to the Terminal window, as in Figure 1-6:
Output #1: I'm excited to learn Python.
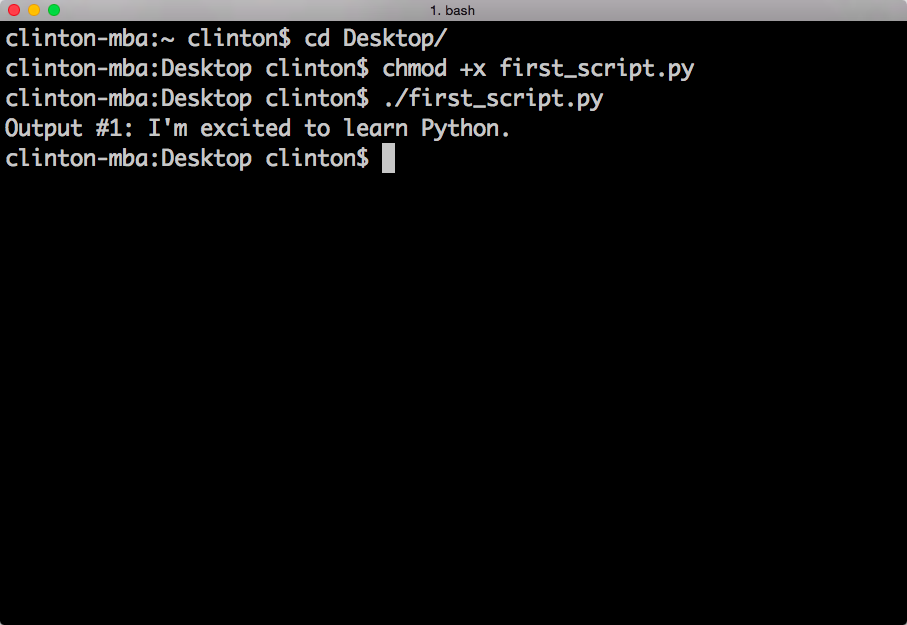
Figure 1-6. Running a Python script in a Terminal window (macOS)
-
Useful Tips for Interacting with the Command Line
Here are some useful tips for interacting with the command line:
- Up arrow for previous command
-
One nice feature of Command Prompt and Terminal windows is that you can press the up arrow to retrieve your previous command. Try pressing the up arrow in your Command Prompt or Terminal window now to retrieve your previous command,
python first_script.pyon Windows or./first_script.pyon Mac.This feature, which reduces the amount of typing you have to do each time you want to run a Python script, is very convenient, especially when the name of the Python script is long or you’re supplying additional arguments (like the names of input files or output files) on the command line.
- Ctrl+c to stop a script
-
Now that you’ve run a Python script, this is a good time to mention how to interrupt and stop a Python script. There are quite a few situations in which it behooves you to know how to stop a script. For example, it’s possible to write code that loops endlessly, such that your script will never finish running. In other cases, you may write a script that takes a long time to complete and decide that you want to halt the script prematurely if you’ve included
printstatements and they show that it’s not going to produce the desired output.To interrupt and stop a script at any point after you’ve started running it, press Ctrl+c (on Windows) or Control+c (on macOS). This will stop the process that you started with your command. You won’t need to worry too much about the technical details, but a process is a computer’s way of looking at a sequence of commands. You write a script or program and the computer interprets it as a process, or, if it’s more complicated, as a series of processes that may go on sequentially or at the same time.
- Read and search for solutions to error messages
-
While we’re on the topic of dealing with troublesome scripts, let’s also briefly talk about what to do when you type
./python first_script.py, or attempt to run any Python script, and instead of running it properly your Command Prompt or Terminal window shows you an error message. The first thing to do is relax and read the error message. In some cases, the error message clearly directs you to the line in your code with the error so you can focus your efforts around that line to debug the error (your text editor or IDE will have a setting to show you line numbers; if it doesn’t do it automatically, poke around in the menus or do a quick search on the Web to figure out how to do this). It’s also important to realize that error messages are a part of programming, so learning to code involves learning how to debug errors effectively.Moreover, because error messages are common, it’s usually relatively easy to figure out how to debug an error. You’re probably not the first person to have encountered the error and looked for solutions online—one of your best options is to copy the entire error message, or at least the generic portion of the message, into your search engine (e.g., Google or Bing) and look through the results to read about how other people have debugged the error.
It’s also helpful to be familiar with Python’s built-in exceptions, so you can recognize these standard error messages and know how to fix the errors. You can read about Python’s built-in exceptions in the Python Standard Library, but it’s still helpful to search for these error messages online to read about how other people have dealt with them.
- Add more code to first_script.py
-
Now, to become more comfortable with writing Python code and running your Python script, try editing first_script.py by adding more lines of code and then rerunning the script. For extended practice, add each of the blocks of code shown in this chapter at the bottom of the script beneath any preceding code, resave the script, and then rerun the script.
For example, add the two blocks of code shown here below the existing
printstatement, then resave and rerun the script (remember, after you add the lines of code to first_script.py and resave the script, if you’re using a Command Prompt or Terminal window, you can press the up arrow to retrieve the command you use to run the script so you don’t have to type it again):# Add two numbers togetherx=4y=5z=x+yprint("Output #2: Four plus five equals {0:d}.".format(z))# Add two lists togethera=[1,2,3,4]b=["first","second","third","fourth"]c=a+bprint("Output #3: {0}, {1}, {2}".format(a,b,c))Tip
The lines that are preceded by a
#are comments, which can be used to annotate the code and describe what it’s intended to do.The first of these two examples shows how to assign numbers to variables, add variables together, and format a
printstatement. Let’s examine the syntax in theprintstatement,"{0:d}".format(z). The curly braces ({}) are a placeholder for the value that’s going to be passed into theprintstatement, which in this case comes from the variablez. The0points to the first position in the variablez. In this case,zcontains a single value, so the0points to that value; however, ifzwere a list or tuple and contained many values, the0would specify to only pull in the first value fromz.The colon (
:) separates the value to be pulled in from the formatting of that value. Thedspecifies that the value should be formatted as a digit with no decimal places. In the next section, you’ll learn how to specify the number of decimal places to show for a floating-point number.The second example shows how to create lists, add lists together, and print variables separated by commas to the screen. The syntax in the
printstatement,"{0}, {1}, {2}".format(a, b, c), shows how to include multiple values in theprintstatement. The valueais passed into{0}, the valuebis passed into{1}, and the valuecis passed into{2}. Because all three of these values are lists, as opposed to numbers, we don’t specify a number format for the values. We’ll discuss these procedures and many more in later sections of this chapter.Figure 1-7 and Figure 1-8 show what it looks like to add the new code in Anaconda Spyder and in Notepad++.
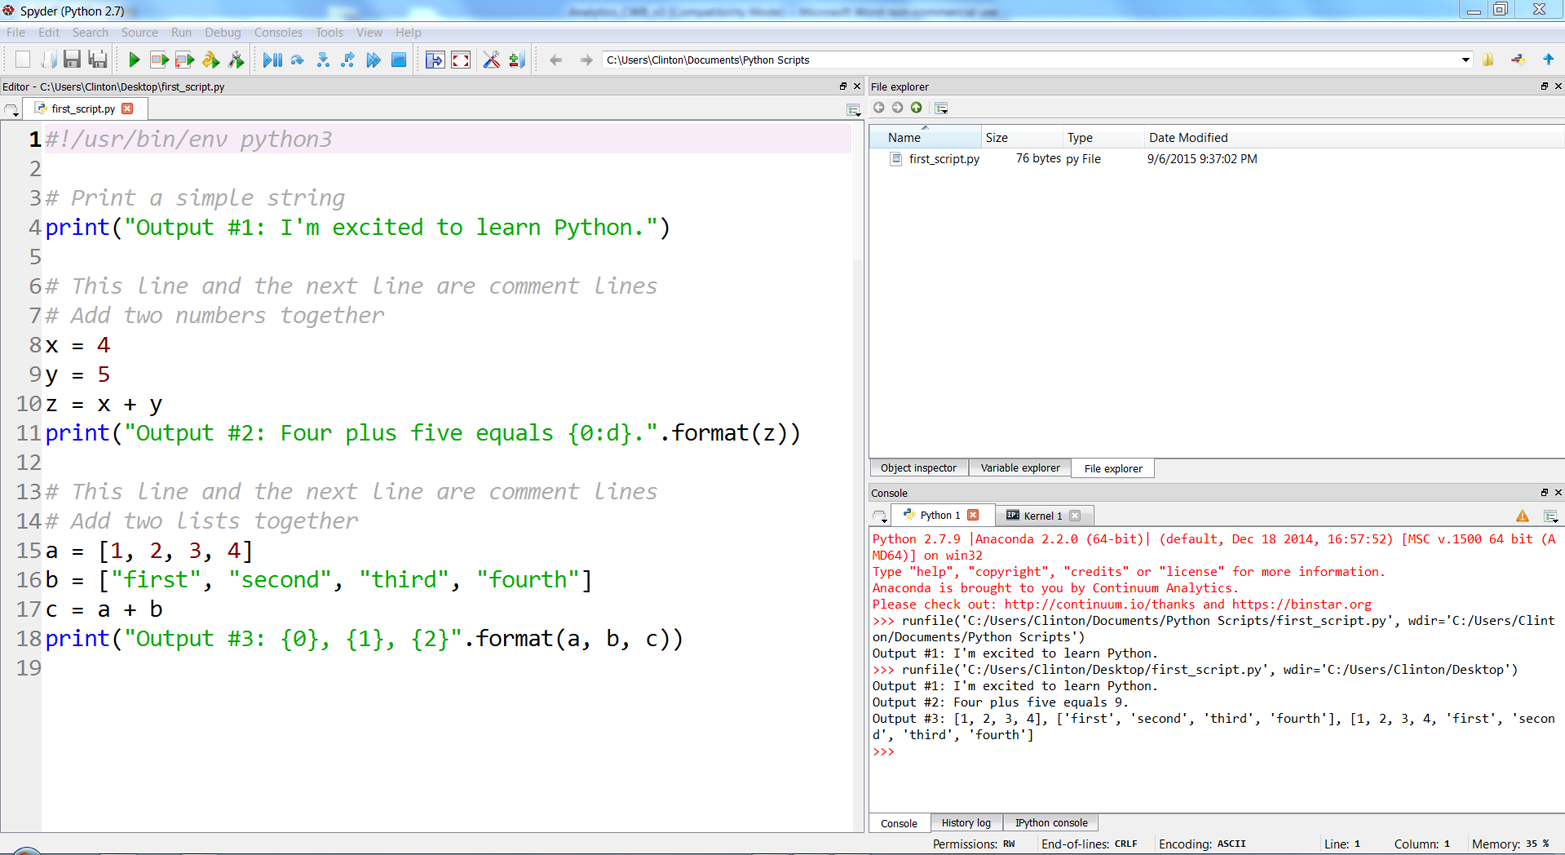
Figure 1-7. Adding code to the first_script.py in Anaconda Spyder
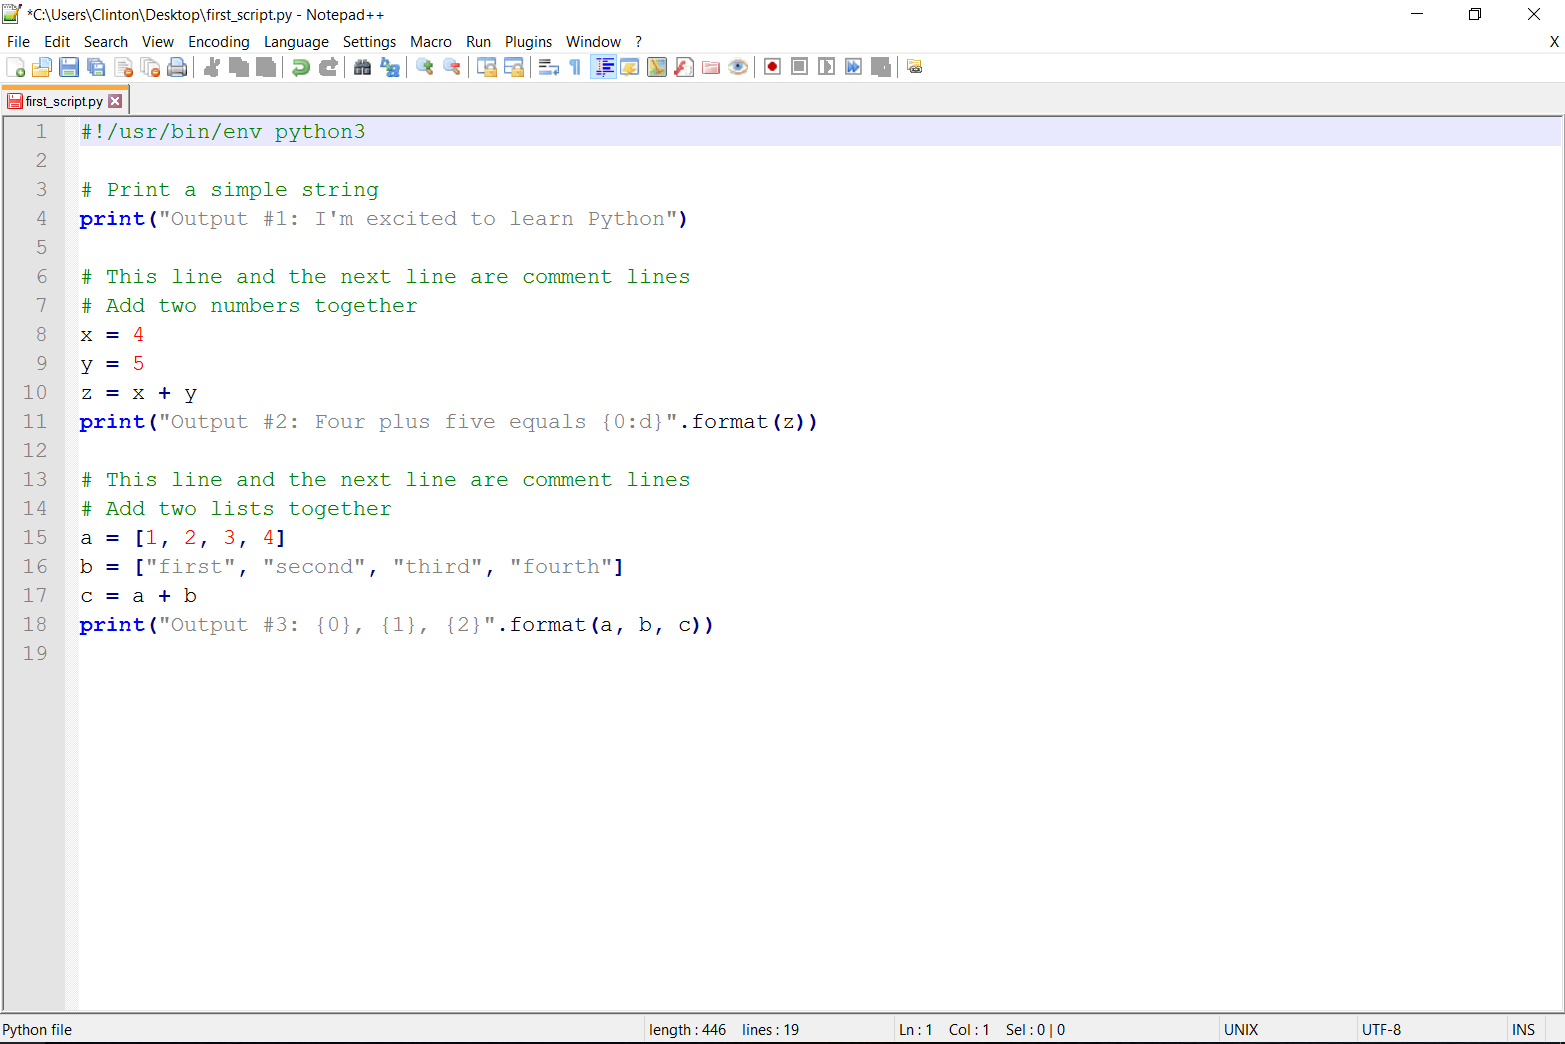
Figure 1-8. Adding code to the first_script.py in Notepad++ (Windows)
If you add the preceding lines of code to first_script.py, then when you resave and rerun the script you should see the following output printed to the screen (see Figure 1-9:
Output #1: I'm excited to learn Python.
Output #2: Four plus five equals 9.
Output #3: [1, 2, 3, 4], ['first', 'second', 'third', 'fourth'],
[1, 2, 3, 4, 'first', 'second', 'third', 'fourth']
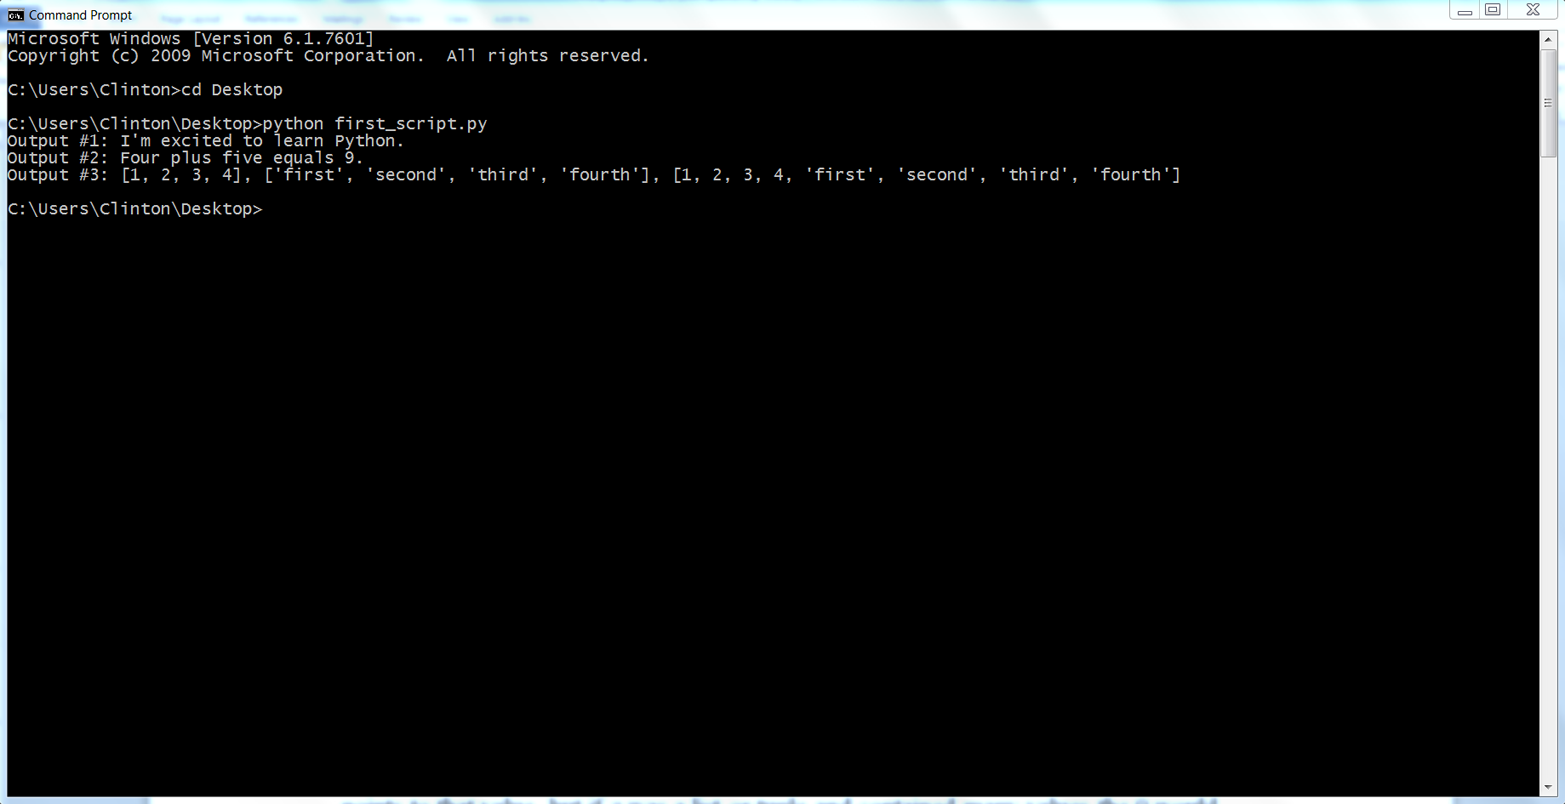
Figure 1-9. Running first_script.py with the extra code in a Command Prompt window
Python’s Basic Building Blocks
Now that you can create and run Python scripts, you have the basic skills necessary for writing Python scripts that can automate and scale existing manual business processes. Later chapters will go into much more detail about how to use Python scripts to automate and scale these processes, but before moving on it’s important to become more familiar with some of Python’s basic building blocks. By becoming more familiar with these building blocks, you’ll understand and be much more comfortable with how they’ve been combined in later chapters to accomplish specific data processing tasks. First, we’ll deal with some of the most common data types in Python, and then we’ll work through ways to make your programs make decisions about data with if statements and functions. Next, we’ll work with the practicalities of having Python read and write to files that you can use in other programs or read directly: text and simple table (CSV) files.
Numbers
Python has several built-in numeric types. This is obviously great, as many business applications require analyzing and processing numbers. The four main types of numbers in Python are integer, floating-point, long, and complex numbers. We’ll cover integer and floating-point numbers, as they are the most common in business applications. You can add the following examples dealing with integer and floating-point numbers to first_script.py, beneath the existing examples, and rerun the script to see the output printed to the screen.
Integers
Let’s dive straight into a few examples involving integers:
x=9("Output #4: {0}".format(x))("Output #5: {0}".format(3**4))("Output #6: {0}".format(int(8.3)/int(2.7)))
Output #4 shows how to assign an integer, the number 9, to the variable x and how to print the x variable. Output #5 illustrates how to raise the number 3 to the power of 4 (which equals 81) and print the result. Output #6 demonstrates how to cast numbers as integers and perform division. The numbers are cast as integers with the built-in int function, so the equation becomes 8 divided by 2, which equals 4.0.
Floating-point numbers
Like integers, floating-point numbers—numbers with decimal points—are very important to many business applications. The following are a few examples involving floating-point numbers:
("Output #7: {0:.3f}".format(8.3/2.7))y=2.5*4.8("Output #8: {0:.1f}".format(y))r=8/float(3)("Output #9: {0:.2f}".format(r))("Output #10: {0:.4f}".format(8.0/3))
Output #7 is much like Output #6, except we’re keeping the numbers to divide as floating-point numbers, so the equation is 8.3 divided by 2.7: approximately 3.074. The syntax in the print statement in this example, "{0:.3f}".format(floating_point_number/floating_point_number), shows how to specify the number of decimal places to show in the print statement. In this case, the .3f specifies that the output value should be printed with three decimal places.
Output #8 shows multiplying 2.5 times 4.8, assigning the result into the variable y, and printing the value with one decimal place. Multiplying these two floating-point numbers together results in 12, so the value printed is 12.0. Outputs #9 and #10 show dividing the number 8 by the number 3 in two different ways. The result in both, approximately 2.667, is a floating-point number.
An important detail to know about dealing with numbers in Python is that there are several standard library modules and built-in functions and modules you can use to perform common mathematical operations. You’ve already seen two built-in functions, int and float, for manipulating numbers. Another useful standard module is the math module.
Python’s standard modules are on your computer when you install Python, but when you start up a new script, the computer only loads a very basic set of operations (this is part of why Python is quick to start up). To make a function in the math module available to you, all you have to do is add from math import [function name] at the top of your script, right beneath the shebang. For example, add the following line at the top of first_script.py, below the shebang:
#!/usr/bin/env python3frommathimportexp,log,sqrt
Once you’ve added this line to the top of first_script.py, you have three useful mathematical functions at your disposal. The functions exp, log, and sqrt take the number e to the power of the number in parentheses, the natural log of the number in parentheses, and the square root of the number in parentheses, respectively. The following are a few examples of using these math module functions:
("Output #11: {0:.4f}".format(exp(3)))("Output #12: {0:.2f}".format(log(4)))("Output #13: {0:.1f}".format(sqrt(81)))
The results of these three mathematical expressions are floating-point numbers, approximately 20.0855, 1.39, and 9.0, respectively.
This is just the beginning of what’s available in the math module. There are many more useful mathematical functions and modules built into Python, for business, scientific, statistical, and other applications, and we’ll discuss quite a few more in this book. For more information about these and other standard modules and built-in functions, you can peruse the Python Standard Library.
Strings
A string is another basic data type in Python; it usually means human-readable text, and that’s a useful way to think about it, but it is more generally a sequence of characters that only has meaning when they’re all in that sequence. Strings appear in many business applications, including supplier and customer names and addresses, comment and feedback data, event logs, and documentation. Some things look like integers, but they’re actually strings. Think of zip codes, for example. The zip code 01111 (Springfield, Massachusetts) isn’t the same as the integer 1111—you can’t (meaningfully) add, subtract, multiply, or divide zip codes—and you’d do well to treat zip codes as strings in your code. This section covers some modules, functions, and operations you can use to manage strings.
Strings are delimited by single, double, triple single, or triple double quotation marks. The following are a few examples of strings:
("Output #14: {0:s}".format('I\'m enjoying learning Python.'))("Output #15: {0:s}".format("This is a long string. Without the backslash\itwouldrunoffofthepageontherightinthetexteditorandbevery\difficulttoreadandedit.Byusingthebackslashyoucansplitthelong\stringintosmallerstringsonseparatelinessothatthewholestringiseasy\toviewinthetexteditor."))("Output #16: {0:s}".format('''You can use triple single quotesfor multi-line comment strings.'''))("Output #17: {0:s}".format("""You can also use triple double quotesfor multi-line comment strings."""))
Output #14 is similar to the one at the beginning of this chapter. It shows a simple string delimited by single quotes. The result of this print statement is "I'm enjoying learning Python.". Remember, if we had used double quotes to delimit the string it wouldn’t have been necessary to include a backslash before the single quote in the contraction "I'm".
Output #15 shows how you can use a single backslash to split a long one-line string across multiple lines so that it’s easier to read and edit. Although the string is split across multiple lines in the script, it is still a single string and will print as a single string. An important point about this method of splitting a long string across multiple lines is that the backslash must be the last character on the line. This means that if you accidentally hit the spacebar so that there is an invisible space after the backslash, your script will throw a syntax error instead of doing what you want it to do. For this reason, it’s prudent to use triple single or triple double quotes to create multi-line strings.
Outputs #16 and #17 show how to use triple single and triple double quotes to create multi-line strings. The output of these examples is:
Output #16: You can use triple single quotes
for multi-line comment strings.
Output #17: You can also use triple double quotes
for multi-line comment strings.
When you use triple single or double quotes, you do not need to include a backslash at the end of the top line. Also, notice the difference between Output #15 and Outputs #16 and #17 when printed to the screen. The code for Output #15 is split across multiple lines with single backslashes as line endings, making each line of code shorter and easier to read, but it prints to the screen as one long line of text. Conversely, Outputs #16 and #17 use triple single and double quotes to create multi-line strings and they print to the screen on separate lines.
As with numbers, there are many standard modules, built-in functions, and operators you can use to manage strings. A few useful operators and functions include +, *, and len. The following are a few examples of using these operators on strings:
string1="This is a "string2="short string."sentence=string1+string2("Output #18: {0:s}".format(sentence))("Output #19: {0:s} {1:s}{2:s}".format("She is","very "*4,"beautiful."))m=len(sentence)("Output #20: {0:d}".format(m))
Output #18 shows how to add two strings together with the + operator. The result of this print statement is This is a short string—the + operator adds the strings together exactly as they are, so if you want spaces in the resulting string, you have to add spaces in the smaller string segments (e.g., after the letter “a” in Output #18) or between the string segments (e.g., after the word “very” in Output #19).
Output #19 shows how to use the * operator to repeat a string a specific number of times. In this case, the resulting string contains four copies of the string “very ” (i.e., the word “very” followed by a single space).
Output #20 shows how to use the built-in len function to determine the number of characters in the string. The len function also counts spaces and punctuation in the string’s length. Therefore, the string This is a short string. in Output #20 is 23 characters long.
A useful standard library module for dealing with strings is the string module. With the string module, you have access to many functions that are useful for managing strings. The following sections discuss a few examples of using these string functions.
split
The following two examples show how to use the split function to break a string into a list of the substrings that make up the original string. (The list is another built-in data type in Python that we’ll discuss later in this chapter.) The split function can take up to two additional arguments between the parentheses. The first additional argument indicates the character(s) on which the split should occur. The second additional argument indicates how many splits to perform (e.g., two splits results in three substrings):
string1="My deliverable is due in May"string1_list1=string1.split()string1_list2=string1.split(" ",2)("Output #21: {0}".format(string1_list1))("Output #22: FIRST PIECE:{0} SECOND PIECE:{1} THIRD PIECE:{2}"\.format(string1_list2[0],string1_list2[1],string1_list2[2]))string2="Your,deliverable,is,due,in,June"string2_list=string2.split(',')("Output #23: {0}".format(string2_list))("Output #24: {0} {1} {2}".format(string2_list[1],string2_list[5],\string2_list[-1]))
In Output #21, there are no additional arguments between the parentheses, so the split function splits the string on the space character (the default). Because there are five spaces in this string, the string is split into a list of six substrings. The newly created list is ['My', 'deliverable', 'is', 'due', 'in', 'May'].
In Output #22, we explicitly include both arguments in the split function. The first argument is " ", which indicates that we want to split the string on a single space character. The second argument is 2, which indicates that we only want to split on the first two single space characters. Because we specify two splits, we create a list with three elements. The second argument can come in handy when you’re parsing data. For example, you may be parsing a log file that contains a timestamp, an error code, and an error message separated by spaces. In this case, you may want to split on the first two spaces to parse out the timestamp and error code, but not split on any remaining spaces so the error message remains intact.
In Outputs #23 and #24, the additional argument between the parentheses is a comma. In this case, the split function splits the string wherever there is a comma. The resulting list is ['Your', 'deliverable', 'is', 'due', 'in', 'June'].
join
The next example shows how to use the join function to combine substrings contained in a list into a single string. The join function takes an argument before the word join, which indicates the character(s) to use between the substrings as they are combined:
("Output #25: {0}".format(','.join(string2_list)))
In this example, the additional argument—a comma—is included between the parentheses. Therefore, the join function combines the substrings into a single string with commas between the substrings. Because there are six substrings in the list, the substrings are combined into a single string with five commas between the substrings. The newly created string is Your,deliverable,is,due,in,June.
strip
The next two sets of examples show how to use the strip, lstrip, and rstrip functions to remove unwanted characters from the ends of a string. All three functions can take an additional argument between the parentheses to specify the character(s) to be removed from the ends of the string.
The first set of examples shows how to use the lstrip, rstrip, and strip functions to remove spaces, tabs, and newline characters from the lefthand side, righthand side, and both sides of the string, respectively:
string3=" Remove unwanted characters from this string.\t\t\n"("Output #26: string3: {0:s}".format(string3))string3_lstrip=string3.lstrip()("Output #27: lstrip: {0:s}".format(string3_lstrip))string3_rstrip=string3.rstrip()("Output #28: rstrip: {0:s}".format(string3_rstrip))string3_strip=string3.strip()("Output #29: strip: {0:s}".format(string3_strip))
The lefthand side of string3 contains several spaces. In addition, on the righthand side, there are tabs (\t), more spaces, and a newline (\n) character. If you haven’t seen the \t and \n characters before, they are the way a computer represents tabs and newlines.
In Output #26, you’ll see leading whitespace before the sentence; you’ll see a blank line below the sentence as a result of the newline character, and you won’t see the tabs and spaces after the sentence, but they are there. Outputs #27, #28, and #29 show you how to remove the spaces, tabs, and newline characters from the lefthand side, righthand side, and both sides of the string, respectively. The s in {0:s} indicates that the value passed into the print statement should be formatted as a string.
This second set of examples shows how to remove other characters from the ends of a string by including them as the additional argument in the strip function.
string4="$$Here's another string that has unwanted characters.__---++"("Output #30: {0:s}".format(string4))string4="$$The unwanted characters have been removed.__---++"string4_strip=string4.strip('$_-+')("Output #31: {0:s}".format(string4_strip))
In this case, the dollar sign ($), underscore (_), dash (-), and plus sign (+) need to be removed from the ends of the string. By including these characters as the additional argument, we tell the program to remove them from the ends of the string. The resulting string in Output #31 is The unwanted characters have been removed..
replace
The next two examples show how to use the replace function to replace one character or set of characters in a string with another character or set of characters. The function takes two additional arguments between the parentheses—the first argument is the character or set of characters to find in the string and the second argument is the character or set of characters that should replace the characters in the first argument:
string5="Let's replace the spaces in this sentence with other characters."string5_replace=string5.replace(" ","!@!")("Output #32 (with !@!): {0:s}".format(string5_replace))string5_replace=string5.replace(" ",",")("Output #33 (with commas): {0:s}".format(string5_replace))
Output #32 shows how to use the replace function to replace the single spaces in the string with the characters !@!. The resulting string is Let's!@!replace!@!the!@!spaces !@!in!@!this!@!sentence!@!with!@!other!@!characters..
Output #33 shows how to replace single spaces in the string with commas. The resulting string is Let's,replace,the,spaces,in,this,sentence,with,other,characters..
lower, upper, capitalize
The final three examples show how to use the lower, upper, and capitalize functions. The lower and upper functions convert all of the characters in the string to lowercase and uppercase, respectively. The capitalize function applies upper to the first character in the string and lower to the remaining characters:
string6="Here's WHAT Happens WHEN You Use lower."("Output #34: {0:s}".format(string6.lower()))string7="Here's what Happens when You Use UPPER."("Output #35: {0:s}".format(string7.upper()))string5="here's WHAT Happens WHEN you use Capitalize."("Output #36: {0:s}".format(string5.capitalize()))string5_list=string5.split()("Output #37 (on each word):")forwordinstring5_list:("{0:s}".format(word.capitalize()))
Outputs #34 and #35 are straightforward applications of the lower and upper functions. After applying the functions to the strings, all of the characters in string6 are lowercase and all of the characters in string7 are uppercase.
Outputs #36 and #37 demonstrate the capitalize function. Output #36 shows that the capitalize function applies upper to the first character in the string and lower to the remaining characters. Output #37 places the capitalize function in a for loop. A for loop is a control flow structure that we’ll discuss later in this chapter, but let’s take a sneak peak.
The phrase for word in string5_list: basically says, “For each element in the list, string5_list, do something.” The next phrase, print word.capitalize(), is what to do to each element in the list. Together, the two lines of code basically say, “For each element in the list, string5_list, apply the capitalize function to the element and print the element.” The result is that the first character of each word in the list is capitalized and the remaining characters of each word are lowercased.
There are many more modules and functions for managing strings in Python. As with the built-in math functions, you can peruse the Python Standard Library for more about them.
Regular Expressions and Pattern Matching
Many business analyses rely on pattern matching, also known as regular expressions. For example, you may need to perform an analysis on all orders from a specific state (e.g., where state is Maryland). In this case, the pattern you’re looking for is the word Maryland. Similarly, you may want to analyze the quality of a product from a specific supplier (e.g., where the supplier is StaplesRUs). Here, the pattern you’re looking for is StaplesRUs.
Python includes the re module, which provides great functionality for searching for specific patterns (i.e., regular expressions) in text. To make all of the functionality provided by the re module available to you in your script, add import re at the top of the script, right beneath the previous import statement. Now the top of first_script.py should look like:
#!/usr/bin/env python3frommathimportexp,log,sqrtimportre
By importing the re module, you gain access to a wide variety of metacharacters and functions for creating and searching for arbitrarily complex patterns. Metacharacters are characters in the regular expression that have special meaning. In their unique ways, metacharacters enable the regular expression to match several different specific strings. Some of the most common metacharacters are |, ( ), [ ], ., *, +, ?, ^, $, and (?P<name>). If you see these characters in a regular expression, you’ll know that the software won’t be searching for these characters in particular but something they describe. You can read more about these metacharacters in the “Regular Expression Operations” section of the Python Standard Library.
The re module also contains several useful functions for creating and searching for specific patterns (the functions covered in this section are re.compile, re.search, re.sub, and re.ignorecase or re.I). Let’s take a look at the example:
# Count the number of times a pattern appears in a stringstring="The quick brown fox jumps over the lazy dog."string_list=string.split()pattern=re.compile(r"The",re.I)count=0forwordinstring_list:ifpattern.search(word):count+=1("Output #38: {0:d}".format(count))
The first line assigns the string The quick brown fox jumps over the lazy dog. to the variable string. The next line splits the string into a list with each word, a string, as an element in the list.
The next line uses the re.compile and re.I functions, and the raw string r notation, to create a regular expression called regexp. The re.compile function compiles the text-based pattern into a compiled regular expression. It isn’t always necessary to compile the regular expression, but it is good practice because doing so can significantly increase a program’s speed. The re.I function ensures that the pattern is case-insensitive and will match both “The” and “the” in the string. The raw string notation, r, ensures Python will not process special sequences in the string, such as \, \t, or \n. This means there won’t be any unexpected interactions between string special sequences and regular expression special sequences in the pattern search. There are no string special sequences in this example, so the r isn’t necessary in this case, but it is good practice to use raw string notation in regular expressions. The next line creates a variable named count to hold the number of times the pattern appears in the string and sets its initial value to 0.
The next line is a for loop that will iterate over each of the elements in the list variable string_list. The first element it grabs is the word “The”, the second element it grabs is the word “quick”, and so on and so forth through each of the words in the list.
The next line uses the re.search function to compare each word in the list to the regular expression. The function returns True if the word matches the regular expression and returns None or False otherwise. So the if statement says, “If the word matches the regular expression, add 1 to the value in count.”
Finally, the print statement prints the number of times the regular expression found the pattern “The”, case-insensitive, in the string—in this case, two times.
This Looks Scary!
Regular expressions are very powerful when searching, but they’re a bear for people to read (they’ve been called a “write-only language”), so don’t worry if it’s hard for you to understand one on first reading; even the experts have difficulty with this!
As you get more comfortable with regular expressions, it can even become a bit of a game to get them to produce the results you want. For a fun trip through this topic, you can see Google Director of Research Peter Norvig’s attempt to create a regexp that will match US presidents’ names—and reject losing candidates for president—at https://www.oreilly.com/learning/regex-golf-with-peter-norvig.
Let’s look at another example:
# Print the pattern each time it is found in the stringstring="The quick brown fox jumps over the lazy dog."string_list=string.split()pattern=re.compile(r"(?P<match_word>The)",re.I)("Output #39:")forwordinstring_list:ifpattern.search(word):("{:s}".format(pattern.search(word).group('match_word')))
This second example is different from the first example in that we want to print each matched string to the screen instead of simply counting the number of matches. To capture the matched strings so they can be printed to the screen or a file, we need to use the (?P<name>) metacharacter and the group function. Most of the code in this example is identical to the code discussed in the first example, so I’ll focus on the new parts.
The first new piece of code snippet, (?P<name>), is a metacharacter that appears inside the re.compile function. This metacharacter makes the matched string available later in the program through the symbolic group name <name>. In this example, I called the group <match_word>.
The final new code snippet appears in the if statement. This code snippet basically says, “If the result evaluates to True (i.e., if the word matches the pattern), then look in the data structure returned by the search function and grab the value in the group called match_word, and print the value to the screen.”
Here’s one last example:
# Substitute the letter "a" for the word "the" in the stringstring="The quick brown fox jumps over the lazy dog."string_to_find=r"The"pattern=re.compile(string_to_find,re.I)("Output #40: {:s}".format(pattern.sub("a",string)))
This final example shows how to use the re.sub function to substitute one pattern for another pattern in text. Once again, most of the code in this example is similar to that in the first two examples, so I’ll just focus on the new parts.
The first new code snippet assigns the regular expression to a variable, pattern, so the variable can be passed into the re.compile function. Assigning the regular expression to a variable before the re.compile function isn’t necessary, as mentioned; however, if you have a long, complex regular expression, assigning it to a variable and then passing the variable to the re.compile function can make your code much more readable.
The final new code snippet appears in the last line. This code snippet uses the re.sub function to look for the pattern, The, case-insensitive, in the variable named string and replace every occurrence of the pattern with the letter a. The result of this substitution is a quick brown fox jumps over a lazy dog.
For more information about other regular expression functions, you can peruse the Python Standard Library or Michael Fitzgerald’s book Introducing Regular Expressions (O’Reilly).
Dates
Dates are an essential consideration in most business applications. You may need to know when an event will occur, the amount of time until an event occurs, or the amount of time between events. Because dates are central to so many applications—and because they’re such a downright weird sort of data, working in multiples of sixty, twenty-four, “about thirty,” and “almost exactly three hundred sixty-five and a quarter,” there are special ways of handling dates in Python.
Python includes the datetime module, which provides great functionality for dealing with dates and times. To make all of the functionality provided by the datetime module available to you in your script, add from datetime import date, time, datetime, timedelta at the top of your script beneath the previous import statement. Now the top of first_script.py should look like:
#!/usr/bin/env python3frommathimportexp,log,sqrtimportrefromdatetimeimportdate,time,datetime,timedelta
When you import the datetime module, you have a wide variety of date and time objects and functions at your disposal. Some of the useful objects and functions include today, year, month, day, timedelta, strftime, and strptime. These functions make it possible to capture individual elements of a date (e.g., year, month, or day), to add or subtract specific amounts of time to or from dates, to create date strings with specific formats, and to create datetime objects from date strings. The following are a few examples of how to use these datetime objects and functions. The first set of examples illustrates the difference between a date object and a datetime object:
# Print today's date, as well as the year, month, and day elementstoday=date.today()("Output #41: today: {0!s}".format(today))("Output #42: {0!s}".format(today.year))("Output #43: {0!s}".format(today.month))("Output #44: {0!s}".format(today.day))current_datetime=datetime.today()("Output #45: {0!s}".format(current_datetime))
By using date.today(), you create a date object that includes year, month, and day elements but does not include any of the time elements, like hours, minutes, and seconds. Contrast this with datetime.today(), which does include the time elements. The !s in {0!s} indicates that the value being passed into the print statement should be formatted as a string, even though it’s a number. Finally, you can use year, month, and day to capture these individual date elements.
This next example demonstrates how to use the timedelta function to add or subtract specific amounts of time to or from a date object:
# Calculate a new date using a timedeltaone_day=timedelta(days=-1)yesterday=today+one_day("Output #46: yesterday: {0!s}".format(yesterday))eight_hours=timedelta(hours=-8)("Output #47: {0!s} {1!s}".format(eight_hours.days,eight_hours.seconds))
In this example, we use the timedelta function to subtract one day from today’s date. Alternatively, we could have used days=10, hours=-8, or weeks=2 inside the parentheses to create a variable that is ten days into the future, eight hours into the past, or two weeks into the past, respectively.
One thing to keep in mind when using timedelta is that it stores time differences inside the parentheses as days, seconds, and microseconds and then normalizes the values to make them unique. This means that minutes, hours, and weeks are converted to 60 seconds, 3,600 seconds, and 7 days, respectively, and then normalized, essentially creating days, seconds, and microseconds “columns” (think back to grade-school math and the ones column, tens column, and so on). For example, the output of hours=-8 is (-1 days, 57,600 seconds) rather than the simpler (-28,800 seconds). This is calculated as 86,400 seconds (3,600 seconds per hour * 24 hours per day) – 28,800 seconds (3,600 seconds per hour * 8 hours) = 57,600 seconds. As you can see, the output of normalizing negative values can be surprising initially, especially when truncating and rounding.
The third example shows how to subtract one date object from another. The result of the subtraction is a datetime object that shows the difference in days, hours, minutes, and seconds. For example, in this case the result is “1 day, 0:00:00”:
# Calculate the number of days between two datesdate_diff=today-yesterday("Output #48: {0!s}".format(date_diff))("Output #49: {0!s}".format(str(date_diff).split()[0]))
In some cases, you may only need the numeric element of this result. For instance, in this example you may only need the number 1. One way to grab this number from the result is to use some of the functions you already learned about for manipulating strings. The str function converts the result to a string; the split function splits the string on whitespace and makes each of the substrings an element in a list; and the [0] says “grab the first element in the list,” which in this case is the number 1. We’ll see the [0] syntax again in the next section, which covers lists, because it illustrates list indexing and shows how you can retrieve specific elements from a list.
The fourth set of examples shows how to use the strftime function to create a string with a specific format from a date object:
# Create a string with a specific format from a date object("Output #50: {:s}".format(today.strftime('%m/%d/%Y')))("Output #51: {:s}".format(today.strftime('%b%d,%Y')))("Output #52: {:s}".format(today.strftime('%Y-%m-%d')))("Output #53: {:s}".format(today.strftime('%B%d,%Y')))
At the time of writing this chapter, the four formats print today’s date as:
01/28/2016
Jan 28, 2016
2016-01-28
January 28, 2016
These four examples show how to use some of the formatting symbols, including %Y, %B, %b, %m, and %d, to create different date-string formats. You can see the other formatting symbols the datetime module uses in the “datetime—Basic date and time types” section of the Python Standard Library.
# Create a datetime object with a specific format# from a string representing a datedate1=today.strftime('%m/%d/%Y')date2=today.strftime('%b%d,%Y')date3=today.strftime('%Y-%m-%d')date4=today.strftime('%B%d,%Y')# Two datetime objects and two date objects# based on the four strings that have different date formats("Output #54: {!s}".format(datetime.strptime(date1,'%m/%d/%Y')))("Output #55: {!s}".format(datetime.strptime(date2,'%b%d,%Y')))# Show the date portion only("Output #56: {!s}".format(datetime.date(datetime.strptime\(date3,'%Y-%m-%d'))))("Output #57: {!s}".format(datetime.date(datetime.strptime\(date4,'%B%d,%Y'))))
The fifth set of examples shows how to use the strptime function to create a datetime object from a date string that has a specific format. In this example, date1, date2, date3, and date4 are string variables that show today’s date in different formats: The first two print statements show the result of converting the first two string variables, date1 and date2, into datetime objects. To work correctly, the format used in the strptime function needs to match the format of the string variable being passed into the function. The result of these print statements is a datetime object, 2014-01-28 00:00:00.
Sometimes, you may only be interested in the date portion of the datetime object. In this case, you can use the nested functions, date and strptime, shown in the last two print statements, to convert date-string variables to datetime objects and then return only the date portion of the datetime object. The result of these print statements is 2014-01-28. Of course, you do not need to print the value immediately. You can assign the date to a new variable and then use the variable in calculations to generate insights about your business data over time.
Lists
Lists are prevalent in many business analyses. You may have lists of customers, products, assets, sales figures, and on and on. But lists—ordered collections of objects—in Python are even more flexible than that! All those types of lists contain similar objects (e.g., strings containing the names of customers or floating-point numbers representing sales figures), but lists in Python do not have to be that simple. They can contain an arbitrary mix of numbers, strings, other lists, and tuples and dictionaries (described later in this chapter). Because of their prevalence, flexibility, and importance in most business applications, it is critical to know how to manipulate lists in Python.
As you might expect, Python provides many useful functions and operators for managing lists. The following sections demonstrate how to use some of the most common and helpful of these functions and operators.
Create a list
# Use square brackets to create a list# len() counts the number of elements in a list# max() and min() find the maximum and minimum values# count() counts the number of times a value appears in a lista_list=[1,2,3]("Output #58: {}".format(a_list))("Output #59: a_list has {} elements.".format(len(a_list)))("Output #60: the maximum value in a_list is {}.".format(max(a_list)))("Output #61: the minimum value in a_list is {}.".format(min(a_list)))another_list=['printer',5,['star','circle',9]]("Output #62: {}".format(another_list))("Output #63: another_list also has {} elements.".format\(len(another_list)))("Output #64: 5 is in another_list {} time.".format(another_list.count(5)))
This example shows how to create two simple lists, a_list and another_list. You create a list by placing elements between square brackets. a_list contains the numbers 1, 2, and 3. another_list contains the string printer, the number 5, and a list with two strings and one number.
This example also shows how to use four list functions: len, min, max, and count. len shows the number of elements in a list. min and max show the minimum and the maximum values in a list, respectively. count shows the number of times a specific value appears in the list.
Index values
# Use index values to access specific elements in a list# [0] is the first element; [-1] is the last element("Output #65: {}".format(a_list[0]))("Output #66: {}".format(a_list[1]))("Output #67: {}".format(a_list[2]))("Output #68: {}".format(a_list[-1]))("Output #69: {}".format(a_list[-2]))("Output #70: {}".format(a_list[-3]))("Output #71: {}".format(another_list[2]))("Output #72: {}".format(another_list[-1]))
This example shows how you can use list index values, or indices, to access specific elements in a list. List index values start at 0, so you can access the first element in a list by placing a 0 inside square brackets after the name of the list. The first print statement in this example, print a_list[0], prints the first element in a_list, which is the number 1. a_list[1] accesses the second element in the list, a_list[2] accesses the third element, and so on to the end of the list.
This example also shows that you can use negative indices to access elements at the end of a list. Index values at the end of a list start at –1, so you can access the last element in a list by placing –1 inside square brackets after the name of the list. The fourth print statement, print a_list[-1], prints the last element in a_list, which is the number 3. a_list[-2] accesses the second-to-last element in the list, a_list[-3] accesses the third-to-last element in the list, and so on to the beginning of the list.
List slices
# Use list slices to access a subset of list elements# Do not include a starting index to start from the beginning# Do not include an ending index to go all of the way to the end("Output #73: {}".format(a_list[0:2]))("Output #74: {}".format(another_list[:2]))("Output #75: {}".format(a_list[1:3]))("Output #76: {}".format(another_list[1:]
This example shows how to use list slices to access a subset of list elements. You create a list slice by placing two indices separated by a colon between square brackets after the name of the list. List slices access list elements from the first index value to the element one place before the second index value. For example, the first print statement, print a_list[0:2], basically says, “Print the elements in a_list whose index values are 0 and 1.” This print statement prints [1, 2], as these are the first two elements in the list.
This example also shows that you do not need to include the first index value if the list slice starts from the beginning of the list, and you do not need to include the second index value if the list slice continues to the end of the list. For example, the last print statement, print another_list[1:], basically says, “Print all of the remaining elements in another_list, starting with the second element.” This print statement prints [5, ['star', 'circle', 9]], as these are the last two elements in the list.
Copy a list
# Use [:] to make a copy of a lista_new_list=a_list[:]("Output #77: {}".format(a_new_list))
This example shows how to make a copy of a list. This capability is important for when you need to manipulate a list in some way, perhaps by adding or removing elements or sorting the list, but you want the original list to remain unchanged. To make a copy of a list, place a single colon inside square brackets after the name of the list and assign it to a new variable. In this example, a_new_list is an exact copy of a_list, so you can add elements or remove them from a_new_list or sort a_new_list without modifying a_list.
Concatenate lists
# Use + to add two or more lists togethera_longer_list=a_list+another_list("Output #78: {}".format(a_longer_list))
This example shows how to concatenate two or more lists together. This capability is important for when you have to access lists of similar information separately, but you want to combine all of the lists together before analyzing them. For example, because of how your data is stored, you may have to generate one list of sales figures from one data source and another list of sales figures from a different data source. To concatenate the two lists of sales figures together for analysis, add the names of the two lists together with the + operator and assign the sum to a new variable. In this example, a_longer_list contains the elements of a_list and another_list concatenated together into a single, longer list.
Using in and not in
# Use in and not in to check whether specific elements are or are not in a lista=2ina_list("Output #79: {}".format(a))if2ina_list:("Output #80: 2 is in {}.".format(a_list))b=6notina_list("Output #81: {}".format(b))if6notina_list:("Output #82: 6 is not in {}.".format(a_list))
This example shows how to use in and not in to check whether specific elements are in a list or not. The results of these expressions are True or False values, depending on whether the expressions are true or false. These capabilities are important for business applications because you can use them to add meaningful business logic to your program. For example, they are often used in if statements such as “if SupplierY in SupplierList then do something, else do something else.” We will see more examples of if statements and other control flow expressions later in this chapter.
append, remove, pop
# Use append() to add additional elements to the end of the list# Use remove() to remove specific elements from the list# Use pop() to remove elements from the end of the lista_list.append(4)a_list.append(5)a_list.append(6)("Output #83: {}".format(a_list))a_list.remove(5)("Output #84: {}".format(a_list))a_list.pop()a_list.pop()("Output #85: {}".format(a_list))
This example shows how to add elements to and remove elements from a list. The append method adds single elements to the end of a list. You can use this method to create lists according to specific business rules. For example, to create a list of CustomerX’s purchases, you could create an empty list called CustomerX, scan through a master list of all purchases, and when the program “sees” CustomerX in the master list, append the purchase value to the CustomerX list.
The remove method removes a specific value from anywhere in a list. You can use this method to remove errors and typos from a list or to remove values from a list according to specific business rules. In this example, the remove method removes the number 5 from a_list.
The pop method removes single elements from the end of a list. Like with the remove method, you can use the pop method to remove errors and typos from the end of a list or to remove values from the end of a list according to specific business rules. In this example, the two calls to the pop method remove the numbers 6 and 4 from the end of a_list, respectively.
reverse
# Use reverse() to reverse a list in-place, meaning it changes the list# To reverse a list without changing the original list, make a copy firsta_list.reverse()("Output #86: {}".format(a_list))a_list.reverse()("Output #87: {}".format(a_list))
This example shows how to use the reverse function to reverse a list in-place. “In-place” means the reversal changes the original list to the new, reversed order. For example, the first call to the reverse function in this example changes a_list to [3, 2, 1]. The second call to the reverse function returns a_list to its original order. To use a reversed copy of a list without modifying the original list, first make a copy of the list and then reverse the copy.
sort
# Use sort() to sort a list in-place, meaning it changes the list# To sort a list without changing the original list, make a copy firstunordered_list=[3,5,1,7,2,8,4,9,0,6]("Output #88: {}".format(unordered_list))list_copy=unordered_list[:]list_copy.sort()("Output #89: {}".format(list_copy))("Output #90: {}".format(unordered_list))
This example shows how to use the sort function to sort a list in-place. As with the reverse method, this in-place sort changes the original list to the new, sorted order. To use a sorted copy of a list without modifying the original list, first make a copy of the list and then sort the copy.
sorted
# Use sorted() to sort a collection of lists by a position in the listsmy_lists=[[1,2,3,4],[4,3,2,1],[2,4,1,3]]my_lists_sorted_by_index_3=sorted(my_lists,key=lambdaindex_value:\index_value[3])("Output #91: {}".format(my_lists_sorted_by_index_3))
This example shows how to use the sorted function in combination with a key function to sort a collection of lists by the value in a specific index position in each list. The key function specifies the key to be used to sort the lists. In this case, the key is a lambda function that says, “Sort the lists by the values in index position three (i.e., the fourth values in the lists).” (We’ll talk a bit more about lambda functions later.) After applying the sorted function with the fourth value in each list as the sort key, the second list [4,3,2,1] becomes the first list, the third list [2,4,1,3] becomes the second list, and the first list [1,2,3,4] becomes the third list. Also, note that whereas the sort function sorts the list in-place, changing the order of the original list, the sorted function returns a new sorted list and does not change the order of the original list.
The next sorting example uses the standard operator module, which provides functionality for sorting lists, tuples, and dictionaries by multiple keys. To use the operator module’s itemgetter function in your script, add from operator import itemgetter at the top of your script:
#!/usr/bin/env python3frommathimportexp,log,sqrtimportrefromdatetimeimportdate,time,datetime,timedeltafromoperatorimportitemgetter
By importing the operator module’s itemgetter function, you can sort a collection of lists by multiple positions in each list:
# Use itemgetter() to sort a collection of lists by two index positionsmy_lists=[[123,2,2,444],[22,6,6,444],[354,4,4,678],[236,5,5,678],\[578,1,1,290],[461,1,1,290]]my_lists_sorted_by_index_3_and_0=sorted(my_lists,key=itemgetter(3,0))("Output #92: {}".format(my_lists_sorted_by_index_3_and_0))
This example shows how to use the sorted() function in combination with the itemgetter function to sort a collection of lists by the values in multiple index positions in each list. The key function specifies the key to be used to sort the lists. In this case, the key is the itemgetter function and it contains two index values, three and zero. This statement says, “First sort the lists by the values in index position three; and then, while maintaining this sorted order, further sort the lists by the values in index position zero.”
This ability to sort lists and other data containers by multiple positions is very helpful because you quite often need to sort data by multiple values. For example, if you have daily sale transactions data, you may need to sort the data first by day and then by transaction amount for each day. Or, if you have supplier data, you may need to sort the data first by supplier name and then by supply receipt dates for each supplier. The sorted and itemgetter functions provide this functionality.
For more information about functions you can use to manage lists, you can peruse the Python Standard Library.
Tuples
Tuples are very similar to lists, except that they cannot be modified. Because tuples cannot be modified, there are no tuple modification functions. It may seem strange to have two data structures that are so similar, but tuples have important roles that modifiable lists cannot fill—for example, as keys in dictionaries. Tuples are less common than lists, so we will only briefly review this topic.
Create a tuple
# Use parentheses to create a tuplemy_tuple=('x','y','z')("Output #93: {}".format(my_tuple))("Output #94: my_tuple has {} elements".format(len(my_tuple)))("Output #95: {}".format(my_tuple[1]))longer_tuple=my_tuple+my_tuple("Output #96: {}".format(longer_tuple))
This example shows how to create a tuple. You create a tuple by placing elements between parentheses. This example also shows that you can use many of the same functions and operators discussed for lists on tuples. For example, the len function shows the number of elements in a tuple, tuple indices and slices access specific elements in a tuple, and the + operator concatenates tuples.
Unpack tuples
# Unpack tuples with the lefthand side of an assignment operatorone,two,three=my_tuple("Output #97: {0} {1} {2}".format(one,two,three))var1='red'var2='robin'("Output #98: {} {}".format(var1,var2))# Swap values between variablesvar1,var2=var2,var1("Output #99: {} {}".format(var1,var2))
This example shows one of the interesting aspects of tuples, unpacking. It is possible to unpack the elements in a tuple into separate variables by placing those variables on the lefthand side of an assignment operator. In this example, the strings x, y, and z are unpacked into the variables one, two, and three. This functionality is useful for swapping values between variables. In the last part of this example, the value in var2 is assigned to var1 and the value in var1 is assigned to var2. Python is evaluating both parts of the tuple at the same time. In this way, red robin becomes robin red.
Convert tuples to lists (and vice versa)
# Convert tuples to lists and lists to tuplesmy_list=[1,2,3]my_tuple=('x','y','z')("Output #100: {}".format(tuple(my_list)))("Output #101: {}".format(list(my_tuple)))
Finally, it is possible to convert tuples into lists and lists into tuples. This functionality is similar to the str function, which you can use to convert an element into a string. To convert a list into a tuple, place the name of the list inside the tuple() function. Similarly, to convert a tuple into a list, place the name of the tuple inside the list() function.
For more information about tuples, you can peruse the Python Standard Library.
Dictionaries
Dictionaries in Python are essentially lists that consist of pieces of information paired with some unique identifier. Like lists, dictionaries are prevalent in many business analyses. Business analyses may involve dictionaries of customers (keyed to customer number), dictionaries of products (keyed to serial number or product number), dictionaries of assets, dictionaries of sales figures, and on and on.
In Python, these data structures are called dictionaries, but they are also called associative arrays, key-value stores, and hashes in other programming languages. Lists and dictionaries are both useful data structures for many business applications, but there are some important differences between lists and dictionaries that you need to understand to use dictionaries effectively:
- In lists, you access individual values using consecutive integers called indices, or index values. In dictionaries, you access individual values using integers, strings, or other Python objects called keys. This makes dictionaries more useful than lists in situations where unique keys, and not consecutive integers, are a more meaningful mapping to the values.
- In lists, the values are implicitly ordered because the indices are consecutive integers. In dictionaries, the values are not ordered because the indices are not just numbers. You can define an ordering for the items in a dictionary, but the dictionary does not have a built-in ordering.
- In lists, it is illegal to assign to a position (index) that does not already exist. In dictionaries, new positions (keys) are created as necessary.
- Because they are not ordered, dictionaries can provide quicker response times when you’re searching for or adding values (the computer doesn’t have to reassign index values when you insert an item). This can be an important consideration as you deal with more and more data.
Given their prevalence, flexibility, and importance in most business applications, it is critical to know how to manage dictionaries in Python. The following examples demonstrate how to use some of the most common and helpful functions and operators for managing dictionaries.
Create a dictionary
# Use curly braces to create a dictionary# Use a colon between keys and values in each pair# len() counts the number of key-value pairs in a dictionaryempty_dict={}a_dict={'one':1,'two':2,'three':3}("Output #102: {}".format(a_dict))("Output #103: a_dict has {!s} elements".format(len(a_dict)))another_dict={'x':'printer','y':5,'z':['star','circle',9]}("Output #104: {}".format(another_dict))("Output #105: another_dict also has {!s} elements"\.format(len(another_dict)))
This example shows how to create a dictionary. To create an empty dictionary, give the dictionary a name on the lefthand side of the equals sign and include opening and closing curly braces on the righthand side of the equals sign.
The second dictionary in this example, a_dict, demonstrates one way to add keys and values to a small dictionary. a_dict shows that a colon separates keys and values and the key-value pairs are separated by commas between the curly braces. The keys are strings enclosed by single or double quotation marks, and the values can be strings, numbers, lists, other dictionaries, or other Python objects. In a_dict, the values are integers, but in another_dict the values are a string, number, and list. Finally, this example shows that the len function shows the number of key-value pairs in a dictionary.
Access a value in a dictionary
# Use keys to access specific values in a dictionary("Output #106: {}".format(a_dict['two']))("Output #107: {}".format(another_dict['z']
To access a specific value, write the name of the dictionary, an opening square bracket, a particular key (a string), and a closing square bracket. In this example, the result of a_dict['two'] is the integer 2, and the result of another_dict['z'] is the list ['star', 'circle', 9].
copy
# Use copy() to make a copy of a dictionarya_new_dict=a_dict.copy()("Output #108: {}".format(a_new_dict))
To copy a dictionary, add the copy function to the end of the dictionary name and assign that expression to a new dictionary. In this example, a_new_dict is a copy of the original a_dict dictionary.
keys, values, and items
# Use keys(), values(), and items() to access# a dictionary's keys, values, and key-value pairs, respectively("Output #109: {}".format(a_dict.keys()))a_dict_keys=a_dict.keys()("Output #110: {}".format(a_dict_keys))("Output #111: {}".format(a_dict.values()))("Output #112: {}".format(a_dict.items()))
To access a dictionary’s keys, add the keys function to the end of the dictionary name. The result of this expression is a list of the dictionary’s keys. To access a dictionary’s values, add the values function to the end of the dictionary name. The result is a list of the dictionary’s values.
To access both the dictionary’s keys and values, add the items function to the end of the dictionary name. The result is a list of key-value pair tuples. For example, the result of a_dict.items() is [('three', 3), ('two', 2), ('one', 1)]. In the next section on control flow, we’ll see how to use a for loop to unpack and access all of the keys and values in a dictionary.
Using in, not in, and get
if'y'inanother_dict:("Output #114: y is a key in another_dict: {}."\.format(another_dict.keys()))if'c'notinanother_dict:("Output #115: c is not a key in another_dict: {}."\.format(another_dict.keys()))("Output #116: {!s}".format(a_dict.get('three')))("Output #117: {!s}".format(a_dict.get('four')))("Output #118: {!s}".format(a_dict.get('four','Not in dict')))
This example shows two different ways to test whether a specific key is or is not in a dictionary. The first way to test for a specific key is to use an if statement and in or not in in combination with the name of the dictionary. Using in, the if statement tests whether y is one of the keys in another_dict. If this statement is true (i.e., if y is one of the keys in another_dict), then the print statement is executed; otherwise, it is not executed. These if in and if not in statements are often used to test for the presence of keys and, in combination with some additional syntax, to add new keys to a dictionary. We will see examples of adding keys to a dictionary later in this book.
The second way to test for a specific key and to retrieve the key’s corresponding value is to use the get function. Unlike the previous method of testing for keys, the get function returns the value corresponding to the key if the key is in the dictionary, or returns None if the key is not in the dictionary. In addition, the get function also permits an optional second argument in the function call, which is the value to return if the key is not in the dictionary. In this way, it is possible to return something other than None if the key is not in the dictionary.
Sorting
# Use sorted() to sort a dictionary# To sort a dictionary without changing the original dictionary,# make a copy first("Output #119: {}".format(a_dict))dict_copy=a_dict.copy()ordered_dict1=sorted(dict_copy.items(),key=lambdaitem:item[0])("Output #120 (order by keys): {}".format(ordered_dict1))ordered_dict2=sorted(dict_copy.items(),key=lambdaitem:item[1])("Output #121 (order by values): {}".format(ordered_dict2))ordered_dict3=sorted(dict_copy.items(),key=lambdax:x[1],reverse=True)("Output #122 (order by values, descending): {}".format(ordered_dict3))ordered_dict4=sorted(dict_copy.items(),key=lambdax:x[1],reverse=False)("Output #123 (order by values, ascending): {}".format(ordered_dict4))
This example shows how to sort a dictionary in different ways. As stated at the beginning of this section, a dictionary does not have an implicit ordering; however, you can use the preceding code snippets to sort a dictionary. The sorting can be based on the dictionary’s keys or values and, if the values are numeric, they can be sorted in ascending or descending order.
In this example, I use the copy function to make a copy of the dictionary a_dict. The copy is called dict_copy. Making a copy of the dictionary ensures that the original dictionary, a_dict, remains unchanged. The next line contains the sorted function, a list of tuples as a result of the items function, and a lambda function as the key for the sorted function.
There is a lot going on in this single line, so let’s unpack it a bit. The goal of the line is to sort the list of key-value tuples that result from the items function according to some sort criterion. key is the sort criterion, and it is equal to a simple lambda function. (A lambda function is a short function that returns an expression at runtime.) In this lambda function, item is the sole parameter, and it refers to each of the key-value tuples returned from the items function. The expression to be returned appears after the colon. This expression is item[0], so the first element in the tuple (i.e., the key) is returned and used as the key in the sorted function. To summarize, this line of code basically says, “Sort the dictionary’s key-value pairs in ascending order, based on the keys in the dictionary.” The next sorted function uses item[1] instead of item[0], so this line orders the dictionary’s key-value pairs in ascending order, based on the values in the dictionary.
The last two versions of the sorted function are similar to the preceding version because all three versions use the dictionary’s values as the sort key. Because this dictionary’s values are numeric, they can be sorted in ascending or descending order. These last two versions show how to use the sorted function’s reverse parameter to specify whether the output should be in ascending or descending order. reverse=True corresponds to descending order, so the key-value pairs will be sorted by their values in descending order.
For more information about managing dictionaries, you can peruse the Python Standard Library.
Control Flow
Control flow elements are critical for including meaningful business logic in programs. Many business processes and analyses rely on logic such as “if the customer spends more than a specific amount, then do such and such” or “if the sales are in category A code them as X, else if the sales are in category B code them as Y, else code them as Z.” These types of logic statements can be expressed in code with control flow elements.
Python provides several control flow elements, including if-elif-else statements, for loops, the range function, and while loops. As their name suggests, if-else statements enable logic like “if this then do that, else do something else.” The else blocks are not required, but make your code more explicit. for loops enable you to iterate over a sequence of values, which can be a list, a tuple, or a string. You can use the range function in conjunction with the len function on lists to produce a series of index values that you can then use in a for loop. Finally, the while loop executes the code in the body as long as the while condition is true.
if-else
# if-else statementx=5ifx>4orx!=9:("Output #124: {}".format(x))else:("Output #124: x is not greater than 4")
This first example illustrates a simple if-else statement. The if condition tests whether x is greater than 4 or x is not equal to 9 (the != operation stands for “not equal to”). With an or operator evaluation stops as soon as a True expression is found. In this case, x equals 5, and 5 is greater than 4, so x != 9 is not even evaluated. The first condition, x > 4, is true, so print x is executed and the printed result is the number 5. If neither of the conditions in the if block had been true, then the print statement in the else block would have been executed.
if-elif-else
# if-elif-else statementifx>6:("Output #125: x is greater than six")elifx>4andx==5:("Output #125: {}".format(x*x))else:("Output #125: x is not greater than 4")
This second example illustrates a slightly more complicated if-elif-else statement. Similarly to the previous example, the if block simply tests whether x is greater than 6. If this condition were true, then evaluation would stop and the corresponding print statement would be executed. As it happens, 5 is not greater than 6, so evaluation continues to the next elif statement. This statement tests whether x is greater than 4 and x evaluates to 5. With an and operator evaluation stops as soon as a False expression is found. In this case, x equals 5, 5 is greater than 4, and x evaluates to 5, so print x*x is executed and the printed result is the number 25. Because we use the equals sign for assigning values to objects, we use a double equals sign (==) to evaluate equality. If neither the if nor the elif blocks had been true, then the print statement in the else block would have been executed.
for loops
y=['Jan','Feb','Mar','Apr','May','Jun','Jul','Aug','Sep','Oct',\'Nov','Dec']z=['Annie','Betty','Claire','Daphne','Ellie','Franchesca','Greta',\'Holly','Isabel','Jenny']("Output #126:")formonthiny:("{!s}".format(month))("Output #127: (index value: name in list)")foriinrange(len(z)):("{0!s}: {1:s}".format(i,z[i]))("Output #128: (access elements in y with z's index values)")forjinrange(len(z)):ify[j].startswith('J'):("{!s}".format(y[j]))("Output #129:")forkey,valueinanother_dict.items():("{0:s}, {1}".format(key,value))
These four for loop examples demonstrate how to use for loops to iterate over sequences. This is a critical capability for later chapters in this book and for business applications generally. The first for loop example shows that the basic syntax is for variable in sequence, do something. variable is a temporary placeholder for each value in the sequence, and it is only recognized in the for loop. In this example, the variable name is month. sequence is the name of the sequence you are iterating over. In this example, the sequence name is y, which is a list of months. Therefore, this example says, “For each value in y, print the value”.
The second for loop example shows how to use the range function in combination with the len function to produce a series of index values that you can use in the for loop. To understand the interaction of compound functions, evaluate them from the inside out. The len function counts the number of values in the list z, which is ten. Then the range function generates a series of integers from zero to the number one less than the result of the len function—in this case, the integers zero to nine. Therefore, this for loop basically says, “For integer i in sequence zero to nine, print integer i followed by a space followed by the value in the list z whose index value is i.” As you’ll see, using the range function in combination with the len function in for loops will show up in numerous examples in this book, as this combination is tremendously useful for many business applications.
The third for loop example shows how you can use the index values generated from one sequence to access values with the same index values in another sequence. It also shows how to include an if statement to introduce business logic in the for loop. In this example, I use the range and len functions again to generate index values from the list z. Then, the if statement tests whether each of the values with those index values in list y (y[0]= 'Jan', y[1]='Feb', …, y[9]= 'Oct') starts with the capital letter J.
The last for loop example shows one way to iterate over and access a dictionary’s keys and values. In the first line of the for loop, the items function returns key-value tuples of the dictionary’s keys and values. The key and value variables in the for loop capture each of these values in turn. The print statement in the body of this for loop includes the str function to ensure each key and value is a string and prints each key-value pair, separated by a space, on separate lines.
Compact for loops: list, set, and dictionary comprehensions
List, set, and dictionary comprehensions are a way to write for loops compactly in Python. List comprehensions appear between square brackets, whereas set comprehensions and dictionary comprehensions appear between curly braces. All comprehensions can include conditional logic (e.g., if-else statements).
List comprehension
The following example shows how to use a list comprehension to select a subset of lists that meet a particular condition from a collection of lists:
# Select specific rows using a list comprehensionmy_data=[[1,2,3],[4,5,6],[7,8,9]]rows_to_keep=[rowforrowinmy_dataifrow[2]>5]("Output #130 (list comprehension): {}".format(rows_to_keep))
In this example, the list comprehension says, “For each row in my_data, keep the row if the value in the row with index position two (i.e., the third value) is greater than five.” Because 6 and 9 are greater than 5, the lists retained in rows_to_keep are [4,5,6] and [7,8,9].
Set comprehension
The next example shows how to use a set comprehension to select the set of unique tuples from a list of tuples:
# Select a set of unique tuples in a list using a set comprehensionmy_data=[(1,2,3),(4,5,6),(7,8,9),(7,8,9)]set_of_tuples1={xforxinmy_data}("Output #131 (set comprehension): {}".format(set_of_tuples1))set_of_tuples2=set(my_data)("Output #132 (set function): {}".format(set_of_tuples2))
In this example, the set comprehension says, “For each tuple in my_data, keep the tuple if it is a unique tuple.” You can tell the expression is a set comprehension instead of a list comprehension because it contains curly braces instead of square brackets, and it’s not a dictionary comprehension because it doesn’t use any key-value pair syntax.
The second print statement in this example shows that you can get the same result as the set comprehension by using Python’s built-in set function. For this use case, it makes sense to use the built-in set function because it is more concise and easier to read than the set comprehension.
Dictionary comprehension
The following example shows how to use a dictionary comprehension to select a subset of key-value pairs from a dictionary that meet a particular condition:
# Select specific key-value pairs using a dictionary comprehensionmy_dictionary={'customer1':7,'customer2':9,'customer3':11}my_results={key:valueforkey,valueinmy_dictionary.items()if\value>10}("Output #133 (dictionary comprehension): {}".format(my_results))
In this example, the dictionary comprehension says, “For each key-value pair in my_dictionary, keep the key-value pair if the value is greater than ten.” Because the value 11 is greater than 10, the key-value pair retained in my_results is {'customer3': 11}.
while loops
("Output #134:")x=0whilex<11:("{!s}".format(x))x+=1
This example shows how to use a while loop to print the numbers from 0 to 10. x = 0 initializes the x variable to 0. Then the while loop evaluates whether x is less than 11. Because x is less than 11, the body of the while loop prints the x value followed by a single space and then increments the value of x by 1. Again, the while loop evaluates whether x, now equal to 1, is less than 11. Because it is, the body of the while loop is executed again. The process continues in this fashion until x is incremented from 10 to 11. Now, when the while loop evaluates whether x is less than 11 the expression evaluates to false, and the body of the while loop is not executed.
The while loop is useful when you know ahead of time how many times the body needs to be executed. More often, you will not know ahead of time how many times the body needs to be executed, in which case the for loop can be more useful.
Functions
In some situations, you may find it expedient to write your own functions, rather than using Python’s built-in functions or installing modules written by others. For example, if you notice that you are writing the same snippet of code over and over again, then you may want to consider turning that snippet of code into a function. In some cases, the function may already exist in base Python or in one of its “importable” modules. If the function already exists, it makes sense to use the existing, tested function. However, in other cases the function you need may not exist or be available, in which case you need to create the function yourself.
To create a function in Python, begin the line with the def keyword followed by a name for the function, followed by a pair of opening and closing parentheses, followed by a colon. The code that makes up the body of the function needs to be indented. Finally, if the function needs to return one or more values, use the return keyword to return the result of the function for use in your program. The following example demonstrates how to create and use a function in Python:
# Calculate the mean of a sequence of numeric valuesdefgetMean(numericValues):returnsum(numericValues)/len(numericValues)iflen(numericValues)>0\elsefloat('nan')my_list=[2,2,4,4,6,6,8,8]("Output #135 (mean): {!s}".format(getMean(my_list))
This example shows how to create a function that calculates the mean of a sequence of numbers. The name of the function is getMean. There is a phrase between the opening and closing parentheses to represent the sequence of numbers being passed into the function—this is a variable that is only defined within the scope of the function. Inside the function, the mean of the sequence is calculated as the sum of the numbers divided by the count of the numbers. In addition, I use an if-else statement to test whether the sequence contains any values. If it does, the function returns the mean of the sequence. If it doesn’t, then the function returns nan (i.e., not a number). If I were to omit the if-else statement and the sequence happened to not contain any values, then the program would throw a division by zero error. Finally, the return keyword is used to return the result of the function for use in the program.
In this example, my_list contains eight numbers. my_list is passed into the getMean() function. The sum of the eight numbers is 40, and 40 divided by 8 equals 5. Therefore, the print statement prints the integer 5.
As you’d guess, other mean functions already exist—for example, NumPy has one. So, you could get the same result by importing NumPy and using its mean function:
importnumpyasnpnp.mean(my_list)
Again, when the function you need already exists in base Python or in one of its importable modules, it may make sense to use the existing, tested function. A Google or Bing search for “<a description of the functionality you’re looking for> Python function” is your friend. However, if you want to do a task that’s specific to your business process, then it pays to know how to create the function yourself.
Exceptions
An important aspect of writing a robust program is handling errors and exceptions effectively. You may write a program with implicit assumptions about the types and structures of the data the program will be processing, but if any of the data does not conform to your assumptions, it may cause the program to throw an error.
Python includes several built-in exceptions. Some common exceptions are IOError, IndexError, KeyError, NameError, SyntaxError, TypeError, UnicodeError, and ValueError. You can read more about these and other exceptions online, in the “Built-in Exceptions” section of the Python Standard Library. Using try-except is your first defense in dealing with error messages—and letting your program keep running even if the data isn’t perfect!
The following sections show two versions (short and long) of a try-except block to effectively catch and handle an exception. The examples modify the function example from the previous section to show how to handle an empty list with a try-except block instead of with an if statement.
try-except
# Calculate the mean of a sequence of numeric valuesdefgetMean(numericValues):returnsum(numericValues)/len(numericValues)my_list2=[]# Short versiontry:("Output #138: {}".format(getMean(my_list2)))exceptZeroDivisionErrorasdetail:("Output #138 (Error): {}".format(float('nan')))("Output #138 (Error): {}".format(detail))
In this version, the function getMean() does not include the if statement to test whether the sequence contains any values. If the sequence is empty, as it is in the list my_list2, then applying the function will result in a ZeroDivisionError.
To use a try-except block, place the code that you want to execute in the try block. Then, use the except block to handle any potential errors and to print helpful error messages. In some cases, an exception has an associated value. You can access the exception value by including an as phrase on the except line and then printing the name you gave to the exception value. Because my_list2 does not contain any values, the except block is executed, which prints nan and then Error: float division by zero.
try-except-else-finally
# Long versiontry:result=getMean(my_list2)exceptZeroDivisionErrorasdetail:("Output #142 (Error): {}".format(float('nan')))("Output #142 (Error): {}".format(detail))else:("Output #142 (The mean is): {}".format(result))finally:("Output #142 (Finally): The finally block is executed every time")
This longer version includes else and finally blocks, in addition to the try and except blocks. The else block is executed if the try block is successful. Therefore, if the sequence of numbers passed to the getMean() function in the try block contained any numbers, then the mean of those values would be assigned to the variable result in the try block and then the else block would execute. For example, if we used +my_list1+, it would print The mean is: 5.0. Because my_list2 does not contain any values, the except block executes and prints nan and Error: float division by zero. Then the finally block executes, as it always does, and prints The finally block is executed every time.
Reading a Text File
Your data is, almost without exception, stored in files. The files may be text files, CSV files, Excel files, or other types of files. Getting to know how to access these files and read their data gives you the tools to process, manipulate, and analyze the data in Python. When you’ve got a program that can handle many files per second, you really see the payoff from writing a program rather than doing each task as a one-off.
You’ll need to tell Python what file the script is dealing with. You could hardcode the name of the file into your program, but that would make it difficult to use the program on many different files. A versatile way to read from a file is to include the path to the file after the name of the Python script on the command line in the Command Prompt or Terminal window. To use this method, you need to import the built-in sys module at the top of your script. To make all of the functionality provided by the sys module available to you in your script, add import sys at the top of your script:
#!/usr/bin/env python3frommathimportexp,log,sqrtimportrefromdatetimeimportdate,time,datetime,timedeltafromoperatorimportitemgetterimportsys
Importing the sys module puts the argv list variable at your disposal. This variable captures the list of command-line arguments—everything that you typed into the command line, including your script name—passed to a Python script. Like any list, argv has an index. argv[0] is the script name. argv[1] is the first additional argument passed to the script on the command line, which in our case will be the path to the file to be read by first_script.py.
Create a Text File
In order to read a text file, we first need to create one. To do so:
-
Open the Spyder IDE or a text editor (e.g., Notepad, Notepad++, or Sublime Text on Windows; TextMate, TextWrangler, or Sublime Text on macOS).
-
Write the following six lines in the text file (see Figure 1-10):
I'malreadymuchbetteratPython.
Figure 1-10. Text file, file_to_read.txt, in Notepad++ (Windows)
-
Save the file to your Desktop as file_to_read.txt.
-
Add the following lines of code at the bottom of first_script.py:
# READ A FILE# Read a single text fileinput_file=sys.argv[1]print("Output # 143:")filereader=open(input_file,'r')forrowinfilereader:print(row.strip())filereader.close()The first line in this example uses the
sys.argvlist to capture the path to the file we intend to read and assigns the path to the variableinput_file. The second line creates a file object,filereader, which contains the rows resulting from opening theinput_filein'r'(read) mode. Theforloop in the next line reads the rows in thefilereaderobject one at a time. The body of theforloop prints each row, and thestripfunction removes spaces, tabs, and newline characters from the ends of each row before it is printed. The final line closes thefilereaderobject once all of the rows in the input file have been read and printed to the screen. -
Resave first_script.py.
-
To read the text file, type the following line, as shown in Figure 1-11, and then hit Enter:
python first_script.py file_to_read.txt
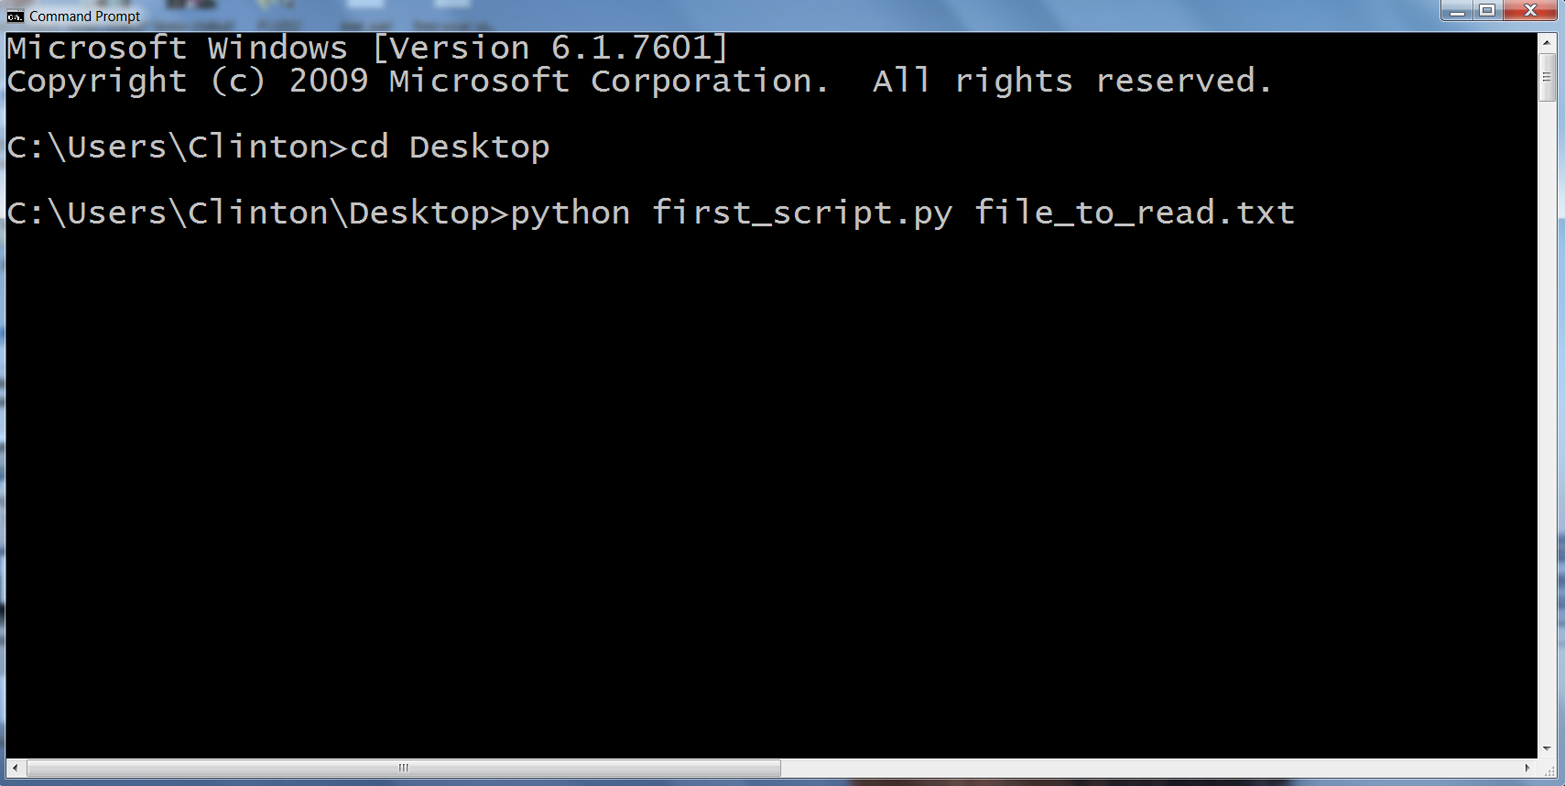
Figure 1-11. Python script and the text file it will process in a Command Prompt window
At this point, you’ve now read a text file in Python. You should see the following printed at the bottom of your screen, beneath any other previous output (Figure 1-12):
I'm
already
much
better
at
Python.
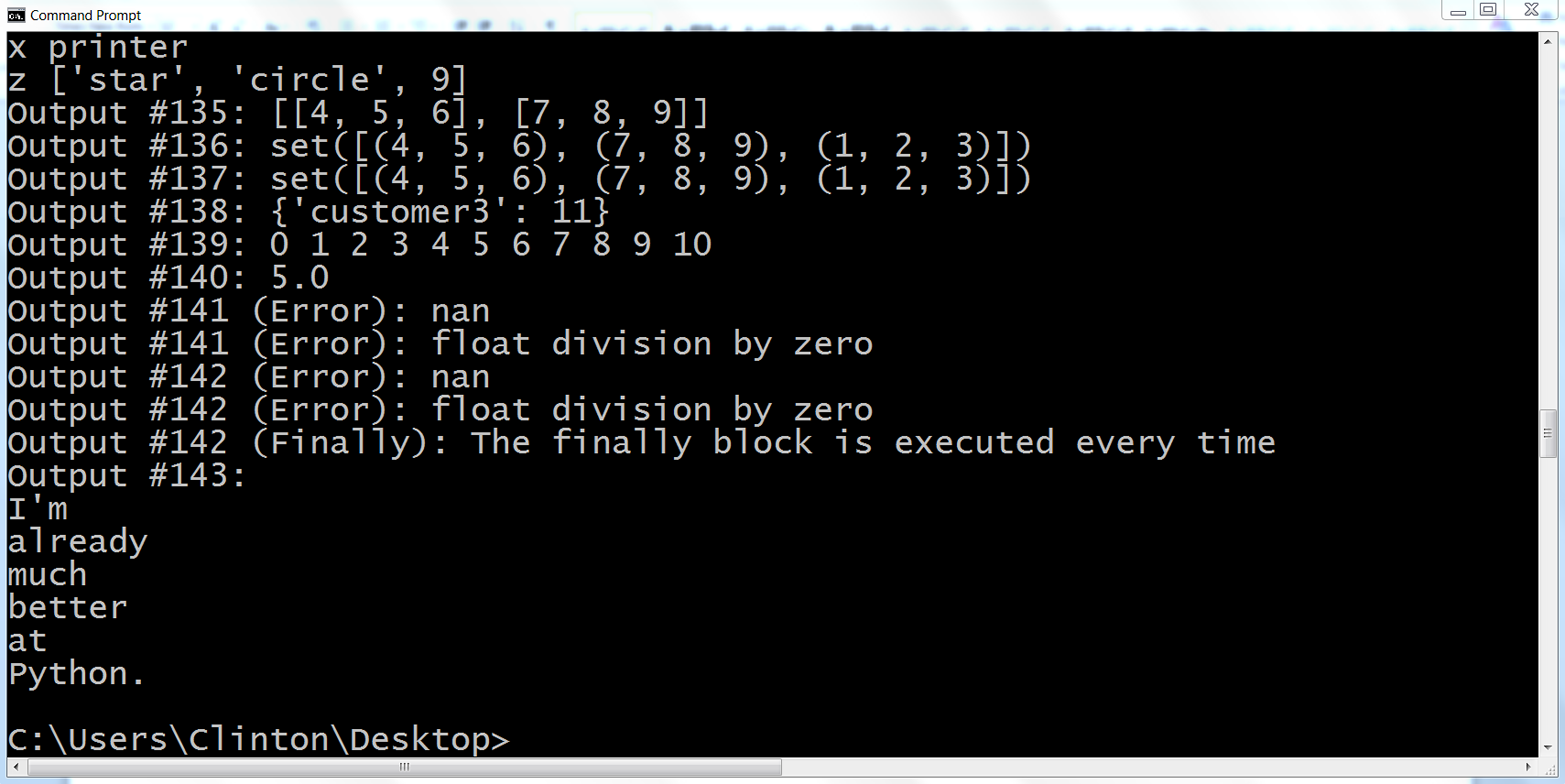
Figure 1-12. Output of first_script.py, processing a text file in a Command Prompt window
Script and Input File in Same Location
It was possible to simply type python first_script.py file_to_read.txt on the command line because first_script.py and file_to_read.txt were in the same location—that is, on your Desktop. If the text file is not in the same location as the script, then you need to supply the full path to the text file so that the script knows where to find the file.
For example, if the text file is in your Documents folder instead of on your Desktop, you can use the following path on the command line to read the text file from its alternative location:
python first_script.py "C:\Users\[Your Name]\Documents\file_to_read.txt"
Modern File-Reading Syntax
The line of code we used to create the filereader object is a legacy way of creating the file object. This method works just fine, but it leaves the file object open until either it is explicitly closed with the close function or the script finishes. While this behavior isn’t usually harmful in any way, it is less clean than it could be and has been known to cause errors in more complex scripts. Since Python 2.5, you can use the with statement to create a file object instead. This syntax automatically closes the file object when the with statement is exited:
input_file=sys.argv[1]("Output #144:")withopen(input_file,'r',newline='')asfilereader:forrowinfilereader:("{}".format(row.strip()))
As you can see, the with statement version is very similar to the previous version, but it eliminates the need to include a call to the close function to close the filereader object.
This example demonstrated how to use sys.argv to access and print the contents of a single text file. It was a simple example, but we will build on it in later examples to access other types of files, to access multiple files, and to write to output files.
The next section covers the glob module, which enables you to read and process multiple input files with only a few lines of code. Because the power of the glob module comes from pointing to a folder (i.e., a directory rather than a file), let’s delete or comment out the previous file-reading code so that we can use argv[1] to point to a folder instead of to a file. Commenting out simply means putting hash symbols before every line of code you want the machine to ignore, so when you do this first_script.py should look like:
## Read a text file (older method) ###input_file = sys.argv[1]#print("Output #143:")#filereader = open(input_file, 'r', newline='')#for row in filereader:# print("{}".format(row.strip()))#filereader.close()## Read a text file (newer method) ###input_file = sys.argv[1]#print("Output #144:")#with open(input_file, 'r', newline='') as filereader:# for row in filereader:# print("{}".format(row.strip()))
With these changes, you are ready to add the glob code discussed in the next section to process multiple files.
Reading Multiple Text Files with glob
In many business applications, the same or similar actions need to happen to multiple files. For example, you may need to select a subset of data from multiple files, calculate statistics like totals and means from multiple files, or even calculate statistics for subsets of data from multiple files. As the number of files increases, the ease of processing them manually decreases and the opportunity for errors increases.
One way to read multiple files is to include the path to the directory that contains the input files after the name of the Python script on the command line. To use this method, you need to import the built-in os and glob modules at the top of your script. To make all of the functionality provided by the os and glob modules available to you in your script, add import os and import glob at the top of your script:
#!/usr/bin/env python3frommathimportexp,log,sqrtimportrefromdatetimeimportdate,time,datetime,timedeltafromoperatorimportitemgetterimportsysimportglobimportos
When you import the os module, you have several useful pathname functions at your disposal. For example, the os.path.join function joins one or more path components together intelligently. The glob module finds all pathnames matching a specific pattern. By using os and glob in combination, you can find all files in a specific folder that match a specific pattern.
In order to read multiple text files, we need to create another text file.
Create Another Text File
-
Open the Spyder IDE or a text editor (e.g., Notepad, Notepad++, or Sublime Text on Windows; TextMate, TextWrangler, or Sublime Text on macOS).
-
Write the following eight lines in the text file (Figure 1-13):
This
text
comes
from
a
different
text
file.
Figure 1-13. Text file, another_file_to_read.txt, in Notepad++
-
Save the file to your Desktop as another_file_to_read.txt.
-
Add the following lines of code at the bottom of first_script.py:
# Read multiple text filesprint("Output #145:")inputPath=sys.argv[1]forinput_fileinglob.glob(os.path.join(inputPath,'*.txt')):withopen(input_file,'r',newline='')asfilereader:forrowinfilereader:print("{}".format(row.strip()))The first line in this example is very similar to that used in the example of reading a single text file, except that in this case we will be supplying a path to a directory instead of a path to a file. Here, we will be supplying the path to the directory that contains the two text files.
The second line is a
forloop that uses theos.path.joinfunction and theglob.globfunction to find all of the files in a particular folder that match a specific pattern. The path to the particular folder is contained in the variableinputPath, which we will supply on the command line. Theos.path.joinfunction joins this folder path with all of the names of files in the folder that match the specific pattern expanded by theglob.globfunction. In this case, I use the pattern*.txtto match any filename that ends with .txt. Because this is aforloop, the rest of the syntax on this line should look familiar.input_fileis a placeholder name for each of the files in the list created by theglob.globfunction. This line basically says, “For each file in the list of matching files, do the following…”The remaining lines of code are the same as the lines of code used to read a single file. Open the
input_filevariable in read mode and create afilereaderobject. For each row in thefilereaderobject, remove spaces, tabs, and newline characters from the ends of the row, and then print the row. -
Resave first_script.py.
-
To read the text files, type the following line, as shown in Figure 1-14, and then hit Enter:
python first_script.py "C:\Users\[Your Name]\Desktop"
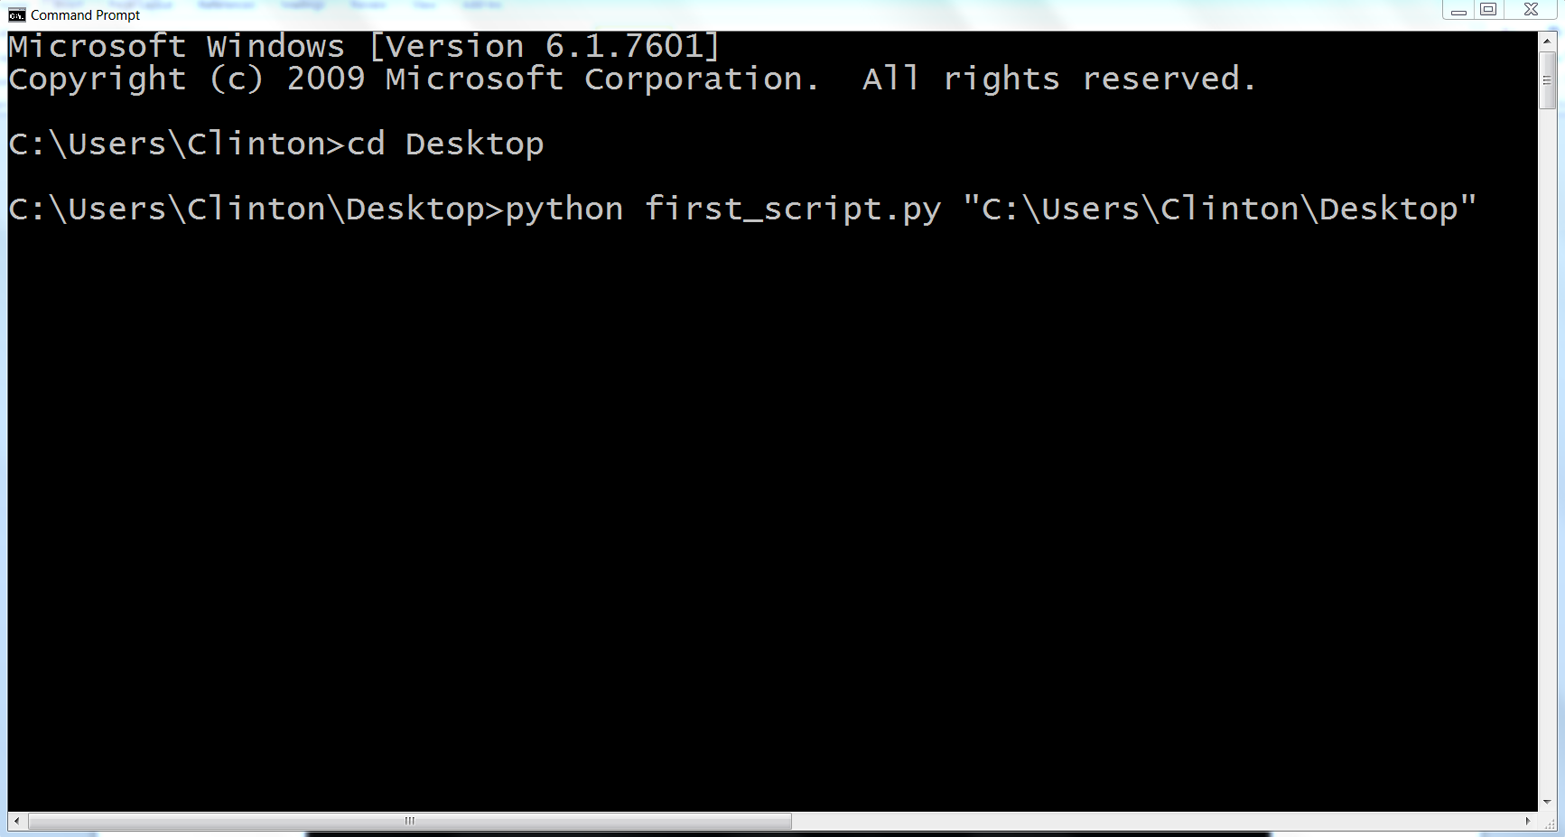
Figure 1-14. Python script and path to the Desktop folder that contains the input files in a Command Prompt window
At this point, you’ve now read multiple text files in Python. You should see the following printed at the bottom of your screen, beneath any other previous output (Figure 1-15):
Thistextcomesfromadifferenttextfile.I'malreadymuchbetteratPython.
Figure 1-15. Output of first_script.py, processing text files in a Command Prompt window
One great aspect of learning this technique is that it scales. This example involved only two files, but it could just as easily have involved dozens to hundreds or thousands or more files. By learning how to use the glob.glob function, you will be able to process a great number of files in a fraction of the time it would take to do so manually.
Writing to a Text File
Most of the examples thus far have included print statements that send the output to the Command Prompt or Terminal window. Printing the output to the screen is useful when you are debugging your program or reviewing the output for accuracy. However, in many cases, once you know the output is correct, you will want to write that output to a file for further analysis, reporting, or storage.
Python provides two easy methods for writing to text and delimited files. The write method writes individual strings to a file, and the writelines method writes a sequence of strings to a file. The following two examples make use of the combination of the range and len functions to keep track of the indices of the values in a list so that the delimiter is placed between the values and a newline character is placed after the last value.
Add Code to first_script.py
-
Add the following lines of code at the bottom of first_script.py:
# WRITE TO A FILE# Write to a text filemy_letters=['a','b','c','d','e','f','g','h','i','j']max_index=len(my_letters)output_file=sys.argv[1]filewriter=open(output_file,'w')forindex_valueinrange(len(my_letters)):ifindex_value<(max_index-1):filewriter.write(my_letters[index_value]+'\t')else:filewriter.write(my_letters[index_value]+'\n')filewriter.close()print("Output #146: Output written to file")In this example, the variable
my_lettersis a list of strings. We want to print these letters, each separated by a tab, to a text file. The one complication in this example is ensuring that the letters are printed with tabs between them and a newline character (not a tab) is placed after the final letter.In order to know when we have reached the final letter we need to keep track of the index values of the letters in the list. The
lenfunction counts the number of values in a list, somax_indexequals 10. Again, we usesys.argv[1]to supply the path to and name of the output file on the command line in the Command Prompt or Terminal window. We create a file object,filewriter, but instead of opening it for reading we open it for writing with the'w'(write) mode. We use aforloop to iterate through the values in the list,my_letters, and we use therangefunction in combination with thelenfunction to keep track of the index of each value in the list.The
if-elselogic enables us to differentiate between the last letter in the list and all of the preceding letters in the list. Here is how theif-elselogic works:my_letterscontains ten values, but indices start at zero, so the index values for the letters are 0, 1, 2, 3, 4, 5, 6, 7, 8, 9. Therefore,my_letters[0]isaandmy_letters[9]isj. Theifblock evaluates whether the index valuexis less than nine,max_index– 1 or 10 – 1 = 9. This condition isTrueuntil the last letter in the list. Therefore, theifblock says, “Until the last letter in the list, write the letter followed by a tab in the output file.” When we reach the last letter in the list the index value for that letter is 9, which is not less than 9, so theifblock evaluates asFalseand theelseblock is executed. Thewritestatement in theelseblock says, “Write the final letter followed by a newline character in the output file.” -
Comment out the earlier code for reading multiple files.
In order to see this code in action, we need to write to a file and view the output. Because we once again are going to use
argv[1]to specify the path to and name of the output file, let’s delete or comment out the previousglobcode so that we can useargv[1]to specify the output file. If you choose to comment out the previousglobcode, then first_script.py should look like:## Read multiple text files#print("Output #145:")#inputPath = sys.argv[1]#for input_file in glob.glob(os.path.join(inputPath,'*.txt')):# with open(input_file, 'r', newline='') as #filereader:# for row in filereader:# print("{}".format(row.strip())) -
Resave first_script.py.
-
To write to a text file, type the following line, as shown in Figure 1-16, and hit enter:
python first_script.py "C:\Users\[Your Name]\Desktop\write_to_file.txt"
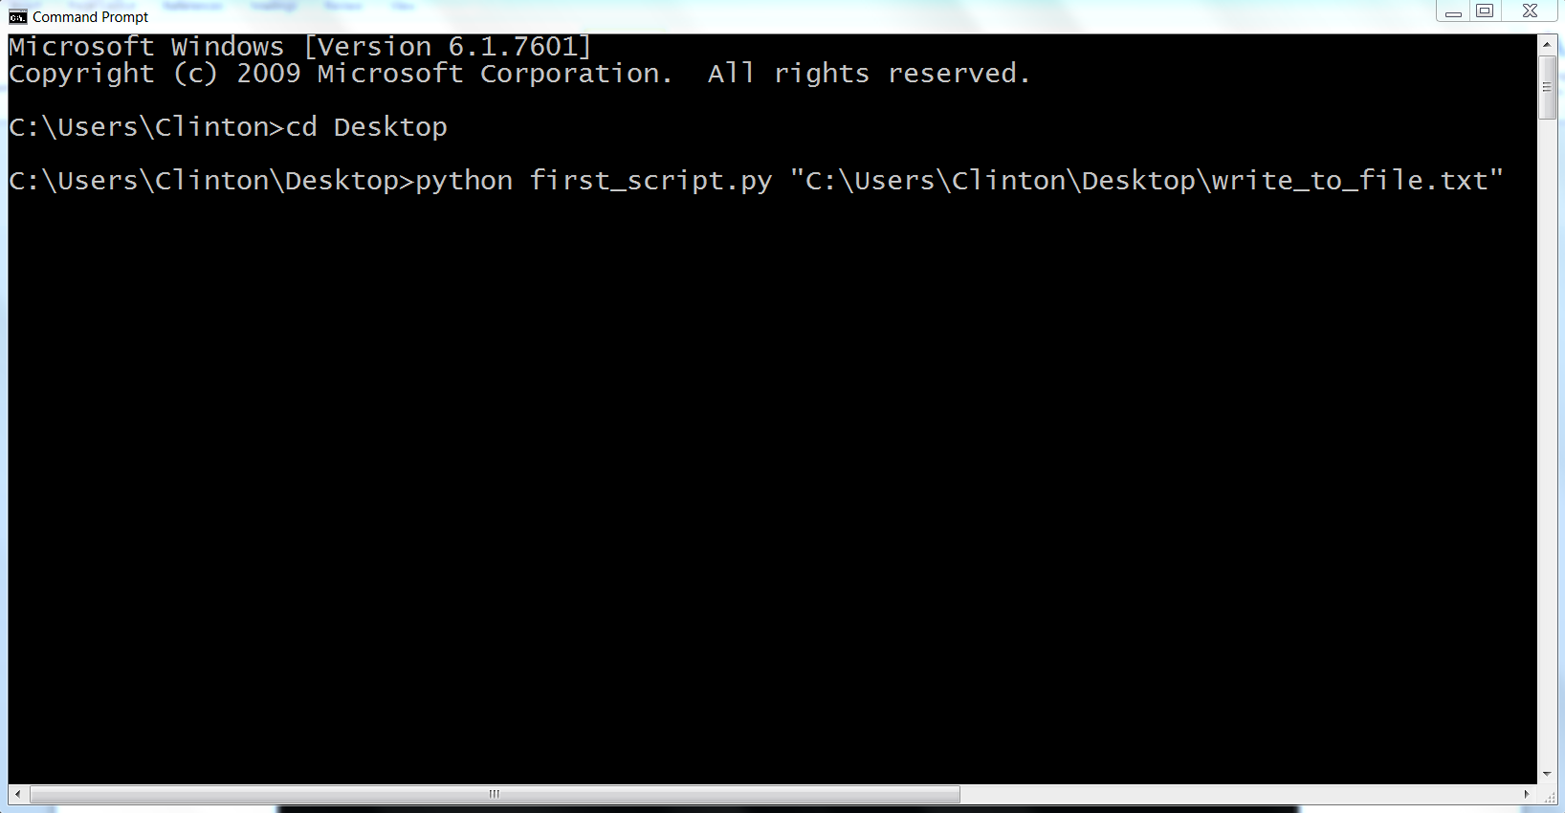
Figure 1-16. Python script, file path, and name of output file it will write in a Command Prompt window
-
Open the output file, write_to_file.txt.
You’ve now used Python to write output to a text file. After you complete these steps, you will not see any new output on the screen; however, if you minimize all of your open windows and look on your Desktop, there should be a new text file called write_to_file.txt. The file should contain the letters from the list my_letters separated by tabs with a newline character at the end, as seen in Figure 1-17.

Figure 1-17. Output file, write_to_file.txt, that first_script.py creates on the Desktop
The next example is very similar to this one, except it demonstrates using the str function to convert values to strings so they can be written to a file with the write function. It also demonstrates the 'a' (append) mode to append output to the end of an existing output file.
Writing to a Comma-Separated Values (CSV) File
-
Add the following lines of code at the bottom of first_script.py:
# Write to a CSV filemy_numbers=[0,1,2,3,4,5,6,7,8,9]max_index=len(my_numbers)output_file=sys.argv[1]filewriter=open(output_file,'a')forindex_valueinrange(len(my_numbers)):ifindex_value<(max_index-1):filewriter.write(str(my_numbers[index_value])+',')else:filewriter.write(str(my_numbers[index_value])+'\n')filewriter.close()print"Output #147: Output appended to file"This example is very similar to the preceding one, but it demonstrates how to append to an existing output file and how to convert non-string values in a list into strings so they can be written to a file with the
writefunction. In this example, the list contains integers. Thewritefunction writes strings, so you need to use thestrfunction to convert the non-string values into strings before they can be written to the output file with thewritefunction.In the first iteration through the
forloop, thestrfunction will write a zero to the output file, followed by a single comma. Writing each of the numbers in the list to the output file continues in this way until the last number in the list, at which point theelseblock is executed and the final number is written to the file followed by a newline character instead of a comma.Notice that we opened the file object,
filewriter, in append mode ('a') instead of write mode ('w'). If we supply the same output filename on the command line, then the output of this code will be appended below the output previously written to write_to_file.txt. Alternatively, if we openedfilewriterin write mode, then the previous output would be deleted and only the output of this code would appear in write_to_file.txt. You will see the power of opening a file object in append mode later in this book when we process multiple files and append all of the data together into a single, concatenated output file. -
Resave first_script.py.
-
To append to the text file, type the following line and then hit Enter:
python first_script.py "C:\Users\[Your Name]\Desktop\write_to_file.txt"
-
Open the output file, write_to_file.txt.
You’ve now used Python to write and append output to a text file. After you complete these steps, you will not see any new output printed to the screen; however, if you open write_to_file.txt you’ll see that there’s now a new second line that contains the numbers in my_numbers separated by commas with a newline character at the end, as shown in Figure 1-18.
Finally, this example demonstrates an effective way for writing CSV files. In fact, if we did not write the output from the previous tab-based example to the output file (that output was separated by tabs instead of by commas) and we named the file write_to_file.csv instead of write_to_file.txt, then we would have created a CSV file.
Figure 1-18. Output file, write_to_file.txt, that first_script.py appends to on the Desktop
print Statements
print statements are an important aid to debugging any program. As you have seen, many of the examples in this chapter included print statements as output. However, you can also add print statements in your code temporarily to see intermediate output. If your code is not working at all or is not producing the results you expect, then start adding print statements in meaningful locations from the top of your program to see if the initial calculations are what you expect. If they are, continue down through subsequent lines of code to check that they are also working as expected.
By starting at the top of your script, you can ensure that you identify the first place where the results are in error and fix the code at that point before testing the remaining sections of your code. The message of this brief section is, “Don’t be afraid to use print statements liberally throughout your code to help you debug your code and ensure it’s working properly!” You can always comment out or remove the print statements later when you are confident your code is working properly.
We’ve covered a lot of ground in this chapter. We’ve discussed how to import modules, basic data types and their functions and methods, pattern matching, print statements, dates, control flow, functions, exceptions, reading single and multiple files, as well as writing text and delimited files. If you’ve followed along with the examples in this chapter, you have already written over 500 lines of Python code!
The best part about all of the work you have put into working through the examples in this chapter is that they are the basic building blocks for doing more complex file processing and data manipulation. Having worked through the examples in this chapter, you’re now well prepared to understand and master the techniques demonstrated in the remaining chapters in this book.
Chapter Exercises
Example solutions can be found in Appendix B.
-
Create a new Python script. In it, create three different lists, add the three lists together, and use a
forloop and positional indexing (i.e.,range(len())) to loop through the list and print the index values and elements in the list to the screen. -
Create a new Python script. In it, create two different lists of equal length. One of the lists must contain unique strings. Also create an empty dictionary. Use a
forloop, positional indexing, and anifstatement to test whether each of the values in the list of unique strings is already a key in the dictionary. If it is not, then add the value as a key and add the value in the other list that has the same index position as the key’s associated value. Print the dictionary’s keys and values to the screen. -
Create a new Python script. In it, create a list of equal-length lists. Modify the code used in “Writing to a Comma-Separated Values (CSV) File” to loop through the list of lists and print the values in each of the lists to the screen as a string of comma-separated values with a newline character at the end.
Get Foundations for Analytics with Python now with the O’Reilly learning platform.
O’Reilly members experience books, live events, courses curated by job role, and more from O’Reilly and nearly 200 top publishers.

