Chapter 1. Getting Around Flash
Computer programs these days strive to give you an intuitive work environment. A word processing document, for example, looks pretty much like a piece of paper and shows your words as you type them. Movie playing software has controls that look just like the ones on your home DVD player. Flash 8 provides the powerful and flexible tools that you need to create interactive animations, which is a more complex affair than producing text or playing media. Problem is, if this is your first time in an animation program, it may not be immediately obvious what to do with all these tools.
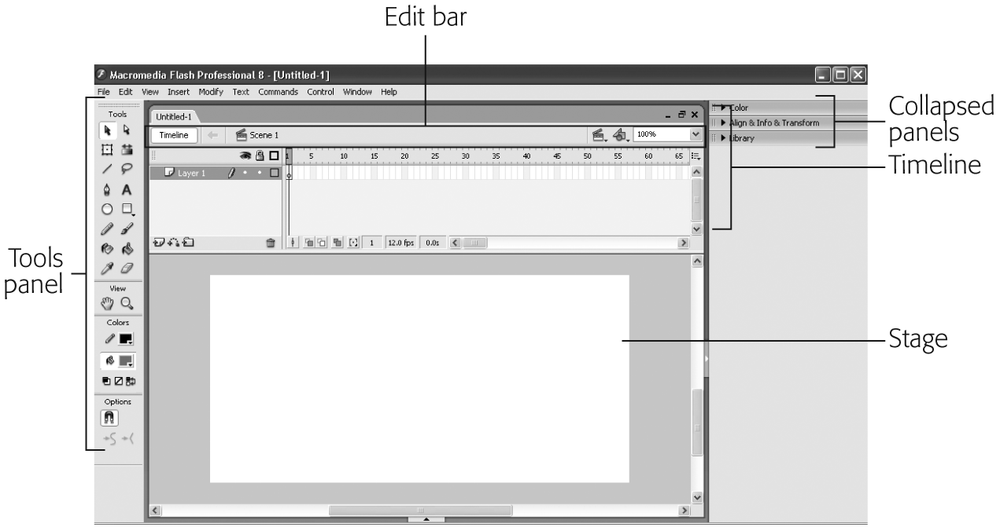
When you start with a blank Flash document, you find yourself staring at a blank white square and a dizzying array of icons, most of which appear to do nothing when you click them (Figure 1-1). You’d pretty much have to be a Flash developer to figure out what to do next. In this chapter, you get acquainted with all the different parts of the Flash window: the stage and main work area, the main menu, the toolbars and panels, the Timeline, and more. You’ll also take Flash for a test drive and get some practice moving around the Flash screen. When you learn to create an animation of your own in Chapters 2 and 3, you’ll feel right at home.
Note
For more help getting acquainted with Flash, you can check out the built-in tutorials by selecting Help → Flash Help → Flash Tutorials. You can read about them, along with the rest of Flash’s Help system, in this book’s Appendix.
Starting Flash
Once you’ve installed Flash on your computer (Section A.2.2), you can launch it like any other program. Choose your method:
Double-click the program’s icon. You can find it on your hard drive in Program Files → Macromedia → Flash 8 (Windows) or Applications → Macromedia Flash 8 folder (Mac).
Click Start → All Programs → Macromedia → Macromedia Flash 8 (Windows). If you’re running Mac, you can drag the Flash 8 icon from the Macromedia Flash 8 folder to the Dock and from then on open it with a single click on the Dock icon.
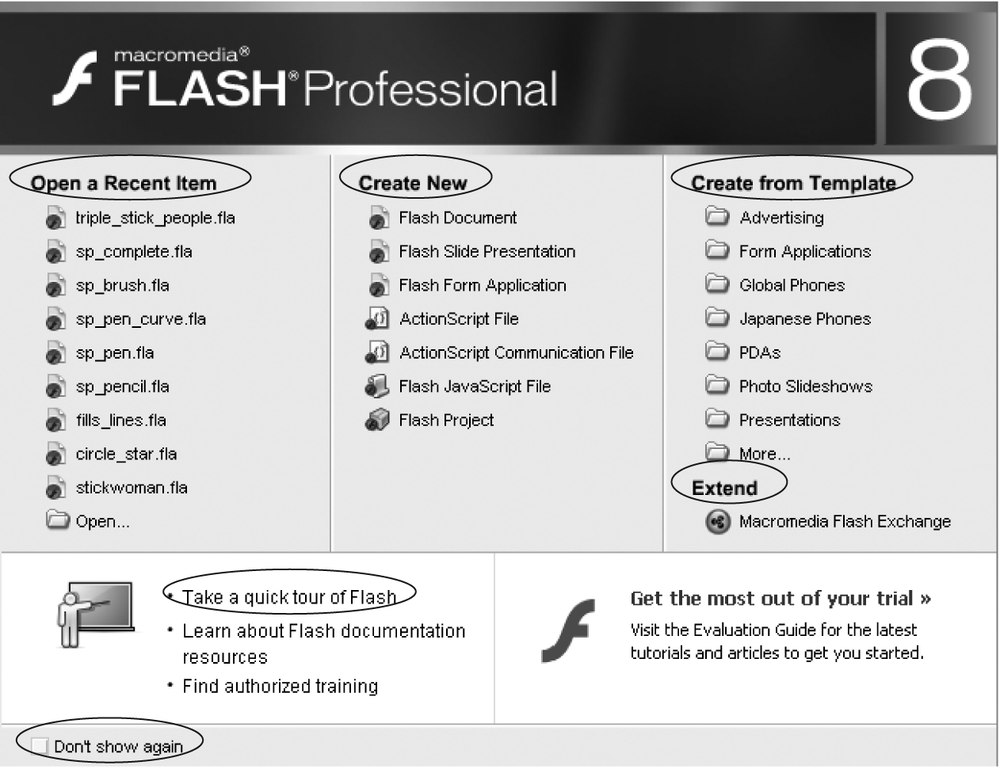
Up pops the Flash start page, as shown in Figure 1-2. When you open the program, you’re most likely to start a new document or return to a work in progress. This screen puts all your options in one handy place.
Tip
If Flash seems to take forever to open—or if the Flash desktop ignores your mouse clicks or responds sluggishly—you may not have enough memory installed on your computer. See Section A.2.2 for more advice.
When you choose one of the options on the start page, it disappears and your actual document takes its place. Here are your choices:
Open a Recent Item. As you create new documents, Flash adds them to this list. Clicking one of the file names listed here tells Flash to open that file. Clicking the folder icon lets you browse your computer for (and then open) any other Flash file on your computer.
Create New. Clicking one of the options listed here lets you create a brand-new Flash file. Most of the time, you’ll want to create a Flash document, which is a plain garden-variety animation file. But you can also create a Flash slide presentation (a specialized kind of animation consisting of a bunch of still images); a Flash form application (an interactive animation that accepts data input and hooks into a server to process that input); an ActionScript file (a file containing nothing but ActionScript, for use with a Flash animation); an ActionScript Communication file (a file that uses ActionScript to transfer data between an animation and a server); a Flash JavaScript file (a file that transfers data between an animation and a Web browser using JavaScript); and a Flash project (useful if you’re planning a complex, multifile, multideveloper Flash production and need version control).
Figure 1-2. This start page appears the first time you launch Flash—and every subsequent time, too, unless you turn on the Don’t Show Again checkbox (circled). If you ever miss the convenience of seeing all your recent Flash documents, built-in templates, and other options in one place, you can turn it back on by choosing Edit → Preferences (Windows) or Flash → Preferences (Mac). On the General panel, choose Show Start Page from the On Launch pop-up menu.Create From Template. Clicking one of the little folder icons under this option lets you create a Flash document using a predesigned form called a template. Using a template helps you create a Flash animation quicker because a developer somewhere has already done part of the work for you. You’ll find out more about templates in Chapter 7.
Extend. Clicking the Macromedia Flash Exchange link under this option tells Flash to open your Web browser (if it’s not already running) and load the Flash Exchange Web site. There, you can download Flash components, sound files, and other goodies (some free, some fee, and all of them created by Flash-ionados just like you) that you can add to your Flash animations.
Take a Quick Tour of Flash. Why the Flash development team thought folks running Flash would want to sit through an ad is anybody’s guess. Click this option if you must, but don’t expect much in the way of usable, nitty-gritty information. Instead, a multimedia presentation shamelessly regales you with market-speak describing all the ways you can “enhance” the “engaging experiences” you create in Flash.
Tip
Except for the Macromedia Flash Exchange, which you find on the Help menu, all of the options on the start page also appear on the File menu (Figure 1-3 below), so you can start a new document any time.
A Tour of the Flash Desktop
Even though it has more controls and gizmos than a jumbo-jet cockpit, don’t let Flash’s interface intimidate you. Each toolbar and panel plays a part in the life of an animation, and most are designed to give you, the animator, full and flexible control over your creation. Once you know why and how to use each type of control, all becomes clear. That’s what this section does.
Menu Bar
Running across the top of the Flash desktop (or the very top of your screen, if you’re on a Mac), is the menu bar. The commands on these menus list every way you can interact with your Flash file, from creating a new file—as shown on Section 2.2—to editing it, saving it, and controlling how it appears on your screen.
Some of the menu names—File, Edit, View, Window, and Help—are familiar to anyone who’s used a PC or Mac. Using these menu choices, you can perform basic tasks such as opening, saving, and printing your Flash files; cutting and pasting sections of your drawing; viewing your drawing in different ways; choosing which toolbars to view; getting help; and more.
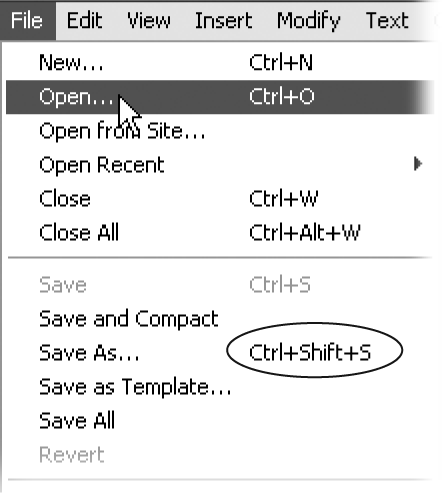
To view a menu, simply click the menu’s title to open it and then click a menu option. On a Mac, you can also drag down to the option you want. Let go of the mouse button to activate the option. Figure 1-3 shows you what the File menu looks like.
Depending on what’s on your screen, additional menus may appear, unique to Flash. You’ll learn all about these options in upcoming chapters. For example:
Insert. The options you find in this menu let you create complex drawings and turn static drawings into Flash animations by adding symbols (reusable bits of drawings and animations, as you’ll learn in Chapter 7); layers (virtual transparencies that let you manipulate the elements of a composite drawing separately, as shown in Chapter 3); and frames (virtual “flip pages” that, when displayed rapidly one after the other, turn a series of drawings into an animation, as discussed in Chapter 3); and so on.
Modify. Selections here let you make changes to your work. For example, this is the menu you want when you want to rotate or scale (shrink or enlarge) a piece of your drawing.
Text. The options in this menu let you work with the text you add to your drawings. Here, you can set standard text characteristics such as font, alignment, and spacing; you can also run a spell check.
Commands. Options here allow you to create and run commands (commonly called macros in other programs). Commands are series of tasks you perform in Flash. For example, if you know you’ll be opening a bunch of Flash documents and making identical changes to each one of them, you can tell Flash to “watch” you make the changes once and save them as a command. The next time you need to make those changes to a different document, all you have to do is run the command.
Control. This is the menu to use when you want to test your animation. You can run your animation, rewind it, or even slow it down so that you step through one frame at a time—great for troubleshooting.
The Stage
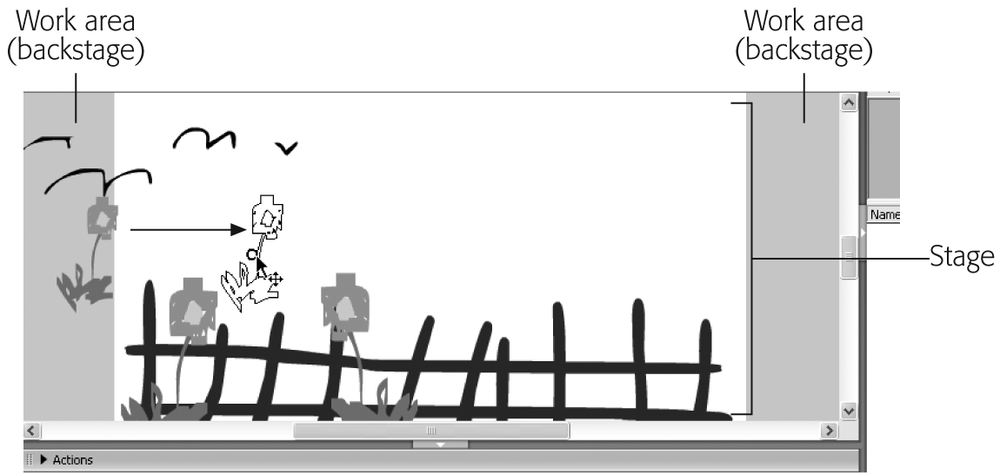
The Stage, located at the dead center of your Flash workspace, is your virtual canvas. Here’s where you draw the pictures that you’ll eventually string together to create your animation. The Stage is also your playback arena: when you run a completed animation—to test it out and see if it needs tweaking—the animation appears on the Stage. At the beginning of this chapter, you saw a Flash desktop with a blank Stage. Figure 1-4 shows one with an animation in progress.
Work area is the technical name for the gray area surrounding the stage, although many Flash-ionados call it the backstage. This work area serves as a prep zone where you can place graphic elements before you move them to the Stage and as a temporary holding pen for elements you want to move off the Stage briefly as you reposition things. For example, let’s say you draw three different circles and one box containing text on your Stage. If you decide you need to rearrange these elements on the Stage, you can temporarily drag one of the circles off the Stage, as shown in Figure 1-4.
Note
The Stage always starts out with a white background, which becomes the background color for your animation. Changing it to any color imaginable is easy, as you’ll learn in the next chapter.
You’ll almost always change the starting size and shape of the Stage depending on where people will see your finished animation to appear—your target platform. If your target platform is a Web-enabled cell phone, for example, you’re going to want an itty-bitty Stage. If, on the other hand, you’re creating an animation you know people will be watching on a 50-inch computer monitor, you’re going to want a giant Stage. You’ll get to try your hand at modifying the size of the stage in the Flash Test Drive later in this chapter.
Toolbars
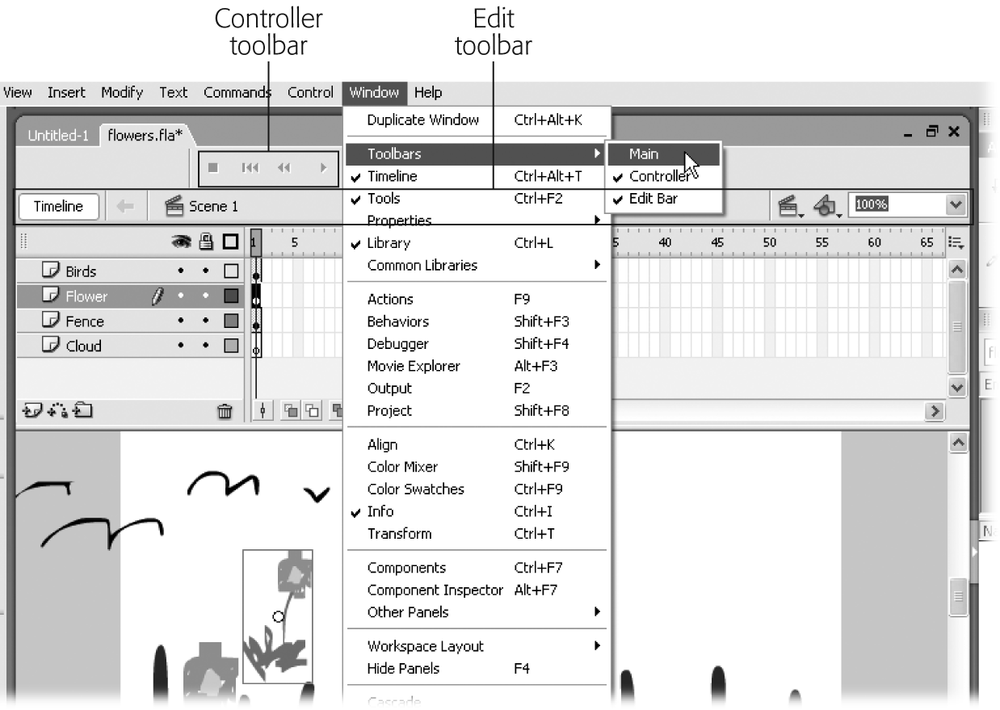
Flash lets you put all the menu options you use most frequently at your fingertips by displaying toolbars and panels like those shown in Figure 1-1. Toolbars and panels are very similar: they’re both movable windows that display Flash options. The difference is that toolbars are small and show only icons; panels are larger and show whole rafts of settings you can change. (You can learn all about panels in the next section.)
Toolbars pack some of the most commonly used options together in a nice compact space that you can position anywhere you like. (See the box on Section 1.4.1 for tips on repositioning toolbars.) Displaying a toolbar means your options are right there in front of you, so you don’t have to do a hunt-and-peck through the main menu every time you want to do something useful.
Tip
When you reposition a floating toolbar, Flash remembers where you put it. If, later on, you hide the toolbar—or exit Flash and run it again—your toolbars appear exactly as you left them. If this isn’t what you want, you can wipe away all your changes and return to the way Flash originally displayed everything by choosing Window → Workspace layout → Default.
Flash offers three toolbars, all of which you see in Figure 1-5:
Main. The Main toolbar lets you one-click basic operations, such as opening an existing Flash file, creating a new file, and cutting and pasting sections of your drawing.
Controller. If you’ve ever seen a video or sound recorder, you’ll recognize the Stop, Rewind, and Play buttons on the Controller toolbar, which allow you to control how you want Flash to run your finished animation. (Not surprisingly, the Controller options appear grayed out—meaning you can’t select them—if you haven’t yet constructed an animation.)
Edit Bar. Using the options here, you can set and adjust the Timeline (Section 1.4.16) as well as edit scenes (named groups of frames) and symbols (reusable drawings).
Panels
A Flash panel is like a toolbar on steroids: bigger and loaded down with more options, but built for the same reason—to let you keep the stuff you work with the most visible right there in front of you, where it’s easy for you to find and use. Furthermore, unlike toolbars, panels offer options you can’t find on any menu.
Flash offers you a ton of panels, each of which appears initially in one of two flavors: docked or floating. Docked panels appear outside your workspace, like the Color Mixer, Library, Property, and Actions panels shown in Figure 1-6.
A docked toolbar or panel appears attached to some part of the workspace window, while a floating toolbar or panel is one that you can reposition by dragging.
Whether you want to display toolbars and panels as docked or floating is a matter of personal choice. If you constantly need to click something on a toolbar—which means it needs to be in full view at all times—docked works best. But if you usually just need a toolbar or a panel for a brief time and want to be able to move it around on the screen (so it doesn’t cover up something else you need to work with, for example), floating’s the ticket.
To turn a docked toolbar into a floating toolbar:
Select the docked toolbar by clicking any blank spot on it. An outline appears around the toolbar to let you know you’ve successfully selected it.
Drag the toolbar away from the edge of the workspace window and release the mouse button. Flash displays the toolbar where you dropped it. You can reposition it anywhere you like simply by dragging it again.
Here, the Controller toolbar has been dragged to make it float.
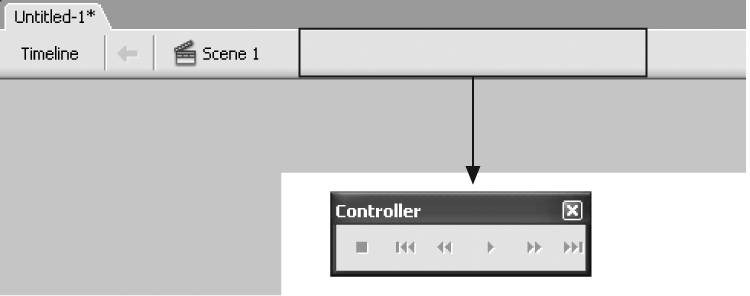
To dock a floating toolbar, simply reverse the procedure: drag the floating toolbar to the edge of the workspace window and let go of the mouse button. When you do, Flash docks the toolbar automatically.
You can have as few or as many panels showing at a time as you like. The Window menu lists all of Flash’s panels, and you show and hide them by selecting to turn their checkmark on and off—exactly as with toolbars, as shown in Figure 1-5.
Besides keyboard shortcuts, there’s only one way to display a panel—from the Window menu—but you have plenty of options for getting them out of your way. For example, you can click the X in the upper-right corner of a floating panel, as shown in Figure 1-6. For docked panels, you can collapse (shrink) them by clicking the down arrow in the upper-left corner.
Tip
To hide all the panels you’ve displayed in one fell swoop, select Window → Hide Panels or press the F4 key. You can also click the arrows just beneath (and to the right of) the workspace scroll bars. Whoosh! The panels below the Stage (or to the right of it) disappear, and you get to see a lot more of your workspace.
Tools Panel
All animations start with a single drawing. And to draw something in Flash, you need drawing tools: pens, pencils, brushes, colors, erasers, and so forth. The Tools panel, shown in Figure 1-7, is where you find Flash’s drawing tools. Chapter 2 shows you how to use these tools to create a simple drawing; in this section, you get a quick overview of the four different sections of the Tools panel, each of which focuses on a slightly different kind of drawing tool.

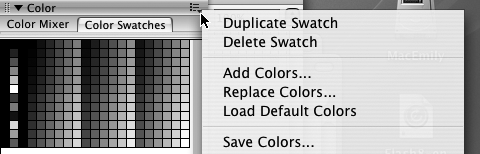
In the upper-right corner of every expanded panel, you see a menu icon. When you click this icon, an options menu appears. The options menu is different for each panel. Here, for example, you see commands that let you edit how the Colors panel displays color choices. But a handful of options are common to all panels:
Group panel with. Displays a panel as a tab in another panel, which is a great way to save space on a crowded screen. Just like a tabbed Web browser, you can keep related panels neatly stacked together.
Close panel. Closes the panel (or tab) you’re working with.
Rename panel group. Lets you rename the panel (not the tab) you’re working with; for example, to a shorter name. (Flash doesn’t let you open the panel by its new name in the Window menu, though.)
Maximize panel group. If the panel you’re working with is docked, Flash redisplays the panel along the full length of your screen. Turning off the checkbox next to Maximize panel group minimizes the panel.
Close panel group. Closes the panel (not the tab) you’re working with.
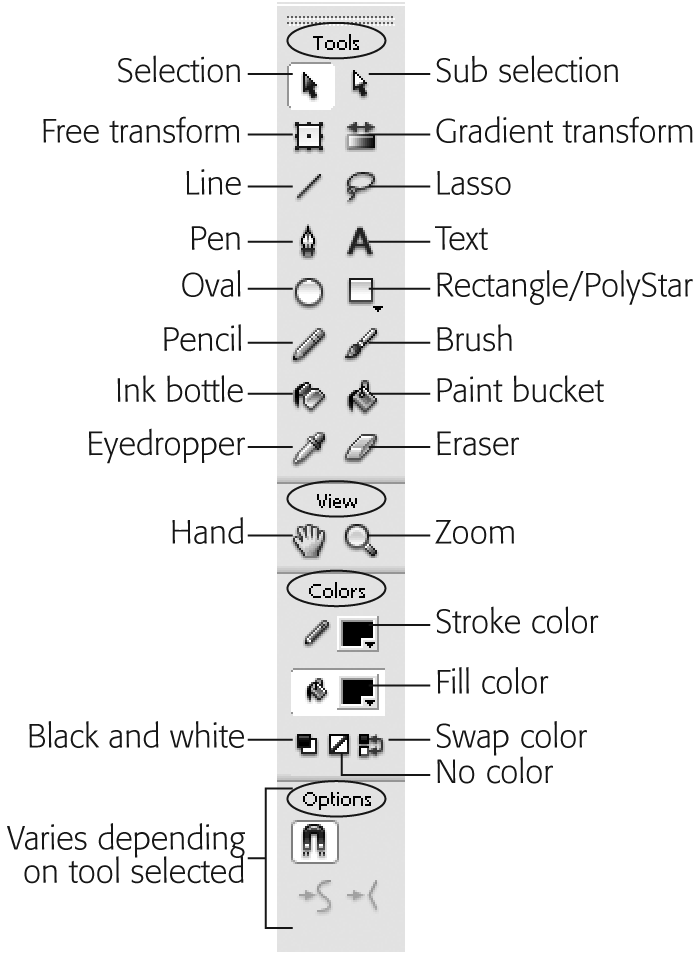
Tools section
The Tools section displays the tools you need to create and modify a Flash drawing. For example, you might use the Pen tool to start a sketch, the Eyedropper to apply color, and the Eraser to clean up mistakes.
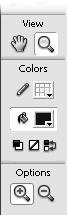
View section
At times, you’ll find yourself drawing a picture so enormous you can’t see it all on the Stage at one time. Or perhaps you’ll find yourself drawing something you want to take a super-close look at so that you can modify it pixel by pixel. When either of these situations occurs, you can use the tools Flash displays in the View section of the Tools panel to zoom in, zoom out, and pan around the Stage. (You’ll get to try your hand at using these tools later in this chapter; see Section 1.7.2.)
Colors section
When you’re creating in Flash, you’re drawing one of two things, a stroke, which is a plain line or outline, or a fill, which is the area within an outline. Before you click one of the drawing icons to begin drawing (or afterwards, to change existing colors, as discussed in Chapter 2) you can use these tools to choose a color from the color palette, and Flash applies that color to the Stage as you draw.
Options section
Which icons appear in the Options section at any given time depends on which tool you’ve selected. For example, when you select the Zoom tool from the View section of the Tools panel, the Options section displays an Enlarge icon and a Reduce icon that you can use to change the way the Zoom tool works (Figure 1-8).
Accessibility Panel
Not everyone is blessed with perfect eyesight and hearing. To make sure vision-and hearing-impaired folks can enjoy the animations you create using Flash, you need to think about accessibility: the special techniques you can use to deliver your message via alternate means.
The Accessibility panel provides tools to help you in creating a design that provides at least some information to those whose vision or hearing is impaired. For example, using the Accessibility panel, you can give names and descriptions to certain sections of your drawings—descriptions that can be translated into speech by an assistive screen reader device, for example. Then, when a blind person surfing the Web views your animation of a car crunching into a thick brick wall, the assistive reader can speak the words, “the car crashes into a brick wall.”
Note
Obviously, it’s hard to translate any primarily visual medium like Flash into one that’s spoken rather than seen. It’s worth the effort it takes to try, though, because doing so gives impaired folks a chance to understand what you’re trying to present.
To display the Accessibility panel, select Window → Other Panels → Accessibility (or press Alt+F2).
Actions Panel/ActionScript Debugger Panel
ActionScript is a serious developer-level scripting language that lets you add interactivity to your animations by tying a graphic element (say, a button) to a specific action (say, opening up a specific Web page). In fact, that’s how ActionScript got its name: it lets you tie an action to an object or element you designate. You use the Actions panel (see the next section) to build the ActionScript code that turns regular animations into interactive animations like clickable splash pages, navigation bars, and type-in forms.
The Actions panel lets you mix and match snippets of ActionScript code to build what’s called an ActionScript script, which you can then attach to one of the objects in your drawing (or one of the frames in your animation) to make your animation “smart.” After you create a script, the ActionScript debugger panel lets you to troubleshoot any scripting code that’s giving you trouble. You’ll learn how to write and debug ActionScripts of your own in Part 3.
Align Panel
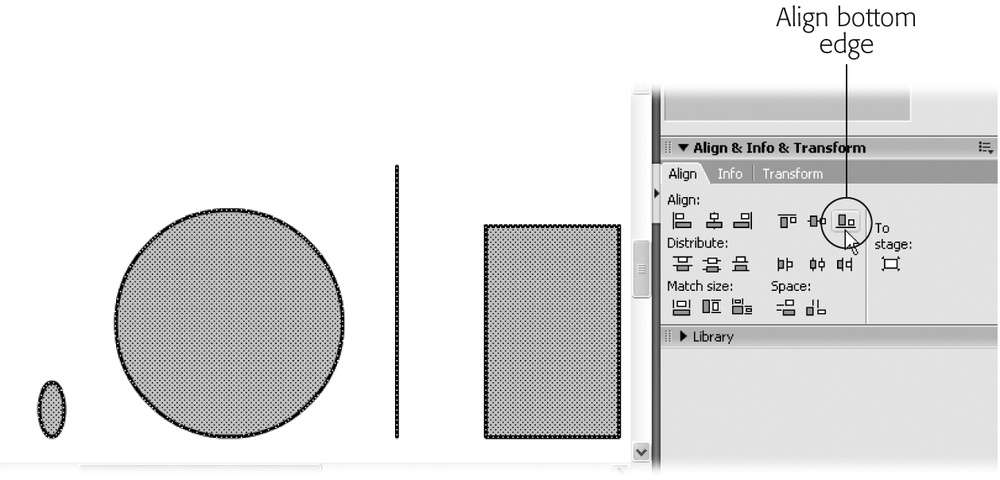
Sometimes dragging stuff around the stage and eyeballing it works just fine; other times, you want to position your graphic elements with pinpoint precision. Using the Align panel, you can align graphic elements based on their edges (top, bottom, right, left) or by their centers. And you can base this alignment on the objects themselves (for example, you can line up the tops of all your objects) or on the Stage (useful if you want to position, say, the bottoms of all your objects at the bottom of the Stage, as shown in Figure 1-9). You can even distribute objects evenly with respect to each other.
To display the Align panel, select Window → Align or press Ctrl+K (Windows) or ⌘-K (Mac).
Tip
More help for aligning stuff on the Stage comes from Flash’s grids, guides, and rulers, which you learn about in Chapter 2 (Section 2.1).
Behaviors Panel
Flash comes with several common, pre-ActionScripted snippets of code called behaviors that you can add to your animations. You’ll find a behavior for most of the really basic things you want to do with ActionScript, such as triggering a sound file or jumping to a specific section of an animation.
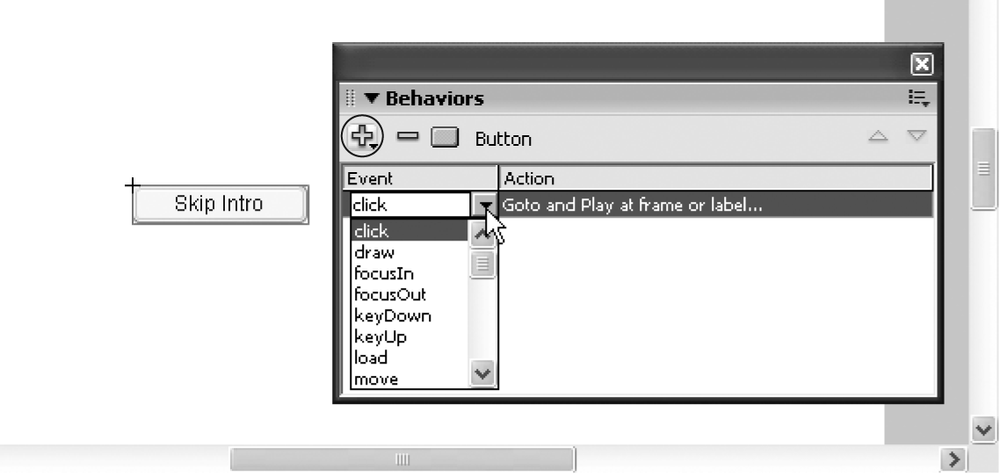
All you have to do to use a behavior is display the Behaviors Panel (Window → Behavior) shown in Figure 1-10 and then click the Add Behavior icon to display a list of available behaviors. When you do, Flash pops up a helpful window (or two) to step you through the process of customizing the behavior.
For example, if you want to trigger a sound file, you need to add the Play Sound behavior, tie it to an event—such as a button clicking or a frame appearing—and then customize your newly added behavior by telling Flash which sound file you want it to play when the event occurs.
Color Mixer Panel/Color Swatches Panel
A good painter can create custom colors by mixing and matching a bunch of other colors. In Flash, you can do that, too, through the Color Mixer panel. And, if you like, you can save your custom color as a reusable color swatch in the Color Swatches tab. That way, when you get the urge to draw another puce-colored hedgehog, you’ll be all set.
Note
Color in Flash is a huge topic. To explore it further (including how you can specify hue, saturation, and luminescence for a custom color) check out Chapter 5.
Common Libraries
The three Common Libraries panels—Buttons, Classes, and Learning Interactions—display prebuilt clips (in other words, self-contained, preconstructed Flash documents) that you can add to your animations simply by dragging them to the Stage:
Buttons. Here you’ll find a wealth of cool-looking customizable push buttons, each as different from a dull gray HTML button as you can get.
Classes. Useful only to heavy-duty ActionScript programmers, these compiled clips—DataBindingClasses, UtilsClasses, and WebServiceClasses—let you transfer information between your animation and server-side programs at runtime.
Note
To access the compiled classes that appear in the Common Libraries, you need to drag them from the Common Library to your document’s Library; then you need to add specific ActionScript calls to your animation. Part 3 of this book introduces you to ActionScript and shows you how to add an action to your animation. You can find out more about the compiled classes Flash offers by choosing Help → Flash Help and searching All Books for the specific class you’re interested in.
Learning Interactions. In this panel, you find customizable components designed specifically for folks creating Flash tutorials, including fill-in-the-blank, multiple choice, and true/false.
Components Panel/Component Inspector Panel
A Flash component is a reusable, self-contained, customizable, interactive graphic that you can add to your animation. Technically, you (or anyone else, for that matter) can create your own components using a combination of Flash, ActionScript, and Macromedia’s special component language. But right out of the box, the only components that appear on the Components panel are standard user interface components (buttons, lists, text fields, and so on), animation controller components (MediaController, PlayButton, PauseButton, that kind of thing), and the handful of other assorted components that ship with Flash. To view and change the component’s settings, all you have to do is click the component to select it and then display the Component Inspector panel by selecting Window → Component Inspector (or pressing Alt+F7).
History Panel
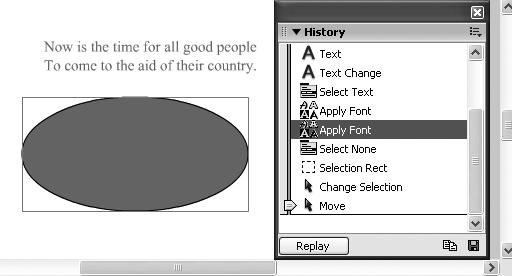
Flash keeps track of every little thing you do to a file, starting with the last time you opened (or created) it: every shape you draw, every file you import, every color you change. This behind-the-scenes tracking—which you can view using the History panel shown in Figure 1-11—comes in handy when you want to revert to an earlier version of an animation. For example, one in which the cartoon rabbits you drew actually look like rabbits instead of overfed mice. To display the History panel, click Window → Other Panels → History (or press Ctrl+F10).
Note
Unless you tell it otherwise, Flash keeps track of the last 100 changes you made to a document starting with the last time you opened the document (or, if you’ve never saved the document, the last 100 changes since you created it). To increase this number, select Edit → Preferences. In the Preferences window that appears, select the General category. Then, in the Undo field, Specify Document-level Undo and type in the number of levels (changes) you want Flash to track. You can specify any number you like from 2 to 9,999.
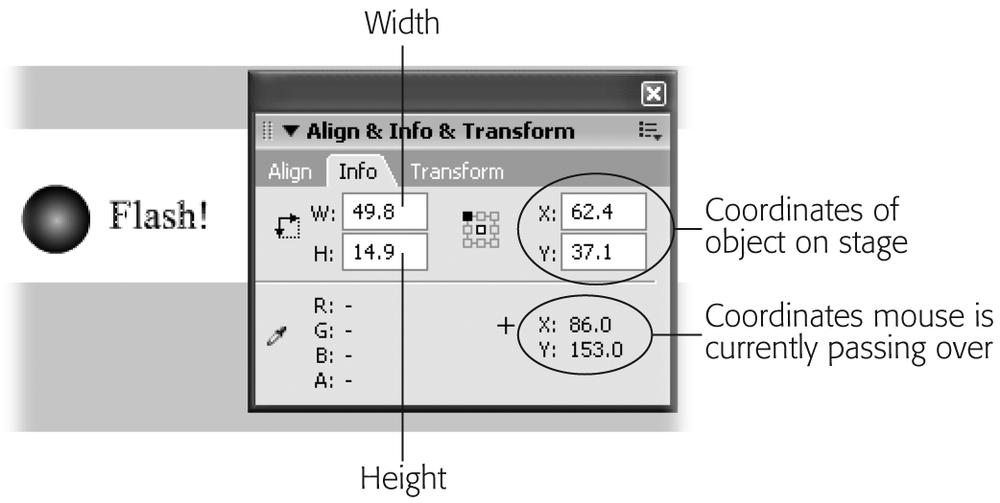
Info Panel
The more complicated your Flash creations become, the more likely it is that at some point you’ll want to know specific details about the objects on your Stage: details like the RGB values of one of the colors you used, the size of one of the objects in pixels, the XY coordinates of an object, and so on. This level of detail can be useful if you want to recreate a particular effect or if you want to rearrange objects on the Stage down to the last little pixel.
To display the Info panel, first head to the Stage and click an object to select it; then choose Window → Info or press Ctrl+I (Windows) or ⌘-I (Mac). As shown in Figure 1-12, the Info panel only displays information about the object you currently have selected.
Library Panel
The Library panel (Figure 1-13) is similar to the Common Libraries panel described on Section 1.4.7: both display reusable components you can add to your Flash animations. The difference between the two is that while the Common Libraries panel displays components you can add to any Flash file, the Library panel displays objects you can add only to the file you currently have open. To show the Library panel, click Window → Library or press Ctrl+L (Windows) or ⌘-L (Mac).
Another difference between the Library panel and the Common Libraries panel is that the Library panel doesn’t come preloaded with helpful buttons and such. You have to add your own reusable objects to the Library panel (which you see how to do in Chapter 7).
Let’s say, for example, that you create a picture-perfect bubble, or sun, or snowflake in one frame of your animation. (You learn more about frames on Section 1.4.16.) Now, if you want that bubble, sun, or snowflake to appear in 15 additional frames, you could draw it again and again, but it really makes more sense to store a copy in the current project library and just drag it to where it’s needed on those other 15 frames. Saves time and ensures consistency, too.

Movie Explorer Panel
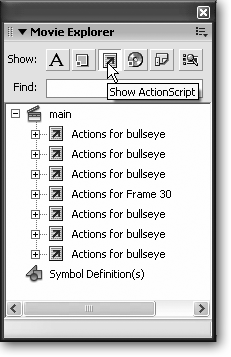
After you finish creating a Flash animation (which you see how to do in Chapter 3), you can find and edit specific animation details quickly and easily by using the Movie Explorer panel, shown in Figure 1-14. To display the Movie Explorer panel, select Window → Movie Explorer (or press Alt+F3).
Note
The Movie Explorer panel only shows you one scene at a time regardless of how many scenes your animation contains. If you want to work with multiple scenes, use the Scene panel described on Section 1.4.16 in conjunction with the Movie Explorer panel.
If you’re familiar with the Explorer tool in Windows, you may recognize the Movie Explorer Panel. Much as the Windows Explorer shows you a collapsible outline of all the folders and files on your computer, the Movie Explorer panel shows you all the components of your animation, organized by scene: the video clips, the sound files, the text, the images, and so on. (For more about scenes, check out the box on Section 1.4.15.)
In addition to seeing an at-a-glance outline of your entire animation, you can use the Movie Explorer panel’s Show icons to tell Flash which specific elements of your movie you want to view (just the buttons, say, or only the images, frames, and layers). Or you can use the Find box to view specific elements (for example, you can hunt for an ActionScript script named openNewBrowserWindow).
Output Panel
When Flash has something to tell you about your animation, it uses the Output panel. To view the Output panel, select Window → Output or press F2. For example, when you export your Flash animation (Chapter 14) or when you add buggy ActionScript code to your animation, Flash displays any problems it encounters in the Output panel.
Tip
To tell Flash to include a file size report in the Output panel every time you publish your animation, select File → Publish Settings. Then, in the Publish Settings window that appears, click the Flash tab; finally, turn on the checkbox next to Generate Size Report. The next time you export your animation, Flash adds a file size report to the comments its displays in the Output panel. (You want to keep on top of file size if you plan to include your Flash animation in a Web page, because the larger the file size, the more likely folks will have problems viewing it over the Web.)
Properties Panel/Filters Panel/Parameters Panel
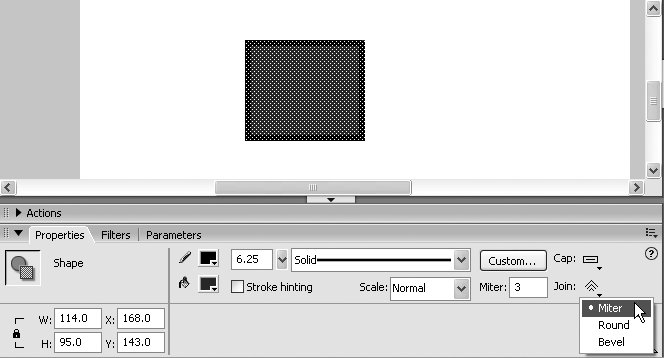
The Properties panel (also known as the Property Inspector) appears automatically beneath the Stage when you open a new document. If you don’t see the Properties panel, you can display it by selecting Window → Properties → Properties or by typing Ctrl+F3.
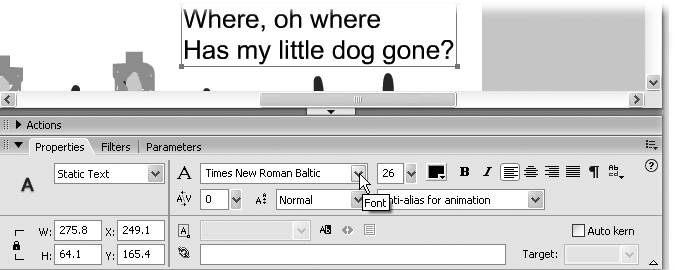
As you can see in Figure 1-15, the Property Inspector displays specific information about whatever object you currently have selected on the Stage. These details can be helpful if, for example, you’re planning to incorporate your finished work into a Web page and need to know the dimensions of a particular drawing. In addition to just viewing the properties of a selected object, you can also edit those properties using the Property Inspector, as you’ll learn in the “Test Drive” section of this chapter.
You’ll notice two additional panel tabs in Figure 1-15: Filters and Parameters. The Filters panel tab lets you add special effect filters to text, movie clips, and buttons (Chapter 7); the Parameters panel tab lets you customize component parameters (Chapter 12).
Scene Panel
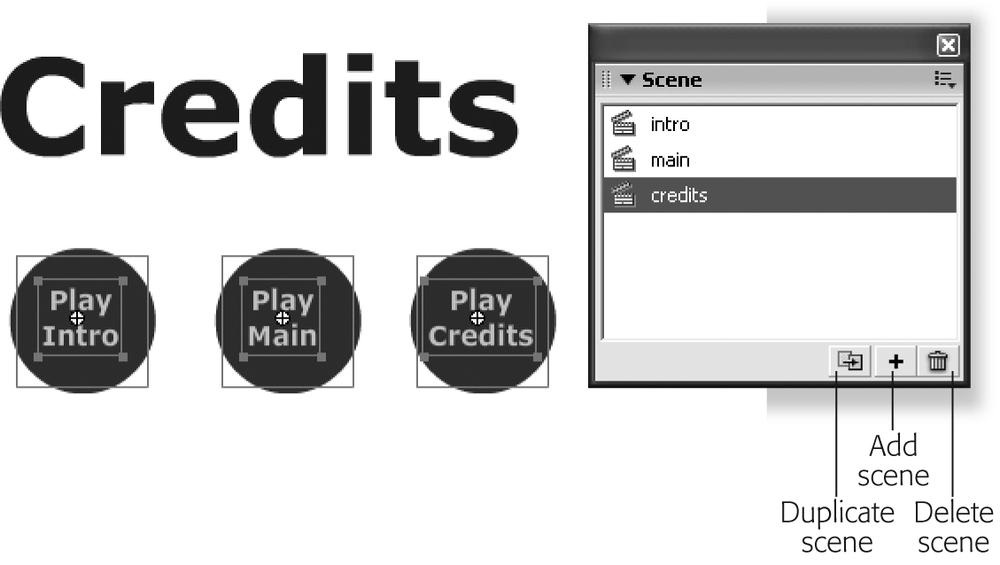
You can create an animation in Flash that comprises just one scene, but you can choose to break your animations up into multiple scenes, too, if you like. (See the box on Section 1.4.15 for the skinny on scenes and why you might want to organize your animation into multiple scenes.)
To add a scene to your animation (or to rename or delete an existing scene), you use the Scene panel, which you display by choosing Window → Other Panels → Scene. Figure 1-16 shows you what the Scene panel looks like.
Transform Panel
Transform is a $64 word meaning “to mess with.” When you have an existing object that you want to mess with selected on your Stage—to scale horizontally or vertically, to rotate, to compress, to distort (pull out of shape like a wad of taffy), or to skew (slant horizontally or vertically)—you want, in animation terms, to transform that object. You can learn how to do all these transformations in Chapter 5 (Section 5.1).
The Timeline
For a complex piece of software, Flash is based on a surprisingly simple principle— the old-fashioned slideshow. In case you’re too young to remember, a slideshow consisted of a stack of slides loaded into a tray, a projector that displayed one slide at a time, and a human to run the show, determining the order in which the slides appear and how long each stays on screen. Well, a Flash animation is really nothing more than a souped-up slideshow. In Flash, the picture-containing slides are called frames, and instead of a person controlling the slide projector, you’ve got the Timeline.
The Timeline (see Figure 1-17) is what determines what order your frames appear in and how long each frame stays onstage. If you’ve decided to organize the images on your frames into separate layers (described in Chapter 3), the Timeline is also where you specify how you want your layers stacked: which layer you want on top, which one beneath that, and so on.
In addition to letting you put together a basic, plain-vanilla, frames-run-left-to-right, layers-run-bottom-to-top animation, the Timeline also lets you create spiffy effects, such as looping a section of your animation over and over again and creating tasteful fades.
Tip
The first time you run Flash, the Timeline appears automatically. But if you don’t see it, you can display it by selecting Window → Timeline or pressing Ctrl+Alt+T.
In the rest of this chapter, you get to take Flash out for a test drive. You’ll learn how to open, play, and save Flash animations; see the Timeline in action; and try your hand at two of the program’s most important panels of all—the Tools panel and the Property Inspector.
The Flash 8 Test Drive
For the tutorials in this section, you need a Flash animation to practice on. There’s one ready and waiting for you on the “Missing CD” page of the Missing Manuals Web site.
Tip
Much of the time, you’ll be working with files that already exist—either because you’ve created them yourself or because you want to incorporate into your Flash animation picture, sound, or movie files you’ve found on the Web. To avoid the agony of downloading a file and not being able to find it later, create a folder called, say, Downloads in the My Documents (Windows) or Home → Documents (Mac) folder and keep them there. You can even set your Web browser’s Preferences to stash all downloads in that folder automatically.
Opening a Flash File
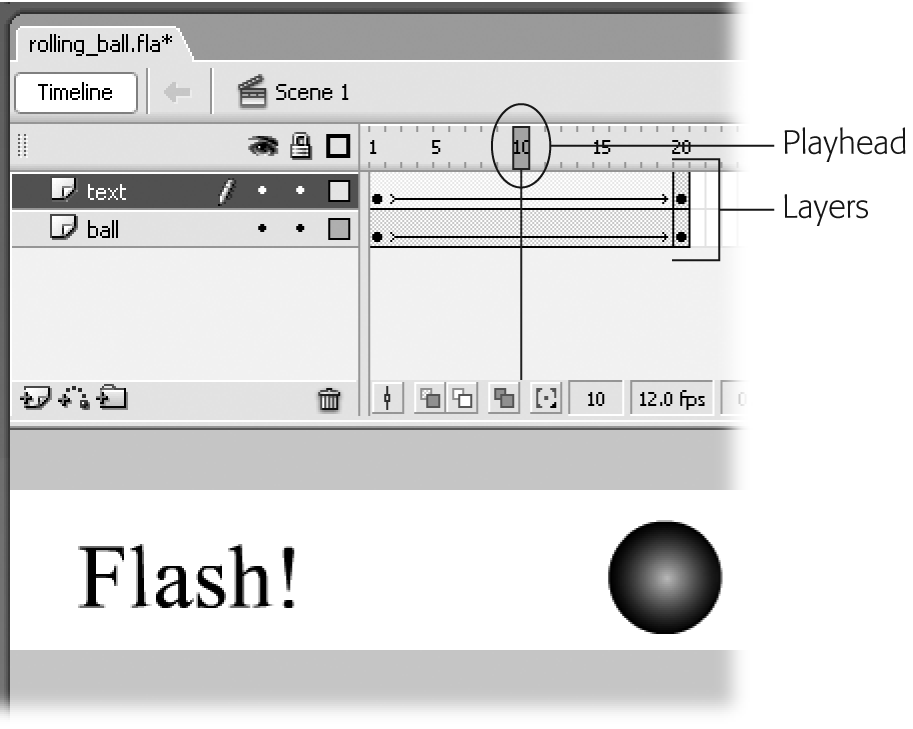
Download the file rolling_ball.fla and save it on your computer. Then launch Flash (Section 1.1), and choose File → Open (the Start page goes away automatically). When the Open dialog box appears, navigate to the file you just downloaded and then click Open. Flash shows you the animation on the Stage, surrounded by the usual Timeline, toolbars, panels, and (at the bottom) the Property Inspector. It should look like Figure 1-18.
Tip
If you don’t see the Property Inspector, you can display it by selecting Window → Properties → Properties or by typing Ctrl+F3.
Exploring the Property Inspector
The Property Inspector appears automatically beneath the Stage when you open a new document. As shown in Figure 1-18, it displays specific information about whatever object you’ve selected on the Stage. Such details can be helpful when you want to recreate an object precisely in another program, or incorporate your finished animation into a Web page you’ve already created. For example, the Size button shows your animation’s dimensions (550 x 200 pixels, say) which is information you need if you want to place your animation in a Web page by hand. (In Chapter 14, you’ll learn how to tell Flash to create a simple Web page that includes your animation so you don’t have to do this work by hand.)
To see how it works, click the letter “F” in the rolling _ball.fla example animation. On the Property Inspector, you’ll see the following:
Height and width. The pixel dimensions of this “F” are 10.4 wide x 13.0 high.
Color. The color of this letter is black.
By typing in new values or changing a setting, you can edit the selected object. To see the Property Inspector in action, you’ll use it to resize the Stage itself, described next.
Resizing the Stage
In addition to just inspecting the properties of a selected object, you can also edit those properties using the Property Inspector. In Flash, the size of your Stage is the actual finished size of your animation, so setting its exact dimensions is one of the first things you do when you create an animation, as you’ll see in the next chapter. But you can resize the Stage at any time.
Here’s how to change the size of your Stage:
Click the Selection tool and then click on a blank area of the Stage (to make sure nothing on the Stage is selected).
Alternatively, you can click the Selection tool and then chose Edit → Deselect All.
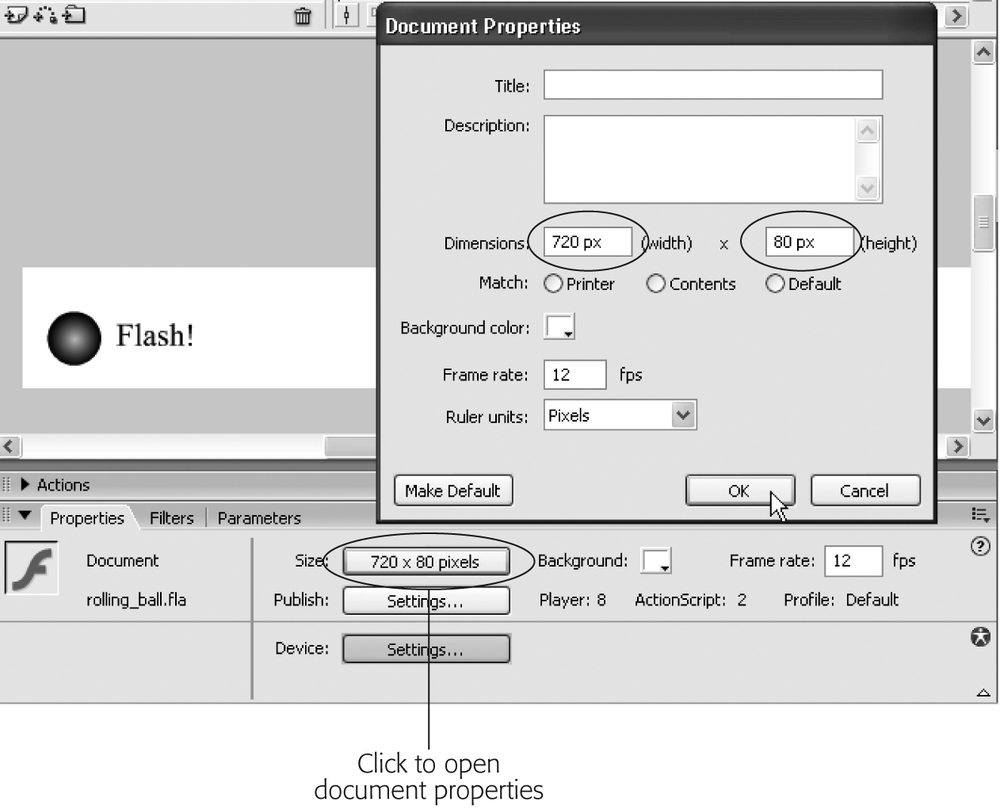
In the Property Inspector, click the Size button.
The Document Properties window appears. Around the middle of the window are boxes labeled Dimensions. That’s where you’re going to work your magic.
Click in the width box (which currently reads 800 px) and type 720 px. Click in the height box and change it from 600 px to 80 px. Click OK when you’re done.
Flash accepts the new dimensions and resizes your Stage, as shown in Figure 1-19.
Zooming In and Out
Sometime in your Flash career, you’ll draw a picture so enormous you can’t see it all on the Stage at one time. The scroll bars let you move around a big Stage, but they can’t help you get a full overview. Next, you’ll learn how to use the Zoom tools to pull back your view and see the entire animation at once. You can find these tools in the View section of the Tools panel. They let you zoom in, zoom out, and pan around the stage. You can even get in so close, you can modify your drawing pixel by pixel.
Here’s how the Zoom tools work:
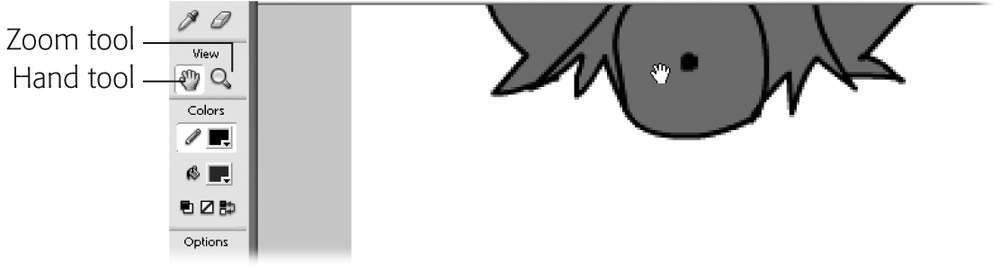
Click the Zoom tool (the little magnifying glass) in the View section of the Tools panel.
The tools panel usually sits at the left side of your screen (but you’re free to move it, as described on Section 1.4.1). As you can see in Figure 1-20, when you click the Zoom tool, the Options section at the bottom of the panel changes to show only zoom-related buttons.
Move your cursor, which now looks like a magnifying glass with a plus sign on it, to the area on the Stage that you want to zoom in on and then click.
Flash enlarges the Stage and everything on it. The area where you clicked stays in full view.
Click the Hand tool.
Your cursor turns into a little hand.
Click anywhere on the Stage and drag your cursor around.
Flash moves the Stage beneath your cursor so you can get a better look at whatever section of your bigger-than-life drawing you’re most interested in.
Playing an Animation
Now that you’ve seen how to work on an animation while it’s standing still, it’s time for some action. After all, an animation by definition must move. Using the Controller toolbar, which you display by choosing Window → Toolbars → Controller (see the box on Section 1.7.5), you can play, pause, and rewind, much like a videotape or DVD. When you click Play on the Controller, your animation plays once through from beginning to end.
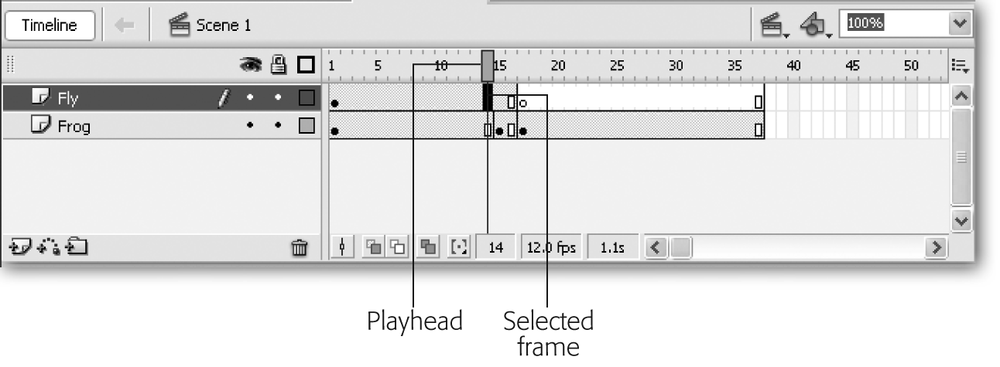
For finer control, you can use the Timeline’s playhead to click through your animation frame by frame, like the slideshow of yore. Playhead is nothing more than a fancy term for currently selected frame. Click a frame, and Flash displays the red playhead rectangle to show that you’ve successfully selected that frame (see Figure 1-21). If you select Control → Play to run your animation, your animation plays on the Stage, beginning with the selected frame.
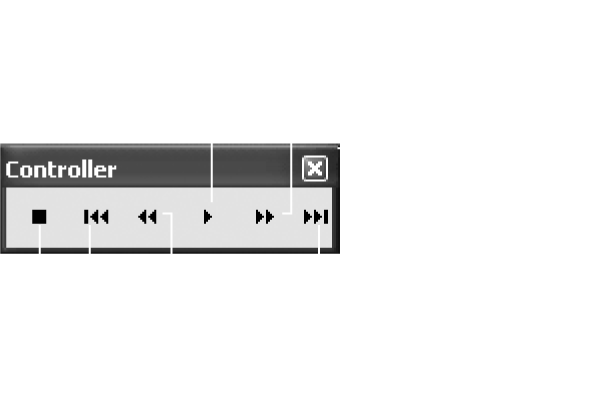
If you’ve ever used a video deck or a tape player, the six icons on the Controller toolbar look comfortingly familiar. In Flash, here’s what each one does, from left to right as they appear onscreen:
Stop. Clicking this square icon stops playback.
Go to first frame. Clicking this icon rewinds your animation. That is, it moves the playhead back to Frame 1.
Step back one frame. Clicking this double-left-arrow icon moves the playhead back one frame. If the playhead is already at Frame 1, this button has no effect.
Play. Clicking this right-arrow runs your animation on the Stage. Playback begins at the current position of the playhead. In other words, playback begins with the frame you selected in the Timeline and runs either until the end of your animation or until you press the Stop button.
Step forward one frame. Clicking this double-right-arrow icon moves the playhead forward one frame (unless the playhead is already at the last frame).
Go to last frame. Clicking this icon fast-forwards your animation to the very end. That is, it sets the playhead to the last frame in your animation.
You can also access these six functions by choosing them from the Control menu in the menu bar.
Keep in mind that certain elements Flash shows you when you’re testing on the Stage—for example, motion guide layers, which you learn about in Chapter 3—don’t appear in your finished animation. So while using the Controller panel is a great way to work the kinks out of your animation, it’s no substitute for choosing Control → Test Movie, which exports (compiles) your Flash document and shows you exactly what your audience will see.
Saving a File
Saving your work frequently in Flash is a good idea. You might think you’ll remember how to recreate a particularly great drawing or animated sequence if the unthinkable happens and your computer crashes, but why take the chance? You’ve got better things to do with your time.
The minute you finish a sizable chunk of work, save your Flash file by following these steps:
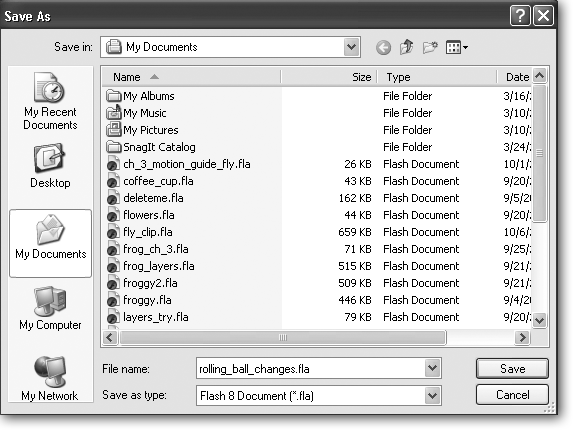
Select File → Save As.
The Save As window appears (Figure 1-22). Choosing Save As (instead of Save) lets you create a new version of the file rather than overwriting the old one. Saving a new version of a file is always a good idea when you’re experimenting, since some experiments invariably end up not working and you want to drop back to the previous working version of your file.
From the Save In pop-up menu, choose the file folder where you want Flash to save your file.
If you like, you can skip this step. If you do—and you’re running Windows— Flash assumes you want it to save your file in the My Documents folder. If you’re running Mac, Flash assumes you want it to save your file in the Home → Documents folder.
In the File Name box, type a unique name for this file.
A short, descriptive name that helps you easily identify the file later like rolling_ ball_changes) is your best choice. Make sure you either include the standard Flash file extension (.fla) or don’t type any extension at all, as shown in Figure 1-22.
Click Save.
Flash saves your file using the location and file name you specified.
Get Flash 8: The Missing Manual now with the O’Reilly learning platform.
O’Reilly members experience books, live events, courses curated by job role, and more from O’Reilly and nearly 200 top publishers.

