Itâs time to get interactive! Flash can be a rewarding design and animation tool, but you wonât be using the application to its fullest potential unless you include elements of interactivity. In Chapter 3, you wrote your first script, to prevent your animation from looping by default. In this chapter, youâll give your audience some control through the use of buttons and ActionScript.
The easiest way to add interactivity to Flash is to use a button to run ActionScript. The projects featured in this chapter will all focus on button use. One project, for example, will be to modify the animation you created in Chapter 3, adding one button to replay the animation and another to open a web page.
You may be thinking, âBig deal, I can do those things with HTML.â True, but Flash buttons can be more powerful, and sometimes even easier to create, than their HTML counterparts. With Flash, itâs easier for buttons to contain animations and sound, to be activated or dimmed dynamically, and to be repositioned automatically when, say, the browser window is resized.
Of course, buttons are just the beginning. ActionScript is a powerful scripting language, and it can be implemented in a variety of ways. Fortunately, the Flash development community is one of the most generous collectives on the Web, and there are many resources available to help you learn more about ActionScript when you are ready. Appendix A contains a very brief list of such resources to get you started, but half the fun is exploring.
In earlier chapters, you learned about graphic symbols and movie clip symbols. Next, youâll see how to create the third type of symbol, a button. Buttons are similar in many respects to other symbols, but there are two important differences.
The main difference is that, by default, a button doesnât have a full timeline, like a graphic or a movie clip. Instead, it has four distinct frames in which you can place the various button âstatesâ (the default appearance of the button, as well as the way it looks when the mouse is hovered over and clicked down on the button).
The second difference is that a button will automatically update its appearance upon user interaction. That is, the button will automatically change its state, and switch the system cursor between the default selection arrow and a âpointing finger,â to respond to corresponding mouse movements. Although the button must still be programmed with ActionScript to affect your movie, the button state and cursor feedback are handled for you.
Multiple button states are not required, and sometimes you just need a quick âhot spot.â Soon, youâll see how to create more complex buttons (and even an invisible button), but your first project is to start with a basic button symbol.
To create a button with the word Button on it:
Create a new Flash document to experiment with and save the file as simple_button.fla in the 04 folder.
Draw a rectangle (choose any color you like) and resize it to 100 x 50.
Use the Text tool to create the word Button. Center-justify the text using the Properties panel, and center the text object itself within the rectangle. (Hint: Try using the Align panel.)
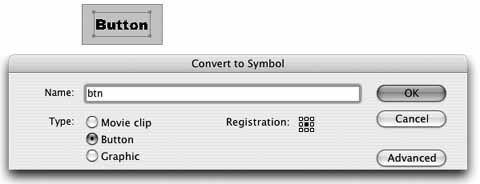
Click and drag to select everything on the Stage, and then press F8 to convert the image to a symbol.
In the Convert to Symbol dialog box, name the symbol
btnand choose Button as the Behavior type, as shown in Figure 4-1. Click OK to close the dialog box.Test the movie.
The Preview window opens, and when you move your cursor over the instance of the btn symbol, the cursor displays as a hand, just as it does when you roll over a link on a web page. Why didnât the buttonâs appearance change? Youâve created a default, or âUp,â button state, but you havenât yet created new artwork to display when the mouse rolls over and clicks on the button. Youâll do that next.
When you look inside a button symbol, the timeline appears unique because of the aforementioned four predefined frames. The first three are button states. The Up state represents the buttonâs appearance when the mouse cursor is not over the button, the Over state is displayed when the mouse is rolled over the button, and the Down state displays when the user clicks on the button. Youâll take a look at the fourth state, the Hit state, in a moment.
For the next project, make your button more complex by creating the Over and Down states for your button symbol:
In your existing simple_button.fla file, double-click the btn symbol to edit it in place.
Add a new empty layer and call it
text. Name the previous layerart.Be careful to select only the Button text in the original art layer, and cut it to your clipboard. Then select the new text layer, and use the Edit â Paste in Place menu command (Ctrl/Cmd-Shift-V). This will paste any clipboard object into the same place on the Stage that it occupied when it was placed on the clipboard (it works for multiple objects as well). The result will be that Button now resides in the new layer.
Warning
The Paste in Place command is relative to the timeline you are editing, and locations and sizes can affect the registration point of each timeline. So, if you cut or copy from inside one symbol and then paste in place outside that symbol (for example, in the root scene or inside another symbol), you may not get the same results.
Select the Over and Down frames in the art layer, and press F6 to add keyframes. The rectangle in your button is re-created in these frames.
Select the same frames in the text layer, but this time press F5 to add frames, not keyframes.
Click on the Over frame in the art layer. This will let you work only on this state.
In order to visually distinguish the buttonâs Over state from its Up state, while in the Over frame, change the fill color for the rectangle in the Properties panel.
Repeat this process for the Down state, choosing another unique color.
Save and test the movie. It should resemble simple_button_02.fla, and your timeline should look like Figure 4-2.

When you roll over it, the button displays its Over state, which in this case changes the buttonâs color. When you click the button, it displays its Down state, which causes it to change colors again.
Youâve now seen Flashâs ability to automatically switch between the three primary button states and update the cursor, but what does the fourth state do? The Hit state allows you to customize the areas of the button that will respond to the cursor. By default, the button will react to the Up state. However, if the Hit frame is populated, any content in this frame, and only content in this frame, will trigger the mouse and allow the button to work. This makes it very easy to make buttons of irregular shapes, and since the Hit state content is invisible to the user, it means you can really get creative.
For example, think of a button that you might find in a Flash file about The Simpsonsâa button that looks like a donut, say. You certainly want the button to function when you click on the creamy pink frosting with sprinkles on top, but you may not want the button to work when the mouse is over the inner hole of the donut. To see an example of this setup, open the donut_button.fla file in the 04 folder of your working directory.
Just as you can customize the Hit state to exclude a particular area, you can add content to a Hit state to make the button react to more than just what is visible. For instance, if you want to create a slide show, you can place previous/next buttons in the bottom center of the Stage, but also add a thin vertical ribbon, the height of the Stage, on the extreme left and right sides of the viewable area. This way, both the button art and the invisible areas at the sides will trigger the buttons. An example, slide_show_buttons.fla, is also included in the 04 folder.
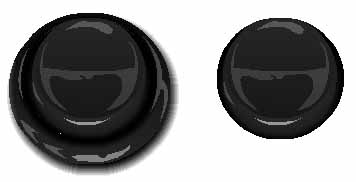
To experiment with modifying a Hit state yourself, consider an old arcadestyle button. This traditional push button has a plastic bevel surrounding the button itself. Itâs easy to understand that the button should work as advertised, but should the bevel also be active?
Test the movie to try both buttons. The button on the left represents the default scenario, with a Hit state derived directly from the Up state. Look at the button in action and get a feel for the interactive areas.
Next, try the button on the right and see how it differs. When youâre through, close the test movie and go back to the Stage.
To improve the first button, double-click the button to edit it in place. In the mini-timeline, click in the Hit frame in the bevel layer, and delete its contents. Youâve removed the bevel, but not the button. Now only the button itself will respond to the mouse, which is the correct behavior. Figure 4-3 shows the visible button on the left, and the Hit state on the right.
Test your movie to try it out. Once youâre satisfied, close the SWF and FLA files. Youâre finished with this segment.
Warning
Keep an eye on this issue when creating buttons made from text. Remember that only non-transparent pixels will respond to the mouse. Therefore, if you create a Hit state from the word âFOO,â the button will respond when the mouse is over the solid areas of the letters, but not when itâs between the letters or inside the âOâ characters. To improve on this, simply draw a rectangle in addition to the word. The Hit state is invisible, so it doesnât matter what it looks like.
Now that you know how to make a button, you have to learn what to do with it. Remember, Flash will take care of the visual feedback, including cursor and state switching, but the button wonât otherwise be functional. Donât worry, though. You can start scripting with a little assist.
If you prefer to write your own HTML rather than using a GUI editor, you may want to skip this section and move on to âHand-Coding.â However, sometimes assisted scripting can help even veterans remember a bit of seldom-used syntax, or the specific parts required to complete a line of code. For this reason, giving this section a quick look wonât hurt.
If youâre not yet comfortable with writing code, Flash 8âs Script Assist can help you find your way. Itâs a guided method of shaping your script into its final form. While it would not be possible to create an unknown variety and complexity of code with a wizard-like linear interface, Script Assist is the next best thing.
You start by browsing a nested menu of available ActionScript entries and double-clicking on something you would like to add to your script. Flash does its best to determine where to add the code and to start the script with the appropriate syntax. It then presents a series of user interface (UI) elements, such as text boxes, menus, and radio buttons, to help you finish the code. All you have to do is fill in the appropriate values, and a script is born.
Now modify Chapter 3âs project by scripting a button that will open a web page:
Open the file animation_buttons.fla in the 04 folder. This is the animation you completed in the last chapter, but a new layer called buttons has been added. In the last frame of this layer, two new buttons exist in a keyframe. The arrow button will eventually play the animation again, and youâll code the globe now to launch the web site. These buttons have been created for you to allow you to focus on the scripting in this chapter, but if you want to practice creating your own buttons, thatâs a good idea, too.
Select the globe button and open the Actions panel using the Window â Actions menu command.
Note
In this project, you will add a script directly to the button. This is not the optimal way of creating a button script, but it is the most direct way to demonstrate some of the purposes of, and differences between, script types. Youâll learn about the preferred way of scripting buttons later in this chapter.
In the Actions panel, make sure that the button is selected and that the title bar says âActionsâButton.â (Itâs easy to put a script in the wrong place if the wrong thing is initially selected.) In this exercise, you want to create a button script rather than a frame script.
If youâve been following along, or the default setup is still intact, your Actions panel should look the same as it did in Chapter 3: a vertical menu area on the left, and a text editor on the right (see Figure 3-15). This is the configuration used by most Flash coders with some scripting experience. It allows you to type in the script as you might in any text editor, but with additional features such as syntax coloring, code hinting, and similar benefits. This is the setup you used to enter the stop() action to prevent your last animation from looping.
Youâll return to the hand-coding method after this demonstration, but for now you should see Script Assist at work. If the left side is not visible, drag the vertical bar on the left edge of the window to the right, exposing the menu. If the right half of the window has a shorter text area beneath a reserved area, youâre probably already in Script Assist mode. In any case, enabling the Script Assist button in the right portion of your Actions panel should make it match Figure 4-4.
Before you populate your script, remember that you want to go to a URL for the book content, and that you are using a button to get there. In the lefthand menu, scroll to the top, open the Global Functions category with a single click, and then open the Browser/Network subcategory with another single click.
In this latter category, you will find a small collection of related actions. (Can you guess which action you want to work with? Whenever possible, Flash uses intuitively named actions.) Double-click on the getURL action.
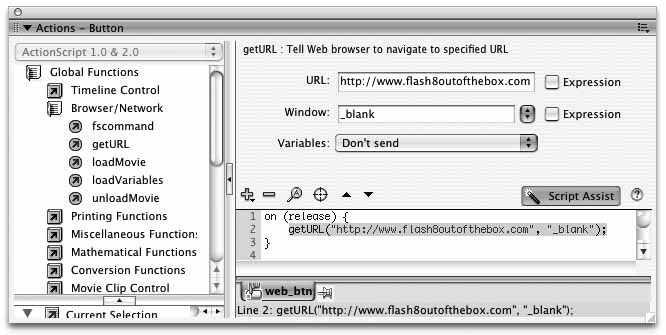
You should see that Flash has written much of your script for you. In addition to adding the getURL() command, it has also added two lines of code, beginning with on (release), to contain the command. This is called an event handler, because it âhandlesâ eventsâthat is, it reacts to events caused by Flash or the user. In this case, it is a button event handler, and it is designed to react when the user releases the mouse button after clicking on this button symbol instance. See the âEvent Handlersâ sidebar for more information.
All you have to do now is let Script Assist help you configure the unfinished getURL() action. If the getURL line in the script you are writing isnât still selected, select it now. The reserved area above the script will display some text input boxes and menus. In the URL text field, type http://www.flash8outofthebox.com. In the Window text field, type
_blank. Donât worry about the other settings, as they are optional.Notice down below that the script has been completed by the Script Assist mode. You may prefer to type this syntax from memory when you become more comfortable with ActionScript. Your script should now look like Figure 4-5.
Save your work. For optimal results when testing, publish your movie using File â Publish Preview â Default - (HTML). This will display your SWF within an HTML page, so that you donât have to worry about your Flash authoring environment knowing how to talk to your browser.

Script Assist can be helpful when youâre just starting out, or when you need a quick syntax clarification. However, as you become more familiar with ActionScript, youâll likely find yourself wanting to have more intimate control over your code, and wanting to take fewer steps when writing your scripts.
In the previous project, you used Script Assist to apply an instruction directly to a button. However, code can be more efficient and productivity can be improved if you consolidate your ActionScript in as few locations as possible. One way of doing this is to place much of your code in frame scripts but refer to, or target, a desired button when writing code for that button.
To do this, you must give a unique name to each button instance that you intend to script in this fashion. Try to use this approach to add a script to the remaining button in your animation. Make the left arrow go back to frame 1 and play the animation again:
Single-click on the button that looks like a left-facing arrow to select it. In the Properties panel, locate the <instance name> field in the lowerleft corner, and type
replay_btnto name the button.Next, select the last frame in the actions layer, where you previously placed your stop() script.
Use its instance name, and an event handler, to add a script to this button. If Script Assist is still on, turn it off and practice writing the script yourself. Use the same event handler as you did with the Web button to trap the mouse release event:
	replay_btn.onRelease = function() {
	};
When you type the dot after replay_btn, a code hint appears. These are context-sensitive options that Flash will auto-complete for you, if desired. Instead of typing the needed phrase in its entirety, you can choose onRelease from the code hint menu. See the âCode Hintsâ sidebar for more information.
Add a method that will tell Flash to send the playhead to a certain point and then begin playing. Type
gotoAndPlayand the first of the two parentheses typically required by methods (as discussed in the last chapter):replay_btn.onRelease = function() {gotoAndPlay(};Notice that as soon as you type the opening parenthesis after gotoAndPlay, another code hint appears. This code hint initially informs you that you must enter a frame as the needed parameter. If you click on the right arrow, it then tells you that an optional scene can be included. A scene is a way of splitting long timelines into more manageable chunks, like stringing together multiple smaller timelines. Scenes are discussed later.
The two things the code hint asks for are called parameters. Together, they give the Flash Player the information needed to execute the method you are using. In this case, a simple play() command would also work, because Flash loops automatically and you want to go back to the first frame. However, in addition to briefly demonstrating parameters, itâs good to know about this option because it will let you jump to a frame other than frame 1 and begin playing. For example, if you use frame 14 as the parameter for your gotoAndPlay() method, you can replay your animation from the point at which the boxes are in their final locations and the text begins to appear.
Finish the script to launch the desired URL when the user clicks the button. Type
1(or14, if you like), close the parentheses, and add a closing semicolon for good form. (If you havenât already, read the âSemicolon;â sidebar in Chapter 3.)replay_btn.onRelease = function() { gotoAndPlay(1); }Save your work and test your file. In addition to the globe button launching this bookâs web site, the left-arrow button will now replay the animation (either from the first frame, as in the example file, or from the point at which the text begins to animate, if you used frame 14 in your script).
Before youâre comfortable with ActionScript, another way to jump-start the interactivity in your projects is by using components and behaviors. A component is a pre-created âwidgetâ that typically contains both assets and much of the coding necessary to make it work. You need only add a small number of custom parameters to most components to make them do your bidding. In limited cases, even this customization can be automated with behaviors, or pre-written scripts that are usually configured using simple UI dialogs.
You will use both components and behaviors in several later chapters, so this introduction will be brief. You will use the simplest of each in this project, and delve deeper when working with audio, video, and similar tasks later.
Occasionally, you wonât want to spend time creating standardized assets if you can use substitutes that have been created for you. The Flash UI components are a good place to start for interface development, because you can use a similarly designed family of interface elements for a professional look.
In this project, try replicating the previous web-launch example using the Push Button component:
Start a new movie to experiment with and save it as components_and_ behaviors.fla in your 04 folder.
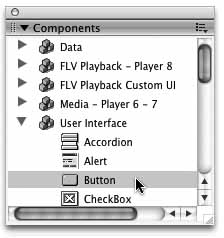
Open the Components panel using the Window â Components menu command, and expand the User Interface category (as shown in Figure 4-6).
Drag the Button component to the Stage. It will appear with the default word âButtonâ as its label, and it will respond with the appropriate Up, Over, and Down states, as well as cursor feedback, when tested.
Normally, you would configure a small handful of parameters and then write a script, as you did previously. However, in this case you will use a behavior to accomplish most of that, so you need only change the label.
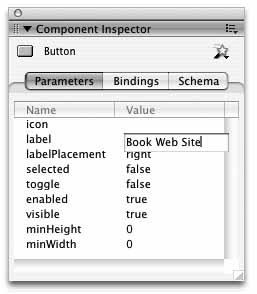
With the button selected, open the Component Inspector panel (Window â Component Inspector).
Make sure the Parameters options are displayed, and click on the label row in the value column. Replace the word Button with
Book Web Site(see Figure 4-7).Save your work.
You should now have a button that says âBook Web Siteâ but doesnât yet function. Use a behavior to add the necessary ActionScript to this component:
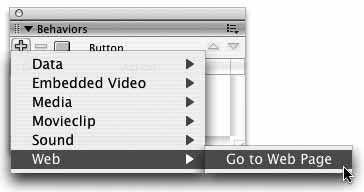
Make sure the button component is selected and open the Behaviors panel (Window â Behaviors).
In the upper-left corner of the panel, click on the plus sign (+) to open the Add Behavior menu. Add the Web â Go to Web Page behavior (see Figure 4-8).
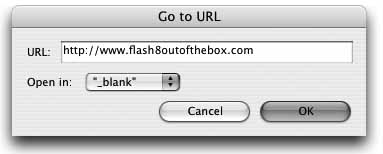
The dialog shown in Figure 4-9 will appear, allowing you to put in your desired URL and specify in which HTML window or frame the web page should appear. Enter http://www.flash8outofthebox.com and
_blank, just as before, and dismiss the dialog.The finished behavior will appear in the Behaviors panel. You can add more behaviors if you wish, but you donât need to for this project, so close this panel.
Thatâs all there is to it! Save your work and preview your movie in an HTML page using the File â Publish Preview â Default - (HTML) menu command. The button should function like your previous example, opening the bookâs web site in a new window.
Behaviors are fine for distilling a complex series of events into a pre-configured script that is designed for a specific task. However, you will find with increasing experience that writing your own code is usually easier and more flexible.
For one thing, the number of available behaviors is fairly limited. Second, behaviors add their scripts directly to the elements being manipulated, making it harder to consolidate code into fewer frame scripts (a coding best practice). Finally, as you become more comfortable with ActionScript, you may find that you can type simple actions faster than you can open and configure dialogs.
However, because you can add multiple behaviors to assets, and you can edit the scripts added by behaviors, they can sometimes be convenient to start with. For example, compare the script added by the behavior to the script you wrote earlier:
	on (click) {
	   //
Goto Webpage Behavior
	   getURL("http://www.flash8outofthebox.com","_parent");
	   //End Behavior
	}
The getURL line is identical, so youâve essentially accomplished the same goal in a different way.
You may notice that, just as buttons and movie clips have unique event handlers, so do components. You may also notice that two new lines appear, both preceded by two slashes (//). These are comments that will not be executed. Adding comments to your scripts will help you, and others, understand how you expect the script to work. See the âCommentsâ sidebar for more information.
Warning
Look at the file size of the file you just created. The components that ship with Flash are designed to share common elements, which makes using several different kinds of components more economical on file size. The shared assets already in place require fewer additions.
However, compared to creating your own custom buttons, this also means that file size will be significantly increased when using only one or two components. In many cases, you may be better off creating your own assets, or investing in third-party replacements that are designed to have a smaller impact on your file size. See Appendix A for possible resources to find such replacements.
The Web wouldnât be what it is today without navigation. The basic ability to link from one page to another is such an essential part of the Internet experience that itâs difficult to imagine what the Web would be like without it.
In many Flash projects, the ability for the user to navigate through a series of frames is also essential. Without the ability to jump around between frames, youâd be forced to design every project as a rigid linear path. In this section, youâll create three buttons, each of which will navigate to another part of the movie, displaying different shapes on the Stage.
The first thing you need is a button, so use one from a prior file to speed things along:
Create a new Flash document and save it as navigation.fla in the 04 folder.
Choose File â Import â Open External Library and open the simple_button.fla file you created earlier. If you havenât been following along, open the simple_button_02.fla file provided in the same directory. This technique is a handy way to make all of the Library assets of one file available to other files during authoring.
Drag an instance of the btn symbol to the Stage. Itâs now a part of your new navigation.fla file, so you donât need the external Library anymore.
Save your work now, but donât save again until instructed. This will allow you to revert to this previously saved point later and save a step or two.
Now you have a button, but you need to change the text inside it:
Double-click the button to edit it in place, and replace the word Button on each frame with the word
Box.Return to Scene 1.
The first button is complete, but you still need two others:
Open the Library, double-click on the btn symbol name to make it editable, and change the name to
box_btn.Click on the Options menu in the upper-right corner of the Library panel and choose Duplicate. The Duplicate Symbol dialog box appears.
Enter
circle_btnfor the name of the new symbol and click OK to close the dialog box.Drag circle_btn to the Stage and double-click on it to edit it in place.
On every frame of the circle_btn timeline, change the word Box to
Circle.
Before you repeat that last group of steps for the third button, feel free to mutter, âThis isnât any fun.â Itâs a lot of redundant work just to make a few buttons this way. There is, however, a better way:
Use File â Revert to revert to the last saved state. If you accidentally saved along the way, open the navigation_01.fla file and pick up where you left off.
Double-click on the btn symbol instance to edit it in place, and delete the text layer from the button symbolâs timeline. This will leave only the multi-state artwork.
Do you see where youâre going? Instead of embedding the text within the btn symbol, youâll keep it separate, so that the button is unlabeled and can be reused easily. Now youâll add the text separately from the button:
Return to Scene 1.
Alt-drag (Win) or Option-drag (Mac) the btn instance to create a second instance, and align the new instance directly to the right of the first one. Repeat this process for a third box. There are now three buttons lined up at the top of the Stage, in a horizontal row.
To make sure the btn instances are aligned perfectly, Shift-select the three boxes and choose Align Top Edge and Distribute Horizontal Center in the Align panel.
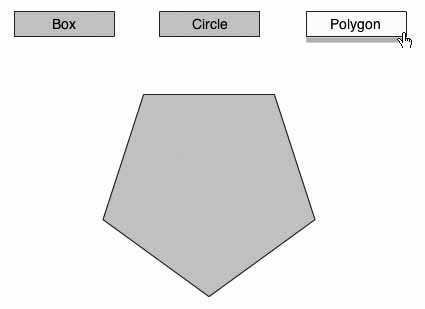
On Layer 1, activate the Text tool and type
Box. Click elsewhere twice (so youâre no longer editing the previous text) to create another text field, and type the wordCircle. Then click twice again and type the wordPolygon.Position the word Box in the center of the first btn instance on the left. Then position Circle in the center of the second btn instance and Polygon in the center of the third, as shown in Figure 4-10.
Save your work and test your file.
Now you have three buttons, made from only one button symbol. Not only is this easier than duplicating buttons and changing the text inside them, but using only one symbol decreases the file size for the published movie.
Now create the content for the three screens in the project:
Draw a square on the Stage, then draw a circle. Convert both to graphic symbols, naming them
boxandcircle.Delete them both from the Stage. You will be adding them later, in specific frames, from the Library.
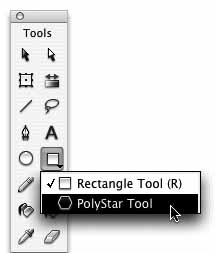
In the Tools panel, click on the Rectangle tool, holding down the mouse button until a menu appears, as shown in Figure 4-11. Choose the PolyStar tool from the menu. This tool allows you to draw polygons or stars, and you can configure the number and size of the points. (Later, feel free to explore the toolâs options in the Properties panel.)
Draw a polygon on the Stage, convert it to a symbol named
polygon, and delete the instance from the Stage.
Now, you need to divide the movie into three different sections. Youâll do this by using frame labels. Frame labels allow you to mark a frame with a string that is easy to remember. More importantly, if you add or delete frames before or after a label, the label stays with the frame you marked, making navigation scripts more reliable.
Note
Unlike labels that move with your content, frame numbers are fixed; frame 10 will always be frame 10 even if you add frames before or after. A navigation script that uses frame numbers may work when you write it but cease to work after youâve added or deleted frames, because the new frames may have moved your content.
Start by setting up your layers and labels:
Create a new layer and name it
content.Create another layer named
labelsand drag it to the top of the layer stack.Create a final layer named
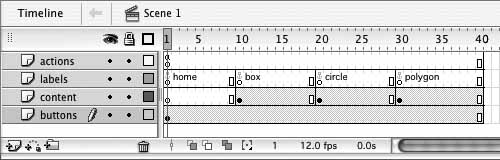
actionsand drag it to the top of the layer stack, so it is above the labels layer.Select frame 40 on every layer and press F5 to insert frames.
Select frame 1 on the labels layer and, in the Frame Label field in the Properties panel, enter
home. Press Enter/Return to commit the name to the selected frame. The frame label home now appears in the timeline, as shown in Figure 4-12.Choose Anchor from the Label Type drop-down list in the Properties panel. Much like an HTML link anchor, Flash frame anchors allow a browserâs Back and Forward buttons to work when navigating through Flash movies, improving usability (currently Windows only).
In the labels layer, insert keyframes at frames 10, 20, and 30, and add named anchors to these frames, just as you did with frame 1. Name the frame anchors
box, circle, andpolygon, respectively, as shown in Figure 4-12.
Now you have four discrete framesâhome, box, circle, and polygonâthat will serve as different destinations in the published movie. You can jump to each section using gotoAndStop() for a static destination or gotoAndPlay() for an animated destination. Add those scripts now:
Select the content layer and insert keyframes at frames 10, 20, and 30 to correspond with the labels in these frames.
At frame 10, drag a box instance to the Stage and position it at the center of the Stage (using the Align panel).
At frame 20, position a circle instance at the center of the Stage. Then, at frame 30, position a polygon instance at the center of the Stage. Each labeled frame now contains the shape that corresponds to the labelâs name.
Save and test the movie.
All 40 frames of the movie play without stopping, so each shape flashes by, and the buttons donât control any of it. Itâs time to write some ActionScript to tame the playhead:
Select frame 1 of the actions layer and open the Actions panel (F9).
Enter a stop() command in frame 1 to stop the playhead there:
stop();
And now itâs time to stop and think for a moment. As you saw earlier, there are two different ways to code the buttons. You can either attach ActionScript directly to the buttons, or keep the code separate by putting it in the actions layer.
It may be easier to use a behavior and attach the script directly to the button. However, youâll quickly discover that there are too few behaviors to solve all your scripting needs. Also, writing the code yourself allows you to keep it in fewer locations, making it easier to edit later.
Note
Remember, any code that accesses movie clips, buttons, or text fields via ActionScript wonât work unless you assign the item an instance name. Make sure your instance names are unique so that Flash knows which instance to target when you refer to it from your ActionScript code.
To add the scripts that control the buttons to the actions layer:
Select each btn instance on the buttons layer in turn, from left to right, and assign instance names of
box_btn, circle_btn, andpolygon_btnto them using the Properties panel.Beneath the stop() command on frame 1 of the actions layer, create an event handler that sends the playhead to the box frame label when the user clicks the box_btn button:
	box_btn.onRelease = function() {
	  gotoAndStop("box");
	};
Copy and paste this handler below the existing script. You need to alter just two words to make it work with the
circle_btnclip instance.In the copy of the handler, change
box_btn.onRelease to circle_btn. onRelease.Next, change
gotoAndStop("box") to gotoAndStop("circle").Repeat this process for the script to react to the
polygon_btnclip instance.Your code on frame 1 of the Actions panel should now look like this:
	stop();

	box_btn.onRelease = function() {
	gotoAndStop("box");
	};
	circle_btn.onRelease = function() {
	    gotoAndStop("circle");
	};
	polygon_btn.onRelease = function() {
	    gotoAndStop("polygon");
	};
Save and test the movie.
Hooray! You now have a functioning movie. When you click each button, the playhead jumps to the appropriate frame and displays the content on that frame. This is a common way of navigating movie content.
In fact, you can also use this technique to control movie clips. Simply by adding the movie clip instance name before the method, so the method is controlling the movie clip rather than the root movie, you can manipulate the movie clip timeline. Youâll do this in Chapter 6, but there are a few more things to accomplish here first.
Most interactive projects have more than one section, each with different functionality. Itâs easy for the user to become lost among the many sections, so to remedy this, most developers use visual cues to guide the user. A navigation bar, for example, may show the current section in addition to the available buttons.
In the navigation project you just completed, each button sends the playhead to a different frame in the timeline and displays a shape, but there is no indication of what screen weâre currently viewing. Itâs fairly obvious, because the content resembles the section name, but a real-world project would likely not be this clear.
Improve the usability of your project by adding a generic indicator of which screen the user is on:
In the box frame in the content layer, use the Rectangle tool to draw a small bar, 100 x 5 pixels, directly underneath the box button. Make it any color you like, but choose a color that will not blend into the button unseen. A fill with no border is particularly appropriate.
Select the bar and convert it to a movie clip called
active_bar.Copy this instance and move to the circle content frame. You will see that the box bar has disappeared. This is because you placed it in the box content keyframe, and this is exactly the behavior you want. Paste the instance into the circle keyframe, but this time position it under the circle button.
Repeat the last step for the polygon keyframe.
Save and test the movie.
This is a simple solution for creating an âactiveâ state for multi-section projects. Even if the content does not resemble the name of the section, the presence of the active_bar instance directly below the relevant button, as seen in Figure 4-13, helps the user remember where he or she is at any time.
For additional advice on how to make your projects more usable, check out the following books:
These books are both focused around web usability, but the knowledge gained can (and should) be applied to every project you create.
In the last section, you learned how to create a generic button that promotes reusability. Next, youâll carry that notion forward by creating invisible buttons that can be used to add âhot spotsâ to just about anything, and by learning how to spice up your buttons with animation.
In some cases, you want the ability to freely place interactive hot spots throughout a project, without having to go to a lot of trouble to create many different buttons. For example, think of a large or complex illustration in which you want to trigger the display of detail views, or a block of text that should display definitions for certain words. Finally, imagine a quiz that requires you to click the correct detail in an image.
In these cases (and many more), it would be difficult to have to create a separate button for every interactive location. However, the generic button you created earlier wouldnât work either, because it would cover the material you want to be visible as a button. This is where invisible buttons can be very handy.
Invisible buttons are merely normal buttons with no Up, Over, or Down state. Only a Hit state exists, to define the area that should respond to the mouse. Try to make one now:
Create a new file with which to experiment.
Draw a rectangle on the Stage and convert it to a button symbol, using any name. The rectangle will serve as a starting point for your invisible button. Double-click on the button to edit it.
Select the Hit frame and press F6 to insert a keyframe. You now have Up and Hit states.
Select the Up frame and delete its contents. (Thatâs right; delete everything but the Hit state.)
Click on Scene 1 to leave Symbol Editing mode.
If the button is invisible, why can you see it? Well, it wouldnât be very convenient if you couldnât ever see the button. Flash will automatically create a translucent blue area that represents the buttonâs shape (as defined by the Hit state), which is visible only in authoring mode.
When you test your movie, you will not see the button at runtime, but you will see the requisite cursor feedback to show the button is functioning. If you want to see an example of how invisible buttons work, look at the invisible_buttons.fla file in your 04 directory.
Animated buttons can be created a number of ways, but in this project youâll look at the simplest. Youâll build an animated button by creating an animation sequence within a movie clip and then simply adding that movie clip to a buttonâs timeline:
Open menu_buttons_01.fla, located in the 04 folder. To skip some of the text-only setup, and to make sure the file matches the following steps exactly (including x- and y-coordinates), this file has been started for you. On the Stage, there is one line of text, in a layer named txt. The text has been broken apart, so it is a shape and not editable text, and the layer has been locked. This ensures that this portion of the file will remain intact during this exercise.
Create a new layer called
btns, and drag it to the bottom of the layer stack.Next, create a graphic symbol to use in your animation. Press Ctrl/ Cmd-F8 to open the Create New Symbol dialog box. Choose the Graphic symbol type and call it
box.When you okay the dialog, the symbol will open in Edit mode. Using the Rectangle tool, draw a light-gray-filled rectangle, with no stroke.
Use the Properties panel to give it a width of 80 and a height of 25, and position it using an x-value of 0 and a y-value of 0. You are now finished with your box.
Press Ctrl/Cmd-F8 again to create another symbol. This time, choose Movie Clip for the symbol type and call it
btn_rollover. When you OK the dialog, you will again be in Edit mode, but this time you will be editing the movie clip.From your Library, drag the box symbol to the Stage. This places an instance of the box graphic symbol in your new movie clip.
With the box selected, position it at (0, 0).
Add a keyframe at frame 5.
At frame 1, select the rectangle, and enter
1into the Height field in the Properties panel. This will reduce only the height to one pixel.Because the entire symbol has been scaled to a new height of one pixel, you will need to reposition it to its former y-coordinate for it to remain centered. With the symbol still selected, enter a value of 12.5 in the Y field of the Properties panel. (Yes, you can use decimal values for pixel positioning. Flash simulates fractional pixels using anti-aliasing.) This value is used because it is one-half of the 25-pixel height of the button.
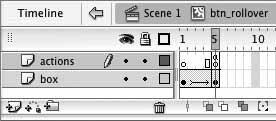
Select the keyframe in frame 1 and, using the Properties panel, apply a motion tween so that frames 1 through 5 are tweened, causing the box to animate to full size.
Add a new layer and name it
actions.In the new actions layer, insert a keyframe at frame 5, and add a stop() command to the Actions panel:
stop();
Press Enter to play the animation. This will allow you to preview the animation of this timeline without having to test your movie.
The rectangle begins short and increases in height from its center point. The stop() command stops the animation at frame 5. Figure 4-14 shows the timeline of the animation.
Now you will nest the movie clip inside a button:
Press Ctrl/Cmd-F8 to create another new symbol. Name the symbol
btnand choose Button as the Behavior type.In Edit mode for the btn symbol, select the Over frame and add a keyframe there (by pressing F6). Add another keyframe in the Hit frame.
While in the Hit frame, drag the box graphic symbol to the Stage and position it at (0, 0).
Select the Over state, and drag the btn_rollover movie clip symbol from your Library to the Stage. Again, with its current height of 1, you will need to position this symbol at (0, 12.5) for it to remain centered.
Leave the Up state empty, just as you did in the invisible buttons project.
Return to Scene 1 and drag an instance of the btn symbol to the Stage. Position it at (0, 0). As discussed earlier, the Hit state will display a translucent blue shape that allows you to test your placement. The button should fill the area from the left of the Stage to the first vertical text dividing line, as seen in Figure 4-15.
Add another instance of the btn symbol to the Stage, this time positioning it at (80, 0). This button doesnât fill the entire area needed, so that must be corrected.
With the button still selected, choose the Free Transform tool. Drag the right edge handle to size the button until you reach the second text divider.
Save your work and test the movie. If you want to compare your work with the sample file, open menu_buttons_02.fla and see how well you fared.
As planned, when you roll over the âabout usâ text, the corresponding buttonâs hit area is triggered, its Over state displays, and the animated movie clip on that frame begins to play. When you roll out, the animation disappears.
Finally, your Flash movies are starting to include some interactivity. From here on, youâll build more and more functionality into your movies, and this chapter should better prepare you for whatâs coming.
To get some practice adding ActionScript to buttons, try coding the buttons in the animated_buttons.fla file to go to various web sites. As you gain more experience, you can mimic button behavior using movie clips for even more creative freedom. For more information, check out Sham Bhangalâs Flash Hacks (OâReilly)âspecifically, Hack #63, âButton Movie Clips.â
Also, visit some of your favorite Flash sites to see how other developers design their buttons. Does animation in a button contribute to the overall look of the site, or does it distract you? How do animated buttons integrate with the siteâs design to blend in with it?
Studying the work of other Flash designers is a wonderful way to get ideas. Learn what you can about how elements in site designs work together to create a cohesive look. Specifically, study when Flash is used and, even more so, when Flash is not used. Many sites benefit from integrating Flash with other HTML content rather than using Flash exclusively.
In the next chapter, youâll begin working with bitmaps. Youâll learn how to:
Import bitmaps
Use bitmap tiles as fills for shapes
Trace images to create vector art from bitmaps
Organize your growing Libraries
Get Flash 8: Projects for Learning Animation and Interactivity now with the O’Reilly learning platform.
O’Reilly members experience books, live events, courses curated by job role, and more from O’Reilly and nearly 200 top publishers.

