Click on the “Developer” link on the left in your developer account.
That should take you to the Developer page. Click on “Set Up New Application.”
You now have the opportunity to enter an application name. We’ll call this app “FBML Essentials”. Click on the checkbox:
Click on “Optional Fields,” and more form fields should become available to you. Here are the optional fields and what they will do:
- Developer Contact Email
This is the email address Facebook will use if it ever needs to contact you about your application. For this example app, we will enter admin@fbmlessentials.staynalive.com.
- User Support Email
On your app’s Help page, users can send support requests. Requests from that page will be sent to the address you set here. We’ll enter support@fbmlessentials.staynalive.com for this app.
- Callback URL
The callback URL is the anchor for your entire application. All Facebook requests get forwarded to this URL behind the scenes. For the purposes of this app, we’ll use http://fbmlessentials.staynalive.com. You will want to enter the URL of your own website, one that you control. It is important to add a trailing slash to this URL because all requests to http://apps.facebook.com/fbmlessentials (see the “Canvas Page URL” field, next) get translated to this URL behind the scenes, and adding a slash ensures that the URL http://apps.facebook.com/fbmlessentials/foo.php does not end up becoming something like http://fbmlessentials.staynalive.comfoo.php.
- Canvas Page URL
There is one box here that follows apps.facebook.com. The text you enter in this box must be unique and unused by other Facebook app developers. For the purposes of this app, we’ll enter “fbmlessentials” in the box, which means that the canvas page URL will be http://apps.facebook.com/fbmlessentials. (You’ll want to choose your own when working on your own app, of course.) If the address is available, it will say “available” next to the box.
- Use FBML (or Use iframe)
This goes back to the “unofficial” developer guidelines we discussed earlier in the Preface. Rarely do you want to make your entire application an iframe. Although that gives you more flexibility for highly intensive JavaScript or Flash applications, it keeps you from valuable uses of FBML. I suggest you select “Use FBML” and use the
<fb:iframe/>tag (described in Chapter 3) to insert rich JavaScript applications into your Facebook app. For the purposes of this app, we’ll select “Use FBML.”- Application Type
This can be “Website” or “Desktop.” “Desktop” enables the application for use outside of a web environment. For the purposes of this app, however, we’re going to select “Website.”
- Mobile Integration
Check this option if you need your app to use mobile features on Facebook. This enables SMS and mobile browser viewing. For now, leave this unchecked.
- IP Addresses of Servers Making Requests
This is a comma-separated list of IP addresses of your servers that might be communicating with Facebook. This is a great security feature, but for this app, we’ll leave this blank.
- Can Your Application be added on Facebook?
Sometimes you may not need the user to add your application to Facebook in order to use it. If this is the case, you can choose “No” here. For this app, choose “Yes,” and a new set of installation options will become available to you. (See step 5 for more details.)
- TOS URL
This is an optional URL that, if entered, forces the user to click a link to accept a Terms of Service (TOS) agreement if they want to install the app. We’ll leave this blank for now.
- Developers
You must add other developers as friends in your account before you can add them here. Once they are your friends, you can select any of them to be allowed to work on and install your application while it is under development.
If you selected “Yes” to the “Can Your Application be added on Facebook?” option in the previous step, a new section called “Installation Options” will appear. Here are your choices (all are optional) and what they mean:
- Who can add your application to their Facebook account?
You have the option to choose between “Users,” “All Pages,” “Some Pages,” and “No Pages.” Checking “Users” enables any user to add the app to their profile. Selecting “All Pages” enables any user to add the app to any page on Facebook. Selecting “Some Pages” allows you to specify a certain type of Facebook page that your app can be added to. For the purposes of this app, we’ll check “Users” and leave “No Pages” selected. The result is that this app can be added only to user profiles.
- Post-Add URL
This is the URL to which your application gets redirected after a user adds the app. This can be a great place to encourage a user to sign up or add friends. For this app, we’ll enter http://apps.facebook.com/fbmlessentials/invite.php in this field.
- Application Description
When a user adds your application, this text appears on the page asking the user to add the application. For this app, we’ll just enter “FBML Essentials Demo Application.”
- Post-Remove URL
A non-Facebook.com URL, this is a place to redirect the user after the user removes your app, which will notify your application that it has been removed. This can be a great way to disable a user’s account in your database for tracking purposes. We’ll leave this blank for this app.
- Default FBML
Unless an API method is called through server-side code, this is the default text that appears on a user’s profile under the application’s profile box. It can contain most FBML tags in addition to text. Here is where our first “Hello World” example comes into play. Enter the following in this box:
Hello <fb:name uid="loggedinuser" useyou="false" />
Note
What just happened? You’ll see this later, but after the application has been added, “Hello [user’s name]” will appear in the application’s profile box in your user profile. <fb:name/> is an FBML tag that calls the name of the Facebook ID specified by
uid. For this example, we enterloggedinuseras theuid. This means that the name of the person visiting your profile will be rendered by the tag.useyou="false"means that if you’re visiting your own profile, it doesn’t say “Hello you,” but rather, “Hello [your name]”.- Default Action FBML[1]
This optional field should be a link that appears under the profile picture of the user who installed the app. This must be an absolute URL. For the purposes of this app, enter:
<fb:profile-action url='http://apps.facebook.com/fbmlessentials/
    invite.php'> Invite <fb:name uid="profileowner"
    useyou="false" /> to use FBML Essentials!
</fb:profile-action>
You'll see how this looks on a user’s profile later in this chapter.
Note
What just happened? <fb:profile-action/> sets a link under a user’s profile image. In fact, it will also place a link on all of the user’s friends’ profile pages (visible only when the person who has installed your app views those profiles).
- Default Profile Box Column
You have two options here: “Wide” or “Narrow.” For the small amount of text we’re displaying, we’ll select “Narrow” for this app.
- Developer Mode
When you are developing an app that you don’t want others to install or see until you are finished, select this option. If you’d like, you can add other developers who can test the app. Just don’t forget to uncheck this box when you go live! For this example app, it’s your choice whether to select this option.
Along with “Installation Options,” a section called “Integration Points” appears (these are also optional):
- Side Nav URL
If you want a link to appear on the lefthand side of the page when you are logged into your Facebook account, you will need to enter an apps.facebook.com URL in this box. For this application, we will enter http://apps.facebook.com/fbmlessentials.
- Privacy URL
This can be any URL. In FBML, you can specify the insertion of a privacy link. The contents of this field will be the location to which the privacy link takes the user. For this app, we’ll leave it blank.
- Help URL
This can be any URL. In FBML, you can specify the insertion of a help link (similar to the privacy URL). The contents of this field will be the location to which the help link takes the user. For this app, we’ll leave it blank.
- Private Installation
When developing a Facebook application, there may be times when you don’t want others to know you are working on it. Check this box to prevent information about the app from appearing in your friends’ News and Mini-Feeds. For this app, this box is optional.
- Attachments – Attachment Action
This action can be text or FBML. It appears when a user wants to add an attachment to a Wall post or message. We’ll leave this blank for this app.
- Attachments – Callback URL
A non-apps.facebook.com URL that loads the content to be attached to a Wall post or message. We’ll leave this blank for this app.

Hit “Submit,” and you’ve created your first application! Let’s add it and see what it looks like. On the resulting page after you hit “Submit,” find your application and click “View About Page.” Now, click “Add Application.” On the following page, leave everything checked and click the button to add the app.
The app will send you to the invite.php page we saw earlier (in the Default Action FBML option). You will get a message similar to this:

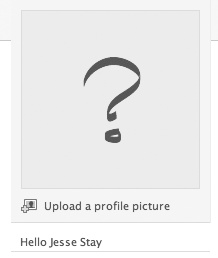
This is because we haven’t set anything for invite.php yet. We’ll create that shortly. Now, click on your “Profile” link in the upper-left corner. Under your profile image, you’ll see an image similar to this:
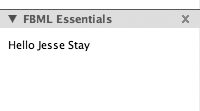
And further down on the page, you’ll see a box similar to this:
Now, create an index.html or index.php file in the home directory where your callback URL is. Place the following in that file:
Hello <fb:name uid="loggedinuser" useyou="false" />
Next, open the file you specified earlier in the Post-Add URL option (we used invite.php), and add the following text (substituting your own information where necessary, including replacing .php with .html if you used index.html):
<fb:request-form action="index.php" method="POST" invite="true"
type="FBML Essentials" content="Hello Friend. <fb:req-choice
url='http://apps.facebook.com/fbmlessentials' label='Go there!'/>">
<fb:multi-friend-selector showborder="false" actiontext="Invite
your friends to use FBML Essentials.">
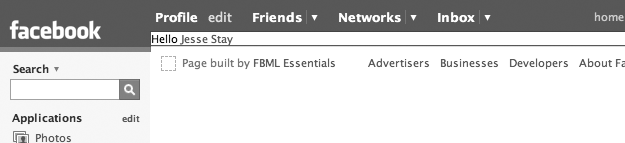
</fb:request-form>Click on the link to your new Facebook app in the left sidebar of your Facebook account (or just click on the “Hello [your name]” link under your profile image!). You’ll now get a page like this:
If you click on the “FBML Essentials” link in the footer, remove the app from your profile, and then re-add it (by clicking on the developer app and then on your new app), and you’ll see the invite page again. This time it will look like this:
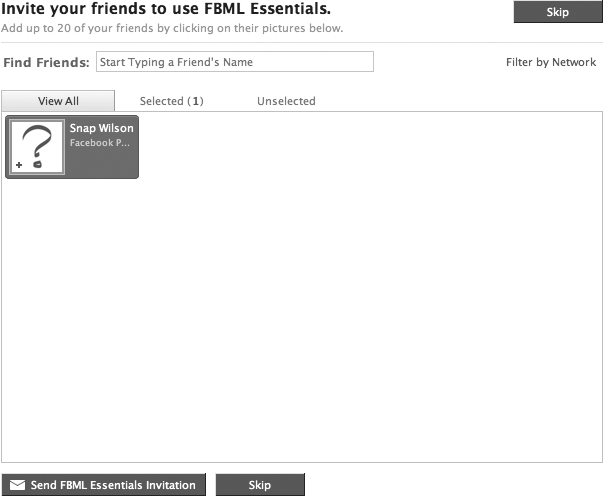
Now, if you have added any friends, select them here and choose “Send [your app name] Invitation.” You’ll be prompted to verify the invitation. Hit “Send,” and an invitation will be sent to the users you just selected, asking them to add the app to their profiles. Congratulations—you have just written your first app, all in FBML. Hello friends!
Note
What just happened? The text or
FBML you enter in your index.html or
index.php gets loaded with the callback URL you
entered previously in the application setup screen. In invite.php, we used the
<fb:request-form/> and
<fb:multi-friend-selector/>
tags to create an automatically generated invite form for your users to
invite their friends. With these tags, Facebook does all the work for
you in making your app viral! Because we added
invite.php to the Post-Add URL field in the setup,
the application will always be directed there after the user adds the
app. This can be a great way to encourage your users to add your app to
Facebook.
In the next chapter, I will go over a few design considerations you need to remember when planning out your FBML-based Facebook application. We’ll cover some architecture options you’ll need to incorporate into your design, as well as basic HTML design in an FBML environment.
Get FBML Essentials now with the O’Reilly learning platform.
O’Reilly members experience books, live events, courses curated by job role, and more from O’Reilly and nearly 200 top publishers.

