Chapter 1. Getting Started
Google, the iPod, spam: Only a handful of technological forces have gone from tiny to towering seemingly overnight, and Facebook is part of this elite group. One big reason: Setting up a Facebook account couldn’t be easier. In the time it takes to say “howdy,” you too can be part of the frenzy.
Then—if you like—you can fill out an optional Facebook profile, a series of questions regarding your likes, dislikes, educational and professional background, and so on. You can even include photos of yourself. The more accurately and completely you describe yourself to Facebook, the more useful you’ll find the site. (After all, headhunters and old college buddies can’t find you if you fake your information.) This chapter shows you how to sign up for an account, fill out your profile, and get to your personalized Facebook Home page.
Tip
Of course, the more info you give Facebook, the greater the risk that someone will steal or misuse that information. See Chapter 13 for ways to get the most out of Facebook while minimizing your risk.
Signing Up for an Account
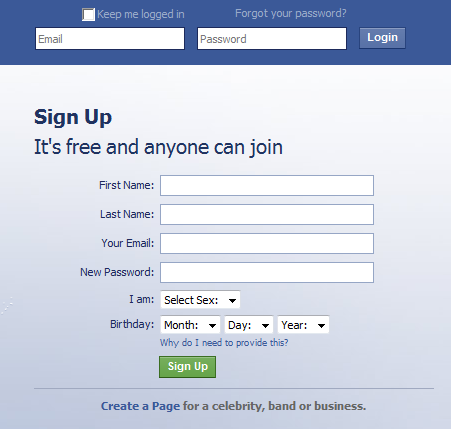
Facebook accounts are free, and have only two requirements: You need a working email address, and you have to be over 13 years old. Here’s how to sign up:
Point your web browser to www.facebook.com. If you’re on a Windows computer, you’ll get the best results with Internet Explorer or Firefox. If you’re on a Mac, use Firefox or Safari. (If you’re not familiar with Firefox [it’s free], check out www.firefox.com.)
Tip
You probably don’t want to sign up for Facebook using your cellphone because there’s quite a bit of typing involved, but you can in a pinch; see Chapter 14.
In the Sign Up area, fill out all the fields. Facebook doesn’t let you skip any fields, but you can change your answers later (Changing Account Info).
First Name/Last Name. Facebook expects you to use your real name, not an alias. Don’t type in the name of a group or company, and don’t include special characters like parentheses or titles such as Mr., Ms., or Dr.
If you like, after you finish the sign-up process you can add your maiden name to your account so people you knew before you got hitched can find you. To do so: At the top of any Facebook page, click the Account link and select Account Settings from the drop-down menu. On the page that appears, click Name and type your full maiden name in the Full Alternate Name field. You’ll see that Facebook is already set up to include your maiden name on your profile and in search results should any old flame be looking for you. Click the Change Alternate Name button when you’re done.
Tip
For the most part, it’s up to you whether or not you give Facebook accurate personal details. But Facebook actually uses a combination of computer programs and real, live humans to weed out obviously bogus registration details. Type in Elvis Presley or Mickey Mouse for your full name, for example, and there’s a good chance your registration won’t go through.
Your Email. Make sure you type in a working email address. If you don’t, you won’t receive the confirmation message Facebook sends you, and therefore won’t be able to complete the sign-up process. If you’re interested in joining your employer’s or school’s Facebook network (Chapter 2), use your work email address (kris_kringle@acme.com) or your student email address (kris_kringle@asu.edu), respectively. If you’re worried about privacy, sign up for a free email address from a site such as www.mail.yahoo.com or www.gmail.com and give Facebook this new email address.
New Password. Make up a six-character or longer, case-sensitive password (you can use numbers, letters, and punctuation), and then jot it down in a notebook or some other safe place so you don’t forget it.
Birthday. Make sure the year you choose puts you over age 12—Facebook doesn’t let under-13s use the site.
Tip
Facebook requires you to hand over your birth date when you’re creating a personal account. But because not everyone wants to share her age with the world, the site gives you a way to hide your birth date from fellow Facebook members (see Adding Basic Info).
When you finish, click the Sign Up button. If you forgot to fill out any of the fields, you’ll see the Sign Up page again, this time with a message at the top that reads, “You must fill in all of the fields.” If you filled everything in to Facebook’s satisfaction, you’ll see a second Sign Up page, explained next.
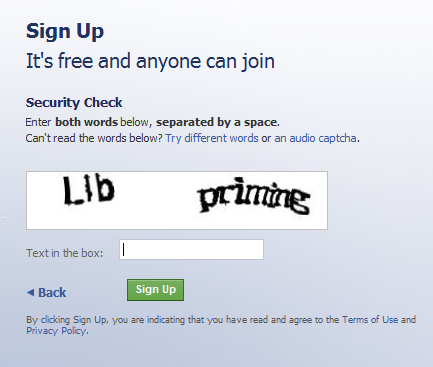
On the second Sign Up page, type the security check words into the “Text in the box” field. This step is to make sure you’re a real, live person and not a computer (computers can’t read the squiggly text).
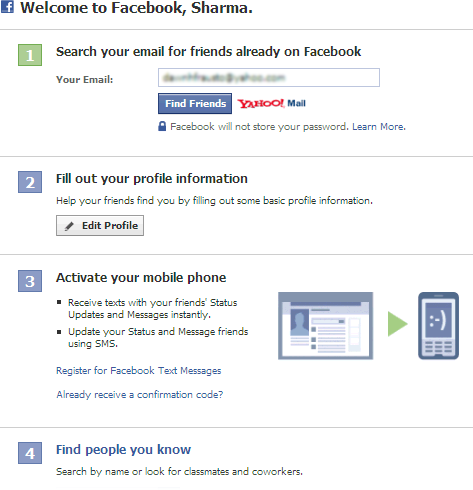
Click the green Sign Up button. Ideally, you should click both the Terms of Use link and the Privacy Policy link and read both of them before you click this button. In reality, though, you’d need 3 hours and a law degree to make sense of them. And because Facebook reserves the right to change them any time it gets the urge, you’d have to keep re-reading them every day. So just click Sign Up and be done with it. After you do, Facebook displays a three-step process you can use to find folks you know who are already on Facebook, and then describe yourself (by creating a Facebook profile and, optionally, uploading a picture of yourself) so that folks can find you.
Tip
Here’s the gist of Facebook’s terms of use and privacy policy: Be nice (don’t spam anybody or post pirated stuff), be honest (leave out personal details if you must, but make sure the details you do give Facebook are accurate), and don’t blame Facebook for anything bad that happens (like your office Christmas party pictures ending up in National Enquirer after you post them on Facebook). Break these rules, and Facebook can boot you off the site.
Tip
If you’re called away from your computer or need to log out of Facebook before you complete the three-step get-started-on-Facebook process, no problem: Just log into your favorite email program using the email address you typed into Facebook’s registration page. In your inbox, you’ll find a welcome message from Facebook containing three icons you can click to begin (or complete) each of the three steps.
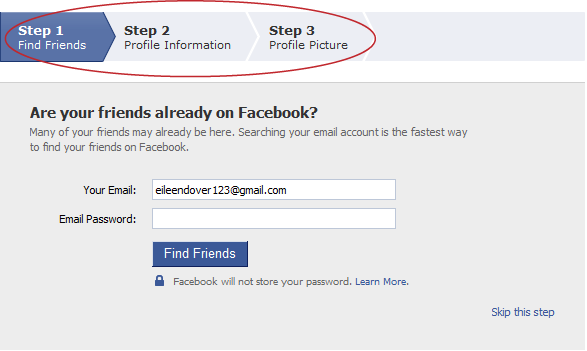
Step 1: Finding Your Friends on Facebook
The whole point of being on Facebook is to get—and stay—in touch with people. So it’s no big surprise that the first of Facebook’s three setup steps gives you a chance to find out which of the folks you regularly email is already on Facebook. Finding People Who Are Facebook Members covers this step in detail, but here’s the gist:
On the Getting Started screen, make sure Step 1: Find Friends is selected.
Type in the email address you use to communicate with the most pals (or, alternatively, leave in the email address you used when you registered for your Facebook account) and then type in the password to that email account.
Click Find Friends. When you do, Facebook scans your email account for email addresses and tries to match each one to a Facebook member profile.
Note
If you don’t use a Web-based email address (such as your_name@gmail.com, your_name@yahoo.com, or your_name@aol.com), Facebook may not have any luck finding friends based on your address (you may even see an error message about the site being unable to import contacts from that address). In that case, just continue with the setup process and add friends later using the methods explained in Chapter 3.
If you regularly use email to keep in touch with pals and don’t mind handing over the password to your email account (and that’s a big if), the steps outlined above can be a quick way to add a bunch of your real-life friends to your Facebook social circle quickly and easily. But if you’d prefer to locate your friends on Facebook yourself after you’ve had a chance to create a profile (explained next)—or just don’t feel comfortable giving email account info to Facebook—you’ve got options that you can come back to when you’re ready, as Chapter 3 describes. For now, click the “Skip this step” link to move along and start building your profile.
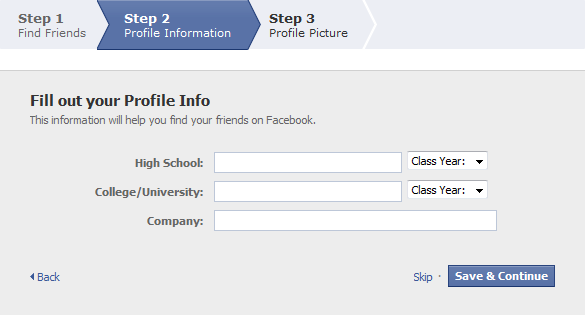
Step 2: Creating Your Profile
A Facebook profile is a collection of facts about you: everything from where you went to school and how old you are, to what kind of romantic relationship you’re in (or hope to be in) and your favorite TV shows. All your Facebook friends and fellow network members can see your profile details (except for the Facebook members you explicitly exclude; see Chapter 13). Facebook automatically creates a bare-bones profile for you based on the info you entered when registering, and then gives you the opportunity to add just a couple more details concerning work and school that help you connect with Facebook friends quickly and easily. Whether or not you add additional details—and how much you add—is up to you.
Tip
If you do decide to flesh out your profile, brevity and truthfulness pay off by helping Facebook connect you with like-minded folks. That’s because Facebook automatically lists your profile answers in the search results of other members. The site can also suggest potential friends by matching your profile info with that of other members; see Chapter 3.
When polishing your profile, ask yourself:
What do I want to get out of Facebook? If you just want to check out your ex’s Facebook profile, you don’t need to waste time crafting one of your own. But if you hope to use Facebook to do some networking and land a job, spending some time building your profile is definitely worth the effort.
How security conscious am I? Although Facebook’s success is based, in part, on its scrupulous commitment to member privacy, the sad truth is that everything you put on the Internet is subject to possible misuse and theft—including what’s in your Facebook profile. So think twice about including political, religious, sexual, and other sensitive proclivities unless revealing these details is absolutely necessary. For example, if you registered for Facebook specifically to connect with other political activists in your area, fill out the political section of your profile; otherwise, skip it.
How much time do I want to spend on this? Profile building can be a huge time suck. If you’re anxious to start using Facebook, just add a few details now. You can always add more later (Adding Basic Info).
Tip
If all you add to your profile is one detail, make it a flattering picture of yourself (see Step 3: Adding a Picture of Yourself). Doing so is quick, easy, and lets folks who already know you identify you right off the bat—even if your name is John Smith.
To add basic school and work details to your Facebook profile:
On the Getting Started screen, make sure Step 2: Profile Information is selected.
Click in the High School field, start typing the name of the school you attended, and—when Facebook displays your high school—click to select it.
Repeat step 2 for the College/University you attended (or are attending) and the Company you currently work for. If you went to a bunch of colleges or have worked for a bunch of companies, you can list them all; see Adding Education- and Work-Related Info.
Click Save & Continue. Facebook displays a list of members you might know based on the schools and workplace you selected. To friend (Inviting People to Be Your Friend) one or more of the folks listed, click the “Add as friend” link that appears below the person’s picture. When you finish, click Save & Continue.
Note
Where you went to school and where you work are the most useful pieces of info to Facebook when it comes to matching you up with possible friends. To describe yourself more fully, flip to Adding Education- and Work-Related Info.
If you’d rather not add anything at all to your profile at this point, click Skip. (You can always come back and add to your profile later; Adding Basic Info tells you how.)
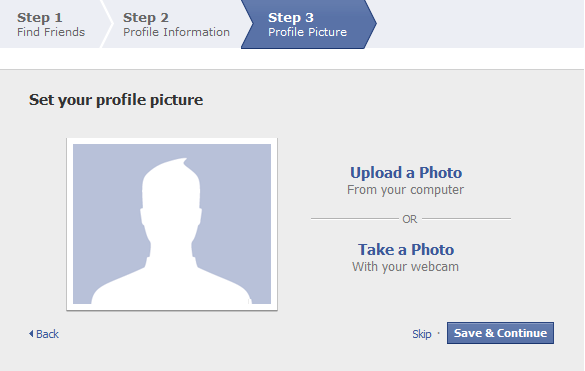
Step 3: Adding a Picture of Yourself
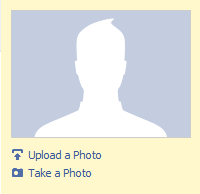
Until you add a picture to your profile, Facebook displays a dorky blue-and-white outline of a guy with a cowlick. Replacing that outline with a picture of yourself is a good idea because it helps searchers identify you more easily. To add a picture to your profile:
On the Getting Started screen, make sure Step 3: Profile Picture is selected.
In the Upload Your Profile Picture dialog box that appears, click Browse to search your computer for the 4-megabytes-or-less .jpg, .gif, or .png picture file you want to add to your profile. After you select the picture you want, Facebook automatically adds it to your profile. (Adding or Changing Profile Pictures shows you how to change it.)
Confirming Your Facebook Registration
After you register for an account, Facebook sends a confirmation email to the address you typed in while you were registering.
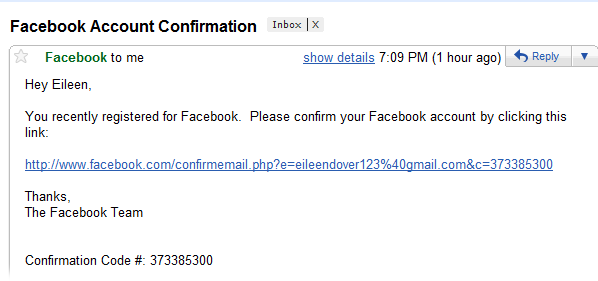
Most of Facebook’s useful features (such as letting you join Groups and discussions) don’t work until you confirm your registration, so you want to do so as soon as you get a chance. Here’s how:
In your Facebook inbox, click the “Check your email” registration reminder message that appears, or just open your email program the way you usually do. Either way, in your email program’s inbox, you’ll find a message from Facebook asking you to confirm that you want to join.
In your email program, click the link in the confirmation email or cut and paste the link into your web browser. Bingo: Facebook displays a welcome message on your newly created, personalized Facebook Home page. Congratulations—you’re officially registered! (You’re automatically logged in, too.)
Viewing Your Profile
Taking a look at your profile from time to time is a good idea because it lets you see yourself as other Facebook members see you. To view your profile:
Make sure you’re registered (Signing Up for an Account) and logged in (Controlling Access to Your Account). If you just finished registering by clicking the link in the confirmation email, you’re already logged in.
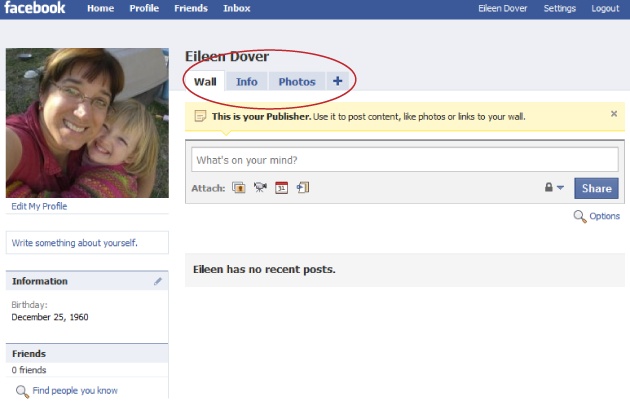
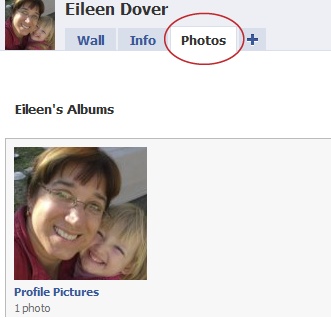
Head to the top of any Facebook screen and click Profile. Your profile comes with three built-in tabs to help organize your personal information: the Wall tab (Writing on Walls describes your Wall and how it works), the Info tab (which you use to update your profile information as shown in this section), and the Photos tab (you use this to create and edit photo collections; see Sharing Pictures). If you find yourself adding mountains of details, such as links or video clips, to your profile, you can click the + tab to create additional tabs and avoid cluttering your profile—Modifying Your Home Page and Profile shows you how.
The profile that appears lists all the info you’ve given Facebook. If you’ve just registered, the only details you see are the bare-bones ones Facebook got from you during the registration process.
Note
Until you tell Facebook differently, anyone on Facebook can see your profile (except for sensitive stuff like your birthday and your political and religious views, which only your friends—and their friends—can see). To fine-tune who can see what, head to the top right of any Facebook page and click the Account link, select Privacy Settings from the drop-down menu, and then click Profile Information. Chapter 13 has more details.
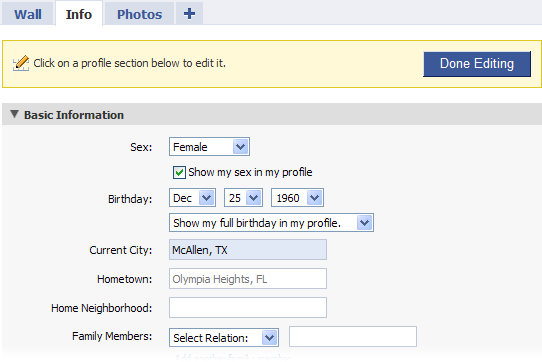
Click the Info tab. Facebook displays four main categories of profile information (you may need to scroll down to see them all): Basic, Personal, Contact, and Education and Work.
Note
If you’ve already added some profile info, you’ll see that information listed instead of the four main categories. To get to the screen with the four categories, click the Edit Information link in the upper-right part of the Info tab.

Tip
Over time, your profile can get so huge you can’t read it easily. To collapse a category of info, click the flippy triangle next to the category’s header; click it again to expand the category back into view.
Adding Basic Info
Most of the information Facebook categorizes as “basic” really isn’t all that useful. You’ll probably just want to type in your hometown and country and skip the rest. (You can skip all of it, if you like; none of it’s required.) Here’s how to add basic info to your profile:
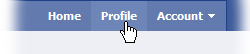
At the top of any Facebook screen, click the Profile link.
On the page that appears, click the Info tab.
Make sure the Basic section is expanded. If it’s not, you won’t see any fields to fill in. To fix that, click the flippy triangle next to the word “Basic” and then you should see a bunch of fields including Sex, Birthday, and Current City.
Fill in as many of the following fields as you like:
Birthday. If you accidentally gave Facebook the wrong date when you signed up, you can change it here. To hide your age or birthday from folks who can see your profile, from the “Show my full birthday in my profile” drop-down list, choose “Show only month & day” or “Don’t show my birthday”.
Current City. Start typing, and Facebook makes suggestions so you can select your city instead of typing the whole thing out. Filling in this field is useful if you plan to attend in-person events (If You’re the Group’s Creator) advertised on Facebook.
Hometown. Filling this in can help long-lost pals identify you.
Home Neighborhood. Type in any borough, barrio, or other neighborhood description you like; Facebook doesn’t match this name against what you entered in the Hometown field.
Family Members. If any of your clan is on Facebook (or if you want them to be), you can list them here. This can be useful for organizing family reunions and remembering important birthdays. First, click the Select Relation field and then, from the drop-down list that appears, choose Son, Sister, or one of the other relationship options. Then, in the blank field next to the Select Relation field, type in the person’s name. To list more folks, click the “Add another family member” link and repeat the process.
Relationship Status. Click this field to announce your availability (or lack thereof). If you’re interested in using Facebook to meet the love of your life, create a wish list by turning on the checkboxes next to the appropriate “Interested in” and “Looking for” choices.
Note
If you do decide to fill out the Relationship section of your profile, keep in mind that Facebook—like all communities, online and off—ascribes very specific meanings to what might seem like innocent labels. Choosing a Relationship Status of “It’s Complicated” or indicating that you’re “In an Open Relationship”, for example, pretty much guarantees that sooner or later you’ll receive the electronic equivalent of mash notes. (Adding provocative photos to your profile makes that even more likely, of course.)
Political views. Cast your vote for Liberal, Conservative, or another label from this drop-down list (the list appears when you start typing).
Religious Views. Start typing in this field and Facebook provides a list you can choose from. If you feel the need, you can expound on your theological leanings in the About Me field of the Personal section, explained next.
When you’re finished, click Save Changes. Or, if you want to discard what you entered, click Cancel.
Adding Personal Info
Thanks to its roots as a souped-up yearbook for college students, Facebook encourages you to wax rhapsodic about such personal details as your hobbies and your favorite TV shows. To add that kind of info, follow these steps:
At the top of any Facebook screen, click the Profile link.
On the page that appears, click the Info tab.
Scroll down to the Personal Information section and make sure it’s expanded (if it’s not, click the flippy triangle next to the Personal Information link).
In the section that appears, type as much as you like into any of the fields: Activities, Interests, Favorite Music, Favorite TV Shows, Favorite Movies, Favorite Books, Favorite Quotations, and About Me.
When you finish, click Save Changes and Facebook automatically updates your profile. (Click Cancel to discard your changes.)
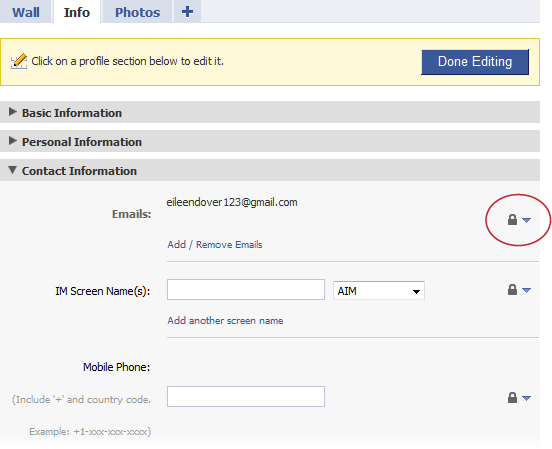
Adding Contact Info
After you register, Facebook members can contact you several different ways, including sending you a message in Facebook and writing on your Facebook Wall (Writing on Walls). But if you like, you can give folks additional ways to contact you by listing your street address, phone number, and instant messaging screen names. Here’s how:
At the top of any Facebook screen, click the Profile link and then click the Info tab.
Scroll down to the Contact Information section and make sure it’s expanded (if it’s not, click the flippy triangle next to the words “Contact Information”).
In the Contact Information section that appears, fill in as many of the following fields as you like.
Tip
Clicking the lock icon next to a field lets you tell Facebook who you want to let see the contents of that field: Everyone on Facebook, only your Facebook friends, only your Facebook friends plus their friends, or a specific list of people (like all of your bowling buddies who use Facebook, say). For example, by clicking the lock icon next to Mobile Phone, you can make it so that Sarah (who went to high school with you) can’t see your cellphone number when she pulls up your Facebook profile, but George (who’s one of your Facebook friends) can. See Chapter 13 for details.
Emails. Clicking the Add/Remove Emails link lets you change your contact email (the one Facebook uses to get in touch with you).
IM Screen Name(s). If you have an account with an instant messaging service such as AIM (AOL Instant Messenger), you can add your instant messaging alias or screen name to your account. Doing so lets anybody looking at your Facebook profile see if you’re logged into your instant messaging program (Facebook displays a green dot next to your screen name when you’re logged in). If you’re logged in, people with an instant messaging program installed on their computers can click your screen name to start messaging you.
To add a screen name, type it into the field and then, from the drop-down list, select your instant messaging service. Your choices are AIM, Google Talk, Skype, Windows Live, Yahoo, Gadu-Gadu, and ICQ. Facebook lets you add up to five different screen names.
Mobile Phone, Land Phone, Address, City/Town, Neighborhood, Zip. If you wouldn’t feel comfortable heading to your local community center and tacking up a flyer listing your phone number and street address, you probably don’t want to add these details to your Facebook profile.
Website. You can list multiple websites; just make sure you type each URL (such as http://www.mycoolsite.com) on its own line. Feel free to skip the http:// part; Facebook adds it automatically.
Tip
If you want to give people who visit your website access to the info on your Facebook profile, click the “Create a Facebook badge for your website” link. Doing so whisks you to a Profile Badges screen displaying a clickable thumbnail image (which Facebook calls a badge) made up of your profile picture and the Facebook logo. Follow the instructions on the screen to cut and paste a bit of HTML code into one of your website’s source files, and voilà—folks who visit your website can click on your badge to see your Facebook profile. If your website is a blog hosted by Blogger or Typepad, adding a Facebook badge is even easier; just click the appropriate button on Facebook’s Profile Badges screen and follow the instructions.
When you’re finished, click Save Changes, or click Cancel to discard your changes.
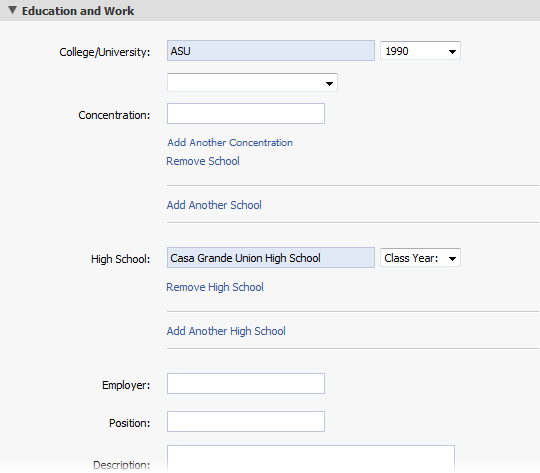
Adding Education- and Work-Related Info
If you’re a student or work at a decent-sized company, adding a few school- or work-related details to your profile is well worth the time. After all, the whole point of Facebook is to try to mimic your real social circles—and if you’re like most folks, a lot of your real-life friends are fellow students and coworkers.
You may have added basic school- and work-related info right after you registered for Facebook (Step 2: Creating Your Profile). Taking the time to add to these details is handy for connecting with long-lost pals, because Facebook lets you search for people based on matching profile details. So, for example, you can easily look up folks who worked at the same pizza place you waitressed at in college.
To add details about the school you go to (or attended in the past):
At the top of any Facebook screen, click the Profile link and then click the Info tab.
Scroll down to the “Education and Work” section and make sure it’s expanded (if it’s not, click the flippy triangle next to “Education and Work”).
Fill out any of the following fields that appear (they’re all optional):
College/University. As soon as you start typing, Facebook pops up a helpful list of schools you can choose from. You can add up to five different colleges or universities.
Concentration. Type in the subject you majored (or minored) in. If you double-majored, click “Add another concentration” to add up to three different subjects.
High School. Facebook lets you list up to two different high schools.
Class Year. Choose the year you graduated high school from the drop-down list.
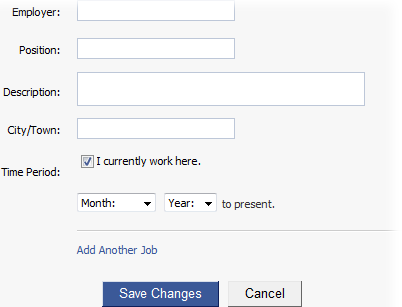
Employer. When you start typing, Facebook displays a list of companies it knows about. If your company is among them, select it from the list; if not, just type in the name.
Time Period. Turn on the “I currently work here” checkbox if you’re still at this job, and then click to select the month and year you started. If you leave this checkbox turned off, Facebook displays another set of Month/Year fields so you can enter the date you left the company.
When you’re finished, click Save Changes or Cancel.
Adding or Changing Profile Pictures
Until you add a picture of yourself, your Facebook profile is about as visually appealing as a plain brown wrapper. You may have added a picture during the registration process (Step 3: Adding a Picture of Yourself). If you didn’t—or if you did but want to change it—you can do so easily by creating or editing a Profile Picture Album containing multiple pictures, each of which you can give an optional caption.
Tip
Facebook lets you upload additional photo albums (Sharing Pictures) and even tag the pictures you upload—including your profile picture. Tagging is a nifty way of assigning a portion of a picture to a specific Facebook member’s name. For example, say you upload a shot of yourself that shows a coworker lurking in the background. You can drag your mouse to outline your own head and assign that portion of the picture to your name, and then outline your coworker and assign that portion of the picture to your coworker’s name. Tagging helps Facebook members find pictures they’re in, wherever those pictures appear—whether on a friend’s profile or a mortal enemy’s. For the skinny on tagging, check out Restricting Access to Your Albums.
If you haven’t uploaded a profile picture yet, here’s how:
At the top of any Facebook screen, click the Profile link.
On the page that appears, click the “Upload a Photo” link below the placeholder picture.
In the Upload Your Profile Picture box that appears, click Browse to search your computer for the image file you want to add to your profile. Make sure the image you choose is a .jpg, .gif, or .png file that weighs in at 4 megabytes or less (it probably will—JPG, GIF, and PNG files tend to be pretty small). If you need help, the Tip on Sharing Pictures tells you how to check a file’s type and size. After you select the file you want, Facebook automatically adds it to your profile. The next time you view your profile (Viewing Your Profile), you see your picture instead of the dorky outlined head.
If you’ve already added a picture to your Facebook profile and want to change it:
At the top of any Facebook screen, click the Profile link and then click the Photos tab.
Tip
If you’ve already uploaded a bunch of pictures and simply want to swap out your current profile picture for another that you’ve uploaded: At the top of any Facebook screen, click the Profile link; then, click the Photos tab. On the page that appears, click the picture you want to replace your current profile picture with (depending on how you’ve organized the photos you’ve already uploaded, you may have to click on an album first, and then a picture). On the screen that appears, scroll down and click the Make Profile Picture link and, in the confirmation box that appears, click Okay.
On the Albums page that appears, click the Profile Pictures album.
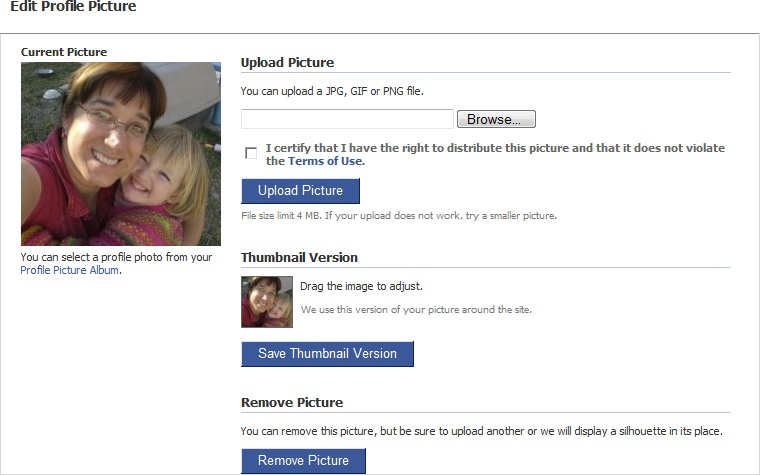
On the “Your Photos - Profile Pictures” page that appears, click the Change Profile Picture link.
On the Edit Profile Picture page that appears, click Browse to search your computer for the image file you want to add. Choose a .jpg, .gif, or .png file that’s smaller than 4 megabytes.
Turn on the “I certify…” checkbox. You can click the "Terms of Use” link to read the legal nitty-gritty of what you’re agreeing to, but here’s the bottom line: Don’t add a picture that you didn’t personally shoot (or draw, or airbrush, or whatever).
Click the Upload Picture button. The next time you view your profile (Viewing Your Profile), Facebook displays your new picture.
If you like, you can tweak your picture or add more pictures to your Profile Picture Album from the Edit Profile Picture page. Here are your options:
To upload an additional picture to your Profile Picture Album, simply repeat steps 4–6.
To change your profile picture to another picture you’ve already added, click the Profile Picture Album link (it’s on the left, below your current picture). Then, in the window that appears, click the photo you want. Finally, at the bottom of the window (scroll way down), click the Make Profile Picture link and, in the confirmation box that appears, click the Okay button.
To add a caption to your profile picture, click the Profile Picture Album link and then click Edit Photos. In the window that appears, head to the Caption field that’s next to your profile picture; type your text and then click Save Changes. (Captions appear when folks viewing your photo albums mouse over pictures.)
To delete a picture from your Profile Picture Album, click the Profile Picture Album link, click the image you want to remove, and then click Delete This Photo.
Facebook displays a tiny thumbnail version of your profile picture in various places around the site depending on your Facebook activities. For example, if you join a Group (Chapter 6), Facebook includes your thumbnail in the Members section of the Group’s profile page. And when you become friends with another member, your thumbnail appears on that person’s Friend List (Organizing Your Friends).
Sometimes Facebook uses only a part of your profile picture as the thumbnail, and it might pick a weird portion of the image. Fortunately, you can control which section of the image it displays. To tweak the thumbnail version of your profile picture, on the Edit Profile Picture page, mouse over the thumbnail until your cursor turns into a four-headed arrow; then drag to move the contents of the picture around in its teensy-tiny frame. When you’re happy with the way things look, click Save Thumbnail Version.
Tip
For a website that doesn’t advertise itself as a photo-sharing site, Facebook lets you do a surprising amount of stuff to your pictures. You can create multiple photo albums, share your photos with Facebook members (and non-Facebook members)—even crop and rotate your photos 90 degrees. At the top of any Facebook screen, click the Profile link, click the Photos tab, and then click the Profile Pictures Album link. In the “Your Photos—Profile Pictures” window that appears, click any picture and then scroll to the bottom of the window to see your options.
Viewing Your Facebook Home Page
After you’ve registered with Facebook, the site creates a Home page just for you. To see it:
Point your web browser to www.facebook.com. You see a generic welcome page with a spot for you to log into Facebook on the right.
Log in. If you always access Facebook from the same computer, you may find that your email address already appears in the Email field. If not, type in the email address and password you gave Facebook when you registered, and then click the Login button.
Tip
Think twice before turning on the “Keep me logged in” checkbox. If you do, your browser will stay logged into Facebook until you specifically remember to log out. If you forget to log out, family members, coworkers, fellow library patrons, or anyone else who uses the computer after you log into Facebook can access your account.
After you finish your Facebook session, click the Account link in the upper-right part of any Facebook screen and then select Logout. Doing so prevents other folks from getting into your profile and designating you as being “In an Open Relationship,” say.

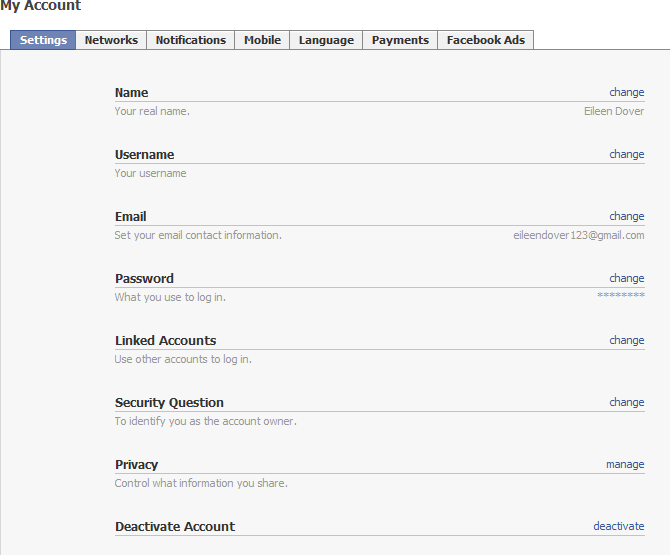
Changing Account Info
Some of the stuff you share with Facebook—like your password, for example—isn’t for public consumption. Because these details are between you and Facebook, they’re not part of your profile, but are part of your Facebook account. To change account details:
At the top-right corner of any Facebook screen, click the Account link and, in the list that appears, click Account Settings. On the screen that appears, make sure the Settings tab is selected.
Click the name of one or more of the following fields:
Name. If your name changes after you register with Facebook—due to a marriage or divorce, for example—you can update it instead of canceling your membership and re-registering. One caveat: Because Facebook runs your name change through security checks to spot potential fraud, the change won’t take effect immediately. (Think days, not hours.)
Username. Confusingly, usernames have nothing to do with the name you give Facebook when you register for an account, and they don’t appear anywhere on your profile. In Facebook parlance, a username is an optional name you can use to make the URL people see when they pull up your Facebook profile look neater. For example, say your brother heads to your Facebook profile. In his browser’s address bar, he sees something like this: http://www.facebook.com/#/profile.php?ref=profile&id=100000598910304. But after you choose a username, he’ll see something like this instead: http://www.facebook.com/eileendover.
Email. If your email address changes, here’s where you let Facebook know.
Note
Depending on how much you use Facebook, your email inbox might be swamped with emails telling you that so-and-so wrote on your Wall or invited you to play virtual poker. If this happens, consider getting a new email address just for your Facebook account. You can get a free email address from sites like www.mail.yahoo.com or www.gmail.com.
Password. For security reasons, you have to type in your old password, and then enter your new password twice.
Linked Accounts. If you regularly use another site, such as Google or Yahoo, and then switch over to Facebook (hey, there are worse morning-coffee routines), you can save time by telling Facebook to log you into Facebook automatically each time you log into Google (or Yahoo, or MySpace).
Privacy. Facebook lets you decide who gets to see the info you share with the site. Privacy is a big issue with potentially nasty ramifications, so Chapter 13 is devoted to understanding and customizing your privacy settings.
Deactivate Account. If you don’t like Facebook, you can just stop using it, but Facebook gives you a better way to break things off. By deactivating your account, you get a chance to tell Facebook’s designers why you don’t like it (actually, you can’t deactivate until you do). And turning on the “Opt out of receiving emails from Facebook” checkbox during the deactivation process lets you stop Facebook-related notifications and invitations from appearing in your inbox.
Get Facebook: The Missing Manual now with the O’Reilly learning platform.
O’Reilly members experience books, live events, courses curated by job role, and more from O’Reilly and nearly 200 top publishers.

