Chapter 4. Exchange Server and Organization Management
Introduction
Exchange servers don’t require a huge amount of ongoing babysitting, but it is important to know how to perform some server-level maintenance tasks. Actually, most Exchange maintenance tasks involve databases or storage groups, as that’s where the high-value data are stored. The recipes in this chapter break down into two basic areas: monitoring and controlling your Exchange servers at the server level, and setting properties on the Exchange organization object. These properties affect all of the servers in your organization. For the most part, you’ll use the Exchange System Manager (ESM) tool to make these changes.
ESM is an MMC-based application that layers a large number of Exchange-specific customizations on top of the basic MMC interface paradigm: a tree view on the left that shows one or more nodes (some with child nodes, some without), plus a large pane on the right that displays subordinate nodes or settings for whatever’s selected in the left pane. This doesn’t sound like too much to master; the real trick with ESM is learning which settings are in which property pages, because there certainly are a lot of those around. It’s also important to understand the versions of ESM and what they can do:
The Exchange 2000 ESM is what we think of as the “classic” version. It can be used to manage Exchange 5.5 and Exchange 2000 servers, and to view (but not change) the properties of Exchange Server 2003 machines. However, you only get the functionality that was available when Exchange 2000 shipped. That means that mailbox moves are single-threaded; there’s no Mailbox Recovery Center, and the queue viewing and management tools are feature-poor.
The Exchange Server 2003 RTM version of ESM mostly looks just like the Exchange 2000 version; the important differences are all under the hood. The biggest change for most administrators is that the Exchange Task Wizard’s mailbox moving code is multithreaded, so you can move up to four mailboxes concurrently. This makes mailbox moves much, much faster under most circumstances, although you have to perform an Exchange Server 2003 forestprep in your Exchange 2000 organization in order to make this work. In addition, there are improvements in how monitoring and status information is displayed, a new, better-organized tool for viewing message tracking data, the Mailbox Recovery Center (described in more detail in Recipe 11.10), and a vastly improved interface for viewing and controlling message queues. Exchange Server 2003’s ESM also includes the Internet Mail Wizard for quickly setting up SMTP mail interchange with Internet hosts. These new features come with a tradeoff: you can’t configure Exchange 2000-only features like the KMS, the Exchange Instant Messaging service, or the old-school MSMail, cc:Mail, and Schedule+ connectors.
Exchange Server 2003 SP1 adds a few new features to ESM, including the ability to set up RPC-over-HTTP connections with a simple property sheet instead of the morass of registry keys and fiddling required with the RTM version.
You can use all three of these versions in the same Exchange organization, whether or not you actually have the corresponding version of Exchange installed. However, Microsoft doesn’t support installing the Exchange 2000 version of ESM on an Exchange Server 2003 server (not that you’d want to anyway). One thing they do support is installing and using ESM from other Windows 2000, Windows Server 2003, and Windows XP computers in the same forest. Note that you can only run ESM from a computer in the same forest as your Exchange servers. If you want to run it on a laptop, home computer, or other machine that’s not a member of a domain in your Exchange forest, you’ll probably need to use Terminal Services to remotely log on to a machine in the forest.
4.1. Installing ESM on Windows XP
Problem
You want to manage Exchange from your desktop or laptop computer instead of having to connect directly to the Exchange server.
Solution
Using a graphical user interface
Log on to your Windows XP Professional machine using an account that has administrative privileges on the local computer.
From the Control Panel, open the Add or Remove Programs applet.
Click the Add/Remove Windows Components icon.
In the Windows Components page of the Windows Components Wizard, select Internet Information Services (IIS), then click the Details button.
In the Internet Information Services (IIS) dialog box, ensure that Internet Information Services Snap-In, SMTP Service, and World-Wide Web Service are checked, and click OK.
Click OK and click Next.
If prompted, supply your Windows XP product CD (or some other kind of installation media) so Windows can load the required files.
Click Finish to complete the component installation.
Open the Computer Management snap-in.
Select Services and Applications and select Services.
Stop the Simple Mail Transfer Protocol and World Wide Web Publishing services.
Set the startup state for the Simple Mail Transfer Protocol and World Wide Web Publishing services to Disabled.
Get the latest version of the Windows Server 2003 administrative tools package from:
http://www.microsoft.com/downloads/details.aspx?FamilyID=c16ae515-c8f4-47ef-a1e4-a8dcbacff8e3&displaylang=en and install it. (A version is on the Exchange CD in i386\adminpak.msi, but the web version has valuable bug fixes.)
Launch the Exchange Server 2003 setup utility from the Exchange product CD or installation point.
Click Next at the initial welcome screen.
Accept the license agreement and click Next.
If prompted for your 25-character product key, fill it in and click Next.
When the Component Selection page appears, use the drop-down menus in the Action column to select the Install action for the Microsoft Exchange System Management Tools. Click Next.
On the Installation Summary page, verify your settings (including the installation path), then click Next.
Wait while the installation proceeds; it usually takes 15-45 minutes.
Click Finish on the final setup page.
Using a command-line interface
Use your favorite text editor to create a text file containing the following lines. Each line lists an IIS component that’s required to run ESM on Exchange.
[Components]
iis_common = on
iis_inetmgr = on
iis_smtp = on
iis_www = on
Save the file; the name doesn’t matter.
From a command prompt, use the sysocmgr command to tell Windows XP to install the components. Although sysocmgr takes several parameters, the switches we’re interested in are
/i(which specifies where the system’s default component list is) and/u(which tells the utility to use the file you created file to determine what to install). Here’s an example:> sysocmgr /i:%systemroot%\inf\sysoc.inf /u:c:\temp\prep-xp-for-esm.txt
If you add the
/qswitch, sysocmgr will suppress its user interface; otherwise, you’ll see the standard Windows Component Wizard interface, but you won’t necessarily be able to click on anything to affect the installation’s progression. Note that you may still be prompted for installation media if Windows can’t find the needed files at the install source path specified by the sysoc.inf file.Complete the ESM installation by following steps 9-21 as described in the graphical solution.
Discussion
Windows XP has the capability to run some of the same core services as Windows 2000 and Windows Server 2003; ESM requires that the management snap-ins for the SMTP and WWW publishing services be present. To meet this prerequisite, you have to install those components; however, most administrators won’t want to run the SMTP or WWW services themselves, which is why you have to disable them after installation.
If you’re using Exchange 2000, you can still install the Exchange Server 2003 ESM on Windows XP. Installing the Exchange 2000 version of ESM on Windows XP machines is possible, but is tedious and unsupported by Microsoft. Instead, you should follow the instructions outlined in the solutions to install ESM 2003. (Remember, you can always use the evaluation version of Exchange Server 2003 to do the ESM install if you haven’t purchased the full product yet.)
See Also
MS KB 822178 (Overview of Dependencies and Requirements for Exchange 2003 Server Features), Recipe 2.9 for creating an unattended installation file for installing ESM via the command line, and Recipe 2.7 for installing Exchange on a member server
4.2. Starting and Stopping Exchange
Problem
You want to manually start or stop the Exchange services without rebooting the computer that hosts them.
Solution
Using a graphical user interface
To stop, start, pause, or restart an individual virtual server, do the following:
Log on to the Exchange server using an account that has administrative privileges on the local computer.
Launch the Exchange System Manager (Exchange System Manager.msc).
Expand the Administrative Groups node, then the administrative group that contains the server whose services you want to twiddle.
Expand the server and open its Protocols container.
Expand the protocol node that contains the virtual server you want to stop, pause, or restart.
Right-click the selected virtual server.
Choose the desired command (Stop, Pause, or Start) from the context menu.
Wait for the service status to update.
To stop, start, pause, or restart a service, do the following:
Log on to a server or workstation in your domain, using an account that has administrative privileges on the server where you’re trying to start or stop Exchange.
Open the Services snap-in (services.msc). If you’re not logged in to the target computer, right-click the Services (local) node in the left pane and use the Connect to another computer command to connect to the target server.
Locate the service that you want to start, stop, or pause. To stop all Exchange services, the easiest method is to stop the Microsoft Exchange System Attendant Service, although you can stop other services (see Table 4-1).
Change the service state by right-clicking the service and choosing a command, using the toolbar icons at the top of the Services snap-in, or choosing a command from the Action menu.
Service | Short name | What it does | Depends on | Default startup state |
System attendant | MSExchangeSA | Provides monitoring and controls interfaces for other services | Event Log, NTLM Security Support Provider, RPC, Server, Workstation services | Automatic |
Routing engine | RESvc | Maintains link state/routing table data | IIS admin | Automatic |
Information store | MSExchangeIS | Provides access to storage groups, databases, mailboxes | System attendant | Automatic |
IIS core | W3Svc | HTTP/HTTPS publishing, OWA | IIS Admin | Automatic |
SMTP service | SMTPSvc | Inbound and outbound SMTP message flow | IIS Admin | Automatic |
IMAP service | IMAP4Svc | IMAP access for end users | IIS Admin | Automatic (Exchange 2000) or disabled (Exchange Server 2003) |
POP3 service | POP3Svc | POP access for end users | IIS Admin | Automatic (Exchange 2000) or disabled (Exchange Server 2003) |
MTA stacks | MSExchangeMTA | X.400 MTA for X.400 connectors or mixed 5.5 organizations | System attendant | Automatic |
Site replication service | MSExchangeSRS | Topology discovery and replication for mixed-mode organizations | none | Disabled; only enabled when needed for Exchange 5.5 compatibility |
Event service | MSExchangeES | Backward compatibility with Exchange 2000 event scripts | Information store | Manual |
Management service | MSExchangeMGMT | Hosts WMI providers for message tracking and DSAccess | RPC, Windows Management Instrumentation services | Automatic |
IIS Admin service | IISADMIN | Protected Storage, RPC services | Automatic | |
NNTP service | NNTPSvc | NNTP feeds, public folder administration | IIS Admin | Manual |
Using a command-line interface
To stop the Exchange services locally, log on to the Exchange server with an account that has administrative privileges, and run the following command:
> net stop <serviceName>If you want to stop services on a remote machine, you can use the sc (“service control”) command with the
stop switch:
> sc <computerName> stop <serviceName>
A complete script to stop all of the Exchange and IIS services
would look like this (the /Y
switch forces the service control manager to stop the service and
any dependent services that have not yet stopped):
net stop MSExchangeES
net stop IMAP4Svc
net stop POP3Svc
net stop RESvc
net stop MSExchangeSRS
net stop MSExchangeMGMT
net stop MSExchangeMTA
net stop MSExchangeIS   /Y
net stop MSExchangeSA   /Y
net stop SMTPSvc
net stop W3Svc
net stop IISAdmin /Y
However, you can cheat by just stopping the Exchange system
attendant (net stop msexchangesa /y); since the information store depends
on it, that will cleanly shut down the IS and dismount your
databases. The other services, like the routing engine and SMTP
service, won’t be affected by this.
Discussion
Starting and stopping the Exchange services is not often necessary. Generally, you only need to stop the services if you’re performing some kind of maintenance, like an offline defragmentation (described in Recipe Recipe 6.16). In a few cases, you’ll have to stop and restart one service or another (usually either MSExchangeIS or W3SVC) to force it to take notice of some parameter you’ve changed in Active Directory or the registry. For example, you have to stop and restart the routing engine service to get it to reload its link state table from another server in its routing group.
Another, more significant, case where you might need to manually stop the Exchange services is when you’re running Exchange Server 2003 on a domain controller that is also a global catalog server. In this case, the AD services can shut down before the Exchange DSAccess component, in which case the DSAccess shutdown will wait, for up to 10 minutes, before giving up and shutting down. To avoid this wait, you can shut down the Exchange services before shutting down the server itself.
Table 4-1 lists the Exchange services; along with the common service name, it lists the short names of the services. You can use either format to start or stop services via the command line. It also lists the dependent services for each service. The fastest way to cleanly shut down an Exchange server is to stop the MSExchangeSA service; before the system attendant stops, it will shut down the information store (which in turn forces the IS to flush its transaction logs to disk, dismount all mounted databases, and write the special database header pages that indicate that the databases were cleanly dismounted).
See Also
Recipe 2.8 for
running Exchange on a domain controller or global catalog server; MS
KB 246287 (How to Write a Batch File to Shut Down Exchange Server
Quickly), and MS KB 829361
(Exchange Server 2003 Computer Takes Longer Than You Expect to Shut
Down); Chapter 2 of the Exchange Server 2003 Technical
Reference Guide for more on the Exchange services and their
dependencies
4.3. Controlling Message Tracking Settings
Solution
Using a graphical user interface
Launch the Exchange System Manager (Exchange System Manager.msc).
In the left pane, expand the appropriate Administrative Groups container and then expand the Servers container.
Right-click the target server and select Properties.
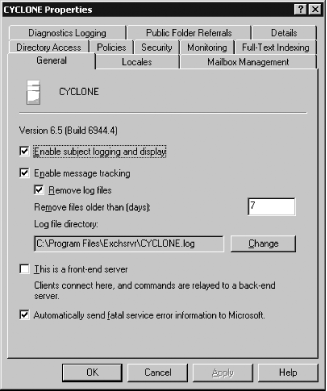
Switch to the General tab of the properties dialog as shown in Figure 4-1.
Enable message tracking by checking the Enable message tracking checkbox. When this setting is cleared, no message tracking information is kept.
Optionally, you can allow message tracking to record message subjects by checking the Enable subject logging and display checkbox. While this may disclose sensitive information, it also makes it much easier to find exactly the message you’re looking for, so we normally recommend that it be set.
Check the Remove log files checkbox and specify a log file retention period. You don’t have to do this, but if this checkbox is left blank, Exchange won’t purge these files on its own, and they will eventually use all available disk space.
Optionally, change the message tracking log file location with the Change button. Exchange automatically shares the message tracking log directory so that one server can be searched from others; bear this in mind when choosing a location.
Using VBScript
' This code uses WMI to interrogate and change message tracking
' properties on the specified server.
' ------ SCRIPT CONFIGURATION ------
strComputerName = "<ServerName>"  ' e.g., batman
' ------ END CONFIGURATION ---------
  strE2K3WMIQuery = "winmgmts://" & strComputerName &_
    "/root/MicrosoftExchangeV2"

  ' Find each Exchange 2003 server and display its message tracking status.
  ' Then, turn on message tracking and subject display and set the
  ' log retention period to 7 days. Real code should include error checking here
  Set serverList = GetObject(strE2K3WMIQuery).InstancesOf("Exchange_Server")

  For each Exchange_Server in serverList
      WScript.Echo "Server:        " & Exchange_Server.Name
      isEnabled = Exchange_Server.MessageTrackingEnabled
      If (isEnabled) Then
        WScript.echo "      Message tracking already enabled"
        Else
          Exchange_Server.EnableMessageTracking(True)

        End if
      WScript.Echo  "      Current lifetime: " &
         Exchange_Server.MessageTrackingLogFileLifetime
      Exchange_Server.MessageTrackingLogFileLifetime = 7
      WScript.Echo  "      New lifetime:     " &
        Exchange_Server.MessageTrackingLogFileLifetime
      WScript.Echo  "      Current subject logging:     " &
        Exchange_Server. SubjectLoggingEnabled
      Exchange_Server.SubjectLoggingEnabled = True
      WScript.Echo  "      New subject logging:         " &
       Exchange_Server. SubjectLoggingEnabled
      Exchange_Server.Put_
  Next
Discussion
Exchange 2000 and 2003 offer a fairly flexible message tracking system that lets you search for individual messages by sender, recipient, date, and time. This is invaluable when trying to find out why a particular user’s messages didn’t go where they were supposed to. For message tracking to be effective, it has to be enabled on all servers in the organization; if not, you won’t be able to track a message’s complete path through your organization. For example, if Alice (on a server in routing group A) sends a message to Zeke (whose mailbox server is in routing group Z), the message may (and probably will) transit other servers; if tracking is disabled on any of those intermediate servers, the trail will stop dead. As an alternative to setting message tracking properties on every individual server, you can create an Exchange system policy that applies the tracking settings you want to use; see Recipe 4.5.
Using VBScript
Exchange Server 2003 includes message tracking properties in
the Exchange_Server object, but
Exchange 2000 doesn’t, so there’s no good way to programmatically
control message tracking settings there. As part of the Exchange
Server 2003 WMI provider, you can optionally specify a location of
the tracking logs when you call EnableMessageTracking() , but you have to write your own code to move existing
log files and set up the folder structure yourself if you’re moving
the logs to a nonstandard location.
See Also
Recipe 4.5 for using Exchange system policies; MS KB 823864 (Improved Message Tracking Features in Exchange Server 2003)
4.4. Determining Whether a Server Is a Front-End Server
Solution
Using a graphical user interface
Launch the Exchange System Manager (Exchange System Manager.msc).
In the left pane, expand the appropriate Administrative Groups container and expand the Servers container.
Right-click an Exchange server object and select Properties.
Select the General tab; if the This is a front-end server checkbox is selected, the server is acting as a front-end server; if it is unchecked, it’s not. In that case, the server may be a back-end, public folder, or SMTP server.
Repeat steps 3 and 4 for each Exchange server you’re interested in.
Using a command-line interface
The following command will query Active Directory for servers that have the ServerRole attribute defined (see the Discussion section):
> dsquery * "CN=Administrative Groups, CN=<orgName>, CN=Microsoft
Exchange,CN=Services,CN=Configuration,<ForestDN>"
   -filter (&(objectcategory=msExchExchangeServer)(serverRole=1)) -attr cn msExchServerRole
For example, this command will find all front-end servers in
the sixih.com AD domain:
> dsquery * "CN=Administrative Groups, CN=sixih, CN=Microsoft
Exchange,CN=Services,CN=Configuration,DC=sixih,DC=com"
   -filter (&(objectcategory=msExchExchangeServer)(serverRole=1))
-attr cn msExchServerRole
Using VBScript
' This code uses ADO to query the MSExchServerRole attribute for all servers
' in the domain.
' --------------SCRIPT CONFIGURATION------------------
strBase = "<LDAP://cn=administrative groups,cn=robichaux and
associates,cn=microsoft exchange,cn=services,cn=configuration,
dc=robichaux,dc=net>;" ' dc=<domain>
,dc=<tld>;"
strFilter = "(objectcategory=MSExchExchangeServer);"
strAttrs = "ServerRole,cn;"
strScope = "subtree"
'---------------END CONFIGURATION---------------------
Set objConn = CreateObject("ADODB.Connection")
objConn.Open "Provider=ADsDSOObject;"

Set objRS = objConn.Execute(strBase & strFilter & strAttrs & strScope)
objRS.MoveFirst
While Not objRS.EOF
    strName = objRS.Fields("cn").value

   'Get the value of the MSExchServerRole
    If objRS.Fields("ServerRole").value = 1 Then
                    strRole = "Front-End Server"
    Elseif IsNull(objRS.Fields("ServerRole").value) Then
          strRole = "Back-End Server"
    Elseif objRS.Fields("ServerRole").value = 0 Then
          strRole = "Back-End Server"
    end if
        wscript.echo strName & " is a " & strRole
   objRS.MoveNext
 Wend
Discussion
In large Exchange deployments, you may lose track of what role
an Exchange server is serving. The msExchServerRole attribute on each server object enables you to
determine that server’s role. A msExchServerRole value of 1 indicates a front-end server; a value of
0 indicates that the server isn’t a
front-end server. If you want to determine whether a non-front-end
server is actually a back-end mailbox server, you can check to see if
it has any mailbox databases associated with it.
Using a graphical user interface
There’s no way to grab this information from numerous servers within your organization at once—you must point and click all the way. This is okay if you have three servers to check, but if you have twelve or twenty, you are better off using the CLI or VBScript solutions.
Using a command-line interface
Dsquery is a command-line tool included in Windows Server 2003 and Windows XP. The tool is not native to Windows 2000 Server, but you can copy dsquery.exe onto a Windows 2000 Server from another computer and it will work correctly for most queries (including the ones shown here).
See Also
Exchange Server 2003 and Exchange 2000 Server Front-End and Back-End Topology white paper:
| http://www.microsoft.com/technet/prodtechnol/exchange/2003/library/febetop.mspx |
4.5. Applying Exchange System Policies
Problem
You need to apply policy settings to multiple Exchange servers, mailbox stores, or public folder stores.
Solution
Using a graphical user interface
To create system policies, do the following:
Launch the Exchange System Manager (Exchange System Manager.msc).
Select the container for the administrative group where the policies should apply. Right-click it and choose New→ System Policy Container.
Right-click the System Policies object and choose New→ Public Store Policy. Select the property pages you wish the policy to handle. Click OK. Assign a name to the policy and click Apply.
Specify the policies you wish enforced on servers in this Administrative Group. Click OK.
Specify the object(s) that the policy will apply to by right-clicking the policy, and selecting Add Public Store. Type the name of the Public Store the policy will manage, and click OK.
To copy system policies between administrative groups, do the following:
In Exchange System Manager, right-click the original policy and choose Copy.
Right-click another System Policy container and choose Paste.
Refresh the view.
Apply the policy to servers, mailbox stores, or public stores as appropriate.
Discussion
Exchange system policies can help apply consistent settings for some server- and database-specific behaviors across an enterprise. Preferred settings can be defined and then applied to servers and databases throughout the organization. Once a policy is created, it can be copied to system policy containers in other administrative groups. Table 4-2 lists the objects that can be set by the three types of Exchange system policy objects: mailbox store policies, public store policies, and server policies.
Policy class | Property page | Setting |
Mailbox store policy | General | NameDefault public storeOffline address listArchive all messagesClients support S/MIME signaturesDisplay plain-text messages in a fixed-size font |
Database | Maintenance interval | |
Limits | Issue warning atProhibit send atProhibit send and receive atWarning message intervalKeep deleted items forKeep deleted mailboxes forDo not permanently delete mailboxes until the store has been backed up | |
Full-text indexing | Update interval | |
Public store policy | General | NameClients support S/MIME signaturesDisplay plain-text messages in a fixed-size font |
Database | Maintenance interval | |
Replication | Replication intervalReplication interval for alwaysReplication message size limit | |
Limits | Issue warning atProhibit send atProhibit send and receive atWarning message intervalKeep deleted items forDo not permanently delete items until the store has been backed upAge limit for all folders in this store | |
Full-text indexing | Update interval | |
Server policies | General | NameEnable subject logging and displayEnable message trackingRemove log filesRemove log files older than |
System policies take priority over settings on individual servers and databases. Once an Exchange system policy is applied, the configured options are not available on the object’s property pages. This helps ensure consistency between servers, while still allowing administrators in separate administrative units to edit their own policies. To remove an object from a policy so that it can be individually managed, simply navigate to the policy, right-click the name of the object, and select Remove From Policy.
Warning
Don’t delete a policy, either by right-clicking it or selecting it and pressing the Delete key. If you do, ESM will ask you if you really want to remove your Exchange server, and that’s exactly what it means! If you agree to the deletion, your Exchange server’s configuration data will be removed from the configuration NC. MS KB 841516 explains this (dangerous) design decision, and points out that once you delete the server, the only way to get it back is to perform a disaster recovery on that computer—not a lot of fun.
If you apply a policy to an object that is already under the control of another set of policy settings, a dialog box will warn you of the policy. You will be asked to confirm that you wish the new policy to replace the old; the newer one always takes precedence.
See Also
MS KB 256141 (How to Create System Policies in Exchange), MS KB 319098 (How to Use System Policies to Configure Public Folder Storage Limits in Exchange 2000 Server), and MS KB 822938 (How to Use System Policies to Configure Mailbox Storage Limits in Exchange Server 2003)
4.6. Monitoring Exchange Service Status
Problem
You want to be alerted if the Exchange-related services on your Exchange 2000 or 2003 servers are stopped.
Solution
Using a graphical user interface
Launch the Exchange System Manager (Exchange System Manager.msc).
If you cannot see Administrative Groups in the left pane, right-click the Organization object and select Properties. On the General tab of the Properties page, check the Display administrative groups box. Click OK.
In the left pane, expand the Servers container (if you are using multiple administrative groups, you will first need to expand each group to see the Servers container).
Right-click the first server listed and select Properties.
Select the Monitoring tab.
Ensure the Default Microsoft Exchange Services group is present. If additional services need to be monitored, you may add them by double-clicking Default Exchange Services and using the Add button.
Click OK.
Repeat steps 3 through 6 for all Exchange 2000 and 2003 servers within your organization.
Expand the Tools container in Exchange System Manager, then expand the Monitoring and Status container.
Right-click Notifications and select New→ Script Notification.
Add a script you want to run, such as a batch file that uses blat.exe or another command-line mailing tool, when a service listed in the Default Exchange Services area is not running. Click OK.
Discussion
This recipe just covers setting up notifications to alert you when a service is down. While there are numerous third-party tools that do a great job of watching over your services, we’re not recommending any here, because each tool has its own advantages and disadvantages.
We often use a batch file with blat.exe to do the notification. Blat is a free, simple utility that can send a message over SMTP. Here is an example batch file that uses blat:
blat c:\temp\test.txt -to administrator@backupdomain.com -f
exchangeserver@domain.com -server mail.backupdomain.com
The file test.txt consists of a single line:
Exchange Server Service Down - check servers!
While this isn’t necessarily the most elegant solution available, it is simple, it works, and there’s not a lot of configuration necessary. If your organization has numerous servers, you may want to consider fancying things up a bit so the text file will tell you which Exchange server has a service down. Note that you probably shouldn’t rely upon your Exchange server’s SMTP service to deliver the notification message, as the message alerting you the SMTP service is down won’t get through! If your messaging infrastructure is really important, you should probably consider using a monitoring and performance package such as Microsoft Operations Manager or the NetIQ suite.
See Also
MS KB 310315 (Troubleshooting monitoring and status in Exchange and in Small Business Server), Blat (http://www.blat.net), and the Blat FAQ (http://www.blat.net/faq/)
4.7. Controlling Diagnostic Logging
Problem
You want to capture more information on the operation of the various Exchange protocols and components to aid in your diagnosis and troubleshooting efforts.
Solution
Using a graphical user interface
Launch the Exchange System Manager (Exchange System Manager.msc).
Choose the administrative group in which the server you wish to troubleshoot resides. Expand the Server node.
Right-click your selected server and choose Properties from the menu. Click the Diagnostics Logging tab.
In the left pane, you will see a listing of the various services and components that are running on that server. As you select different services, the right pane will update the specific categories or actions that the service provides logging for, and will list what level of logging is currently configured for each one.
Select a category and choose the radio button under Logging Level at which you wish that category to be logged: None, Minimum, Medium, or Maximum.
When you have finished setting new levels for each service and category desired, click OK to close the server properties dialog and activate your new logging settings. (Note that unlike Exchange 5.5, Exchanges 2000 and 2003 don’t require that the services be restarted after changing the logging level.)
Using VBScript
Each component listed in Table 4-2 has its own
registry key under HKLM\System\CurrentControlSet\Services\<servicename>\Diagnostics. Each category of the
component has a DWORD value that sets the logging level for that
particular component. Annoyingly, there’s no real naming scheme for
the category values; one component might use “1 General” as the name
of the logging control value for general logging, while another
might use “9005 General.” Some complex components, like the
information store, actually have subkeys under the Diagnostics key,
so the best way to write a script to set logging values is to spend
a couple of minutes locating the exact component value you want to
toggle.
Once that’s done, you can set the value using a script like this:
' This code sets diagnostic logging to "maximum" on the Logons
' component of the information store
' ------ SCRIPT CONFIGURATION ------
strDiagKey = "HKEY_LOCAL_MACHINE\System\CurrentControlSet\
Services\MSExchangeIS\Diagnostics\"
' ------ END CONFIGURATION ---------

Set objWSH = wscript.CreateObject("WScript.Shell")
objWSH.RegWrite strDiagKey & "90015 Logons", 5, "REG_DWORD"
The actual value you attach to the category value can be any of the values described in the Discussion section.
Discussion
Exchange provides granular level of control over diagnostic logging for the various components within the Exchange server. Events generated by diagnostic logging are stored in the application event log. The log settings themselves are helpfully gathered, for the most part, in one convenient place. That these controls are accessible only via the GUI is less convenient, especially when problems may involve multiple servers in your organization; having to adjust multiple sets of categories by hand is somewhat annoying and possibly prone to errors. Every category can have one of five logging values associated with it:
0No logging. Use this value to disable logging on a category. Critical errors and warnings will still be logged.
1Minimum. This value produces log entries for informational and warning events, but without much detail.
3Medium. This value adds more informational events and gives you more details for those events that would have been logged at minimum logging.
5Maximum. This value logs pretty much everything that happens in the category.
7Field engineering. This value, which isn’t accessible through the ESM GUI, logs everything that happens in the category. Normally, you’ll turn this on only when Microsoft support is working with you to troubleshoot a problem.
The following components are included in the default Exchange installation and are available for detailed diagnostic logging:
- IMAP4Svc
The IMAP4 protocol service.
- MSExchangeActiveSyncNotify
The ActiveSync service for PocketPC and SmartPhone users.
- MSExchangeADDXA
The Active Directory Synchronization service keeps Active Directory properly updated when running in a mixed Exchange 5.5/200x organization.
- MSExchangeAL
The Recipient Update Service.
- MSExchangeDSAccess
The DSAccess component is the central Active Directory proxy for all other Exchange services.
- MSExchangeIS
The Information Store controls the storage of mailboxes and public folders and is broken into three subservices: System, Public Folder, and Mailbox.
- MSExchangeMTA
The Message Transport Agent provides X.400 and Exchange 5.5-compatible RPC transports.
- MSExchangeMU
This service keeps the Exchange server information in Active Directory and the local IIS metabase synchronized.
- MSExchangeSA
The System Attendant performs important monitoring and housekeeping tasks.
- MSExchangeSRS
Active only in mixed-mode organization, the Site Replication service allows the replication of site and server information with Exchange 5.5 servers.
- MSExchangeTransport
The Transport service handles the default SMTP transport and maintains the routing tables.
- POP3Svc
The POP3 protocol service.
There are several additional services that make up the various connectors; these services and their corresponding categories will only be present on servers that have these connectors installed:
The Microsoft Exchange Calendar Connector (MSExchangeCalCon) replicates free/busy information with both Lotus Notes and Novell GroupWise.
The Microsoft Exchange Connector for Novell GroupWise (LME-GWISE) provides message flow between Exchange and GroupWise. There is also the Microsoft Exchange Router for Novell GroupWise (MSExchangeGWRtr).
The Microsoft Exchange Connector for Lotus Notes (LME-NOTES) provides message flow between Exchange and Notes.
Generally, you will want to leave all logging levels at None; running them at higher levels can quickly generate an abnormally large number of event log entries. Keep careful track of which services and categories are being logged in more detail and be sure to reset them to no extra logging as soon as you have gathered the necessary information.
Note that even with the services and categories that provide logging for protocols such as IMAP and SMTP, these options do not provide logging of the actual commands being issued and received on these connections. Troubleshooting an inbound SMTP connection, for example, may require an actual look at the SMTP commands the client connection is attempting to use. If this is the kind of logging you need, you need to enable protocol logging; see Recipe 8.23 for more details.
Table 4-3 provides a list of the default services in Exchange Server 2003 SP1 and the categories provided by each of them.
Service | Category |
IMAP4Svc | ConnectionsAuthenticationClient ActionConfigurationContent EngineGeneral |
MSExchangeActiveSyncNotify | OMA Push CategorizerOMA Push Event Sink |
MSExchangeADDXA | ReplicationAccount managementAttribute mappingService ControllerLDAP Operations |
MSExchangeAL | LDAP OperationsService ControlAttribute MappingAccount managementAddress List Synchronization |
MSExchangeDSAccess | GeneralCacheTopologyConfigurationLDAP |
MSExchangeIS\System | RecoveryGeneralConnectionsTable CacheContent EnginePerformance MonitorMove MailboxDownloadVirus ScanningExchange VSS WriterExchange Backup RestoreExchange Client Monitoring |
MSExchangeIS\Public Folder | Transport GeneralGeneralReplication AD UpdatesReplication Incoming MessagesReplication Outgoing MessagesNon-delivery ReportsTransport SendingTransport DeliveringMTA ConnectionsLogonsAccess ControlSend On Behalf OfSend AsRulesStorage LimitsReplication Site FoldersReplication ExpiryReplication ConflictsReplication BackfillBackground CleanupReplication ErrorsIS/AD SynchronizationViewsReplication GeneralDownloadLocal Replication |
MSExchangeIS\Mailbox | Transport GeneralGeneralTransport SendingTransport DeliveringTransfer Into GatewayTransfer Out Of GatewayMTA ConnectionsMTA ConnectionsLogonsAccess ControlSend On Behalf OfSend AsRulesStorage LimitsBackground CleanupReplication ErrorsIS/AD SynchronizationViewsDownloadLocal Replication |
MSExchangeMTA | X.400 ServiceResourceSecurityInterfaceField EngineeringMTA AdministrationConfigurationDirectory AccessOperating SystemInternal ProcessingInteroperabilityAPDU |
MSExchangeMU | General |
MSExchangeSA | Mailbox ManagementNSPI ProxyRFR InterfaceOAL GeneratorProxy GenerationRPC CallsRPC-HTTP Management |
MSExchangeSRS | Knowledge Consistency CheckerSecurityExDS InterfaceReplicationGarbage CollectionInternal ConfigurationDirectory AccessInternal ProcessingLDAP InterfaceInitialization/TerminationService ControlField EngineeringSite Consistency Checker |
MSExchangeTransport | Routing Engine/ServiceCategorizerConnection ManagerQueuing EngineExchange Store DriverSMTP ProtocolNTFS Store DriverNDRAuthentication |
POP3Svc | ConnectionsAuthenticationClient ActionConfigurationContent EngineGeneral |
See Also
Recipe 8.23 for using protocol logging, MS KB 821912 (How to Collect Diagnostic Data to Help Troubleshoot Information Store Issues), MS KB 555232 (Exchange server diagnostic logging levels), and MS KB 295307 (How to Enable and Increase Logging for Microsoft Exchange Connectivity Controller Connectors)
4.8. Measuring Exchange Performance
Problem
You want to measure and monitor performance of your Exchange servers, comparing current performance against an established baseline.
Solution
Using a graphical user interface
From the Start menu, select Administrative Tools→ Performance.
In the Performance MMC, expand Performance Logs and Alerts.
Right-click Counter Logs, select New Log Settings, and enter a name for the log. Click OK.
On the General tab, click the Add Counters button and add the performance counters you wish to monitor. Once you’ve added all the counters you want to be available in this log set, click Close. Change the sample interval time or credentials if desired.
Click the Log Files tab and select the log file type, naming convention, and whether you want to allow log files to be overwritten.
Optionally, click the Configure button and select a log file path and the maximum log file size. Click OK when you’re done.
Click OK.
Using the Performance Monitor Wizard
Instead of setting up performance monitoring manually, you can use Microsoft’s free Performance Monitor Wizard to quickly configure a set of Exchange-related log settings.
Download and extract the Performance Monitor Wizard (perfwiz.exe) from Microsoft’s download site:
http://www.microsoft.com/downloads/details.aspx?FamilyID=31fccd98-c3a1-4644-9622-faa046d69214&DisplayLang=en From the Start Menu, select Run and enter the full path to perfwiz.exe and click OK.
After the welcome screen, enter the name of the computer that will be collecting the performance monitor logs and click Next.
Select Create New Log and click Next.
Select Standard Perfmon and click Next. (You can select Advanced Configuration to add or remove individual performance counters.)
Enter the name of the computer to be monitored, check the Exchange Server box, and click Next.
Select a name, file size, and location for the performance log file. Check Continue logging in next file to create new log files once the maximum size has been reached, or leave blank to overwrite the file. Click Next.
Either enter the log file’s sample interval, or allow the wizard to calculate an appropriate interval for you based upon how much time elapses between significant issues. Click Next.
Press Start to begin running the Performance Monitor log you’ve just created. Click Next, then click Finish. You can now use the Performance MMC to access the logs.
Discussion
Measurement of Exchange Server system performance monitoring is a discipline that helps throughout the lifecycle of your messaging system. Proper understanding of what affects your system’s performance allows you to properly choose the server configuration, watch for problems on an ongoing basis, and solve problems quickly when they occur. It’s important to establish a baseline performance log over a meaningful time period when the system is operating normally, so that during routine monitoring you’ll quickly notice if something has gone awry. Separate baselines will have to be established for different types of servers in your Exchange organization; obviously an Outlook Web Access front-end server is going to experience different loads than a mailbox server or a connector server.
The Performance Monitor Wizard is a quick way to set up a full set of Exchange performance counters that can then be accessed through the Performance MMC. Exchange bottlenecks will most likely come from your disk subsystem, RAM, processor, or network connection, so these are the performance objects you’ll want to give your attention to. You can get a short description of the function of each performance object and counter by clicking the Explain button within the Performance MMC. Microsoft publishes several detailed white papers detailing performance monitoring and tuning for Exchange servers; these are highly recommended as supplemental reading on this topic.
Table 4-4 shows a list of some of the more important performance counters and a description of their function. There are hundreds of performance counters and this represents a fairly generic set; you will want to browse through the performance counters for OMA, public folder stores, POP3, IMAP4, or any other services that need to be measured.
Performance object | Counter | What it does |
Logical Disk | % Free Space | Percentage of usable space on the selected logical drive that remains free. |
Logical Disk | % Disk Time | Percentage of elapsed time that the selected logical drive was busy servicing read or write requests. |
Physical Disk | Disk Reads/secDisk Writes/sec | The rate of read (or write) operations on the physical disk. |
Physical Disk | Current Disk Queue Length | Number of requests outstanding on the disk when the performance data is collected. |
Memory | Available Bytes (or KBytes or MBytes) | Amount of physical memory available for allocation. |
Memory | Pages/sec | Rate at which pages are read from or written to disk. |
Network Interface | Bytes Total/sec | Rate at which bytes are sent and received over each network adapter. |
Paging File | % Usage | The amount of the page file that is in use, as a percent of the total page file size. |
Processor | Interrupts/sec | Rate at which hardware interrupts are serviced by the CPU(s). |
Server | Bytes Total/sec | Amount of traffic in bytes sent to and from the network. |
Server | Work Item Shortages | Occurs when no work item is available for allocation to incoming service requests. |
Server Work Queues | Queue Length | Current length of work queue for the CPU. |
System | Processor Queue Length | Number of threads in the processor queue. |
MSExchangeIS | Connection Count | Number of client processes connected to the information store. |
MSExchangeIS | RPC Operations/sec | Rate at which RPC operations occur. |
MSExchangeIS | Write Bytes RPC Clients/sec | Number of RPC bytes written. |
MSExchangeIS | RPC Requests | Number of client requests being processed by the information store. |
MSExchangeIS Mailbox | Receive Queue Size | Number of messages in mailbox store’s receive queue. |
MSExchangeIS Mailbox | Send Queue Size | Number of messages in mailbox store’s send queue. |
SMTP Server | Local Queue Length | Number of messages in the local queue. |
SMTP Server | Remote Queue Length | Number of messages in the remote queue. |
SMTP Server | Messages Delivered/sec | Rate that messages are being delivered locally. |
SMTP Server | Messages Sent/sec | Rate that outbound messages are being sent. |
Web Service | ISAPI Extension Requests/sec | Rate at which Internet server API requests are received by the Web service (for OWA). |
See Also
MS KB 811237 (How To: Capture Performance Data from a Remote Windows 2000 Computer Using System Monitor), Troubleshooting Exchange Server 2003 Performance white paper:
| http://www.microsoft.com/technet/prodtechnol/exchange/2003/library/e2k3perf.mspx |
Performance Monitor Wizard:
| http://www.microsoft.com/downloads/details.aspx?FamilyID=31fccd98-c3a1-4644-9622-faa046d69214 |
Exchange Performance Tuning web page:
| http://www.microsoft.com/exchange/techinfo/administration/finetune.asp |
The Server Performance Adviser documentation:
| http://www.microsoft.com/downloads/details.aspx?familyid=61A41D78-E4AA-47B9-901B-CF85DA075A73&displaylang=en |
4.9. Delegating Administrative Control
Problem
You want to delegate control over Exchange Server administrative functions to a user or group in your organization.
Solution
Using a graphical user interface
Launch the Exchange System Manager (Exchange System Manager.msc).
Right-click the organization object and select Delegate Control.
At the Exchange Administration Delegation Wizard welcome screen, click Next.
To add users or groups to whom you’d like to delegate administrative access, click Add. Click Browse and type the name of the user or group being granted access. Click OK.
Select the role you wish to grant: Exchange Administrator, Full Administrator, or View-Only Administrator, and click OK.
Click Next, then click Finish. You have successfully delegated an administrative role to the specified user(s) or group(s).
Discussion
Exchange 2000 and Exchange Server 2003 support three distinct administrative roles:
The Exchange Administrator role allows holders to see and change all Exchange-related settings in ESM. However, holders of this role can’t change permissions on Exchange-related objects.
The Exchange Full Administrator role can do everything Exchange Administrator can, plus it can be used to change permissions.
The Exchange View-Only Administrator can see settings, but can’t make permanent changes.
There’s no equivalent of the Exchange 5.5 service account administrator; by design, Microsoft sets the ACEs on mailbox databases to prevent administrators from reading other people’s mail without some effort.
The Exchange Delegation Wizard can be used to grant administrative permissions over organizations or administrative groups. It is a good idea to create security groups for the Exchange Administrator, Exchange View Only Administrator, and Exchange Full Administrator roles; you can then add and remove users from these groups as necessary. Putting users in groups, then delegating control to those groups, is the preferred method of delegation. You can delegate to individual users, but this increases the chances that you’ll either make a mistake and grant access to the wrong user or that you’ll have to go back later and undo the delegation. If a delegation is made in error, you can use the dsrevoke command-line tool to remove it, or you can manually edit the access control lists (ACLs) by hand. In addition to ease of delegation and subsequent permission removal, delegation to groups adds the advantage of requiring fewer access control lists for Active Directory to manage and replicate. As an alternate method, you may choose to customize the Delegation Wizard to control what kinds of permissions are set on which objects; MS KB 308404 explains the process of modifying the delegwiz.inf file to do this, but it’s not for the faint of heart.
See Also
MS KB 308404 (How to customize the task list in the Delegation Wizard), MS KB 823018 (Overview of Exchange Administrative Role Permissions in Exchange 2003), and MS KB 316792 (Minimum Permissions Necessary to Perform Exchange-related Tasks), and the dsrevoke tool:
| http://www.microsoft.com/downloads/details.aspx?FamilyID=77744807-c403-4bda-b0e4-c2093b8d6383&DisplayLang=en |
4.10. Setting Default Send and Receive Size Limits
Solution
Using a graphical user interface:
Launch the Exchange System Manager (Exchange System Manager.msc).
Open the Global Settings node and select Message Delivery.
Right-click Message Delivery and select Properties.
On the Defaults tab, enter the default size limits in kilobytes for messages sent and received through your organization. Click OK.
Using a command-line interface
Save the following LDIF file (inserting limits, in kilobytes, where indicated):
'---------------- limits.ldf ------------------ dn: CN=Message Delivery,CN=Global Settings,CN=First Organization, CN=Microsoft Exchange,CN=Services,CN=Configuration, DC=<domain>,DC=com changetype: modify replace: submissionContLength submissionContLength:<yourSendLimit>- dn: CN=Message Delivery,CN=Global Settings,CN=First Organization, CN=Microsoft Exchange,CN=Services,CN=Configuration, DC=<domain>,DC=com changetype: modify replace: delivContLength delivContLength:<yourReceiveLimit>-
Run the following command to import the LDIF file and apply the new limits:
> ldifde -i -f <filename.ldf>To clear the global message size limits, save the following LDIF file:
'-------------------- clearlimits.ldf ------------------
dn: CN=Message Delivery,CN=Global Settings,CN=First Organization,
CN=Microsoft Exchange,CN=Services,CN=Configuration,
   DC=<domain>,DC=com
changetype: modify
delete: submissionContLength
-

dn: CN=Message Delivery,CN=Global Settings,CN=First Organization,
CN=Microsoft Exchange,CN=Services,CN=Configuration,
   DC=<domain>,DC=com
changetype: modify
delete: delivContLength
-
Run the following command to import the LDIF file and remove the limits:
> ldifde -i -f <filename.ldf>Note that importing these changes into the directory will
happen immediately when you run ldifde, but the changes won’t be visible
immediately on the user object; you’ll have to wait a few minutes
for the changes to propagate.
Using VBScript
' The following code sets the default sending and receiving ' message size limits. ' ------ SCRIPT CONFIGURATION ------ strDomain = "dc=<companyname>,dc=com" ' e.g., "dc=robichaux, dc=net" ' ------ END CONFIGURATION ------ strMessageDeliveryDN = "cn=message delivery,cn=global settings,cn=first organization, cn=microsoft exchange,cn=services,cn=configuration," & _ strDomain set objMessageLimit = Getobject("LDAP://" & strMessageDeliveryDN) ' Limits are expressed in kilobytes objMessageLimit.Put "submissionContLength", "12345" objMessageLimit.Put "delivContLength", "54321" objMessageLimit.SetInfo WScript.Echo "Set message size delivery limits"
You can also remove the message limits altogether:
' The following code removes the global message size limits ' from your organization: ' ------ SCRIPT CONFIGURATION ------ strDomain = "dc=<companyname>,dc=com" ' e.g., "dc=robichaux, dc=net" const ADS_PROPERTY_CLEAR = 1 ' ------ END CONFIGURATION ------ strMessageDeliveryDN = "cn=message delivery,cn=global settings,cn=first organization, cn=microsoft exchange,cn=services,cn=configuration," & _ strDomain set objMessageLimit = Getobject("LDAP://" & strMessageDeliveryDN) objMessageLimit.PutEx ADS_PROPERTY_CLEAR,"delivContLength",vbNullString objMessageLimit.PutEx ADS_PROPERTY_CLEAR,"submissionContLength",vbNullString objMessageLimit.SetInfo WScript.Echo "Removed message size delivery limits"
Discussion
Most organizations want to have some sort of limit on the size of messages being sent into or out of the environment. Large messages obviously take a larger amount of system and network resources to process, so an upper limit is established and applied on the Global Settings node in Exchange System Manager. Individual settings can also be applied on SMTP connectors and virtual servers; be aware that if you apply limits in more than one place, the most restrictive setting will always be enforced.
See Also
Recipe 5.24 for limiting the number of message recipients, and MS KB 821881 (“How to Modify Global Settings in Exchange System Manager”)
Get Exchange Server Cookbook now with the O’Reilly learning platform.
O’Reilly members experience books, live events, courses curated by job role, and more from O’Reilly and nearly 200 top publishers.

