Chapter 1. Schema and Types
The first thing we must do is define what data our tables hold, how that data is interrelated, and any constraints on that data.
In order to provide access to the underlying database, SQLAlchemy needs a representation of the tables that should be present in the database. We can do this in one of three ways:
-
Using user-defined
Tableobjects -
Using declarative classes that represent your tables
-
Inferring them from the database
This chapter focuses on the first of these, as that is the approach used with SQLAlchemy Core; we’ll cover the other two options in later chapters after we have a grasp of the fundamentals. The Table objects contain a list of typed columns and their attributes, which are associated with a common metadata container. We’ll begin our exploration of schema definitions by taking a look at the types that are available to build tables in SQLAlchemy.
Types
There are four categories of types we can use inside of SQLAlchemy:
-
Generic
-
SQL standard
-
Vendor specific
-
User defined
SQLAlchemy defines a large number of generic types that are abstracted away from the actual SQL types supported by each backend database. These types are all available in the sqlalchemy.types module, and for convenience they are also available in the sqlalchemy module. So let’s think about how these generic types are useful.
The Boolean generic type typically uses the BOOLEAN SQL type, and on the Python side deals in true or false; however, it also uses SMALLINT on backend databases that don’t support a BOOLEAN type. Thanks to SQLAlchemy, this minor detail is hidden from you, and you can trust that any queries or statements you build will operate properly against fields of that type regardless of the database type being used. You will only have to deal with true or false in your Python code. This kind of behavior makes the generic types very powerful, and useful during database transitions or split backend systems where the data warehouse is one database type and the transactional is another. The generic types and their associated type representations in both Python and SQL can be seen in Table 1-1.
| SQLAlchemy | Python | SQL |
|---|---|---|
|
|
|
|
|
|
|
|
|
|
|
|
|
|
|
|
|
|
|
|
|
|
|
|
|
|
|
|
|
|
|
|
|
|
|
|
|
|
|
Note
It is important to learn these generic types, as you will need to use and define them regularly.
In addition to the generic types listed in Table 1-1, both SQL standard and vendor-specific types are available and are often used when a generic type will not operate as needed within the database schema due to its type or the specific type specified in an existing schema. A few good illustrations of this are the CHAR and NVARCHAR types, which benefit from using the proper SQL type instead of just the generic type. If we are working with a database schema that was defined prior to using SQLAlchemy, we would want to match types exactly.
It’s important to keep in mind that SQL standard type behavior and availability can vary from database to database. The SQL standard types are available within the sqlalchemy.types module. To help make a distinction between them and the generic types, the standard types are in all capital letters.
Vendor-specific types are useful in the same ways as SQL standard types; however, they are only available in specific backend databases. You can determine what is available via the chosen dialect’s documentation or SQLALchemy’s website. They are available in the sqlalchemy.dialects module and there are submodules for each database dialect. Again, the types are in all capital letters for distinction from the generic types. We might want to take advantage of the powerful JSON field from PostgreSQL, which we can do with the following statement:
fromsqlalchemy.dialects.postgresqlimportJSON
Now we can define JSON fields that we can later use with the many PostgreSQL-specific JSON functions, such as array_to_json, within our application.
You can also define custom types that cause the data to be stored in a manner of your choosing. An example of this might be prepending characters onto text stored in a VARCHAR column when put into the database record, and stripping them off when retrieving that field from the record. This can be useful when working with legacy data still used by existing systems that perform this type of prefixing that isn’t useful or important in your new application.
Now that we’ve seen the four variations of types we can use to construct tables, let’s take a look at how the database structure is held together by metadata.
Metadata
Metadata is used to tie together the database structure so it can be quickly accessed inside SQLAlchemy. It’s often useful to think of metadata as a kind of catalog of Table objects with optional information about the engine and the connection. Those tables can be accessed via a dictionary, MetaData.tables. Read operations are thread-safe; however, table construction is not completely thread-safe. Metadata needs to be imported and initialized before objects can be tied to it. Let’s initialize an instance of the MetaData objects that we can use throughout the rest of the examples in this chapter to hold our information catalog:
fromsqlalchemyimportMetaDatametadata=MetaData()
Once we have a way to hold the database structure, we’re ready to start defining tables.
Tables
Table objects are initialized in SQLAlchemy Core in a supplied MetaData object by calling the Table constructor with the table name and metadata; any additional arguments are assumed to be column objects. There are also some additional keyword arguments that enable features that we will discuss later. Column objects represent each field in the table. The columns are constructed by calling Column with a name, type, and then arguments that represent any additional SQL constructs and constraints. For the remainder of this chapter, we are going to build up a set of tables that we’ll use throughout Part I. In Example 1-1, we create a table that could be used to store the cookie inventory for our online cookie delivery service.
Example 1-1. Instantiating Table objects and columns
fromsqlalchemyimportTable,Column,Integer,Numeric,String,ForeignKeycookies=Table('cookies',metadata,Column('cookie_id',Integer(),primary_key=True),Column('cookie_name',String(50),index=True),Column('cookie_recipe_url',String(255)),Column('cookie_sku',String(55)),Column('quantity',Integer()),Column('unit_cost',Numeric(12,2)))

Notice the way we marked this column as the table’s primary key. More on this in a second.

We’re making an index of cookie names to speed up queries on this column.

This is a column which takes multiple arguments, length and precision, such as 11.2, which would give us numbers up to 11 digits long with two decimal places.
Before we get too far into tables, we need to understand their fundamental building blocks: columns.
Columns
Columns define the fields that exists in our tables, and they provide the primary means by which we define other constraints through their keyword arguments. Different types of columns have different primary arguments. For example, String type columns have length as their primary argument, while numbers with a fractional component will have precision and length. Most other types have no primary arguments.
Note
Sometimes you will see examples that just show String columns without a length, which is the primary argument. This behavior is not universally supported—for example, MySQL and several other database backends do not allow for it.
Columns can also have some additional keyword arguments that help shape their behavior even further. We can mark columns as required and/or force them to be unique. We can also set default initial values and change values when the record is updated. A common use case for this is fields that indicate when a record was created or updated for logging or auditing purposes. Let’s take a look at these keyword arguments in action in Example 1-2.
Example 1-2. Another Table with more Column options
fromdatetimeimportdatetimefromsqlalchemyimportDateTimeusers=Table('users',metadata,Column('user_id',Integer(),primary_key=True),Column('username',String(15),nullable=False,unique=True),Column('email_address',String(255),nullable=False),Column('phone',String(20),nullable=False),Column('password',String(25),nullable=False),Column('created_on',DateTime(),default=datetime.now),Column('updated_on',DateTime(),default=datetime.now,onupdate=datetime.now))
Here we are making this column required (
nullable=False) and also requiring a unique value.The default sets this column to the current time if a date isn’t specified.
Using
onupdatehere will reset this column to the current time every time any part of the record is updated.
Caution
You’ll notice that we set default and onupdate to the callable datetime.now instead of the function call itself, datetime.now(). If we had used the function call itself, it would have set the default to the time when the table was first instantiated. By using the callable, we get the time that each individual record is instantiated and updated.
We’ve been using column keyword arguments to define table constructs and constraints; however, it is also possible to declare them outside of a Column object. This is critical when you are working with an existing database, as you must tell SQLAlchemy the schema, constructs, and constraints present inside the database. For example, if you have an existing index in the database that doesn’t match the default index naming schema that SQLAlchemy uses, then you must manually define this index. The following two sections show you how to do just that.
Note
All of the commands in “Keys and Constraints” and “Indexes” are included as part of the Table constructor or added to the table via special methods. They will be persisted or attached to the metadata as standalone statements.
Keys and Constraints
Keys and constraints are used as a way to ensure that our data meets certain requirements prior to being stored in the database. The objects that represent keys and constraints can be found inside the base SQLAlchemy module, and three of the more common ones can be imported as shown here:
fromsqlalchemyimportPrimaryKeyConstraint,UniqueConstraint,CheckConstraint
The most common key type is a primary key, which is used as the unique identifier for each record in a database table and is used used to ensure a proper relationship between two pieces of related data in different tables. As you saw earlier in Example 1-1 and Example 1-2, a column can be made a primary key simply by using the primary_key keyword argument. You can also define composite primary keys by assigning the setting primary_key to True on multiple columns. The key will then essentially be treated like a tuple in which the columns marked as a key will be present in the order they were defined in the table. Primary keys can also be defined after the columns in the table constructor, as shown in the following snippet. You can add multiple columns separated by commas to create a composite key. If we wanted to explicitly define the key as shown in Example 1-2, it would look like this:
PrimaryKeyConstraint('user_id',name='user_pk')
Another common constraint is the unique constraint, which is used to ensure that no two values are duplicated in a given field. For our online cookie delivery service, for example, we would want to ensure that each customer had a unique username to log into our systems. We can also assign unique constraints on columns, as shown before in the username column, or we can define them manually as shown here:
UniqueConstraint('username',name='uix_username')
Not shown in Example 1-2 is the check constraint type. This type of constraint is used to ensure that the data supplied for a column matches a set of user-defined criteria. In the following example, we are ensuring that unit_cost is never allowed to be less than 0.00 because every cookie costs something to make (remember from Economics 101: TINSTAAFC—that is, there is no such thing as a free cookie!):
CheckConstraint('unit_cost >= 0.00',name='unit_cost_positive')
In addition to keys and constraints, we might also want to make lookups on certain fields more efficient. This is where indexes come in.
Indexes
Indexes are used to accelerate lookups for field values, and in Example 1-1, we created an index on the cookie_name column because we know we will be searching by that often. When indexes are created as shown in that example, you will have an index called ix_cookies_cookie_name. We can also define an index using an explicit construction type. Multiple columns can be designated by separating them by a comma. You can also add a keyword argument of unique=True to require the index to be unique as well. When creating indexes explicitly, they are passed to the Table constructor after the columns. To mimic the index created in Example 1-1, we could do it explicitly as shown here:
fromsqlalchemyimportIndexIndex('ix_cookies_cookie_name','cookie_name')
We can also create functional indexes that vary a bit by the backend database being used. This lets you create an index for situations where you often need to query based on some unusual context. For example, what if we want to select by cookie SKU and name as a joined item, such as SKU0001 Chocolate Chip? We could define an index like this to optimize that lookup:
Index('ix_test',mytable.c.cookie_sku,mytable.c.cookie_name))
Now it is time to dive into the most important part of relational databases: table relationships and how to define them.
Relationships and ForeignKeyConstraints
Now that we have a table with columns with all the right constraints and indexes, let’s look at how we create relationships between tables. We need a way to track orders, including line items that represent each cookie and quantity ordered. To help visualize how these tables should be related, take a look at Figure 1-1.
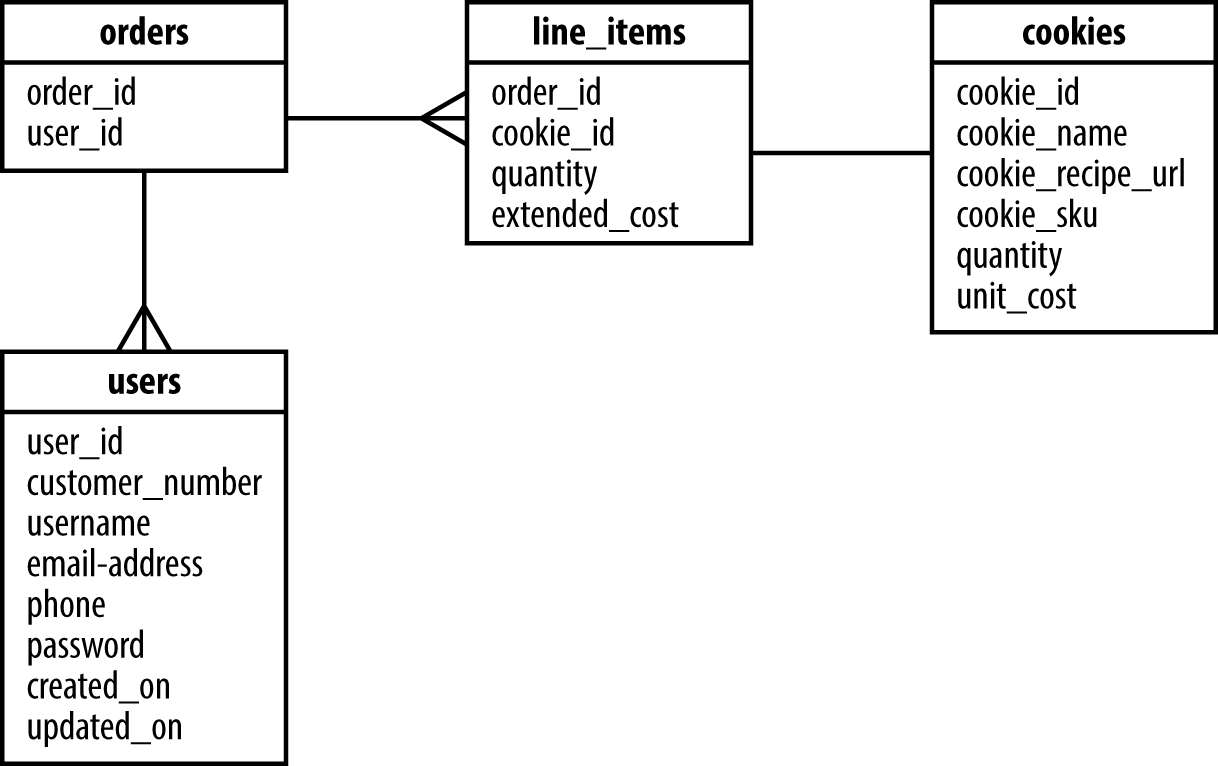
Figure 1-1. Relationship visualization
One way to implement a relationship is shown in Example 1-3 in the line_items table on the order_id column; this will result in a ForeignKeyConstraint to define the relationship between the two tables. In this case, many line items can be present for a single order. However, if you dig deeper into the line_items table, you’ll see that we also have a relationship with the cookies table via the cookie_id ForeignKey. This is because line_items is actually an association table with some additional data on it between orders and cookies. Association tables are used to enable many-to-many relationships between two other tables. A single ForeignKey on a table is typically a sign of a one-to-many relationship; however, if there are multiple ForeignKey relationships on a table, there is a strong possibility that it is an association table.
Example 1-3. More tables with relationships
fromsqlalchemyimportForeignKeyorders=Table('orders',metadata,Column('order_id',Integer(),primary_key=True),Column('user_id',ForeignKey('users.user_id')),Column('shipped',Boolean(),default=False))line_items=Table('line_items',metadata,Column('line_items_id',Integer(),primary_key=True),Column('order_id',ForeignKey('orders.order_id')),Column('cookie_id',ForeignKey('cookies.cookie_id')),Column('quantity',Integer()),Column('extended_cost',Numeric(12,2)))
Notice that we used a string instead of an actual reference to the column.
Using strings instead of an actual column allows us to separate the table definitions across multiple modules and/or not have to worry about the order in which our tables are loaded. This is because SQLAlchemy will only perform the resolution of that string to a table name and column the first time it is accessed. If we use hard references, such as cookies.c.cookie_id, in our ForeignKey definitions it will perform that resolution during module initialization and could fail depending on the order in which the tables are loaded.
You can also define a ForeignKeyConstraint explicitly, which can be useful if trying to match an existing database schema so it can be used with SQLAlchemy. This works in the same way as before when we created keys, constraints, and indexes to match name schemes and so on. You will need to import the ForeignKeyConstraint from the sqlalchemy module prior to defining one in your table definition. The following code shows how to create the ForeignKeyConstraint for the order_id field between the line_items and orders table:
ForeignKeyConstraint(['order_id'],['orders.order_id'])
Up until this point, we’ve been defining tables in such a way that SQLAlchemy can understand them. If your database already exists and has the schema already built, you are ready to begin writing queries. However, if you need to create the full schema or add a table, you’ll want to know how to persist these in the database for permanent storage.
Persisting the Tables
All of our tables and additional schema definitions are associated with an instance of metadata. Persisting the schema to the database is simply a matter of calling the create_all() method on our metadata instance with the engine where it should create those tables:
metadata.create_all(engine)
By default, create_all will not attempt to re-create tables that already exist in the database, and it is safe to run multiple times. It’s wiser to use a database migration tool like Alembic to handle any changes to existing tables or additional schema than to try to handcode changes directly in your application code (we’ll explore this more fully in Chapter 11). Now that we have persisted the tables in the database, let’s take a look at Example 1-4, which shows the complete code for the tables we’ve been working on in this chapter.
Example 1-4. Full in-memory SQLite code sample
fromdatetimeimportdatetimefromsqlalchemyimport(MetaData,Table,Column,Integer,Numeric,String,DateTime,ForeignKey,create_engine)metadata=MetaData()cookies=Table('cookies',metadata,Column('cookie_id',Integer(),primary_key=True),Column('cookie_name',String(50),index=True),Column('cookie_recipe_url',String(255)),Column('cookie_sku',String(55)),Column('quantity',Integer()),Column('unit_cost',Numeric(12,2)))users=Table('users',metadata,Column('user_id',Integer(),primary_key=True),Column('customer_number',Integer(),autoincrement=True),Column('username',String(15),nullable=False,unique=True),Column('email_address',String(255),nullable=False),Column('phone',String(20),nullable=False),Column('password',String(25),nullable=False),Column('created_on',DateTime(),default=datetime.now),Column('updated_on',DateTime(),default=datetime.now,onupdate=datetime.now))orders=Table('orders',metadata,Column('order_id',Integer(),primary_key=True),Column('user_id',ForeignKey('users.user_id')))line_items=Table('line_items',metadata,Column('line_items_id',Integer(),primary_key=True),Column('order_id',ForeignKey('orders.order_id')),Column('cookie_id',ForeignKey('cookies.cookie_id')),Column('quantity',Integer()),Column('extended_cost',Numeric(12,2)))engine=create_engine('sqlite:///:memory:')metadata.create_all(engine)
In this chapter, we took a look at how metadata is used as a catalog by SQLAlchemy to store table schemas along with other miscellaneous data. We also can define a table with multiple columns and constraints. We explored the types of constraints and how to explicitly construct them outside of a column object to match an existing schema or naming scheme. Then we covered how to set default values and onupdate values for auditing. Finally, we now know how to persist or save our schema into the database for reuse. The next step is to learn how to work with data within our schema via the SQL Expression Language.
Get Essential SQLAlchemy, 2nd Edition now with the O’Reilly learning platform.
O’Reilly members experience books, live events, courses curated by job role, and more from O’Reilly and nearly 200 top publishers.

