“Data is a precious thing and will last longer than the systems themselves.”
The Quantified Self (http://quantifiedself.com/about/) community enables self-knowledge through self-tracking. Self-tracking, when powered by appropriate data analysis, has been proven to trigger behavioral change. The act of self-tracking creates awareness and feedback. The hunger for, and success of, self-knowledge is evident from the growing number of self-quantifiers (currently 6,000+ in 41 cities and 14 countries).
Self-knowledge is possible only with a substantial collection of data about oneself. HealthVault provides more than 80 granular data types that enable tracking data regarding everything from daily exercise to genome sequences. In this chapter, we will build upon the understanding of the HealthVault API covered in Chapter 3 and extend it to develop a data-intensive self-quantifying application. Through the Quantified Self application, we will gain an understanding of HealthVault data types and application development.
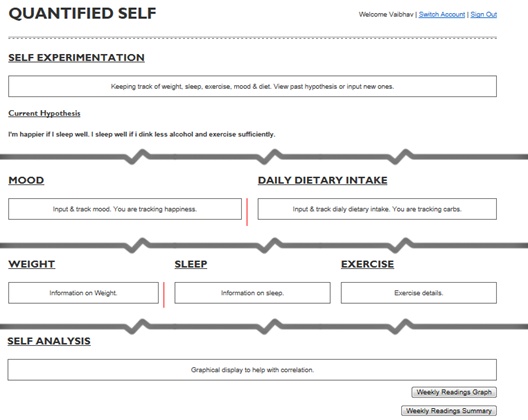
In Chapter 1 we analyzed weight data, and in Chapter 2 we worked with sleep information and correlated it with exercise. HealthVault offers a data type for tracking emotional state and daily dietary intake as well. Let’s consider building a simple Quantified Self utility that helps a user keep track of his emotional state, daily dietary intake, weight, sleep, and exercise. Tracking these types of data and their relation to each other would allow our user to form and prove interesting hypotheses such as: “I’m happier if I sleep well, and I sleep well if I drink less alcohol and exercise sufficiently.”
Self-tracking fosters awareness and a feedback loop; numerous participants in the Quantified Self movement have attributed improvement to insights generated by the data and the act of data collection. Our Quantified Self application will aim to emulate this pattern. Figure 4-1 summarizes the data pattern we wish to capture.
Let’s start by making a Quantified Self application with a unique application identifier. In this chapter we will use the HealthVault .NET SDK in order to focus on understanding the HealthVault data types. However, as HealthVault SDK and Open Source Libraries outlines, you can use other languages and HealthVault libraries as well.
The first step in creating the application is to download and install the HealthVault SDK from MSDN (http://msdn.microsoft.com/en-us/healthvault). After installing the SDK, you will notice a utility called Application Manager. From the Windows Start button, this utility can be accessed through All Programs→Microsoft HealthVault→SDK→HealthVault Application Manager.
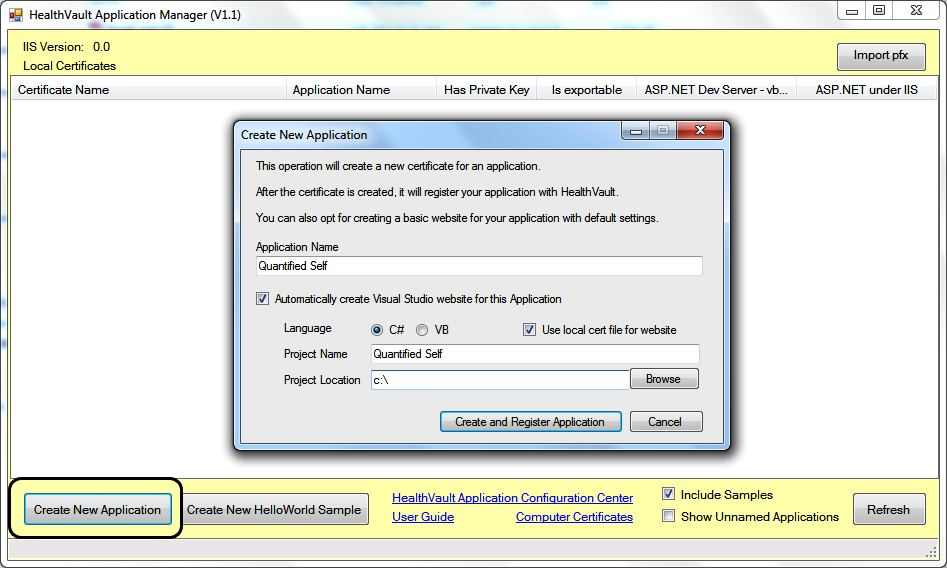
Once you open the Application Manager, you will notice the Create New Application button, which you should use now to create a new application. As Figure 4-2 shows, the new application creation process asks you for an application name and other details, and creates a Visual Studio solution with the application starting point.
The second step in the process is to register your application. Application Manager automatically opens a new browser window that signs you into the HealthVault Application Configuration utility (https://config.healthvault.com) and creates the appropriate application in the HealthVault Development environment. The development environment is frequently referred to as PPE, which stands for preproduction environment. In the next chapter we will learn how the Application Configuration Center can be used to create a development application without using the Application Manager.
On the dashboard of the HealthVault Application Configuration Center, you will see the application you just created, as depicted in Figure 4-3.
HealthVault offers more than 80 granular items to which a user can authorize access. They fall into categories such as fitness, condition, medications, health history, measurements, personal profile, files, and custom data. A developer can obtain access for particular health data items by configuring an application’s authorization rule set. For our application, we need access to weight, sleep, and exercise data, which come directly from various devices. We also want the user to be able to track emotional state and daily dietary intake, which is information that she will enter manually.
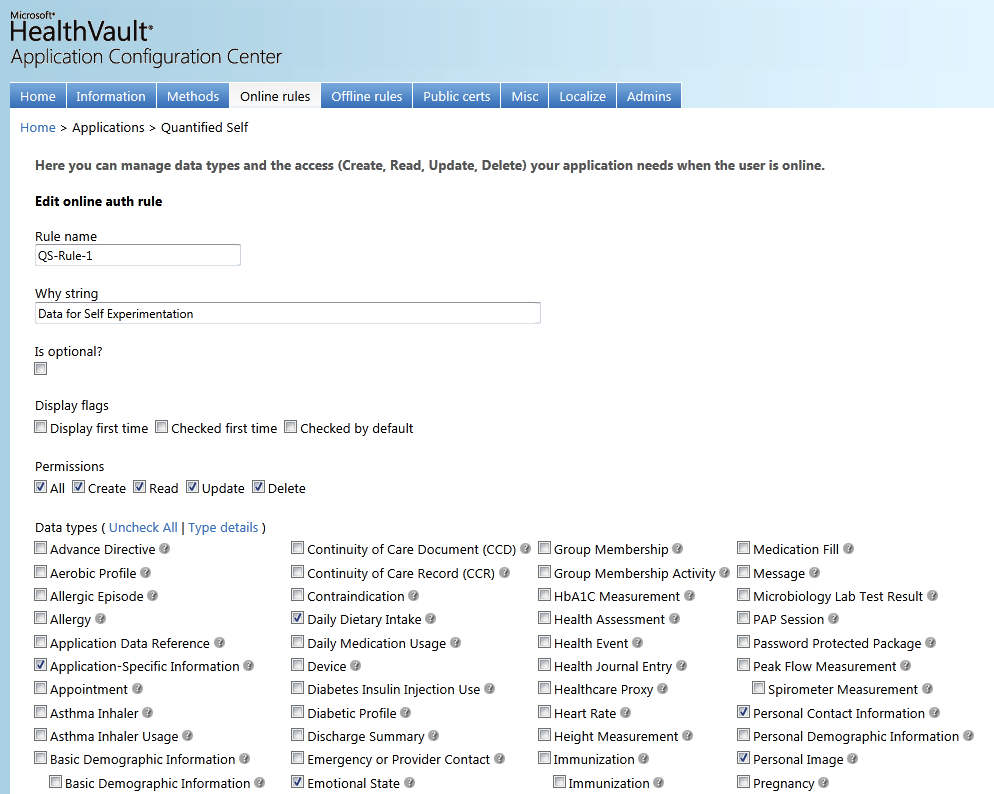
To start the necessary configuration, click on the application ID in the HealthVault Application Configuration Center. Figure 4-4 illustrates the view of our Quantified Self application after clicking on the “Online rules” tab. In this menu, select the appropriate data types for the application (weight measurement, sleep, exercise, etc.), select all permissions (read, write, update, delete), provide a reason why the application needs access to these types, and name the rule. A rule can also be configured as optional and can have display settings. Why String, Is Optional, and Display Flags items are currently not active for most HealthVault applications.
We are using HealthVault as the user authentication provider for our application, so we choose to operate in the online mode and create an authorization rule for such access. If we wanted our application to work through a backend system provided by one of the other types of architecture discussed in Chapter 3, we would configure the offline rules for access to appropriate data types.
We are finished selecting the appropriate data types for our application, and can now try accessing them through the application.
The application manager utility creates a template application. Figure 4-5 shows the initial solution created by this utility.
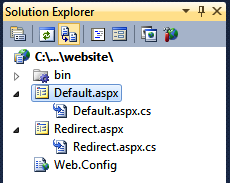
The solution makes sure that your application is configured properly with an appropriate application ID, points it to the appropriate HealthVault platform and shell development environments, and configures the application’s redirect URL; all of these configurations live in the Web.Config file. The Default.aspx page is derived from the HealthServicePage and handles authorization with the HealthVault Platform, whereas the Redirect.aspx page is derived from the HealthServiceActionPage and handles authentication and interaction with HealthVault Shell. The bin folder contains HealthVault SDK libraries: Microsoft.Health.dll, which encapsulates the core HealthVault functionality; Microsoft.Health.Web.dll, which broadly encapsulates browser interaction; and Microsoft.Health.Itemtypes, which encapsulates an object model for all HealthVault data types.
The main solution doesn’t add a master page. In order to make it easy to extend functionality, we create a MasterPage named QuantifiedSelf.master, create a fresh Default.aspx page after deleting the old one, and ensure this page is derived from HealthServicePage.
As discussed in Chapter 3,
we can use the HealthVault GetThings API to access health items in a
user’s health record. The code shown in Example 4-1 accesses Emotion, DietaryDailyIntake, Weight, Sleep, and Exercise from HealthVault. As shown in the two
lines at ![]() , we make sure to fetch these
elements for the last seven days only.
, we make sure to fetch these
elements for the last seven days only.
Example 4-1. GetThings call to access multiple things
    protected void Page_Load(object sender, EventArgs e)
    {
        Lbl_UserName.Text = this.PersonInfo.SelectedRecord.DisplayName;

        HealthRecordSearcher searcher = PersonInfo.SelectedRecord.CreateSearcher();
        HealthRecordFilter filter = new HealthRecordFilter(
            ApplicationSpecific.TypeId,
            Emotion.TypeId,
            DietaryDailyIntake.TypeId,
            Weight.TypeId,
            SleepJournalAM.TypeId,
            Exercise.TypeId);

        filter.EffectiveDateMin = DateTime.Now.Subtract(new TimeSpan(7, 0, 0, 0));
        searcher.Filters.Add(filter);

        HealthRecordItemCollection items = searcher.GetMatchingItems()[0];
searcher.Filters.Add(filter);
HealthRecordItemCollection items = searcher.GetMatchingItems()[0];Before we display these types, let’s dig deeper to understand a HealthVault data type.
Get Enabling Programmable Self with HealthVault now with the O’Reilly learning platform.
O’Reilly members experience books, live events, courses curated by job role, and more from O’Reilly and nearly 200 top publishers.

