The term motion menus is perhaps a misnomer. Motion certainly can be involved, but the menu doesn't have to be in motion to count as a motion menu. Any menu with video or audio content (as opposed to a static or layered image) is a motion menu. Background audioâeven with a still graphic for the imageâis considered a motion menu. Buttons that show a small video clip require a motion menu. Subtle, wavy backgrounds with still buttons also are motion menus.
Music, motion backgrounds, and movie buttons might seem like disparate things, but they are closely tied together in the world of DVD menus. They all involve a common element: a video for the primary menu asset.
We're drawing this distinction clearly because motion menus have some limitations. Although they can be arresting visually, things such as layered buttons do not work in motion menus. And remember, even if the only "motion" is an audio file playing in the background, you're in motion-menuland.
Of course, sometimes the audio and video assets are worth including in your DVD. As an example, we'll build a simple menu with an audio loop. Adding audio really can amplify the importance of an image. One interesting case of audio effects was studied with computer users looking at a still image of artwork. Half the users were shown the image on its own and half were shown the image with music playing in the background. The participants were asked about the image the next day. Many of the folks in the music group recalled watching an animated image.
If you have a simple still image that you use for a menu, you can add audio without much troubleâyou can do it directly in DVDSP. In the first versions of DVDSP, you had to create a simple movie using your still image and the audio file in an editor such as iMovie or Final Cut Pro. That wasn't difficult, but it certainly was annoying.
This next project is really a detour; it's part of a larger project we'll be building in this chapter. But it's important to try it out and run it in the Simulator. You'll want to see (and hear!) the end results.
First, grab the two assets you'll need for this test from the projects/ch04 folder:
skiff.mp3
skiff_still.pct
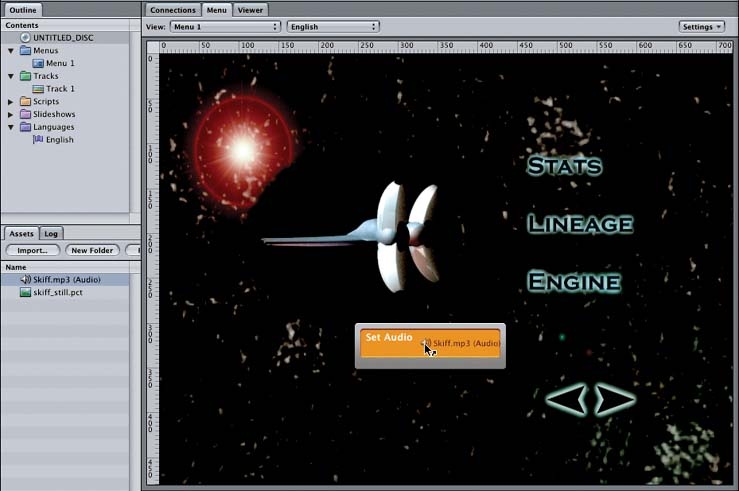
For this quick menu, you'll let DVDSP convert the audio file to the proper format. For larger projects, you need to make sure all your menu audio clips are encoded in the same way. (For example, on the DVD for this book, some of the other menus use AC3 audio, so we had to convert the MP3 for this project to AC3 as well.) You can set the image as the background for a new menu. Now we're going to add the audio. Ready? Drag the skiff.mp3 file over to your menu and drop it there, as shown in Figure 4-19.
You're done! At least, you've completed the business of adding audio. If you were setting up a real menu, you'd have to create and link the buttons, of course. But you were doing this to test the audio. Take a look at the Menu tab in the properties for the audio-enhanced menu in Figure 4-20.
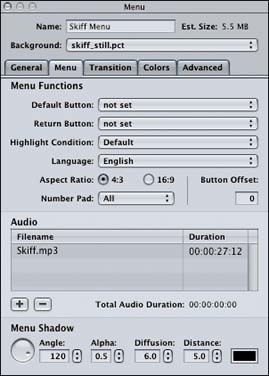
There are a few interesting things to notice. First, you can see that an audio asset has been set. You can change the asset here later if you need to. Second, you can see that now the image has a start and end position. This menu uses a still image, so there's not much reason to play with these values. (As you'll see in the next project on quick video buttons, though, these values can be useful when playing with video assets.) DVDSP took the liberty of setting our values to match the duration of our audio clipâprecisely what we want.
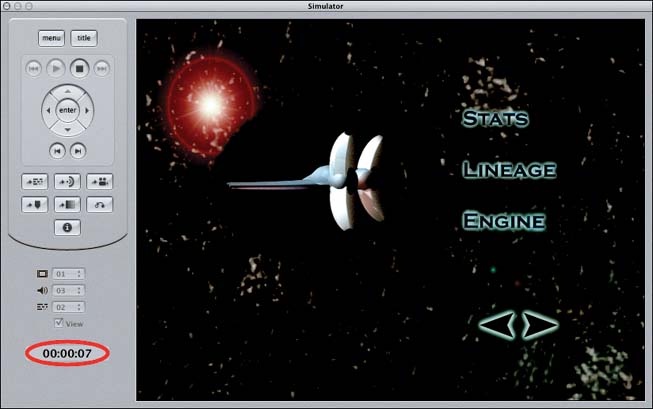
Go ahead and simulate your project and verify the audio is playing. You also should see another clue that you have a motion menu in the Simulator (see Figure 4-21). The counter is activeânot stuck on 00:00:00, as it is for still menus.
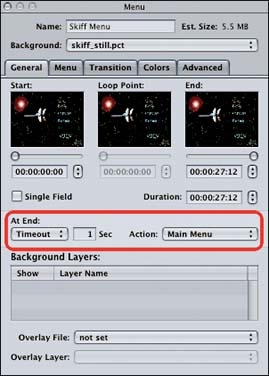
Another default DVDSP chose for us that usually matches what we need is the At End property (highlighted in Figure 4-22).
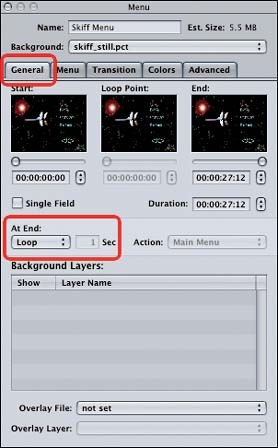
Usually you just want to loop the audio when you're done. You have two other choices, though.
- Still
This stops the audio (or video) and waits for the user to make a selection. This can be useful if you have some intro text or images that aren't meant to loop.
- Timeout
This option stops the audio (or video) and jumps somewhere else. You can specify that action by picking a target similar to what you would do for a button. For example, Figure 4-23 shows us setting the end action for our Skiff menu to Timeout. One second after the audio stops, we default back to the main menu. This option can be a life-saver for kiosks in which you want to make sure you go back to your primary menu if the user walks away.
Get DVD Studio Pro 3: In the Studio now with the O’Reilly learning platform.
O’Reilly members experience books, live events, courses curated by job role, and more from O’Reilly and nearly 200 top publishers.

