There's so much to menus in DVDSP that we had to include another chapter on them. This chapter tackles several zippy projects that include motion menus (with video and audio elements), using the built-in transitions from DVDSP 3. Chapter 11 covers custom transitions.
On the way to making full-motion menus, DVDs allow for a nice intermediate step that doesn't require much effort to include in your DVDSP projects. When you switch between menus, you can add a transition much like we did between slides at the end of Chapter 3. In fact, you have access to exactly the same set of transitions. DVDSP treats the last frame of the current menu and the first frame of the destination as two slides and builds a transition between them.
However, as with slides, this feature is available only in DVDSP 3 and higher. But there's a fallback for these transitions, just as there was for the slides. You can create video sequences in your video editing software and squeeze them into menus. These menu transitions built outside of DVDSP are a bit more complex, so we put them in their own chapterâChapter 11. You'll also see how to build your own custom transitions in that chapter if the existing set doesn't satisfy your creative needs.
In the meantime, those of you using DVDSP 3 are in for a nice treat. Transitions are simple to set up and they provide quick flash to your projects.
Even though we're reusing content from a previous project, we're going to build this more or less from scratch again. This time, however, we'll rely on the Graphical view (also new to DVDSP 3) for our primary content canvas.
Start by importing the same assets we used for the Castle Tours DVD in Chapter 3:
cawdor.m2v
cawdor.AC3
holyrood.m2v
holyrood.AC3
urquhart.m2v
urquhart.AC3
In addition, you can obtain the following new menu images from the projects/ch04 directory:
cawdor_menu.pict
holyrood_menu.pict
urquhart_menu.pict
quick_castle_tours_scaled.psd
Now perform the following steps:
Open the DVDSP Graphical View. You can open the Graphical view with the Control-
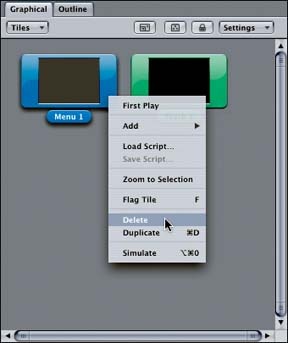
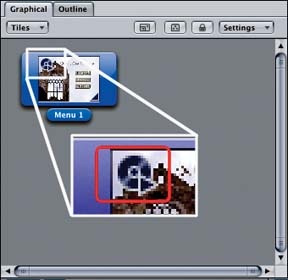
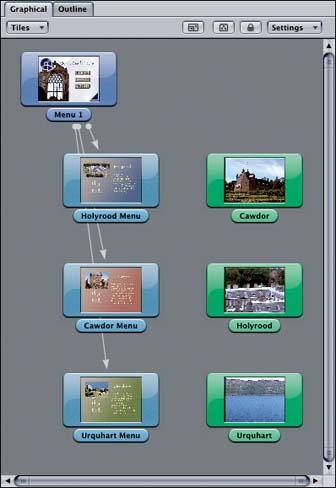
5 keyboard shortcut. Figure 4-1 shows that tab in its initial state. It also highlights the context menu (Control-click or right-click) for menus.
Delete the Default Menu. We want to delete the default menu. Go ahead and do that now. You also can delete the default track the same way.
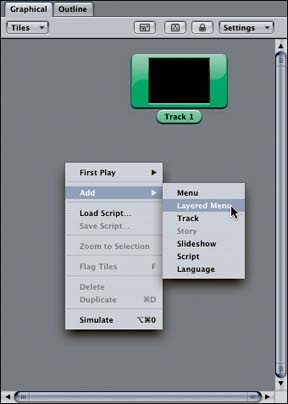
Add a Layered Menu. With the default parts cleaned up, you can add your layered menu. You can do that using any of the techniques from Chapter 3, but Figure 4-2 shows the context menu in the Graphical view and how to use that for the new layered menu.
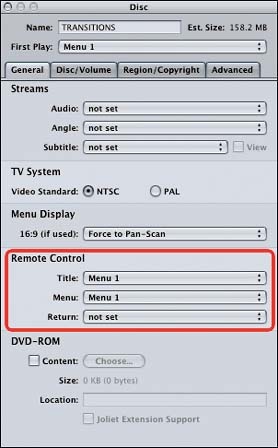
Set the First Play and Remote Control Options. As before, deleting the default menu will leave your First Play and Remote Control options unset. Figure 4-3 shows a recap of the disc properties you'll want to set in the Property Inspector for the disc. (Clicking anywhere in the background of the Graphical view will make the disc the focus of the Property Inspector.)
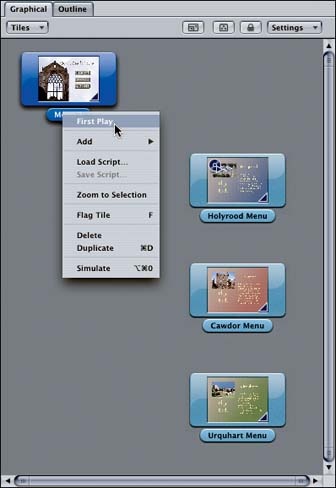
You can set the First Play property in the Inspector or use the context menu in the Graphical view (see Figure 4-4) for the new layered menu. You can verify that your menu is the first play target by looking for the DVD-with-pointer icon in the upper-left corner. Figure 4-5 calls out that icon.
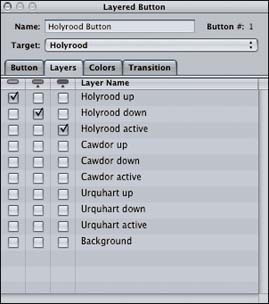
Define the Three Buttons for the Castle Tours. You do this in the Menu view just as you did in Chapter 3. You'll use the Inspector for each button to turn on the appropriate layers. Figure 4-6 shows a reminder for the layers you need.
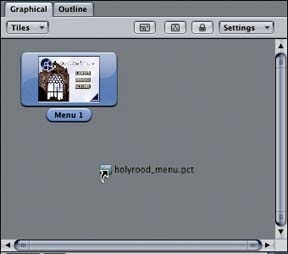
Add the Submenus. To add a submenu to your project, grab its background asset from the Assets view and drop it in the Graphical view, as shown in Figure 4-7. We'll use the PICT assets from the project/ch04 folder for our submenus. You'll have to do this one menu at a time. Dropping multiple image assets in the Graphical view creates a new slideshow!
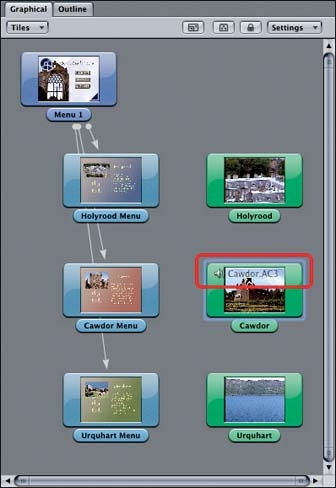
Add Tracks and Audio. You can use the same drag-and-drop approach for the tracks. Although this time, you can grab all the tracks and drop them in at one time (see Figure 4-8). You'll probably get a stack of tracks that are too close together to be useful. Reorganize them however you want to make them easier to access. We ended up with the arrangement shown in Figure 4-9.
Clicking any of the track items in the Graphical view should make that track the focus of the Property Inspector as well as make the track available in the Track view. If the audio was not attached automatically to the video track, you can do that quickly in either the Track or Graphical view. Figure 4-10 shows how to add an audio track to a video clip in the Graphical view.
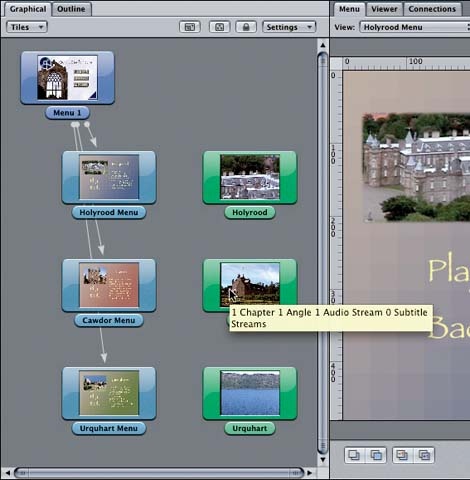
Check Out the Tool Tips. Although this Graphical view is great for getting a good overview of your project, it doesn't show too many details on the items themselves. If you let your mouse hover over an item, though, you'll get a fairly verbose tool tip (small pop-up window) with information on that item. In particular, you can see how many video and audio tracks are attached. Figure 4-11 shows the tool tip for one of our video items.
Link the Buttons to the Submenus. Hook up the buttons from the main menu to point to their respective submenus. Each submenu has a Play and a Back button. Just define simple buttons for each. We chose to use the Arrow Point shapes in the Apple-supplied list. The Play buttons should point to the video tracks. Figure 4-12 shows the Inspector for the Play button on our Holyrood menu.
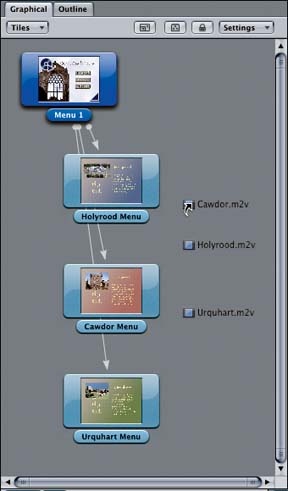
When you're done, you should end up with the items and connections shown in Figure 4-13. You'll probably want to set the End Jump properties on each track to point somewhere useful. We send the user back to the submenu.


Now that you have the project flow completed, adding transitions happens quickly. Depending on how you want the transitions to behave, you can specify them in one of two places. A menu can have a default transition that applies to all its buttons. An individual button, though, can override that default with its own transition. We'll try it both ways for this project.
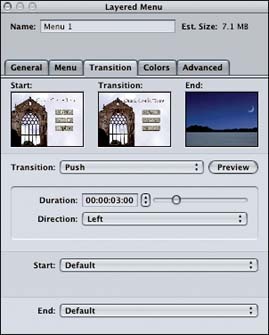
Figure 4-14 highlights the Transition tab of the Property Inspector for a menu. You can pick the transition from a pop-up list. Then you can tweak any parameters the transition might haveâjust as you did for slides. We chose the Push transition and set it up to take three seconds.
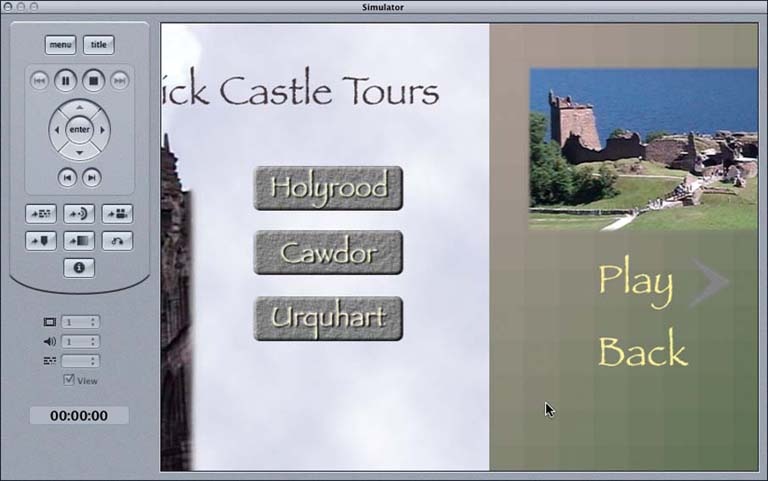
Any button on this menu now should use the Push transition to get to its target. If you want to test things out to make sure this is working, just launch the Simulator. Figure 4-15 shows one of our transitions in action.
Button transitions are analogous to all the other transitions; they're simply specified in the Inspector for an individual button. Although it's often easier to slap a default transition on a menu, adding a transition to each button enables you to vary the attributes of your transitions or even to supply different transitions altogether. (But don't go overboardâ¦too many transitions can be distracting from your overall project!)
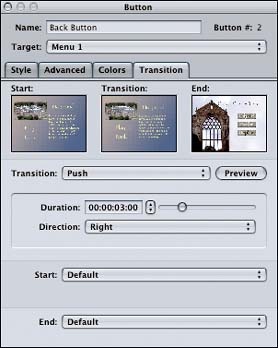
Let's add per-button transitions to the Back buttons on our submenus. Figure 4-16 shows you the general properties for the shape and target of the Back buttons.
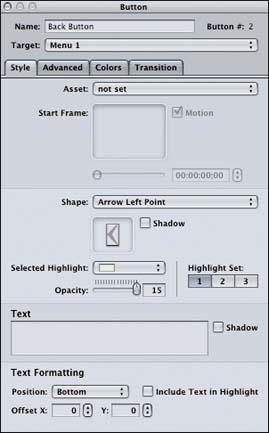
The transition we chose is shown in Figure 4-17. Notice that we use the Push transition again, but this time we push to the right instead of using the default of left.
When all is said and done, your Graphical view should provide a complete overview of the project, as shown in Figure 4-18. Try it out in the Simulator. Don't be too concerned if the transitions appear choppy or don't function in real time. They'll be rendered before the project is burned and should play quite smoothly in regular players.
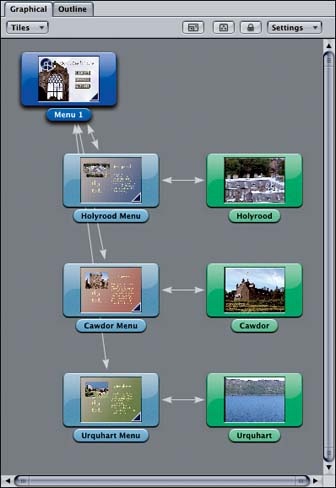
One last note about the Graphical view: you can tell transitions are applied to an item by looking in the lower left-hand corner of the item's thumbnail. That little blue triangle means a transition exists. Again, you don't get details, but you do get a quick overview of everything that's happening.
Get DVD Studio Pro 3: In the Studio now with the O’Reilly learning platform.
O’Reilly members experience books, live events, courses curated by job role, and more from O’Reilly and nearly 200 top publishers.

