The second project in this chapter covers the same basic process as the first project, but this time we'll create our own menu in Photoshop instead of using one of the template menus.
For the second project, you'll need to import the following files from the Chapter 1 folder:
volcano.m2v
volcano.AC3
mainmenu.psd
chaptermenu.psd
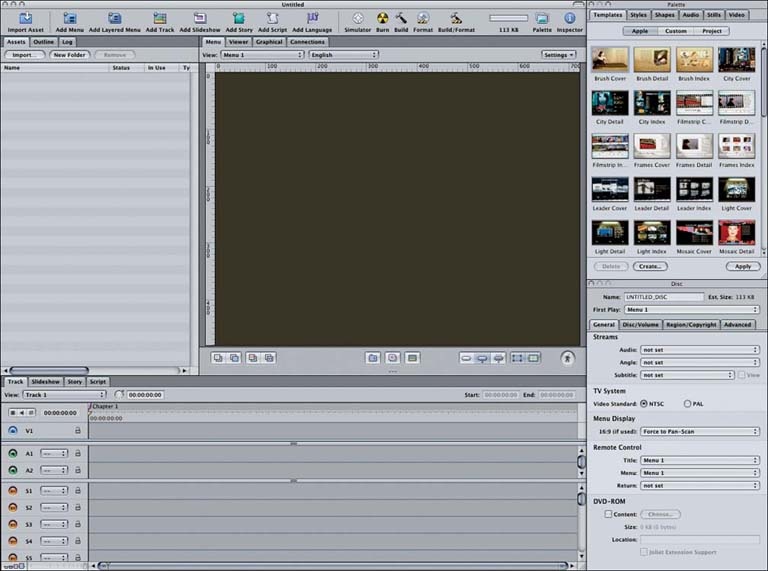
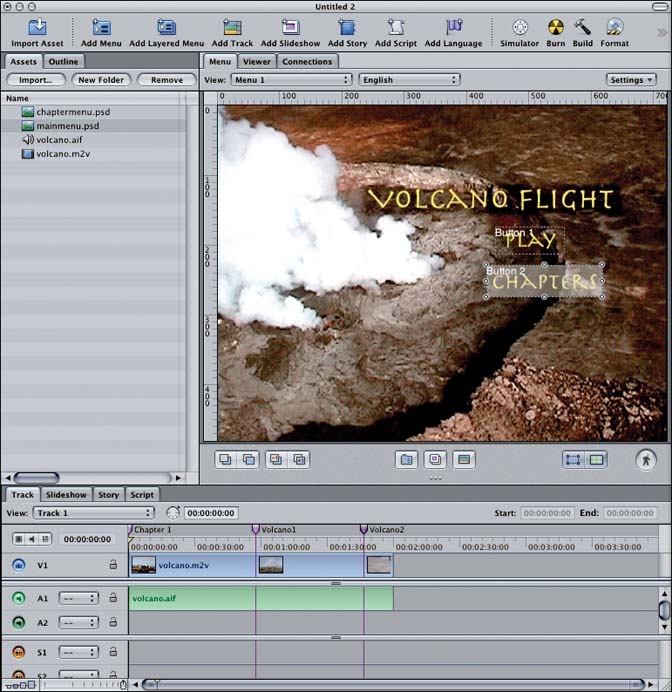
You'll probably want to switch to the Extended layout for this project. Press F2 or use the Window â Configurations menu. You should end up with a screen similar to Figure 1-29.
Usually you don't have to do much work to add a movie clip to your DVD projects. In most cases, you can just drag the movie clip from the Assets tab to one of the editors and drop it. Occasionally you'll have to set the chapter markers manually. You'll probably also want to specify where to go after finishing the clipâback to the main menu, for example.
For this project, we set the chapters while editing the video in Final Cut Pro (which, incidentally, was very easy to do), so we're OK there. After the movie is done, we want to go back to the main menu. We'll set that property in a few minutes after we add the menu.
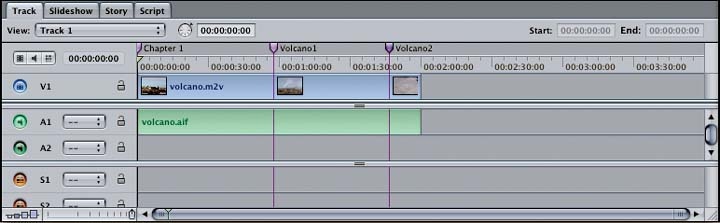
So, here's the next task: drag the volcano.m2v file from the Assets tab to the Track tab. Your Track editor now should have one movie item, as shown in Figure 1-30.
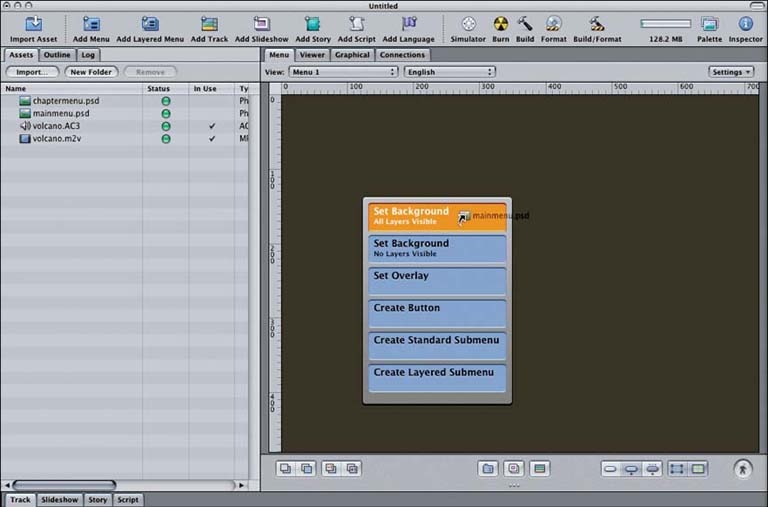
Adding menus is just as simple as adding movie clips. First make the Menu tab active in your Main window. Now drag the mainmenu.psd file from the Assets view to the menu area. You should see a pop-up list similar to Figure 1-31. Choose the first option to set your image as the background for the menu.
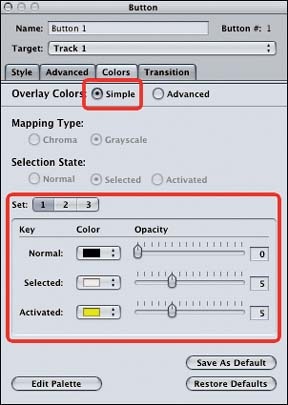
So, at this point, the menu itself exists. However, you still have to create the buttons for the menu. If you're making a simple menu with the standard box highlights over the buttons, be sure to pick your highlight colors in the Menu Inspector. See Figure 1-32 for an example.

If your Photoshop document consists of multiple layers, you'll also need to specify which layers of the Photoshop document you want to use. The Menu Inspector can help you there as well. Choose the options highlighted in Figure 1-33.
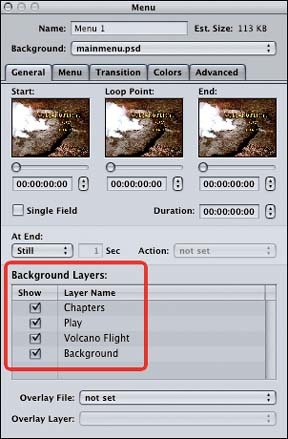
You'll see some examples of really complex layered buttons and menus later. For now we'll just use the one layer we have. Figure 1-34 shows that menu in the Menu tab.

Here's a nifty thing to know: you can create new buttons by simply dragging an outline over part of the background. Then you can select an existing button by clicking inside its border. Figure 1-35 shows the action of creating our first button.

Once you have the boundary set to the right size and position, right-click the button to bring up a menu of quick options. You can set the target for the button here or through the Inspector. (I recommend always relying on the Inspector, as shown in Figure 1-36.) You can use the Inspector to set a few other key properties: specifically, the button's name and its navigation properties (e.g., which button comes next when you press the left arrow on your remote). You might not be able to specify the proper navigation entries until you have created all the buttons in your menu. That's fine. Just click the interior of a button's outline in the menu window to make that the "active" button in the Property Inspector.
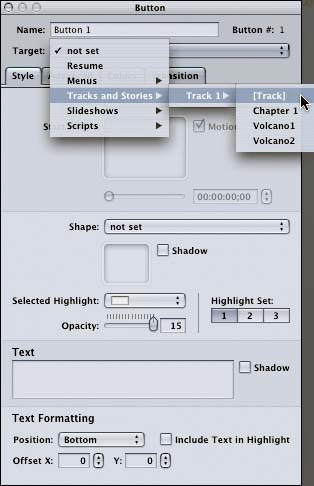
For this project, you'll need to make menus from the mainmenu.psd and chaptermenu.psd assets. You can rename the menus via their property sheets if you don't like using the filename to tag them. Double-click the mainmenu.psd icon to build the buttons shown in Figure 1-37.
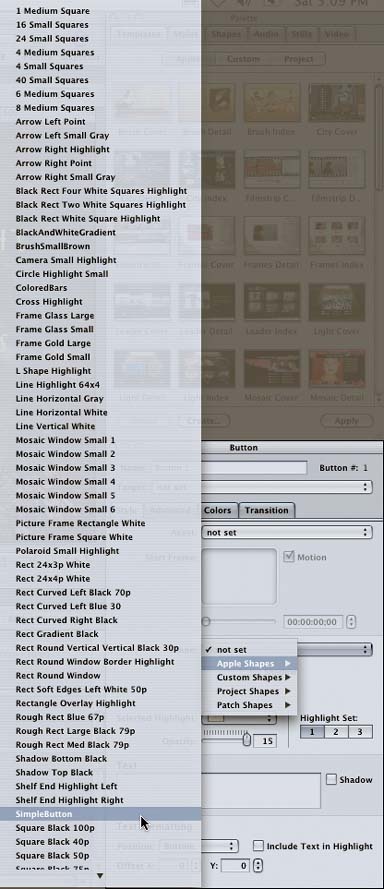
You'll also need to pick a shape for your buttons. We just went with the Simple button option, but you can play around a bit if you want. As you can see in Figure 1-38, there are plenty of options.
Once you've got the shape, you also might need to set the level of transparency, or opacity. If the shape is off to the side of your text, the default of 100% opaque might be fine. Our buttons cover the text we built in Photoshop, so we want translucent buttons. You can set that opacity value in the Button Inspector. (See Figure 1-39.)
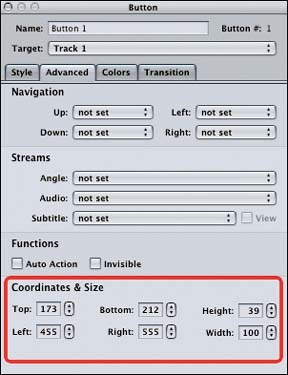
If you want to set the precise values for the buttons' coordinates, use the Advanced tab in the button property sheets, and enter the numbers shown in Table 1-2.
Figure 1-40 shows you the Advanced tab of the Button Inspector where you can enter these values.
Note
The Height values for the button coordinates in Table 1-2 and Table 1-3 are dependent on the Top and Bottom values. Changing either the Top or Bottom value will automatically change the Height value. Changing the Height value will, in turn, update the Bottom value.
Similarly, the Width value is dependent on the Left and Right values. Changing either the Left or Right value will automatically change the Width value. Changing the Width value will, in turn, update the Right value.
Click Add Menu from the toolbar. You should now have a Menu 2 option in the pull-down on the Menu tab. Select Menu 2 and set the chaptermenu.psd file as the background, as you did for the first menu. Go ahead and set up the four buttons shown in Figure 1-41.
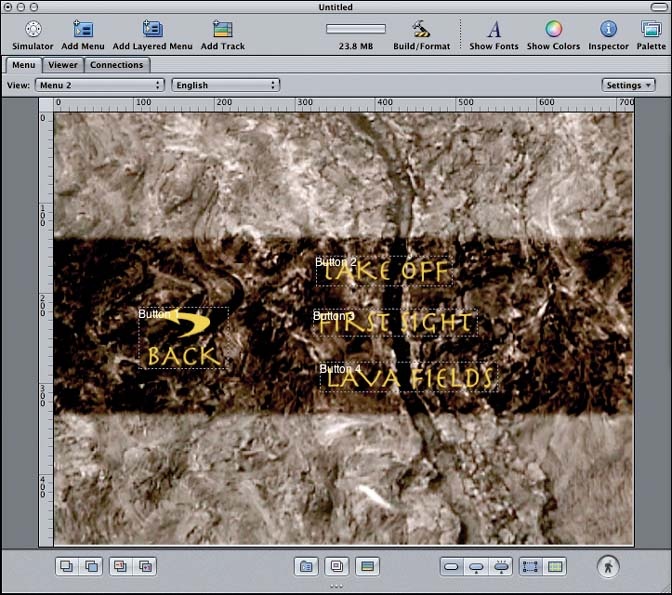
Table 1-3 lists the values for the buttons in this menu.
Table 1-3. Button coordinates for the Chapters menu
|
Button |
Top |
Left |
Bottom |
Right |
Target |
|---|---|---|---|---|---|
|
1. BackButton |
160 |
323 |
193 |
504 |
Menu 1 |
|
2. TakeoffButton |
210 |
323 |
210 |
528 |
Track 1 â [Track] |
|
3. FirstSightButton |
273 |
330 |
311 |
552 |
Track 1 â Volcano 1 |
|
4. LavaButton |
209 |
101 |
288 |
223 |
Track 1 â Volcano 2 |
You'll need to go back to Menu 1 and set the target for the Chapters button now that you actually have a chapter menu. And you should definitely save your project at this point if you haven't already.
Now is a good time to make sure you've specified those "Things You Can't Forget" that we covered earlier. In the Outline tab (see Figure 1-42), click the DVD icon at the top and bring up the Inspector.
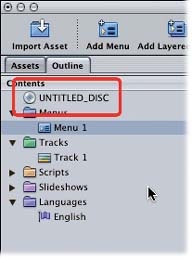
Be sure to set the following values in the Inspector and then save the project:
Name: VOLCANO_FLIGHT
First Play: Menu 1
Remote-Control â Title: Menu 1
Remote-Control â Menu: Menu 1
At this point, your DVD project should be in really good shape. You can test that theory by previewing the project. Launch the Simulator just as you did before. (You can call it up by selecting File â Simulate⦠as well.) Figure 1-43 highlights the Simulator button. You also can just press Option-
0.
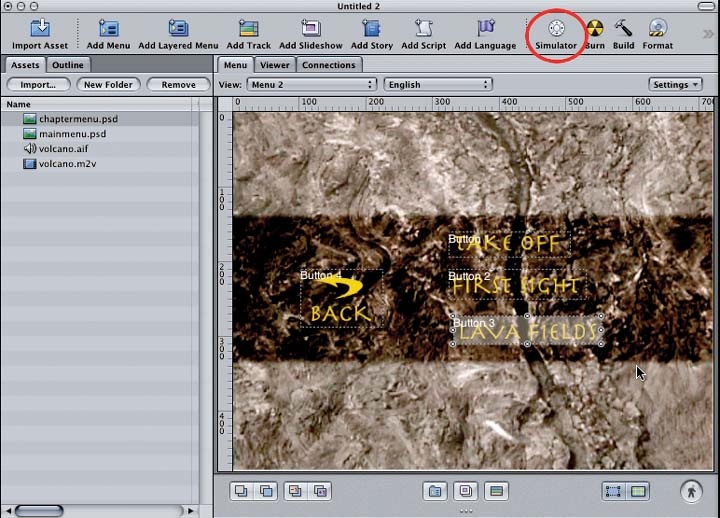
That should launch you into a fully functional preview of your disc. You can navigate your menus using the arrow keys and the Return key. See Figure 1-44 for an example of our disc running in Preview mode.
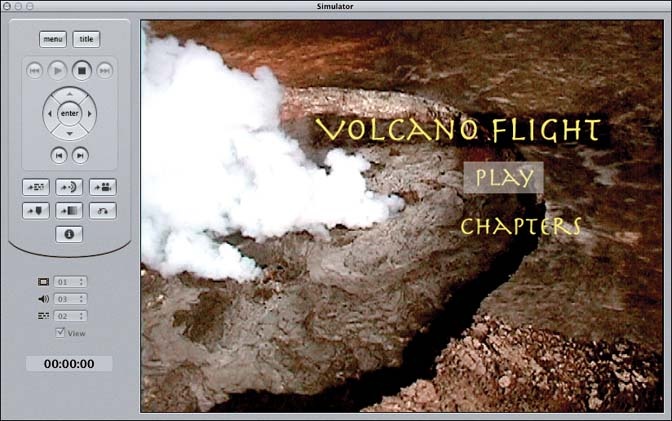
Simulating is a great way of debugging things such as the menu buttons. It's easy to forget to specify the navigation information for every button. When you actually try to use the disc, though, things such as broken buttons pop out almost immediately. Simulating can save you the hassle of finding problems after you've burned the disc. Although you shouldn't worry about creating a few bad discs, that shouldn't be your goal!
OK, you're almost there. All you have to do now is build and burn the project. Although the assets already should be encoded in the proper format, they need to be assembled properly for a DVD. From the File menu, choose the Burn option. That should launch a build and format session that picks reasonable defaults for the burn.
If you need to, you can select File â Advanced Burn â Build & Format. This option enables you to customize the burn session. If you have separate drives for building the disc or multiple DVD burners, you'll need to take this route. Figure 1-45 shows you where to set your build location.
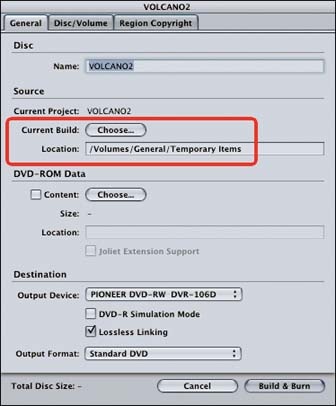
Note that you created a Volcano folder on a separate hard disk. You certainly can use the same disk if you have space, but separate disks make the process go a little bit faster. That way, you can read continuously from one disk and write to the other at the same time rather than reading, stopping, writing, stopping, reading, stopping, etc., on the same disk.
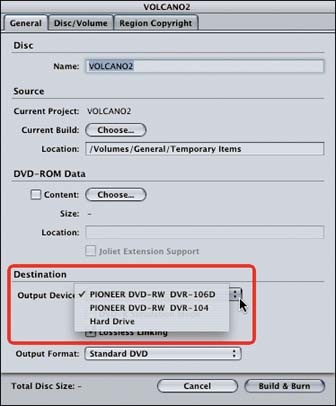
Next, you have to tell DVDSP to write the project to an actual DVD. If you're lucky enough to have a variety of DVD writers in your machine, pick the one you want to use. As you can see in Figure 1-46, we have the built-in SuperDrive that shipped with our G4 and an external Pioneer 106 drive in an external FireWire enclosure. We'll use the built-in burner for this example.
Now you should be prompted to insert a blank piece of DVD media. Once DVDSP recognizes the media, it'll start burning. First it builds the project and encodes your menus. Then it actually writes the project to the disc. Watch for any errors in the Log window, which is shown in Figure 1-47.
When it's done writing, you should have an honest-to-goodness, ready-to-play DVD. Most players can play these discsâbut not all. You can find a number of compatibility charts online. The folks at DVDRHelp.com (http://www.dvdrhelp.com/dvdplayers.php) even maintain an interactive search tool that you can use to determine which players will work and which ones will not.
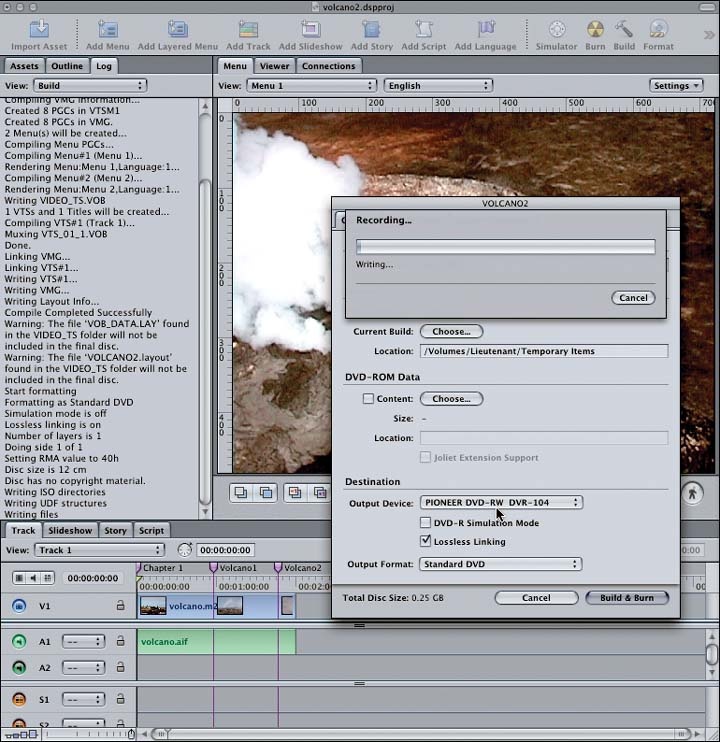

Figure 1-48 shows a screen capture from a TV playing our spiffy volcano DVD.
If you want multiple copies of this disc, you can just go back and choose the Format option from the toolbar. This time around you'll be prompted to reuse the existing project's data, as shown in Figure 1-49. Click the Reuse button, and you can skip over the menu encoding step.

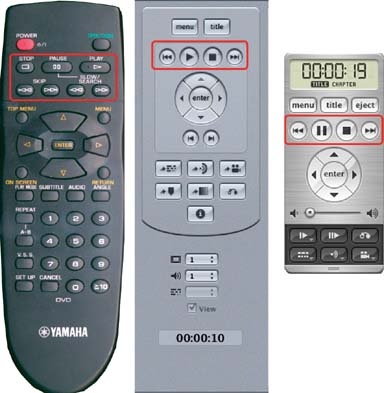
For those of you who are new to the DVD world, let's take a quick detour and talk about playing your DVD in a consumer device, which is usually the goal for these projects. Let's start off by making sure you know how to navigate your menus with the remote controls that come with such players. Figures 1-50, 1-51, 1-52, 1-53 through 1-54 show a consumer remote (from a Yamaha DVD-S796), the Simulator remote control, and the DVD Player remote control with various function categories highlighted.
The VCR functions (Figure 1-50), which are available on both consumer remotes and the software DVD players, behave exactly as you would expect them to behave. You can play, stop, pause, and fast-forward/fast-rewind through the video. Most fast-forward/fast-rewind buttons double as chapter-forward/chapter-back buttons as well.
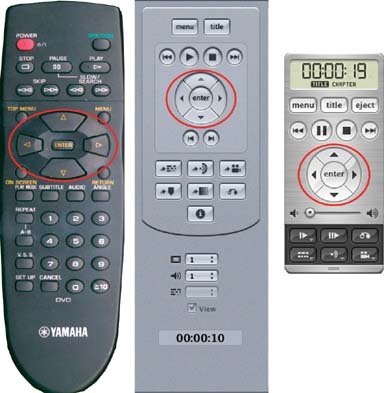
The arrow and Enter buttons highlighted in Figure 1-51 enable you to move the "cursor" around the onscreen menus and select a highlighted option. The Enter button is sometimes labeled Select or OK.
The more interesting buttons to note are the stream controls (audio, video, and subtitles) and the various menu buttons, shown in Figure 1-52.
DVDs support a fancy variety of audio, video, and text streams. Most DVDs have menus that enable you to con-figure which streams you want to see (a Spanish audio track with French subtitles, for example). In addition, most DVD players also enable you to switch streams on the fly. The stream control buttons perform that service. You can cycle through all the available streams. Not every DVD will have multiple streams, of course. We'll be discussing streams and how to use them extensively in Chapter 5, where we'll cover our international project.

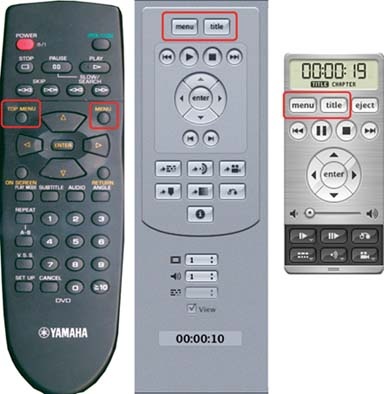
Most DVD remotes also have two separate menu buttons: a button labeled Top Menu (sometimes called the Title, Root, or Disc menu) and one labeled Menu, highlighted on the far left in Figure 1-53. The Top Menu button is supposed to take you back to the first menu of the disc. The Menu button should take you back to the most recently viewed menu. (Or, if you just used the Menu button to get to a menu, pressing it again often resumes playback where you left off.) Chapters 3 and 4 dive into menus and show you how to configure your remote control menu buttons if you don't like the default behaviors.
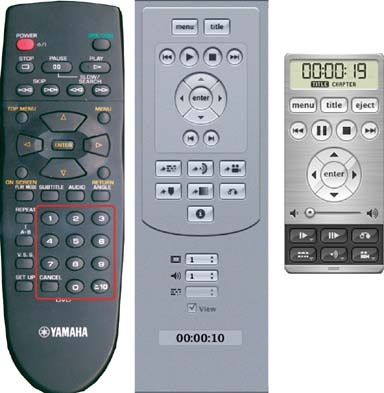
Last but not least, you probably noticed that the consumer remote has numeric input keys (shown in Figure 1-54). You can use these buttons for various things. Some discs allow time searching so that you can enter a timeâusually in minutes and secondsâand jump to that point in the video. While viewing a menu, you often can use the numeric buttons to immediately activate a given onscreen item. Chapter 8 covers using numeric input for fun and games.
So, what's next, you ask? Chapter 2 covers the various media types (audio, video, and still images) you can use in DVDSP. If you're already up to speed on that topic, skip Chapter 2 and get to the fun stuff in Chapter 3.
Get DVD Studio Pro 3: In the Studio now with the O’Reilly learning platform.
O’Reilly members experience books, live events, courses curated by job role, and more from O’Reilly and nearly 200 top publishers.

