Chapter 1. The Guided Tour
The Droid X2—an elegant, muscular-looking phone—is an enticing gadget, and the first time you hold it in your hands, you’ll immediately want to put it through its paces, calling friends, browsing the Web, checking your email, and more.
That’s as it should be: The Droid X2 is the Superman of smartphones. As you’ll see in the rest of this book, it can do some remarkable things that make it feel as if the phone truly does have superpowers.
To help you unlock all those powers, though, it’s a good idea to get a solid understanding of how the Droid X2 works, and a look at all its different parts. You’ll want to know where all of its buttons, keys, and ports are located, for example—not to mention how to get to your Home screen and panes.
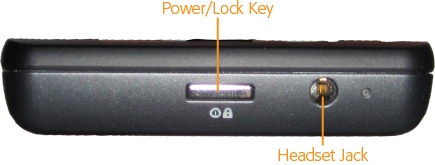
Power/Lock Key
Smack dab in the middle of the top of the Droid X2, you find a small, rectangular silver button. It may be only a single button, but it’s a hard-working one, and it performs several functions:
Standby/Wake. When your Droid X2 is turned on, pressing and releasing the button puts the phone into Standby mode, a state in which the display is turned off and the device uses only a minimum amount of power, in order to save battery life. When the Droid X2 is in dreamland, it also doesn’t register any taps, so that you can’t accidentally send an email or delete every picture on your phone. When your Droid X2 is in Standby, pressing and releasing this button wakes up the Droid into its locked mode—you’ll see how to unlock it a little later. When the phone is in Standby, it can still receive calls, communicate with the Internet, and so on.
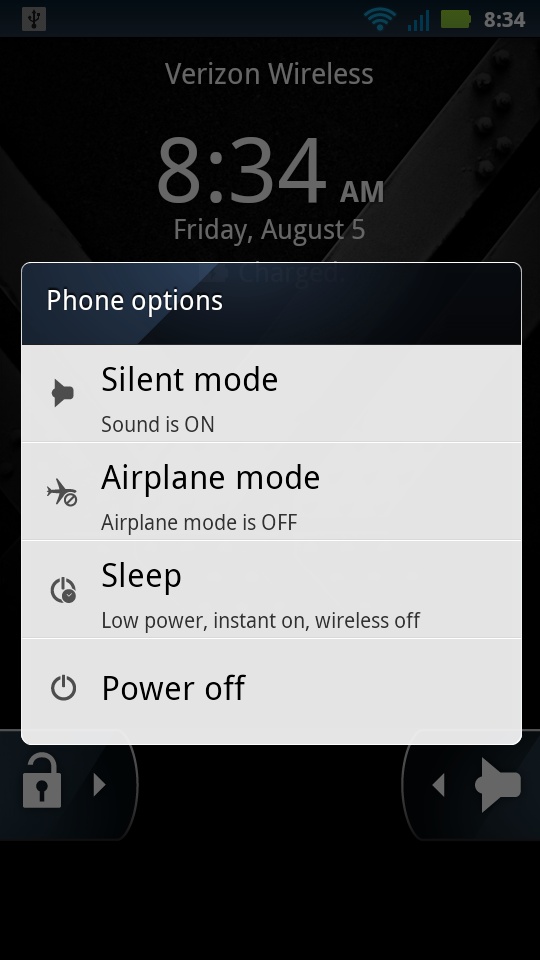
On/Off. If your Droid X2 is turned off, hold down the button, and it springs to life. Simple, yes? If, on the other hand, it’s turned on, holding down the button turns it off. When you do so, though, it doesn’t immediately shut down. Instead, a screen appears that lets you choose between shutting it down (“Power off”); putting it into Silent mode, in which the Droid X2 works as it normally does except that it makes no sounds; Airplane mode, in which all wireless communications are shut off but you can still use the phone’s apps and other features; and Sleep, a state in which the Droid X2 uses very little power and its wireless radios are turned off, but it still turns on instantly when you press the On button. It’s a better bet than turning it off completely.
Note
As explained in the Introduction (About the Droid X2), the Droid X2’s predecessor, the Droid X, has many features in common with the Droid X2. When there’s a significant difference between the two devices, this book will let you know.
Tip
The Power/Lock key also performs a useful trick that people near you will appreciate—it shuts off your ringer when you receive a call. Press it once when you get a call, and your ringer turns off. You’ll be able to see who’s calling, without the ring, and decide whether to answer the call or ignore it. If you ignore the call, it gets sent to voicemail.
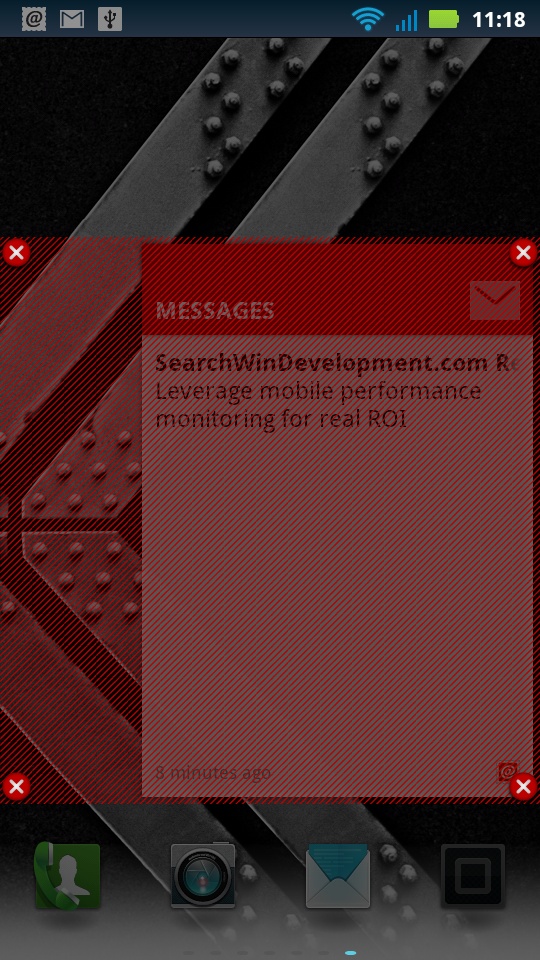
Locking the Screen
As described on Power/Lock Key, when you put the Droid X2 on Standby, the screen stops responding to touch. It blacks out, indicating that the screen is locked. Always lock the screen before putting the Droid X2 in your pocket or bag to avoid accidental screen taps (and potentially embarrassing unintended phone calls). In fact, every time you leave the phone untouched for one minute, the screen automatically locks itself.
While the screen is locked, the Droid X2 still operates behind the scenes, checking email and Facebook on schedule. You can still get phone calls and text messages and even listen to music while the screen is locked.
Note
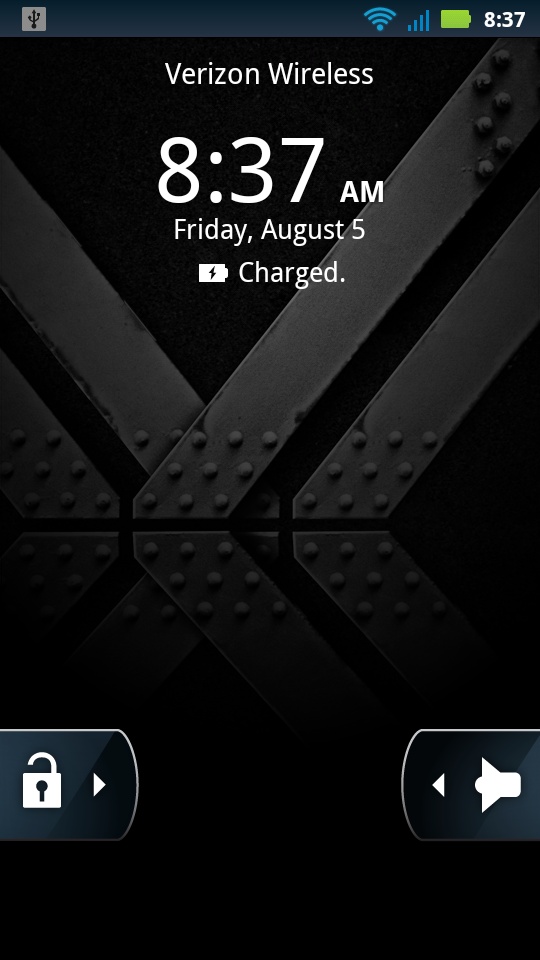
The button on the right side of the screen in Locked mode provides a useful piece of information: It tells you if the Droid X2 is in Silent mode. If it is, the icon is gray and looks like this:  If it’s not in Silent mode, the icon looks like a ringer:
  . Slide the ringer icon to the left, and you put your phone in Silent mode, and the Silent mode icon appears. If your phone is in Silent mode, slide the Silent mode ringer to the left, and the phone is set out of Silent mode and the icon changes to the ringer.
When you again want to use the Droid X2, you’ll need to unlock it. Simply put your fingertip on the lock icon on the screen and slide it to the right. Your Droid X2 is now ready to do your bidding.
Tip
You can adjust the amount of time it takes for the Droid X2 to lock itself. You can also turn off Locked mode entirely. And for added security, you can also require that a password be used to unlock your Droid X2, or even that a specific finger swiping motion be performed on the keyboard before it can be unlocked. For details, see Location & Security.
Headset Jack
Just to the left of the Power/Lock key, you’ll find a 3.5-millimeter headset jack. Notice that it’s a headset jack, not just a garden variety headphone jack. It doesn’t just let you listen; it accepts incoming sound as well. That’s so you can plug an earbud headset (or other kind of headset) into it and use it for making phone calls.
Of course, it’s also a headphone jack, so you can plug in headphones or even external speakers, and enjoy the Droid X2 as a music machine, because it offers full stereo.
About the Screen
The screen is where you and the Droid X2 do most of your communicating with each other. Compare the Droid X2’s screen to that of almost any other phone, and you’ll immediately notice how roomy it is—4.3 inches, measured diagonally (technically, that’s 540 x 969 pixels for the Droid X2 and 480 x 854 pixels for the Droid X). When you turn it sideways, it switches to a widescreen TV and movie format.
But there’s a lot going on behind that pretty display.
Tip
Since you’re going to be touching the display with your fingers, it’s going to get dirty and streaky. Simply wipe it clean with a soft, lint-free cloth or tissue. The screen is scratch-resistant, but if you’re worried about scratches, get a case or screen protector. See Appendix B for ideas.
Built-in Sensors
Underneath its flat black screen, the Droid X2 has four sensors that perform a lot of its magic:
Proximity sensor. Have you ever noticed that when you’re talking on your Droid X2, the screen often goes blank? That’s thanks to the proximity sensor. It senses when your face is close to it during a phone call and automatically turns off and blanks the touch screen as you keep talking. It does this to the screen to save power, and so you don’t accidentally touch the screen while talking and perform some unwanted task.
Ambient light sensor. Senses the light level, and adjusts your screen’s brightness, as a way to save battery power. So in bright light, it makes the screen brighter so that it can be more easily seen, and in dim light, it makes the screen dimmer, because bright light is not needed.
3-axis accelerometer. As its name implies, this sensor measures acceleration and motion. The Droid X2 uses the accelerometer to sense the orientation of the screen and turn it to either landscape or portrait mode. But clever app makers use it for other things as well, such as automatic collision notification, which detects when you’re in an accident and then automatically makes a call for assistance for you. There’s even an app that works with the Droid X2’s magnetometer to detect potholes as you drive, and create a log about their locations, which you can then email to your local department of public works. (It’s called Pothole Agent. Search the Droid X2’s Marketplace app for it.)
Magnetometer. Measures the strength and direction of the Earth’s magnetic field. It’s used for compass apps and can also work with the accelerometer, as it does in Pothole Agent.
Status Bar Icons
The Droid X2 makes sure to always keep you updated with information about its current status, and with any news, updates, and information it thinks is important. It does this by displaying a variety of icons in the status bar at the top of the Droid X2 screen. The status bar is divided into two parts. On the upper-right side of the screen, you’ll find icons that give information about the current state of the Droid X2, such as signal strength, 3G connection status, the time of day, and so on. At the upper left is the Notification area, which notifies you when you have email or voice messages waiting, an event on your calendar is about to occur, and so on.
Note
Many applications have their own icons that alert you to news, information, and updates. These always appear on the left side of the status bar. You’ll see alert icons from Gmail, Facebook, and many others.
Here are the most common icons you’ll come across:
Cell signal
 . The more bars you see, the stronger the signal. The stronger the signal, the clearer the call and the lower the likelihood that you’ll lose a connection. If you have no connection at all, this signal won’t appear, and just underneath the status bar, on the top of the Home screen, you’ll see the much-hated warning: (No service).
Note
When you see a notification on the left side of the status bar, drag down the Notification bar to see more details. You can also take some kind of action on the notification by tapping its icon after you drag it down—like checking your email or running an app that you’ve just downloaded. There’s also a Clear button that makes all the current notifications go away.
Roaming
 . If you’re outside a Verizon service area and connected via another network, you’ll see the Roaming icon. Keep in mind that typically you’re charged for making calls or using data when you’re roaming, so when you see this icon, be careful what you do on your Droid X2—maybe it’s not the time to download 30 songs and a half-hour TV show.
3G
 . This one appears when you’re connected via 3G, Verizon’s high-speed, broadband service, which should be most of the time. It means that download and upload speeds are fast. The little arrows underneath the symbol show when data is being sent and received. You’ll notice that the arrows may turn black even when you think you’re not sending or receiving data. That’s because the Droid X2 may be checking for email, updates, and so on.
Bluetooth connection
 . This icon indicates that you’ve turned on Bluetooth, for making a connection to a headset or some other device.
3G Mobile Hotspot
 . Your Droid X2 can serve as a mobile hotspot, providing Internet service to up to five computers, smartphones, or other devices and gadgets via Wi-Fi. See Managing Wi-Fi Networks for details. When you turn the phone into a 3G mobile hotspot, this icon appears.
Airplane mode
 . When you use Airplane mode, you turn off Wi-Fi and cellular communications, so you can still keep using your phone’s apps, but it won’t interfere with navigation equipment. See Settings Pane for more details.
Downloading
 . When you’re downloading an app or media file, you’ll see this icon.
Download complete
 . Congratulations—your download was successful.
New email message
 . You’ve got mail! See Reading Mail for more about reading new email.
New Gmail message
. You’ve got Gmail! See Reading Mail in Gmail for more about reading new email messages in Gmail.GPS
 . Your GPS radio is turned on. See How the Droid X2 Finds Your Location for information about GPS.
Problem with message delivery
 . Oops! Email is having problems. Sometimes you can solve this problem easily—just check your email again.
Upcoming event
 . Now you’ll never forget your anniversary—or your dentist appointment. The Droid X2 alerts you via this icon when you’ve got an event about to happen.
Voicemail message
 . You’ve got mail—voicemail, that is. See the note on Dialing for Messages to learn how to check your voicemail.
Missed call
 . Someone called you, and you didn’t answer. You’ll see this icon appear even if the person left no voicemail.
Vibrate
 . This symbol indicates that you’ve set your Droid X2 to vibrate when you get a call.
Sync active
 . This icon alerts you that you’ve set the Droid to automatically synchronize information such as email, contacts, and calendar data. The icon is animated when you’re doing the actual syncing.
Silent
 . If you’ve a believer that silence is golden, and you’ve told the Droid X2 not to ring when you get a call, here’s what you’ll see.
Mute call
 . Reminds you that you’ve put your call on mute. If no one can hear what you’re saying, that may be why.
Speakerphone
 . Using the Droid X2’s built-in speakerphone? Here’s what you’ll see.
TTY symbol
 . You’ve turned on Teletypewriter mode, a special mode that allows the Droid X2 to communicate with a teletypewriter. That’s a machine that lets deaf people make phone calls by reading and typing text.
Alarm
 . Who needs an alarm clock when you’ve got your Droid X2? This icon indicates that the alarm is on. You can even set multiple alarms.
Time
 . Shows you what time it is. Say goodbye to your watch.
Battery
 . Get to know this little icon—it shows you how much battery life you’ve got. If it’s charging, it plays a battery-filling animation and displays a small lightning bolt.
Connected to VPN
 . If you use your Droid X2 to connect to your company network via virtual private networking (VPN), this icon shows when your connection is active. You can check your work email and do anything else your company lets VPNers do. (If you’re interested in getting VPN access, you’ll need your IT department’s help, as described in Chapter 13.)
Disconnected from VPN
 . You were on the VPN, and now you’re off.
Problem with sign in or sync
 . Houston, we have a problem. Sync isn’t working or you can’t sign into one of your services.
USB connection
 . You’ll connect your phone to your computer via a USB cable for a variety of reasons, including copying and syncing files. Here’s the icon you’ll see when you make the connection.
SD card is full
 . This icon appears when your SD card has run out of space. It’s time to get a bigger or newer one, or start deleting files.
Notification Light
Just above the upper-left corner of your screen, on the face of the Droid X2, there’s a small notification light that flashes information to you. It’s quite useful, because it works even when your screen is off. So just by checking this light, you can know whether the Droid X2 has something important to tell you. Here’s what the color codes mean:
Flashing green. You’ve got a notification, such as a missed call, a new email, a missed text, and so on, that you haven’t yet cleared.
Blue. You’ve got an incoming call. Most of the time you won’t need to pay attention to this, because your phone will ring or vibrate. But if you’ve got the ring and vibration turned off, it’s the only notice you’ll get that someone is calling.
The Four Keys
Most of the time you use your Droid X2, you’ll be tapping on virtual buttons on the keyboard. But down at the bottom of the Droid X2, there are four real keys—physical things that you actually push. From left to right, here’s what they do:
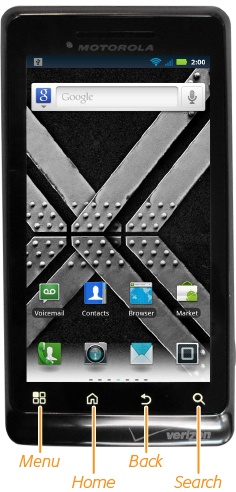
Menu Key
This key opens up a menu that lets you perform some kind of task or customization related to what you’re currently doing. In geek-speak, it’s context sensitive, which is a fancy way of saying that the menu that appears changes according to what you’re doing on your phone when you touch the button. So if you’re looking at your contacts, for example, you’ll be able to do things like adding a contact, displaying only a certain group of contacts, backing up your contacts, and so on. If you’re looking at your calendar, you’ll be able to create a new event, change the time period that shows in your calendar, and other similar options.
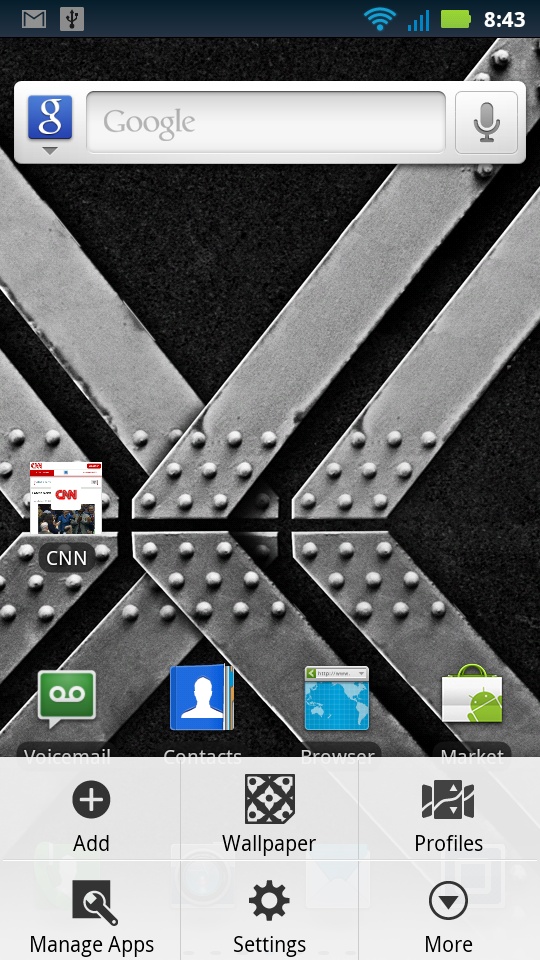
When you’re at the Home screen and you press the Menu key, here’s the menu that appears, and what you can do with each command:
Add. Lets you add a shortcut to your Home screen—an icon that when tapped launches an app, opens a file, and so on. You can add pre-built widgets (apps or little gadgets that do things like toggle Airplane mode on and off), shortcuts to actions like searching for contacts, and shortcuts to folders. You can also change your wallpaper. Just tap the action you want to take, and follow the onscreen directions. For more details, see Display.
Wallpaper. Tap this option on the menu, and you can change your Home screen wallpaper. Some of the niftier choices here are the “live” wallpapers that display changing information, such as your current location in Google Maps, or an animated wallpaper that draws smoke, clouds, water, and various plasmas. For more details, see Adding Widgets, Folders, Shortcuts, and Wallpaper.
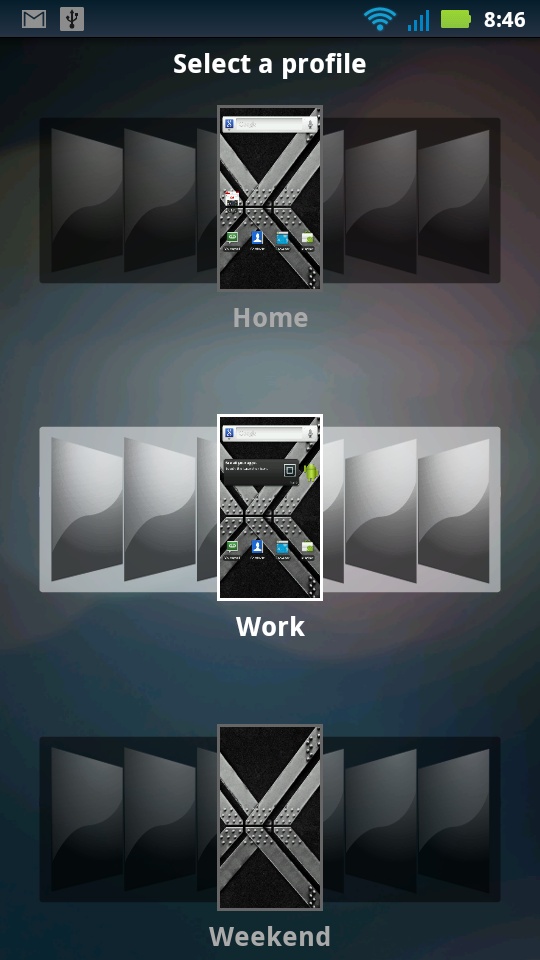
Profiles. Tap here to use profiles—different screen layouts for doing different kinds of things on the Droid X2. So, for example, you might have one profile for when you’re at work, another for when you’re at home, and another for weekend fun. Each profile can have a different wallpaper, and different apps on the home screens. When you tap, you can switch among the profiles. When you’re in a profile, any changes you make to the home screen become part of that profile.
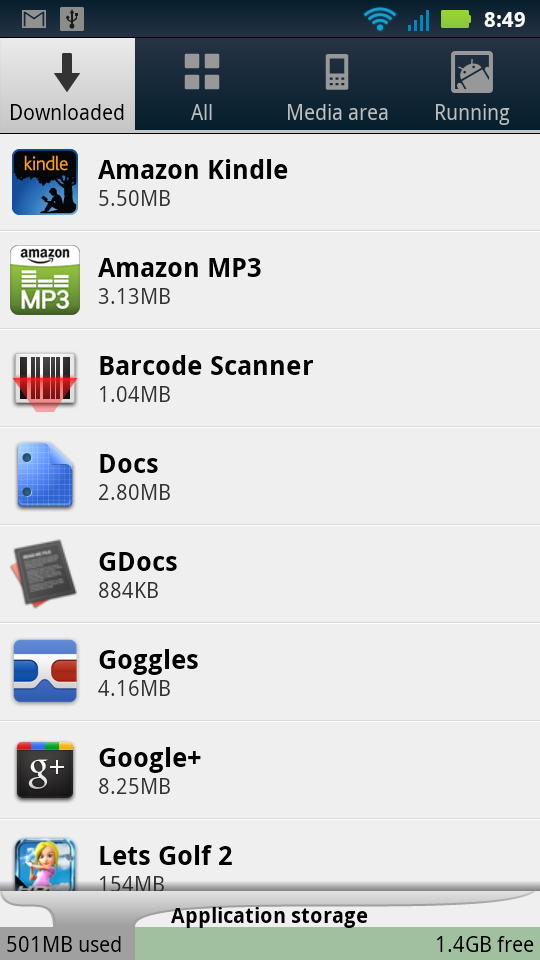
Manage Apps. Takes you to a screen that lets you control all of your apps. For details, see Managing, Sharing, and Uninstalling Apps.
Settings. Lets you change all your Droid X2 settings. For details, see Wireless & Networks.
More. Leads to two options: Search and Notifications. Search lets you search your Droid X2 and the Internet—the same thing you can do by pressing the Search button when you’re on the Home screen. See Copying Text from a Web Page for more details. Notifications pulls down the Notification bar, just as if you dragged it down yourself.
Home Key
Repeat after me, Dorothy: There’s no place like home, there’s no place like home…. Wherever you are on the Droid X2, press the Home key and you’ll come back to the familiar Home screen. You won’t even need to tap your ruby slippers together.
The key does more than just bring you home, though. If the Droid X2 is sleeping, pressing the Home key wakes it up in the same way that pressing the Power/Lock key does. And if the Droid is unlocked, holding it down brings up a small menu of shortcuts to your commonly used apps. Tap an icon on that menu, and the app launches.
Back Key
Wherever you are, press this key, and you go to where you just were. The Back key works inside apps as well as in menus. So when you’re browsing the Web, for example, it acts as your Back button. Pressing the Back key also makes a displayed keyboard or menu disappear.
Search Key
Press this key, and a Quick Search box appears. Tap in the text you want to search for, and then tap the Search button to perform the search. Like the Menu key, the Search key is contact sensitive. So if you’re in your email inbox, it searches your email, and if you’re in your Contacts list, it searches through your contacts. If you press it while you’re on the Home screen, it searches your contacts and displays any matching results, and also displays a list of likely matches for a Google search. Tap any match to search for that term on the Web.
If Search finds more than a screenful of matching contacts and likely Google search results, it includes a link at the bottom of the screen telling you how many more matches there are. Tap the link to see those matches.
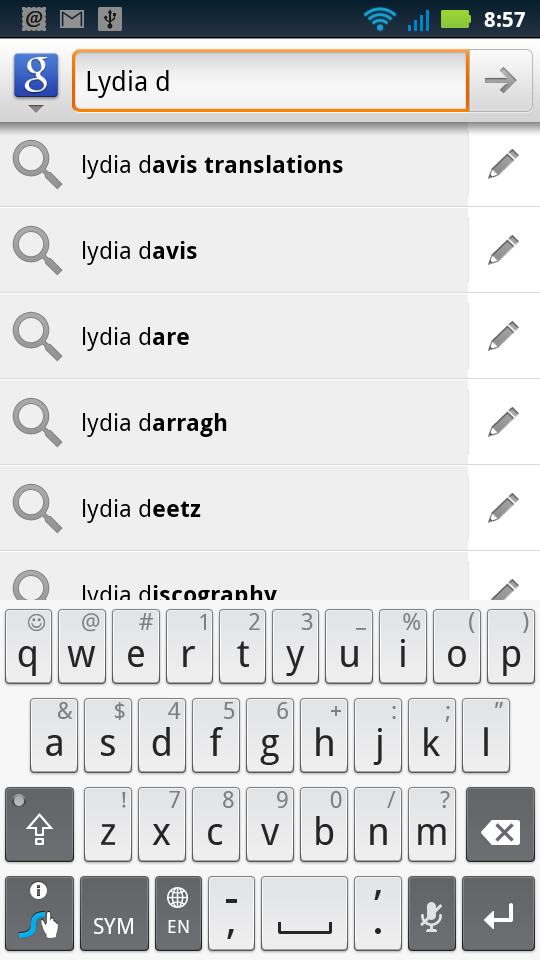
The Droid X2 also lets you perform voice search—instead of tapping in your search terms, you can speak them. To do a voice search, hold down the Search key instead of just pressing it, and then speak. The Droid X2 does its best to interpret what you say, and it generally does a good job of it.
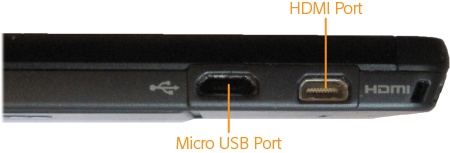
Micro USB Port
For transferring files and syncing music and movies between your computer and the Droid X2, there’s a micro USB port down near the bottom-right corner of the Droid X2. A micro USB port is much smaller than the normal one on devices such as printers. To connect the Droid X2 to your computer, you’ll need a micro USB cable, one of which comes in the Droid X2 box. The Droid X2 can connect to both Macs and PCs. When you connect your Droid X2 to a computer by USB cable, your phone gets power and charge from the computer. But it charges at a much slower rate than when you use the normal charger.
For more information about transferring files between a computer and the Droid X2, see Transferring Files Using Your PC.
Tip
When you connect your Droid X2 to a PC for the first time, your PC may not recognize it. That’s because your PC may need special drivers (small pieces of software) to communicate with the Droid X2. Windows will try its mightiest to find the drivers, but there’s a chance it won’t be able to locate them. If it doesn’t, you can go over to the Motorola website (www.motorola.com) and search for Droid X2 drivers. Then download them and follow the instructions for installing them. You can also download the drivers directly from http://bit.ly/brh0YH. (Mac fans, you’re out of luck this time. At this writing, iSync doesn’t work with the Droid X2. But then, if you’re a Mac fan, you probably have an iPhone.)
HDMI Port
The Droid X2 may be small enough to fit in the palm of your hand, but it’s still a big-time entertainment machine. That’s because it has a very geeky-sounding HDMI (High-Definition Multimedia Interface) port built into it, just below the micro USB port. With it, you can watch videos and photos taken on your Droid X2 right on your computer or TV screen, as long as they also have HDMI ports. Plug one end of the cable into your Droid X2, the other into your PC or TV, and you’re ready to go…well, almost. For details about how to do it, see Using HDMI to View Photos and Videos on a TV or Monitor.
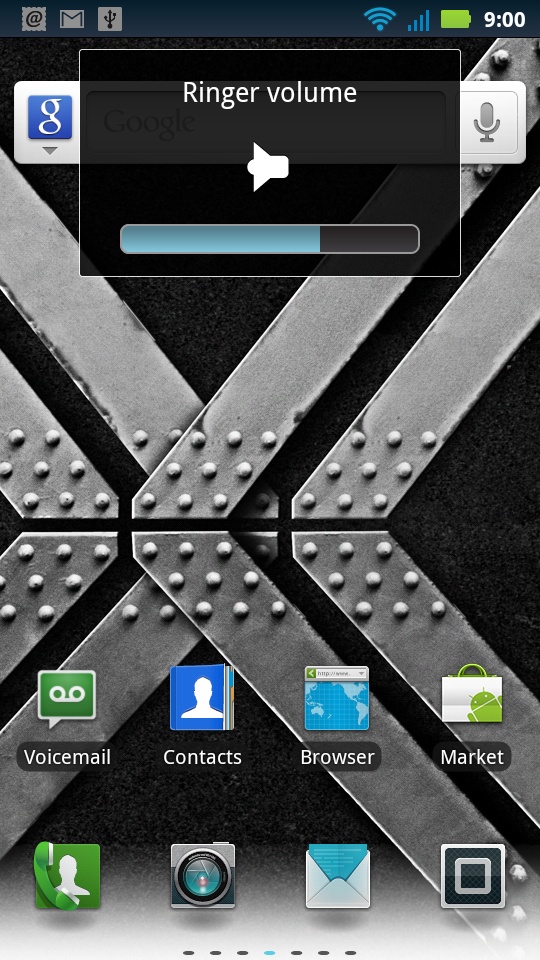
Ringer Volume
Is your ringer too loud? Too soft? Get it just right by using these keys. Press the top one to make the volume louder, and the bottom one to make it softer. When you press either key, a ringer volume app pops up on your screen, showing you how much louder or softer you’re making the ring.
Microphone
That tiny little hole at the bottom of the Droid X2 is the microphone. Yes, it’s small, but it does the job very nicely.
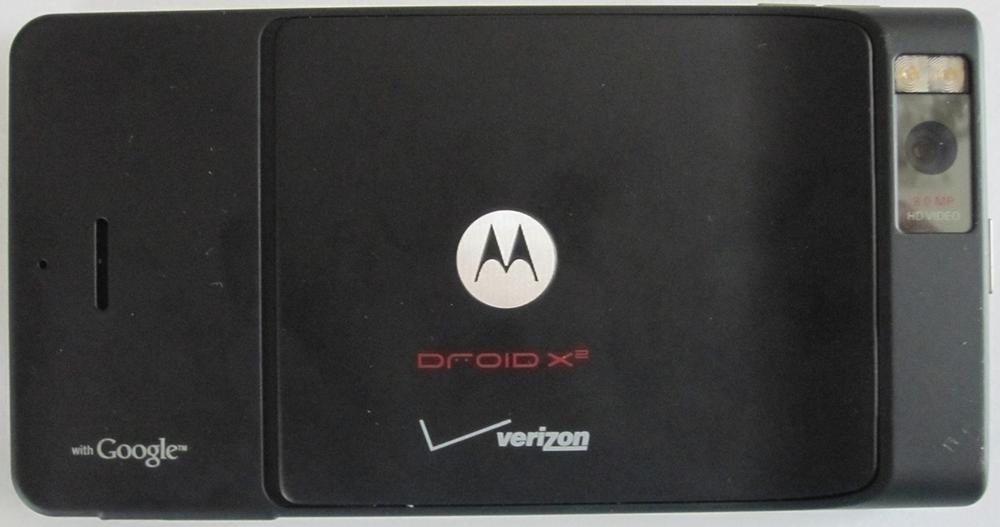
SD Card and Battery
Flip the Droid X2 over, and you’ll find the battery cover. Yes, that’s right, an actual battery cover—you can remove the Droid X2 battery and replace it with a new one, unlike some other cellphones. To remove the battery, slide down the battery cover, and then pull up gently on the plastic tab under the left corner of the battery. Don’t pull it hard or yank it, and don’t cut the tab. You can now lift out the battery.
To replace the battery, simply put it back into place, making sure that the tab doesn’t get stuck underneath the battery. The tab has to be sticking out so that you can use it to dislodge the battery when you next want to remove it. After you’ve put the battery back in place, slide the battery door back over it. Now turn on the Droid X2.
MicroSD Card
Near the battery, you’ll also find what stores most of the Droid X2’s memory: the MicroSD card, which is about the size of a fingernail, and much smaller than the normal SD memory cards used in cameras. This card may be small, but it’s got a lot of capacity—8 GB on the Droid X2 (16 GB on the Droid X).
The Droid X2 has memory in two places—in the phone itself, and on the MicroSD card. To see how much memory remains in both, tap the Menu key from the Home screen, select Settings→Storage and you’ll see how much memory you’ve got left.
In the SD card section, you can see how much storage space remains on the SD card, and under “Internal phone storage”, you can see how much space is left on your phone’s built-in storage. The Droid X2 comes with either 4 GB or 8 GB of built-in storage and 8 GB on the Micro SD card. (The Droid X has 8 GB of built-in storage, and 16 GB in the Micro SD card.)
If you want, you can remove the card and replace it with a new one—even one with more capacity, up to 32 GB. To do so, from the Home screen press the Menu key, and then choose Settings. Scroll down to “SD card & phone storage” and tap “Unmount SD card.”
When you’ve done that, turn off the phone’s power and remove the battery. You can then slide out the MicroSD card. To insert a new MicroSD card, slide it into the empty space, replace the battery, and turn on the Droid X2. It should automatically recognize the new card and storage.
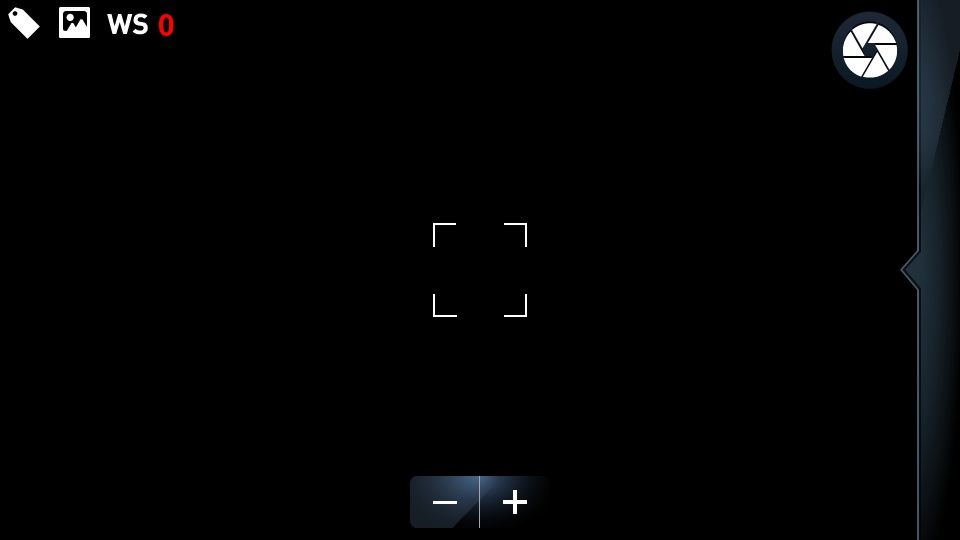
Camera
Your Droid X2 includes a very nice built-in 5-megapixel camera that can take videos as well as still photos. Its lens is on the back of the phone. The Droid X2 doesn’t have a physical button for taking pictures; instead you tap a button onscreen (Taking Still Photos).
Charging Cable and AC Adapter
This cable is how you both charge your Droid X2 and connect it to your computer, if you wish to transfer files back and forth, as described on Transferring Files Using Your PC. If you’ve just taken the Droid X2 out of the box, plug it in now and give it a full charge before using it.
There are two options included for charging. One is a micro USB cable. Plug the cable into your Droid X2 and a PC or Mac, and you can sync and transfer files. When the cable is plugged in, it’s also providing power to the Droid X2. Keep in mind, though, that it supplies much less power than an AC adapter, so it takes a very long time to charge your Droid X2 this way. The AC adapter looks like a stubby electric plug, except that there’s a small USB port in its side. Insert the charging/syncing USB cable into that port, plug the AC adapter into an electric outlet, and then insert the USB cable into your Droid X2. Now it’s charging on AC power.
If you use power-hungry features like video and GPS, you may have to charge the Droid X2 every night. If you stick to mostly phone calls and text messages, you may be able to get by with charging only two or three times a week.
Home Screen
Welcome to your new home, the Droid X2 Home screen. Get to it by pressing the Home key no matter where you are.
Note
When you first visit your Home screen, you see a green robot icon (he’s a droid—slang for android). Touch him to get a few basic tips about getting started with the Droid X2. After that, though, you don’t need him, so press and hold the icon until a trash can appears at the bottom of the screen. Then you can drag him to the Trash.
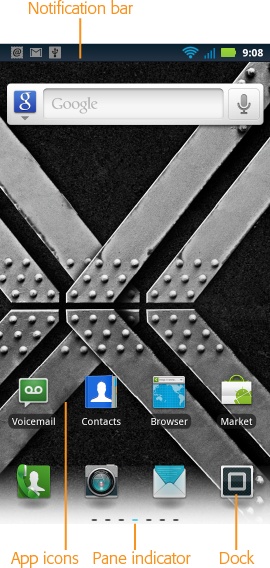
At first glance, it’s a relatively bare screen, populated by the following:
Notification bar. As detailed on Status Bar Icons, this bar displays the status of many phone features and a variety of notifications, like when you’ve got email waiting for you.
App icons. Typically, the Home screen has four icons—one for text messaging, one for running a browser, one for checking voicemail, and one, titled Market, to let you search for and download new apps—tens of thousands of them, many of them free. As you’ll see later in this section, you can add or delete icons from the Home screen.
Dock. Just below the app icons are four icons. They sit in an area called the Dock, and they’re different from the app icons. Unlike the app icons, you can’t delete them. As you’ll see in a little bit, there are other screens you can move to, called panes or panels, and the icons in the Dock stay in place no matter which pane to which you move. (The app icons change according to what pane you’re on.) The Phone icon launches the Phone app; the camera icon launches the camera; the text messaging icon lets you send and receive text messages; and the Launcher icon reveals a whole new screen called the Apps Menu, filled with apps, apps, and more apps.
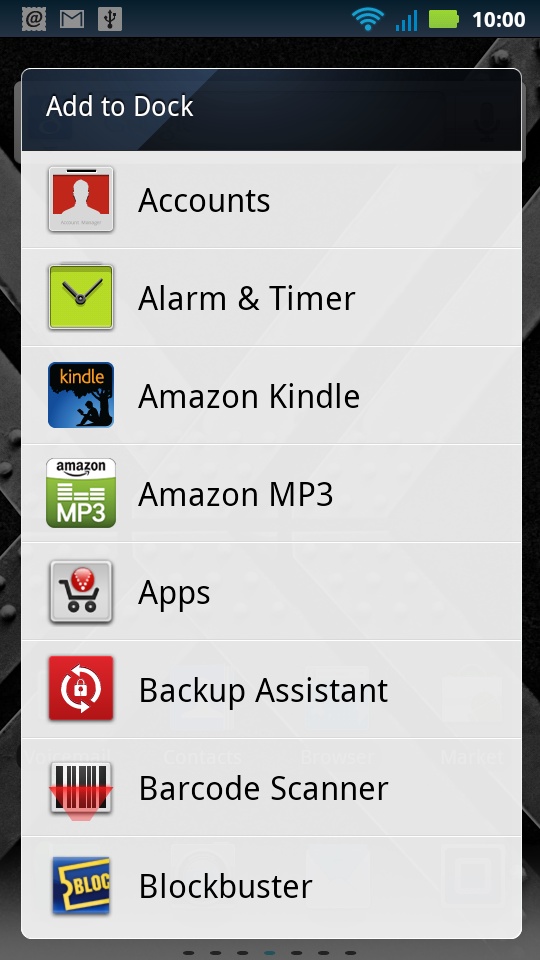
Although you can’t delete icons from the Dock, you can replace them with different icons to run different apps. Hold your finger on the icon you want to replace with a new app, and a screen appears with a list of apps you can add to the Dock. Tap the icon you want to replace the existing one, and it replaces it.
Pane indicator. Way down at the bottom of the screen you’ll see a dashed line. The blue dash indicates which pane you’re currently looking at.
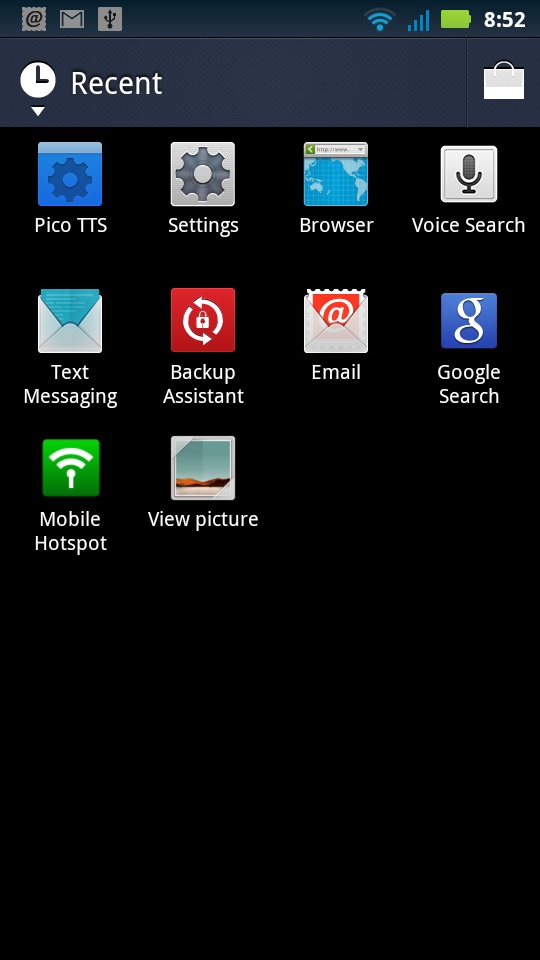
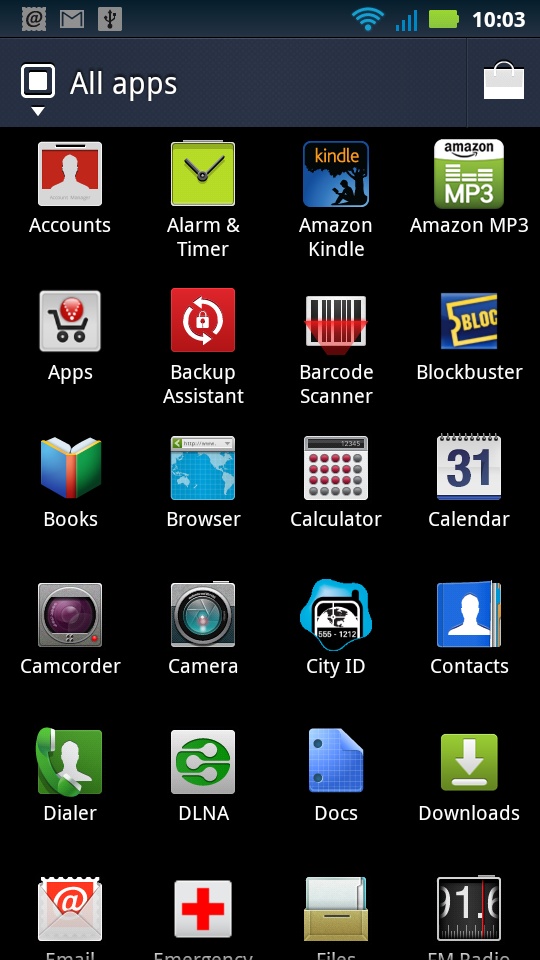
Press the Launcher icon, and up pops the Application Tray, which includes all the Droid X2’s preinstalled apps, plus any apps that you’ve downloaded and installed. There’s more than can fit on one screen, so flick your finger up and down to scroll through them all. Tap any icon to run the app.
Don’t be fooled by the relative barrenness of the Home screen, because one of its main purposes is to be a gateway to the Application Tray and to seven (count ‘em, seven) different panes that make it easy to perform plenty of common and not-so-common things, like checking your calendar and weather, seeing what your friends are up to on Facebook and other social networking sites, playing music and videos, and more.
Slide your finger to the left or right on the Home screen, and two things happen. First, you move from the Home screen to one of the six panes. Second, towards the bottom of the screen, the row of app icons changes so you can easily run different apps, although the Dock remains the same. At the very bottom of the screen, you’ll see that the pane indicator has changed—a different dash is now blue, to show you which pane you’re on. And finally, depending on the pane to which you’re moving, you may see a variety of widgets and app icons on the main part of the screen.
Note
The Droid X2 is powered by an operating system from Google called Android, as are many other phones, such as the Droid2, the HTC Incredible, the Sprint HTC EVO 4G, and many others. The Android operating system is constantly getting updated, and those updates are automatically sent to your phone when they’re available. So what you see on your Droid X2 may vary slightly from what you see onscreen here, depending on the version of Android you have on your phone.
Also, manufacturers often tweak the phone’s interface, sometimes in significant ways. Motorola has significantly changed the Home screen of Android with the addition of panes and other features. So when you compare the Droid X2 to other Android phones, you’ll notice differences.
Of the Droid X2’s seven panes (including the Home screen), the leftmost and rightmost ones are empty, except for the Dock and the pane indicator. They’re blank, so you can customize them to your heart’s content. (See Customizing the Home Screen and Panes for details.)
Each of the other panes serves a primary purpose. Here they are, from left to right:
Settings Pane
This pane contains a variety of widgets and apps for changing your settings, although it does more than that. Consider it the catch-all pane.
At the top is the Power Control widget, which lets you turn on and off various types of radios and services that eat up power, such as Wi-Fi, Bluetooth, and GPS. (For details, see the box on Maximizing Your Battery Charge.) When a radio or feature is on, its icon is colored (green for Wi-Fi and red for GPS, for example); its icon turns grey when it’s off. Notable on the power control widget is the far right icon, Airplane Mode. Tap it to turn it on, and all the Droid X2’s radios are turned off, as is often required in flight, but you can still use the Droid X2 for running apps and so on.
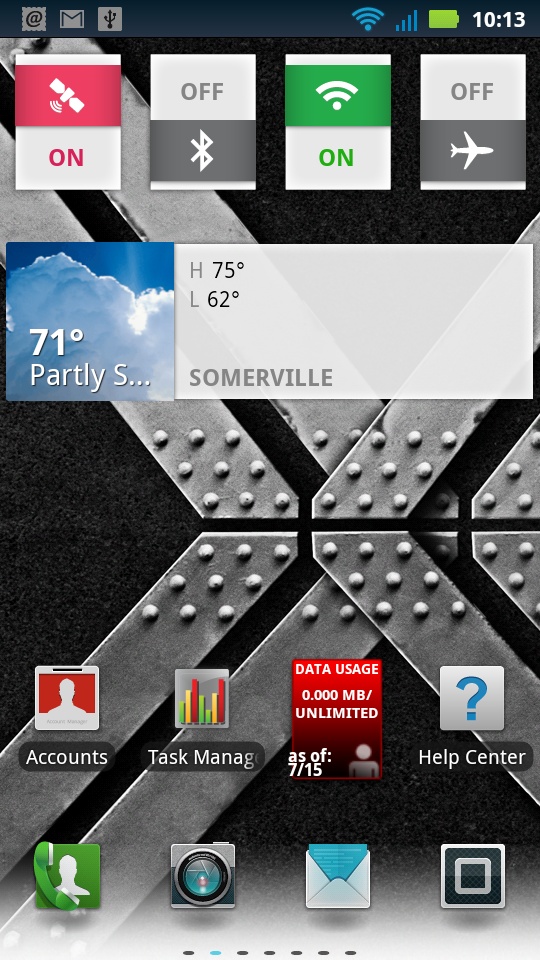
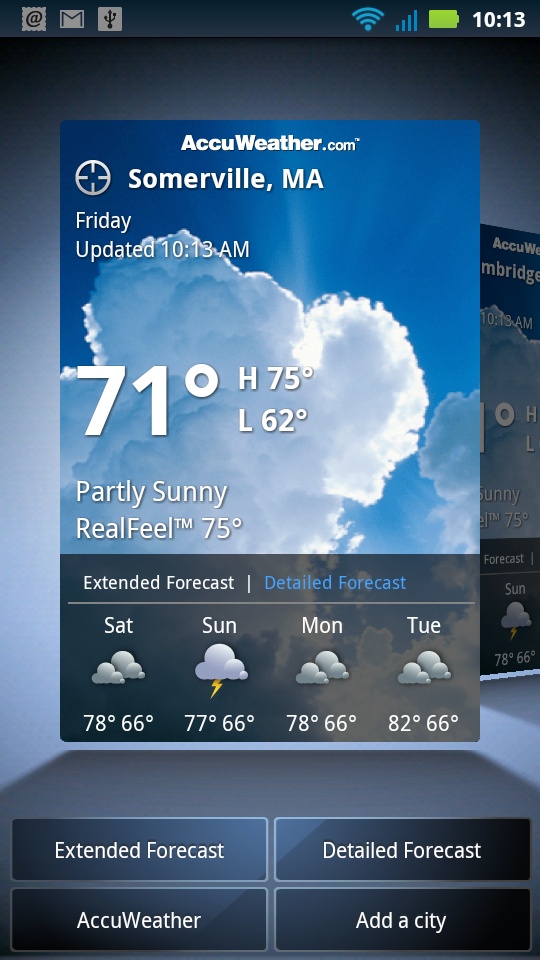
Below the Power Control widget there’s a weather gadget that displays your local weather. Tap it, and you see more details about the local weather.
At the bottom of the screen, you’ll find three icons. One, Accounts, lets you set up your social networking and email accounts (Setting Up Email Accounts). (This last app really belongs on the Social Networking pane, but who’s quibbling?) Another, the Task Manager, shows you apps that are running, and lets you manage, stop and control them (Using the Task Manager for Managing Apps). The next one to the right, Data Usage, shows you how much data you’ve used that month—especially useful if you’re on a plan where you have to pay more if you use more than a certain amount of data. Tap the furthest one to the right to get help with using your Droid X2.
Social Networking Pane
This pane, two panes over to the left from the Home screen, displays updates from all of the social networking sites you’ve set up to work with your Droid X2, such as Facebook. It shows just a snapshot of your social networking activity—only the most recent activity—via a widget, which is a small program that can grab information from an app or other information source and display it. To see all your social networking activity, launch the Social Networking app from this pane. For details, including how to set up social networking accounts, see Facebook and Twitter on the Droid X2.
You can read and interact with the updates you see on this pane, as well as update your own status and send messages. Click the entry you want to interact with (or your own for updating your own status and sending messages), and follow the onscreen instructions for posting an update, adding a comment to a post, and so on.
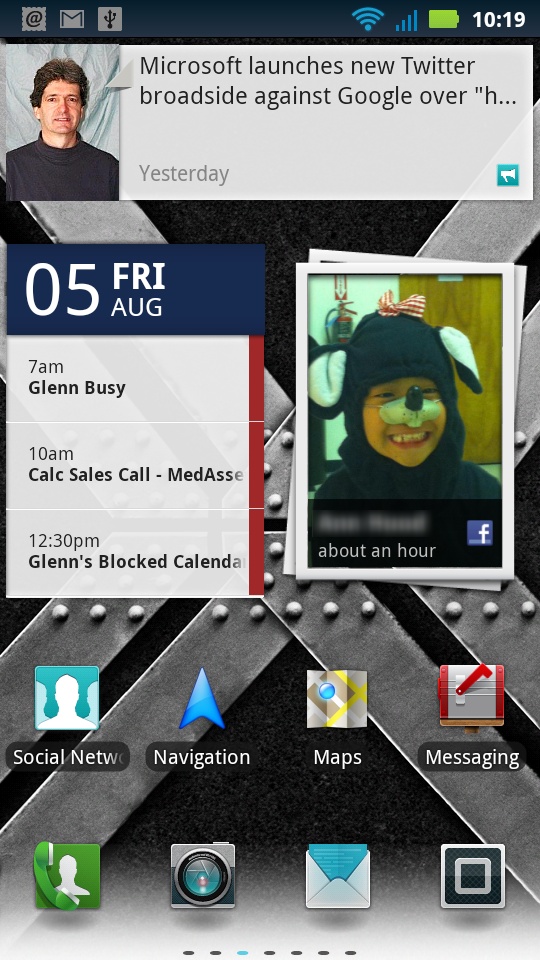
The pane also includes a widget for displaying your calendar (Using the Calendar). You’ll find a variety of app icons on this pane, including ones for navigation, Google Maps, and messaging.
Media Pane
This pane, just to the right of the Home screen, is the go-to pane for listening to music, viewing photos, and watching videos. At the top is a Music widget. Tap the play button to play whatever song is currently queued in the Music app (Playing Your Music). You can also launch the full-blown Music app by tapping the rightmost part of the widget.
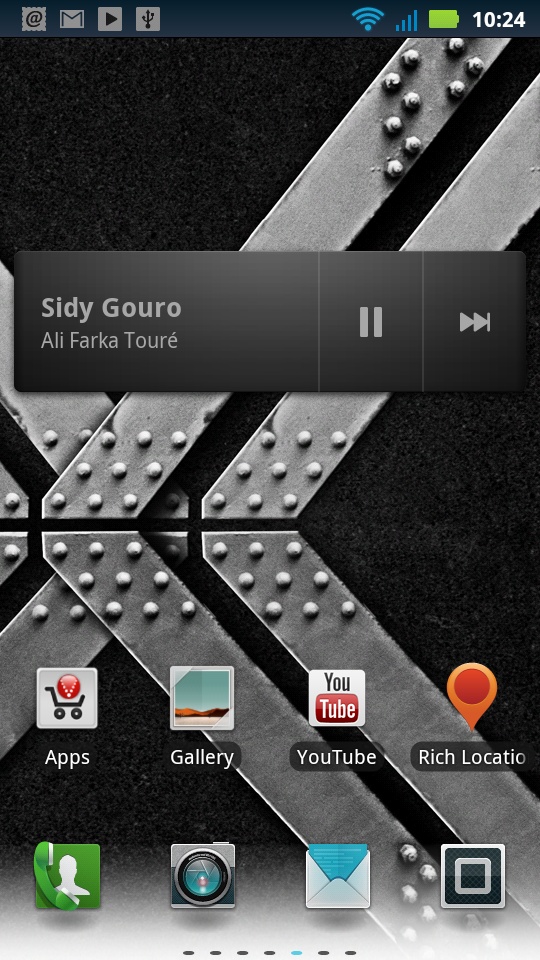
At the bottom of the screen, you’ll find a variety of media apps, including one for viewing your Gallery (Opening the Gallery), one for launching YouTube (Using HDMI to View Photos and Videos on a TV or Monitor), one for going to Verizon’s Vcast apps store (not really media-related, but why expect consistency?), and one for a Rich Location app that works in concert with GPS and Google Maps to show you information about places near you. (Again, it’s not media-related, but they had to put it somewhere.)
News Pane
This pane includes a single widget that displays news from your news feeds (see Setting Your Weather Options for how to set those up). Other than that, there’s nothing here.

The Droid X Panes
If you’ve got a Droid X, the panes you see will vary somewhat from the Droid X2, with a slightly different mix of widgets and apps. For example, on the Droid X, there are separate panes for social networking and for your calendar. And the Droid X also has two panes that the Droid X2 doesn’t have—the Productivity pane and the Calling pane. (The Droid X doesn’t have any blank panes for you to customize.)
The Droid X Productivity Pane
On the Droid X, the Productivity pane is just to the left of the Home screen. It has a grab bag of productivity widget and apps. At the top there’s Google search, and beneath that, widgets that display what’s next on your calendar, and the most recent email message fetched. Tap either of them to launch your Calendar or Email app, respectively.

At the bottom of the screen, you’ll find apps for Gmail, Backup Assistant (it backs up important data to Verizon storage), a very nifty Messaging app that’s Command Central for all of your email and messaging services, and an app for Skype mobile that lets you make free calls anywhere in the world to others who use Skype, or low-cost calls around the world to landlines and cellphones.
Calling Pane
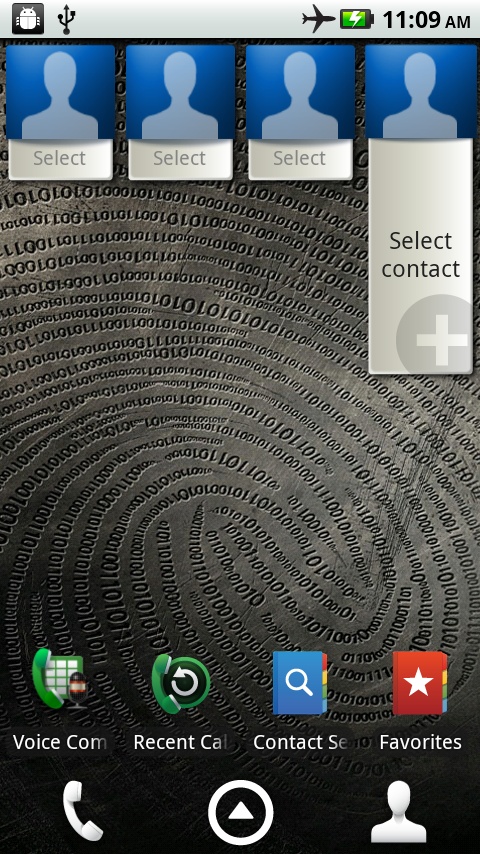
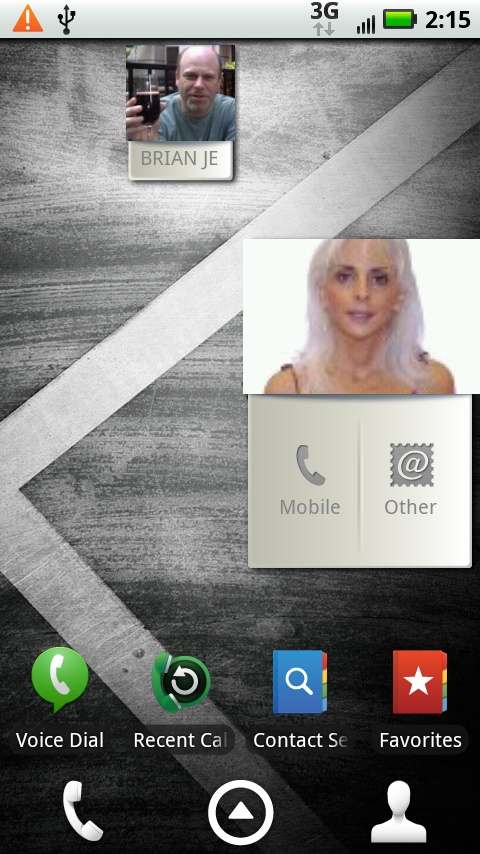
This Droid X pane brings together the widgets and apps for making phone calls. At top is a widget that lets you put your favorite contacts front and center, so it’s easy to call them. Tap Add Contact to add them here. You can also add them in the same way you add other objects to your screen, covered on Customizing the Home Screen and Panes.
Why use this widget instead of simply dialing the phone? Because it puts a lot more options at your fingertips. You can make a call with a single tap, send an email with a single tap, send a social networking message with a single tap, and so on.
Tap the contact onscreen, and you see all the contact information for that person, including phone numbers, email addresses, social networking links, and so on. Select the way you want to contact the person with a single tap, and then select Done. The next time you tap the contact onscreen, you’ll get a message that lets you complete the connection—compose an email, dial the phone, and so on. If you’re calling them by phone, tap “Enable one-touch calling with this widget.” The next time you tap the picture, you’ll automatically make a phone call.
At the bottom of the screen, you’ll find icons for apps for making phone calls, viewing your recent contacts, searching contacts, and viewing your favorite contacts.
Customizing the Home Screen and Panes
Here’s one of the many nice things about the Droid X2—it’s easy to put your personal mark on it. Wish there were a few more apps on the Home screen? No problem; you can easily add them. Want to change the location of apps, or move around widgets and add new ones to each of your panes and the Home screen? It’s a breeze. The rest of this section shows you how.
Adding Widgets, Folders, Shortcuts, and Wallpaper
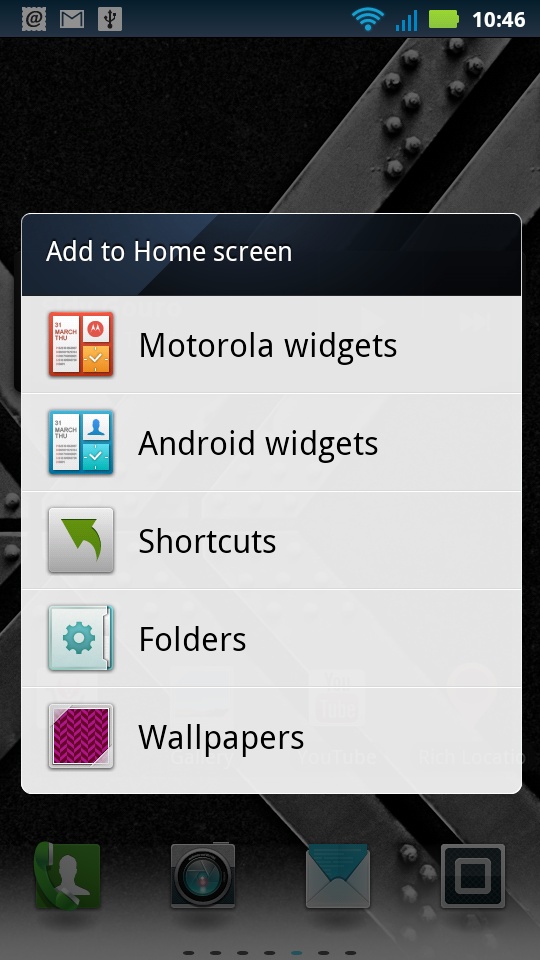
The Home screen and all its panes are much like a blank canvas, waiting for your Picasso-like touches. Instead of paint, you can add widgets, shortcuts, and folders, and even change its wallpaper. To do any of the above, the first step is the same: Press and hold your finger anywhere on the Home screen. Alternatively, press the Menu key and select Add. Either way, an “Add to Home screen” menu appears, with the following options:
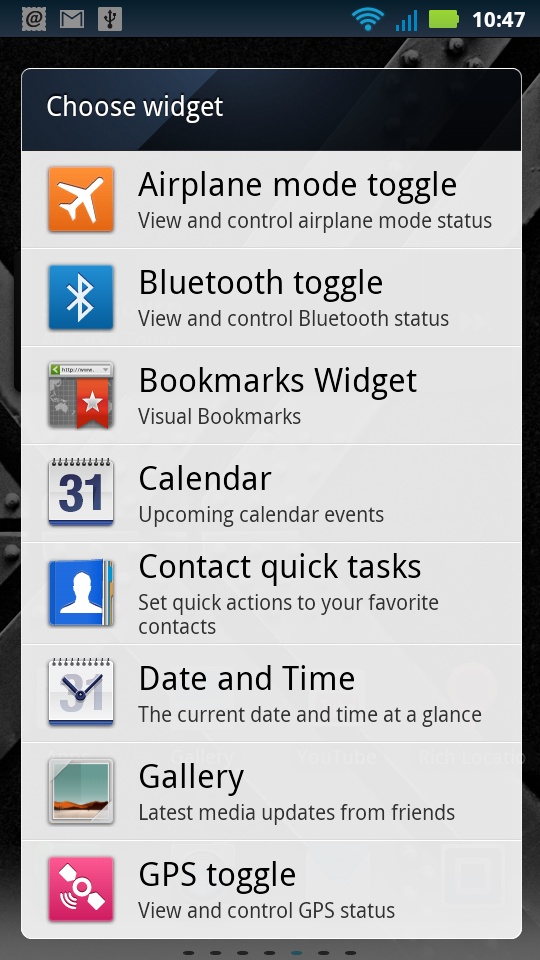
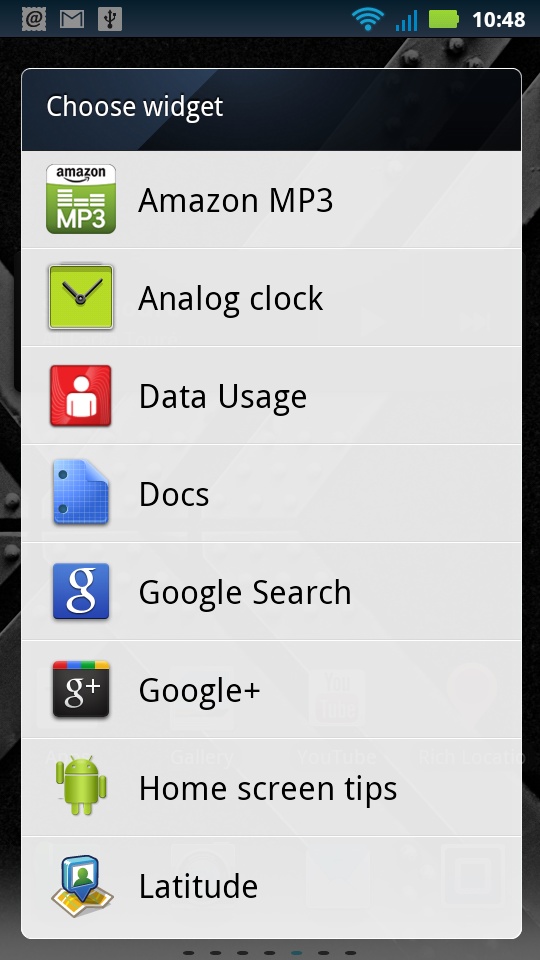
Motorola widgets. A widget is an applet that performs a small, specific task, often grabbing and displaying information from the Droid X2 or the Internet. Motorola widgets are those that the Droid X2’s manufacturer cooked up and added to the basic Android operating system that runs the Droid X2. When you select this option, you see a list of all the Motorola widgets you can add—anything from toggling into Airplane mode to displaying your status on social networking sites, browsing bookmarks, and more. Tap the widget you want to add and follow its instructions.
Android widgets. These are widgets built directly into the Android operating system, and so if you use another Android-based phone, you’ll see the same list here, and they work like the same way. Android widgets tend to be a bit plain-vanilla and not as nifty as Motorola widgets. Still, there are good ones to choose from, such as an analog clock and a music player.
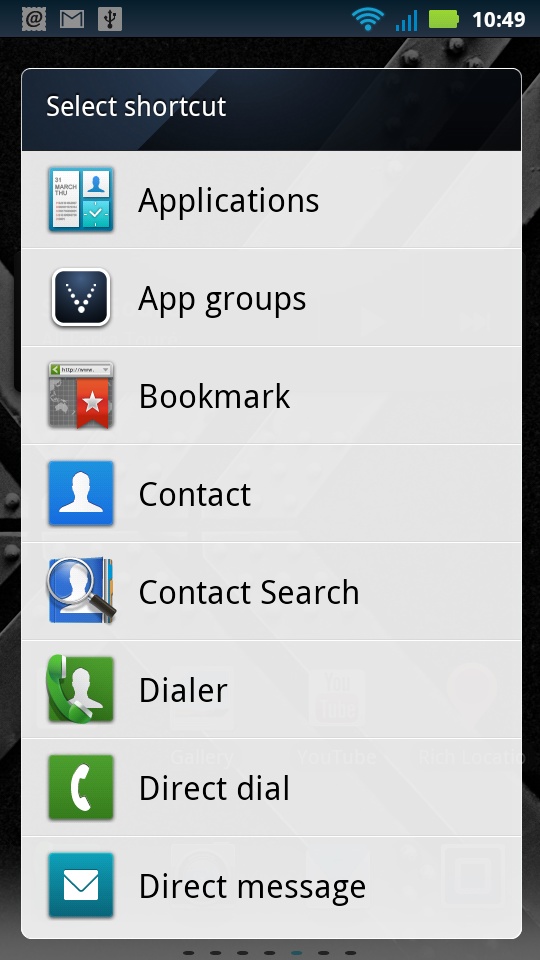
Shortcuts. A shortcut is a quick link to an app or specific task. So, for example, you could put a shortcut to the Pandora Internet radio app, or to an individual contact to display contact information, or to the Droid X2’s voice dialing app.
Note
When you try to add widgets, shortcuts, and folders to a pane, when you hold your finger on it, nothing happens. (For example, try it on the Social Networking pane.) That just means the pane is full. If a pane is so full with icons, widgets, and shortcuts that there’s no room on it, you can’t add to it. So if you want to add something to the pane, you first need to delete something.
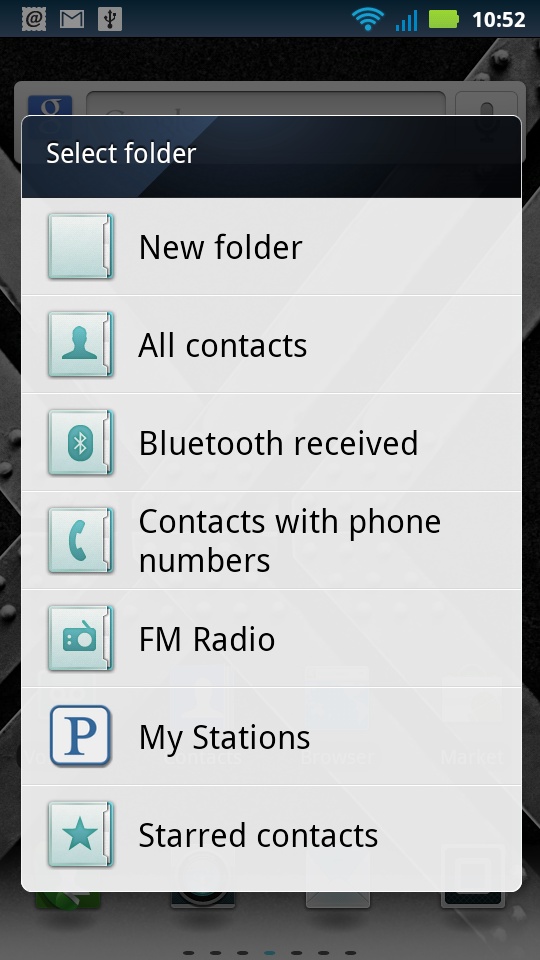
Folders. Folders hold information and files, the same way they do on computers. You’ve already got lots of folders on your Droid X2, like your folder full of contacts, and Favorites from your browsers. When you install apps, they may create their own folders as well—the Pandora Internet radio app, for example, creates a folder of your radio stations.
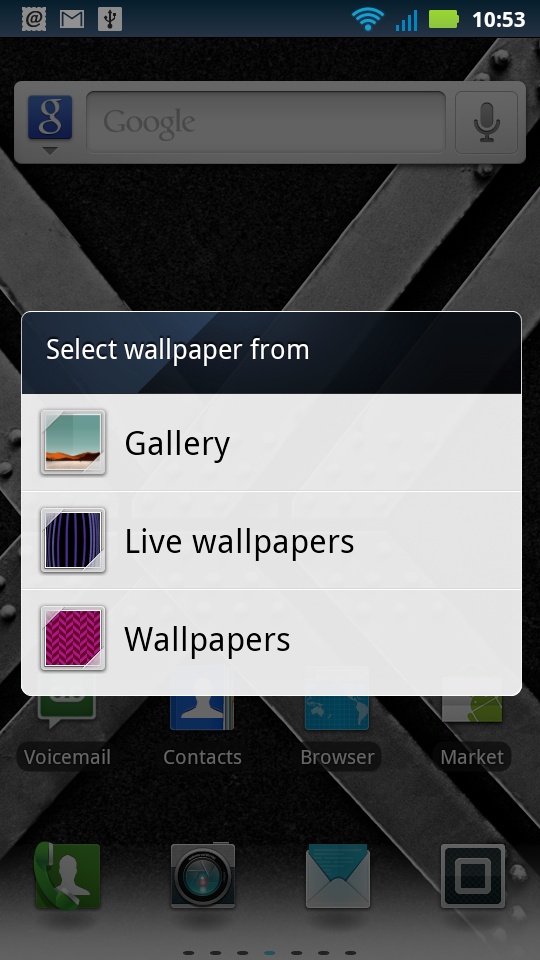
Wallpaper. OK, here’s where the Picasso part comes in. You can add a wallpaper to the background of your Home screen, just as you can add wallpaper to your computer. There are three choices here: Gallery, Live wallpapers, or Wallpapers.
Live wallpapers are changing backgrounds, either because they’re animated, or because they grab information from somewhere, and then display it as part of the wallpaper background. So the Galaxy live wallpaper, for example, shows an animated galaxy made up of swirling stars, while the Maps live wallpaper displays your current location on Google Maps. If you choose Gallery, you can take any of your photos and use it as wallpaper. The Wallpaper choice lets you use a static wallpaper. No matter what you choose, you get to preview the wallpaper first.
Note
When you add wallpaper to your Home screen, it also shows up as the background on all your panes.
OK, time to go crazy. You can now trick out your Home screen in countless ways.
Deleting and Moving
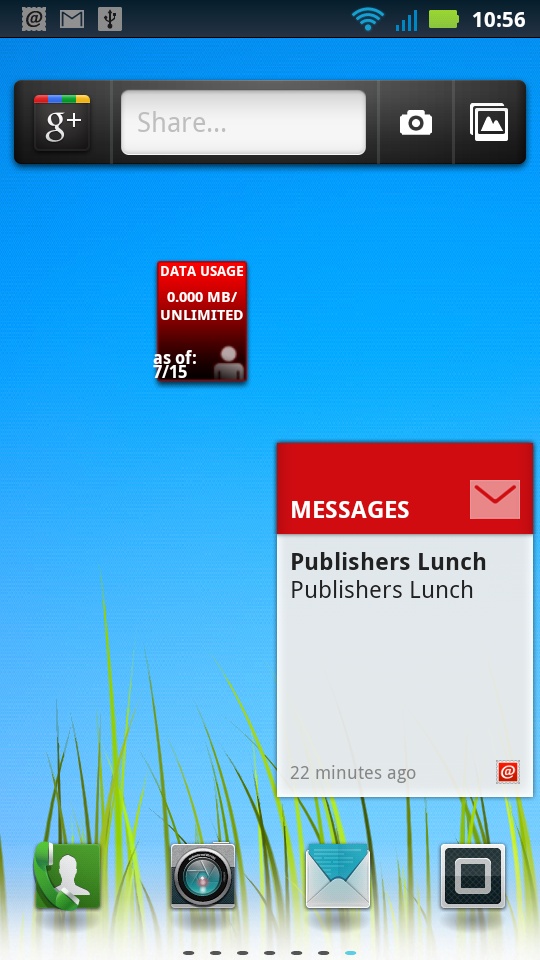
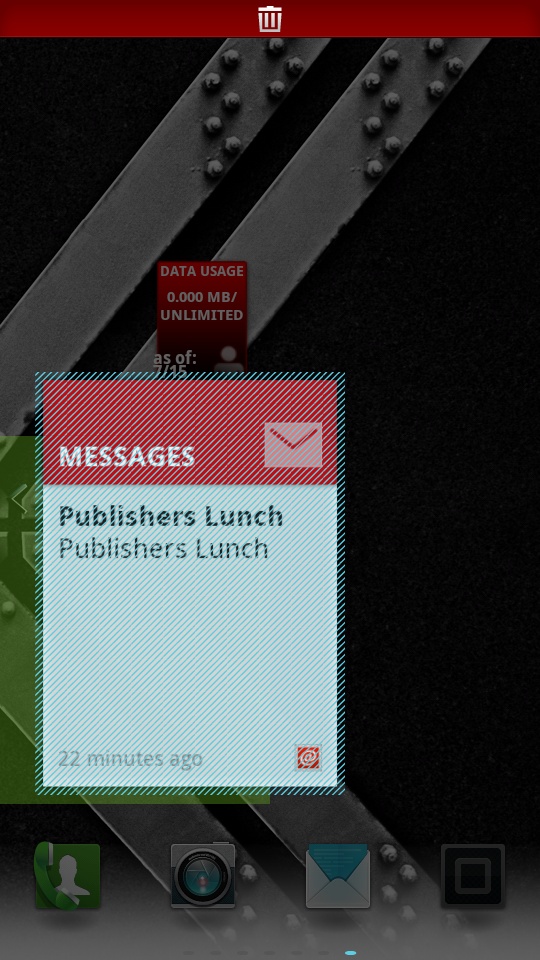
Once you’ve added widgets, folders, and shortcuts to your Home screen, you’re not stuck with them, or with where you’ve placed them:
To move a widget, folder, or shortcut, press your finger on it and hold it for a second or two. A light blue, hatched outline appears around the widget. Drag it to its new location and take your finger off of it. That’s where it will stay.
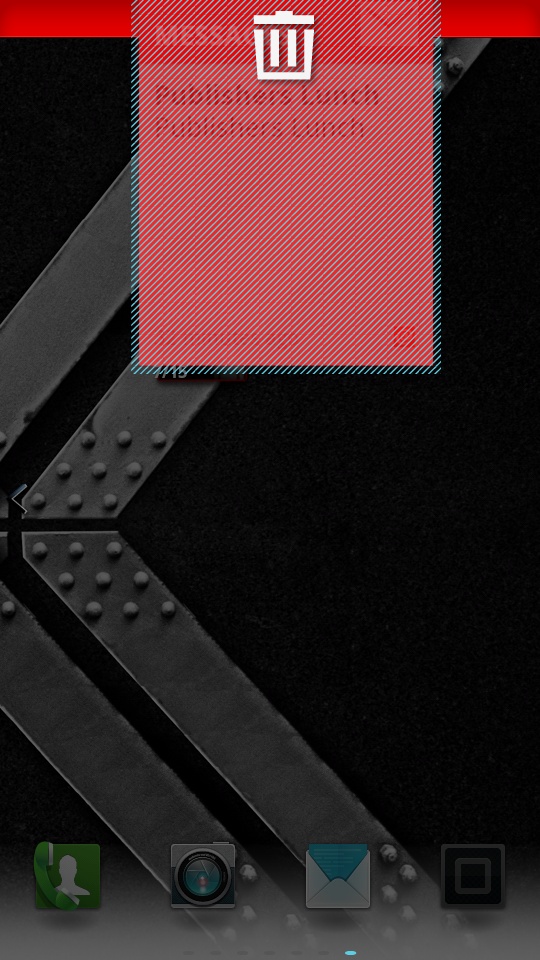
To delete a widget, folder, or shortcut, also press your finger on it and hold it for a second or two until the hatched line appears. At the top of the screen, the Notification Bar is replaced by an icon of a trash can. Drag the doomed item to the trash can. When you see it turn red, release it—it’s gone. Keep in mind, by the way, that when you delete something, it’s gone forever. It’s not like the PC’s Recycle Bin or the Mac’s Trash where it’s kept for a while. It’s gone, baby, gone.
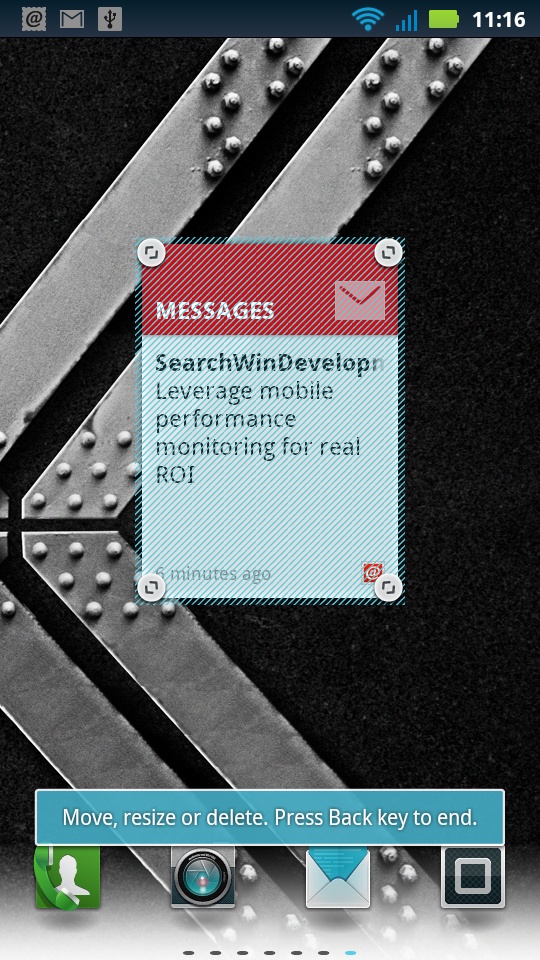
Resizing Widgets
Got a widget that you wish was larger or smaller, or had different dimensions? You can resize it—although not always. Remember that the Droid X2 has two kinds of widgets, Motorola widgets and Android widgets? Well, Motorola widgets can be resized, but Android ones can’t.
To resize a Motorola widget, press and hold it until the now-familiar hatched outline appears. Then take your finger off. On each of the widget’s corners appear resize indicators. Drag a corner and reposition it until the widget is the size you want, and then let go. You’ve just resized the widget.
Life, though, is not always so simple. Some widgets are built to have certain dimensions or length-to-width ratios. A widget designed to be wide but short, for example, may not allow itself to be resized to be tall and narrow.

Tip
Not all Motorola widgets can be resized. Toggles, such as the Wi-Fi toggle, GPS toggle, and Airplane mode toggle can’t be resized, no matter how hard you try.
The Droid X2 lets you know right away if you’re trying to stretch your widget like it’s Gumby, even though it’s about as flexible as a stone. It just says no. As you’re resizing, if it can’t resize to the dimension to which you’re dragging it, it turns red and red Xs appear on its corners.
Tip
How can you know ahead of time whether a widget on your Home screen or one of your panes is an Android widget or a Motorola widget? You can’t. The only way to find out is to try resizing it. If the resizing corners appear after following the instructions on the previous page, then it’s a Motorola widget. If they don’t, it’s either not designed to be resized or it’s an Android widget.
Controlling the Droid X2 with Your Fingers
With the Droid X2, your fingers do the walking. They do all the work that you do on a computer with a mouse or keyboard. Here are the eight finger strokes you can use on the Droid X2’s screen.
Tap
Tapping is as basic to the Droid X2 as clicking is to a mouse. This one simple gesture is how you press onscreen buttons, place the cursor for text entry, and choose from menus. Note that’s a finger tap; the screen is designed to detect a fleshy fingertip, not a stylus.
Touch and Hold
Touch an object and hold it for several seconds, and depending on what you’re holding, an option menu may appear. (For example, when you touch and hold the Home screen, a menu appears that lets you add an object such as a widget, change your wallpaper, and so on.) You also touch and hold an object as a way to grab onto it if you then want to drag the object somewhere.
Drag
After you’ve grabbed something, you can drag it with your finger, such as dragging an icon to the Trash.
Slide
Slide your finger across the screen to perform some specific tasks, such as unlocking your phone after it’s been put into Sleep mode, or to answer a phone call on a locked Droid X2. You’ll also use the sliding motion to move through all six of the Home screen’s panes.
Flick
Think of the flick as a faster slide, done vertically when scrolling through a list, such as a list of your contacts. The faster you make the flicking motion, the faster your screen scrolls—sometimes too fast. You can stop the motion, though, by touching the screen again.
Note
Flicks seem to actually obey the laws of physics, or at least as much as virtual movement can. When you flick a list, it starts off scrolling very quickly, and then gradually slows down, as if it were a ball set in motion that gradually loses momentum.
To scroll through large lists quickly, you can flick multiple times.
Pinch and Spread
In many apps, such as Google Maps, Mail, the Web, and Photos, you can zoom in by spreading your fingers—placing your thumb and forefinger on the screen and spreading them. The amount you spread your fingers will determine the amount you zoom in.
To zoom out, put your thumb and forefinger on the screen and pinch them together. The more you pinch, the more you zoom out.
Get Droid X2: The Missing Manual, 2nd Edition now with the O’Reilly learning platform.
O’Reilly members experience books, live events, courses curated by job role, and more from O’Reilly and nearly 200 top publishers.

