Transferring Files
Once you’ve told Dreamweaver how you plan to ship off your Web page files to the Net, you can set about doing it. Thanks to Dreamweaver’s Site panel, the whole process takes only a few steps.
Note
If you’re using WebDav, SourceSafe, or Dreamweaver’s Check In/Check Out process, use the steps describe on page 494 for transferring files.
Moving Files to the Web Server
To transfer files to your Web server:
Open the Site panel (Figure 16-7).
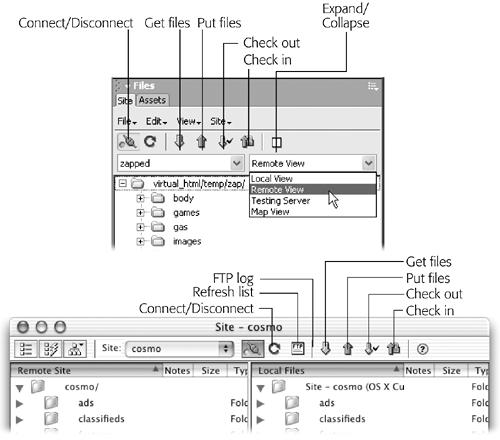
Figure 16-7. The Site panel in Windows (top) and on the Mac (bottom) looks slightly different. Both, however, offer toolbar buttons for uploading and downloading your Web files to the actual Web server that will dish them out to the adoring public. (See Chapter 14 for much more on this important window.)
Choose Site→Site Files (or press F8).
From the Site menu, choose the name of the site whose files you wish to move (if it isn’t already selected).
The Site panel displays files for the selected site. (See Figure 16-7.)
From the file list in the Site panel, select the files to upload to the Web server.
To move a folder and every file inside it, just select the folder. (In other words, you can transfer your entire Web site to the server by simply selecting the local root folder—the folder listed at the very top of the Local Folder file list.) When only a few files have changed, you can also select only certain files or folders for uploading, ...
Get Dreamweaver MX: The Missing Manual now with the O’Reilly learning platform.
O’Reilly members experience books, live events, courses curated by job role, and more from O’Reilly and nearly 200 top publishers.

