What you see on a web page when you use garden-variety HTML tags like <h1>, <p>, and <ul>, pales in comparison to the text and styling on display in, say, a print magazine. If web designers had only HTML to make their sites look great, the Web would forever be the ugly duckling of the media world. HTML doesnât hold a candle to the typographic and layout control you get when you create a document in even the most basic word processing program.
Fortunately for web designers, you can change the ho-hum appearance of HTML using a technology called Cascading Style Sheets (CSS). CSS gives you the tools you need to make HTML look beautiful. If you think of HTML as the basic structure of a house (the foundation, walls, and rooms), then CSS is the houseâs interior decoration (the paint, carpeting, and the color, style, and placement of furniture). CSS gives you much greater control over the layout and design of your pages. Using it, you can add margins to paragraphs (just as in a word processor), colorful and stylish borders to images, and even dynamic rollover effects to text links. Best of all, Dreamweaverâs streamlined approach lets you combine many of these design properties into powerful, centralized style sheets that let you control pages throughout your site.
CSS is a large topic. Itâs also the heart of todayâs cutting-edge web design. So instead of dedicating just a single chapter to it, this book provides instruction in the fine art of using CSS in nearly every chapter. In this chapter, youâll learn the basics of CSS and how to use Dreamweaverâs powerful CSS tools. In the next few chapters youâll learn how CSS can improve the look of common web page elements like links, images, and tables. Once youâre comfortable with the basics, youâll find in-depth information on CSS in Chapter 8. In Chapter 9, youâll learn how to harness the power of CSS to fully control the layout of a web page. And in Chapter 10, youâll learn how to troubleshoot CSS problems with Dreamweaver.
If youâve used styles in programs like Microsoft Word or Adobe InDesign, CSS will feel familiar. A style is simply a rule describing how a browser should format a particular HTML tag. A style sheet is a collection of these styles.
You can create a single style, for example, that formats text with the font Arial, colored red, and with a left margin of 50 pixels. You can also create styles specifically for images; for instance, you can create a style that aligns an image along the right edge of a web page, surrounds the image with a colorful border, and adds a 50-pixel margin between the image and the surrounding text.
Once you create a style, you can apply it to text, images, or other elements on a page. For example, you could select a paragraph of text and apply a style to it to instantly change the textâs size, color, and font. You can also create styles for specific tags, so that, for example, a browser displays all <h1> elements in the same style, no matter where they appear on your site.
In the past, HTML alone provided basic formatting options for text, images, tables, and other web page elements. But today, professional web designers use CSS to style their pages. In fact, the older HTML tags used to format text and other page elements have been phased out by the World Wide Web Consortium (W3C), the organization that defines Web standards, in favor of CSS. And following along with industry practice, Dreamweaver CS5.5 has made it impossible (unless you write the code yourself) to add obsolete HTML tags, such as the <font> tag.
CSS has many benefits over HTML. With it, you can format paragraphs to resemble those that appear in a book or newspaper (with the first line indented and no space between paragraphs, for example), and control the leading (the space between lines of type in a paragraph). When you use CSS to add a background image to a page, you get to decide how (and whether) it tiles (repeats). HTML canât even begin to do any of these things.
Even better, CSS styles take up much less space than HTMLâs formatting options, such as the much-hated <font> tag. CSS usually shaves off a lot of kilobytes from text-heavy pages, while maintaining a high level of formatting control. As a result, your pages look great and load faster.
Style sheets also make it easier to update your site. You can collect all your styles into a single file linked to every site page. When itâs time to change every <h2> tag to lime green, you edit a style in the style sheet file, and that change immediately ripples throughout your site, wherever you used that style. You can thus completely change the appearance of a site simply by editing a single style sheet.
As you create new formatting styles, youâll add them to a style sheet that you store either in the web page itself (in which case itâs an internal style sheet), or in a separate file called an external style sheet.
Internal style sheets appear in the <head> portion of a web page, and contain styles that apply only to that page. An internal style sheet is a good choice when you have a very specific formatting task for a single page. For example, if the marketing department wants a one-page online âflyerâ with a unique format and its own distinctive look.
Tip
When you create a new page design, itâs often easier to add styles to an internal style sheet. Once youâre satisfied with the design, you can export the styles to an external style sheetâfor use by all your siteâs pagesâas described on Moving and Managing Styles.
An external style sheet, on the other hand, contains only stylesâno HTMLâand you can link numerous pages to it. In fact, you can link every page on your site to it, giving your site a uniform, sitewide set of styles. For instance, you can put a headline style in an external style sheet, and link every page on the site to that sheet. Every headline on every page then shares the same lookâinstant design consistency! Even better, when the boss (or the interior decorator in you) calls up and asks you to change the color of the headlines, you need to edit only a single fileâthe external style sheetâto update hundreds or even thousands of web pages.
You can create both types of style sheets easily in Dreamweaver, and you arenât limited to choosing one or the other. A single web page can have both an external style sheet (for styles that apply to the whole site) and an internal style sheet (to format just that page). You can even attach multiple external style sheets to a single page.
Styles come in several flavors. The most common are class, ID, and tag styles.
A class style is one you create, name, and attach manually to an HTML tag or to selected text (in other words, text you select with your cursor). Class styles work much like styles in word processing and page layout programs. If you want to display the name of your company in bold and red wherever it appears in a web page, you can create a class style named company that formats text in boldface and red letters. You would then select your companyâs name on the page, and apply this style to it.
An ID style lets you format a unique item on a page. Use ID styles to identify an object (or an area of a page) that appears only onceâlike a websiteâs logo, copyright notice, main navigation bar, banner, or a particular field in a form. Designers frequently use IDs when they create CSS-based layouts like those youâll learn about in Chapter 9. An ID style is similar to a class style in that you name the style and apply it manually. But you can apply a class to many different elements on a page, and you can apply an ID to only one tag or object per page. (Itâs okay to use multiple IDs on a single page, so long as each ID name is different.)
The other major type of CSS style is called a tag style, and it applies to an individual HTML tag globally, as opposed to individual pages or selections. Suppose you wanted to display every Heading 1 paragraph in the Arial font. Instead of creating a class style and applying it to every Heading 1 on the page, you could create a tag style for the <h1> tag. In effect, you redefine the tag so that a browser displays it in Arial.
The main benefit to redefining an HTML tag this way is that you donât have to apply the style by hand. Since the new style says that all <h1> tags must use Arial, a browser displays <h1> tags in Arial wherever it encounters them.
These HTML tag styles are the easiest way to format a page. For one thing, thereâs no need to select the tag manually and apply the style; wherever the tag appears, a browser automatically applies the style.
Nevertheless, sometimes only a class style will do, such as when you want to format just a few words in a paragraph. Simply redefining the <p> tag wonât do the trick, since that would affect the entire paragraph (and every other paragraph on your site). Instead, you have to create a class style and apply it to just the words you wish to style. In addition, class styles are handy when you want to format just one instance of a tag differently from others. If you want to format the introductory paragraph on a page one way, and all the other paragraphs on the page a different way, you create a class style and apply it to that first paragraph. (Another solution is a slightly more complicated, but more flexible, type of style called a descendent selectorâyouâll read about those later, on Descendent Selectors.)
Note
In addition to class and tag styles, other types of styles provide added control for particular situations. You can read about these more advanced styles starting on Compound Selectors.
Dreamweaver gives you several ways to create CSS styles. For text, you can use the Property inspectorâs CSS mode to apply a font, font size, font color, font weight, and alignment to selected text. To create styles for elements other than text (like images or tables), or to tap into the dozens of other CSS properties not listed in the Property inspector, use the CSS Styles panel (see Figure 4-1). To get a complete overview of the style creation process, youâll look at both methodsâstarting with the more versatile CSS Styles panel, then moving on to the Property inspector.
Dreamweaver gives you many ways to create a new style: On the CSS Styles panel, click the new style button (which Dreamweaver calls the New CSS Rule button; see Figure 4-1); right-click anywhere in the CSS Styles panel, and then, from the menu that appears, select New. Alternatively, choose FormatâCSS StylesâNew. The New CSS Rule dialog box appears (Figure 4-2), where you begin creating your new style. (In the technical language of CSS, a style is actually called a rule, but for simplicityâs sake this book uses the term style. After all, Cascading Rule Sheets doesnât have much of a ring to it.)
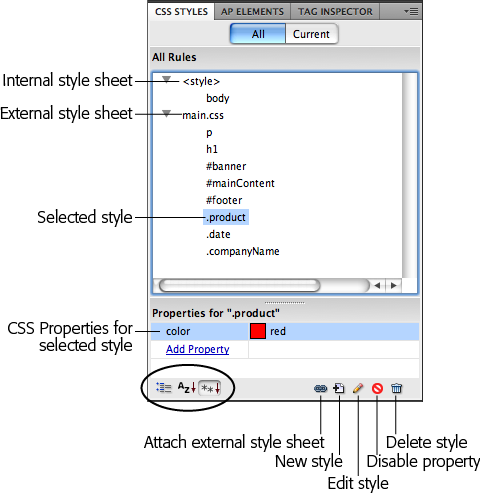
Figure 4-1. With the âAllâ button selected, the CSS Styles panel lists the names of all the styles the current page uses, including those in both external and internal style sheets. Here, one external style sheetâmain.cssâcontains five styles. The first two are tag styles (notice that the names match various HTML tags), while the next three are ID styles (note the # at the beginning of the name), and the last three are class styles (note the period before the name). You also see one tag style defined in an internal style sheetâthe one listed below â<style>â. Click the minus (-) icon (arrow on Mac) to the left of the style sheet to collapse the list of styles, hiding them from view. The âPropertiesâ list in the bottom half of the panel lets you edit a style (see page 319); the three buttons at the bottom left of the panel (circled) control how Dreamweaver displays the Properties list.
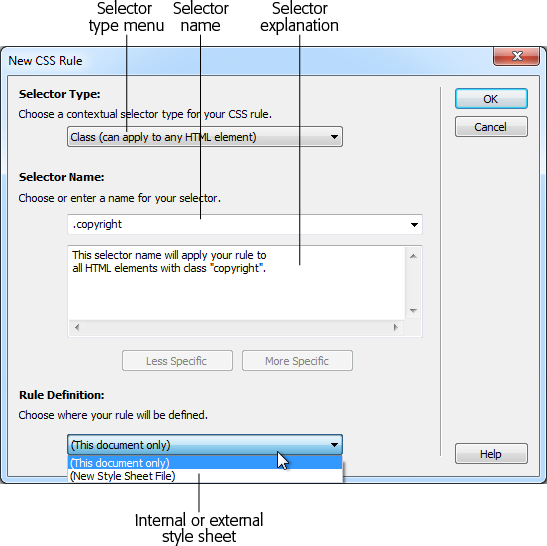
Figure 4-2. In the New CSS Rule dialog box, you choose a type of style, give it a name, and decide whether to put the style in an internal or external style sheet. You use the two dimmed buttons, labeled Less Specific and More Specific, when you type a special type of CSS selector, called a descendent selector (see page 315).
Hereâs a quick tour of your choices:
Selector Type. From the Selector Type menu, choose the kind of style you want to create. Class creates a style that you manually apply to page elements, ID creates a style that you can use only once on the page, and Tag creates an HTML style that Dreamweaver applies to each occurrence of the tag.
Youâll want to use a fourth type of CSS style, Compound, to create more advanced style types, such as pseudo-classes, attribute selectors, and descendent selectors. Youâll learn about these styles in various parts of the book; you can find a detailed discussion starting on Compound Selectors.
In addition, if you select something on a page (such as a paragraph, an image, or a headline), Dreamweaver highlights the Compound option and, in the Selector Name field, suggests whatâs called a descendent selector. Youâll learn more about descendent selectors on Descendent Selectors, but basically, theyâre a type of style that applies formatting to nested page elements, that is, to page elements within other HTML tags. For example, div p is a descendent selector that formats any paragraph (thatâs where the p comes from) that appears within a <div> tag. So in cases where you want a descendent selector, choose Compound selector.
Selector Name. If you selected Class or ID from the Selector Type menu, enter a name for the new style. According to the rules of CSS, you have to start class style names with a periodâ.copyright, for exampleâand ID style names with the # symbolâ#banner, for example. Dreamweaver automatically adds the proper symbol if you forget.
Another class or ID style name rule: A letter must follow the period or # symbol. After that, you can use any combination of letters and numbers, but avoid unusual characters and spaces. For example, .logo, #main_content, and #column2 all work fine. Dreamweaver lets you know if you use any invalid characters.
If you chose the Tag style instead, choose the HTML tag you want to redefine from the Selector Type pop-up menu.
Note
If youâre an HTML guru, you may find it faster to skip the Selector Name pop-up menu and just type the tag (minus the brackets) in the text box. For example, if you want to create a style for all unordered (bulleted) lists, type ul.
If you select the Compound option, Dreamweaver lets you type any valid CSS selector type in the Selector field (youâll learn about more selectors on Compound Selectors). You use this feature for some advanced CSS tricks, but you can also use it just to create a class, ID, or tag style.
Note that when you add a class, ID, tag, or other selector to the Selector Name field, Dreamweaver briefly explains to which HTML elements it will apply the selector. For example, Figure 4-2 displays the New CSS Rule dialog box in the process of creating a new class style named .copyright. The dialog box explains that Dreamweaver will apply this rule to all the HTML elements to which you assigned the class property .copyright (in other words, to all the text and tags to which you applied the class copyright, as described on Applying a Class Style). For simple styles like class and tag styles, this explanation is pretty much like âUh, yeah. Tell me something I donât know, Dreamweaver.â But for complex selectors such as the descendent selectors youâll learn about on Descendent Selectors, this explanation box helps clarify which page element an otherwise confusing selector name will apply to.
Rule Definition. The Rule Definition menu at the bottom of the dialog box lets you specify where you want to put the CSS code for the style youâre about to create. Choose âThis document onlyâ if you want to use the style only on the current web page (creating an internal style sheet, as described on Internal vs. External Style Sheets). To create a new external style sheet, choose New Style Sheet File from the Rule Definition pop-up menu. This option not only creates a new external CSS file (which you can save anywhere in your site folder), but also adds the necessary code in the current document to link it to that file.
If you previously linked an external style sheet to this document, then that style sheetâs name appears in the pop-up menu, indicating that Dreamweaver will add the new style to this style sheet file.
Note
If you create a bunch of internal styles on a particular page and later realize youâd like to turn them into an external style sheet that you can use in other pages, youâre in luck. Dreamweaver includes many tools for managing your style sheets. Youâll learn how to use them starting on Moving and Managing Styles.
If you indicate that you want to create an external style sheet, clicking OK brings up a Save Style Sheet As dialog box. Navigate to your siteâs folder, and then type in a name for the new external CSS file. Just as HTML files end in .html, so CSS files end in .css.
Note
If youâll use this style sheet for all your siteâs pages, you may want to save it in your siteâs root folder, or in a folder specifically dedicated to style sheets, and give it a general name like site_styles.css, main.css, or global.css. (You donât have to type the .css file name extension, by the way. In this case, Dreamweaver adds it.)
No matter what Selector Type option you select (Class, ID, Tag, or Compound), clicking OK brings you to the CSS Rule Definition window, discussed next.
The CSS Rule Definition window lists all the available properties for styling text, graphics, tables, and other HTML tags (see Figure 4-3). Youâll learn about each of the properties throughout this book.

Figure 4-3. For ultimate formatting control, Dreamweaver lets you set dozens of different Cascading Style Sheet properties from the CSS Rule Definition window. Youâll learn about these options throughout this book. For example, you can find the Type properties shown here discussed on page 146.
When you finish defining a style, click OK at the bottom of the Rule Definition window. Dreamweaver adds the style to the specified style sheet, and displays it in the CSS Styles panel (Figure 4-1).
The real trick to defining a style is mastering all the properties available, such as borders, margins, and background colors, and then learning how to use them reliably in different browsers. Youâll learn about different CSS properties starting on Text Formatting with CSS.
The Property inspectorâs CSS mode lets you quickly create (or modify) styles, such as choosing a font or a font size (see Figure 4-4) for text you select. In CSS mode, the Property inspector looks a lot like a formatting bar in a word processing program: dedicated buttons let you make text bold or italic, control alignment, and set font type, size, and color. All these options rely on CSS properties.
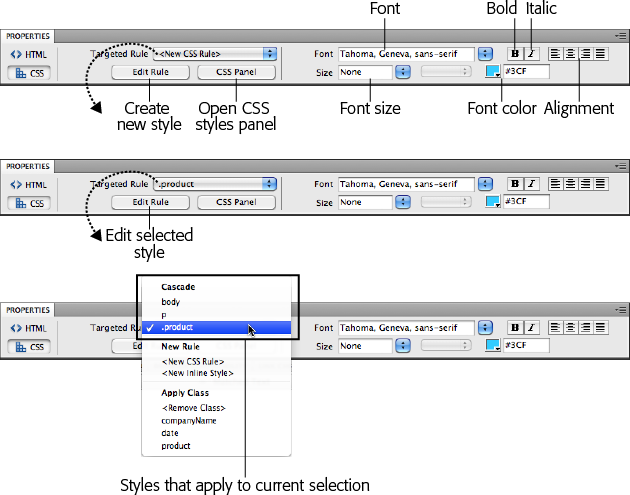
Figure 4-4. The Property inspectorâs CSS mode either creates a new style when you select a formatting option like font size (top) or it adds the formatting property to an already existing style (middle). You can tell which action Dreamweaver will take by looking at the Targeted Rule menuâif it says <New CSS Rule>, Dreamweaver lets you create a brand new class, ID, tag, or other style. However, if a style name (like p or .copyright in the middle image) appears in that menu, youâre editing an already existing style. If you want to create a new one, select <New CSS Rule> from the menu before you select a formatting option. Normally you want to avoid the <New Inline Style> style, since it adds CSS directly to an HTML tag, making the web pageâs file size larger, slower to load, and harder to update. However, inline styles come in handy when you need to create HTML emails, since thatâs the most reliable way to add CSS to an email message.
To use the Property inspectorâs CSS mode, select some text on the page (drag your cursor to select a swath of copy, double-click to select a word, and triple-click to select an entire paragraph or headline). Then, from the Property inspector, select an optionâfor example, choose a set of fonts from the font menu. If you donât have a style currently applied to the selection, you see <New CSS Rule> in the Targeted Rule menu on the Property inspector (see Figure 4-4, top), and when you apply a format, Dreamweaver opens the New CSS Rule dialog box.
Now itâs up to you to pick the type of style (class, ID, and so on), name it, and decide where to store it; just follow the same steps you used to create a new style using the CSS Styles panel, as described on Creating Styles. Youâre free to create a class, ID, tag or other style. After you create the new style, you return to the Property inspector (you skip the Rule Definition window). The Property inspector then lists the new style name in the Targeted Rule menu and displays the format settings you selected (for example, the font you chose appears in the Font menu).
Look at a basic example: Suppose you want to format a copyright notice at the bottom of a page in a way thatâs different from other text on the page. You would first triple-click the copyright paragraph to select the text, and then choose whatever formatting options you want from the CSS mode of the Property inspectorâfor example, select 12 from the Size menu to create small, 12-pixel type.
At this point, Dreamweaver opens the New CSS Rule dialog box and, from the Selector Type menu, you select Class, and then, in the Selector Name field, type .copyright. You could then store the file in either an external or internal style sheet, as described on Internal vs. External Style Sheets. When you close the New CSS Rule window, Dreamweaver applies the new class style named copyright to the paragraph and the Size box in the Property inspector displays â12â to denote the textâs pixel size.
The Property inspectorâs CSS Mode behaves differently, however, if you already have a style applied to the selected text. In that case, the style appears in the Targeted Rule menu. For example, in Figure 4-4 (middle), you already applied the class style product to the selected text, so you see â.productâ listed in that menu. At this point, choosing another formatting option from the Property inspectorâfor instance, clicking the bold button, or selecting a font from the font menuâdoesnât create a new style, it simply adds this new format to the existing style.
For example, say you create a .copyright class style with a font size of 12 pixels. If you select that copyright text again and then select a font color, Dreamweaver updates the .copyright class styleâit adds the CSS color property to the style. Making additional formatting choices also updates the style.
Once you create styles, you can easily apply them. In fact, if you created HTML tag styles, you donât need to do anything to apply them: Their selectors (see the box on Anatomy of a Style) automatically dictate which tags they affect.
You can apply class styles to any selection in the document window, whether itâs a word, an image, or an entire paragraph. In fact, you can apply a class style to any individual HTML tag, such as a <p> (paragraph), <td> (table cell), or <body> tag. You can even select just a single word within a paragraph and apply a style to it.
Start out by selecting some words. Then, from the Property inspector, select the style nameâyou can do this either in HTML mode, in which case you select the name from the Class menu (Figure 4-5, top), or in CSS mode, where you use the Targeted Rule menu (Figure 4-5, bottom).
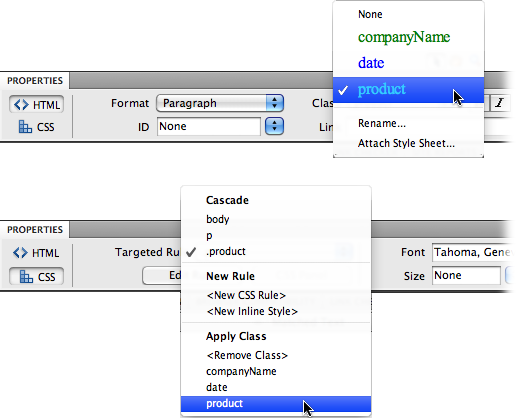
Figure 4-5. The easiest way to apply a class style is through the Property inspector. For non-text elements like images or tables, a Class menu appears in the top right of the Property inspector. For text, you apply class styles using the Class menu if the Property inspector is in HTML mode (top) or the Targeted Rule Menu when itâs in CSS mode (bottom). Dreamweaver uses only the bottom section of the Targeted Rule Menu (the stuff below âApply Classâ) to add (or remove) a class from a text selection. The other items listed let you create new styles, or view the styles that apply to the selection.
To style an entire paragraph, triple-click within the paragraph (or heading) to select it, and then use the Property inspector to select a style. When you style an entire paragraph, youâre actually telling Dreamweaver to apply the style to the <p> tag. In that case, Dreamweaver adds a special class property to the pageâs code, like this: <p class=âcompanyâ> (for a class style named .company).
Tip
You can also add a class style to an entire paragraph or heading simply by clicking anywhere inside the paragraph, and then, from the Property inspector, choosing the class nameâjust make sure you donât select a piece of text, or Dreamweaver applies the style just to the selected text, not the entire paragraph.
On the other hand, if you apply a class style to a selection that isnât a tagâlike a single word that you double-clickâDreamweaver wraps that selection within a <span> tag, like this: <span class=âcompanyâ>Chia Vet</span>. This tag, in other words, applies a style to a span of text that doesnât have its own tag.
To apply a class style to an object (like an image or a table), start by selecting the object. As always, the Tag selector at the bottom of the document window is a great way to select a tag. Then, at the top right of the Property inspector, use the Class pop-up menu to select the style name.
You can also apply a class style by selecting whatever element you want to style, choosing FormatâCSS Styles, and then, from the submenu, selecting the style. Or you can right-click (Control-click) the styleâs name in the CSS Styles panel, and then, from the pop-up menu, choose Apply. Finally, you can also apply a class from the document windowâs Tag selector, as shown in Figure 4-6.
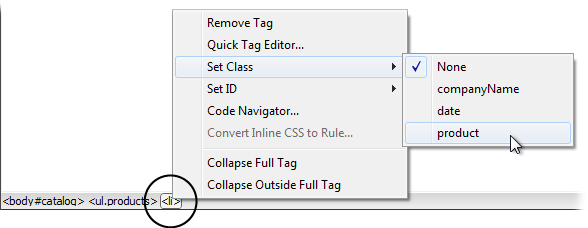
Figure 4-6. You can apply a class style directly to a tag using the document windowâs Tag selector at the bottom of the window. Just right-click (Control-click) the tag you wish to format (circled), and then, from the Set Class submenu, select a class style. In addition, the Tag selector lets you know if a tag has a class style or an ID style already applied to it. If so, the styleâs name is added at the end of the tag. For example, in this figure, the body has an ID of catalog applied to it (<body#catalog>) and an unordered list has the class .products applied to it (<body.products>).
To remove a class style from text, select the text and then, from the Property inspector, choose None from the Class menu (HTML mode) or <Remove Class> from the Targeted Rule menu (CSS mode). To remove a class style from another object (like an image), select the object, and then, from the Property inspectorâs Class menu, choose None. You can also choose FormatâCSS StylesâNone to remove a style from any selection (even non-text elements like images or tables).
Tip
If you applied a class style to a selection of text, you donât have to select all the text to remove the style. Just click anywhere inside it, and then select None from the Property inspectorâs Class menu or <Remove Class> from the Targeted Rule menu. Dreamweaver is smart enough to realize that you want to remove the style applied to the text. (If you applied the style to a tag, then Dreamweaver removes the Class property. If you applied the style using the <span> tag, Dreamweaver removes the <span> tag.)
You canât, however, remove tag styles from HTML tags. For example, suppose you redefined the <h2> tag using the steps outlined on Creating Styles. If your page has three Heading 2 (<h2>) paragraphs, and you want the third heading to have a different style from the other two, you canât simply âremoveâ the <h2> style from the third heading. You need to create a new class style with all the formatting options you want for that heading, and then apply it directly to this particular <h2> tag. (By the magic of CSS, the class formatting options override any existing tag style optionsâsee The Cascade for more on this sleight of hand.)
To apply an ID to text, just select the text, and use the ID menu in the HTML mode of the Property inspector (see Figure 4-5, top). Since you can apply each ID name only once per page, the menu lists only unassigned IDsâIDs that exist in your style sheet but that you havenât applied to a tag on the current page.
For non-text elements, select the element, and then, in the Property inspector, type the ID name into the ID field. (For some elements, the ID field is unlabeled, but you can always find it on the far left of the Property inspector.)
You can also use the Tag selector as outlined in Figure 4-6. Just use the Set ID menu in the contextual menu that appears when you right-click (Ctrl-click) the tag.
Note
The Tag selector tells you whether you applied an ID to a tag by including the # symbol with the ID name. In Figure 4-6, for example, body#catalog indicates that the <body> tag has an ID named âcatalogâ applied to it.
Whenever you apply an ID to a tag, Dreamweaver adds a bit of HTML code to your page. For instance, an ID style named #copyright applied to a paragraph looks like this in the HTML: <p id=âcopyrightâ> (this is just like the âclassâ property thatâs added when you use class styles, as described on Applying a Class Style).
To remove an ID from a text element, select the text, and then, from the Property inspectorâs ID menu, select None. For non-text elements, select the element, and then, in the Property inspectorâs ID field, delete the ID name.
Whenever you create an external style sheet while adding a style to a web page, Dreamweaver automatically links it to the current document. To use its styles in a different web page, you must attach it to the page.
To do so, open the web page to which you want to add the style sheet. Then, on the CSS Styles panel, click the Attach External Style Sheet button (see Figure 4-1). (If the CSS Styles panel isnât open, choose WindowâCSS Styles or press Shift-F11.)
Tip
You can also use the Property inspector to attach a style sheet. Just select âAttach Style Sheetâ from the Class menu in HTML mode (see Figure 4-5, top).
The Attach External Style Sheet window appears (see Figure 4-7). Click Browse. In the Select Style Sheet File dialog box that appears, navigate to and double-click the CSS (.css) file you want to attach to the document. If the style sheet you select is outside the current siteâfor example, itâs in another of your websitesâDreamweaver offers to copy the style sheet file into your siteâs root folder; click Yes.

Figure 4-7. Adding styles from an external style sheet is as simple as browsing for the file, and then clicking OK. Choosing a media type is optional.
The Attach External Style Sheet window provides two other options: how to attach the style sheet, and what type of âmediaâ you want the styles to apply to. The âmediaâ setting is optional and dictates when Dreamweaver applies the styles. For example, you can use one set of styles when you print a page and another set when a browser displays the page. Youâll find in-depth information on media types and how to use them on Styling for Print.
When you attach an external style sheet, you can either âlinkâ it or âimportâ it. These two choices are nearly identical; theyâre simply two different ways to attach an external style sheet to a web page. The method preferred by the pros, linking to the style sheet, is also Dreamweaverâs suggested choice. Save yourself an extra click and go with the link option.
Tip
You can preview the effect of the style sheet on your page by clicking the Preview button in the Attach External Style Sheet window.
After choosing your options, click OK, and Dreamweaver adds the necessary HTML to the head of the web page, and automatically formats any tags in the document according to the style sheetâs tag styles. In Design view, you see the formatting changes take place in the document window immediately after you attach the style sheet.
If the style sheet contains class styles, on the other hand, you donât see their formatting effects until you apply them to an element on the page, as described on Applying a Class Style.
As with anything in Dreamweaver, styles are easy enough to edit, delete, or duplicate; all you need is a map of the terrain.
While building a website, you almost always continually refine your designs. That chartreuse color you assigned to the background of your pages may have looked great at 2 a.m., but it loses something in the light of day.
Fortunately, one of CSSâs greatest selling points is how easy it is to update a websiteâs formatting.
Note
Although this section focuses mainly on how to style your text, you also use CSS styles to add background colors, background images, borders, and to accurately position elements on a page. The next few chapters show you how to style links, images, tables, forms, and other page elements with CSS.
Dreamweaver provides many ways to edit styles:
In the CSS Styles panel, select a style and then click the Edit Style button to open the Rule Definition window (this is the same window you used to create the style). Make your changes, and then click OK to return to the document window. Dreamweaver reformats the page to reflect your changes.
Double-clicking the name of a style in the CSS panel also opens the Rule Definition window. Actually, depending on a preference settingâor a setting someone else may have tweaked while using your computerâdouble-clicking a style in the CSS panel may display theâeek!âraw CSS code in Code view. To change this behavior, open the Preferences window (Ctrl+U [â-U]), click the CSS Styles category, and then select the âEdit using CSS dialogâ button.
In the CSS Styles panel, right-click (Control-click) the name of a style, and then, from the shortcut menu, choose Edit, which also opens the Rule Definition window. Make your changes to the style and then click OK to return to the document window.
Note
The properties pane in the CSS Styles panel offers yet another, faster way to edit a style. This advanced technique requires a bit of CSS savvy and is discussed on Fast Style Editing with the Properties Pane.
At some point, you may find you created a style that you donât need after all. Maybe you redefined the HTML <code> tag and realized that you never use it. You donât need to keep it around, taking up precious space in the style sheet.
To delete a style, make sure you have the CSS Styles panel open (WindowâCSS Styles), and the All button highlighted. Click the name of the style you wish to delete, and then press your keyboardâs Delete key (you can also click the Trash can icon at the bottom of the panel). You can remove all the styles in an internal style sheet (as well as the style sheet itself) by selecting the style sheetâindicated by â<style>â in the CSS Styles panel (see Figure 4-1)âand pressing Delete (or clicking the Trash can icon). If you âtrashâ an external style sheet, however, you merely unlink it from the current document without actually deleting the .css file.
Unfortunately, deleting a class style doesnât delete any references to the style in your siteâs pages. For example, if you created a style called .company and applied it throughout your site, and you then delete that style from the style sheet, Dreamweaver doesnât remove the <span> tags or class properties that refer to the style. Your pages are still littered with orphaned code like thisâ<span class=âcompanyâ>CosmoFarmer</span>âeven though the text loses its styling. (See how to solve this problem using Dreamweaverâs powerful âFind and Replaceâ tool in Chapter 22.)
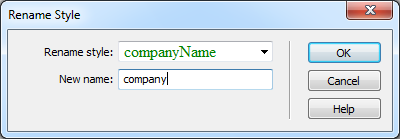
You can rename any style by selecting it in the CSS Styles panel, pausing a second, and then clicking the name again. This makes the name editable, at which point you can type a new name in its place. Of course, if you change a style named p to a style named h1, youâve essentially removed the style for the <p> tag and added an <h1> style to the style sheetâin other words, all the paragraphs in your pages would lose their formatting, and all <h1> tags would suddenly change appearance. Alternatively, you could open the .css file in Code view and then edit the name. However, when it comes to class styles, just changing the name doesnât do much good if you already applied the style throughout your site. The old class name still appears in the HTML everywhere you used it.
What you really need to do is rename the class style, and then perform a find-and-replace operation to change the name wherever it appears in your site. Dreamweaver includes a handy tool to simplify this process.
To rename a class style:
In the Property inspector, choose Rename in the Class menu.
The Rename Style window appears (Figure 4-8).
From the top menu, choose the name of the style you want to rename.
This menu lists all the class styles in the pageâs style sheets, both internal and external.
In the âNew nameâ box, type the new style name.
You must follow the same rules for naming class styles as described on Phase 1: Set Up the Style. But, just as when creating a new class in Dreamweaverâs New CSS Rule window, you donât need to precede the name with a periodâDreamweaver takes care of that.
Click OK.
If the style whose name youâre changing is an internal style, Dreamweaver makes the change. Your job is complete.
If the style belongs to an external style sheet, however, Dreamweaver warns you that other pages on the site may also use this style. To successfully rename the style, you have to use Dreamweaverâs âFind and Replaceâ tool to search the site and update all the pages that use the old style name. In that case, continue to step 5.
If you get cold feet, click Cancel to call off the name change, or click Yes to open the âFind and Replaceâ window, where you should click Replace All.
One last warning appears, reminding you that you canât undo the find-and-replace.
Click Yes.
Dreamweaver goes through each page of your site, dutifully updating the name of the style everywhere it appears.
Dreamweaver makes it easy to duplicate a CSS style, which is handy when you create, say, an HTML tag style, and then decide youâd rather make it a class style. Or you may want to use the formatting options from one style as a starting-off point for a new style. Either way, you start by duplicating an existing style.
You can do that in two ways. The easiest is to open the CSS Styles panel (WindowâCSS Styles), right-click (Control-click) the name of the style you want to duplicate, and then, from the shortcut menu, choose Duplicate.
The Duplicate CSS Rule window appears (Figure 4-9), where you can give the duplicated style a new name, reassign its Type setting, use the âDefine inâ menu to move it from an internal to an external style sheet, and so on.
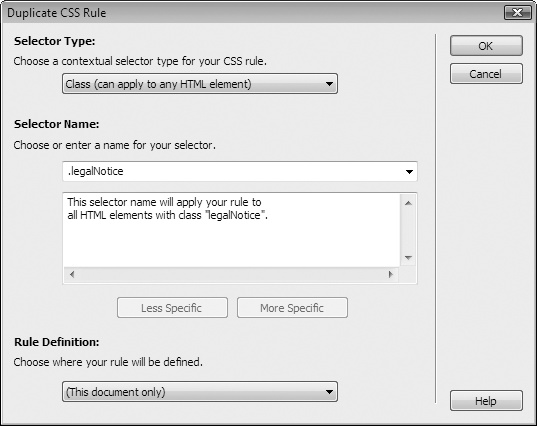
Figure 4-9. The Duplicate CSS Rule dialog box looks and acts just like the New CSS Rule box (Figure 4-2). You can select a new style type, name it, and then add it to an external or internal style sheet. The only difference is that the duplicated style retains all the original styleâs CSS properties.
When you click OK, Dreamweaver adds the duplicate style to the page or external style sheet. You can then edit the new style just as you would any other, as described on Manipulating Styles.
One of the best uses for Cascading Style Sheets is to convert the drab appearance of HTML text into lavishly designed prose. Or, if you like a somber, corporate style, CSS can help with that, too. Whatever your design inclination, you can improve the look of your web text using CSS.
You can define six text-related CSS properties using the CSS mode of the Property inspector (see Figure 4-4), or use the full-blown CSS Rule Definition window to deploy more than 64 CSS properties. The most commonly used properties for text are stored in the Type and Block categories, while the List category offers several options for formatting bulleted and numbered lists.
Note
You can apply nearly every CSS property to text. For example, you can use the border property to underline text, and the margin property to remove space between paragraphs. Youâll find those properties and others not listed in the Type or Block categories introduced later in this book (you donât want to blow your circuits too quickly). For now, youâll learn the most type-centric properties.
There are two ways to include fonts on a web page: the traditional method uses fonts installed on a visitorâs computer, while a newer technique lets you use specially prepared fontsâcalled âweb fonts.â The newer technique lets visitors download the fonts they need, either from your site or from another site (Google is one example) that has those fonts available. In other words, you can use any font you want, itâs just that a visitor to your site will have to download them. This second technique, using what are known as âweb fonts,â may sound like the answer to a designerâs dreams but there are a few drawbacks to it: first, you need different types of fonts for different browsers (for example, Internet Explorer 8 and earlier require an .eot font, while Safari needs TrueType fonts). Second, font files can be large, forcing end users to wait for lengthy downloads. Lastly, Dreamweaver doesnât provide any tools for using web fonts: it can only display web fonts in Live View, and youâll have to write all the CSS code by hand. Still, if youâre interested in using web fonts, see the box on the next page.
The traditional methodâand the way that Dreamweaver supportsârelies on fonts already installed on a visitorâs computer. This mimics the way you use fonts in a word processor. For example, as you craft a document in Microsoft Word, you can select any font on your computer, even that fancy font you just bought from a small font company in Nome, Alaska. Unfortunately, when you email that document to your boss, she wonât see the same design when she opens the document on her computer. Thatâs because she doesnât own the same fonts. Sheâll see some default font on her computerâTimes, perhaps. Fonts show up in a distributed document only if each recipient has the same fonts installed.
Unless you use web fonts, youâre in the same predicament when crafting web pages. Youâre free, as a web designer, to specify any font you want in a web page, but it doesnât show up on a viewerâs computer unless sheâs installed the same font on her system. If she hasnât, your visitorâs web browser shows your text in a default font, which is usually some version of Times, Arial, or Courier.
You can deal with this dilemma several ways. One is to convert your text into graphic imagesâunfortunately that process takes time and forces your web visitors to download byte-hogging images just to read your web page. Another is to specify the font youâd like to use; if your viewerâs computer has the specified font, thatâs what sheâll see. You can specify secondary or tertiary font choices, too, in case the preferred font isnât available. In fact, Dreamweaver offers prepackaged lists of such âfirst choice, second choice, third choiceâ fonts, as youâll find out in the following section.
To use a font, you select it from either the Font menu in the Property inspectorâs CSS mode or from the CSS Rule Definition windowâs Font-family menu. In either case, youâre actually either creating a new style (as described on Creating Styles) or updating an existing one.
Youâll soon discover that Dreamweaverâs font menus arenât quite what youâre used to. When you apply a font to text, you choose from one of the prepackaged lists just described; a typical choice is something like âArial, Helvetica, sans-serif.â In other words, you donât just choose a single font, such as Helvetica.
If the first font isnât installed on your visitorâs computer, the browser looks down the list until it finds a font that is. Different operating systems use different fonts, so these lists include one font thatâs common on Windows PCs and another, similar-looking font, thatâs common on Macs. Arial, for instance, is found on all Windows machines, while Macs offer the similar Helvetica font.
Thatâs it. Youâve just selected one of Dreamweaverâs predefined font lists, and any text the CSS style formats will use the font you selected. If youâd like a greater degree of control over the fonts your page displays, read on.
Dreamweaver CS5.5 comes with 13 preset font lists, which incorporate fonts common to both Windows and Macs. But you can easily stray from the pack and create your own list. If you proceed with the custom approach, make sure you know what fonts your visitors haveâeasily done if youâre designing a corporate intranet and know what computers your company usesâand always specify one font that you know is installed. This way, while your page may not look exactly as you intended, itâll at least be readable.
Note
Technically, you can specify any number of fallback fonts in one of these lists, not just first, second, and third choices. Your list can range anywhere from just a single font to a long list arranged in order of preference.
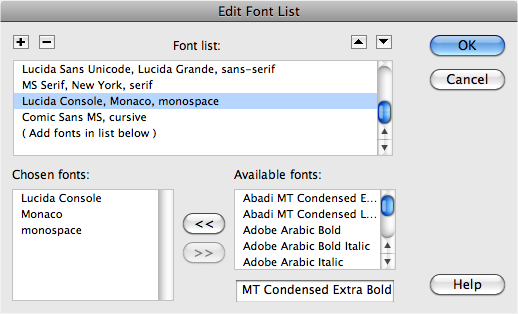
Hereâs how you create a new âfirst choice, second choice, third choiceâ font list.
Open the Edit Font List dialog box.
From the Property inspectorâs Font menu (visible only in CSS mode), choose Edit Font List, or choose FormatâFontâEdit Font List. Either way, the Edit Font List dialog box appears (Figure 4-10).
Figure 4-10. In the Edit Font dialog box, you can not only create your own font lists, you can edit, remove, or reorder the predefined lists. When you click a list in the âFont listâ menu, the âfirst choice, second choice, third choiceâ fonts appear in the lower-left corner. To remove a font from that list, click the font name, and then click the >> button. To add a font to the list, select a font in the âAvailable fontsâ menu, and then click the << button. Finally, to reorder the font lists in the Property inspector, click the CSS Rule Definition windowâs Font menu, or FormatâFont menu, and then click the arrow keys near the upper-right corner of the dialog box.
Select a first-choice font from the âAvailable fontsâ list, or type in the font name.
Dreamweaver lists all the fonts installed on your computer in the âAvailable fontsâ menu. Simply click to select the font you wish to add.
Alternatively, you can type a fontâs name into the box that appears directly below the list of available fontsâa handy trick if you want to include a font that isnât installed on your computer (a Windows font when youâre working on a Mac, for example).
Tip
You can add a web font when you create a custom font list. For example, using the CSS code listed in the box on Web Fonts, you would type TeutonicNo1DemiBold into the box below the list of available fonts (Figure 4-10) and then click the << button. Once you do so, that web font appears in the font-family menu when you create new styles in Dreamweaver.
Add the font you just highlighted to your new, custom font list by clicking the << button (or just double-clicking the font name).
Your first-choice font appears in the âChosen fontsâ list.
Repeat steps 2 and 3 for each font you want to include in your custom list.
The order in which you add the fonts is the order in which they appear on the list. These become the âfirst choice, second choice, third choiceâ fonts.
Unfortunately, thereâs no way to change the order of the fonts once you add them. So if you accidentally put the fonts in the wrong order, you must delete the list by clicking the minus (â) button (at the upper-left corner of the dialog box) and start over.
Add a generic font family.
This last step isnât strictly necessary, but itâs a good idea. If your web page visitor is some kind of anti-font radical whose computer doesnât have any of the fonts you chose, his browser will substitute the generic font family you specify here.
Generic fonts are listed at the bottom of the list of âAvailable fontsâ and include âcursive,â âfantasy,â âmonospace,â âsans-serif,â and âserifâ. On most systems, the monospaced font is Courier, the serif font is Times, and the sans-serif font is Arial or Helvetica. Select a generic font thatâs similar in appearance to the fonts in your list. For instance, choose âsans-serifâ if your list consists of sans-serif fonts like Helvetica or Arial; choose âserifâ if you specified fonts like Times or Georgia; or choose âmonospaceâ for a font like Courier.
Click OK.
Your new font package appears in the Property inspectorâs Font menu, ready to apply.
Varying the sizes of fonts on a web page is one way to direct a viewerâs attention. Large type screams âRead Me!ââexcellent for attention-grabbing headlinesâwhile small type fades into the backgroundâperfect for necessary but unexciting legal mumbo-jumbo like copyright notices.
Unless you specifically define its size, text in a regular paragraph appears at the default size specified by your visitorâs browser, usually 16 pixels. However, not only can people change that default size (much to the eternal frustration of web designers), but different operating systems have been known to display text at different sizes. Bottom line: You canât really assume that text will appear at the same size on all your guestsâ monitors.
To set a font size, you can use either the Size menu in the Property inspectorâs CSS mode (Figure 4-11) or the CSS Rule Definition windowâs Font-size menu (Figure 4-12). Whichever you choose, youâre either creating a new style as described on Creating Styles or updating an existing style.

Figure 4-11. You can set a dizzying array of font sizes using CSS. When you use the Property inspectorâs CSS mode to set the size of text, you either create a new styleâin which case you see <New CSS Rule> listed in the Targeted Rule field (circled)âor you edit an already existing style, as shown here. In this case, the class style, .product, is listed, so picking a font size edits that CSS style.

Figure 4-12. While you can set some text formatting using the Property inspector, the CSS Rule Definition windowâs Type category offers additional formatting options. For example, you get the ability to control the space between lines of text, and an option to change the case of textâto make text upper- or lowercase.
The choices available from the Size menu break down into four groups:
The None option removes any size information applied to the text. The text returns to its default size.
The numeric choicesâ9 through 36âindicate how tall you wish to make the text, measured in pixels. Nine-pixel-tall text is nearly unreadable, while 36-pixel copy makes a bold statement. One benefit of specifying pixel sizes is that the resulting text appears nearly the same across different browsers and operating systems, obviating the problems mentioned above.
The options xx-small through xx-large indicate fixed sizes, replacing the sizes 1 through 7 used with the old HTML <font> tag. The medium size is usually the same as the default size.
The last two choicesâsmaller and largerâare relative sizes, meaning that they shrink or enlarge the selected text based on the default size in your page. These choices come in handy when you define a base font size for the entire page using the Page Properties window (see Figure 1-20).
Suppose you set the default text size for a web page at 12 pixels. If you apply a âlargerâ size to a selection of text, then it gets bigger (the exact amount varies by web browser). If, later, you change the base size to 14 pixels (in Page Properties), all of that âlargerâ text will also increase proportionally.
To change the size of text, simply select it, and then, from the Property inspector, choose a new size, or edit the appropriate CSS style as described on Manipulating Styles. If you applied a pixel value, you have an additional option: If you donât like any of the sizes listed, you can type in any number you wish. In fact, unlike HTML, browsers can handle humongous textâhundreds of pixels tall, if thatâs what youâre into.
Youâre not limited to pixels, either. The Units pop-up menu (to the right of the Size menu, shown in Figure 4-11) lets you use as the unit of measure pixels, points, inches, centimeters, millimeters, picas, ems, percentages, or exes (an ex is the width of the letter X in the current font). Most of these measurement systems arenât intended for on-screen display. The most popular options are:
Pixels are great for ensuring that text looks the same size across different browsers and operating systems. The downside, however, is that Internet Explorer 6 doesnât let web surfers adjust the pixel size. So people who canât see well, or whose monitors are set to very high resolutions, are stuck with your choice of pixel size. Make it too small, and they wonât be able to read your text. (Fortunately, all other browsers donât have this problem.)
Ems are a relative measurement, meaning that the actual point size varies.
One em is equal to the default font size. So suppose a web browserâs default font size is 16 pixels tall. In that case, 1 em would mean 16 pixels tall, 2 ems would be twice that (32 pixels), and 1.5 ems would be 24 pixels.
The advantage of ems is that they let web visitors using Internet Explorer 6 (a dwindling minority) control the size of on-screen text. If itâs too small, they can increase the base font size. In Internet Explorer, you make this adjustment from the ViewâText Size menu. Any text measured in ems then changes according to the web browserâs new setting.
Note
You donât need to use ems to allow non-IE 6 browsers (in other words, the vast majority of the world) to resize text. In fact, all current browsers have a âZoomâ command that enlarges not only text but all other page elements (pictures, navigation links, and so on).
You can use pixels and ems together. You could, for instance, set the base font size of your page to 16 pixels, and then use ems for other parts of the page. For example, you could set headlines to 2 ems, making them 32 pixels tall. If you later thought the overall text size of the page was too small or too large, you could simply change the base font size for the page, and the headlines and all other text would resize proportionally.
Note
As you get more advanced with CSS, youâll probably run into some weird problems with em or percentage text sizes due to an advanced concept known as the cascade. The gruesome details begin on The Cascade.
Percentages (%) are another relative size measurement. When applied to text size, theyâre functionally equivalent to emsâ100% is the same as 1 em, 200% is 2 ems, and 75% is .75 ems. If youâre more comfortable with the notion of percentages than the typography-inspired ems, use percentage values.
The other measurement options, like inches and millimeters, donât make as much sense as pixels, ems, and percentages because you canât consistently measure them on monitors. For example, Windows is set to 96 pixels to the inch, whereas Mac OS X is set to 72 pixels per inchâbut people can change even these settings, so thereâs no reliable way to measure âpixels-to-the-inchâ on computer screens. The upshot is that if youâre not worried about IE 6âs inability to resize text, youâre safe using pixel valuesâtheyâre easier to understand, more consistent across browsers, and work fine with the zoom feature of all currently shipping browsers.
To set the color of text, use the CSS color property. You can choose a color in the Property inspectorâs CSS mode, or assign a text color in the Text category of the CSS Rule Definition window (Figure 4-12).
Most color formatting in Dreamweaver, whether for text or the background of a web page, makes use of Dreamweaverâs color box. You can pick a color by clicking the color box and, from the pop-up color palette, selecting a hue (see Figure 4-13). Or click the System Color Picker button to launch the Windows or Mac color-picker dialog box, which lets you choose from a much wider selection of colors.
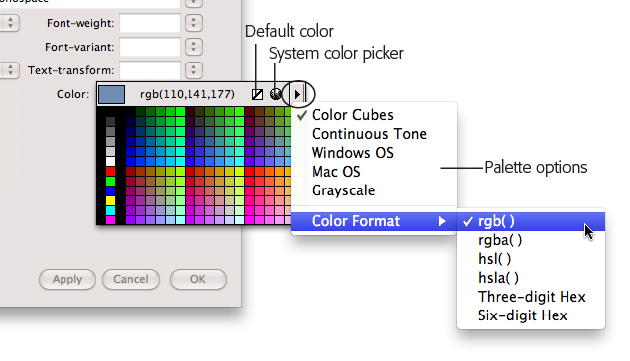
Figure 4-13. Dreamweaverâs Palette Options menu is of limited use. It lets you select a different set of (very limited) rainbow colors for your palette. The first two choices, for example, contain the outdated web-safe color paletteâa limited collection of 216 colors that display accurately on any computer. The web-safe palette made sense back when graphics cards were expensive and dinosaurs ruled the earth. Today, however, most monitors can display millions of colors. Likewise, the Grayscale palette offers 256 somber shades of gray (youâll find them most useful for Ingmar Bergman tribute sites). To really exercise your color creativity, use your computerâs color-picker, and select from the millions of colorful options available to computers today.
In addition, you can use the eyedropper cursor that appears when you click the color box. This cursor is âloaded,â meaning you can click any spot on your screenâeven outside the dialog boxâto select a color, a trick that comes in handy when you want to use a color from an image elsewhere in your document (to have headline text match the color in an image, for example). You can even sample a color from another application (from any visible window, Dreamweaver or not): Just move the eyedropper over the color, and then click. (This click may take you out of Dreamweaver. Just return to Dreamweaver, and the color you sampled is listed in the color property box.)
Normally, Dreamweaver uses whatâs called âhexadecimal notationâ to specify the color you select (see the box below). However, Dreamweaver CS5.5 has expanded the available color options to include hexadecimal (or âhexâ), RGB, HSL, RGBa and HSLa colors (see the box on Web Colors). To use one of the other color options, click the contextual menu button in the color selector (circled in Figure 4-13), and select an option from the Color Format menu â you can then sample a color from the page, from the color palette, or even from the System color picker and Dreamweaver will write the correct code for that color.
Warning
Only the RGB and two hex color formats are supported by Internet Explorer versions 8 and earlier. Until Internet Explorer users upgrade to IE 9 or switch to Firefox, Chrome, Safari, or Opera, youâre better off sticking with RGB or hex color values for your pages.
If you decide you donât want to add color, or want to remove a color you already applied, click the Default Color button. Without a color specified, web browsers use default colors for the element in question. For instance, text on a web page is usually black unless you specify otherwise.
Next to the color box in any Dreamweaver dialog box is a blank text field. If you know your web colors, you can type its value into this box, which is sometimes faster and more precise than clicking the rainbow palette.
You can use the Property inspector to make text bold or italic. Depending on which mode the inspector is inâHTML or CSSâclicking the B or I button does different things. In HTML mode, the B button wraps selected text with the <strong> tag, while the I button wraps it with the <em> (for emphasis) tag. However, in CSS mode, the B button sets the CSS font-weight property to bold, while the I button sets the CSS font-style property to italic. In other words, these two buttons either insert HTML tags or add CSS properties to a style.
If you want to just change the appearance of text, use CSS mode, but if you actually want to emphasize some text because itâs important for the sentenceâs meaning (and therefore important to the way search engines perceive the sentence), use HTML mode. For example, if you want the word âMondayâ to stand out on a page, use CSS. But for a sentence like âHe never makes mistakesâ the emphasis on âneverâ is important to understanding the sentence; in that case, use HTML mode. The people viewing your site might not notice the difference, but Google, other search engines, and screen reading software will.
Note
If you use the Property inspectorâs CSS mode, the B button only makes type bold or removes bold formatting that you previously applied. In the case of headlines, which browsers automatically display as bold, clicking the B button has no effect. To remove the bold formatting from headlines, you have to use the CSS Style Definition window, and, from the font-weight menu, select normal.
The alignment buttons in the Property inspectorâs CSS mode set the CSS text-align property to either left, right, center, or justify. These same options are available under the Block category of the CSS Rule Definition window.
As its name implies, the Rule Definition windowâs Type category lets you format text. Several of the settings are the same as those available from the Property inspector in CSS mode, and you learned about them in depth starting on Text Formatting with CSS. To summarize, this category of CSS properties includes:
Font. You choose a font for the new CSS style rule from the Font menu. As discussed on Text Formatting with CSS, you choose groups of fonts rather than the specific one you have your heart set on. Dreamweaver also lets you create your own âfirst-choice, second-choiceâ¦â font choices from this menu, as described on Applying font formatting.
Size. As described on Changing the Font Size, you can choose from many different measurement standards to size text, but the most common are pixels, ems, and percentages.
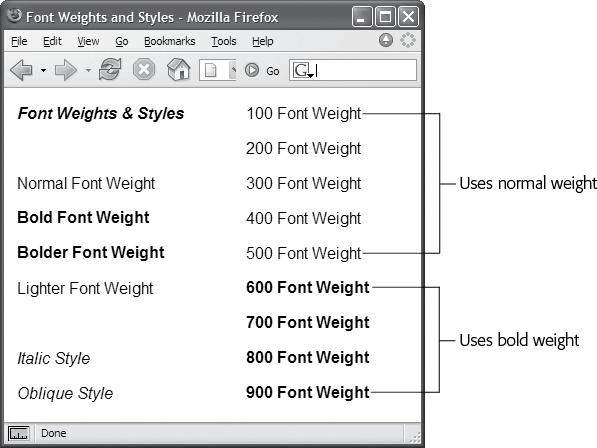
Weight. Weight refers to the thickness of a font. The Weight menu offers 13 choices. Normal and bold are the most common, and they work in all browsers that understand CSS. See Figure 4-14 for details.
Figure 4-14. CSS was designed so that each of the nine numeric weight values between 100 and 900 would tweak the thickness of fonts that have many different weights (ultrathin, thin, light, extra bold, and so on). 400 is normal; 700 is the same as bold. However, given the limitations of todayâs browsers, youâll notice no difference between the values 100 and 500 (top text in right column). Similarly, choosing any of the values from 600 to 900 just gets you bold text (bottom text in right column). Youâre better off keeping things simple and choosing either ânormalâ or âboldâ when picking a font weight.
Style. In this peculiar instance, Style means italic, oblique, or normal text. Technically, italic is a custom-designed, emphatic version of a typeface, like this. Oblique, on the other hand, is just a computerized adaptation of a normal font, in which each letter is inclined a certain number of degrees to the right. In practical application, thereâs no visible difference between italic and oblique in web browsers.
Variant. This pop-up menu simply lets you specify small-caps type, if you likeâa slightly formal, fancy-looking type style much favored by attorneysâ offices.
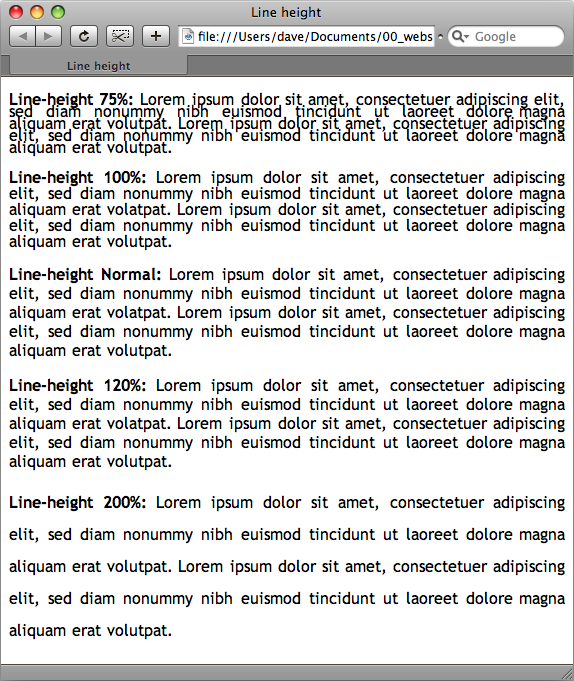
Line Height. Line height, otherwise known as leading (pronounced âLED-ingâ), refers to the space between lines of text in a paragraph (see Figure 4-15). To create more space between lines, set the line height greater than the font size. (If you type a number without a % sign, Dreamweaver assumes youâre specifying a line height in pixels. You can change the units of measure using the pop-up menu to the right of the Line Height field.)
Figure 4-15. Control the space between lines with the Line Height property in the CSS Rule Definition dialog box. In this example, each paragraphâs text is set in 16-pixel Trebuchet MS. With CSS, you can make lines bump into each other by setting a low line-height value (top paragraph), or spread them far apart by using a larger value (bottom paragraph).
âNormal,â the default setting (third paragraph in Figure 4-15), uses a line height thatâs slightly larger than the height of the text. You donât get access to the pop-up menu of measurement units (pixels, points, %, and so on) unless you type a number in this box.
Tip
A good approach for line height is to type in a percentage measurement, such as 120%, which is relative to the size of the text; so if your text were 10 pixels tall, the space from the base of one line of text to the next would be 12 pixels (120% of 10). Now, if you change the size of the text, the relative space between lines remains the same.
Text-transform. From this menu, you can automatically capitalize text. To capitalize the first letter of each word, choose âcapitalizeâ The âuppercaseâ option gives you all capital letters, while âlowercaseâ makes all the letters lowercase. The factory setting is ânone,â which has no effect on the text.
Decoration. This strange assortment of five checkboxes lets you dress up your text, mostly in unattractive ways. âUnderline,â âoverline,â and âline-throughâ add horizontal lines below, above, or directly through the affected text, respectively. Turning on âblinkâ makes text blink on and off (but only in a few browsers); unless you want to appear on one of those âworst website of the weekâ lists, avoid it. You can apply any number of decorative types per style, except with ânone,â which, obviously, you canât choose along with any of the other options. The ânoneâ setting is useful for hiding the underlines that normally appear below links.
Color. Set the color of the styleâs text using Dreamweaverâs color box, described on Picking a Font Color.
The Block Properties panel is a hodgepodge of CSS settings that affect how browsers display letters and words (see Figure 4-16).
Note
To completely remove the space between paragraphs, set the Top and Bottom margin for paragraphs to 0 in the CSS Rule Definition windowâs Box category. This setting also helps remove space before and after headlines. To indent paragraphs, set the Left and Right margin properties.
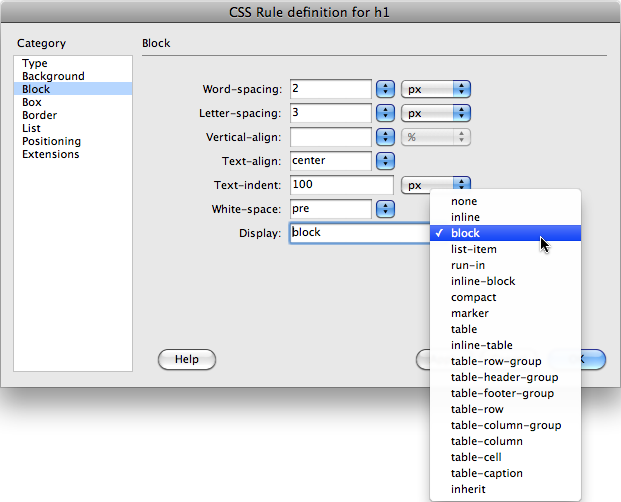
Despite this categoryâs name, these properties donât just apply to block-level elements (paragraphs, headlines, and so on). You can apply a style you define here to even a single word or two. (The one exception is the Text Align property, which applies only to paragraphs and other block-level elements.) Here are your choices:
Word spacing. This property helps you clean up text by adding or removing space between words. The default value, ânormal,â leaves a normal, single space between words. If you want words in a sentence to be spaced apart like this, then type a value of about 10 pixels (choose Value from the first pop-up menu and then the units you want from the second one). The bigger the number, the larger the gap between words. You can also remove space between words by using a negative numberâa great choice when you want to make your pages difficult to read.
Letter spacing. This property works just like word spacing, but governs the space between letters. To add space l i k e t h i s, type a value of about 5 pixels. The result can make long passages hard to read, but a little space between letters can add a dramatic flair to short headlines and movie titles.
Vertical alignment. With this property, you can change the vertical placement of an objectâsuch as text or an imageârelative to the items around it. For example, you could move text above or below the surrounding text to format a trademark character, copyright symbol, or footnote reference using the options âsuperâ and âsub.â If you wanted to add the trademark symbol to, say, Chia Petâ¢, then youâd select the letters TM and set the vertical alignment to âsuper.â In addition, for more accurate control, you can type a value (like 10%) to raise an object above its normal baseline, or a negative value (like -10% or -5 pixels) to move an object down.
Vertical alignment also works with graphics, and designers often use the options Top, Bottom, and Middle with HTML table cells to position content within a cell.
Text align. This property controls the alignment of a block-level element, like a paragraph or table. You can choose from among the usual suspectsââleft,â âcenter,â âright,â or even âjustify.â (Like the text in this paragraph, justified text aligns copy on both the left and right edges.)
Use the âjustifyâ option with care, however. Because web browsers donât have the advanced controls that page-layout software does, they usually do an awful job of justifying text on a computer screen. The results can be difficult to read, and ugly.
Text indent. This useful option lets you indent the first line of a paragraph. If you enter 15 pixels, each paragraph gets an attractive first-line indent, exactly as in a real word processor.
You can also use a negative number, which makes the first line extend past the left margin of a paragraph, creating a hanging indent (or outdent)âa nice effect for a sentence that introduces a bulleted lists or for glossary pages. If you use a negative number, itâs a good idea to set the left margin (Understanding the Box Model) for the paragraph equal to the value of the negative text indent. Otherwise the first line might extend too far to the left, off the screen!
Whitespace. This property controls how a browser displays extra white space (spaces, tabs, returns, and so on). Browsers normally ignore extra spaces in the HTML of a page, reducing them to a single-space character between words and other elements, as described on Nonbreaking Spaces. The âpreâ option functions just like the HTML <pre> tag: Extra white space (like tabs, multiple spaces, and hard returns) that you put in the HTML code appear in the document window. The ânowrapâ option prevents lines from breaking (and wrapping to the next line) when they reach the end of the browser window.
Display. This property defines how a browser displays a particular element, like a paragraph or link. The range of choices here may overwhelm youâand you may be underwhelmed when you find out that browsers donât support most of these options.
The only three that work reliably across browsers are ânone,â âinline,â and âblock.â The âblockâ option treats any item styled with this property as a blockâseparated from other content by space above and below it. Paragraphs and headings normally appear this way. But you can apply this value to a link (which normally appears inside a block-level element like a paragraph) to turn it into its own block. Usually, you have to click directly on the text or image inside a link to jump to the linked page. But when you set a linkâs display to âblock,â guests can click anywhere in the entire width of the blockâeven areas where no text appears.
The âinlineâ option treats the item as though itâs part of the current block or paragraph, so that any item styled with this property (like a picture) flows together with other items around it, as if it were part of the same paragraph. People frequently use this property to take a bulleted list of links and turn it into a horizontal navigation bar. For a good tutorial on this topic, visit http://tinyurl.com/as4rk.
The ânoneâ option is the most fun: It turns off the display of an item. In other words, any text or item styled with this option doesnât appear on the page. You can use JavaScript programming to switch this property on and off, making items seem to appear and disappear. In fact, Dreamweaverâs Change Property behavior gives you one simple way to do this (see Change Property).
To exercise greater control over bulleted and numbered lists, use the options in the CSS Rule Definition windowâs List category (see Figure 4-17):
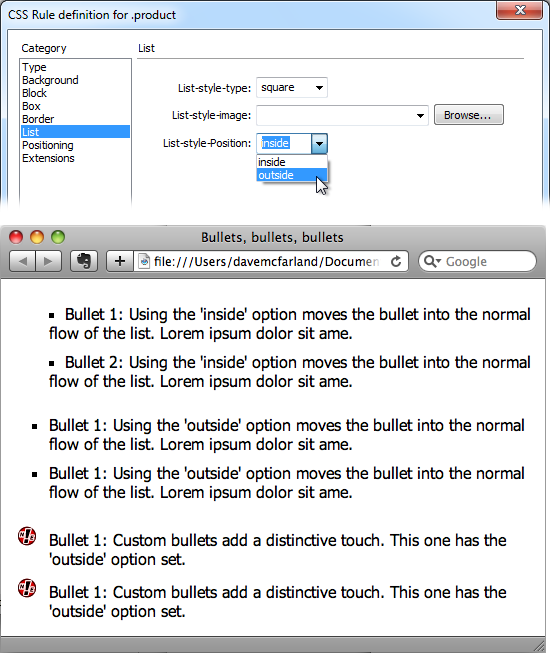
Type. Select the type of bullet you want to use in front of a list item. Options include: âdisc,â âcircle,â âsquare,â âdecimalâ (1., 2., 3.), âlower-romanâ (i, ii, iii), âupper-romanâ (I, II, III), âlower-alphaâ (a, b, c), âupper-alphaâ (A, B, C), and ânoneâ (no bullet at all).
Figure 4-17. Top: Take control of your bulleted and numbered lists using the CSS Rule Definition windowâs List category. With Cascading Style Sheets, you can even supply your own graphic bullets. Bottom: A bullet-crazed web page, for illustration purposes. Parading down the screen, you can see âinsideâ bullets, âoutsideâ bullets, and bullets made from graphics.
Bullet image. For the ultimate control of your bullet icon, skip the boring options preprogrammed into a web browser (like disc, circle, square, or decimal) and supply your own. Click the Browse button, and then, from your site folder, select a graphics file. Make sure the graphic is appropriate bullet materialâin other words, small.
Tip
The Background Image property, which youâll learn about on Background Images, is a more versatile solution to adding bullet images to a list. You canât specify the position of a bullet image, but, you can accurately position a background image, so itâs much easier to tweak the placement of your bullet images using the Background property than the âlist-style-imageâ property. Hereâs how to do it: Create a style for the <li> tag (or a class style that you apply to each <li> tag); make sure you set the List property type to ânoneâ (this hides the bullet); set the background image to your graphical bullet; and play with the background position values (Background attachment). Playing with the padding values (Understanding the Box Model) helps position the text relative to the image.
Position. This property controls where the bullet is placed relative to the list itemâs text. The âoutsideâ option places the bullet outside the margin of the text, exactly the way bulleted lists normally look. âInside,â on the other hand, displays the bullet within the text margin, so that the left edge of the bullet aligns with the left margin of the text; Figure 4-17 should make the effect clearer.
Note
If you want to adjust the amount of space web browsers normally use to indent lists, set the left padding property (see Understanding the Box Model) to 0, and set the left margin (see Understanding the Box Model) to the amount of indent youâd like. Sometimes you want no indent at allâfor example, if youâre creating a list of links that should look like buttons, not bulleted itemsâset both the left padding and left margin to 0 (while youâre at it, set the bullet type to ânoneâ as described above).
In this tutorial, youâll practice the basic techniques required to create and edit styles. Make sure you grasp the fundamentals covered in the following pages: Youâll be building lots of style sheets in the other tutorials in this book using these same methods. In this tutorial, youâll create an external style sheet that formats pages on the Chia Vet website.
Note
Before getting started, download the tutorial files from www.sawmac.com/dwCS5.5. See the Note on Note for more details.
Once you download the tutorial files and open Dreamweaver, you need to set up a site for this tutorial. You learned how to do this in the first chapter, but here are the few basic steps as a quick recapâpractice makes perfect!
Choose SiteâNew Site.
The Site Setup window appears.
For the Site Name, type CSS Tutorial.
The only other step required to set up a site is to tell Dreamweaver where to find the siteâs files.
To the right of the Local site folder box, click the folder icon.
The Choose Root Folder window appears. This is just a window onto your computerâs file system; navigate to the proper folder just as you would when working with other programs.
Navigate to and select the Chapter04 folder located in the MM_DWCS5.5 folder. Click the Select button (Choose on Macs) to select this folder, and then, in the Site Setup window, click OK to complete the process of defining a site.
You should see two filesâabout.html and services.htmlâin the Files panel. (If you donât see the Files panel, choose WindowâFiles to open it.)
In this example, youâll create a collection of styles for the Chia Vet website.
In the files panel, double-click the file named services.html.
The web page contains a list of services that Chia Vet offers. The page has a few headline tags and a bunch of paragraphs. The pageâs text is plain, boring-looking HTML, so youâll use CSS to spiff it up.
To start, youâll create a style for the first headline.
Triple-click the headline âChia Vet Services.â
This selects the entire headline. Youâll now use the Property inspector to select a font.
Click the CSS button in the Property inspector and then, from the Font menu, choose âPalatino Linotype, Book Antiqua, Palatino, serif.â
Because the headline had no style applied it, Dreamweaver opens the New CSS Rule window (see Figure 4-18). Youâll pick the type of style you want to create.
Figure 4-18. The New CSS Rule window requires that you complete three tasks: Pick the type of style you want to create; name the style; and pick where Dreamweaver should store the CSS code. Notice how the large text box explains what web page elements the style will apply toâin this case all <h1> tags.
From the Selector Type menu at the top of the window, select Tag.
This step lets you create a style for a particular HTML tag, in this case, the <h1> tag. In other words, youâre going to create a formatting rule that automatically applies to every heading 1 paragraph.
The Selector Name field should have âh1â listed, but if it doesnât, use the middle drop-down menu to select âh1.â
Next youâll choose where to store the CSS code for this new styleâin this case, in an external style sheet.
From the bottom menu, choose New Style Sheet File, as pictured in Figure 4-18. Click OK.
The Save Style Sheet File As dialog box appears. Youâre about to create the fileâan external style sheetâthat stores the styles for this page.
Click the Site Root button (top of the dialog box on Windows, bottom right on Macs).
The Site Root button is a handy shortcut. It automatically takes you to the local site folder for the site youâre currently working on, saving you the effort of manually navigating there. (OK, in this example, youâre already in the local site folder, but you should know about this button and what it doesâit really does come in handy for getting you to the top level folder of the current site after you open files from other sites located elsewhere on your hard drive, or folders deeply nested inside the current site.)
In the File Name box (the Save As field on the Mac), typeglobal.css, and then click Save.
Cascading Style Sheet files always end in .css; thatâs how web servers and browsers can tell what kind of files they are.
Notice how the headline now uses the new font. You created a style and added an external style sheet to your site in just a couple steps. Now, youâll add some color.
Make sure you still have the headline selected, and then, in the Property inspectorâs Color field, type#779A00 (see Figure 4-19).
You can use the color box to select another color if you prefer.
Figure 4-19. Choosing properties for an element that already has a style applied to itâlike the h1 tag style hereâupdates that style.
The New CSS Rule window doesnât appear this time, because now youâre editing the h1 tag style you created previously. Time to change the size of the font.
Note
If the New CSS Rule window appears again at either step 9 or 10, something went wrong. Click the Cancel button. You must have accidentally selected some other textâmaybe just part of the headlineâbefore using the Property inspector. To get back on track, triple-click the top headline again, and then repeat step 9 or 10.
In the Property inspectorâs Size box, type 48.
The Property inspector should now look like Figure 4-19. You just set the font size to 48 pixels tall. Youâve pretty much reached the limit of what the Property inspector is capable of, but youâve barely scratched the surface of Cascading Styles Sheets. In the next part of this tutorial, youâll learn how to edit a style and access the wide range of formatting options that CSS offers.
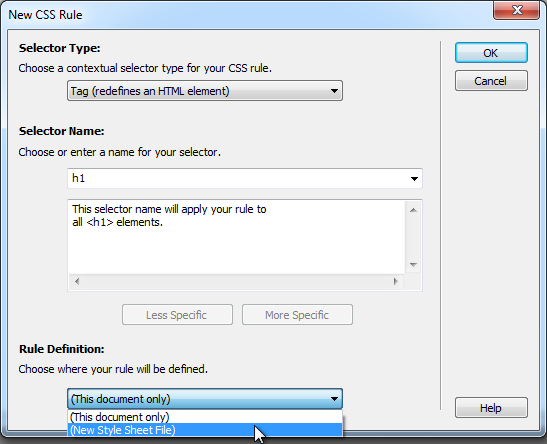

Make sure you have the CSS Styles panel open (WindowâCSS Styles), and make sure you have the All button selected at the top of the panel.
This displays all the style sheets attached to this page (in this case, just global.css).
If it isnât already, expand the list of styles in theglobal.css style sheet by clicking the + icon (arrow on the Mac) to the left of âglobal.css.â
This lists all the styles youâve added to the external style sheetâjust the one h1 tag style at this point.
In the list, double-click âh1.â
This action opens the CSS Rule Definition window, where you can access a range of CSS properties (see Figure 4-20). First, youâll remove the bold formatting from the headline.
Figure 4-20. The CSS Rule Definition window provides access to many more CSS properties than the Property inspector. In addition, you have to use the Font-weight menu to remove bold formatting from a heading tagâno matter how many times you click the B button on the Property inspector, you canât remove bold from headlines.
From the Font-weight menu, choose ânormal,â and then click the Apply button.
You can preview the look of a tag style without closing the CSS Rule Definition window by clicking the Apply buttonâjust drag the window out of the way of the headline.
When formatting text, you can use many other non-text related CSS properties. For example, you can add border lines to any element on a page.
In the category list, click Border.
The CSS Rule Definition window now displays all the properties that add a border around a style. You can control each border individually, or use the same line style for all four edges. In this case, youâll add lines to just the top and bottom of the headline.
Click to turn off all three âSame for allâ checkboxes. For the Top border, choose âsolidâ from the top Style menu, type7 in the top Width box, and type#F93 in the top Color box. For the Bottom border, choose âsolidâ from the Style menu, type2 in the Width box, and type#F93 in the color box.
The window should now look like Figure 4-21. As mentioned in the box on Web Colors, #F93 is shorthand for #FF9933. If you click the Apply button now, you may notice that the top border is a little too close to the top of the headline. You can add a little breathing room using the CSS Padding property.
In the Rule Definition window, click the Box category. Uncheck the âSame for allâ box underneath Padding, and then, in the âTop paddingâ box, type 5.
Padding is the space between the edge of an element (where the border appears) and the stuff inside the element (like text). In this case, adding 5 pixels of top padding adds 5 pixels of space between the top border line and the headlineâs text. Youâll learn more about padding on Understanding the Box Model.
Click OK to close the window and complete editing the style.
Now you have a distinctive-looking headline. But youâve just started building styles for this page.
Choose FileâSave All Related Files.
The Save All Related Files command can be a real lifesaver when you work with external style sheets. Even though youâre looking at and working on a web page (services.html here), each time you add a style, Dreamweaver updates the external style sheet file (global.css). So most of the work youâve done so far has gone into updating the global.css file. Unfortunately, the regular keyboard shortcut to save a file, Ctrl+S (â-S), saves only changes to the file you can seeâin this case, the web page. Make sure you invoke the Save All Related Files command frequently, otherwise you could lose all the changes you make to an external style sheet if Dreamweaver or your computer crashes. (To make things easier, you can create your own keyboard shortcut for the Save All Related Files command. See Keyboard Shortcuts for details.)
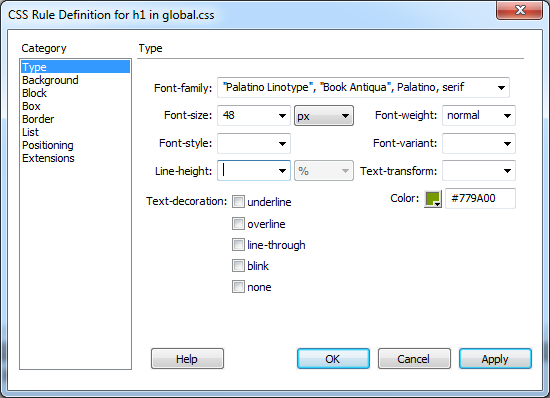
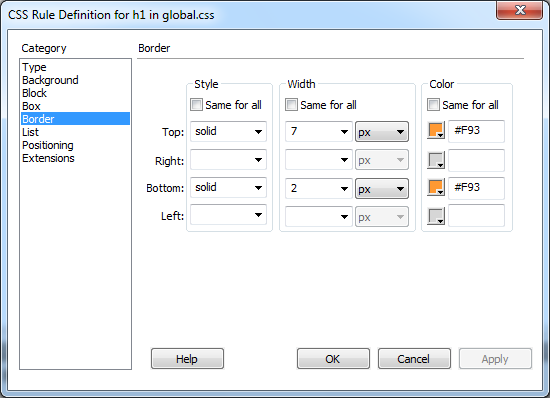
Note
The FileâSave All command is also useful. It saves every file you have open with unsaved changes. Feel free to use this command frequently even if you might want to undo some of those changesâDreamweaverâs smart enough to let you undo changes you made to a file even after you save those changes (but only if donât close the file in the meantime).
The Property inspector isnât the only way to create a styleâin fact, since it offers a limited number of formatting options, it isnât even the best way. The CSS Styles panel provides a faster method with more comprehensive choices.
At the bottom of the CSS Styles panel, click the New CSS Rule button (the + button pictured in Figure 4-1).
The New CSS Rule window appears. Youâll create another tag style for the Heading 2 tag.
From the top menu, choose Tag; in the Selector Name field, typeh2 (or select âh2â from the menu); in the bottom menu, make sure you have âglobal.cssâ selected. Click OK.
This action adds a new tag style to the global.css style sheet. Youâll set a few text properties next.
From the Font-family menu, choose âPalatino Linotype, Book Antiqua, Palatino, serif.â
Youâll use the same font as in Heading 1, but youâll change its size and color.
In the Size box, type24, and, in the Color box, type #EC6206.
This creates medium-sized, orange text. To make the headline stand out a bit, youâll make all the text uppercase. Fortunately, you donât have to hold down the caps-lock button and retype each headline to do soâthereâs a CSS property that can do it for you.
From the Text-transform menu, choose âuppercase.â
One problem with this design is the large gap between the subheads and the paragraphs following them. The Heading 2 paragraphs (âPreventative Care,â for example) introduce the paragraph that follows. Removing the gap that appears between the heading and the following paragraph would visually tie the two together better. To make this change, you must first remove the margin below each headline.
In the left-hand list of CSS categories, select Box. In the Margin area, turn off the âSame for allâ checkbox; in the Bottom box, type 0.
This should remove any space that appears below the Heading 2 tags.
Click OK to close the Rule Definition window and finish editing the style.
The space between the headlines and the paragraphs hasnât changed a bit. What gives? Paragraphs and headlines have space both above and below. The space youâre seeing is actually the top margin of the paragraph tag.
Top and bottom margins have a peculiar feature: They donât add up like 1+1=2. In other words, a web browser doesnât add the bottom margin of Heading 2 to the top margin of the paragraph to calculate the total space between the two blocks of text. Instead, a web browser uses the margin with the largest value to determine the space between paragraphs (a lot of text layout programs, including word processors, share this behavior).
For example, say the <h2> tag has a bottom margin of 12 pixels, while the paragraph following it has a top margin of 10 pixels. The total space between the two isnât 22 pixels (10+12)âitâs 12 pixels (the value of the larger margin). So, if you remove the bottom margin of the headline, the gap between the two blocks of text isnât goneâitâs now 10 pixels, the top margin value for the paragraph. Thatâs the situation here: you need to modify the paragraphsâ top margin as well. You can do that by creating another style.
In the CSS Styles panel, click the New CSS Rule button.
The New CSS Rule window appears. Youâll create a tag style to control how browsers format paragraphs.
From the top menu, choose Tag; in the Selector Name box, typep, and then, in the bottom menu, make sure you have âglobal.cssâ selected. Click OK to create the style.
Before getting to that pesky margin, first set some basic type options.
From the Font-family menu, choose âTrebuchet MS, Arial, Helvetica, sans-serif,â and then, in the Font-size box, type 14.
CSS provides a lot of control over type, including the ability to adjust the leading, or space between, lines in a paragraph.
In the Line-height box, type150, and then, from the pop-up menu to the right, choose %.
The line-height property controls the space between lines of text. In this case, youâve set that space to 150%, which means that each line will be 150 percent (or 1.5 times) the size of the font. A setting of 150% adds more space than usual between each line of text in a paragraphâthe result is more white space and a more luxurious feel.
Now back to that margin problem.
Click the Box category; in the Margin section, uncheck the âSame for allâ box. Type5 in the Top box, and75 in the Left box.
The window should now look like Figure 4-22. The 5-pixel top margin adds just a small amount of space between the paragraph and the <h2> tag above itâcompletely removing all space between the two would make them seem crowded together. The 75-pixel left margin is just for fun. This margin indents the paragraphs from the left edge of the page by 75 pixels, creating a distinctive look that makes the Heading 2 paragraphs stand out even more.
Click OK; choose FileâSave All Related Files.
The page is nearly complete. Just one more style to create.
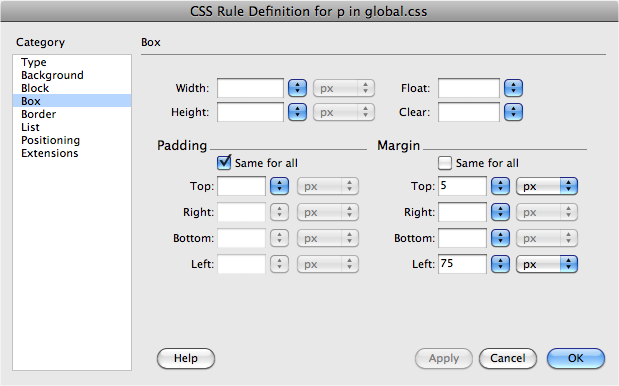
Now youâll create a style to format the copyright notice at the bottom of the page. Itâs inside a regular paragraph (<p> tag), so itâs getting all its formatting from the p tag style. Hereâs an instance where youâd like to style a single paragraph without affecting the other paragraphs on the page. A class style is perfect for this kind of specific styling task.
On the CSS Styles panel, click the New CSS Rule button (+).
The New CSS Rule window opens. This time, youâll create a class style rather than an HTML tag style.
From the top menu, select Class. In the Selector Name box, type .copyright (with a period before it).
Class styles always begin with a periodâhowever, if you leave it out, Dreamweaver puts it in.
Note
Some beginners think that whenever you create a new style, you also need to create a new external Style Sheet. On the contrary, you canâand shouldâstore more than one style in a single external style sheet. In fact, if youâre creating a set of styles for an entire site, put them all in the same external style sheet.
Make sure you have âglobal.cssâ selected in the bottom menu, and then click OK.
Youâre adding yet another style to the external style sheet you created at the beginning of this tutorial. The CSS Rule Definition window appears. Youâll add a few new properties to make this style look different from the rest of the text on the page.
In the Size box, type 12; from the Font-weight menu, choose âboldâ; and for the Color, type #666666 or use the color box to select a gray color.
The smaller text and lighter gray color make the copyright notice less prominent on the page; the bold setting makes it stand out from the other paragraphs. Finally, youâll add a line above the copyright to separate it from the page.
In the category list, click Border.
The CSS Rule Definition window now displays all the properties used to put a border around a style. In this case, youâll add a line above the copyright notice.
Click to turn off all three âSame for allâ checkboxes. For the Top border, choose âdashedâ from the Style menu, type1 in the Width box, and type#93BD00 in the color box.
You have several different styles of borderlines to choose from, including dashed (see Adding Borders for the different types of borders). Lastly, youâll add a little space between the border and the text.
In the left-hand list of CSS categories, click the Box category. Uncheck the âSame for allâ box in the Padding area, and then, type5 in the Top box.
While margins control the space between elements (like the gap between paragraphs), padding controls the space between the content and the contentâs border. In other words, adding padding pushes a border farther away from the text (or other content) youâre styling.
Youâll change the copyright noticeâs margin settings as well.
In the Margin area, uncheck the âSame for allâ box, and then type25 in the Top box and0 in the Left box.
The window should look like Figure 4-23. The 25 pixels of top margin pushes the copyright notice away from the bottom of the paragraph of text above it. In addition, since Dreamweaver indents all the paragraphs 75 pixels from the left edge, you need to set the left margin of the copyright notice to 0. This essentially overrides the 75-pixel margin from the p tag style and lets the copyright notice hug the left edge of the page.
Figure 4-23. The difference between padding and margin is subtle, but important. Both properties add space around content youâre styling. And if you donât have a background color, image, or border, both properties pretty much act the same. However, when you do have a background color, image, or border, padding adds space between the content and the edge of the backgrounds and borders. Margins add space outside the border and background.
Click OK.
The Rule Definition window closes, but this time, nothingâs changed in the document window. Unlike HTML tag styles, class styles donât show up anywhere until you apply them by hand.
Scroll to the bottom of the page, and select the last paragraph, the one with the copyright notice.
This action sets you up for applying the style. You can also just click anywhere inside the paragraph (without selecting any text) to apply a class style to it.
In the Property inspector, click the HTML button, and then, from the Class menu, choose âcopyrightâ (see Figure 4-24).
Boomâthe copyright notice suddenly changes size, color, and grows a line above it. Magic. You may also notice that the copyright still uses the same font as the other paragraphs. In fact, it has âinheritedâ that font type from the p tag styleâyouâll learn about inheritance, an advanced CSS concept, on More About CSS.

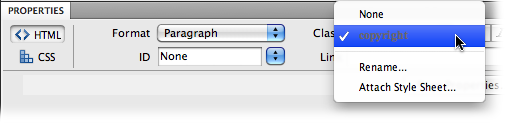
Figure 4-24. The Class menu in the HTML mode of the Property inspector lists all class styles. It also displays the style name using the styleâs text formattingâin this case, bold, gray text. Notice that the menu lists only class styles; tag styles donât appear in this menu, since you donât apply them manually. You can also apply a class using the Property inspectorâs CSS Mode, as described on page 124.
Now that youâve created these styles, you may wonder how you can use them on other pagesâafter all, thatâs the beauty of external style sheets. Once created, itâs a simple process to link other pages in the site to that style sheet.
Choose FileâSave All Related Files; close theservices.html page.
Youâll open a new web page to attach the external style sheet to it.
In the Files panel, double-click the fileabout.html to open it.
This file is another page for the Chia Vet website. It has no formatting yet, so youâll attach the external style sheet you just created.
On the CSS Styles panel, click the Attach Style Sheet button (the chain link button at the bottom of the CSS styles panel.
The Link External Style Sheet window appears.
Click the Browse button.
The Select Style Sheet dialog box appears.
Navigate to the Chapter04 folder (or click the Site Root button), and then double-click theglobal.css file.
Donât forget the Site Root button. It appears on every window in which you need to save, open, or select a file. Itâs a great shortcut to make sure youâre working in the correct folder for your site.
You can ignore the other settings in the Attach External Style Sheet window for now (theyâre described on Linking to an External Style Sheet).
Click OK to attach the style sheet to the page.
Dreamweaver instantly formats the headlines and main text of the story. Pretty coolâand very efficient. You need to apply the .copyright class style only to the last paragraph on the page.
Scroll to the bottom of the page, and then click anywhere inside the paragraph with the copyright notice.
Next youâll add a style to the tag.
From the Class menu on the Property inspector, select âcopyright.â
This page is done. Time to view it.
Press F12 (Option-F12 on Mac) to preview the page.
Dreamweaver probably prompts you to save your files; go ahead and do that. The finished page should look something like Figure 4-25. If youâd like to compare your finished product to the completed version, youâll find those pages in the Chapter04_finished folder in the tutorials folder.
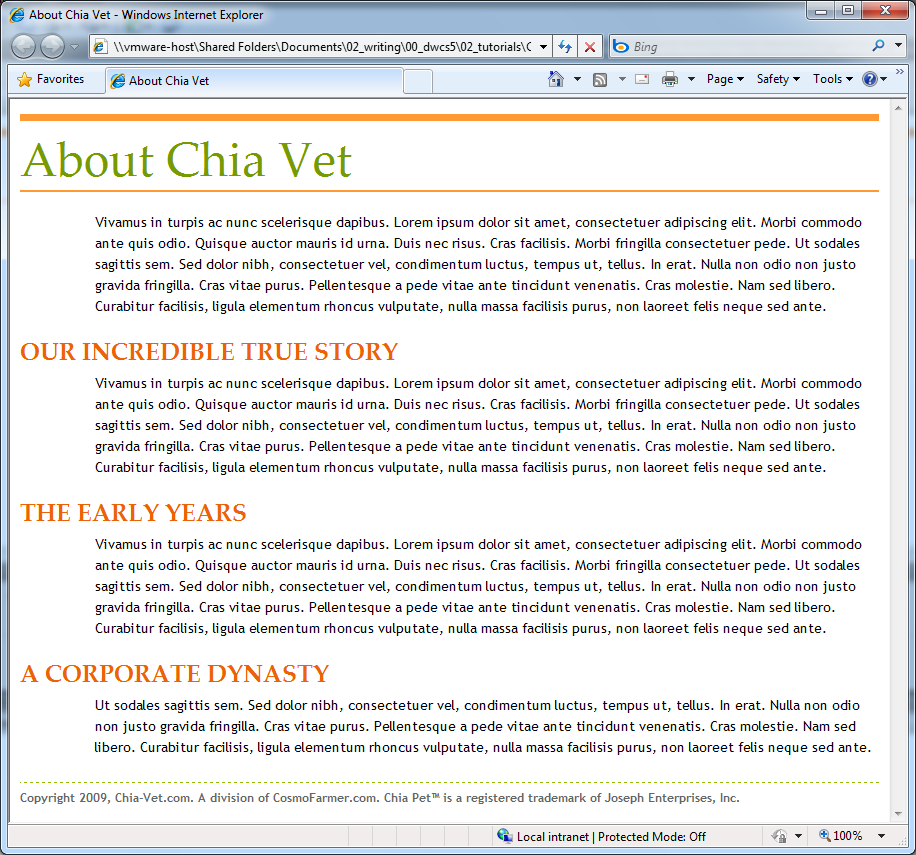
Figure 4-25. CSS offers a lot of design tools to produce beautiful typography for your web pages. In addition, an external style sheet lets you quickly, easily, and consistently add style to hundreds of pages without much work.
Note
You may need to hit your browserâs Refresh button to see the most recent changes you made to the style sheet. This is one problem youâll encounter when you design pages with external style sheetsâweb browsers often cache them (see Download Statistics). Normally thatâs a good thingâit means visitors to your site have to wait only once for the CSS file to download. But when youâre in the midst of a design, frantically switching back and forth between Dreamweaver and a web browser preview, the browser might retrieve the obsolete version of the external style sheet saved in its cache rather than the newly updated file on your computer. (The Safari browser is particularly aggressive at holding onto cached files, so if you preview in that browser, make sure to reload the page when you do.)
You can work around this problem: Open the Preferences window (EditâPreferences [DreamweaverâPreferences]); select the âPreview in Browserâ category, and then turn on the âPreview using temporary fileâ box. Now, when you preview the page, Dreamweaver actually makes a temporary file on your computer that incorporates both the CSS and HTML of the page. This defeats a browserâs cache so that now youâre seeing the very latest changes. This setting has the added benefit of stopping Dreamweaverâs annoying âYou must save your file before previewingâ dialog box each time you preview an unsaved page.
Get Dreamweaver CS5.5: The Missing Manual now with the O’Reilly learning platform.
O’Reilly members experience books, live events, courses curated by job role, and more from O’Reilly and nearly 200 top publishers.

