Dreamweaver CS5.5 is a powerful program for designing and building websites. If youâre brand-new to Dreamweaver, turn to What Dreamweaver Is All About to get a quick look at what this program can do; if youâre a longtime Dreamweaver fan, this page shows you whatâs new in this, its latest incarnation.
This chapter provides a basic overview of Dreamweaverâthe different windows, toolbars, and menus youâll use every time you build a web page. Youâll also learn to set up the program so you can begin building pages. And, because doing is often a better way to learn than just reading, youâll get a step-by-step tour of web page designâthe Dreamweaver wayâin the tutorial at the end of this chapter.
Dreamweaver CS5.5âs interface shares the look and feel of other programs in the Adobe âCreative Suite,â like Photoshop, Illustrator, and Flash. Out-of-the-box, Dreamweaver organizes its various windows as a unified whole (see Figure 1-1). That is, the edges of all the windows touch each other, and resizing one window affects the others around it. This type of interface is common on Windows computers, but Mac fans accustomed to independent floating panels might find this look strange. Give it a chance. As youâll soon see, the design has some benefits. (But, if you just canât stand this locked-in-place style, you can detach the various panels and place them wherever you like on the screen; see Organizing Your Workspace for instructions.)
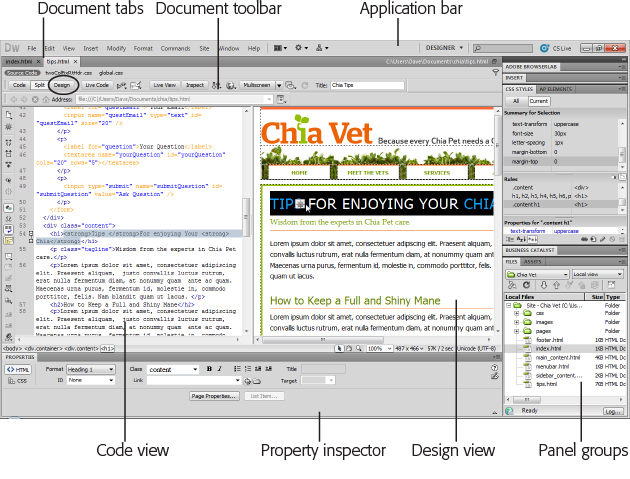
Figure 1-1. Out-of-the-box, Dreamweaver documents appear in âSplit viewââHTML code on the left and a visual preview on the right. If you prefer to see how your page looks as you add and delete elements, click the Design button (circled) in the Document toolbar; that hides the HTML view and brings the page view full-screen. To switch among open documents, click a fileâs tab immediately above the Document toolbar.
Many of the programâs individual windows help you handle specific tasks, like building style sheets. Youâll read about the panels in the relevant chapters. But youâll frequently interact with four main groups of windows: the document window, the Application bar, the Property inspector, and panel groups.
Note
The look of these windows depends on what kind of computer you use (Windows or Macintosh) and what changes you make to the programâs preference settings. Even so, the features and functions generally work the same way. In this book, where the programâs operation differs dramatically in one operating system or the other, special boxes and illustrations (labeled âFor Macs Onlyâ or âFor Windows Onlyâ) will let you know.
You build web pages in Dreamweaverâs document window. As in a word processor, simply click inside the window and start typing to add text to a page. Youâll work in this window as you build a page, and youâll open new document windows as you add pages to your site or edit existing ones.
Several other screen components provide useful information about your document. They may appear in different locations on Windows and Mac computers (see Figures Figure 1-1 and Figure 1-2, respectively), but they work the same way.
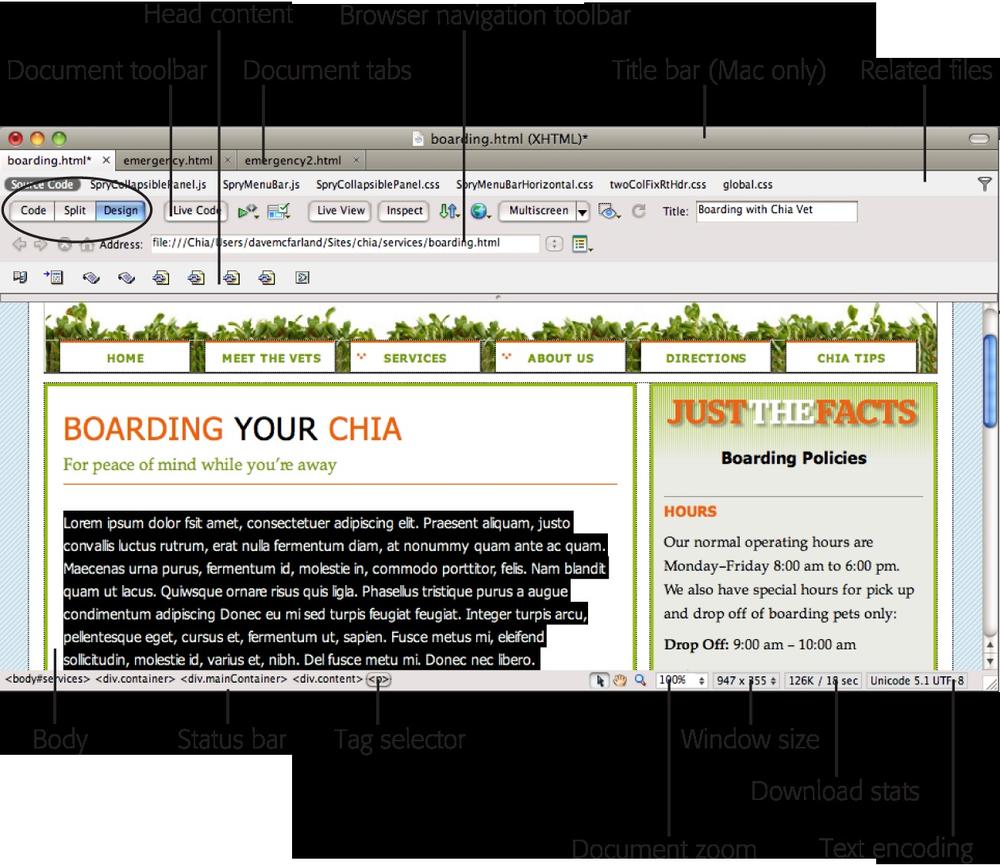
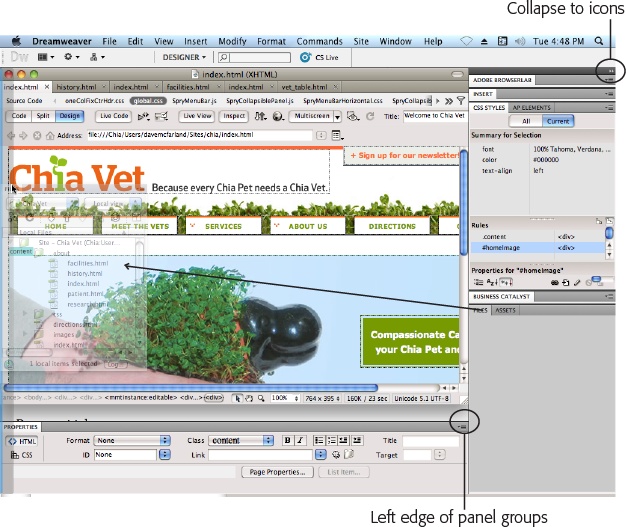
Figure 1-2. A document window like this represents each web page; hereâs where you add text, graphics, and other objects as you build a page. The status bar at the bottom of the window provides some useful information. It shows you how quickly the page will download and the way the page encodes text. You can also instruct Dreamweaver to display the current document at different widths and heights so you can simulate what the page would look like when viewed in different size browsers, such as those on a mobile phone, tablet, or desktop computer.
Title bar (Mac only). The title bar displays the name of the file on which youâre currently working. In addition, if the page is XHTML-compliant (see XHTML, Too), Dreamweaver indicates that in parentheses. For instance, in the example shown in Figure 1-2, the web page is written in XHTML and saved as a file named boarding.html.
Document tabs. When you have more than one web document open at a time, small tabs appear at the top of the document windowâone for each open file. The name of the file appears in the tab; to switch to a file, just click its tab. In Windows, the Document tab bar also displays where you saved the file youâre working on (see Figure 1-1).
Related files bar. The related files bar lists all CSS (cascading style sheets), JavaScript, and server-side programming pages (like PHP) the current web page uses. Youâll learn more about external files, such as external style sheets (Internal vs. External Style Sheets), JavaScript files, and server-side pages (Part Six), later in this book. But as a quick summary, itâs common in current web design to have other files supply design and interactivity to a page of HTML. Web designers frequently work on these files, so the related files bar lets you quickly jump to and work on âhelperâ files like external style sheets and JavaScript programs.
Document toolbar. The Document toolbar lets you change the title of a page, switch between Design and Code views, jump to Live View (to see how the page looks and works in a web browser), preview the page in different browsers, make sure your page is free of HTML errors, and change the look of the document window. Youâll read about its various buttons and menus in the relevant chapters of this book, but youâll want to be aware of the Code, Split, and Design buttons (circled in Figure 1-2). They let you see, respectively, just the raw HTML of the file youâre working on; a split view showing the code in one half of the window and the visual, design view in the other half; and, finally, a button for showing just the design of the page.
When you first install Dreamweaver, it displays your pages in split view, with both the raw HTML and the visual design side-by-side. In this book, weâll assume youâre in Design view (the visual, âthis is what your page will pretty much look like in a browserâ view) most of the time. (To make the toolbar visible if itâs not already, choose ViewâToolbarsâDocument.) However, if you have a really big screen, staying in Split view gives you a great education in HTML; you can add elements to the Design view and instantly see the corresponding HTML tags added to the Code view.
Note
You may find two other toolbars, the Standard toolbar and Style Rendering toolbar, useful. The Standard toolbar is common on many Windows programs and includes buttons for frequent file and editing tasks, like creating a new page, opening a page, saving one or all open documents, canceling and repeating commands, and cutting, copying, and pasting page elements. (Dreamweaver hides this toolbar until you summon it by choosing ViewâToolbarsâStandard.) The Style Rendering toolbar comes in handy when you work with CSS. Youâll learn how to use it on Previewing Media Styles in Dreamweaver.
Browser navigation toolbar. This toolbar works with the programâs Live View feature. When you click the Live View button in the Document toolbar, Dreamweaver displays your page in a web browser built right into the program. As a result, you can see what your page will look like in a browser (Dreamweaver uses WebKitâbasically the Safari and Chrome web browsers, both based on WebKitâfor this feature). You can ctrl-click (â-click) a link on the page and Dreamweaver will load that page. Youâll find Live View most useful with the server-side web pages discussed in Part Six of this book, and less useful when you create regular HTML pages. You can hide this toolbarâa good idea since it takes up valuable screen spaceâby unchecking ViewâToolbarsâBrowser Navigation. Turn it back on by selecting that menu option again.
Head content. Most of what you put on a web page winds up in the body of the page, but some elements are specific to the region of a page called the head. This is where you put things like the pageâs title, the meta tags (for example, a description of the page, or keywords used in the page) that provide information for some search engines and browsers, JavaScript programs, and links to CSS files (Chapter 4).
None of this information actually appears on your page when itâs âliveâ on the Internet, but you can have a look at it in Dreamweaver by choosing ViewâHead Content. Youâll see a row of icons representing the different bits of information in the head.
Tag Selector. The Tag selector is extremely useful. It provides a sneak peek at the HTML that, behind the scenes, composes your web page. It indicates how Dreamweaver nests HTML tags in your document to create what you see on the page. In addition, the Tag selector lets you isolate, with a single mouse click, an HTML tag and all the information inside it. That means you can cleanly remove a page element or set its properties (see The Property Inspector), add behaviors (Chapter 15), and precisely control the application of styles (Chapter 4).
Youâll make good use of the Tag selector in the tutorials to come. For experienced Dreamweaver fans, itâs one of the programâs most useful tools.
Note
In Design view, clicking the <body> tag in the Tag selector is usually the same as pressing Ctrl+A (â-A) or choosing EditâSelect All. It selects everything in the document window. However, if you click inside a table (Chapter 7) or <div> tag (see The Mighty <div> Tag), choosing EditâSelect All selects only the contents of the table cell or <div> tag. In such a case, you need to press Ctrl+A (â-A) several times to select everything on the page. After you do, you can press the Delete key to instantly get rid of everything in your document.
Careful, though: Pressing Ctrl+A (â-A) or choosing EditâSelect All in Code view selects all the code. Deleting code gives you an empty fileâand an invalid web page.
Dreamweaver provides many windows for working with the various technologies required to build and maintain a website. Dreamweaver calls most of its windows panels, and they sit in tidy groups on the right edge of your screen. The various panels and their uses will come up in relevant sections of this book, and youâll learn how to organize the panels on Organizing Your Workspace. But two are worth mentioning up front: the Insert panel and the Files panel.
If the document window is your canvas, the Insert panel holds your brushes and paints, as you can see in Figure 1-3. Although you can add text to a web page simply by typing within the document window, the Insert panelâs click-to-add approach simplifies the process of adding page elements like images, horizontal rules, forms, and multimedia content. Want to put a picture on your web page? Just click the Images icon.
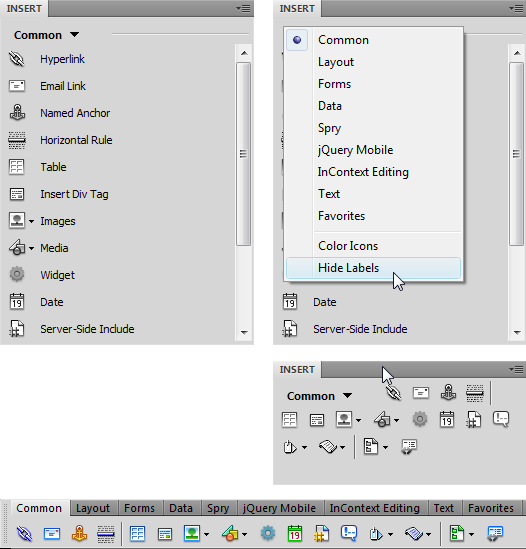
Figure 1-3. The Insert panel has many faces and, depending on how large your monitor is, several space-saving techniques for displaying it. Normally, the panel displays the objects under each of its drop-down menus in a single list with an icon and a nameâfor example, the picture of an envelope and the label âEmail Linkâ (top left). Unfortunately, this tall list takes up a lot of screen real estate. You can display the Insert panelâs buttons in a more compact way by hiding the labels. When you choose Hide Labels from the panelâs category drop-down menu (top-right image), Dreamweaver displays the icons side by side in rows, taking up a lot less space (middle-right image). Finally, you can turn the Insert panel into an Insert bar that appears above the document window instead of grouped with the right-hand panels; this space-saving option is a favorite among many Dreamweaver users. To get the Insert toolbar, drag it either under the Application bar, or, if you have a really wide monitor, into the Application bar. Alternatively, just choose Classic from the Workspace Switcher menu (see Figure 1-6) to convert the Insert panel into an Insert bar.
Note
Adding elements to your web page this way may feel like magic, but the Insert panel is really just a quick way to add code to a page, whether itâs HTML, XHTML, JavaScript, or server-side programming like PHP (see Part Six). Clicking the Images icon, for instance, simply inserts the <img> tag into the underlying HTML of your page. Of course, Dreamweaverâs visual approach hides that code and cheerfully displays a picture on the page.
When you first start Dreamweaver, the Insert panel is open. If you ever close it by mistake, you can open it again by choosing WindowâInsert or by pressing Ctrl+F2 (â-F2). On the other hand, if space is at a premium on your screen, you can close the Insert panel and use the Insert menu instead. The commands in the Insert menu duplicate all the objects available from the Insert panel. You can even turn the Insert panel into a toolbar above the document window, as described in Figure 1-3.
The Insert panel offers nine sets of objects, each available by selecting an option from the menu at the top of the panel (see Figure 1-3, top right) or by clicking one of the tabs on the Insert toolbar (bottom image in Figure 1-3):
Common objects. In addition to images, tables, and email linksâwhich youâll use frequently in everyday web designâthis category of the Insert panel offers access to Dreamweaverâs template features. Templates let you build basic web-page designs that you can use over and over again on your site, speeding up page development and facilitating easy updates. See Chapter 21 for details.
Layout objects. The objects in this category help you control the layout of a web page by organizing the pageâs contents using CSS or HTML tables. In addition, this panel includes Dreamweaverâs Spry widgets that let you add interactive page elements, such as drop-down menus, and animated, collapsible panels so you can fit more information in less space on a page (see Chapter 14).
Form objects. Want to get some input from visitors to your website? Use forms to let them make comments, order products, or answer questions. The Forms category lets you add form elements like radio buttons, pull-down menus, and text boxes (see Chapter 13). Dreamweaver includes sophisticated form validation so you can make sure visitors input the correct information before they submit a form.
Data. Dreamweaver makes connecting your web pages to databases as easy as clicking a few buttons (OK, almost as easy; see Part Six for details). The Data category provides powerful tools that help you build dynamic pages: controls that add records to your database, for example, or that update information already in a database. Dreamweaver also includes several data tools that work without a complicated database setup. Its Spry dataset feature lets you display interactive data in a table, so visitors can sort the data by column and even change the information displayed on the page by interacting with the dataâall without having to reload an additional web page (youâll find Spry datasets discussed on Spry Data Sets).
Note
If youâre a longtime Dreamweaver user, you know that versions of the program before Dreamweaver CS4 displayed tool buttons in color; now it displays the buttons in the Insert panel in black-and-whiteâif you liked it better the old way, right-click the Insert panel and then choose Color Icons. Better yet, you can move the Insert panel back to its old location above the document window by selecting Classic from the Workspace Switcher menu (jump ahead to Figure 1-6). This action not only brings back the old Insert bar, it also adds color to all the buttons.
Spry. Spry is a technology from Adobe that lets you easily add interactive features to your site, from drop-down navigation menus to animated effects to complex displays of data. Basically, Spry is a simple way for web designers to insert complex JavaScript programming into websites. The Spry category of the Insert panel gathers together all of Dreamweaverâs Spry features. Youâll find the same buttons spread throughout the Insert panel; for example, the Spry tools related to form validation also appear in the Form objects category, while the Spry dataset buttons are also available from the Data category.
jQuery Mobile. jQuery Mobile is a JavaScript-powered toolset for building websites and web applications that work well on mobile devices, like Android phones and iPhones. The objects listed in this category simplify the creation of page elements like lists, form fields, and text areas for mobile-enhanced websites. Youâll learn about these new tools in Chapter 12.
InContext Editing. If you build websites that non-web-savvy folk will update, Adobe offers a commercial service called InContext Editing, which lets nontechnical people edit web pages using a simple web-based interface. Unfortunately, while Adobe used to offer this as a standalone tool that you could use with any website, InContext Editing is now available only when you use Business Catalyst (www.businesscatalyst.com) to host your site. Owned by Adobe, Business Catalyst is a web-hosting service for web designers whose clients require sophisticated e-commerce capability, mail-list management, advanced web statistics, and automated tools to manage and update websites. The service offers hosting packages ranging from a $9 a month âstarterâ package to a $79 per month âproâ package. Dreamweaver includes a Business Catalyst panel that lets you download and install a Dreamweaver extension (see Create a Shortcut Cheat Sheet for more on extensions) to help you manage sites hosted by Business Catalyst. Of course, if you already have a web hosting company or donât want to use Business Catalyst, you should steer clear of this category.
Text objects. This category of objects lets you format typeâmake it bold or italic, for instance. Unfortunately, clicking some of the buttons in this category can introduce HTML errors if you donât know what youâre doing. The Property inspector (introduced on The Property Inspector, and discussed in depth in Chapter 3) is a much more effective tool for creating headlines, bulleted lists, and bold and italic text. The one useful button in this category is Characters, which lets you insert text thatâs not easy to type on a keyboard, like the trademark and copyright symbols (Adding Special Characters discusses how to insert special characters like these into a web page).
Favorites. Perhaps the most useful category, Favorites, can be anything you want it to be. That is, after you discover which objects you use the most (like the Image command, if you work with a lot of graphics). You can add those objects to this set of personal tools. You may find that once you populate this category, youâll never again need the other categories in the Insert panel. For instructions on adding objects to your Favorites tools, see the box on the opposite page.
ASP, PHP, ColdFusion. If youâre building database-driven web pages, youâll discover yet another category of objects. The exact name of the category depends on the server model you use (PHP, Microsoftâs Active Server Pages, or Adobeâs ColdFusion server, for example), but it always contains frequently used code snippets for the appropriate programming language. See Part Six for more on working with these technologies.
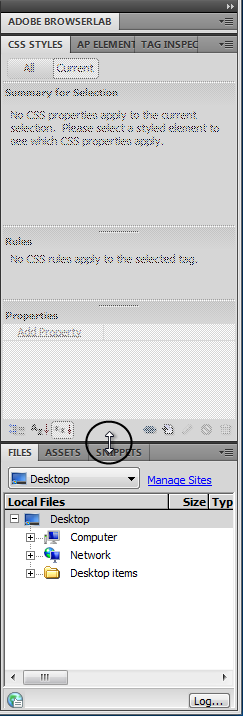
The Files panel is another Dreamweaver element youâll turn to frequently (see Figure 1-4). It lists all the filesâweb pages, graphics, Flash movies, and so onâthat make up your website. It gives you a quick way to open pages you want to work on (just double-click the file name in the panel). It also lets you switch among different sites youâre building or maintaining, and provides some valuable tools for organizing your files. If the Files panel isnât open, summon it by choosing WindowâFiles or by pressing F8 (Shift-â-F on Macs).
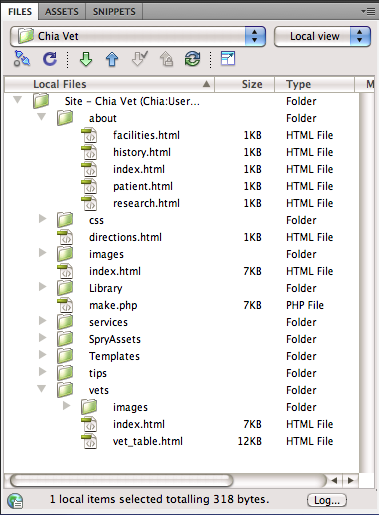
Figure 1-4. The Files panel provides a birdâs-eye view of your siteâs files. But itâs more than just a simple listâit also lets you quickly open files, rename and rearrange them in the site, and more. Youâll learn about the Files panel in detail on page 728.
To use the Files panel effectively, you need to create a local site for each website you work onâsetting up a site is a specific Dreamweaver task, and one of the most important steps in using Dreamweaver correctly. Youâll learn how to set up a site later in this chapter, starting on Setting Up a Site.
After dropping in an image, table, or anything else from the Insert panel, you can use the Property inspector to fine-tune its appearance and attributes. Suppose, for example, that your boss has decided she wants her picture to link to her personal blog. After highlighting her picture in the document window, you can use the Property inspector to add the link.
The Property inspector (Figure 1-5) is a chameleon. Itâs aware of what youâre working on in the document windowâa table, an image, some textâand displays the appropriate set of properties (that is, options). Youâll use the Property inspector extensively in Dreamweaver.

Figure 1-5. If you donât see the Property inspector, open it by choosing WindowâProperties or pressing Ctrl+F3 (â-F3).
For now, though, here are two essential tips to get you started:
In the Property inspector, double-click any blank gray area to hide or show the bottom half of the inspector, where Dreamweaver displays a set of advanced options. (Itâs a good idea to leave the inspector fully expanded, since you may otherwise miss some useful options.)
At its heart, the Property inspector simply displays the attributes of HTML tags. The src (source) attribute of the image tag (<img>), for instance, tells a web browser where to find an image file.
You can most easily make sure youâre setting the properties of the correct object by clicking its tag in the Tag selector (see The Insert Panel).
Note
When you work with text, the Property inspector has two buttonsâlabeled HTML and CSSâthat let you work with either the HTML properties related to text, or create CSS styles. Youâll read more about this in Chapter 3, but hereâs a quick pointer: when you want to create paragraphs, headlines, bulleted lists, and bold or italic text, click the HTML button. When you want to change the appearance of text (its font, color, and size), use the CSS buttonâor, better yet, use the CSS Styles panel, described on Creating Styles, to choose from a much wider range of formatting options.
The Application barâs main purpose in life is to let you switch between document views (for example, between Code and Design view), to configure the programâs windows, and to give you a shortcut for getting help, defining sites, downloading extensions, and tapping Adobeâs online services (such as BrowserLab and Acrobat.com). You can find all the options listed here in the programâs main menus, too. Figure 1-6 shows its location on Windows PC (top) and on a Mac (bottom).
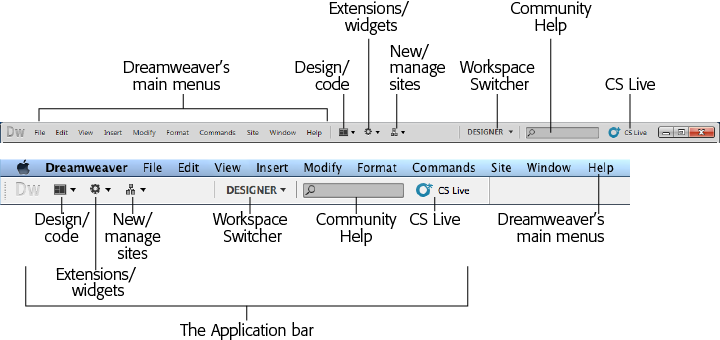
Figure 1-6. Dreamweaverâs Application bar looks slightly different on Windows (top) and Macs (bottom).
The Code/Design View menu lets you switch between the visual Design view (a rough approximation of what a page will look like in a web browser) and the raw HTML. You can also see both the design and code at the same time by selecting Split view. Code View has more on that option.
Tip
The Application barâs Code/Design view options are mostly duplicated on the Document toolbar using easier-to-access buttons. However, the Split Code option (which you wonât find on the Document toolbar) is useful if you love to hand code. Selecting this option lets you view the code for a page in two windows, side-by-side. This way, you can work on both the HTML at the top of a web page, and the HTML at the bottom of the page without scrolling. Or better yet, you can work on the CSS of a page on one half of the document window and the HTML for that page on the other half.
The Extensions menu gives you quick access to Dreamweaverâs Extension Manager and the Adobe Exchange website. Extensions are add-on features (some are free and some cost money) that let you do more with Dreamweaver. Youâll find extensions discussed on Create a Shortcut Cheat Sheet. You can also use the menu to open a Widget Browser to locate and install prepackaged programs that add JavaScript-driven interactivity to a page. Youâll learn about the Widget Browser on The Widget Browser.
The Sites menu lets you âdefineâ a new site or âmanageâ the sites you already have. Youâll learn a lot more about Dreamweaver sites later in this chapter (in Setting Up a Site on page 39), but basically a site is defined as the folder where you keep all the files that make up one particular website. If youâre designing more than one website, you can define multiple sites within Dreamweaver.
The Workspace Switcher lets you reorganize Dreamweaverâs layout of windows. You can choose one of the workspaces supplied by Dreamweaver or, as discussed on Workspace Layouts, you can design your own layout to create the ultimate workspace.
The Community Help box is a search function. But unlike the âHelpâ box you find in most programs, this search field lets you search the entire Internet for useful information related to Dreamweaver. Type a search term in the box and then hit Enter (Return)âthe Adobe Help program launches, loading a web page related to your search, and offering a list of links to other, related web pages. This help function is a bit better than just using Googleâyou never know what thatâll turn upâsince Adobe handpicks all the sites that turn up in a search. So you wonât be getting âhelpfulâ advice from the blogger down the street who just bought Dreamweaver and decided to post his thoughts.
The CS Live menu provides access to online services from Adobe, such as useful web tools like Adobe BrowserLab, which lets you preview a web page in a variety of browsers and operating systems. Itâs also a gateway to less useful (at least for web designers) tools such as Adobe Story (for collaborative screenwriting) and Acrobat.com (can you say âcross-marketing vehicleâ three times fast?) The actual contents of this menu are pulled off the web each time you use Dreamweaver, so the options you see will vary.
Dreamweaverâs basic user interface includes the document window, Application bar, Property inspector, and panel groups. All these windows act like a unified whole; that is, if you resize one window, the other windows resize to fit the space. For example, you can drag the left edge of the panel groups (circled in Figure 1-7) to the left to make the panels wider, or to the right to make them thinner. The other windows that touch the panels (the document window and the Property inspector) change their widths accordingly. This kind of joined-at-the-hip interface is common in Windows applications, but may feel a bit weird for Mac enthusiasts. (If you prefer the âfloating paletteâ look and feel common to a lot of Mac programs, you can set up Dreamweaver that way as wellâsee Floating panels.)
You can control the panel in many ways to customize your workspace:
You can open a particular panel from the Window menu. For example, to open the Files panel, choose WindowâFiles.
If the panel is closed but its tab is visible (for example, the Insert tab in Figure 1-7), double-click the tab to open it. Double-click the tab again, and the panel (and any other panels grouped with it) closes.
Drag the horizontal line between an open panel and another panel to resize a panel. For example, to make the CSS Styles panel taller, grab the thick border line between that panel and the Business Catalyst panel and drag down. The CSS Styles panel gets taller and the open panel below it gets shorter.
Figure 1-7. Youâre not limited to keeping all of Dreamweaverâs panels on the right sideâyou can move individual panels to other parts of the screen. In this figure, grabbing the Files panelâs tab lets you drag the panel to the left edge of the screen. A ghosted version of the panel appears as you do. When you see a thick blue line on the screenâs edge, drop the tab to create a panel that takes up the entire edge of the screen. In other words, in this figure, dropping the Files panel tab creates a full-height column on the left edge of the screen composed entirely of Files panel objectsâthe document window and Properties inspector move to the right to make room.
To completely close a panel so that even its tab no longer appears, right-click (Control-click) the tab and then choose Close. (Choose Close Tab Group to hide the tab and any other tabs itâs grouped with.) To get the panel back, you need to use the Window menu or use the panelâs keyboard shortcutâfor example, the F8 key (Shift-â-F on Macs) opens and closes the Files panel.
If you want to hide all windows except for documents, choose WindowâHide Panels or press F4âa useful trick when you want to maximize the amount of screen space dedicated to showing the web page youâre working on. To bring back all of Dreamweaverâs administrative windows, press F4 again or choose WindowâShow Panels.
As mentioned earlier, you can drag a panel by its tab to another part of the screen. Dragging it to the edge of the screen docks the panel on that edge. However, if you drag a panel and drop it when itâs not near a screenâs edge, then it becomes a floating panel (see Figure 1-8). Floating panels are often nuisances, since they hide whateverâs beneath them, so you often end up having to move them out of the way just to see what youâre doing. However, they come in handy when you have two monitors. If thatâs the case, you can dedicate your main monitor to the document window and Property inspector (and maybe your most important panels), and then drag a bunch of floating panels onto your second screen.
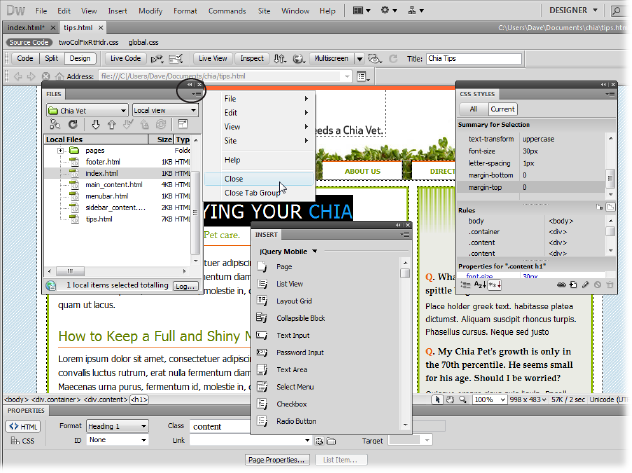
Figure 1-8. Here, the Files, Insert, and CSS Styles panels float. Each panel has its own Context menu icon (circled on the right side of Files panel). Clicking the button reveals a shortcut menu that lets you work with features specific to that panel. This menu also offers generic panel actions, such as closing the panel. If you find youâve made a mess of your workspace and want to return to the way Dreamweaver normally lays out its panels, use the Workspace Switcher, discussed next.
To âunfloatâ a floating panel, simply drag it to the edge of your screen (if you have more than one monitor, drag the panel to one of the edges of your main monitor). If you already have panels at that edge, drag the panel to either the bottom of the panels (to dock it at the bottom of the column of panels), between other panel groups (to insert that panel in its own group between the other panels) or next to another panelâs tab to group the panels together.
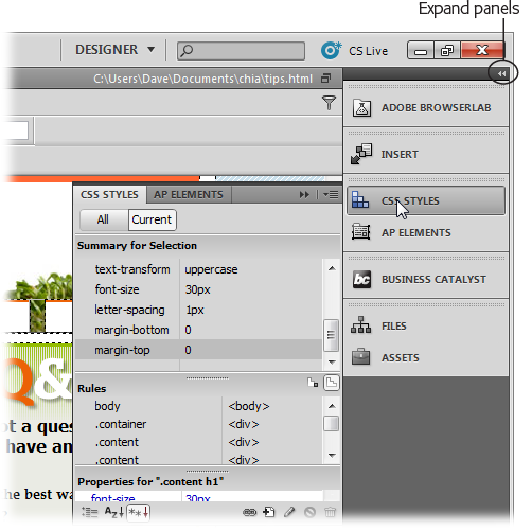
As if you didnât already have enough ways to organize your panels, Dreamweaver includes yet another way to display them. By clicking the âCollapse to Iconsâ button at the top right of a column of panels, you can shrink the panels to a group of much smaller icons. To reopen the controls for a panel you shrunk, just click the icon. For example, in Figure 1-9, clicking the CSS Styles icon opens the CSS Styles panel to the left. Once you finish working with the panel, and click elsewhere on the screen, the pop-up panel disappears. This so-called iconic view is particularly good if you have a small monitor and need to preserve as much screen real estate as possible.
Sometimes too much choice is a bad thing, and even though Dreamweaverâs interface means you can pretty much organize its windows and panels any way you like, it also means you can easily accidentally click or drag the wrong thing and suddenly find panels strewn across the screen or completely gone.
Fortunately, Dreamweaver includes a wonderful, timesaving productivity enhancer that ensures you always have your windows organized the way you want, and you can quickly return to that setup if you accidentally move your panels. The Workspace Layouts feature lets you save the position and size of Dreamweaverâs panels and windows as a custom âlayoutâ that you can return to by simply selecting the layoutâs name from the Workspace Switcher menu in the Application bar or by choosing WindowâWorkspace Layout.
For example, when you work on a database-driven website, you may like to have the Application panel group and the Snippets panel open, but keep the CSS panel tucked away. When you work on design-heavy sites, on the other hand, you probably want the CSS panel open, but could care less about the Tag inspector. You can create a different layout for each situation and then simply switch between them.
Note
Dreamweaver CS3 veterans should check out the âClassicâ layout, which puts the Insert panel back up at the top of the screen. Even if youâre new to Dreamweaver, the Classic layout is a great way to free up space in the already crowded grouping of panels on the right edge of the screen.
In addition, Dreamweaver comes preprogrammed with eight workspaces designed to configure the interface to match the needs of designers, coders, application developers, and those who like to spread their windows and panels across two monitors. You should try each one (use the Workspace Switcher menu in the Application bar) to see which you like best. You can then tweak that layout by closing or opening other panels, rearranging panels, and so on, until you find the perfect layout for you. Then just save it as a custom layout (as described below) so you can call it up any time. Here are a few other tips when youâre ready to lay down a custom layout:
Open the panels you work with most frequently. For example, choose WindowâFiles to open the Files panel.
Increase or decrease the height of a panel by dragging up or down the empty space to the right of a panel or panel-group name (see Figure 1-10).
You can move a panel to another area of your screen by dragging its tabs as described earlier. This trick is especially useful if you have a large monitor, since you can place one group of panels on the right edge of the monitor and another group either next to the first one or on the left side of the monitor. As described in Floating panels on page 34, you can also create floating panels. If youâve got two monitors hooked up to your computer, you can spread the panels across both screens.
To save your layout, select New Workspace from the Workspace Switcher menu in the Application bar (see Figure 1-11) or, alternatively, choose WindowâWorkspace LayoutâNew Workspace. The Save Workspace dialog box appears; type in a name for the layout and then click OK. (If you type in a name thatâs the same as one you already used, Dreamweaver lets you know and gives you the option to replace the old layout with the new one. Thatâs the only way to update a workspace layout you previously created.) Dreamweaver saves your new layout.
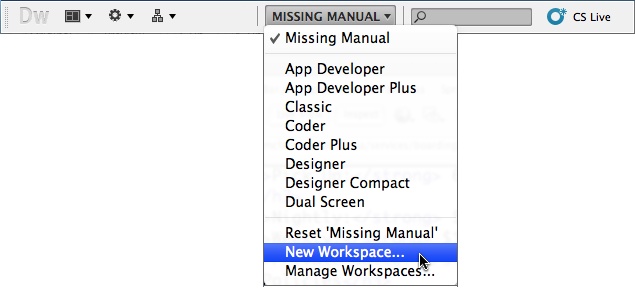
Figure 1-11. The Application barâs Workspace Switcher menu lets you choose one of eight workspaces already set up in the program, or a workspace you create. For example, the Missing Manual option pictured here is a custom workspace. If you accidentally move a panel out of position, return the workspace to its original setup by selecting the Reset option at the bottom of this menu.
Tip
The Workspace Layout feature is also handy if you share your computer with other people. You can create your own workspace layout (âBobâs Workspace,â for example) with all the panels and windows exactly where you like them. Then, when you go to use the computer and the bozo before you has rearranged the entire workspace, just select your layout from the Application bar or the WindowâWorkspace Layouts menu.
To switch to a layout you already saved, simply select your workspace from the Application bar or choose WindowâWorkspace LayoutâName of Your Layout. After a brief pause, Dreamweaver switches to the selected layout.
Whenever you build a new website or want to edit one that you created elsewhere, you have to introduce Dreamweaver to itâa process called setting up a site. This is the most important first step when you start using Dreamweaver, whether you plan to whip up a five-page site, build a 1,000-page online store, or edit the site your sister built for you. At its most basic, defining a site lets Dreamweaver know where you store your web pages on your computer, and makes sure Dreamweaver correctly inserts images and adds links to the pages of your site. In addition, if you want to take advantage of Dreamweaverâs many timesaving site-management tools, such as the link checker (see Finding Broken Links), Library items (Chapter 20), templates (Chapter 21), and FTP tool for moving your files to a web server (Chapter 19), you have to set up a site.
There are a lot of ways to configure a site, depending on your needs. For example, if youâre ready to move pages to the Web, you need to tell Dreamweaver how to connect to your web server. But you only need to do a couple of things to get started using Dreamweaver effectively:
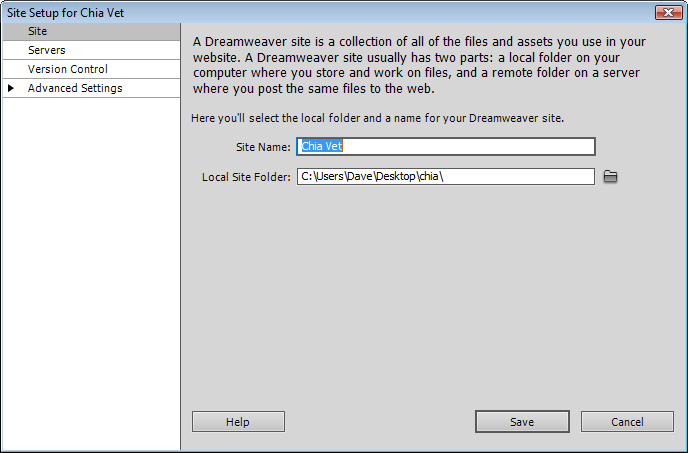
Choose SiteâNew Site to open the Site Setup window (see Figure 1-12).
You only need to provide a couple of pieces of information.
In the Site name field, type a name for your site.
The name you type here is solely for your own reference, to help you identify the site in Dreamweaverâs Files panel; it wonât appear on the Web.
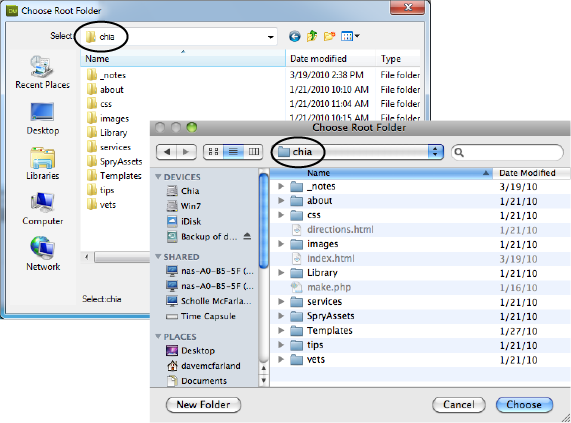
Click the folder icon to the right of the Local site folder field.
The Choose Root Folder window opens, where you select a folder on your hard drive to serve as your local siteâs main (root) folder. Youâll store all of your siteâs filesâHTML documents and graphics, CSS files, and other files that make up your siteâin this folder.
Browse to and select a folder for your siteâs files.
Figure 1-13 demonstrates the process for Windows and Macs. If youâre editing an existing site, select the folder that contains the siteâs files. If youâre creating a new site, create a folder for that site using the New Folder button in this window.
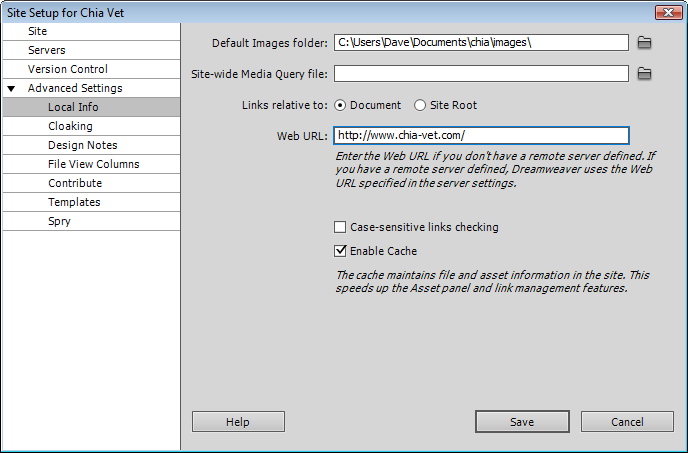
Figure 1-12. The Site Setup window lets you tell Dreamweaver about your siteâwhere you store your files, how to connect to your web server so you can upload files to the Internet, and so on. To get started, you only need to provide the two pieces of information in this window. Youâll find the other categories discussed later: the Servers category lets you connect to a web server to upload files to your website (Chapter 19) and point Dreamweaver to a âtesting serverâ for complex, database-driven websites (Part Six); the Version Control category is for those using the (very complex) Subversion system (most peopleâthe author of this book includedânever use this option, but if youâre curious, see the box on page 800 for more information). Youâll find the Advanced settings discussed in step 5 below and elsewhere in this book.
For a few additional options, select Advanced from the left-hand list of setup categories (see Figure 1-14).
This step is optional and you can happily skip it to begin building web pages. Youâll find most of the categories in the Advanced Setting category discussed elsewhere in the book, but you may want to visit the options in the Local Info category:
The Default Images folder field lets you select (or create) a folder inside your site folder to hold the images youâll use on your web pages. Choosing an images folder is useful only if you tend to add images from outside of your site folderâfor example, if you have images sitting on your desktop or in another folder on your hard drive. If thatâs the case, Dreamweaver automatically copies those files to the images folder you specify here. (Dreamweaver will still copy image files to your site without setting this option, but each time you add an image from outside your site folder, you have to tell Dreamweaver where to save the file. If youâll primarily use images saved somewhere in your site, skip this setting.)
Figure 1-13. The dialog box for selecting a folder in Windows (top) is pretty much the same as the one for Macs (bottom). You can verify which folder youâre about to select by looking in the Select field for Windows (circled in top image) or in the path menu on a Mac (circled in bottom image).
Figure 1-14. You can happily use Dreamweaver without ever visiting the Advanced Settings options listed in the left-hand column of the Site Setup window. The Local Info options are discussed above, and the other options are discussed elsewhere in this book: Cloaking on page 794, Design Notes on page 807, File View Columns on page 729, Templates in Chapter 21, and Spry on page 197.
The Site-wide Media Query file field is useful when designing a site that visitors using tablets, mobile phones, as well as desktop web browsers, will visit. Media queries are a CSS-based tool that let you set up different formatting rules for a page based on (among other things) the screen resolution of the device used to visit your site. In other words, you can design a site that displays differently on the small screen of a mobile device (for example, it may show just a single column of content) than it does on the much larger screen of a desktop browser (where you can fit, for example, a three-column design). Youâll learn about media queries in Chapter 12.
The Links relative to setting determines how Dreamweaver writes links to other pages in your site, links to images in your site, and links to external files, like Cascading Style Sheet files, Flash movies, and so on. Unless youâre an experienced web designer, stick with the normal âDocumentâ setting hereâyou can read about the difference between (and uses for) Document and Site Root relative links on Understanding Links.
Type the web address for your site in the Web URL box: for example http://www.chia-vet.com/. If you donât yet have a web address, you can leave this blank. In some cases, you may need to add some more information after the domain name. For example, the address for your website might look something like this: www.somecollege.edu/~bob. Or you might be responsible for maintaining just part of a larger siteâsometimes called a âsub site.â Regardless, just type the address you normally type into a web browser to visit your site. For example, www.mybigcompany.com/marketing.
Leave the âCase-sensitive links checkingâ box unchecked. This is useful only when you have web pages and files on a Unix server that allows files with the same name but different letter cases: for example, HOME.html, home.html, or HoMe.html. Since Windows machines and Macs donât let you do this, youâll probably never have a site that has files named like this.
Keep the Enable Cache box checked. Dreamweaver creates a site cache for each site you set up. Thatâs a small database that tracks pages, links, images, and other site components. The cache helps Dreamweaverâs site-management tools avoid breaking links, lets Dreamweaver warn you when youâre about to delete important files, and lets you reorganize your site quickly. The only reason to uncheck this box is if you have a really large website (tens of thousands of pages and images) and you notice that Dreamweaver is really slow whenever you begin to work on the site, move a file, change a fileâs name, delete a file, or perform one of Dreamweaverâs other âsite managementâ tasks. In that case, you may see a box saying âupdating the site cacheâ or âchecking linksâ that stays open and prevents you from using Dreamweaver for a minute or moreâbasically your site is so big that Dreamweaver has to spend a lot of time keeping track of your files and links.
Click the Save button to finish the site setup process.
Your siteâs files (if there are any yet) appear in the Files panel. Now youâre ready to create web pages and take advantage of Dreamweaverâs powerful site-building tools.
Note
Dreamweaver lets you set up multiple websites, a handy feature if youâre a web designer with several clients, or if your company builds and manages more than one site. To define an additional site, choose SiteâNew Site and then repeat the steps starting on Setting Up a Site. You can then switch from one site to another using the Sites menu in the Files panel.
After you define a site, youâll want to start building pages. Just choose FileâNew or press Ctrl+N (â-N on a Mac) to open Dreamweaverâs New Document window (see Figure 1-15). Itâs a little overwhelming at first. You have so many options itâs hard to know where to start. Fortunately, when you just want to create a new HTML file, you can skip most of these options.
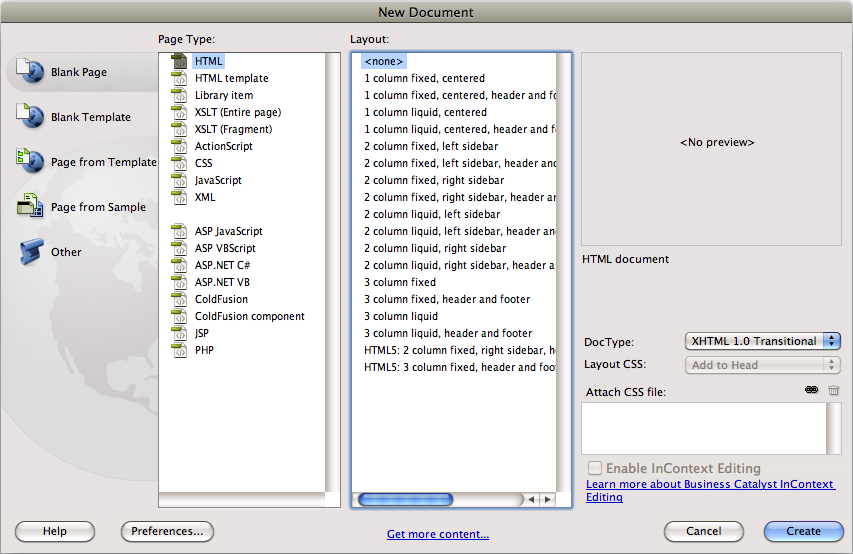
Figure 1-15. The New Document window lets you create nearly every type of web document under the sun. Dreamweaver CS5.5 includes a set of prepackaged CSS layouts that use the latest web design techniques, including HTML5. You can learn more about these CSS layouts in Chapter 10.
To create a basic HTML file for a web page:
From the left-hand list of document categories, choose Blank Page.
The Blank Page category lets you create a new empty documentâmaybe a web page or something a bit more esoteric, like an XML file (see Storing Data in an XML File for more on XML), an external JavaScript file, or one of the several server-driven pages, such as a PHP file (discussed in Part Six).
Both the Blank Template and âPage from Templateâ categories relate to Dreamweaverâs Template feature discussed in Chapter 21. The âPage from Sampleâ category lets you choose from several files with already-created designs. Most of the designs are old and left over from earlier versions of Dreamweaver, arenât very attractive, and donât use the best techniques for building a web page. However, Dreamweaver CS5.5 includes some starter pages for creating mobile-only websites and web applications. You can learn more about these on jQuery Mobile. The last category, Other, lets you create documents for different programming languages, like ActionScript or Javaâunless youâre a Flash or Java programmer, you probably wonât ever need these.
From the Page Type list, choose HTML.
You can create other types of documents, too, most of which youâll learn more about later in this book, such as PHP pages for database-driven sites (see Part Six of this book), XSLT files for processing XML (Chapter 28), templates (Chapter 21), Library items (Chapter 20), and CSS files (Chapter 5).
From the Layout list, choose â<none>.â
This choice creates a blank document. The other choices (â1 column elastic, centeredâ, â1 column elastic, centered, header and footerâ, and so on) are predesigned page layouts. These designs (not to be confused with the designs under the âPage from Sampleâ category) use CSS, which youâll learn much more about starting in Chapter 4. Because CSS-based layout can be tricky, Dreamweaver includes all the code you need to create many of the most common types of page designs. Youâll learn more about this feature in Chapter 10.
Select a document type from the DocType menu.
Selecting a doctype, or document type, identifies the type of HTML youâll use to create your page. It affects how Dreamweaver writes the HTML code and how a web browser understands it. Fortunately, since Dreamweaver writes all the code for you, you donât need to worry about the subtle differences between the different document types.
XHTML 1.0 Transitional is the normal setting in Dreamweaver, but HTML 4.01 Transitional, HTML 4.01 Strict, and XHTML 1.0 Strict are also fine choices. The transitional doctypes let you use a few HTML tags and properties that have been phased out of the strict types. Most notably, transitional doctypes can use the âtargetâ property for linksâa simple way to force links to open in a new browser window.
If you donât really understand or care about doctypes, just select HTML 4.01 Transitional. But make sure you avoid None (which can force browsers to display pages in whatâs called âquirks modeâ and makes perfecting designs difficult), XHTML Mobile, and XHTML 1.1 (which is not only obsolete, it also requires a special setting on your web server to work properly).
If you like to live on the technological edge of web development, you can choose HTML5. HTML5 offers a simplified document type, plus a whole range of new HTML tags and features. Unfortunately, Dreamweaver CS5.5 doesnât offer ready access to these new HTML5 tags or featuresâin other words, you wonât find any of the new tags in the Insert panel, or tools for using cool new features like the <canvas> tag for drawing on a web page. However, CS5.5 does include âcode-hinting,â described on Code Hinting, to make hand-typing HTML5 tags faster.
Tip
If you donât want to deal with the New Document window every time you create a page, choose EditâPreferences in Windows (DreamweaverâPreferences on a Mac). In the Preferences dialog box, click the New Document category and then turn off the âShow New Document Dialog on Control-Nâ checkbox.
While youâre at it, you can specify the type of file Dreamweaver creates whenever you press Ctrl+N (â-N). For example, if you usually create plain HTML files, choose HTML. But if you usually create dynamic pages, choose a different type of fileâlike PHP, for example.
With these settings, pressing Ctrl+N (â-N) instantly creates a new blank document of your choosing. (Choosing FileâNew, however, still opens the New Document window.)
Click Create.
Dreamweaver opens a new, blank web page ready for you to save and title (see Figure 1-16).
Choose FileâSave.
The Save As dialog box appears. You need to save the file somewhere inside your local root folder. You can save it inside any subfolder within the root folder as well.
Type a name for the file and then click Save.
Make sure the name doesnât contain spaces or any characters except letters, numbers, hyphens, and underscores, and that it ends in either .html or .htm.
Although most operating systems let you save files with long names, spaces, and characters like #, $, and &, some browsers and servers have trouble interpreting anything other than letters and numbers.
Furthermore, web servers rely on file extensions like .htm, .html, .gif, and .jpg to know whether a file is a web page, graphic, or some other type of file. Dreamweaver for Windows automatically adds the extension to your saved document names. But on the Macâwhich lets you save files without extensionsâmake sure the file ends in the suffix .html or .htm when you save it.
At the top of the document window, click inside the Title box and then type a name for the page.
Every new document Dreamweaver creates has the unflattering title âUntitled Document.â If you do a quick search on Google for âUntitled Document,â youâll find (at the time of this writing) 27,500,000 results (obviously there are still some people who need to pick up a copy of this book). Dreamweaver probably created most of those pages. You should change this to a descriptive title indicating the main topic of the page, like âContact Chia Vet,â âAbout Chia Vetâs Chia Pet Services,â or âTechnical Specifications for the Anodyne 3000 Indoor Lawn Mower.â Not only is replacing âUntitled Documentâ more professional, but providing a descriptive title can improve a web pageâs ranking among search engines.

Although reading a book is a good way to learn the ins and outs of a program, nothing beats sitting in front of your computer and taking a program through its paces. Many of this bookâs chapters, therefore, conclude with hands-on training: step-by-step tutorials that take you through the creation of a real, working, professionally designed website for the fictional company Chia Vet.
The rest of this chapter, for example, introduces Dreamweaver by taking you step by step through the process of building a web page. It shouldnât take more than an hour. When itâs over, youâll have learned the basic steps for building any web page: creating and saving a new document, adding and formatting text, inserting graphics, adding links, and making the program work for you.
If you already use Dreamweaver and want to jump right into the details of the program, feel free to skip this tutorial. (And if youâre the type who likes to read first and try second, read Chapters Chapter 2 through Chapter 5 and then return to this point to practice what you just learned.)
Note
The tutorial in this chapter requires the example files from this bookâs website, http://www.sawmac.com/dwCS5.5/. Click the Download Tutorials link to download the files. The tutorial files are stored as ZIP files, a type of file that compresses a lot of different files into one, smaller archive file.
Windows folks should download the file and then double-click it to open the archive. Click the Extract All Files option and then follow the instructions of the Extraction Wizard to unzip the files and place them on your computer. Mac users, just double-click the file to decompress it.
After you download and decompress the files, you should have an MM_DWCS5.5 folder on your computer, containing all the tutorial files for this book.
Before you start working in Dreamweaver, make sure the programâs set up to work for you. In the following steps, youâll double-check some key Dreamweaver preference settings and organize your workspace using the Workspace Layout feature.
First, make sure your preferences are all set:
If it isnât already open, start Dreamweaver.
Hey, youâve got to start with the basics, right?
Choose EditâPreferences (Windows) or DreamweaverâPreferences (Mac).
The Preferences dialog box opens, listing a dizzying array of categories and options (see Figure 1-17).
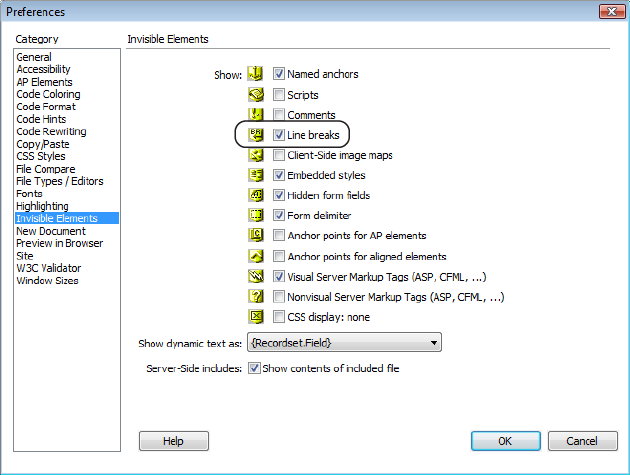
In the Preferences dialog box, select the Invisible Elements category and then turn on the fourth checkbox from the top, labeled âLine Breaksâ (cirlcled in Figure 1-17).
Sometimes, when you paste text from other programs, like Microsoft Word or an email program, Dreamweaver displays separate paragraphs as one long, single paragraph broken up with invisible characters called line breaks (for you HTML-savvy readers, this is the <br> tag). Normally, you canât see the line break character in Dreamweaverâs Design view. This setting makes the character visible in that viewârepresented in the document window by a little gold shield. The shield gives you an easy way to select a line break and remove it, either to create a single paragraph by combing the text before and after the line break, or to create two paragraphs.
Click OK.
The Preferences dialog box closes. Youâre ready to get your workspace in order. As noted at the beginning of this chapter, Dreamweaver offers many windows to help you build web pages. For this tutorial, though, you need only three: the Insert panel, the document window, and the Property inspector. But, for good measure (and to give you a bit of practice), youâll open another panel and rearrange the workspace a little. To get started, have Dreamweaver display the space-saving Classic workspace.
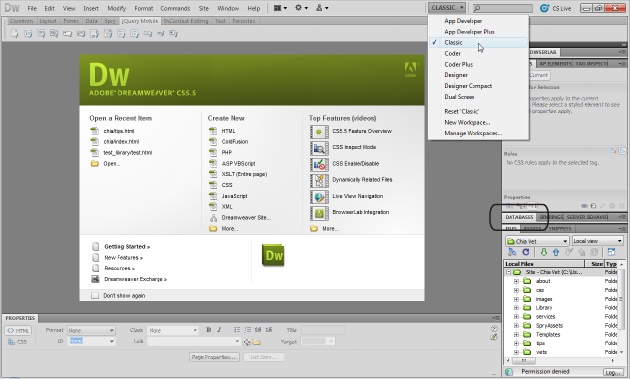
From the âWorkspace Switcherâ on the Application bar, select Classic (see Figure 1-18), or go to WindowâWorkspace Layout from the main menu bar and then select Classic from the drop-down menu.
If you see Classic already selected, choose Reset âClassicâ, which moves any panels that were resized, closed, or repositioned back to their original locations. The Classic workspace built into Dreamweaver puts the Property inspector at the bottom of the screen, turns the Insert panel into an Insert toolbar that appears either in the Application toolbar or directly below it, opens the CSS Styles and Files panels on the right edge, and displays two other groups of closed tabs.
Figure 1-18. The Dreamweaver Welcome screen pictured in the middle of this figure lists recently opened files in the left column. Clicking one of the file names opens that file for editing. The middle column provides a quick way to create a new web page or define a new site. In addition, you can access introductory videos and other getting-started materials from this screen (in the right-hand panel). You see the Welcome screen only when you have no other web files open.
You only need the Databases panel when you work with database-driven websites, so, even though the panel is currently closed, thereâs no reason to keep its tab (and the tabs for the other database-related panels) around, so youâll close that group of tabs next.
Right-click (Control-click) on the Databases tab (circled in Figure 1-18), and choose Close Tab Group from the pop-up menu.
The Databases panel and its three tabs disappear (you can always get it back by selecting WindowâDatabases). The CSS Styles panel is very useful; it also comprises three panes stacked one on top of the next, so giving it plenty of vertical room is a good idea.
Drag the thick line that appears between the top of the Files panel and the bottom of the CSS Styles panel (circled in Figure 1-19) until the Files panel is about half the size of the CSS Styles panel.
Now the workspace looks great. It displays most of the panels you need for this tutorial (and for much of your web-page building). Since this arrangement of windows is so useful, youâll want to save it as a custom layout (OK, maybe you donât want to save the layoutâ¦just play along).
Figure 1-19. Make a panel taller or shorter by dragging the thick line separating two panels (circled). The options in some panels, like the CSS Styles panel here, are dimmed if you donât have a web page open. You can also minimize a panel group by clicking its tab. For example, clicking the âFilesâ tab in this figure hides the Files panel (the list of files), and expands the CSS Styles panelâa good technique if you need more space for a particular panel.
From the Application barâs Workspace Switcher menu, choose New Workspace.
The Save Workspace window appears, waiting for you to name your new layout.
Type Missing Manual (or any name you like), and then click OK.
You just created a new workspace layout. To see if it works, switch to another one of Dreamweaverâs layouts, see how the screen changes, and then switch back to your new setup.
From the Workspace Switcher menu, choose App Developer Plus.
This step moves the panels around quite a bit, and even displays some panels in Dreamweaverâs iconic mode (as described on Iconic panes). This layoutâs a bit too complicated for our needs, so youâll switch back.
From the Workspace Switcher menu, choose Missing Manual (or whatever you named your custom space in step 9).
Voilà ! Dreamweaver sets up everything the way you want it. You can create multiple workspaces for different websites or different types of sites.
As discussed on Setting Up a Site, whenever you use Dreamweaver to create or edit a website, your first step is always to show Dreamweaver the location of the site folder (also called the root folder)âthe master folder for all your websiteâs files. You do this by setting up a site, like so:
Choose SiteâNew Site.
The Site Setup window appears. You only need to provide two pieces of information to get started.
Type Test Drive in the Site Name field.
The name you type here is solely for your own reference, so you can identify the site in Dreamweaverâs Site menu. Dreamweaver also asks where you want to store the websiteâs files. In this example, youâll use one of the folders you downloaded from this bookâs website (at other times, youâll choose or create a folder of your own).
Click the folder icon next to the label âLocal site folder.â
The Choose Root Folder window opens, so you can choose a folder on your hard drive to serve as your local root folder. (This is the folder on your computer where youâll store the HTML documents and graphics, CSS, and other web files that make up your site.)
Browse to and select the Chapter01 folder located inside the MM_DWCS5.5 folder you downloaded earlier. Click the Select (Choose) button to set this folder as the local root folder.
This process is discussed in step 3 on Setting Up a Site. Click the folder icon to the right of the Local site folder field. At this point, youâve given Dreamweaver all the information it needs to successfully work with the tutorial files.
Click the Save button to close the Site Setup window.
After you set up a site, Dreamweaver creates a site cache for it (see Setting Up a Site). Since there are hardly any files in the Chapter01 folder, you may not even notice this happeningâit goes by in the blink of an eye.
âEnough already! I want to build a web page,â youâre probably saying. Youâll do just that now:
Choose FileâNew.
The New Document window opens. Creating a blank web page involves a few clicks.
From the left-hand list of document categories, select Blank Page; in the Page Type list, highlight HTML; and from the Layout list, choose <none>. From the DocType menu in the bottom right of the window, select âHTML 4.01 Transitional.â
HTML (and XHTML as well) actually has two âflavors.â The Transitional type keeps your pages compatible with older browsers, and gives you a wider range of HTML properties to work with. If youâve grown up with regular HTML, itâs perfectly fine to select HTML 4.01 Transitional. (In fact, itâs even OK to select XHTML 1.0 Transitional, if you prefer.) You can even choose HTML5 if you wishâall the steps in this tutorial will create a valid HTML5 page as well.
Click Create.
Dreamweaver opens a new, blank HTML page. Even though the underlying code for an HTML page differs in slight ways depending on which document type you chose (HTML 4.01 Transitional, XHTML 1.0 Strict, HTML5, and so on), you have nothing to worry about: Dreamweaver manages all that code so you donât have to.
If you see a bunch of strange text in the window, youâre looking at the underlying HTML; youâre in either Code or Split view. At the top left of the document window, click the Design button to tell Dreamweaver to display the page in its visual layout mode.
Choose FileâSave.
Always save your page right away. This good habit prevents serious headaches if the power goes out as you finish that beautifulâbut unsavedâcreation.
Save the page in the Chapter01 folder as directions.html.
You could also save the page as directions.htm; both .html and .htm are valid extensions for HTML files.
Make sure you save this page in the correct folder. In Phase 2 (Phase 2: Creating a Website), you told Dreamweaver to use the Chapter01 folder as the siteâs root folderâthe folder that holds all the pages and files for the site. If you save the page in a folder outside the Chapter01 folder, Dreamweaver gets confused and its site-management features wonât work correctly.
Tip
When you save a file, you can quickly jump to the current siteâs root folder. In the Save As dialog box, click the Site Root buttonâthat takes you right to the root folder. This little trick also works when you link to a file or open a file (except on the Mac, which mysteriously lacks the Site Root button when opening a fileâ¦whatâs that about, Adobe?)
If the document window toolbar isnât already open, choose ViewâToolbarsâDocument to display it.
The toolbar at the top of the document window provides easy access to a variety of tasks youâll perform frequently, such as titling a page, previewing it in a web browser, and looking at the HTML source code.
In the toolbarâs Title field, select the text âUntitled Document,â and then type in âDirections to Chia Vet Headquarters.â
The Title field lets you set a pageâs titleâthe information that appears in the title bar of a web browser. The page title also shows up as the name of your page when someone searches the web using a search engine like Bing or Google. In addition, a clear and descriptive title that identifies the main point of the page can also help increase a pageâs rank among the major search engines.
Dreamweaver CS5.5 includes a Browser Navigation toolbar that appears directly below the Document toolbar. Itâs intended to help web designers working on complex web applications, like the WordPress blogging system or the Drupal content management system. However, it mostly just wastes vertical space. Youâll hide it now.
Choose ViewâToolbarsâBrowser Navigation.
The toolbar disappears. Now youâll set some basic properties of the page.
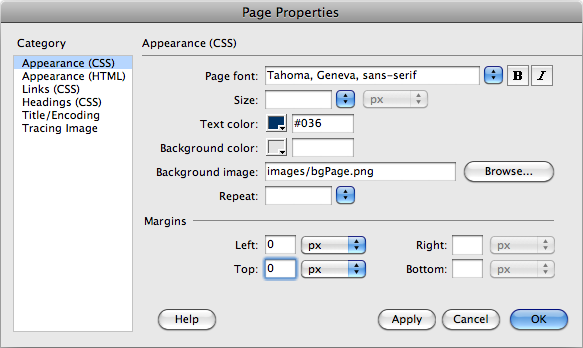
On the Property inspector, click the Page Properties button, or choose ModifyâPage Properties.
The Page Properties dialog box opens (see Figure 1-20), letting you define the basic attributes of each web page you create. Six categories of settings control attributes like text color, background color, link colors, and page margins.
From the âPage fontâ menu, select âTahoma, Geneva, sans-serif.â
This sets a basic font (and two backup fonts, in case your visitorâs machine lacks Tahoma) that Dreamweaver automatically uses for all the text on a page.
However, as youâll see later in this tutorial, you can always specify a different font for selected text.
Next, youâll set a basic text color for the page.
Next to the âText colorâ label, click the small gray box. From the pop-up color palette, choose a color (a dark color like a royal blue works well).
Unless you intervene, all web page text starts out black; the text on this page reflects the color you select here. In the next step, youâll add an image to the background to liven up the page.
Note
Alternatively, you could type a color value, like #333333, into the box beside the palette square. Thatâs hexadecimal notation, which is familiar to HTML coding gurus. Both the palette and the hexadecimal color-specifying field appear fairly often in Dreamweaver. Dreamweaver CS5.5 even lets you specify color in other ways, such as with RGB (red-green-blue) and HSL (hue-saturation-lightness) values. See Picking a Font Color for more on setting colors in Dreamweaver.
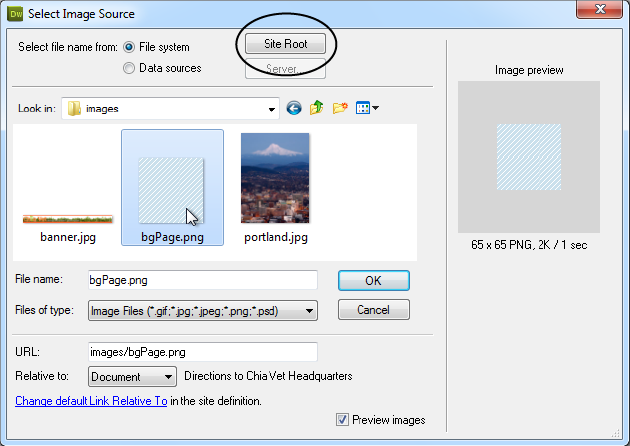
To the right of the Background image field, click the Browse button.
The Select Image Source window appears (see Figure 1-21). Use it to navigate to and select a graphic.
Click the Site Root button at the top of the window (bottom of the window on Macs). Open the folder named âimages,â select the file named bgPage.png, and then click the OK (Choose) button.
In Dreamweaver, you can also just double-click a file to select it and close the selection window. For example, you can select the bgPage.png file and click the OK buttonâby just double-clicking the file in the Select Image Source window.
Note
Note to Windows Users: Normally, Windows doesnât display a fileâs extension. So when you navigate to the images folder in step 13 above, you might see bgPage instead of bgPage.png. Since file extensions are an important way people (and web servers) identify the types of files a website uses, you may want Windows to display extensions. Hereâs how: In Windows Explorer, navigate to and select the MM_DWCS5.5 folder (the folder containing this bookâs tutorials). Then, if youâre using Windows XP, choose ToolsâFolder Options. If youâre on Vista or Windows 7, choose OrganizeââFolder and search options.â In the Folder Options window, select the View tab, and then turn off the âHide extensions for known file typesâ checkbox. To apply this setting to the tutorial files, click OK; to apply it to all the files on your computer, click the âApply to Foldersâ button, and then click OK.
In the Left and Top margin boxes, type 0.
This step removes the little bit of space web browsers insert between the contents of your web page and the top and left sides of the browser window. The size of this margin varies from browser to browser, so itâs good to set this value yourself to make sure the page appears consistently across the different browsers.
If you like, you can change this setting to make the browser add more space to the top and left side of the page. In fact, you can even add a little extra empty space on the right side of a page. (The right margin control is especially useful for languages that read from right to left, like Hebrew or Arabic.) Note, however, that the bottom margin has no effect on the page display.
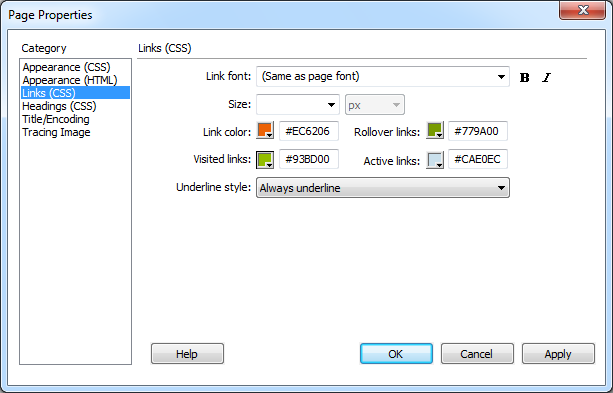
Click the Links category, and then add the following properties: in the âLink colorâ field, type #EC6206; in the âVisited linksâ field, type #93BD00; in the âRollover linksâ field, type #779A00; and in the âActive linksâ color field, type #CAE0EC (see Figure 1-22).
These hexadecimal codes specify specific web page colors (see Picking a Font Color for more on choosing colors for web pages).
Figure 1-22. You can set several hyperlink properties using the Links category of the Page Properties dialog box. You can choose a different font and size for links, as well as specify colors for four different link states. Finally, you can choose whether (or when) a browser underlines links. Most browsers automatically do, but you can override that behavior with the help of this dialog box and Cascading Style Sheets
Links come in four varieties: regular, visited, active, and rollover. A regular link is a plain old link, unvisited, untouched. A visited link is one youâve already clicked, as noted in a browserâs History list. An active link is one youâre currently clicking (youâre pressing the mouse button down as you hover over the link). And finally, a rollover link indicates how the link looks when you mouse over it without clicking. You can choose different colors for each of these link states.
While it may seem like overkill to have four different colors for links, the regular and visited link colors provide useful feedback to web visitors by telling them which links theyâve followed and which remain to be checked out. For its part, the rollover link gives you instant feedback, changing color as soon as you move your cursor over it. The active link color isnât that useful for navigating a site since its color changes so briefly you probably wonât even notice it.
Click OK to close the window and apply the changes to the page.
You return to your document window, where you see an asterisk next to the file name at the top of the windowâthatâs Dreamweaverâs way of telling you that you havenât saved a page you edited, a nice reminder to save your file frequently and prevent heartache if the program suddenly shuts down (see circled image in Figure 1-23).
Choose FileâSave (or press Ctrl+S [â-S]).
Save your work frequently. (This isnât a web technique as much as a computer-always-crashes-when-you-least-expect-it technique.)

Now youâll add the real meat of your web page: words and pictures.
On the Insert barâs Common tab, from the Image menu, select Image (see Figure 1-24).
Alternatively, choose InsertâImage. Either way, the Select Image Source dialog box opens. (If you didnât choose the Classic view from the Workspace Switcherâstep 5 on Phase 1: Getting Dreamweaver in Shapeâthen the Insert bar is really the Insert panel and it appears in the right-hand group of panels.)
Figure 1-24. Some of the buttons on Dreamweaverâs Insert bar do double duty as menus (the ones with the small, black, down-pointing arrows). Once you select an option from the menu (in this case, the Image object), it becomes the buttonâs current setting. If you want to insert the same object again (in this case, an image), you donât need to use the menu againâjust click the button.
Browse to the âimagesâ folder in the Chapter01 folder, and then double-click the banner.jpg graphics file.
The Image Tag Accessibility window appears. Fresh out of the box and onto your computer, Dreamweaver automatically turns on several accessibility preferences. Theyâre designed to make your web pages more accessible to people who use alternative devices for viewing websitesâfor example, people with viewing disabilities who require special web browser software, such as a screen reader, which literally reads the contents of a web page out loud. Of course, images arenât words, so they canât be spoken. But you can identify an image by adding whatâs called an alt property. This is a text description of the graphic (an alternative to seeing the image) thatâs useful not only for screen-reading software, but for people who deliberately turn off pictures in their web browsers so web pages load faster. (Search engines also look at alt properties when they index a page, so an accurate description can help your siteâs search-engine rankings.)
In the Alternate Text box, type Chia Vet. Click OK to add the image to the page.
The banner picture appears at the top of the page, as shown in Figure 1-25. A thin border appears around the image, indicating that you have it selected. Note that the Property inspector changes to reflect the properties of the selected item, the image in this case.
Deselect the image by clicking anywhere else in the document window, or by pressing the right arrow key.
Keep your keyboardâs arrow keys in mindâtheyâre a great way to deselect a page element and move your cursor into place to add text or more images.
Press Enter to create a new paragraph. Type Directions to Chia Vet Headquarters.
Notice that the text is a dark color and uses the Tahoma (or, if you donât have Tahoma installed, the Geneva) font; you set these options earlier, in the Page Properties dialog box. The Property inspector now displays text-formatting options.
Note
The key called Enter on a Windows keyboard is named Return on most Macintosh keyboards, and Enter on the others. So on the Mac, you press either Return or Enter.
Figure 1-25. When you select an image in the document window, the Property inspector reveals the imageâs dimensions. In the top-left corner of the inspector, a small thumbnail image appears, as does the word âImageâ (to identify the type of element you selected) and the imageâs file size (in this case, 29 KB). Youâll learn about other image properties in Chapter 6.
In the Property inspector, click the HTML button, and then, from the Format menu, choose Heading 1 (see Figure 1-26).
The text you just typed becomes big and boldâthe default style for Heading 1. The Format menu offers a number of different paragraph types. Right now, the text doesnât stand out enough, so youâll change its color next.
Figure 1-26. The Property inspector includes two views: HTML and CSS. The HTML view, shown here, lets you control the HTML tags Dreamweaver applies to text: bulleted lists, paragraphs, links, and so on. The CSS view provides a simple interface for creating Cascading Style Sheets so you can format text to look great.
Select the text you just typed.
You can do so either by dragging carefully across the entire line or by triple-clicking anywhere inside the line. (Unlike the Format menu, which affects an entire paragraph at a time, many options in the Property inspectorâlike the one youâll use nextâapply only to text youâve selected.)
In the Property inspector, click the CSS button to switch to CSS properties. From the âTargeted ruleâ menu, choose New CSS Rule. In the Color field of the Property inspector, replace the value thatâs listed with #EC6206 (or select a color using the color box, if you prefer), and then hit Enter (Return).
The New CSS Rule window opens. This window (which youâll learn a lot more about in Chapter 4) lets you create new CSS styles. In this case, youâll create a type of style, called a tag style, that Dreamweaver applies to any Heading 1 (or <h1> tag) on a page.
From the top menu, select âTag (redefines an HTML element).â
Notice that the field below that menu changes to display âh1.â This is called a selectorâand once you define its characteristics, it tells a web browser how to display any text that is a level-1 heading (in other words, any text that has an <h1> tag applied to it).
Donât worry about any of the other settings in this window; youâll learn the details soon.
Click OK.
Dreamweaver has just created a new CSS style. Now, wasnât that easy? Next, youâll add more text.
Click to the right of the heading text to deselect it. Press Enter to create a new paragraph below the headline.
Although you may type a headline now and again, youâll probably get most of your text from word processing documents or emails from your clients, boss, or coworkers. To get that text into Dreamweaver, you simply copy it from the document and paste it into your web page.
In the Files panel, double-click the file directions.txt to open it.
This file is just plain text. No formatting, just words. To get it into your document, youâll copy and paste it.
Click anywhere inside the text, and then choose EditâSelect All, followed by EditâCopy. Click the directions.html tab to return to your web page and, finally, choose EditâPaste.
You should see a few gold shields sprinkled among the text (circled in Figure 1-27). If you donât, make sure you complete step 3 on Phase 1: Getting Dreamweaver in Shape. These shields represent line breaksâspots where text drops to the next line without creating a new paragraph. Youâll often see these in pasted text. In this case, you need to remove them, and then create separate paragraphs.
Click one of the gold shields, and then press Enter (Return). Repeat this for all the other gold shields in the document window.
This deletes the line break in the document (it actually deletes the HTML tag <br>) and creates two paragraphs out of one. At this point, the pasted text is just a series of paragraphs. To give it some structure, youâll add headings and two numbered lists.
Click in the paragraph with the text line âAddress.â In the Property inspector, click the HTML button, and then choose Heading 2 from the Format menu.
This step changes the paragraph to a headlineâmaking it bigger and bolder.
Repeat the last step for the lines of text âDriving Directionsâ and âFor Geocachersâ (near the end of the page).
You now have one Heading 1 and three Heading 2 headlines. To further structure the contents of this page, youâll add one last level of headlines.
Click in the paragraph with the text line âFrom the North,â and then choose Heading 3 in the Format menu. Repeat this step for the text âFrom the South.â
To add a bit more style to this page, youâll format the Heading 3 headlines next.
Triple-click the headline âFrom the Southâ to select it. In the Property inspector, click the CSS button. In the field next to the color box, replace the color currently there with #779A00 and then hit Enter (Return).
The New CSS Rule window appears again. Now youâll create a style for formatting <h3> tags.
From the top menu, select âTag (redefines an HTML element).â
You should see h3 in the middle field.
Click OK.
Notice that the text changes to green. Youâll see that the headline âFrom the Northâ is also green. The style you just created applies to all <h3> tags.
Triple-click one of the green headlines. In the Property inspector, click the I (for italic) button.
This italicizes the text and updates the h3 style you created earlierâthatâs why the other Heading 3 headline is now italicized, too.
Select the seven paragraphs under the headline âFrom the Northâ; drag from the start of the first paragraph down to the end of the seventh paragraph.
You can also drag up starting from the end of the last paragraph. Either way, youâve selected all seven paragraphs listing driving directions to Chia Vet headquarters.
In the Property inspector, click the HTML button, and then click the Ordered List button (see Figure 1-26).
The paragraphs turn into a single, step-by-step, numbered list. Youâll do the same for the other set of directions.
Repeat steps 22 and 23 for the six paragraphs below the headline âFrom the South.â
Now you see two numbered lists (called âordered listsâ in HTML-speak). Finally, youâll highlight the company name where it appears in the text.
Near the top of the page, select âChia Vetâ at the beginning of the sentence that starts with âChia Vet is located inâ¦.â
Youâll make the name bold.
Make sure you have the HTML button pressed in the Property inspector, and then click the B button.
The text changes appearance but the New CSS Rule window doesnât appear. Even though you find the B (for bold) button on both the HTML and CSS views of the Property inspector, they do different things. When you select the B button in HTML mode, Dreamweaver inserts the HTML <strong> tagâused to âstronglyâ emphasize text. But when you press the B button in CSS mode, Dreamweaver adds CSS code to the page to make the text look bold. Itâs a subtle but important difference that youâll read about on Text Styles. In this case, you want to use the HTML <strong> tag to emphasize your companyâs name.
Repeat step 26 for both the âChia Vetâ text that appears about halfway down the page and the text âChia-Vet.comâ at the very bottom of the page. Save the page.
Youâll add a few more design touches to the page, but first you should see how the page looks in a real web browser.
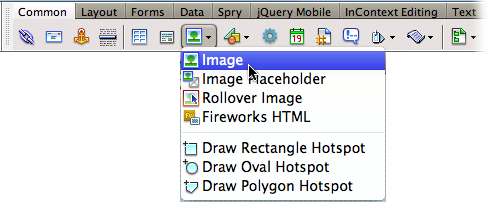
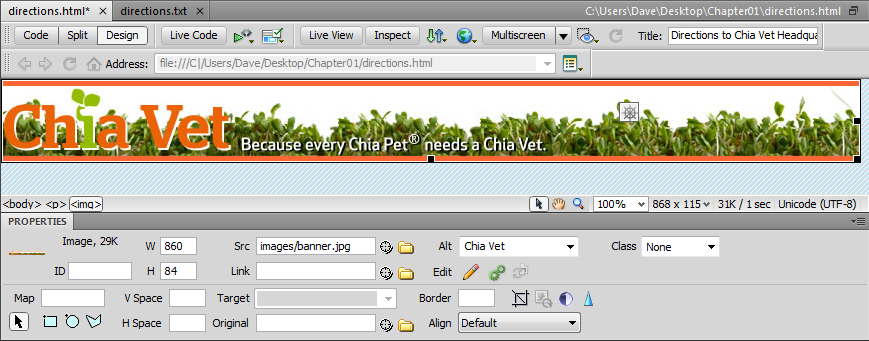
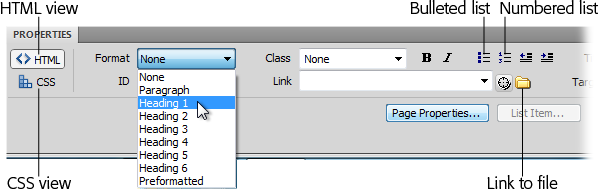
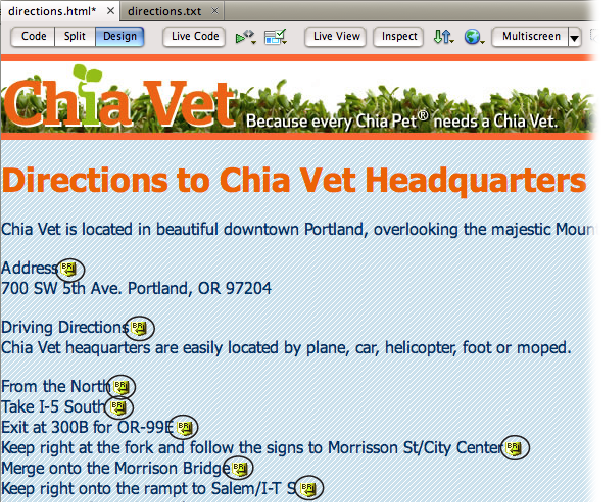
Dreamweaver is as close as a web design program can get to a WYSIWYG application, meaning that for the most part, What You See (in the document window) Is What You Get (on the Web).
At least thatâs how itâs supposed to work. But Dreamweaver may display more information than youâd see on the Web (including âinvisibleâ objects like those line breaks you removed earlier, and table borders) and may display less (it sometimes has trouble rendering complex designs).
Furthermore, much to the eternal woe of web designers, different browsers display pages differently. Pages you view in Internet Explorer donât always look the same in other browsers, like Firefox or Safari. In some cases, the differences may be subtle (for example, text may be slightly larger or smaller). In other cases, they can be dramatic: Some of the advanced page-layout techniques described in Chapter 10 can look awful in older browsers (youâll learn how to deal with many of these problems throughout this book).
Note
If you donât happen to have a Windows computer, a Mac, and every browser ever made, you can take advantage of Adobeâs BrowserLab service, which takes screenshots of your page in a variety of browsers running on a variety of operating systems. Youâll learn about BrowserLab on Previewing Web Pages in BrowserLab.
If youâre designing web pages for a company intranet and only have to worry about the one web browser your IT department puts on everyoneâs computer, youâre lucky. Most people have to deal with the fact that their sites must withstand scrutiny from a wide range of browsers, so itâs a good idea to preview your pages using whatever browsers you expect your visitors to use. Fortunately, Dreamweaver lets you preview a web page using any browser you have installed on your computer.
Note
With the increasing popularity of tablets and mobile phones, web designers can no longer just worry about how their web pages look in desktop browsers; they also have to think about how a web page looks on the small screen of an iPhone, Android phone, or Windows Mobile-powered phone. Chapter 12 has information on how Dreamweaver CS5.5 can help you make your websites mobile-ready.
One quick way to check a page in a web browser is to use Dreamweaverâs built-in Live View feature, which lets you preview a page using a browser thatâs built into Dreamweaver.
In the Document toolbar, click the Live View button (circled in Figure 1-28).
The Live View button highlights. The page doesnât look that differentâfor a simple page like this it wonât, but Live View is great for testing JavaScript interactivity, like the kind provided by Dreamweaverâs Spry tools, such as the Spry Menu Bar (Creating a Navigation Menu), and for previewing more complex CSS.
Figure 1-28. The Live View feature lets you preview a page in a real web browser built into Dreamweaver.
There is one problem with the Live View feature: it uses WebKit (the main engine behind Appleâs Safari browser and Googleâs Chrome browser). This isnât the most common web browser, so itâs not how most visitors will view your site. You want to test your page designs in other browsers, too. Fortunately, Dreamweaver makes it easy to jump straight to any web browser installed on your computer.
Click the Live View button again to exit Live View.
This is an important and easily overlooked step. When youâre in Live View, you canât edit a page. Since a page in Live View can look very much like it does in Design view, itâs easy to try to work on the page while youâre in Live View and say âHey, whatâs going on? Dreamweaver isnât working any more!â So, always remember to exit Live View when itâs time to work on your pages.
To preview your page in a web browser, you need to make sure Dreamweaver knows which browsers you have installed and where they are.
Choose FileââPreview in BrowserââEdit Browser List.
The âPreview in Browserâ preferences window opens (see Figure 1-29). When you install Dreamweaver, it detects the browsers installed on your computer; a list of them appears in this window. If you installed a browser after you installed Dreamweaver, then it doesnât appear here, and you need to follow steps 4 and 5 next; otherwise, skip to step 6.
Click the + button.
The Add Browser or Select Browser window opens.
Click the Browse button. Search your hard drive to find the browser you want to add to this list.
Dreamweaver inserts the browserâs default name in the Name field of the Add Browser window. If you wish to change its name for display purposes within Dreamweaver, select it, and then type in a new name. (But donât do this before you select the browser, since Dreamweaver erases anything you typed as soon as you select a browser.)
In the windowâs Browser list, select the browser you most commonly use. Turn on the Primary Browser box. Click OK.
You just designated this browser as your primary one when you work in Dreamweaver. You can now preview your pages in this browser with a simple keyboard shortcut: F12 (Option-F12 on a Mac).
If you like, you can also choose a secondary browser, which you can launch by pressing the Ctrl+F12 (â-F12) key combination.
Now youâre ready to preview your document in your favorite browser. Fortunately, Dreamweaver makes it easy.
Press the F12 key (Option-F12 on a Mac) or choose FileââPreview in Browserâ and, from the menu, select a browser.
The F12 key (Option-F12) is the most important keyboard shortcut youâll learn. Macintosh fans: Unfortunately, Apple has assigned the F12 key to the Dashboard program, so it takes two keys to preview the pageâOption and F12 together (however, you can change this by creating your own keyboard shortcut, as described on Keyboard Shortcuts). This keyboard shortcut opens the web page in your primary browser, so you can preview your work.
If youâre using a Macintosh laptop, you may have to press Option-F12 and the function (fn) key in the lower-left corner of the keyboard.
You can also use the âPreview in Browserâ menu in the document window to preview a page (see Figure 1-30).
Note
If you use the âPreview in Browserâ menu to select a browser, youâll notice two other options: âPreview in Device Centralâ and âPreview in Adobe BrowserLab.â The first option, Device Central, is a program that lets you preview web pages in mobile devices. Device Central isnât really an accurate way to preview regular HTML, but itâs good for previewing Flash-based sites that target mobile devices. However, Dreamweaver CS5.5 does include some tools to help you better build web pages for mobile devices (see Chapter 12). Youâll learn about the Adobe BrowserLab in depth on Previewing Web Pages in BrowserLab.
When youâre done previewing the page, go back to Dreamweaver.
Do so using your favorite way to switch programs on your computerâby using the Windows taskbar, or the Dock in Mac OS X.
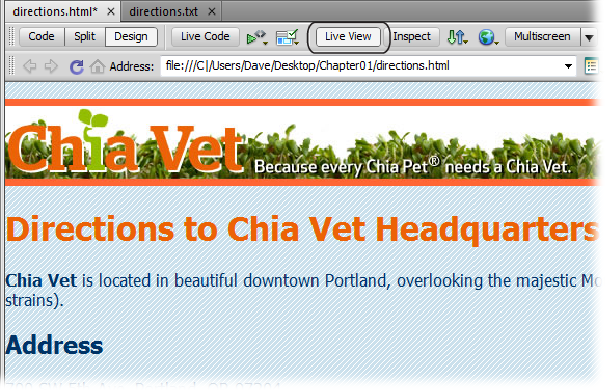
Youâve covered most of the steps you need to finish this web page. Now you just need to add a graphic, format the copyright notice, and provide a little more structure to the appearance of the page.
In the âAddressâ headline, click just before the âA.â
This step places the cursor at the beginning of the headline. Youâll insert a graphic here.
From the Common category on the Insert panel, click the Image button.
You can also choose InsertâImage or use the keyboard shortcut Ctrl+Alt+I (â-Alt-I).
Browse to the âimagesâ folder in the Chapter01 folder, and double-click the graphics file portland.jpg.
Again, the Image Tag Accessibility window appears. You need to provide a good description for this image.
Note
Note to Windows Users: As noted above (Phase 3: Creating and Saving a Web Page) Windows doesnât display a fileâs extension (unless you tell it to). So when you navigate to the images folder in step 3 above, you might see portland instead of portland.jpg.
Type âPortland skyline,â and then press OK.
Look at the Property inspector. It displays properties specific to this image. Youâll learn more about these options in Chapter 6, but now youâll learn a quick way to make text wrap around an image.
In the Property inspectorâs lower-right corner, from the Align pop-up menu, choose Right.
The image moves to the right edge of the page and text wraps around its left side. (If you chose the Left option, Dreamweaver would move the image to the left and wrap text around the right side.)
Look for a copyright notice at the bottom of the page. Itâs not really related to the content of the page, so youâll add a line to visually separate it from the rest of the page.
Note
Although the Left and Right options for an imageâs Align property are quick ways to force text to wrap around an image, they arenât valid options for the âstrictâ versions of HTML or XHTML, or for HTML5. CSS provides a more flexible techniqueâknown as a floatâto achieve this effect. Youâll learn about it on Wrapping Text Around an Image.
Scroll to the bottom of the page, click before the letter âCâ in âCopyright 2011,â and then choose InsertâHTMLâHorizontal Rule.
A gray line appears above the copyright notice. The copyright appears a little big, so youâll format it next.
Note
You can also add a line above a paragraph of text using the CSS border property. See Adding Borders.
Select all the text in the copyright paragraph.
You can either triple-click inside the paragraph or drag from the beginning to the end of the paragraph.
Click the CSS button in the Property inspector, and then, from the Size menu, choose 12.
The New CSS Rule window opens again. This time you want to create a style that applies only to this one paragraph of textânot every paragraphâso you need to use whatâs called a class style.
Leave the default settingââClass (can apply to any HTML element)ââfor the Selector Type box, type .copyright in the Selector Name field (Figure 1-31), and then click OK.
Class names begin with a periodâthatâs how browsers identify the CSS style as a class. You can see that the copyright notice text gets smaller.
Figure 1-31. The New CSS Rule window lets you create CSS styles. You can choose among many types of styles. In this case, youâre creating a class style named .copyright. Class styles work a lot like styles in word processorsâto use them, you select the text you want to format, and then apply the style.
The legal department of Chia Vet headquarters has decided that every page on the site must link to an official corporate statement. Youâll add a link for that next.
At the bottom of the page, select the text âRead our full legal statement.â
To create a link, you just need to tell Dreamweaver which page you want to link to. You can do this several ways. Using the Property inspector is the easiest.
In the Property inspector, click the HTML button, and then click the folder icon that appears to the right of the link field.
The Select File dialog box appears.
Click the Site Root button (at the top of the dialog box in Windows, the bottom of the dialog box on a Mac), and double click the file legal.html.
The Site Root button jumps you right to the folder containing your site. Itâs a convenient way to move quickly to your root folder. Double-clicking the file tells Dreamweaver to insert the HTML needed to create a link.
If you preview the page in a web browser, it looks all rightâ¦well, not really. The text is kind of hard to read against the blue striped background, itâs too wide if you expand your web browser on a large monitor, and the photo is hanging way out on the right-hand side of the browser. To fix these problems, youâll create a new layout elementâa box to contain all the content on the page.
Click anywhere inside the page, and then choose EditâSelect All or press Ctrl+A (â-A on a Mac).
You selected the entire contents of the page. Youâll wrap all the text and images in a <div> tag to create a kind of container for the page contents.
Choose InsertâLayout ObjectsâDiv Tag.
The Insert Div Tag window opens (see Figure 1-32). A <div> tag simply provides a way to organize content on a page by grouping HTMLâthink of it as a box containing other HTML tags. For example, to create a sidebar of navigation links, news headlines, and Google ads, you would wrap them all in a <div> tag. Itâs a very important tag for CSS-based layouts. Youâll read more about it on The Mighty <div> Tag.
Figure 1-32. The Insert Div Tag window provides an easy way to divide sections of a web page into groups of related HTMLâlike the elements that make up a banner, for example. Youâll learn about all the different functions of this window on page 353.
Next, you need to create a style that provides the instructions needed to format this new <div> tag. Youâve already used the Property inspector to create a style, but that works only for text. To format other tags, you need to create a style in another way.
Click the New CSS Rule button at the bottom of the Insert Div Tag window.
The New CSS Rule window appears (a CSS style is technically called a âruleâ). This window lets you specify the type of style you create, the styleâs name, and where Dreamweaver should store the style information. Youâll learn all the ins and outs of this window in Chapter 4.
From the top menu, choose ID, and then type #wrapper in the âChoose or enter a nameâ field. Make sure you have âThis document onlyâ selected in the bottom menu. Click OK,
The âCSS Rule definitionâ window appears (see Figure 1-33). (Thereâs a lot going on in this box, but donât worry about the details at this point. Youâll learn everything there is to know about creating styles later in this book. This part of the tutorial is intended to give you a taste of some of a web designerâs daily page-building duties. So relax and follow along.)
Figure 1-33. The âCSS Rule definitionâ window lets you set over 60 CSS properties (divided into eight categories) to control the formatting of everything from text to images to entire web pages.
This window is the command center for defining the formatting properties, such as text color, font, and size, for a style. CSS has quite a few properties, which Dreamweaver divides into eight categories. First, youâll add a background color for this <div> element.
From the left-hand list of categories, select Background. Click the color box that appears to the right of âBackground-color,â and then select a white swatch.
This action adds a white background to the box, making sure the text stands out. Next youâll set a width for the box, and center it in the middle of the browser window.
Click the Box category, and then, in the width box, type 860.
This step makes the box 860 pixels wideâthe same width as the banner. To make sure the text doesnât butt right up against the edge of the box, youâll add a little space (called padding) around the inside of this style.
In the Top box under Padding, type 10 (make sure the âSame for allâ checkbox is turned on).
This action adds 10 pixels of space inside the box, essentially pushing the text and the graphics away from the edges of it.
Under the Margin settings, uncheck the âSame for allâ box, and then, for both the right and left margin menus, select âauto.â
Selecting âautoâ here is your way of telling a web browser to automatically supply the left and right marginsâin this case, as youâll see in a moment, it has the effect of centering the <div> element in the middle of a browser window.
The âCSS Rule definitionâ window should now look like Figure 1-33. Click OK to complete the style.
The Insert Div Tag window reappears, and the name of the style you just createdââwrapperââappears in a box labeled ID.
In the Insert Div Tag window, click OK.
This inserts the new <div> tag and at the same time applies the style you just created. Now itâs time to take a look at your handiwork.
Choose FileâSave. Press the F12 key (Option-F12) to preview your work in your browser (Figure 1-34).
Test the link to make sure it works. Resize your browser and watch how the page content centers itself in the middle of the window.
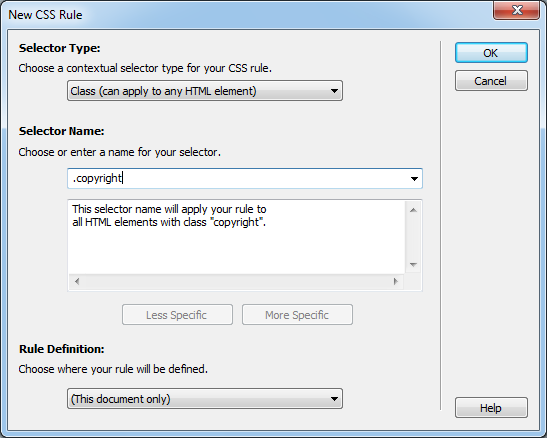
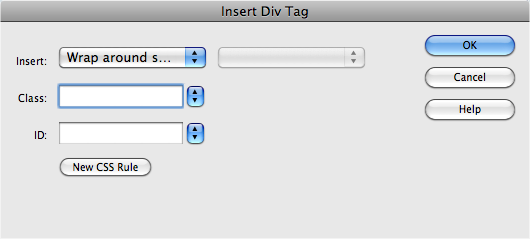
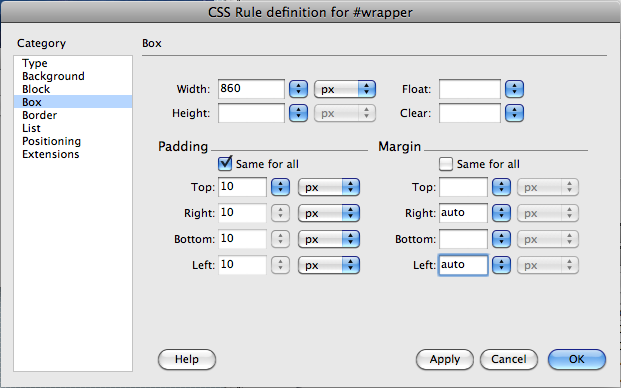
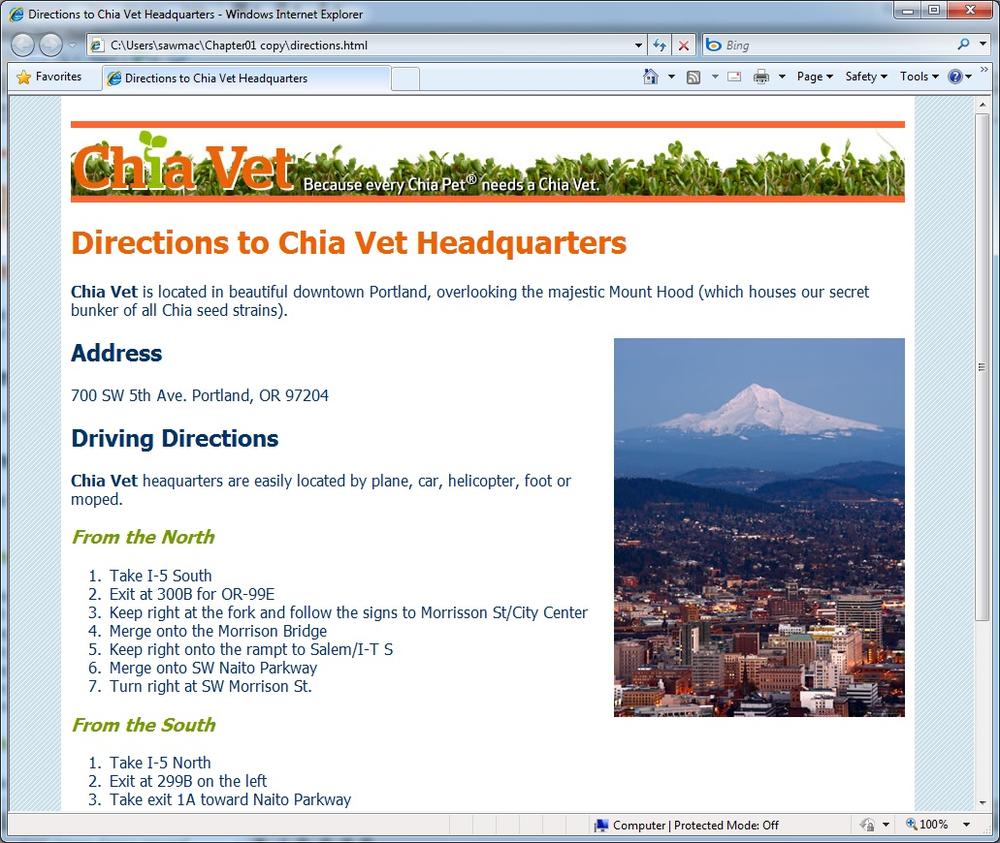
Congratulations! You just built your first web page in Dreamweaver, complete with graphics, formatted text, and links. If you want to compare your work with the finished product, go to Chapter01_finished in the Tutorials folder and load the file directions.html.
Much of the work of building websites involves the procedures covered in this tutorialâdefining a site, adding links, formatting text, placing graphics, creating styles, and inserting divs. The next few chapters cover these basics in greater depth and introduce other important tools, tips, and techniques for using Dreamweaver to build great web pages.
Tip
To get a full description of every Dreamweaver menu, see Appendix B.
Get Dreamweaver CS5.5: The Missing Manual now with the O’Reilly learning platform.
O’Reilly members experience books, live events, courses curated by job role, and more from O’Reilly and nearly 200 top publishers.

