Although the rest of this book systematically works through the entire toolkit, let's take a moment to tinker around with Dojo from the Firebug console. During development, there may be times when it is helpful to try out a few ideas in isolation, and the Firebug console provides an environment that behaves much like an interpreter.
To illustrate, transcribe the minimalist HTML page in Example 1-3 into a local file
to get started. The only Dojo-specific nuance is the script tag that
performs the XDomain loading. Although we haven't covered the
djConfig parameter that you'll
see is included in the SCRIPT
tag, it's just a way of passing in configuration information to Dojo
as it bootstraps. In this case, we're specifying that debugging
facilities such as the Firebug console should be explicitly
available to us. Even if you're using another browser such as IE,
the djConfig="isDebug:true"
option ensures that Firebug Lite is loaded.
Example 1-3. A really simple HTML page for illustrating a few features from Base
<html>
<head>
<title>Fun with Dojo!</title>
<link rel="stylesheet" type="text/css"
href="http://o.aolcdn.com/dojo/1.1/dojo/resources/dojo.css" />
<script
type="text/javascript"
src="http://o.aolcdn.com/dojo/1.1/dojo/dojo.xd.js"
djConfig="isDebug:true">
</script>
<style type="text/css">
.blue {color: blue;}
</style>
</head>
<body>
<div id="d1" class="blue">A div with id=d1 and class=blue</div>
<div id="d2">A div with id=d2</div>
<div id="d2">Another div with id=d2</div>
<div id="d4">A div with id=d3.
<span id="s1">
This sentence is in a span that's contained in d1.
The span's id is s1.
</span>
</div>
<form name="foo" action="">
A form with name="foo"
</form>
<div id="foo">
A div with id=foo
</div>
</body>
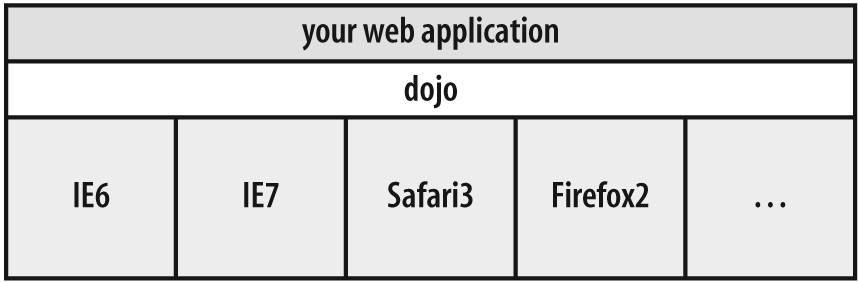
</html>Once you've saved out the file, open the page in Firefox, and click on the little green circle with the checkmark in it to expand the Firebug console. Then, click on the caret icon just beside Firebug's search box to open up Firebug in a new window, as shown in Figure 1-2. (If you haven't read the primer on Firebug in Appendix A, this would be a good time to divert and do so.) Clicking on the "Net" tab reveals that the XDomain dojo.xd.js file consisting of Base has indeed been downloaded from the CDN.

Figure 1-2. Firebug reveals valuable information that you can use to sanity check what is happening with network requests, and more
If you click back on the "Console" tab and type dojo on the
>>> prompt followed by the enter key,
you should see a Firebug console message that says something along
the lines of Object global=window
isBrowser=true isRhino=false, which shows you that the
global JavaScript object dojo is
indeed alive and well. Typing in console.dir(dojo) would provide an
exhaustive tree-view of everything that's contained in Dojo.
Although you'll also see a lot of private members that are prefixed
with a leading underscore, go ahead try it out for yourself.
Skimming the contents of the output will give you a small taste of
what's packed up inside of Base.
Dojo provides dojo.byId
as a drop-in replacement for document.getElementById. Thus, passing
in a string value like dojo.byId("s1"), for example, shows that
it returns a reference that you could store in a variable just
like you could with a call to document.getElementById. However, in
addition to looking up an id
value, dojo.byId also acts like
a no-op if you pass it a DOM node. Internally, the function
introspects its argument, so on the application level, you don't
have to even think twice. Its complete function signature looks
like this:
dojo.byId(/*String*/ id | /*DomNode*/ node) // Returns a DOM Node
Tip
Throughout the book, the pipe, |, is used to denote the logical "or"
operation in function signatures whenever there is more than one
possibility.
Because it appears that dojo.byId does almost the very same
thing as document.getElementById, you may be
tempted to just forget about dojo.byId all togetherâbut don't! As it
turns out, it smooths out some subtle inconsistencies that might
just burn you when you least expect it. One well-known bug for
document.getElementById
surfaces IE6 and IE7. To illustrate, type the following into the
Firebug Lite console for the sample document we're working on, and
you'll see Figure 1-3:
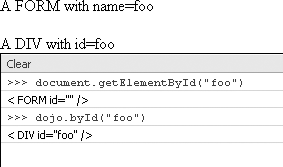
Figure 1-3. The resulting behavior of document.getElementById versus dojo.byId for the previous document
document.getElementById("foo") //Isn't the answer *so* obvious?!?Hmm. You probably didn't expect to have the FORM element returned, did you? As it
turns out, if it had not appeared first in the document, you
should have gotten the div
element returned. This particular bug arises because the name and id attribute namespaces are merged for
IE. So much for cross-browser compatibility on the obvious things
in life! Figure 1-4
shows how Dojo protects you from the cold hard metal of the
browser, saving you from working around the multitude of
inconsistencies that would otherwise prevent your application from
being portable.
But in addition to dojo.byId working around that particular
quirk, dojo.byId also returns
the first element if more than one element has an id set to the same value, thereby
normalizing corner case behavior. For our example document, you
can verify that dojo.byId
always returns the first element by trying out the following
statement:
dojo.byId("d2").innerHTMLMore than anything else, the takeaway from this short lesson is that if you're developing with a JavaScript toolkit, use its API to get work done instead of ways you may have learned with raw JavaScript. Occasionally, you may see an API call that doesn't seem to add any additional value, and the temptation may be to fall back to your own tried-and-true method of getting something accomplishedâbut resist the temptation! Well-designed APIs do not provide useless functionality.
Warning
Viewing an API call as "worthless" may be an indication that you may be confused about the exact utility that the call provides. Whenever this happens, review the documentation to find out what it is you're missing. If the documentation still doesn't convince you, hop on a mailing list or IRC channel and ask someone about it.
Grabbing a DOM node is admittedly boring, so let's look at
something slightly more interestingâlike attaching a UI event such
as a mouse movement to a node via dojo.connect, the toolkit's machinery
for dynamically adding and removing these types of events. Its
signature might look complex at first glance, but it's actually
quite simple in routine use. Take a look:
connect(/*Object|null*/ obj,
        /*String*/ event,
        /*Object|null*/ context,
        /*String|Function*/ method) // Returns a connection handle
To try out connect,
execute the following code into the Firebug console, and then move
your mouse over the content of the sentence contained in the
SPAN to see that the mouseover event was set up properly.
(You'll probably want to click on the caret icon in the
lower-right corner to expand the command prompt to multiline
mode.)
var handle = dojo.connect(
  dojo.byId("s1"), //context
  "onmouseover", //event
  null, //context
  function(evt) {console.log("mouseover event", evt);} //event
);
You should notice that in addition to seeing confirmation in the Firebug console that an event has occurred, you get an actual reference to the event that you can click on and inspectâusually getting vital information relating to where the click occurred on the screen and more.
As it turns out, dojo.connect, like dojo.byId, does a lot of inspecting so
that you don't have to think nearly as much about it as you might
initially imagine. In fact, any arguments that may be null can be
omitted completely. Thus, the previous function call could be
reduced to the slightly more readable:
var handle = dojo.connect(
  dojo.byId("s1"), //context
  "onmouseover", //event
  function(evt) {console.log("mouseover event",evt);} //event
);
Tearing down the connection so that the function that is
executed is based on a DOM event is even easier, and is important
for preventing memory leaks if you are doing a lot of connecting
and disconnecting. Just call dojo.disconnect on the handle you saved,
and Dojo takes care of the rest for you:
dojo.disconnect(handle);
Although it is a simple example, dojo.connect demonstrates a key
principle behind Dojo's philosophy: make getting from A to B as
simple as it should have been all along. Sureâif you're
well-versed in your JavaScript, you could go through the motions
of setting up, maintaining, and tearing down connections all on
your own. However, you'd still incur the cost of boilerplate that
would clutter up your design, and let's not forget: every line of
code you write is a line you have to maintain. For the aspiring
web developers out there and those among us who prefer to keep
things simple, calling dojo.connect and dojo.disconnect is a fine option.
Dojo doesn't do anything that JavaScript can't already do, and for that matter, neither does any other JavaScript toolkit. The tremendous value that Dojo introduces is in smoothing out inconsistencies amongst multiple browsers and making common operations as simple as they should have been all alongâprotecting you from writing and maintaining all of that boilerplate, which allows you to be as productive as possible.
Another neat feature that demonstrates tremendous power in a
tiny package is dojo.query, the
toolkit's mechanism for quickly querying the page with CSS3 style
syntax.
Tip
Chapter 5 covers dojo.query in detail and provides a
lot more context about CSS3 selectors, if you want to jump ahead
and skim over them.
For example, finding all of the DIV elements on the page is as simple as
calling:
dojo.query("div") //find all of the div elements in the DOMIf you try that statement out in the Firebug console, you'll
see that you indeed get back a list of DIV elements. Querying the page for the
existence of a particular named DIV element is just as easy as it should
be as well:
dojo.query("div#d2") //check for the existence of a div with id=d2And then there's querying by class:
dojo.query(".blue") //returns a list of elements that have the blue class applied.Speaking of classes, you could also filter on particular
element types, but because there's only one DIV that has a class applied to it,
we'll need to apply the blue
class to another element as well. But before you go and start
editing the page itself, why not just use another built-in
function from Base, dojo.addClass, to apply the class like
so:
dojo.addClass("s1", "blue"); //add the blue class to the SPANAfter we apply the blue
class to s1, we can illustrate
another query with dojo.query
like so:
dojo.query("span.blue") //returns only span elements with the blue class appliedGetting the hang of it? Sure, we could do all of these things in our own roundabout ways, but isn't it nice to know that the toolkit insulates you from all of that mayhem and provides a single, easy-to-use function instead?
While we could go on and on showcasing Base's easy-to-use API, let's save that for subsequent chapters and instead divert to a quick example of how easy it is to snap some dijits into your page without any additional programming.
Suppose you have the page shown in Example 1-4.
Example 1-4. A very primitive form example
<html>
    <head>
        <title>Fun with Dijit!</title>
    </head>
        <body>
        Just Use the form below to sign-up for our great offers:<br /><br />
        <form id="registration_form">
            First Name: <input type="text" maxlength=25 name="first"/><br />
            Last Name: <input type="text" maxlength=25 name="last"/><br />
            Your Email: <input type="text" maxlength=25 name="email"/><br /><br />
            <button onclick="alert('Boo!')">Sign Up!</button>
        </form>
    </body>
</html>
Figure 1-5 shows what that page looks like, although it's not very difficult to imagine.
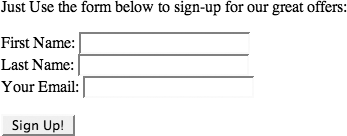
That might have cut it back in '92, but it's wholly unacceptable for this day and age. Take a moment to consider what your normal routine would be at this point: define some classes, apply the classes, write some JavaScript to provide validation routines, etc.
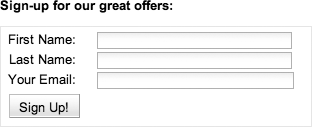
To give you a taste of how the page would look after some Dojoification, take a look at Example 1-5. Don't worry about what every little detail is doing; lots of pages follow on that get into the nooks and crannies of the finer details. For now, just familiarize yourself with the general structure of a page with some dijits snapped into it.
Example 1-5. A form that's not so primitive anymore (thanks to some Dojoification)
<html>
    <head>
        <title>Fun with Dijit!</title>

        <!-- Grab some style sheets for the built-in tundra theme that Dojo offers for
         styling the page, equipping you with a professional style without
any additional
         effort required. -->
        <link rel="stylesheet" type="text/css"
          href="http://o.aolcdn.com/dojo/1.1/dijit/themes/tundra/tundra.css" />
        <link rel="stylesheet" type="text/css"
          href="http://o.aolcdn.com/dojo/1.1/dojo/resources/dojo.css" />
        <!-- Add in some plain old CSS to line up the form elements more nicely -->

        <style type="text/css">
            h3 {
                margin : 10px;
            }
            label,input {
                display: block;
                float: left;
                margin-bottom: 5px;
             }
             label {
                text-align: right;
                width: 70px;
                padding-right: 20px;
             }
             br {
                clear: left;
             }
             .grouping {
                width:300px;
                border:solid 1px rgb(230,230,230);
                padding:5px;
                margin:10px;
             }
        </style>

        <!-- Load Base and specify that the page should be parsed for dijits after it
          loads -->
        <script
            type="text/javascript"
            src="http://o.aolcdn.com/dojo/1.1/dojo/dojo.xd.js"
            djConfig="parseOnLoad: true" >
        </script>

        <!-- Load some dijits via dojo.require in the same manner that you
would #include
          some files in C programming or perform an import in Java -->
        <script type="text/javascript">
            dojo.require("dojo.parser");
            dojo.require("dijit.form.TextBox");
            dojo.require("dijit.form.ValidationTextBox");
            dojo.require("dijit.form.Button");
        </script>
    </head>

        <!-- Specify that the built-in tundra theme should be applied to
everything in the
          body of the page. (Dijit relies heavily on CSS so including the appropriate
          theme is crucial.)-->
        <body class="tundra">

            <h3>Sign-up for our great offers:</h3>

            <form id="registration_form">

                <!-- Weave some widgets into the page by supplying the tags and
including
                  a dojoType attribute so the parser can find them and swap
them out -->

                <div class="grouping">
                    <label>First Name:</label>
                    <input type="text"
                     maxlength=25
                     name="first"
                     dojoType="dijit.form.TextBox"
                     trim="true"
                     propercase="true"/><br>

                    <label>Last Name:</label>
                    <input type="text"
                     maxlength=25
                     name="last"
                     dojoType="dijit.form.TextBox"
                     trim="true"
                     propercase="true"/><br>

                    <label>Your Email:</label>
                    <input type="text"
                     maxlength=25
                     name="email"
                     dojoType="dijit.form.ValidationTextBox"
                     trim="true"
                     lowercase="true"
                     regExp="[a-z0-9._%+-]+@[a-z0-9-]+\.[a-z]{2,4}"
                     required="true"
                     invalidMessage="Please enter a valid e-mail address"/><br>

                    <button dojoType="dijit.form.Button"
                     onClick="alert('Boo!')">Sign Up!</button>
                </div>

            </form>
    </body>
</html>
And voilà , Figure 1-6 shows what it looks like, complete simple validation functionality.
If you're intrigued by the examples in this chapter, and are ready to learn more about Dojo, then you've come to the right place. The following chapters systematically work through the specifics of the toolkit. But first, let's take a quick moment to reflect on what this chapter was all about (as we'll do in every chapter).
[10] Bookmarklets are nothing more than snippets of JavaScript code that can be stored as a bookmark. Generally, bookmarklets are designed to augment the behavior in a page.
Get Dojo: The Definitive Guide now with the O’Reilly learning platform.
O’Reilly members experience books, live events, courses curated by job role, and more from O’Reilly and nearly 200 top publishers.

