Chapter 4. Making Critique a Part of Your Process
Creating Opportunities for Critique
Critique is an analysis tool that we use for the purposes of evolving and improving something. At any point during our projects—when we’re looking to take what we have created so far and analyze it in order to make it better by revising choices we might have made—we have an opportunity for critique.
As Aaron and I have worked with organizations to see how they are or aren’t using critique, we’ve found three common points in processes during which feedback is often collected. These points offer some interesting opportunities and considerations for critique.
- Standalone critiques
Meetings or discussions held for the sole purposed of critiquing something
- Collaborative activities
Events in which multiple people work together simultaneously to solve a specific challenge
- Design reviews
A common event in organizations’ project and design processes
Things to Keep in Mind
We’ll discuss each of the above forms in more depth later in this chapter, but before we do, it’s important to call out some considerations that you should keep in mind as any team works to incorporate critique into their process or improve upon the way you might already be using critique.
Start Small
The number of people involved has a direct effect on how much effort it takes to manage a conversation, both from a facilitation standpoint as well as an individual participant’s ability to follow along.
When introducing critique or working on improving an organization’s skills with it, it’s good to keep the number of people involved to fewer at first, maybe just pairs. This minimizes the mental acrobatics that participants need to do to keep track of everyone’s feedback and gives them the ability to focus a bit more on the critique itself and their own skills within it. As people grow more comfortable, you can introduce increasingly larger groups.
Think Before You Speak
Listening plays a huge role in critique, for both recipients and those giving the feedback. It’s been beaten into many of us that there is a difference between listening and hearing. That difference can become very clear in conversations, particularly discussions that include or are focused on feedback.
Hearing is a passive act. It’s something that we just do. And even though it takes no real effort for us “hear” something, it can still produce a response. At any given moment, we’re likely to be hearing a variety of things, some influencing our actions and some not, all with little to no conscious recognition of what we’re hearing actually is or means. We still react to what we hear, but these reactions are typically impulsive and automatic. Does that sound like anything we’ve already discussed?
Listening, on the other hand, requires focus. When we listen, we take in information through what we’re hearing and consciously interpret it to form an understanding that directs how we behave. This process is a deliberate one that we’re aware of as it is happening. We’re conscious of the questions being asked in our brain to make sense of what we’ve heard and we’re focusing our energy on getting to that interpretation.
Although both hearing and listening can lead to changes in action and both rely on some form of attention, it’s this deliberate focus and conscious awareness that separates listening from hearing. To make sure our feedback discussions stay focused on pertinent, useful feedback, we need to ensure that we’ve actually listened to and understood what has been said before we say something in response. Whether you are giving or receiving critique, listening plays a critical role.
Think About Who to Include
When working on an organization’s critique skills, it’s important to give some consideration to which individuals you bring into the conversations, given that each participant can either help or hinder the others. This in no way means that we should start excluding everyone who might be struggling. It’s more that we need to think about how and why we put people together in critiques whose purpose is to maximize the potential for improving the skills of the group overall.
OK. With all that now out of the way, let’s talk about process. Or, more specifically, the ways critique can fit into it.
Standalone Critiques
Standalone critiques are nothing more than meetings or discussions with the single purpose of critiquing a creation so that it can be iterated upon further. This form makes it possible for us to critique pretty much anything we need analysis on, at any time. Because of that flexibility they often provide us with the ability to gather more targeted and focused feedback on specific areas of our designs than we would if we wait and try to incorporate feedback into other project meetings.
At a previous job, my director and I would chat at the end of every day to discuss the work we did, how we felt about it, and provide each other with feedback. On one particular project, we had a tight deadline and a lot of ambiguity surrounding the website we needed to design. Because we met at the end of each day for critique, we were able to talk through our design decisions and help each other measure those decisions against our goals. The more we met, the better we became at asking questions about each other’s work as well as uncovering questions to ask the product team so we could get the information we felt was lost in ambiguity. After the project, we continued meeting at the end of each day, and once or twice a week, we included a product manager to help build a shared understanding.
This was very helpful to both of us because we became very comfortable giving and receiving feedback and it also helped us improve our presentation and communication skills when discussing designs. It also didn’t hurt that a nice cold beer often accompanied these standalone critiques.
—AARON
Standalone critiques are also very effective when we’re introducing critique to someone who isn’t familiar with the process or when a team is working to practice and improve its critique skills. Because the entire purpose of these meetings is to critique something, we can organize them so that they provide a safe, controlled place in which participants can share and analyze work while getting comfortable with giving and receiving feedback. This is especially helpful when we’re working with teammates who might be intimidated by receiving or giving feedback, possibly because they have had negative experiences with it in the past. It truly is awesome to watch someone come out of his shell as he improves his ability to communicate ideas and designs to others, receive feedback on his work, and use that feedback to strengthen his creations.

“Team critique” likely sets a nice visual—a lot of people gathered in a semicircle around a wall adorned with beautiful designs. Inevitably, someone is pointing at a particular design, while others hover back a bit with furrowed brows and questions on the tips of their tongues. It looks like a fun scenario to get to be a part of!
The reality that I’ve seen has been just a little bit different. I’ve frequently worked on distributed teams across multiple time zones and locations. The physicality of gathering together isn’t always feasible for a variety of reasons. Factor in multiple projects and timelines, other administrative and work-related tasks and meetings, and it’s easy to see that getting everyone together at the same time can be really challenging.
The other reality is that I’ve witnessed design teams who really desire for critique to be ingrained into their process, and they want to hear and learn from their teammates. I’ve always felt that time zones shouldn’t be a debilitating constraint—technology, along with a little bit of flexibility from a team, can be useful in getting past many of the obstacles that distributed teams face.
In light of the fact that many of us can’t be in the same place to have that glorious-seeming ideal critique scenario, here’s an approach I’ve worked with to get started with a distributed, fairly continuous critique system:
- Define rules of critique
The good news is that you’ve got a great book in your possession that provides you with all of the information that you need to do this.
- Choose critique teams
If you have a team of five people or fewer, you can lead the team in one-on-one critique sessions. If your team comprises six or more, you can share those duties with another member of your team. Consider rotating the role of the person leading critique sessions with some regularity to give everyone an opportunity. It’s great to choose teams where people don’t work on the same projects or products (if possible) and are in different physical locations.
- Establish a critique operating rhythm
This can be really simple—30-minute meetings, once a week, with a variety of approaches that can extend that into something more broad to help vary the types of critique you’re receiving. Here are some examples of how a 12-week cycle might operate:
One-on-one meetings: 30-minute meetings between the critique leader and other members of the team.
Group critique meetings: Erica Deahl (www.ericadeahl.com) suggested that one-on-one critique sessions could be improved by adding group critique sessions, as well. Try rotating weeks between one-on-one meetings and group critique meetings to get the benefit from both types of sessions.
All design team meetings: In addition to the group critique meetings and the one-on-one meetings, consider a regular meeting with everyone across all teams. Allow team members to sign up to receive critique, and let everyone participate across your entire design practice. Youi could also expand this to include developers and/or other disciplines as it makes sense.
- Repeat this
Your mileage may vary, of course, and you might (and I might, too!) find that a different approach works as you implement and gain feedback for your team. Use this framework as a way to kick off continuous critique for your team, and see where it leads.
By implementing continuous critique with the teams I’ve worked with (a relatively small investment, likely less than five percent of a team’s utilization), I’ve seen several benefits, including:
Identifies leaders and leadership in the team; everyone gets an opportunity to participate, lead, and offer improvements.
Uncovers growth and training / learning needs; discussions across multiple projects and products help identify areas of growth needs for the team.
Strengthens critique abilities across the team; it’s being put into practice regularly and becomes embedded in the design culture.
Increases distributed team communication, interaction, and engagement; team members who might not normally have reasons to interact get to spend time working together.
Improves facilitation and presentation skills; the more we practice, the better we get at framing the scope of discussions and presenting our work.
Improves design across the team; critique gives us opportunities to hear and learn from different perspectives and take action that makes our designs better.
Formal and Informal Critiques
Standalone critiques themselves can take two forms: they can be formal, such as a scheduled meeting with a time, place, invites, and the whole 9 yards, or they can be as simple as asking someone for 10 minutes of her time to look over what we are working on—maybe chatting with someone over lunch, coffee, or drinks as we share our work and what we are trying to accomplish, and asking for her feedback.
Both formal and informal critiques are helpful. To ensure that we get the most out of them we need to consider the right type of critique setting for the situation.
Formal critiques provide a dedicated, predictable time, and as such, they typically give us an opportunity to collect a wider range of perspectives because we can gather more people.
Informal critiques provide designers with a way to quickly collect feedback and get answers to pressing questions so that they can continue working on their solutions instead of waiting for a scheduled meeting.
Organizations that have done well at integrating critique use both approaches and have constructed an environment in which both are not only accepted by team members, but expected.
Pixar, the animation powerhouse, uses a formal critique process as a way to analyze and strengthen works in progress while building collaboration. The practice, called “Dailies,” is commonly used in television and film and is based on reviewing a previous day’s footage to determine if reshoots and adjustments are needed. Seeing the potential and utility of this process, though, Pixar has adapted it such that it can improve and iterate on work at any stage, not just captured footage.
On a daily basis, Pixar staff from a variety of roles—whether it’s writers, storyboard artists, character designers, directors, or whatever—will convene to examine and critique a work in progress. Making critique such a routine part of Pixar’s process makes it possible for team members to build habits and “muscle memory” around productive conversations about their work. It also breaks down silos and provides a consistent opportunity to gain insights and perspectives about creations, allowing for continuous improvement. It’s safe to assume that these Dailies are a contributing factor to the great work the Pixar team produces.
Whichever approach you choose, it is important to remember that the more you participate, the stronger your critique skills will become. As we said in Chapter 3, practice, practice, practice!
When Should You Critique?
A question that comes up often in our presentations and workshops is, “When should we be critiquing?”
Any time you’re looking to take something you’ve done or created and improve upon it, you have an opportunity for critique. Although that’s true in general, when we’re talking about the practicalities and logistics of team collaboration and project timelines, the real answer becomes a bit more nuanced.
When thinking about what needs to be in place to critique an idea in a useful manner with respect to the idea itself, two very important considerations come up:
We need to be able to clearly communicate the idea to others.
We need to have the time to process the feedback we receive from the critique and use it to iterate on our idea.
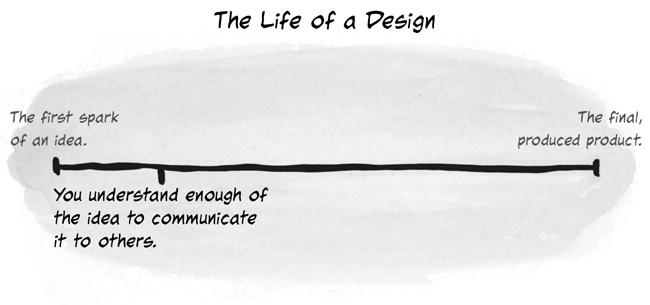
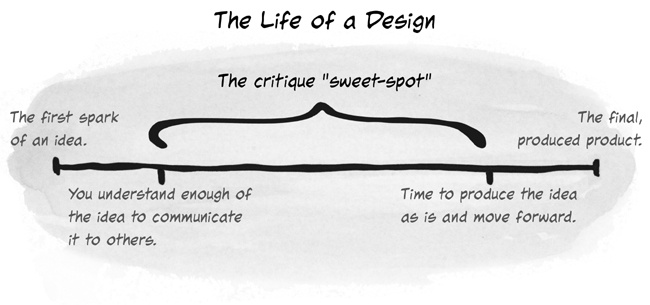
Taking these things into consideration, we can place two points related to these considerations on a timeline that represents the life or “baked-ness” of a design, as illustrated in Figure 4-1.
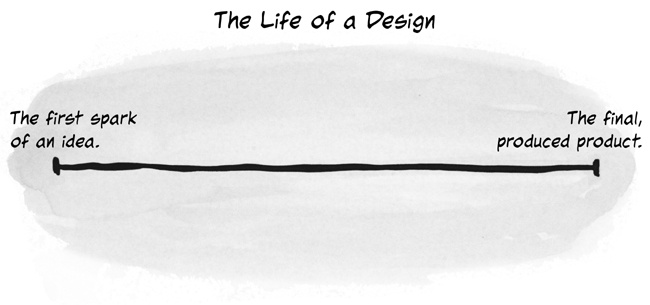
Early critique
The leftmost end of the timeline represents the very first spark of an idea. At this point, things are very abstract and our own brains are still trying to make sense of the connections between aspects of the ideas that are coagulating in our minds. Think of it as the early embryonic stage of a baby’s development (note I didn’t say what kind of baby). It’s just a lump. We still don’t really know what it might be. Maybe it will have two arms, maybe eight. Or maybe it will have wings, and fangs, and shoot laser beams from its eyes and... well, you get the idea.
The gist is that at this early stage, we still need to develop our thoughts around the solution a bit more. If we tried to share them with others so that we could get their critique, we’d likely confuse the heck out of them because the idea itself isn’t clear enough even to ourselves at this point. As soon as the first person asked us to clarify things, all we would be able to answer with is “I don’t know.”
To be able to critique, we first need to have enough of our own clarity around the idea so that we can clearly communicate it to others. This marks the first point that we can plot on the timeline, as depicted in Figure 4-2. Before it, critique is premature. It doesn’t mean that we must wait until we’ve figured out every single detail and can thoroughly answer any question asked. In fact, at this early stage, there will still be a lot of details left to figure out and questions whose answers aren’t known. That’s alright.
Later critique
The rightmost side of the timeline represents the fully developed, or “fully baked,” solution. At this point, whatever is going to be created has been. It’s done. It’s out in the world and it is what it is. Nothing more can be done to change it.
Those of us who work in digital products or services or who have any understanding of design philosophy recognize that this state is considered a fallacy. We can always learn from what we’ve created, iterate on our ideas, and release a New! Improved! Design!
Thinking in practical terms, specifically those of the design and production processes, we know that there is a point at which we have to let something go and allow it to be built with whatever details specified at that point in time. Then, we wait for the chance to work on it again and take it further—the next iteration or phase, if you will. There are processes and methodologies such as Lean and Agile that work to minimize the time between and maximize the frequency of iterations. But that point, that “time to let it go, even if just for a bit” is always there.
That point is the second point on the timeline (see Figure 4-3); it’s the point at which we need to stop iterating for whatever amount of time, so that something can actually be produced. Often this point coincides with sign-offs, approvals, and design reviews (which we’ll talk about in a bit).

Finding the sweet spot
The space between the two points in Figure 4-3 is where critique is most immediately useful. Yes, it can be argued that we can still critique in the time to the right of the second point (we just need to wait until things circle back again before we can do something with the feedback). But here we’re thinking about critique that is immediately useful; that is to say, the designer can walk away, think about the insights that were shared, and right away begin to iterate on the solution.
Now, the amount of time on either side of and between these two points will be highly dependent on any number of factors: the scale of the problems you’re trying to solve, the scale of the idea itself, your team, your process and methods, and so on. We can’t say that the first point comes exactly two days after the idea begins to form and then there’s three weeks between when critique is useful and then another four days when it isn’t.
Often these points are described in terms of percentages. For example, the best time to critique a solution is after it is 20 percent baked but before it’s 80 percent baked. These kinds of labels can be useful in helping us to think and talk about when critique is useful, but they still have the possibility of being taken a bit too literally for our comfort. Instead, we think it’s best to understand the dynamics and criteria we’ve described here and then use your judgment. In some cases, you’ll get to that 20 percent mark very fast—maybe a matter of minutes or even seconds. Sometimes, it can take longer.

Within the cyclical, rapid pace of Agile projects, designs (and designers) can often become lost in the race to continue “feeding the Agile beast.” This makes thoughtful reflection on the design even more difficult to achieve. Perhaps not surprisingly, it is exactly in these iterative environments that critique is most needed. In a recent engagement, we were helping an enterprise client conceive and then launch a new digital subscription business. In the conceptual stages of the project, designs were rough—often produced on nothing more than Sharpies and A4 paper—in an effort to bring alignment and team cohesion to the new product vision. Critique was rare; most conversations focused on workflow, customer needs, and integration into existing client and customer workflows.
With continued experimentation and testing, the team gained more certainty about the product’s direction. With increased certainty comes increased fidelity. Our designer (the only one on the team at the time) was tasked with daily refinements of the interaction design as well as an ever-improving visual design. Week-long iterations, filled with continuous customer feedback and cadenced client reviews, allowed little time for design reflection of critique. Making things more challenging was the small size of our team: just four people made up of a product manager, two developers, and the designer. Our build/measure/learn cycle was the main source of design input.
Although the product features and workflow were improving on a weekly basis, there was a strong sense from the team that the design was stagnating. With engineers writing and refining features, the product manager liaising with client and customers, and the client scrambling to provide content on a timely basis, the challenge became pausing long enough for insightful design reflection to take place. In addition, we had the incremental challenge of integrating this new product into a suite of services and offerings of a client brand that had been around for decades. The design couldn’t fall short.
Twelve weeks into this cycle the team realized that without meaningful design conversation, the product’s success would be limited to early adopters and brand loyalists, not the broader new audience the client was seeking. With constant urging from the designer at first and the broader team second, the client finally agreed to add a designer. With the addition of this new team member, design responsibilities were now split between two people, making conversation possible at a tactical level between the two practitioners. In addition, this gave both designers the time they needed to be more thoughtful in their work and to seek out feedback both internally and from the client.
One of the first things to fall by the wayside in Lean validation work is design critique. This is natural because the refinement of the design is not essential if the product ideas are wrong. However, when product ideas, customer needs, and solution approaches gain traction, it’s important to remember that great design differentiates products and focus needs to be shifted to this work. Adequately integrating critique into a Lean or Agile environment requires a few things:
- Ensure that designers aren’t limited in their ability to seek out critique
Tasking one designer with interaction design, visual design, content, research, and frontend coding limits that person’s ability to seek out and incorporate meaningful feedback into their design work. It’s important to add designers on to the team to help distribute workload, provide practitioner-level critique, and ensure design details aren’t being missed.
- Set expectations about when and how frequently critiques will occur
There is a tough balance to maintain between clients who love seeing (and can easily react to) design work and the need to validate early product ideas. Set client expectations that design critique meetings will begin at some point during the project and will become increasingly frequent as features mature and customer feedback increases.
- Keep discussions broad at first
Design critique sessions early in the Lean validation process can sometimes prove too tactical yet need to be brought back in as soon as product ideas reach a threshold of market validation. Keep critique sessions focused starting initially with a style guide–level critique targeting product-wide elements and then digging into tactical critiques that look at unique elements and implementations across the product suite.
Agile processes are iterative. Design processes are also iterative. Their natural integration is not only inevitable, it’s tailor-made. Just as code is reviewed regularly in these processes, design critique must also become commonplace. The techniques shared provide a framework for starting the Agile critique initiative. As with any process, the recommendations are just that, starting points. Pay attention to the unique needs of your organization and adjust these frameworks to reflect your industry and culture’s unique needs.
How Often Should You Critique?
Early on in our exploration into critique, Aaron and I were asked by an audience member at one of our talks if there is such a thing as “too much critique.”
I (Adam), in a bit of zealotry and over-enthusiasm replied, “No. Not at all!” And then I went on and on about how critique was the best thing to ever happen to modern civilization. Well, not really... but you get the picture.
We wish we could find that audience member and apologize.
Having had much more time to work with different teams and organizations as well as listen to the experiences of many, many people, we agree that yes, there is absolutely such a thing as too much critique. As with timing though, there isn’t a specific number or formula that indicates exactly how much is too much. Instead, it’s an innate sense or sensitivity that a team or individuals develop over time as their skills and comfort with critique improve. It’s the sense that critiques are no longer helping or contributing to the momentum of the solution or the project; instead, they are possibly inhibiting it.
There might be too much critique when the team begins to sense that the amount of advancement between critiques is so small that it makes it feel as though progress has stalled. Or, perhaps when critiques are just talking in circles and the changes being made as a result of the insights collected in those discussions aren’t doing anything to advance the design, it might be the case that there is too much critique or it is happening too often.
Or relatedly, if members of the team feel that critique—more specifically formal critiques—are being required so frequently that they can’t push the design forward enough between them, there might be too much critique.
Additionally, if critiques begin to be seen or used by team members as a validation mechanism because there isn’t enough confidence in their ideas either by the team or the designer themselves, there might be too much critique.
Answering the question of how often to critique is too nebulous to take on. Your needs will be different depending on the individuals and team. Given the scale of what you’re looking for feedback on, sometimes you’ll want critique very frequently, sometimes not so much. With practice, you’ll know when the time is appropriate.
The key is honing that sense of when it’s right and when it’s too much, and that only comes with practice. Be flexible. As you try incorporating critique at various points and times and frequencies, think about whether it feels like too much or too little. Talk with other members of the team and get their perspectives. Adjust your timing and try some more.
What Should You Critique?
Another common question that Aaron and I hear is, “What should we be critiquing? Sketches? Wireframes? Visual Design Comps? Prototypes?”
The answer is, yes, all those and more.
Anything you want to improve can be critiqued. The documents listed above (sketches, wireframes, and so on) are all representations of a solution. The form of documentation doesn’t matter. If you’re looking to iterate and improve the solution, critique it. Going further, it isn’t just the design we create for our project that we can critique. We can critique any and all of the artifacts we create: personas, scenarios, journey maps, whatever. We can critique the tools, methodologies, processes, and so on that we use. We can critique it all. We really can... Critique. All. The. Things.
But what changes when you go from critiquing a wireframe to a visual design mockup? Or how about design principles? What’s different when you’re critiquing those?
No matter what you’re critiquing, the framework stays the same. What are the objectives? What elements or aspects of the product relate to those objectives? Are those aspects or elements effective? Why or why not?
What changes when critiquing different artifacts or design elements are the objectives against which you’re analyzing. The objectives for the product will carry through in critiques of any and all aspects of the design, but some will be more pertinent at times, depending on what you’re analyzing. For example, the color pallet you choose might or might not be relevant to a goal of increasing authenticated visits to your website or reducing calls to the support desk.
Different aspects of the design can also have their own unique objectives. Often, we see these in the form of principles and best practices. A team might establish principles that are specific to interaction design or some specific to visual design. Each of these, in turn, has its own best practices that should be considered.
This extends beyond the design to anything else you might critique, too. For example, if a team is working on establishing design principles, what it comes up with could (and should) be critiqued against best practices for creating design principles.
So, regardless of what’s being critiqued, the structure of the conversation doesn’t really change. What does change is that against which the object being critiqued is being analyzed.
Collaborative Activities
As design practices mature within individuals and organizations, collaborative activities are playing a larger role in the process. Often referred to as workshops or working sessions, these activities pull together multiple people to work on solving a problem simultaneously and collectively.
Because of their usefulness as both an iteration driver and as a consensus builder (see Chapter 1), critique can be a powerful activity to incorporate into collaborative activities.
Enter the Brainstorm
One of the most common “activities” in a workshop is the brainstorm. The idea behind brainstorms is that, as a group, people can come up with more potential solutions to a challenge than if they worked individually.
Although it’s a nice idea, we can’t say that we’ve often seen it work out that way. Instead, what we commonly see in brainstorms, following a presentation of the challenge to be solved, is a period of silence. Then, one person proposes an idea. Other participants then begin to analyze the idea and discuss why it might or might not work, while the remainder of the team is trying to come up with their own ideas. Then, someone else proposes a second idea. That idea might be completely new, but it’s more than likely that it’s a variation on the previous idea. The discussion picks up again, now analyzing both presented ideas, and this pattern repeats one or two more times. It’s rare that we’ve seen brainstorms executed this way produce more than a handful of unique ideas.
The problems with brainstorms as they’re commonly executed are many.
Brainstorms lack focus
In many of the brainstorms we’ve observed the challenge to be solved has not been adequately defined or broken apart to allow people to come up with ideas. Often it can feel like someone on the team encountered a problem, determined she couldn’t or shouldn’t solve it on her own, and so dropped everything to call everyone together in the hopes that magically after a few hours they’d have a solution.
Brainstorms lack structure and facilitation
Coordinating the mental processes of a group of individuals isn’t easy, but it’s essential to productive collaborative activities. When everyone is working in different directions, it can be impossible to resolve questions and find agreements.
Brainstorms devolve quickly into design-by-committee
Often, because of the limited ideas, lack of structure, and pressure to have a solution at the end of the session, brainstorms often shift to a goal of getting everyone in a room to say yes to a solution without much regard as to whether it’s the right solution.
Now, this doesn’t mean that brainstorms are bad and should be avoided. Harnessing the power of a group and the fact that you have many minds working on a challenge in order to find as many solutions as possible is a worthy and righteous goal. A good idea can come from anywhere and the best way to find great ideas is to have lots of ideas.
However, we need to put some thought into how we go about planning and running brainstorms. Let’s take a look at a very simple framework that can instantly improve the quantity and quality of ideas your team conceives.
Building Better Brainstorms
Let’s think about the objectives of the average brainstorm. Of course, the primary objective is to come up with lots of ideas—as many as possible. But more often than not, we also have the objective of figuring out which one of the ideas the team should pursue. And if we’re doing things right that idea should be the one the team feels most works toward the goals we’re trying to achieve.
With those objectives in mind, let’s take them one by one.
Generate as many ideas as possible
Why is it that brainstorms often struggle to generate more than a handful of ideas? The answer is simple, and it’s a phrase we’ve used quite a few times already, though not in reference to an obstacle: critical thinking.
Critical thinking is the nemesis of creative or generative thinking. With critical thinking we’re trying to determine if an idea will or won’t do what we want it to. The problem with most brainstorms is that we’re not doing anything to prevent participants from thinking critically. So, not only are some participants spending their time and energy thinking about the ideas that have been presented—meaning they aren’t coming up with more ideas—but other participants who might be coming up with ideas aren’t sharing them because as they’re coming up with them, they’re analyzing them prematurely. Thus the group that’s formulating new ideas determines that they aren’t worth mentioning and keeps those ideas to themselves. This is exactly what we don’t want to happen!
Additionally challenging to coming up with lots of ideas in a brainstorm is the way in which participants are pushed to interact and discuss things almost immediately after being presented with the challenge to be solved. This means that before an individual is even able to form his own perspective on the challenge and possible solutions, he’s forced to listen to, make sense of, and discuss the perspectives of others. It’s pretty hard to come up with ideas when all that’s going on.
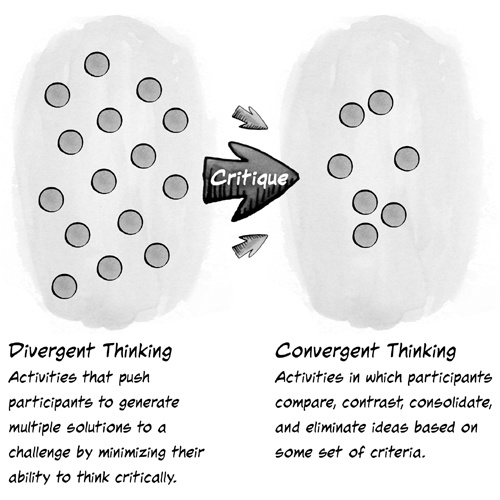
To generate lots of ideas, we need to utilize activities that minimize or remove the opportunity for critical thinking and give individual participants an opportunity to form their own perspective. These kinds of activities are called divergent thinking activities. These are activities that push participants to consider lots of possibilities without consideration of their validity. How do they remove or minimize critical thinking? Well, sometimes it’s just a matter of a good facilitator watching out for it, but more often than not, these activities involve some kind of time limit and a challenge. For example: sketch six to eight ideas for this interface in five minutes.
OK. On to our second objective.
Determine which idea to pursue
This one isn’t so difficult. As we mentioned, most brainstorms do already do this, just badly. If we began our brainstorm with divergent thinking activities, the activities we want to do here are convergent thinking activities. These are activities that push participants to compare, contrast, consolidate, and eliminate ideas. This is where participants come together to discuss ideas and collaboratively determine what to do with them. At the end of this process, by virtue of consolidating and eliminating ideas, we’re left with far fewer solutions than we started with.
Which leads us to the final objective.
Ensure that the idea(s) you’re left with are the strongest ones
Consolidating similar ideas only goes so far in shrinking our pool of possible solutions. Elimination, or more specifically, deciding which ideas not to pursue, is really the key to figuring out what we’re going to pursue. Some ideas will be easy to eliminate; they might be cost or time prohibitive, or maybe they involve acquiring the magical horn of the last purple unicorn from the far-away land of Trilandia. But what about the rest?
Voting is a common mechanism used to determine which ideas should stay in the fight. Participants vote on the idea or ideas they think are strongest. But it’s more than likely that the criteria each participant is using for making that decision varies and might or might not have much to do with the goals of the project.
Enter critique
By incorporating critique as a precursor to voting or a voting-like activity, we prime the pump, so to speak. We get participants thinking about the ideas that have been presented through the lens of the agreed-upon objectives for the product. By way of conversation, we’ve likely already begun to see where consensus lies with regard to which ideas are strongest relative to the objectives, even before the vote takes place.
Taken all together, these considerations give us a very simple framework for our brainstorms, which you can see in Figure 4-5:
Divide your time into two main phases.
In the first phase, utilize divergent thinking activities with which you can generate a large number of possible solutions without concern about their validity or quality.
In the second phase, plan for convergent activities that push participants to examine the proposed ideas, looking for ways to categorize, consolidate, and eliminate ideas.
Incorporate critique as part of the second phase to ensure that ideas are being kept or eliminated based on their strengths with respect to the product’s objectives.
An Example: Design Studio
Adam and I are big fans of the Design Studio methodology. Design Studio is a perfect example of the framework we just mentioned in action. The technique itself is based upon architecture, industrial design, and some art schools where “studio” is the core component of the curriculum. Studio classes follow a basic iterative structure in which students are presented with a challenge, asked to generate a number of possible solutions, and then present those solutions to the instructor and class for critique. Based on that critique, the students then go back and refine a subset of their ideas, to be presented and critiqued again. This pattern repeats until an end solution is determined and continually refined.
The methodology was adapted to digital design practices and popularized by Todd Zaki Warfel in many presentations; it is noted in his book, Prototyping: A Practitioner’s Guide (Rosenfeld Media, 2009).
Although there are many variations on the methodology, there are a few core criteria that remain consistent:
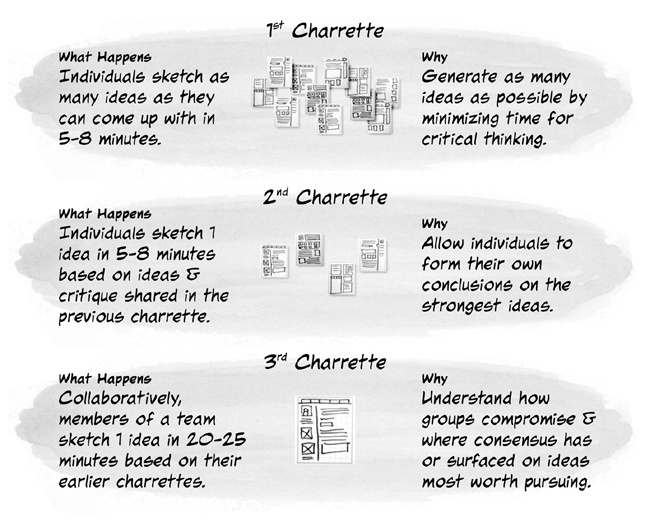
The order of activities within one phase, called a charrette, of a studio is always sketch > present > critique.
There are at least two charrettes. Three is a more commonly used number.
The first charrette is always individuals sketching their own ideas for the given challenge.
Adam and I have been using Design Studio with our teams and clients for years now and have had a lot success using it to get teams to collaboratively work to define interfaces for apps, websites, and other products. What follows is the setup we’ve developed and refined over the years.
We use a three-charrette model. Each charrette has a set time that allows for sketching concepts, presenting them to other participants, and receiving critique. Participants are broken up into teams of no more than six individuals. If there are not six participants to a team that is OK. Ideally, three to six participants works well for the exercises. Teams are constructed so that to the degree possible they are cross-functional; that is, we don’t have one team comprised completely of designers and one entirely of developers. A facilitator (or two) helps keep time for the exercises, ensures the meeting stays on track, and remains available for questions.
Preparation
Participants should be equipped with the problem statement for the product they’ll be designing. They should also be given the product’s business goals, scenarios, personas, and any other previously agreed-upon artifacts that will provide the context needed for their designs. It is very helpful to the participants if they aren’t seeing these items for the first time, so we work to get them distributed before the session.
It’s also important to have the right tools ready. You can find almost all of these tools at an office supply store and they are relatively inexpensive. Here’s what we typically use (see also Figure 4-6):
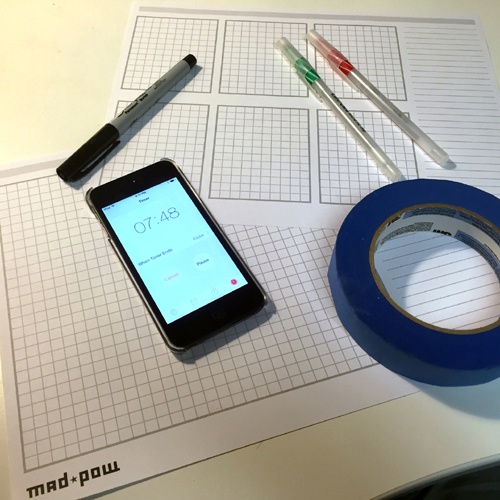
A timer for time-boxing each charrette. Time-boxing is nothing more than putting a limit on the amount of time for an activity.
Paper for sketching. We use two kinds, 6-ups and 1-ups. Don’t get put off by the names; it’s just grid paper. 6-ups are pages broken down into six small grids, and 1-ups are one large grid. Really, any paper will do, but we use these because the smaller spaces on 6-ups used in early charrettes restrict participants from including too much detail.
Black markers for sketching. We don’t let participants use pencil—having the ability to erase can slow people down. Also, because markers draw thicker lines, they prevent people from getting too detailed.
Red and green pens for the critique sessions. During critique, you can use green pens to mark the elements of a design that are considered particularly strong, or those that could be strong with more work. Use the red pens to mark elements that are considered ineffective or provide little value toward the product’s objectives.
Painters tape to post sketches to the wall during critiques. Posting to the wall requires the designer to stand with his team. At times, we’ve noticed that in presentations designers will hold up their sketches and stand behind them as if they’re some sort of barrier between themselves and the rest of the team. Taping things up to the wall eliminates this.
The activity
The format of charrettes is as follows (see also Figure 4-7):
- Charrette 1
Participants are given eight minutes to sketch as many concepts as they can come up with using the 6-up paper.
The goal of this round is for the participants to generate as many ideas as possible without over thinking things. Often, we’ll challenge participants to see if they can come up with at least five ideas.
When the time is up, participants post their sketches on the wall, present their ideas to their teammates (three minutes), and receive critique on them (four to five minutes).
- Charrette 2
Participants take the feedback they heard during their critiques as well as the ideas and feedback that they heard their teammates present and receive and revisit their sketches. The participants now have eight minutes to iterate on their previous sketches and come up with a singular concept, again using 6-up paper. This allows individuals to form their own conclusions based on the strongest ideas that came up during the critiques as well as go a bit deeper into details.
When the eight minutes are up, the team tapes their sketches to the wall and again presents their concepts and receives critique. Just like in the first round, the participants get three minutes to present their sketches and receive critique from their team for four to five minutes.
- Charrette 3
Participants are given 20 minutes to work collaboratively within their teams to come up with a singular design concept based on the critique they received in the last two rounds. By doing this, the teams work together to get a better understanding of how groups compromise and where consensus has been achieved.
When the time is up, teams present their concepts to the other teams to receive critique. The teams each have three minutes to present their ideas and seven minutes to receive critique from the other teams.
The aftermath
With the studio just about complete, we now have multiple concepts that are based on the ideas, critique, and compromise of each team. We next have participants talk about any common themes or patterns that emerged, making sure to document and share any open questions or assumptions that need to be validated.
It’s important to note that for most situations, we do not recommend using a studio to generate a single ultimate solution. In many cases, it’s unlikely that all of the considerations that need to be taken into account to determine a single solution can be addressed in the time constraints of a studio activity. Instead, as we use it, following the studio, the design team takes the ideas from the final charrette and works to create a single solution taking into account further analysis, critique, and other considerations and dependencies.
When Not to Use Design Studio
Design Studio is a great technique for quick collaboration, helping a team find consensus, and begin to see the direction that their design will take. But like any tool, it isn’t the best fit for every situation. Depending on your circumstances your project may not yet be in a position to utilize Design Studio or there may be circumstances that require you to rethink aspects of Design Studio or pursue a different approach all together. For example:
The problem hasn’t been framed adequately
If the problem hasn’t been adequately framed, there isn’t enough context and definition to guide the team in generating ideas. Participants are left to generate ideas based on their individual understanding of the problem that is being solved. And they may struggle to generate any ideas because the lack of framing leaves the problem too nebulous with too many potential solutions to explore.
The problem has been framed, but there is no agreement on the framing
In some cases, we find that a portion of the team, perhaps the designers or researchers, has worked to frame the problem, but that framing hasn’t yet been shared, understood and agreed upon by the team. This can often derail a Design Studio because, rather than generate ideas, the group will instead become mired in discussion and debate about what the framing should be. This is of course, an important discussion to be had, but if this discussion starts when you’re trying to kick off a Design Studio, it means that the group isn’t ready and you should have had this conversation earlier.
Alternatively, if you are able to get participants into the sketching phase of a studio without agreed upon framing, participants will generate ideas based on their own opinion of what the problem is, rather than a shared framing. This causes complications during the critiques and iterations in a studio because people are analyzing and judging the value of ideas on different sets of criteria.
A concept already exists from which the team can’t or won’t stray
Design Studio pushes participants to consider as many possibilities as they can come up with. This means that the ideas that emerge at the end of a studio may look very different than an existing design or product that the team already has. In order for Design Studios to be effective, the participants (and leadership) need to be OK with that. If the team has been instructed to make minimal changes to an existing design, then chances are they’ll struggle throughout a studio activity and with determining what to do with the ideas that arise from it.
The team is not open to using Design Studio
Design Studios require active participation. Everyone involved will be sketching, presenting and sharing their ideas. As such, participants need to approach the activity with attitudes that support it.
Some people just won’t have an attitude that fits. Some will hate the idea of having to share their ideas. Some will hate the pressure of being asked to come up with solutions. Some just won’t want to participate at all. In these situations it’s worth it to at least try to get people involved, but if they repeatedly resist, it is not worth forcing the issue.
Overly complicated remote situations
Design Studio is best executed in person; for this activity, there is nothing like collaborating and working together face to face. With that said, remote Design Studio can work (we both do them regularly with our teams) as long as expectations are clear from the beginning, teams are equipped with tools like document cameras, and a solid Internet connection is available. Things get difficult when participants experience connection issues, or when a participant is working from an environment with lots of background activity and distractions.
Another instance in which you might want to consider alternative techniques, is when you have unbalanced remote distribution of your participants. For example, if all but one person is located in one place, so everyone is working face to face except for the sole remote participant, it can become a bit difficult to work, particularly with respect to the group components of a studio. Or, if all your designers are in one location and your developers in another, it can be difficult because you don’t want your teams to be constructed entirely of people within the same role. The key is to think through how you’ll form your teams and how the people on those teams will interact and contribute. If you can figure out something that will work, you can probably pull off a remote studio. One common fall back for situations like this is to, regardless of who happens to be in the same location, have everyone participate virtually.
Conducting Design Reviews
Whereas standalone critiques and collaborative activities are great and recommended ways to incorporate critique into the design process, design reviews are a bit different.
Design reviews are a common type of meeting that we find in projects in most organizations. Sometimes they have different names. To clarify what we’re referring to, these meetings share the following characteristics:
They are generally meetings held toward the end of the design phase.
They include a goal of collecting approval from someone on the design thus far so that efforts can shift to some new focus—the design of a different set of functionality, a shift in process to development, and so on.
If approval is not captured, these meetings focus on identifying the changes that need to be made to obtain approval in the future.
Regardless of what they’re called, these meetings can be seen as a form of “gate,” something that the design and team needs to pass through in order to proceed to something else.
Because a design—and changes to it—is being discussed in these sessions, they are often where teams we’ve worked with expect critique to be happening. However, even though feedback is a part of design reviews, they are not the same as critiques. The goals and logistics of these sessions in many cases make design reviews challenging for critique.
The Challenges Design Reviews Pose to Critique
Their intended outcome is approval
As previously mentioned, these sessions are typically held for the purpose of getting an approval or sign-off of some kind, an agreement that it’s OK to shift the focus of work onto something else.
Even though their main activity is discussion of the design, the objective of these discussions is very different from those of a critique. Critiques are held with the intention of iterating on the design. It is understood and expected by all those involved that the design will be worked on further. The critique discussion is a tool used to inform where and how it might be iterated upon.
Specific changes are given as feedback
Because of this difference in objectives, in instances where approval isn’t received in design reviews, the feedback collected is often in the form of a list of what needs to change or be improved in the design. The thinking here is along the lines of, “It isn’t ready yet, but if you do these things and show it to us again, we’ll give you the OK.”
As we’ve shared in earlier chapters, though, critique isn’t about problem solving and specifying solutions. This is directive feedback and it is problematic to critique for a number of reasons.
Too many people and people with the wrong intentions are involved
The majority of the people we find in these meetings are there to ensure that their own list of interests and requirements are present in the final design, not necessarily comparing the design to its objectives to determine what might or might not be effective. When this is the setting, motives are skewed and goals are much different than in a normal critique session.
Additionally, because design reviews are usually to get approval, the group in the meeting is often too large to have productive conversations. Adam was once involved in a design review with more than 70 people in attendance, most by phone. How is it possible to have a productive, coherent conversation with that many people all trying to make sure their voice is heard?
Design review timing is determined by the project’s timeline
The timing of design reviews is usually determined by a project’s timeline and often held toward the end of a design phase or release cycle. Not only does this timing impede a team’s ability to collect and make use of critique because there isn’t enough time following the review to fully utilize it, but it is completely disjointed from when a team might actually need critique.
We should be able to conduct critiques whenever it’s useful for designers to understand the impact or effect of the choices they’ve made so far in order to iterate further on their creations. This typically means that effective critiques can begin fairly early in the design process and are held numerous times throughout.
Addressing the Challenges of Design Reviews
None of this is to say that design reviews aren’t a necessity. For some organizations, the need to gather everyone and collect approvals or sign-off is going to be essential. And, even though the intention behind critique differs from design reviews, the utility of the techniques we share in this book is to make feedback more useful in informing design decisions. If you’ve found these meetings and the feedback collected from them to be challenging, using techniques for gathering and facilitating critique can go a long way to making them better.
Specifically, to address the challenges design reviews present, we recommend the following to help prepare and get the most out of them.
Take control of the review
This doesn’t mean that you need to hijack the meeting, per se, but try to get into as much of a lead role as possible. If you can be the one to set up and organize the meeting, do it. If you can be the one to lead and facilitate the meeting, do it. This way you have an opportunity to work toward steering discussions so that they focus on comparing the design to its objectives, not just whether it has approval. This will give you the opportunity to measure the feedback against the goals and the intended outcomes, and in so doing, help in getting actionable feedback.
Recap the objectives
To the degree you’re able to, remind people of the agreed upon objectives for the design. If you’re leading or facilitating the meeting, review these at the beginning of the session. If not, when you have a chance to speak try to bring them up. By reminding the team of the objectives for the project, you can inform their thinking so that it stays closer to the intent of critique.
Use the techniques we suggest for dealing with difficult people
In Chapter 6, we cover techniques for handling situations that involve people behaving in a difficult manner during a critique. It’s inevitable that you’ll encounter them. In many situations, the behaviors exhibited by participants in a design review are very similar to those situations. Techniques such as direct inquiry and laddering as well as strong facilitation skills go a long way toward getting better, more useful feedback out of design reviews.
Do not rely on design reviews for critique
We should not rely on design reviews as the only form of critique. If we are regularly critiquing before and leading up to a design review, the review can serve its purpose. It can act as a focused forum for approval of designs. Additionally, the team will have established a shared understanding about the goals and progress of the designs leading to a more focused review with fewer personal agendas.
Wrapping Up
Critique’s primary utility is as an iteration driver. There are many, many opportunities for it to occur within our practice. Whenever we are looking to improve or iterate on an idea or process, or almost anything, we have an opportunity for critique.
There are three points within the design process that present opportunities for incorporating critique.
Standalone critiques (both formal and informal or ad hoc): These are meetings or discussions with the solitary purpose of critiquing a creation so that it can be iterated upon further.
Collaborative activities: Activities that bring team members together to work on idea generation and selection. Including critique in these activities helps teams identify where there is consensus around ideas with the most value to the product’s objectives.
Design reviews: Meetings that include some intention to collect sign-off or approval on a design. Although we recommend that these be handled separate from critiques, as feedback is collected during reviews, we can use many of the tools and techniques for critique to make the feedback collected as useful as possible.
No matter how you incorporate critique it’s important to remember the following:
Start small. The more people involved in a conversation, the more difficult it is to manage. When introducing or practicing critique, start with small groups or just pairs and build from there.
Think before you speak. Listening is paramount. How can you offer good feedback or act on the feedback you’ve received if you don’t accurately understand what you’re being told?
Choose participants carefully. Critique is not for everyone. Some people struggle more than others. To the degree you can, think about how you put people together to best improve their skills and comfort level.
Get Discussing Design now with the O’Reilly learning platform.
O’Reilly members experience books, live events, courses curated by job role, and more from O’Reilly and nearly 200 top publishers.

