A scanner is simply an enormous digital camera that points in a fixed direction: up. And just like a camera, your scanner comes with scads of settings that most folks live a long and happy life without ever adjusting. That’s where Windows XP’s built-in Scanner and Camera Wizard (the same one you learned about earlier in this chapter) comes in: It’s your ticket to a remarkably pain-free scanning experience. Follow these steps for quick, and easy scanning.
Clean your scanner’s surface, and place the photo you want to scan in the upper-right corner of the scanning bed.
Before scanning, always wipe the scanner’s glass bed with a clean, lint-free cloth. Add a little rubbing alcohol to the cloth for the really nasty goo spots. You want to remove every dust speck before those fibers end up magnified 200 times on your scanned image. Place your image in the corner for one simple reason: Doing so squares the edges, so the image sits nice and straight in the scanned image you create.
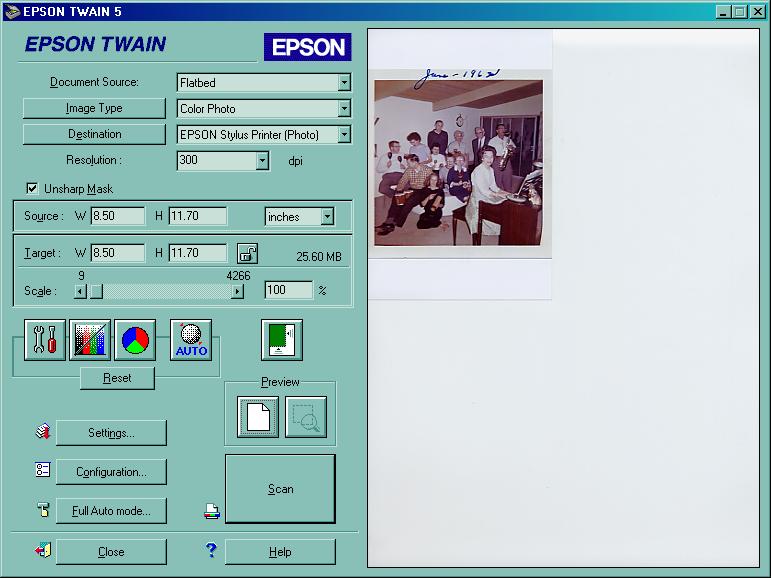
Figure 4-6. Choosing TWAIN from Photoshop Elements File → Import menu brings up this screen, which lets you tweak your scan’s color, size, and exposure settings, much like a digital camera’s manual controls. If you spot TWAIN listed on your graphics software’s menus, select it for a few test scans; you may prefer its controls over Windows XP’s built-in scanner wizard.
Turn on your scanner, choose the Scanner and Camera Wizard (if necessary), and then click Next at the Welcome screen.
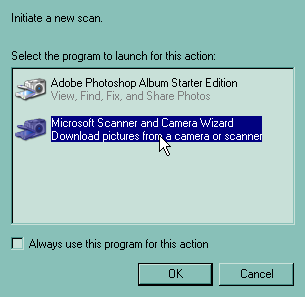
As soon as you turn on your scanner or plug it into your computer, the wizard appears with a greeting. When you click Next, the wizard lists all the programs on your PC capable of handling scans (Figure 4-7); your first decision is what program you want to handle the job. For the quickest and easiest scanning, choose Windows XP’s built-in Scanner and Camera Wizard, the same sorcerer that conjures pictures out of your digital camera.
Don’t see the wizard? You can summon it manually with a double-click of the scanner’s icon in My Computer. Don’t see the scanner’s icon? Then you’re probably limited to the software that came with the scanner, described in “Installing a Scanner” in Section 4.3.2.
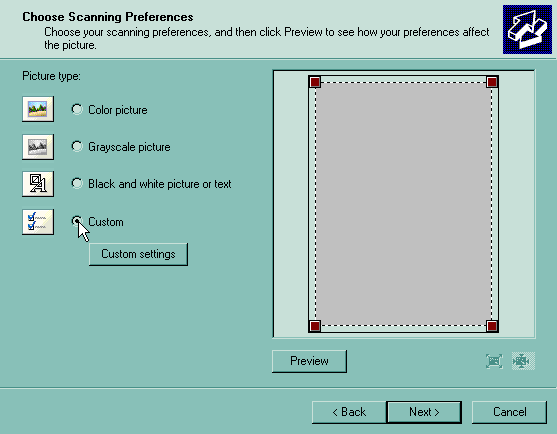
Choose Custom.
In an attempt to simplify matters, the wizard offers you three preset choices (in addition to the Custom option), shown in Figure 4-8, each tailored to match the image you’re scanning: color picture; Grayscale picture; and black and white picture, or text. Each is explained in step 5.
Figure 4-7. Turn on your scanner, and Windows XP lists all the software on your PC capable of handling scans. Choose the Scanner and Camera Wizard for creating quick scans and saving them as files on your hard drive. If you select a graphics program like Photoshop Elements, the wizard routes the scan into the software, letting you touch it up before saving it. That saves time when scanning old photographs, for instance, where you may need to repair tears and scratches.
However, those choices don’t take into account what you’ll be doing with your image. For instance, if you choose Color Picture, the wizard scans the photo in at a resolution of 150 dots per inch (dpi)—twice the size you need when sending through email. (See Section 1.2 for a quick primer on resolution.) For best results, skip the wizard’s preset options and tailor your scans by choosing Custom.
Choose the Resolution setting for your scan.
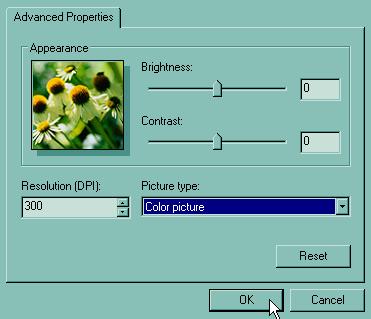
When you click Custom, the Properties box shown in Figure 4-9 appears. The wizard lets you choose any resolution your scanner offers. Resolution, measured in dots per inch (dpi), controls the amount of detail shown on your image, as well as its size. You want high resolution for printouts, for instance, but low resolution for items meant to be seen onscreen (like email). Leave the Brightness and Contrast controls set to 0; you can adjust these settings much more effectively using image-editing software like Picasa, EasyShare, or Photoshop Elements.
If you’re feeling overwhelmed by the resolution options, use this table for guidance:
Table 4-1.
Scanned Item or Destination
Its Resolution
Onscreen (for emailing photos or posting them on a Web site)
75 dpi
Miscellaneous letters, receipts, and text (for archiving)
150 dpi
Line drawings (for faxing or printing)
200 dpi
Photos (for printing)
300 dpi
Scan at resolutions higher than 300 dpi only when you want to enlarge something tiny—a postage stamp, for instance—to view minute details.
Figure 4-9. This Properties box lets you choose a resolution suitable for whatever you intend to do with your scanned image. The Resolution’s menu lists all the resolutions your scanner can handle, usually 50 to 2400 dpi or more, but you rarely want anything more than 300. As a general rule of thumb, choose 75 dpi for photos you’re going to email, 150 when using your scanner as a copy machine, and 300 for photos you want to print out.
Choose the type of picture you’re scanning.
The choices listed in the " Picture type” drop-down menu let your scanner know how many colors to grab. (There’s no sense making a color scan of Doonesbury if the cartoon ran in the weekly, black and white funnies.) Limiting the colors is an easy way to keep the file size manageable. Choose your image from one of these options:
Color picture. The natural choice for color scans. Selecting this option takes a color snapshot of anything you place on the scanner’s bed.
Grayscale picture. When scanning a black and white photograph or a newspaper clipping, choose this option. Doing so means your scan preserves up to 256 shades of gray, which is what most people consider to be black and white.
Black and white picture or text. Don’t choose this option for black and white photos, since the wizard narrows down the colors to either black or white, thereby turning Dalmatians into groups of small black spots. Choose this option only when scanning line drawings, text, diagrams, flowcharts, and other monotone items.
When you’re finished making all your selections in the Properties box, click OK.
Back in the Scanner and Camera Wizard main window, click the Preview button, lasso your image (if necessary), and then click Next.
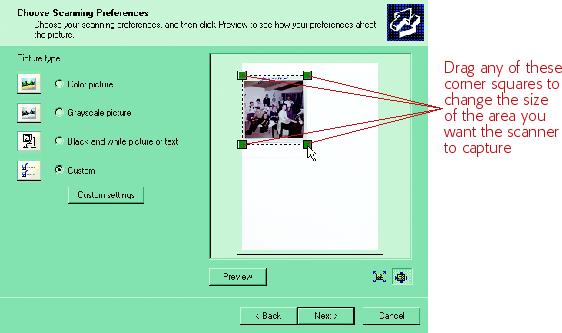
Don’t skip this important step: Clicking the Preview button tells the scanner to make a quick scan, locate your image’s position, and lasso it—outline the image’s edges with a little square. By locating the image, the scanner then knows to scan only that portion of its bed. If you skip the preview, the scanner simply scans its entire bed, creating a huge file with your image floating somewhere inside.
The wizard’s usually pretty good with its lasso, but if it’s a little off target, drag inward or outward on the lasso’s little corner squares, as shown in Figure 4-10, until it completely surrounds your image.
Figure 4-10. When you click the Preview button, the scanner locates where you placed your item on the scanner’s bed. The dotted outline indicates movable borders. The wizard generally identifies the perimeter of your item fairly accurately, but often leaves out the white border around printed photographs. If you want your scan to include the border, drag the corner squares out a bit.
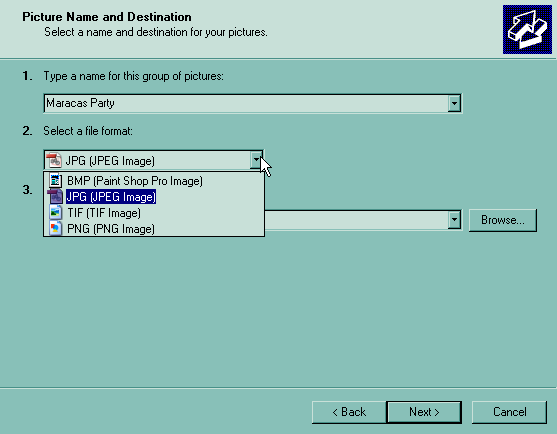
Choose a file format that matches your scan’s contents.
The Picture Name and Destination dialog box, shown in Figure 4-11, also appears when you retrieve photos from a digital camera, but with one major exception: The scanner lets you choose the format it uses to save your file. Here are your options.
BMP (Bitmap image). Avoid this option, as it creates files large enough to store blimps. Nevertheless, graphics programs always offer it because BMP’s been around for years, and nobody collects patent fees on the format.
JPG (JPEG image). The best choice for photographs. JPG (Joint Photographic Experts Group) compresses photos by removing subtle nuances imperceptible to most mortal eyes.
TIF (TIF image). Choose TIF (Tagged Image File Format) when you can’t afford to lose any quality—when creating archives of family photos, for instance, or sending images to a print shop. The images are substantially larger than JPGs, but sometimes quality’s more important than saving on storage space.
PNG (PNG image). PNG works best for color images with smooth, defined edges—logos, for instance, color charts, or line drawings. Most Internet browsers support PNG (Portable Network Graphics), which is slowly replacing the old standard, GIF (Graphics Interchange Format).
Choose a descriptive name for your scan, select a folder in which to store it, and then click Next.
After choosing the file format, enter a descriptive name (in the “Type a name for this group of pictures” box) and select a storage folder for your scan. The wizard creates a folder with that name inside your My Pictures folder, and tosses in your scan using that same name. (Alternatively, you can click the Browse button if you want to select a folder on your PC that already exists.)
Figure 4-11. Choose JPG as the file format for most scanned photos. See step 7 in Section 4.5 for a review of when you’d want to pick the other file types.
Choose Nothing to exit the wizard.
The wizard offers the same three choices as when you use it to transport digital photos to your PC. None really belong here—few people would order prints of something after they’ve just scanned the print version—so choose Nothing. The wizard closes, dropping you off in the folder that holds your newly created scanned image file.
Once your photo’s turned into a file, you can email it as an attachment (Chapter 15) or print it (Chapter 16).
Get Digital Photography: The Missing Manual now with the O’Reilly learning platform.
O’Reilly members experience books, live events, courses curated by job role, and more from O’Reilly and nearly 200 top publishers.

