Many digital photographers have a difficult time keeping their horizons straight while peering into their digicam’s LCD monitor. Here’s how to straighten things up.
For some reason, it’s more difficult to compose a straight horizon line with a digital camera’s LCD monitor than with a traditional SLR viewfinder. You could use the optical viewfinder that’s included with most digital cameras, but the problem is that many of them show only about 85% of the actual area that’s being photographed. Plus, quite honestly, they’re not that accurate.
Regardless of how you frame your shots, LCD or optical, a bubble level attached to your camera can really help straighten things out. Bubble levels are helpful for composing architecture, landscapes, panoramas, and anything else that needs a straight horizontal line.
At various online retailers, you can buy bubble levels designed specifically for cameras. For example, the Hama Double-Bubble Level is a precision instrument that slides into the hot shoe atop your camera, enabling you to level it on two axes. The only downside is that these accessories are relatively expensive. The Hama level, for example, runs about US$30.
If you have more time than money, you can make your own bubble level. Hardware stores carry pocket bubble levels, often for US$3 or less. Find one that looks suitable for your camera. If your model has a hot shoe, all you have to do is find a spare shoe that will slide into it. This is one reason why I have a box of old equipment that includes broken cameras, dead flashes, and orphaned straps. If you have an old flash or any accessory that was designed to fit in your camera’s hot shoe, you can detach the foot and attach it to your bubble level with a spot of glue. The trick here is to make sure the foot and the level are flush against each other when you glue them. Otherwise, your homemade device might not be accurate when you attach it to the camera.
If your camera doesn’t have a hot shoe, just get a level with a flat bottom and set it on top of your camera. As long as the level rests flush against the camera’s surface, you’re in business.
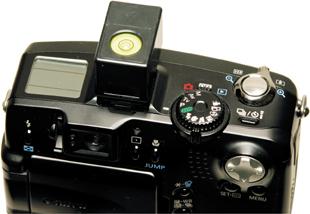
To use the bubble level, simply mount your camera on a tripod and attach the level. Adjust the tripod until the bubble is centered, as shown in Figure 1-9, and the resulting picture should be nice and square. This is particularly helpful when shooting multiframe panoramas.
Regardless of whether you buy a professional photographer’s bubble level or make your own, you’ll find that it will help you overcome crooked horizons and leaning buildings. Just like the carpenter says: measure twice and shoot once.
Get Digital Photography Hacks now with the O’Reilly learning platform.
O’Reilly members experience books, live events, courses curated by job role, and more from O’Reilly and nearly 200 top publishers.

