Chapter 4. Exploring the APIs
Now that you know how to create a new application in your choice of layout options and know how to request application permissions, it is time to explore the ways in which your application can interact with the iOS operating system. The AIR 2.7 release includes access to many iOS features. These include the accelerometer, the GPS unit, the camera, the camera roll, the file system, and the multitouch screen.
Accelerometer
The accelerometer is a device that measures the speed or g-forces created when a device accelerates across multiple planes. The faster the device is moved through space, the higher the readings will be across the x, y, and z axes.
Let’s review the code below. First, you will notice there is a
private variable named accelerometer declared of type
flash.sensors.Accelerometer. Within
applicationComplete of the application, an event
handler function is called, which first checks to see whether the device
has an accelerometer by reading the static property of the Accelerometer class. If this property
returns as true, a new instance of Accelerometer is
created and an event listener of type AccelerometerEvent.UPDATE is added to handle
updates. Upon update, the accelerometer information is read from the event
and written to a TextArea within the
handleUpdate function. The results can be seen within
Figure 4-1:
<?xml version="1.0" encoding="utf-8"?>
<s:Application xmlns:fx="http://ns.adobe.com/mxml/2009"
                  xmlns:s="library://ns.adobe.com/flex/spark"
                  applicationComplete="application1_applicationCompleteHandler(event)">
    <fx:Script>
          <![CDATA[
               import flash.sensors.Accelerometer;

               import mx.events.FlexEvent;

               private var accelerometer:Accelerometer;

               protected function application1_applicationCompleteHandler
                     (event:FlexEvent):void {
                     if(Accelerometer.isSupported==true){
                          accelerometer = new Accelerometer();
                          accelerometer.addEventListener(AccelerometerEvent.UPDATE,
                          handleUpdate);
                     } else {
                          status.text = "Accelerometer not supported";
                     }

               }

               private function handleUpdate(event:AccelerometerEvent):void {
                     info.text = "Updated: " + new Date().toTimeString()
                     + "\n\n"
                     + "acceleration X: " + event.accelerationX + "\n"
                     + "acceleration Y: " + event.accelerationY + "\n"
                     + "acceleration Z: " + event.accelerationZ;
               }

          ]]>
    </fx:Script>

    <fx:Declarations>
          <!-- Place non-visual elements (e.g., services, value objects) here -->
    </fx:Declarations>
    <s:Label id="status" text="Accelerometer" top="10" width="100%"
          textAlign="center"/>
    <s:TextArea id="info" width="100%" height="220" top="40"
          editable="false"/>
</s:Application>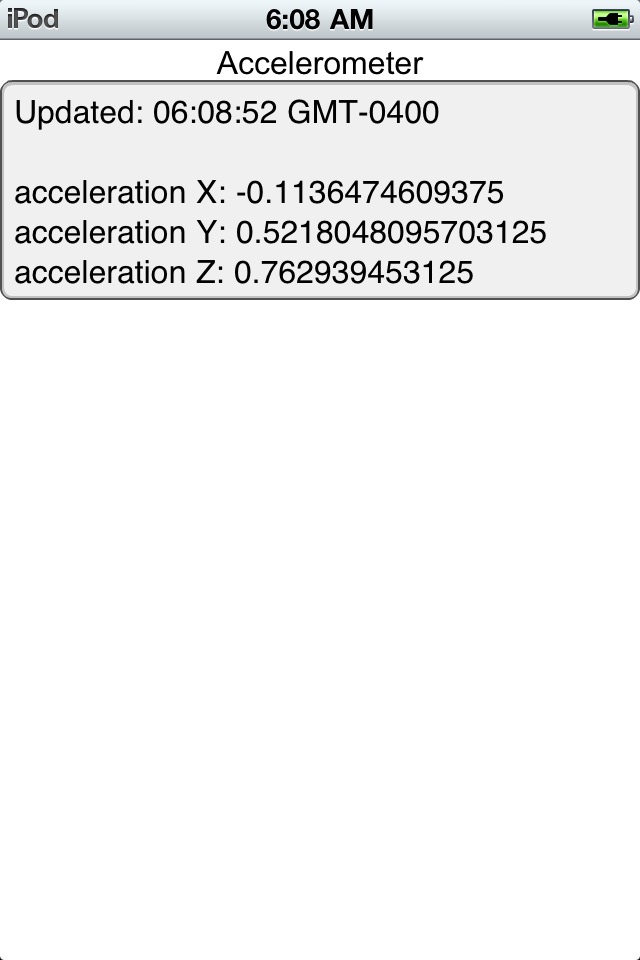
GPS
GPS stands for Global Positioning System. GPS is a space-based satellite navigation system, which provides reliable location information to your handheld device.
Let’s review the code below. First, you will notice there is a
private variable named geoLocation declared, of type
flash.sensors.GeoLocation. Within
applicationComplete of the application, an event
handler function is called, which first checks to see whether the device
has an available GPS unit by reading the static property of the
GeoLocation class. If this property returns as true, a
new instance of GeoLocation is created and the data
refresh interval is set to 500 milliseconds (.5 seconds) within the setRequestedUpdateInterval
method and an event listener of type GeoLocationEvent.UPDATE is added to handle updates.
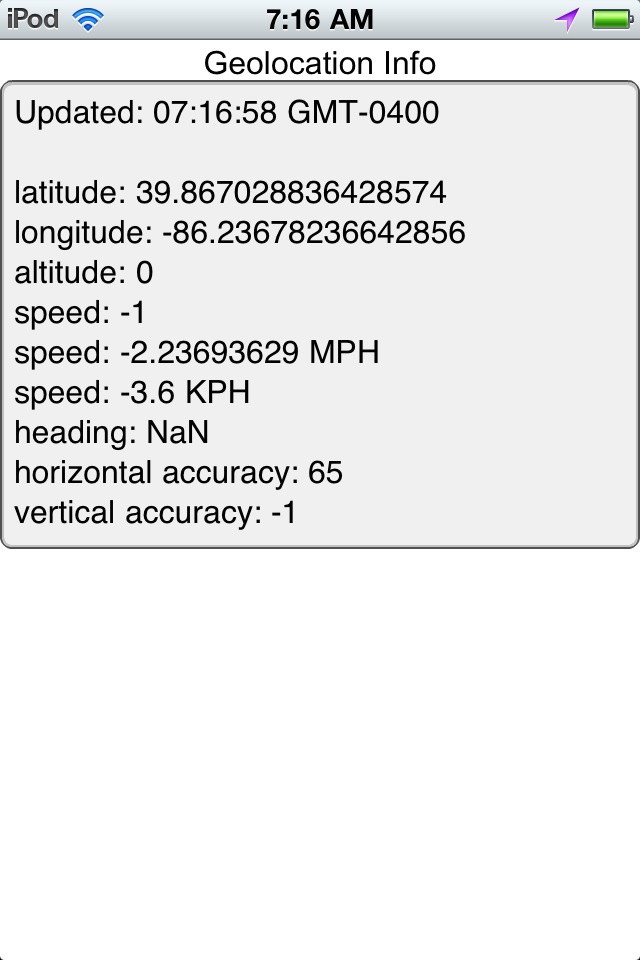
Upon update, the GPS information is read from the event and written to a
TextArea within the handleUpdate
function.
Figure 4-2 shows the warning message that iOS will give your user before your application can access the GPS unit. Note: there is also some math being done to convert the speed property into miles per hour and kilometers per hour. The results can be seen within Figure 4-3.
<?xml version="1.0" encoding="utf-8"?>
<s:Application xmlns:fx="http://ns.adobe.com/mxml/2009"
                  xmlns:s="library://ns.adobe.com/flex/spark"
                  applicationComplete="application1_applicationCompleteHandler(event)">
    <fx:Script>
          <![CDATA[
               import mx.events.FlexEvent;

               import flash.sensors.Geolocation;

               private var geoLocation:Geolocation;

               protected function application1_applicationCompleteHandler
                     (event:FlexEvent):void {
                     if(Geolocation.isSupported==true){
                          geoLocation = new Geolocation();
                          geoLocation.setRequestedUpdateInterval(500);
                          geoLocation.addEventListener(GeolocationEvent.UPDATE,
                              handleLocationRequest);
                     } else {
                          status.text = "Geolocation feature not supported";
                     }
               }

               private function handleLocationRequest(event:GeolocationEvent):void {
                     var mph:Number = event.speed*2.23693629;
                     var kph:Number = event.speed*3.6;
                     info.text = "Updated: " + new Date().toTimeString() + "\n\n"
                          + "latitude: " + event.latitude.toString() + "\n"
                          + "longitude: " + event.longitude.toString() + "\n"
                          + "altitude: " + event.altitude.toString()  + "\n"
                          + "speed: " + event.speed.toString()  + "\n"
                          + "speed: " + mph.toString()  + " MPH \n"
                          + "speed: " + kph.toString()  + " KPH \n"
                          + "heading: " + event.heading.toString()  + "\n"
                          + "horizontal accuracy: "
                          + event.horizontalAccuracy.toString()  + "\n"
                          + "vertical accuracy: "
                          + event.verticalAccuracy.toString();
               }

          ]]>
    </fx:Script>
    <fx:Declarations>
          <!-- Place non-visual elements (e.g., services, value objects) here -->
    </fx:Declarations>

    <s:Label id="status" text="Geolocation Info" top="10" width="100%"
        textAlign="center"/>
    <s:TextArea id="info" width="100%" top="40" editable="false"/>
</s:Application>
Camera UI
All recently manufactured full sized iPods, iPhones, and iPads have
cameras available. The flash.media.CameraUI class
allows your application to utilize the device’s native camera
interface.
Let’s review the code below. First, you will notice there is a
private variable named camera declared of type
flash.media.CameraUI. Within
applicationComplete of the application, an event
handler function is called, which first checks to see whether the device
has an available camera by reading the static property of the
CameraUI class. If this property returns as true, a new
instance of CameraUI is created and event listeners of
type MediaEvent.COMPLETE and ErrorEvent.COMPLETE are added to handle a
successfully captured image, as well as any errors that may occur.
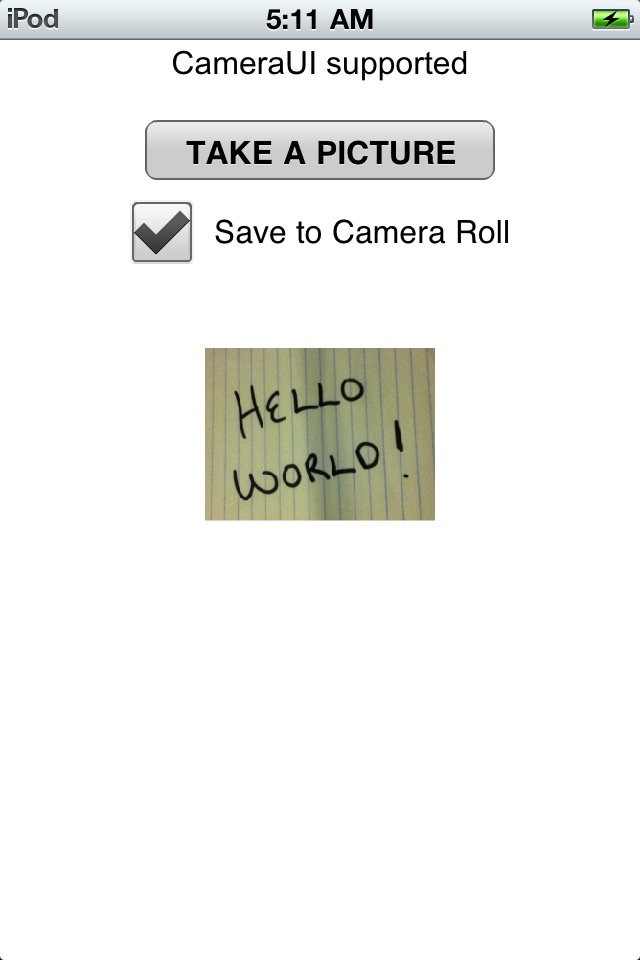
A Button with an event listener on the click
event is used to allow the application user to launch the
CameraUI. When the user clicks the TAKE A PICTURE
button, the captureImage method is
called, which then opens the camera by calling the
launch method and passing in the MediaType.IMAGE static property. At this point
the user is redirected from your application to the native camera. Once
the user takes a picture and clicks OK, the user is directed back to your
application, the MediaEvent.COMPLETE
event is triggered, and the onComplete method is
called. Within the onComplete method, the
event.data property is cast to a
flash.Media.MediaPromise object. Since iOS does not
automatically write the new image to disk like Android or BlackBerry
tablets, we are not able to simply read the file property of the
flash.Media.MediaPromise object to display the new
image within our application. The solution to this is to load the
flash.Media.MediaPromise object into a
flash.display.Loader. Within the
onComplete method, you will see a new
Loader being created and an event listener added to the
loader’s contentLoaderInfo property to listen for the
Event.COMPLETE of the loader. Finally,
the loader’s loadPromiseFile method is called with the
mediaPromise passed in. Once the mediaPromise is
loaded, the onMediaPromiseLoaded method is called. The
target of the event is cast as a
flash.display.LoaderInfo object and its loader property
is set as the source of the Image component.
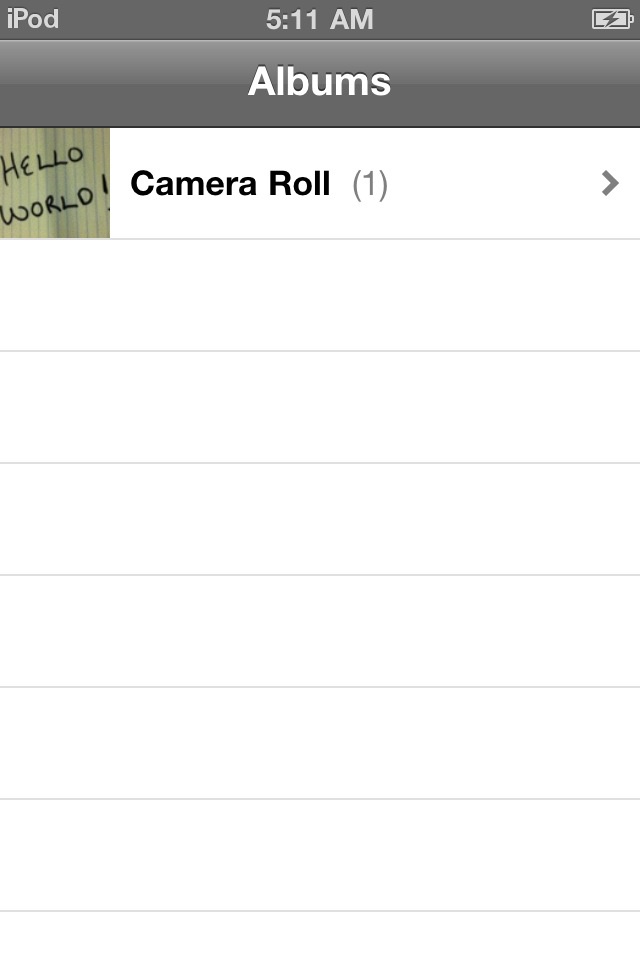
This example also demonstrates how to write the new image to the
CameraRoll so that it will persist on the iOS device.
Within the onMediaPromiseLoaded method, you will notice
that there is a test to see if the application has the permission to write
to the CameraRoll, by checking the static property
supportsAddBitmapData on the
CameraRoll class. In addition, I have added a
CheckBox that allows this function to be toggled on and
off so that we can easily test to see when images are being written to the
CameraRoll. If the
supportsAddBitmapData is true and the
saveImage CheckBox is checked, a new
flash.display.BitmapData object is created using the
data from the LoaderInfo and the
draw method is called. Finally, a new
CameraRoll object is created and the
addBitmapData method is called with the
bitmapData passed in.
Note
Utilizing CameraUI within your application is
different than the raw camera access provided by Adobe AIR on the
desktop. Raw camera access is also available within AIR on iOS and works
the same as the desktop version.
Figure 4-4 shows the application,
Figure 4-5 shows the native camera user
interface, and Figure 4-6 shows
the application after a picture was taken, the user clicked Use to return
to the application, and the new image was loaded. Figure 4-7 shows the new image
within the iOS Photos application
after being written to the CameraRoll:
<?xml version="1.0" encoding="utf-8"?>
<s:Application xmlns:fx="http://ns.adobe.com/mxml/2009"
                  xmlns:s="library://ns.adobe.com/flex/spark"
                  applicationComplete="application1_applicationCompleteHandler(event)">
    <fx:Script>
          <![CDATA[
               import mx.events.FlexEvent;
               import mx.graphics.codec.JPEGEncoder;

               private var camera:CameraUI;
               private var loader:Loader;

               protected function application1_applicationCompleteHandler(event:FlexEvent):void {
                     if (CameraUI.isSupported){
                          camera = new CameraUI();
                          status.text="CameraUI supported";
                     } else {
                          status.text="CameraUI NOT supported";
                     }
               }

               private function captureImage(event:MouseEvent):void {
                     camera.addEventListener(MediaEvent.COMPLETE, onComplete);
                     camera.addEventListener(ErrorEvent.ERROR, onError);
                     camera.launch(MediaType.IMAGE);
               }

               private function onError(event:ErrorEvent):void {
                     trace("error has occurred");
               }

               private function onComplete(e:MediaEvent):void {
                     camera.removeEventListener(MediaEvent.COMPLETE, onComplete);
                     camera.removeEventListener(ErrorEvent.ERROR, onError);
                     var mediaPromise:MediaPromise = e.data;
                     this.loader = new Loader();
                     this.loader.contentLoaderInfo.addEventListener(Event.COMPLETE,
                         onMediaPromiseLoaded);
                     this.loader.loadFilePromise(mediaPromise);
               }

               private function onMediaPromiseLoaded(e:Event):void {
                     var loaderInfo:LoaderInfo = e.target as LoaderInfo;
                     image.source = loaderInfo.loader;

                     if(CameraRoll.supportsAddBitmapData && saveImage.selected){
                          var bitmapData:BitmapData = new BitmapData(loaderInfo.width,
                              loaderInfo.height);
                          bitmapData.draw(loaderInfo.loader);
                          var c:CameraRoll = new CameraRoll();
                          c.addBitmapData(bitmapData);
                     }
               }

          ]]>
    </fx:Script>
    <fx:Declarations>
          <!-- Place non-visual elements (e.g., services, value objects) here -->
    </fx:Declarations>

    <s:Label id="status" text="Click Take a Picture button" top="10" width="100%" textAlign="center"/>

    <s:CheckBox id="saveImage" top="160" label="Save to Camera Roll" horizontalCenter="0"/>

    <s:Button width="350" height="60" label="TAKE A PICTURE" click="captureImage(event)"
                 horizontalCenter="0" enabled="{CameraUI.isSupported}"
                 top="80"/>

    <s:Image id="image" width="230" height="350" horizontalCenter="0" top="220"/>
</s:Application>

Camera Roll
The Camera Roll is the access to the camera’s gallery of images.
Let’s review the code below. First, you will notice there is a
private variable named cameraRoll declared of type
flash.media.CameraRoll. Within
applicationComplete of the application an event handler
function is called, which first checks to see if the device supports
access to the image gallery by reading the static property of the
CameraRoll class. If this property returns as true, a
new instance of CameraRoll is created and event
listeners of type MediaEvent.COMPLETE
and ErrorEvent.COMPLETE are added to
handle a successfully captured image as well as any errors that may
occur.
A Button with an event listener on the click
event is used to allow the application user to allow the user to browse
the image gallery. When the user clicks the BROWSE GALLERY button, the
browseGallery method is called, which then opens the
device’s image gallery. At this point the user is redirected from your
application to the native gallery application. Once the user selects an
image from the gallery, the user is directed back to your application, the MediaEvent.COMPLETE event is triggered and the
mediaSelected method is called. Within the
mediaSelected method, the event.data
property is cast to a flash.Media.MediaPromise object.
Since iOS does not return the file populated on the
MediaPromise, we are not able to simply read the file
property for display the image within our application like we can with
Android or BlackBerry. Instead, the solution is to load the
flash.Media.MediaPromise object into a
flash.display.Loader. Within the
onComplete method, you will see a new
Loader being created and an event listener added to the
loader’s contentLoaderInfo property to listen for the
Event.COMPLETE of the loader. Finally,
the loader’s loadPromiseFile method is called with the
mediaPromise passed in. Once the
mediaPromise is loaded, the
onMediaPromiseLoaded method is called. The target of
the event is cast as a flash.display.LoaderInfo object
and its loader property is set as the source of the
Image component.
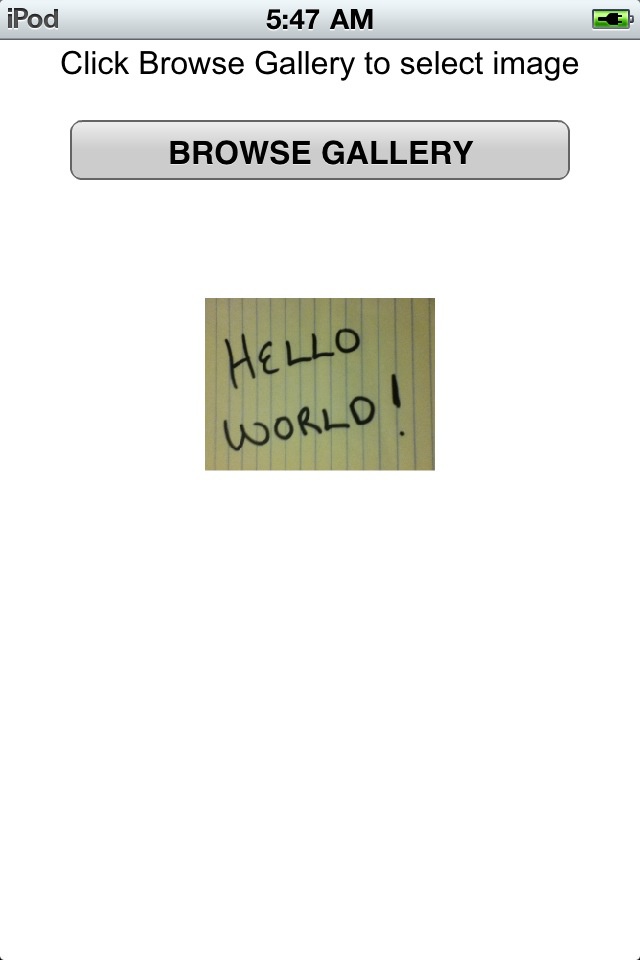
Figure 4-8 shows the application and Figure 4-9 shows the application after a picture was selected from the gallery and the user has returned to the application:
<?xml version="1.0" encoding="utf-8"?>
<s:Application xmlns:fx="http://ns.adobe.com/mxml/2009"
                  xmlns:s="library://ns.adobe.com/flex/spark"
                  applicationComplete="application1_applicationCompleteHandler(event)">
    <fx:Script>
          <![CDATA[
               import mx.events.FlexEvent;

               private var cameraRoll:CameraRoll;
               private var loader:Loader;

               protected function application1_applicationCompleteHandler(event:FlexEvent):void {
                     if(CameraRoll.supportsBrowseForImage){
                          cameraRoll = new CameraRoll();                     } else{
                          status.text="CameraRoll NOT supported";
                     }
               }

               private function browseGallery(event:MouseEvent):void {
                     cameraRoll.addEventListener(MediaEvent.SELECT, mediaSelected);
                     cameraRoll.addEventListener(ErrorEvent.ERROR, onError);
                     cameraRoll.browseForImage();
               }

               private function onError(event:ErrorEvent):void {
                     trace("error has occurred");
               }

               private function mediaSelected(e:MediaEvent):void {
                     cameraRoll.removeEventListener(MediaEvent.SELECT, mediaSelected);
                     cameraRoll.removeEventListener(ErrorEvent.ERROR, onError);
                     var mediaPromise:MediaPromise = e.data;
                     this.loader = new Loader();
                     this.loader.contentLoaderInfo.addEventListener(Event.COMPLETE,
                         onMediaPromiseLoaded);
                     this.loader.loadFilePromise(mediaPromise);
               }

               private function onMediaPromiseLoaded(e:Event):void {
                     var loaderInfo:LoaderInfo = e.target as LoaderInfo;
                     image.source = loaderInfo.loader;
               }

          ]]>
    </fx:Script>
    <fx:Declarations>
          <!-- Place non-visual elements (e.g., services, value objects) here -->
    </fx:Declarations>

    <s:Label id="status" text="Click Browse Gallery to select image" top="10" width="100%" textAlign="center"/>

    <s:Button width="500" height="60" label="BROWSE GALLERY" click="browseGallery(event)"
                 enabled="{CameraRoll.supportsBrowseForImage}"
                 top="80" horizontalCenter="0"/>

    <s:Image id="image" width="230" height="350" top="170" horizontalCenter="0"/>
</s:Application>
Microphone
All recently manufactured full sized iPods, iPhones, and iPads have microphones available.
Let’s review the code below. First, you will notice there is a
private variable named microphone declared of type
flash.media.Microphone. Within
applicationComplete of the application an event handler
function is called, which first checks to see if the device supports
access to the microphone by reading the static property of the
Microphone class. If this property returns as true, an
instance of the Microphone is retrieved and set to the
microphone variable, the rate is set to 44, and the
setUseEchoSuppression method is used to set the echo
suppression to true. There are also variables of type
ByteArray and Sound declared within
this application. There will be instances of these variables created
during use of this application.
There are three button components within the application to trigger the record, stop, and playback functionalities.
Clicking the record button will call the
record_clickHandler function, which will create a new
instance of the recording variable of type ByteArray.
An event listener of type SampleDataEvent.SAMPLE_DATA is added to the
microphone, which will call the micDataHandler method
when it receives data. Within the micDataHandler
method, the data is written to the recording
ByteArray.
Clicking the stop button will stop the
recording by removing the SampleDataEvent.SAMPLE_DATA event listener.
Clicking the play button will call the
play_clickHandler method, which first sets the position
of the recording ByteArray to 0 so it is ready for
playback. It then creates a new instance of the Sound
class and sets it to the sound variable. It also adds an event listener of
type SampleDataEvent.SAMPLE_DATA that
will call the playSound method when it receives data.
Finally the play method is called on the
sound variable to start the playback.
The playSound method loops through the recording
ByteArray in memory and writes those bytes back to the
data property of the SampleDataEvent, which then plays
through the device’s speaker.
To extend this sample, you would need to use some open source
classes to convert the recording ByteArray to an
.mp3 or .wav file so that it can
be saved to disk. The application can be seen in Figure 4-10:
<?xml version="1.0" encoding="utf-8"?>
<s:Application xmlns:fx="http://ns.adobe.com/mxml/2009"
                  xmlns:s="library://ns.adobe.com/flex/spark"
                  applicationComplete="application1_applicationCompleteHandler(event)">
    <fx:Script>
          <![CDATA[
               import mx.events.FlexEvent;

               private var microphone:Microphone;
               private var recording:ByteArray;
               private var sound:Sound;

               protected function application1_applicationCompleteHandler(event:FlexEvent):void
               {
                     if(Microphone.isSupported){
                          microphone = Microphone.getMicrophone();
                          microphone.rate = 44;
                          microphone.setUseEchoSuppression(true);
                     } else {
                          status.text="Microphone NOT supported";
                     }
               }

               private function micDataHandler(event:SampleDataEvent):void{
                     recording.writeBytes(event.data);
               }

               protected function record_clickHandler(event:MouseEvent):void
               {
                     recording = new ByteArray();
                     microphone.addEventListener(SampleDataEvent.SAMPLE_DATA,
                         micDataHandler);
               }

               protected function stop_clickHandler(event:MouseEvent):void
               {
                     microphone.removeEventListener(SampleDataEvent.SAMPLE_DATA,
                         micDataHandler);
               }

               protected function play_clickHandler(event:MouseEvent):void
               {
                     recording.position = 0;
                     sound = new Sound();
                     sound.addEventListener(SampleDataEvent.SAMPLE_DATA, playSound);
                     sound.play();
               }

               private function playSound(event:SampleDataEvent):void
               {
                     for (var i:int = 0; i < 8192 && recording.bytesAvailable > 0; i++){
                          var sample:Number = recording.readFloat();
                          event.data.writeFloat(sample);
                          event.data.writeFloat(sample);
                     }
               }

          ]]>
    </fx:Script>
    <fx:Declarations>
          <!-- Place non-visual elements (e.g., services, value objects) here -->
    </fx:Declarations>

    <s:Label id="status" text="Click Record to grab some audio, then Stop and Play it back"
                top="10" width="100%" textAlign="center"/>
    <s:HGroup top="80" horizontalCenter="0">
          <s:Button id="record" label="Record" click="record_clickHandler(event)" />
          <s:Button id="stop" label="Stop" click="stop_clickHandler(event)" />
          <s:Button id="play" label="Play" click="play_clickHandler(event)" />
    </s:HGroup>
</s:Application>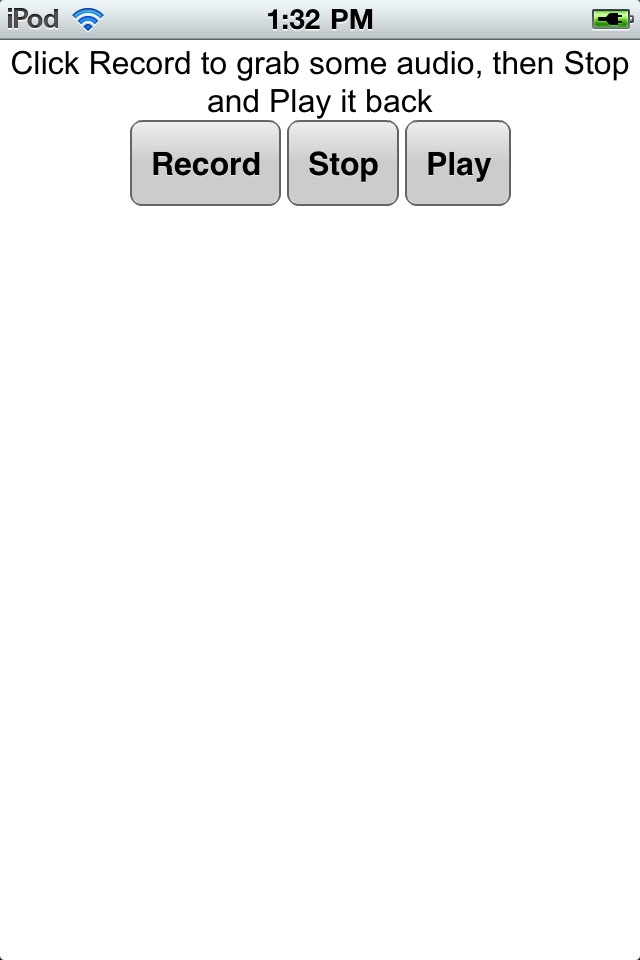
Multitouch
One of the navigation methods that are unique to mobile devices is the ability to interact with an application via gestures on the device’s touch screen. Multitouch is defined as the ability to simultaneously register three or more touch points on the device. Within Adobe AIR 2.7, there are two event classes used to listen for multitouch events.
GestureEvent
The GestureEvent class is
used to listen for a two-finger tap on the device. The event used to
listen for this action is the GESTURE_TWO_FINGER_TAP. This event will return
the registration points for the x and y coordinates when a two-finger
tap occurs, for both stage positioning as well as object
positioning.
Let’s review the code below. Within
applicationComplete of the application, an event
handler function is called which first sets
the Multitouch.inputMode to MultitouchInputMode.GESTURE. Next, it checks to see
if the device supports multitouch by reading the static property of the
Multitouch class. If this property returns as true,
an event listener is added to the stage to listen for GestureEvent.GESTURE_TWO_FINGER_TAP events.
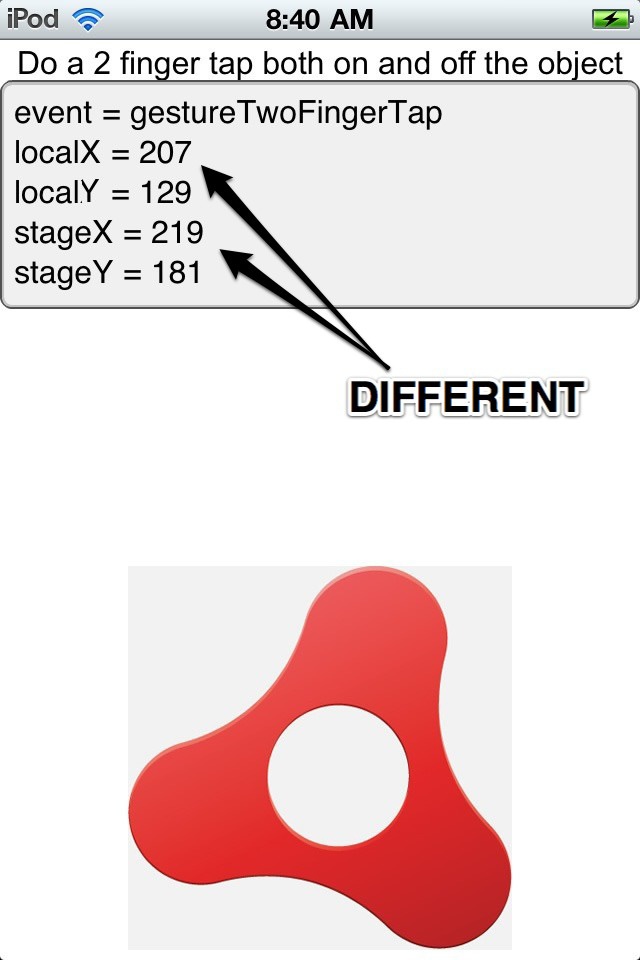
When this event occurs, the
onGestureTwoFingerTap method is called. The
onGestureTwoFingerTap method will capture the
localX and localY coordinates, as
well as the stageX and stageY
coordinates. If you two-finger tap on an empty portion of the stage,
these values will be identical. If you two-finger tap on an object on
the stage, the localX and localY
coordinates will be the values within the object, and the
stageX and stageY will be relative
to the stage itself. See Figure 4-11 for
an example of a two-finger tap on the stage and Figure 4-12 for a two-finger tap on the
Adobe AIR image:
<?xml version="1.0" encoding="utf-8"?>
<s:Application xmlns:fx="http://ns.adobe.com/mxml/2009"
                  xmlns:s="library://ns.adobe.com/flex/spark"
                  applicationComplete="application1_applicationCompleteHandler(event)">
    <fx:Script>
          <![CDATA[
               import mx.events.FlexEvent;

               protected function application1_applicationCompleteHandler(event:FlexEvent):void {
                     Multitouch.inputMode = MultitouchInputMode.GESTURE;
                     if(Multitouch.supportsGestureEvents){
                          stage.addEventListener(GestureEvent.GESTURE_TWO_FINGER_TAP,
                              onGestureTwoFingerTap);
                     } else {
                          status.text="gestures not supported";
                     }

               }
               private function onGestureTwoFingerTap(event:GestureEvent):void{
                     info.text = "event = " + event.type + "\n" +
                          "localX = " + event.localX + "\n" +
                          "localY = " + event.localY + "\n" +
                          "stageX = " + event.stageX + "\n" +
                          "stageY = " + event.stageY;
               }

          ]]>
    </fx:Script>
    <fx:Declarations>
          <!-- Place non-visual elements (e.g., services, value objects) here -->
    </fx:Declarations>
    <s:Label id="status" text="Do a 2 finger tap both on and off the object"
                top="10" width="100%" textAlign="center"/>
    <s:TextArea id="info" width="100%" top="40" editable="false"/>
    <s:Image width="384" height="384" bottom="10" horizontalCenter="0"
                source="@Embed('adobeair.jpg')"/>
</s:Application>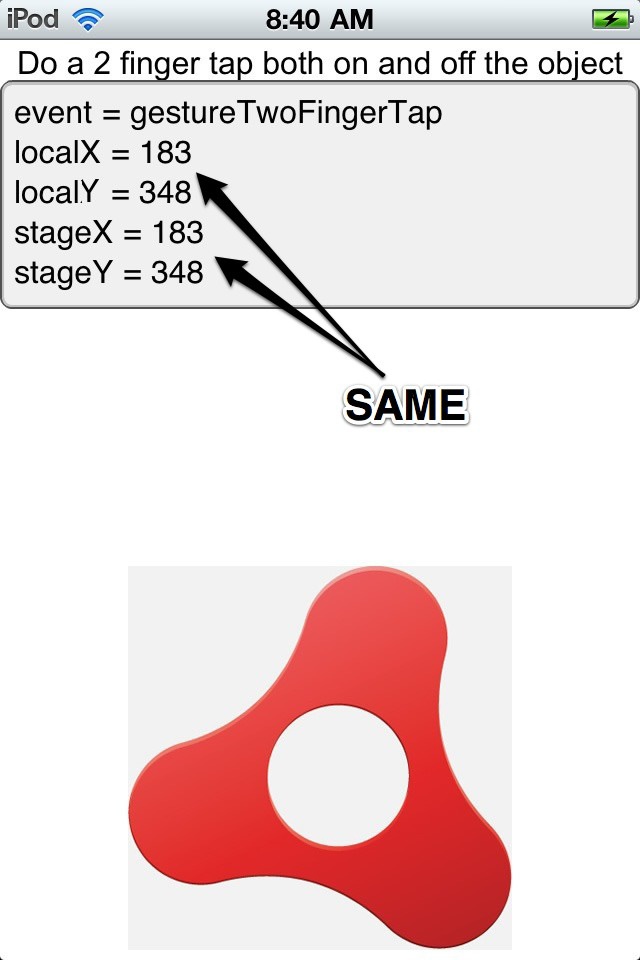
TransformGesture
There are multiple transform gesture events available within AIR
2.7. Each will capture a unique multitouch event. The example below
demonstrates how to listen for GESTURE_PAN, GESTURE_ROTATE, GESTURE_SWIPE, and GESTURE_ZOOM events.
Let’s review the code below. Within
applicationComplete of the application, an event
handler function is called which first sets
the Multitouch.inputMode to MultitouchInputMode.GESTURE. Next, it checks to see
if the device supports multitouch by reading the static property of the
Multitouch class. If this property returns as true,
event listeners are added to the stage to listen for the TransformGestureEvent.GESTURE_PAN, TransformGestureEvent.GESTURE_ROTATE, TransformGestureEvent.GESTURE_SWIPE, and
TransformGestureEvent.GESTURE_ZOOM
events.
When a user grabs the object with two
fingers and drags the object, the TransformGestureEvent.GESTURE_PAN event is
triggered and the onGesturePan method is called.
Within the onGesturePan method, the
offsetX and offsetY values of this
event are written to the text property of the
TextArea component. Adding the event’s
offsetX and offsetY values sets
the object’s x and y, to move
the object across the stage. The results can be seen in Figure 4-13.
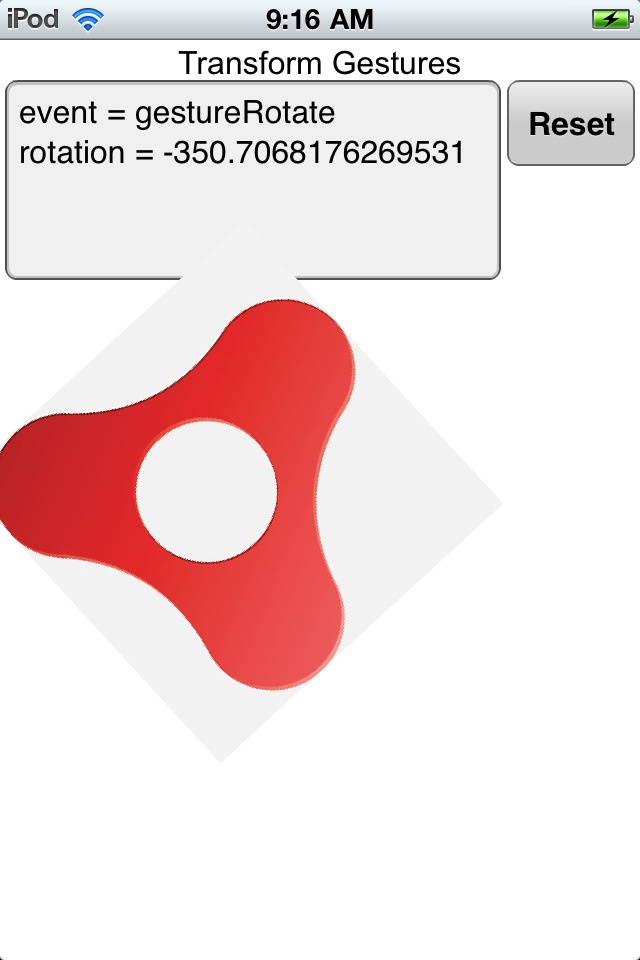
When a user grabs the object with two fingers and rotates the
object, the TransformGestureEvent.GESTURE_ROTATE event is
triggered and the onGestureRotate method is called.
Within the onGestureRotate method, the rotation value
of this event is written to the text property of the
TextArea component. To allow the object to rotate
around its center, the object’s transformAround
method is called and the event’s rotation value is added to the object’s
rotationZ value. The results can be seen in Figure 4-14.
When a user swipes across the object with one finger in any
direction, the TransformGestureEvent.GESTURE_SWIPE event is
triggered and the onGestureSwipe method is called.
Within the onGestureSwipe method, the value of the
event’s offsetX and offsetY are
evaluated to determine which direction the user swiped across the
object. This direction is then written to the text property of the
TextArea component. The results can be seen in Figure 4-15.
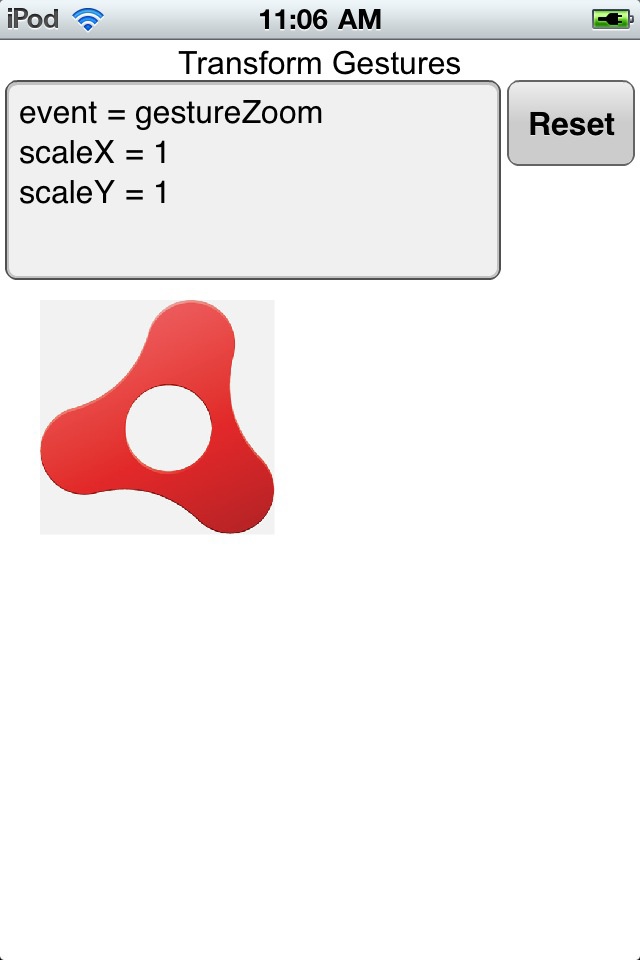
When a user performs a “pinch and zoom” on the object with two
fingers, the TransformGestureEvent.GESTURE_ZOOM event is
triggered and the onGestureZoom method is called.
Within the onGestureZoom method, the value of the
event’s scaleX and scaleY written
to the text property of the TextArea component. The
scaleX value is then used as a multiplier on the
object’s scaleX and scaleY
property to increase or decrease the size of the object as the user
pinches or expands two fingers on the object. The results can be seen in
Figure 4-16:
<?xml version="1.0" encoding="utf-8"?>
<s:Application xmlns:fx="http://ns.adobe.com/mxml/2009"
                  xmlns:s="library://ns.adobe.com/flex/spark"
                  applicationComplete="application1_applicationCompleteHandler(event)">    <fx:Script>
          <![CDATA[
               import mx.events.FlexEvent;

               protected function application1_applicationCompleteHandler(event:FlexEvent):void {
                     Multitouch.inputMode = MultitouchInputMode.GESTURE;
                     if(Multitouch.supportsGestureEvents){
                          image.addEventListener(TransformGestureEvent.GESTURE_PAN,
                              onGesturePan);
                          image.addEventListener(TransformGestureEvent.GESTURE_ROTATE,
                              onGestureRotate);
                          image.addEventListener(TransformGestureEvent.GESTURE_SWIPE,
                              onGestureSwipe);
                          image.addEventListener(TransformGestureEvent.GESTURE_ZOOM,
                              onGestureZoom);
                     } else {
                          status.text="gestures not supported";
                     }
               }

               private function onGesturePan(event:TransformGestureEvent):void{
                     info.text = "event = " + event.type + "\n" +
                          "offsetX = " + event.offsetX + "\n" +
                          "offsetY = " + event.offsetY;
                     image.x += event.offsetX;
                     image.y += event.offsetY;
               }

               private function onGestureRotate( event : TransformGestureEvent ) : void {
                     info.text = "event = " + event.type + "\n" +
                          "rotation = " + event.rotation;
                     image.transformAround(new Vector3D(image.width/2,image.height/2, 0),
                          null,
                          new Vector3D(0,0,image.rotationZ
                                + event.rotation));
               }

               private function onGestureSwipe( event : TransformGestureEvent ) : void {
                     var direction:String = "";
                     if(event.offsetX == 1) direction = "right";
                     if(event.offsetX == −1) direction = "left";
                     if(event.offsetY == 1) direction = "down";
                     if(event.offsetY == −1) direction = "up";
                     info.text = "event = " + event.type + "\n" +
                          "direction = " + direction;
               }

               private function onGestureZoom( event : TransformGestureEvent ) : void {
                     info.text = "event = " + event.type + "\n" +
                          "scaleX = " + event.scaleX + "\n" +
                          "scaleY = " + event.scaleY;
                     image.scaleX = image.scaleY *= event.scaleX;
               }

               protected function button1_clickHandler(event:MouseEvent):void
               {
                     image.rotation = 0;
                     image.scaleX = 1;
                     image.scaleY = 1;
                     image.x = 40;
                     image.y = 260;
                     info.text = "";
               }

          ]]>
    </fx:Script>
    <fx:Declarations>
          <!-- Place non-visual elements (e.g., services, value objects) here -->
    </fx:Declarations>
    <s:Label id="status" text="Transform Gestures" top="10" width="100%"
             textAlign="center"/>
    <s:HGroup width="100%" top="40" left="5" right="5">
          <s:TextArea id="info" editable="false" width="100%" height="200"/>
          <s:Button label="Reset" click="button1_clickHandler(event)"/>
    </s:HGroup>
    <s:Image id="image" x="40" y="260" width="384" height="384"
                source="@Embed('adobeair.jpg')"/>
</s:Application>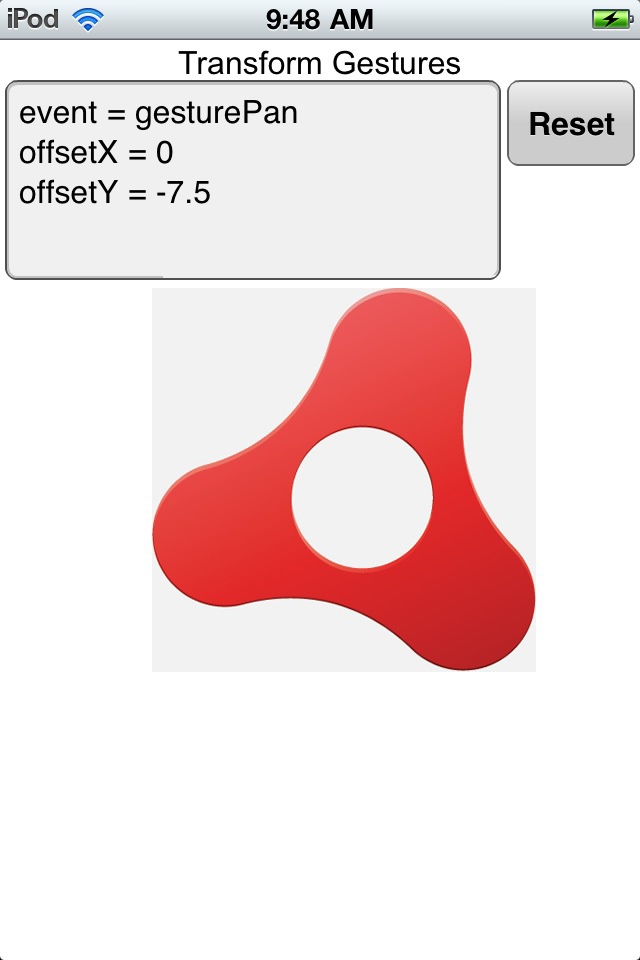

Busy Indicator
A new component has been added to provide feedback to the users
within your mobile application. There is no cursor to show busy status as
there is in desktop development, so the BusyIndicator
component was added specifically for this reason. The usage of this
component is extremely simple.
Let’s review the code below. There is a CheckBox
with the label “Show Busy Indicator,” which when checked, calls the
checkbox1_clickHandler method. There is a
BusyIndicator component with an id
of indicator, with visible set to
false. Within the
checkbox1_clickHandler method, the indicator’s
visible property is set to the value of the
CheckBox. This simply shows or hides the
BusyIndicator. Within the
BusyIndicator, you can set the
height, width, and
symbolColor to suit the needs and style of your application. The results can be seen in
Figure 4-17:
<?xml version="1.0" encoding="utf-8"?>
<s:Application xmlns:fx="http://ns.adobe.com/mxml/2009"
                  xmlns:s="library://ns.adobe.com/flex/spark">

    <fx:Script>
          <![CDATA[
               protected function checkbox1_clickHandler(event:MouseEvent):void               {
                     indicator.visible = event.target.selected;
               }
          ]]>
    </fx:Script>

    <fx:Declarations>
          <!-- Place non-visual elements (e.g., services, value objects) here -->
    </fx:Declarations>

    <s:CheckBox label="Show Busy Indicator"
                     horizontalCenter="0"
                     click="checkbox1_clickHandler(event)" top="10"/>
    <s:BusyIndicator id="indicator" height="300" width="300"
                           verticalCenter="0"
                           horizontalCenter="0"
                           visible="false"
                           symbolColor="black"/>

</s:Application>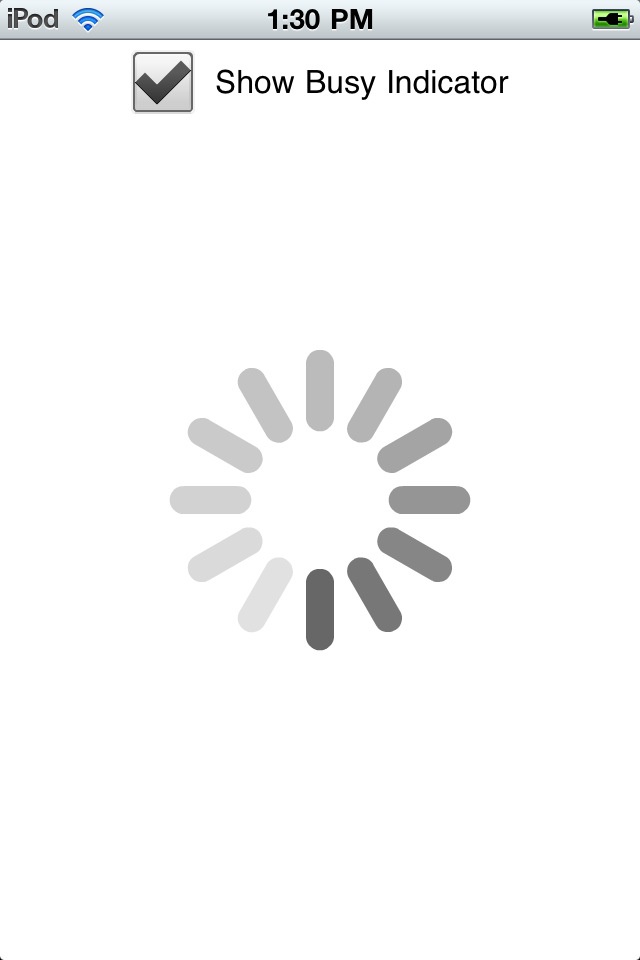
Get Developing iOS Applications with Flex 4.5 now with the O’Reilly learning platform.
O’Reilly members experience books, live events, courses curated by job role, and more from O’Reilly and nearly 200 top publishers.

