Chapter 15. Security
The cowl does not make the monk.
In the broadest sense, the security of computer systems encompasses many subjects and techniques, ranging from encryption schemes to availability and disaster recovery systems. However, it is not the goal of this chapter to discuss such a wide range of themes. Instead, weâll focus our attention on the security aspects that are more specific to Web APIsâin particular, transport security, authentication, and authorization. So, in the following sections we will be addressing these subjects, from both theoretical and practical viewpoints, using ASP.NET Web API as the supporting technology.
This chapter is complemented by the following chapter, which will focus solely on the OAuth 2.0 Framework: a set of protocols and patterns addressing access control in HTTP-based APIs.
Transport Security
The confidentiality and integrity of transferred information are important security requirements that must be addressed when you are designing and implementing distributed systems.
Unfortunately, the HTTP protocol provides little support in this area.
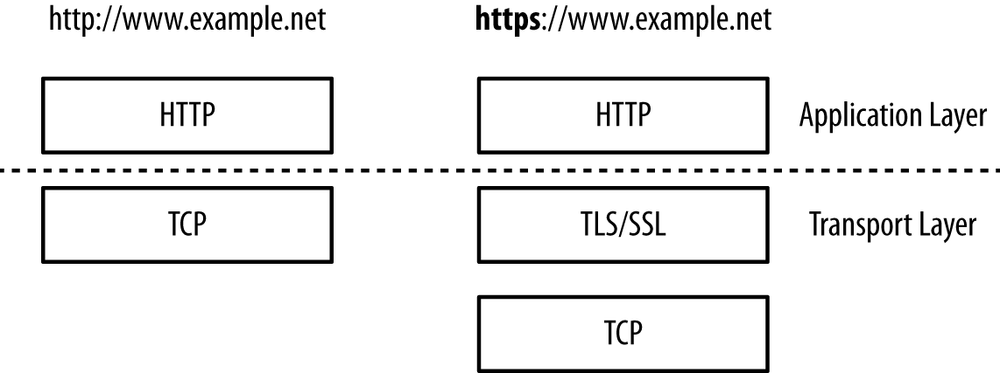
For this reason, the common practice among developers is to address these requirements by using HTTP on top of a secure transport layer, as defined by RFC 1818, âHTTP Over TLS,â resulting in what is informally known as HTTPS.
Briefly, this specification states that when a client performs an HTTP request to a URI with the https scheme (e.g., https://www.example.net), then the HTTP protocol is layered on top of a secure transport (TLS or SSL) instead of directly over TCP, as depicted in Figure 15-1.
This way, both the request and the response message bytes are protected by the transport protocol while being transferred between two transport endpoints.
The Transport Layer Security protocol (TLS), defined by RFC 5246, is an evolution of the Secure Socket Layer protocol (SSL).[9] Both these protocols aim to provide a secure bidirectional connection between two communicating entities, usually called peers, with the following properties:
- Integrity
- Each peer has the assurance that the received byte stream is equal to the byte stream transmitted by the remote peer. Any modifications to this stream by a third party, including replays, are detected and the connection is terminated.
- Confidentiality
- Each peer has the guarantee that the sent byte stream will be visible only to the remote peer.
In addition to the integrity and confidentiality assurances, the TLS protocol can also perform peer authentication, providing the client or the server with the verified identity of the remote peer. Very importantly, when used in the HTTP context, TLS is also responsible for the fundamental task of server authentication, providing the client with the serverâs verified identity before the client sends any request message. We will address TLS-based authentication in more detail in the section Authentication.
The TLS protocol is itself divided into two major subprotocols. The record subprotocol provides the integrity and confidentiality properties, using symmetric encryption schemes and message authentication codes (MAC) to protect the exchanged byte stream. It operates over a reliable transport protocol (e.g., TCP), and is composed of three different layers. The first one divides the incoming stream into records, each one with a maximum length of 16 KB. The second layer applies compression to each one of these records. The last layer applies the cryptographic protection, using a MAC-then-Encrypt design: first a MAC is computed over the compressed record concatenated with a sequence number; then both the compressed record and the MAC value are encrypted.
The handshake subprotocol is used to establish the TLS operation parameters, namely the cryptographic material used by the record subprotocol (e.g., encryption and MAC keys). It supports multiple key establishment techniques. However, in the web context, the most common ones are based on the use of public-key cryptography and certificates. In Appendix G, we present a brief introduction to this subject and also show how to create keys and certificates to use in development environments.
Using TLS in ASP.NET Web API
The TLS protocol operates on top of the transport layer, meaning that it is implemented by the low-level HTTP hosting infrastructure, which on Windows is the kernel-mode HTTP.SYS driver. As a consequence, most of its related configuration is done outside of ASP.NET Web API and also differs between IIS hosting and self-hosting.
Using TLS with IIS Hosting
On IIS, TLS is configured through the addition of an HTTPS binding to a site, as illustrated in Figure 15-2.
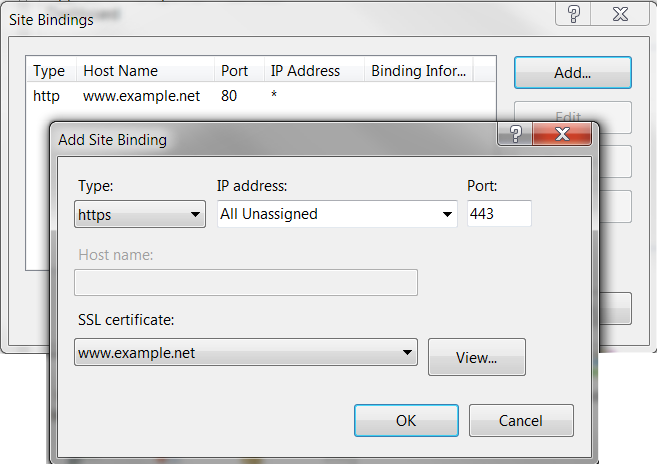
This addition is configured by the serverâs certificate, which must be installed in the Personal store of the Local Computer location, have an associated private key, and also have a valid certification path to a trusted root certification authority. No further changes are required on the IIS configuration or on the Web API configuration.
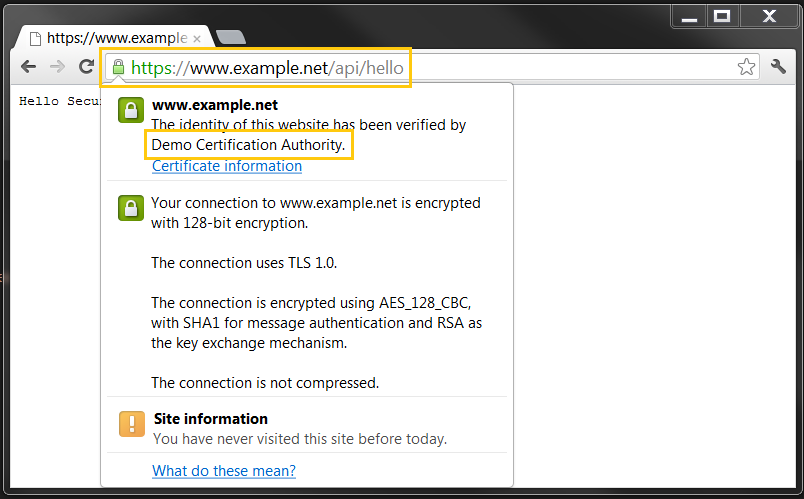
Figure 15-3 shows the user interface presented by a browser performing a request via HTTPS. Notice that the presented information includes both the serverâs identity (www.example.net) and the certification authority name (âDemo Certification Authorityâ).
In IIS 7.5, multiple sites may have HTTP bindings configured for the same IP address and port, since the request demultiplexing (dispatching the request for the selected site) uses the hostname present in the Host header.
However, it is not possible to have multiple HTTPS bindings with different certificates configured for the same IP address and port (because the server certificate is needed when the TLS connection is established, well before the HTTP request is received).
So, when hosting multiple HTTPS sites on the same server, the alternatives are:
- Use a different IP address or port for each HTTPS binding.
- Use the same certificate for all bindings, which typically implies using wildcards in the certificateâs subject name. Alternatively, the Subject Alternative Name extension can be used to define multiple subject names for the same certificate.
RFC 4366 defines a new TLS extension, named Server Name Indication (SNI), which adds the name of the HTTP host into the TLS initial handshake. This extra information allows the server to use a different certificate for each hostname, even if the TCP connection is established for the same IP address and port. Unfortunately, this extension is supported by IIS 8.0 and greater versions but not by IIS 7.5 or previous versions.
Using TLS with Self-Hosting
When you are using self-hosting, TLS is configured using the netsh command-line tool:
netsh http add sslcert ipport=0.0.0.0:port certhash=thumbprint appid={app-guid}where:
-
ipportis the listening IP address and port (the special0.0.0.0IP address matches any IP address for the local machine). -
certhashis the server certificate SHA-1 hash value, represented in hexadecimal. -
appidis just a GUID used to identify the owning application.
The chosen server certificate has the same requirements as when you are hosting on IIS, namely that it must be installed in the Personal store of the Local Computer location, have an associated private key, and also have a valid certification path to a trusted root.
The only change required on the ASP.NET Web API configuration is the usage of the https scheme in the self-host listening address:
varconfig=newHttpSelfHostConfiguration("https://www.example.net:8443");
This concludes the section on transport security. In the next section, we will address authentication.
Authentication
According to RFC 4949 (Internet Security Glossary), authentication is âThe process of verifying a claim that a system entity or system resource has a certain attribute value.â In the context of HTTP, the two obvious system entities are the client and the server, and this attribute verification is typically required by both these entities.
On one side, server authentication is required to preemptively ensure clients that request messages are sent only to correct origin serversâthat is, the servers on which the identified resources reside or should be created.
In this case, the message sender needs to authenticate the message receiver before sending the message, typically by authenticating the other side of the transport connection.
Server authentication is also needed to check if the received response messages were indeed produced by the correct servers.
Since clients are interacting with resources identified by http URIs, the main attribute checked by this authentication process is the possession of the URIâs hostname (an IP address or DNS name).
On the other side, client authentication provides servers with identity information used to decide if the request message should be authorizedâthat is, if the requested methods can be applied to the identified resources. In this case, the attributes verified by the authentication process are more context dependent, and may range from simple opaque identifiers, such as usernames, to rich collections of attributes, such as emails, names, roles, addresses, and banking and social security numbers.
As we will see in the following sections, these authentication requirements can be accomplished at two levels:
- At the transport level, by sending and receiving HTTP messages over secure connections
- At the message level, by attaching security information to the messages in order to authenticate its origin
However, before presenting the details of these authentication mechanisms, we will first address how identityâthat is, the output of the authentication processâcan be represented in the .NET Framework.
The Claims Model
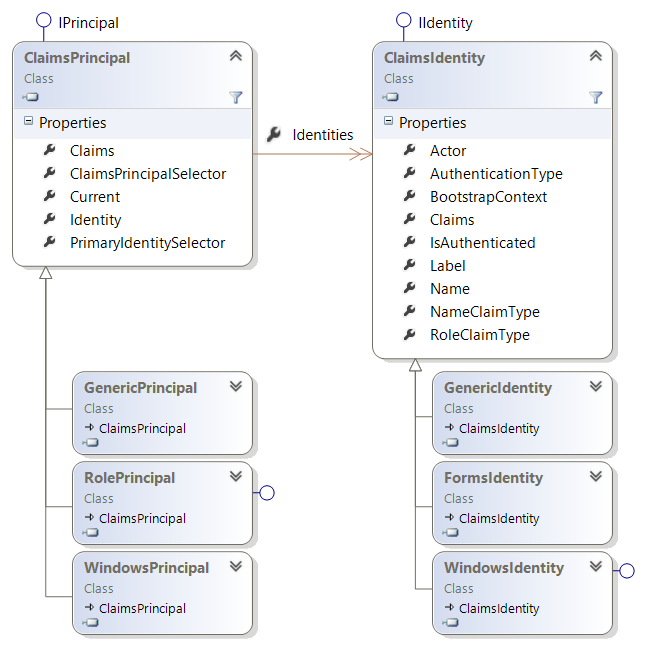
Since version 1.0, the .NET Framework contains two interfaces to represent identities, shown in Figure 15-4: IPrincipal and IIdentity.
The IPrincipal interface ârepresents the security context of the user on whose behalf the code is running.â
For instance, in the HTTP request handling context, this interface represents the request message producerâthe HTTP client.
This interface contains an IsInRole method, used to query if the requester has a given role, and an Identity property, of type IIdentity.
This last interface represents an identity via three properties:
-
The
AuthenticationTypestring -
The
Namestring -
The
IsAuthenticatedstring

The current principal (i.e., the object representing the security context of the user on whose behalf the current code is running), can be accessed via the Thread.CurrentPrincipal static property.
This information is also accessible via more context-specific properties, such as the ASP.NET MVC System.Web.Mvc.Controller.User property or WCFâs System.ServiceModel.ServiceSecurityContext.PrimaryIdentity.
In the ASP.NET Web API context, this role is played by the ApiController.User property, also containing an IPrincipal.
The .NET Framework also contains a set of concrete classes implementing the IPrincipal and IIdentity interfaces:
-
The
GenericPrincipal,WindowsPrincipal, andRolePrincipalclasses implement theIPrincipalinterface. -
The
GenericIdentity,WindowsIdentity, andFormsIdentityclasses implement theIIdentityinterface.
However, the previous model uses a rather limited view of what an identity can be, reducing it to a simple string and a role query method. Also, this model assumes an implicit identity authority, which does not fit a world where identity information can be provided by multiple providers, ranging from social sites to organizational directories.
The claims model aims to overcome these limitations by defining a new way of representing identities, based on the claim concept. A Guide to Claims-Based Identity and Access Control (Microsoft Patterns & Practices) defines a claim as a âstatement, such as a name, identity, key, group, permission or capability made by one subject about itself or another subject.â Weâll highlight two characteristics of this definition. First, this definition is broad enough to allow different identity attributes, ranging from simple name identifiers to authorization capabilities. Second, it makes explicit that claims can be issued by multiple parties, including the identified subject (self-issued claims).
With version 4.5, the .NET Framework adopted this claims model to represent identities and introduced the System.Security.Claims namespace, which contains several classes associated with this model.
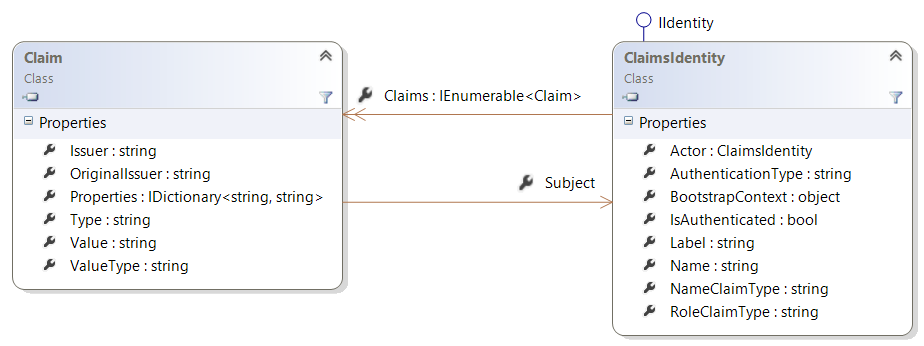
The Claim class, depicted in Figure 15-5, is composed of three core properties:
-
Issueris a string identifying the authority that asserted the identity claim. -
Typeis a string characterizing the claim type. -
Valuecontains the claim value, also represented as a string.
The following code excerpt illustrates the three Claim core properties, for a claim obtained from the processâs Windows identity:
[Fact]publicvoidClaims_have_an_issuer_a_type_and_a_value(){AppDomain.CurrentDomain.SetPrincipalPolicy(PrincipalPolicy.WindowsPrincipal);varidentity=Thread.CurrentPrincipal.IdentityasClaimsIdentity;Assert.NotNull(identity);varnameClaim=identity.Claims.First(c=>c.Type==ClaimsIdentity.DefaultNameClaimType);Assert.Equal(identity,nameClaim.Subject);Assert.Equal("AD AUTHORITY",nameClaim.Issuer);Assert.Equal(ClaimTypes.Name,nameClaim.Type);Assert.Equal("http://schemas.xmlsoap.org/ws/2005/05/identity/claims/name",nameClaim.Type);Assert.True(nameClaim.Value.EndsWith("pedro"));}
The ClaimTypes class contains a set of commonly used claim type identifiers:
publicstaticclassClaimTypes{publicconststringRole="http://schemas.microsoft.com/.../claims/role";publicconststringAuthenticationInstant=...publicconststringAuthenticationMethod=...publicconststringAuthorizationDecision=...publicconststringDns=...publicconststring=...publicconststringMobilePhone=...publicconststringName=...publicconststringNameIdentifier=...// other members elided for readability}
-
The
ClaimsIdentityclass, also shown in Figure 15-5, represents an identity as a claim sequence. -
The
ClaimsPrincipalclass represents a principal as one or more claims-based identities.
Note that these new classes also implement the old IPrincipal and IIdentity interfaces, meaning they can be used with legacy code.
In addition, the old concrete principal and identity classes, such as WindowsPrincipal or FormsIdentity, were also retrofitted to derive from these new claims-based classes, as shown in Figure 15-6.
For the remainder of this chapter, we will be using the new claims-based classes to represent identities.
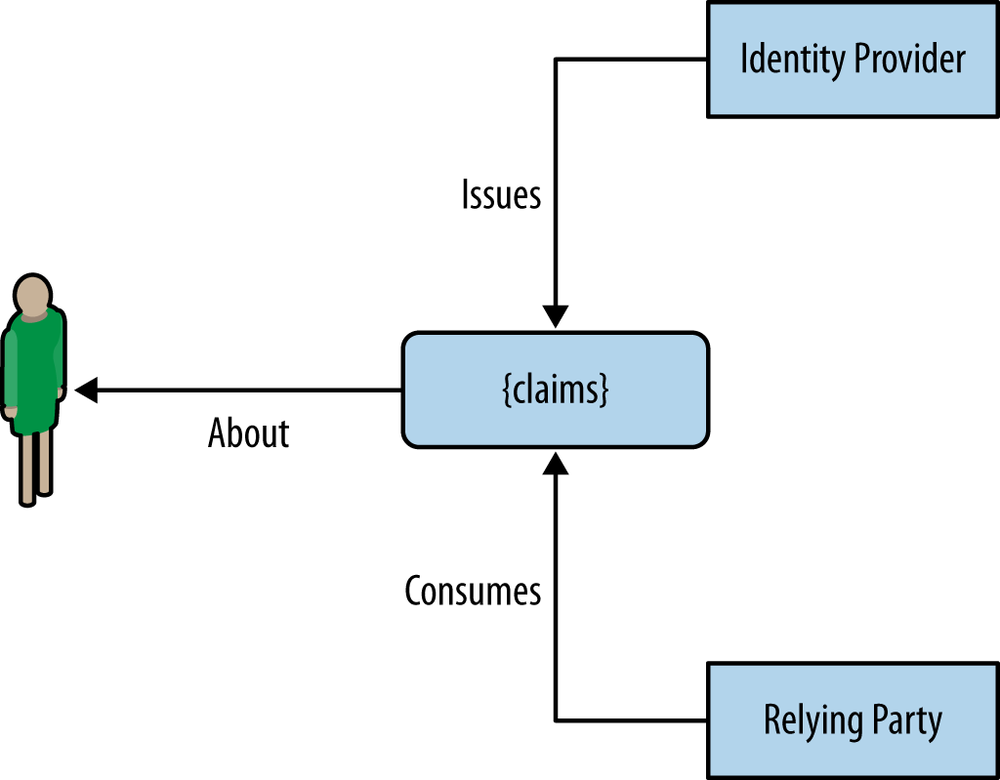
In distributed systems, the source for the identity information and the party interested in it may not be the same. In these contexts, it is important to distinguish these two parties:
Figure 15-7 shows the relations between these two parties. The task of a distributed authentication protocol, such as WS-Federation, is to provide the mechanisms for:
Retrieving and Assigning the Current Principal
In the early days of the .NET Framework, the retrieving and assignment of the current principal was performed via the Thread.CurrentPrincipal static property.
However, currently this technique presents two problems.
First, a request isnât necessarily executed by a single thread.
Specifically, the broad adoption of asynchronous programming models means that the affinity between a request and its single executing thread doesnât exist anymore.
Secondly, several .NET Framework components, such as ASP.NET and WCF, created alternative ways to access and define this information.
As an example, in ASP.NET, the HttpContext class contains a User static property holding an IPrincipal.
This increases the probability of incoherence between the identities present in these multiple places.
In version 1.0 of ASP.NET Web API, the correct way of assigning the current principal inside the message handler pipeline depends on the used host.
When you are self-hosting, it is sufficient to assign the Thread.CurrentPrincipal.
However, when using the web host, you must assign both the Thread.CurrentPrincipal and the HttpContext.Current.User.
A commonly used technique is to check if HttpContext.Current isnât null:
Thread.CurrentPrincipal=principalToAssign;if(HttpContext.Current!=null){HttpContext.Current.User=principalToAssign;}
Unfortunately, this technique creates a dependency to the System.Web assembly, even in the self-host scenario.
In ASP.NET Web API version 2.0, you can solve this problem by using the new HttpRequestContext class.
First, the current identity should be retrieved and assigned to the current request object, not to a static property.
Secondly, different hosts can use different HttpRequestContext implementations:
-
The self-host uses the
SelfHostHttpRequestContext, which simply assigns theThread.CurrentPrincipalproperty. -
The web host uses the
WebHostHttpRequestContext, which assigns both theThread.CurrentPrincipaland theHttpContext.Userproperties. -
Finally, the OWIN host uses the
OwinHttpRequestContext, which assigns both theThread.CurrentPrincipaland the current OWIN context.
Unfortunately, there isnât a way that works for both versions of Web API. In the remainder of this book, we will primarily use the version 2.0 method.
Transport-Based Authentication
As we stated previously in this chapter, the TLS protocol can also be used to perform authentication, providing each transport peer with the verified identity of the remote peer. In the following sections, we show how to use this feature to obtain both server authentication and client authentication.
Server Authentication
When a client sends an HTTP request with an https request URI, the used connection must always be protected by TLS or SSL, ensuring the integrity and confidentiality of the sent message.
In addition, the client must check the server identity by comparing the URI hostname with the identity present in the serverâs certificate, received during the handshake negotiation.
This verification solves the server authentication problem by ensuring that an HTTP request message is sent only to a properly identified server.
The serverâs identity is obtained from the certificate in one of two ways:
If the subject alternative name extension contains multiple names, then the URI hostname can match any of them.
This feature allows the use of the same certificate for different hostnames (e.g., www.example.net and api.example.net), which is very useful when these hostnames are bound to the same IP address.
For instance, until version 7.5 of IIS, different https bindings that use the same IP and port must use the same certificate.
The name in the serverâs certificate can also contain wildcards (e.g., *.example.net).
As an example, the hostname www.example.net is matched by *.example.net.
This feature is useful in multitenancy scenarios, where the set of hostnames is not known in advance, namely when the serverâs certificate is issued.
As an example, currently the Azure Service Bus uses a certificate containing two alternative names: *.servicebus.windows.net and servicebus.windows.net.
This allows a hostname such as my-tenant-name.servicebus.windows.net to be matched by this certificate.
Currently, TLS-based server authentication is based on the PKI trust model described in Appendix G, where the overall security depends on the correct behavior of a set of certificate authorities. Unfortunately, this model presents a rather significant surface area for MITM (man-in-the-middle) attacks. For instance, if a certificate authorityâs (CA) name verification practices are compromised, an attacker can obtain certificates that bind public keys under his control to names that he does not own. The same consequence can result if the attacker is able to use the CA private keys to issue rogue certificates.
This problem is amplified by the high number of trusted root certification authorities configured by default on several platforms. As an example, the list of root certificates used by the Mozilla projects (e.g., the Firefox browser) has more than 150 different entries. Note that if any of these certificate authorities is compromised, then a MITM attack can be mounted against any server, even if its certificate is not issued by the compromised authority.
A solution to this security problem is the addition of extra contextual requirements to the server certificate validation process. One of these extra requirements is called certificate pinning, where the certificates in the chain are compared with a fixed set of known certificates, called the pinset. In scenarios where the first interaction of a client with a server is guaranteed to be safe from MITM attacks, the certificate chain presented by the server can be used to build the pinset. The rationale behind this choice is based on the low probability of a server changing the root authority that it uses.
Another choice is to use a static context-based pinset. As an example, the Chromium browser limits the CAs that can be used when users connect to the Gmail and Google account servers. Another example is the Twitter API security best practices, which state that any client application should ensure that the certificate chain returned by the Twitter servers contains a subset of the approved CAs.
When using HttpClient, you can enforce certificate pinning by using the WebRequestHandler client handler and a custom certificate validation callback, as shown in the following example:
privatereadonlyCertThumbprintSetverisignCerts=newCertThumbprintSet("85371ca6e550143dce2803471bde3a09e8f8770f","62f3c89771da4ce01a91fc13e02b6057b4547a1d","4eb6d578499b1ccf5f581ead56be3d9b6744a5e5","â5deb8f339e264c19f6686f5f8f32b54a4c46b476");[Fact]publicasyncTaskTwitter_cert_pinning(){varwrh=newWebRequestHandler();wrh.ServerCertificateValidationCallback=(sender,certificate,chain,errors)=>{varcaCerts=chain.ChainElements.Cast<X509ChainElement>().Skip(1).Select(elem=>elem.Certificate);returnerrors==SslPolicyErrors.None&&caCerts.Any(cert=>verisignCerts.Contains(cert.GetCertHashString()));};using(varclient=newHttpClient(wrh)){awaitclient.GetAsync("https://api.twitter.com");varexc=Assert.Throws<AggregateException>(()=>client.GetAsync("https://api.github.com/").Result);Assert.IsType<HttpRequestException>(exc.InnerExceptions[0]);}}
The verisignCerts field contains the pinset as a set of certificate thumbprints contained in the custom CertThumbprintSet class:
publicclassCertThumbprintSet:HashSet<string>{publicCertThumbprintSet(paramsstring[]thumbs):base(thumbs,StringComparer.OrdinalIgnoreCase){}}
The HttpClient used in this example is created with an explicitly instantiated WebRequestHandler.
This handler exposes the ServerCertificateValidationCallback property, which can be assigned with a delegate that is called by the runtime after the standard built-in certificate validation process is finished.
This delegate receives this validation result, including information on the occurrence of errors, and returns a Boolean with the final validation result.
It can be used to override the built-in validation result or to perform additional verification steps.
In this case, we use it for this last goal. The server certificate is considered valid only if:
-
The built-in validation was successful; that is,
errors == SslPolicyErrors.None. - The certificate chain contains at least one of the known CA certificates (the pinned certificates).
Notice that the leaf certificate is skipped in this process, since we are interested only in ensuring that the CA certificates belong to a well-known pinset.
Notice also that this pinset is applicable only to the Twitter context.
As Assert.Throws illustrates, connecting to a different server (api.github.com) using this configuration results in a certificate authentication exception.
At the time of this writing, the use of certificate pinning is still highly context-dependent and must typically be coordinated with the authority managing the servers. The Twitter security best practices are an example of the pinning strategy. There are, however, some specifications being developed that aim to make this technique more generic. One of them, called Public Key Pinning Extension for HTTP, enables a server to instruct clients to pin the provided certificates for a given period of time. It accomplishes this by adding a response header with the pinned certificates and the pinning time period:
Public-Key-Pins: pin-sha1="4n972HfV354KP560yw4uqe/baXc=";
        pin-sha1="qvTGHdzF6KLavt4PO0gs2a6pQ00=";
        pin-sha256="LPJNul+wow4m6DsqxbninhsWHlwfp0JecwQzYpOLmCQ=";
        max-age=2592000
Another aspect that you should enforce when authenticating a server is to ensure that none of the presented certificates was revoked.
However, for this to happen the ServicePointManager must be explicitly configured via the CheckCertificateRevocationList static property:
ServicePointManager.CheckCertificateRevocationList=true;
The ServicePointManager is the class used by the .NET HTTP client infrastructure to obtain connections to servers, via ServicePoint objects.
We can also use the WebRequestHandler.ServerCertificateValidationCallback to ensure that the proper revocation verification was performed.
returnerrors==SslPolicyErrors.None&&caCerts.Any(cert=>verisignCerts.Contains(cert.GetCertHashString()))&&chain.ChainPolicy.RevocationMode==X509RevocationMode.Online;
The last condition in the previous code excerpt uses the ChainPolicy property of the X509Chain received by the callback delegate to ensure that the revocation verification was performed over an online mechanism.
If this condition does not hold, then the server certificate is not accepted and an exception is thrown.
Client Authentication
The TLS transport security mechanism can also provide client authentication. However, it requires the use of client certificates, increasing the client complexity and infrastructure requirements: clients must store private keys and have certificates issued to them. Because of these requirements, this client authentication option is not very common. However, you should strongly consider its use in the following scenarios:
For instance, several European countries are developing electronic identity initiatives, where each citizen has a smartcard containing a personal certificate (and associated private key). These certificates can be used to authenticate the citizenâs TLS interactions with e-government sites. So, when developing an e-government Web API in these contexts, you should consider using TLS client authentication. Currently, the major limitation is the difficulty in using these smartcards in portable devices, such as smartphones or tablets.
As a concrete example , the Windows Azure Service Management REST API is a public Web API using TLS-based client authentication: client requests must use a management certificate, previously associated with the managed service. In this API, the certificates are self-generated by the client and no PKI is required, which simplifies its usage.
When hosting on top of IIS, you can configure TLS client authentication in the SSL Settings of the IIS Manager Features view, as shown in Figure 15-8.
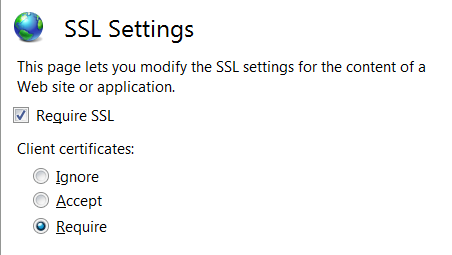
This setting is scoped to a folder and presents three options for the TLS handshake:
- Not requesting the client certificate (Ignore)
- Requesting the client certificate but allowing the client to not send one (Accept)
- Requesting the client certificate and requiring the client to send it (Require)
When self-hosting, you configure the client authentication using the netsh command-line tool, by using the clientcertnegotiation parameter when setting the server TLS certificate:
netsh http add sslcert (...) clientcertnegotiation=enable
The client certificate is not contained in the HTTP request sent by the client.
Instead, this certificate is a property of the transport connection on which the request was received.
This certificate is associated with the request object via the Web API hosting layer.
If self-hosting, you must perform an additional configuration step: setting the configurationâs ClientCredentialType property to Certificate:
varconfig=newHttpSelfHostConfiguration("https://www.example.net:8443");config.ClientCredentialType=HttpClientCredentialType.Certificate;
This configuration is required only so that the certificate information is flowed up from the self-host WCF adapter into the request object.
It does not influence the way the TLS connection is negotiated and establishedânamely, it does not replace the netsh-based configuration.
When youâre using web hosting, this configuration step isnât required.
The HttpSelfHostConfiguration also contains the X509CertificateValidator property, allowing the definition of an additional custom certificate validation procedure.
Note that this definition does not change the certificate validation done by the TLS HTTP.SYS implementation; it simply adds another one.
Also, it is available only when youâre self-hosting.
When using TLS-based client-side authentication, you obtain the clientâs identity at the server side by inspecting the negotiated certificate, independently of the hosting scenario.
This information is retrieved from the request message via the GetClientCertificate extension method, as shown in Example 15-1.
publicclassHelloController:ApiController{publicHttpResponseMessageGet(){varclientCert=Request.GetClientCertificate();varclientName=clientCert==null?"stranger":clientCert.Subject;returnnewHttpResponseMessage{Content=newStringContent("Hello there, "+clientName)};}}
In ASP.NET Web API 2.0, the new HttpRequestContext class can also be used to retrieve the client certificate:
varclientCert=Request.GetRequestContext().ClientCertificate;
However, a better approach is to create a message handler, such as the one shown in Example 15-2, that maps the received client certificate into a claims-based identity. This way, we obtain a homogeneous identity representation that is independent of the authentication mechanism. We can also use this message handler to perform additional certificate validation. By default, the TLS HTTP.SYS implementation will validate certificates using any of trusted root certification authorities present in the Windows Store. However, we may wish to limit this validation to a more restricted certification authority set.
publicclassX509CertificateMessageHandler:DelegatingHandler{privatereadonlyX509CertificateValidator_validator;privatereadonlyFunc<X509Certificate2,string>_issuerMapper;conststringX509AuthnMethod="http://schemas.microsoft.com/ws/2008/06/identity/authenticationmethod/x509";publicX509CertificateMessageHandler(X509CertificateValidatorvalidator,Func<X509Certificate2,string>issuerMapper){_validator=validator;_issuerMapper=issuerMapper;}protectedoverrideasyncTask<HttpResponseMessage>SendAsync(HttpRequestMessagerequest,CancellationTokencancellationToken){varcert=request.GetClientCertificate();if(cert==null)returnawaitbase.SendAsync(request,cancellationToken);try{_validator.Validate(cert);}catch(SecurityTokenValidationException){returnnewHttpResponseMessage(HttpStatusCode.Unauthorized);}varissuer=_issuerMapper(cert);if(issuer==null){returnnewHttpResponseMessage(HttpStatusCode.Unauthorized);}varclaims=ExtractClaims(cert,issuer);varidentity=newClaimsIdentity(claims,X509AuthnMethod);AddIdentityToCurrentPrincipal(identity,request);returnawaitbase.SendAsync(request,cancellationToken);}privatestaticIEnumerable<Claim>ExtractClaims(X509Certificate2cert,stringissuer){...}privatestaticvoidAddIdentityToCurrentPrincipal(ClaimsIdentityidentity){...}}
First, the client certificate is obtained from the request message via the GetClientCertificate extension method.
Afterward, the validator defined in the constructor is used to perform the additional certificate validation.
The X509CertificateValidator is an abstract base class, belonging to the .NET Framework, that represents a certificate validation process.
It contains a set of static classes with commonly used validators:
publicabstractclassX509CertificateValidator:ICustomIdentityConfiguration{// members and implementation elided for claritypublicstaticX509CertificateValidatorNone{get{...}}publicstaticX509CertificateValidatorPeerTrust{get{...}}publicstaticX509CertificateValidatorChainTrust{get{...}}publicstaticX509CertificateValidatorPeerOrChainTrust{get{...}}}
If the certificate passes the additional verification, then the Func<X509Certificate2, string> is used to obtain an issuer name, which will be used when the extracted claims are created.
The two common strategies for this are:
-
Use the certificateâs issuer name (e.g.,
CN=Demo Certification Authority, O=Web API Book). - Map the CA certificate that issued the clientâs certificate to an issuer string, using a previously defined registry.
The IssuerNameRegistry is a .NET Framework class providing this last behavior.
After the issuer name is obtained, the claim set representing the requester is computed from the client certificate:
privatestaticIEnumerable<Claim>ExtractClaims(X509Certificate2cert,stringissuer){varclaims=newCollection<Claim>{newClaim(ClaimTypes.Thumbprint,Convert.ToBase64String(cert.GetCertHash()),ClaimValueTypes.Base64Binary,issuer),newClaim(ClaimTypes.X500DistinguishedName,cert.SubjectName.Name,ClaimValueTypes.String,issuer),newClaim(ClaimTypes.SerialNumber,cert.SerialNumber,ClaimValueTypes.String,issuer),newClaim(ClaimTypes.AuthenticationMethod,X509AuthnMethod,ClaimValueTypes.String,issuer)};var=cert.GetNameInfo(X509NameType.EmailName,false);if(!=null){claims.Add(newClaim(ClaimTypes.,,ClaimValueTypes.String,issuer));}returnclaims;}
In the previous example, we mapped several certificate fields into individual claimsânamely, the certificate hash thumbprint, the subjectâs name, the certificate serial number, and the subjectâs email, if present. A claim with the authentication method is also added.
Finally, a claims identity is created and added to the current claims-based principal. If there isnât a current principal, then a new one is created:
privatestaticvoidAddIdentityToCurrentPrincipal(ClaimsIdentityidentity){privatevoidAddIdentityToCurrentPrincipal(ClaimsIdentityidentity,HttpRequestMessagerequest){varprincipal=request.GetRequestContext().PrincipalasClaimsPrincipal;if(principal==null){principal=newClaimsPrincipal(identity);request.GetRequestContext().Principal=principal;}else{principal.AddIdentity(identity);}}}
Using a message handler to map the client certificate into a claims-based identity allows the downstream Web API runtime components to always consume identity information in the same manner.
For instance, the previous HelloController presented in Example 15-1 can now be rewritten as:
publicclassHelloController:ApiController{publicHttpResponseMessageGet(){varprincipal=UserasClaimsPrincipal;varname=principal.Identities.SelectMany(ident=>ident.Claims).FirstOrDefault(c=>c.Type==ClaimTypes.).Value??"stranger";returnnewHttpResponseMessage{Content=newStringContent("Hello there, "+name)};}}
The ApiController class contains a User property with the requesterâs principal, similar to what happens in ASP.NET MVC.
Note also that the consuming code deals only with claims and does not depend on the transport-based client mechanism.
As an example, the use of a new authentication mechanism, such as the ones weâll address in the next section, will not require changes on the actionâs code.
However, before we move on to message-based authentication, we must see how transport-based client authentication is used on the client side.
On the client side, the configuration of TLS-based authentication requires you to deal directly with one of the available HttpClient handlers presented in Chapter 14: HttpClientHandler or WebRequestHandler.
The first option is to explicitly configure the HttpClient with an HttpClientHandler instance, containing its ClientCertificateOptions property set to Automatic:
varclient=newHttpClient(newHttpClientHandler{ClientCertificateOptions=ClientCertificateOption.Automatic});// ...
The resulting HttpClient can then be used normally: if during a connection handshake the server requires the client certificate, the HttpClientHandler instance will automatically select a compatible client certificate.
This option is the only one available for Windows Store applications.
For classic scenarios (e.g., console, WinForms, or WPF applications) there is a second option: using the WebRequestHandler:
varclientHandler=newWebRequestHandler()clientHandler.ClientCertificates.Add(cert);varclient=newHttpClient(clientHandler)
Here, cert is a X509Certificate2 instance representing the client certificate.
This instance can be constructed directly from a PFX file or obtained from a Windows certificate store:
X509Storestore=null;try{store=newX509Store(StoreName.My,StoreLocation.CurrentUser);store.Open(OpenFlags.OpenExistingOnly|OpenFlags.ReadOnly);// select the certificate from store.Certificates ...}finally{if(store!=null)store.Close();}
Having explored the use of the transport security mechanism to provide client and server authentication, we will now see how these security requirements can also be addressed at the HTTP message level.
The HTTP Authentication Framework
As we saw in Chapter 1, the HTTP protocol specification includes a generic authentication framework, upon which concrete mechanisms can be defined. The basic authentication and digest access authentication schemes are examples of such mechanisms, both defined by RFC 2617. This authentication framework defines both response status codes, message headers, and a challenge-response sequence that can be used by the concrete mechanisms, as illustrated in Chapter 1 and Appendix E.
The basic authentication scheme uses a simple username and password pair to authenticate the client. These credentials are added to the request message in the following manner:
- The username and the password are concatenated, separated by a : (colon).
-
The concatenation result is Base64-encoded to produce a string that is placed after the
Basicscheme identifier in theAuthorizationheader.
Example 15-3 presents a code fragment for obtaining user information from the GitHub API, using basic authentication.
Notice the addition of the Authorization header to the request message.
using(varclient=newHttpClient()){varreq=newHttpRequestMessage(HttpMethod.Get,"https://api.github.com/user");req.Headers.UserAgent.Add(newProductInfoHeaderValue("webapibook","1.0"));req.Headers.Authorization=newAuthenticationHeaderValue("Basic",Convert.ToBase64String(Encoding.ASCII.GetBytes(username+':'+password)));varresp=awaitclient.SendAsync(req);Console.WriteLine(resp.StatusCode);varcont=awaitresp.Content.ReadAsStringAsync();Console.WriteLine(cont);}
On the server side, the use of basic authentication can be enforced by a message handler, such as the one presented in Example 15-4.
This handler checks for the presence of an Authorization header with the Basic scheme and tries to extract the username and password in order to validate it.
If this verification succeeds, a principal describing the requester is created and added to the request message, before the processing is delegated to the next handler.
If any of the preceding conditions fails, the handler short-circuits the request by producing a response message with a 401 status code.
In any of the former cases, if the response message has a 401 status code, then a WWW-Authenticate header containing the required scheme and the realm name is added.
publicclassBasicAuthenticationDelegatingHandler:DelegatingHandler{privatereadonlyFunc<string,string,Task<ClaimsPrincipal>>_validator;privatereadonlystring_realm;publicBasicAuthenticationDelegatingHandler(stringrealm,Func<string,string,Task<ClaimsPrincipal>>validator){_validator=validator;_realm="realm="+realm;}protectedasyncoverrideTask<HttpResponseMessage>SendAsync(HttpRequestMessagerequest,CancellationTokencancellationToken){HttpResponseMessageres;if(!request.HasAuthorizationHeaderWithBasicScheme()){res=awaitbase.SendAsync(request,cancellationToken);}else{varprincipal=awaitrequest.TryGetPrincipalFromBasicCredentialsUsing(_validator);if(principal!=null){request.GetRequestContext().Principal=principal;res=awaitbase.SendAsync(request,cancellationToken);}else{res=request.CreateResponse(HttpStatusCode.Unauthorized);}}if(res.StatusCode==HttpStatusCode.Unauthorized){res.Headers.WwwAuthenticate.Add(newAuthenticationHeaderValue("Basic",_realm));}returnres;}}
If the authentication is successful, the resulting principal is added to the request via the HttpRequestContext.Principal.
The extraction and validation is performed by an extension method:
publicstaticasyncTask<ClaimsPrincipal>TryGetPrincipalFromBasicCredentialsUsing(thisHttpRequestMessagereq,Func<string,string,Task<ClaimsPrincipal>>validate){stringpair;try{pair=Encoding.UTF8.GetString(Convert.FromBase64String(req.Headers.Authorization.Parameter));}catch(FormatException){returnnull;}catch(ArgumentException){returnnull;}varix=pair.IndexOf(':');if(ix==-1)returnnull;varusername=pair.Substring(0,ix);varpw=pair.Substring(ix+1);returnawaitvalidate(username,pw);}
This function is decoupled from the username and password validation login, which is passed in as a delegate in the handler constructor.
Implementing HTTP-Based Authentication
In the previous example, we implemented server-side HTTP authentication as a Web API message handler. However, there are other architectural options: authentication can be implemented up in the pipeline as a Web API filter, or down in the hosting layer. Next weâll discuss the advantages and disadvantages of each option.
Implementing authentication on a Web API filter has the advantage of giving you access to a richer set of request information, namely:
- The selected controller and routes
- The routing parameters
- The actionâs parameters (if implemented as a action filter)
This option is relevant when the authentication depends on this information. In addition, Web API filters may be selectively applied to only a subset of controllers or actions. However, implementing authentication at the filter level also has some important disadvantages:
- Improperly authenticated requests are detected later in the pipeline, increasing the computational cost of rejected requests.
- The requesterâs identity is available only later in the pipeline. This means that other middleware components, such as caching middleware, may not have access to the identity information. If the caching should be private (i.e., segregated by user), then this is a severe limitation.
An alternative option is to implement authentication on a message handler, as shown previously.
Since a message handler runs immediately after the hosting adaptation layer, the cost of rejected requests is smaller.
Also, the identity information is immediately available to all the following handlers.
Since message handlers are also available on the client side, when you use HttpClient, this approach exhibits an interesting symmetry.
However, the use of the OWIN specification, described in Chapter 11, introduces another option for implementing authentication: OWIN middleware. This option presents important advantages:
- It broadens the usage scope, since the same authentication middleware can now be used by multiple frameworks, not only ASP.NET Web API.
- The identity information is immediately available to other downstream OWIN middleware, such as caching or logging.
In fact, the introduction of the OWIN specification means that all intermediary layers that are not specific to a framework should probably be best implemented as OWIN middleware. This is the approach being followed by the Katana project, which includes a set of authentication middleware implementations.
Obviously, this approach is applicable only when youâre hosting Web API on top of an OWIN server. However, the increasing OWIN adoption makes this scenario much more plausible.
Katana Authentication Middleware
Version 2.0 of the Katana project includes a set of middleware implementations, providing multiple authentication mechanisms with different usage scopes, ranging from classical cookie-based authentication to OAuth 2.0âbased authorization. These middleware implementations are based on an extensible class infrastructure, which weâll describe in the following paragraphs.
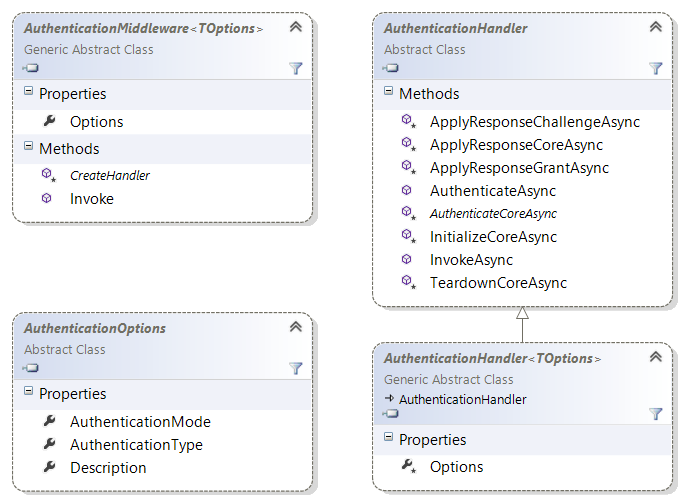
At the root of this infrastructure it is the base abstract AuthenticationMiddleware<TOption> class, shown in Example 15-5, from which concrete authentication middleware can derive.
publicabstractclassAuthenticationMiddleware<TOptions>:OwinMiddlewarewhereTOptions:AuthenticationOptions{protectedAuthenticationMiddleware(OwinMiddlewarenext,TOptionsoptions):base(next){...}publicTOptionsOptions{get;set;}publicoverrideasyncTaskInvoke(IOwinContextcontext){AuthenticationHandler<TOptions>handler=CreateHandler();awaithandler.Initialize(Options,context);if(!awaithandler.InvokeAsync()){awaitNext.Invoke(context);}awaithandler.TeardownAsync();}protectedabstractAuthenticationHandler<TOptions>CreateHandler();}
This class is parameterized by a TOption type that defines the authentication middleware configuration options, such as credential validation.
Typically, the development of custom authentication middleware includes the definition of a specific options class, such as the one presented in
Example 15-6.
publicclassBasicAuthenticationOptions:AuthenticationOptions{publicFunc<string,string,Task<AuthenticationTicket>>ValidateCredentials{get;privateset;}publicstringRealm{get;privateset;}publicBasicAuthenticationOptions(stringrealm,Func<string,string,Task<AuthenticationTicket>>validateCredentials):base("Basic"){Realm=realm;ValidateCredentials=validateCredentials;}}
The OwinMiddleware.Invoke method, called when the request is being passed through the middleware pipeline, delegates the authentication behavior into an authentication handler instance, provided by the CreateHandler method.
So, the main task of a custom authentication middleware is typically just the definition of this method, as illustrated by Example 15-7.
classBasicAuthnMiddleware:AuthenticationMiddleware<BasicAuthenticationOptions>{publicBasicAuthnMiddleware(OwinMiddlewarenext,BasicAuthenticationOptionsoptions):base(next,options){}protectedoverrideAuthenticationHandler<BasicAuthenticationOptions>CreateHandler(){returnnewBasicAuthenticationHandler(Options);}}
To better understand the handlerâs responsibilities, youâll find it useful to see how it is used by the base middleware.
As shown in Example 15-5, after creating the handler, the base middlewareâs Invoke method performs three steps.
First, it calls the handlerâs Initialize method. As we will see briefly, it is this method that triggers most of the authentication behavior.
Afterward, it calls the handlerâs InvokeAsync method.
If the return value is false, then the next middleware in the chain is called. Otherwise, the request processing is short-circuited, meaning that no more downstream middleware is called.
Finally, at the end, the TeardownAsync method is called to finalize the handlerâs instance.
Notice that the middleware and the handler objects have different lifetimes: the middleware lasts for the duration of the application, while the handler instance is specific to single-request processing.
This is one of the reasons that justifies the existence of these two separate concepts.
The AuthenticationHandler abstract class, shown in Figure 15-9, is where most of the common authentication coordination resides.
The specific authentication logic is delegated to hook methods implemented by concrete derived classes.
In the context of the HTTP framework-based authentication, two of these hook methods are particularly relevant: AuthenticateCoreAsync and ApplyResponseChallengeAsync.
The AuthenticateCoreAsync method is called by the handlerâs Initialize method to try to authenticate the current request.
Example 15-8 shows an AuthenticationCoreAsync implementation that tries to get and validate the Basic credentials from the requestâs Authorization header.
If itâs sucessful, an identity is returned, which will be added by the base Initialize method to the requestâmore specifically, to the server.User context entry.
If not, null is returned to signal that no sucessful authentication was achieved.
ApplyResponseChallengeAsync is registered by the handlerâs Initialize method to be called on the responseâs OnSendingHeaders event, which is triggered just before the responseâs headers start to be sent to the connection.
Example 15-8 also shows a ApplyResponseChallengeAsync implementation that adds a WWW-Authenticate challenge header, with the Basic scheme, if the response is a 401.
classBasicAuthenticationHandler:AuthenticationHandler<BasicAuthenticationOptions>{privatereadonlystring_challenge;publicBasicAuthenticationHandler(BasicAuthenticationOptionsoptions){_challenge="Basic realm="+options.Realm;}protectedoverrideasyncTask<AuthenticationTicket>AuthenticateCoreAsync(){varauthzValue=Request.Headers.Get("Authorization");if(string.IsNullOrEmpty(authzValue)||!authzValue.StartsWith("Basic ",StringComparison.OrdinalIgnoreCase)){returnnull;}vartoken=authzValue.Substring("Basic ".Length).Trim();returnawaittoken.TryGetPrincipalFromBasicCredentialsUsing(Options.ValidateCredentials);}protectedoverrideTaskApplyResponseChallengeAsync(){if(Response.StatusCode==401){varchallenge=Helper.LookupChallenge(Options.AuthenticationType,Options.AuthenticationMode);if(challenge!=null){Response.Headers.AppendValues("WWW-Authenticate",_challenge);}}returnTask.FromResult<object>(null);}}
The AuthenticationTicket type, asynchronously returned by the AuthenticationTicket hook method, is a new type introduced by the Katana project to represent an identity.
It is composed of a claims identity and a set of additional authentication properties:
publicclassAuthenticationTicket{publicAuthenticationTicket(ClaimsIdentityidentity,AuthenticationPropertiesproperties){Identity=identity;Properties=properties;}publicClaimsIdentityIdentity{get;privateset;}publicAuthenticationPropertiesProperties{get;privateset;}}
To facilitate the middleware registration, it is typical for custom authentication implementations to also provide an extension method such as the one shown in Example 15-9. This enables usages such as this one:
app.UseBasicAuthentication(newBasicAuthenticationOptions("webapibook",(un,pw)=>{/* some credential validation logic */}));
publicstaticclassBasicAuthnMiddlewareExtensions{publicstaticIAppBuilderUseBasicAuthentication(thisIAppBuilderapp,BasicAuthenticationOptionsoptions){returnapp.Use(typeof(BasicAuthnMiddleware),options);}}
Active and Passive Authentication Middleware
In the OWIN specification, middleware accesses the request before it reaches the web framework. This means that the authentication requirements may not be known at the time the middleware is run. As an example, consider a classical web application and a Web API hosted on the same OWIN host. The former may use cookies and forms-based authentication, while the latter may use basic authentication. Using cookies to inadvertently authenticate a Web API request may result in security problems such as CSRF (cross-site request forgery) attacks, since cookies are automatically sent by browser-based user agents.
For this reason, Katana introduced the concept of active and passive authentication modes.
When in active mode, an authentication middleware will actively try to authenticate the request, adding an identity to the request context if successful.
It also will add a challenge to the responses if they have 401 status codes.
On the other hand, a middleware in passive mode registers itself only on a authentication manager.
Only if explicitly asked does the handler try to authenticate the request and produce an identity.
Authentication middleware operating in passive mode will also add challenges only if explicitly instructed by the authentication manager.
The authentication manager is yet another concept introduced by Katana and defines an interface through which other components, such as web applications, can interact with authentication middleware. In the next section, when describing Web APIâs authentication filters, we will present a concrete example of such usage.
The operation mode of an authentication middleware is defined by the AuthenticationOptions.AuthenticationMode property.
For the most part, concrete authentication implementations donât have to be aware of the configured authentication mode.
Instead, the behavioral differences are located in the common code located in the base AuthenticationHandler class.
For instance, AuthenticateCoreAsync will be called only if the authentication mode is active.
One notable exception to this rule is the addition of challenges to the response.
ApplyResponseChallengeAsync is always called by the infrastructure, independently of the configured mode.
However, the challenge should be added only if the mode is active or if the authentication scheme was added to the authentication manager.
The ApplyResponseChallengeAsync implementation in Example 15-8 uses the Helper.LookupChallenge utility method to decide if the challenge should be added.
Web API Authentication Filters
As stated before, an alternative architectural decision is to place authentication behavior on Web API filters. Version 2.0 of Web API introduces a new action pipeline stage, specifically designed to handle authentication. This stage is composed of authentication filters and precedes the authorization filters stage, meaning that it is the first one in the action pipeline.
An authentication filter is defined by the following interface, which contains two asynchronous methods:
publicinterfaceIAuthenticationFilter:IFilter{TaskAuthenticateAsync(HttpAuthenticationContextcontext,CancellationTokencancellationToken);TaskChallengeAsync(HttpAuthenticationChallengeContextcontext,CancellationTokencancellationToken);}
This authentication pipeline stage is divided into two phases: request processing and response processing.
In the first one, the Web API runtime calls the AuthenticateAsync method for each one of the registered filters, passing an authentication context containing both the action context and the request:
publicclassHttpAuthenticationContext{publicHttpActionContextActionContext{get;privateset;}publicIPrincipalPrincipal{get;set;}publicIHttpActionResultErrorResult{get;set;}publicHttpRequestMessageRequest{get{...}}...}
Each filterâs AuthenticateAsync method is responsible for authenticating the contextâs request.
If no credentials of the appropriate scheme are present in the message, then the context should be left unchanged.
If credentials are present and valid, then the contextâs Principal property is assigned with the authenticated principal.
Otherwise, if the credentials are invalid, a 401 status response message should be assigned to the contextâs ErrorResult, signaling to the runtime that there was an authentication error.
As a consequence, the request processing phase is immediately stopped, without calling any further AuthenticateAsync method, and the response phase is started.
If no filter assigned the contextâs ErrorResult, then the runtime continues to the next action pipeline phase.
This happens independently of the contextâs principal being assigned or not, delegating to upper layers the decision of whether or not to authorize the anonymous request.
The response processing phase of the authentication stage starts when a response is returned from the upper layer or if an error response was produced by an authentication filter.
In this response phase, the ChallengeAsync method is called for each one of the registered filters, passing a challenge context:
publicclassHttpAuthenticationContext{publicHttpActionContextActionContext{get;privateset;}publicIPrincipalPrincipal{get;set;}publicIHttpActionResultErrorResult{get;set;}publicHttpRequestMessageRequest{get{...}}// members and definitions elided for clarity}
This gives the authentication filters the opportunity to inspect the result message and add an authentication challenge if appropriate. Note that this method is always called for all authentication filters, independently of what happened in the request processing phase.
Example 15-10 shows a concrete authentication filter for the basic authentication scheme.
Since the credential validation process may involve communication with external systems (e.g., a credential database), we use a function returning a Task<ClaimsPrincipal>.
If no Authorization header is present or if the scheme is not Basic, then AuthenticateAsync leaves the context unchanged.
If credentials are present but are invalid, then an UnauthorizedResult representing a 401 status response is assigned to the ErrorResult.
This UnauthorizedResult has an empty challenge list, since this challenge information is added to the response processing phase by the ChallengeAsync method.
ChallengeAsync simply checks if the response has a 401 status, and if so adds the appropriate challenge.
The use of the ActionResultDelegate helper is required because the contextâs Response property is an IHttpActionResult, not directly an HttpResponseMessage.
This helper combines a sequence of IHttpActionResult instances into a single one.
publicclassBasicAuthenticationFilter:IAuthenticationFilter{privatereadonlyFunc<string,string,Task<ClaimsPrincipal>>_validator;privatereadonlystring_realm;publicboolAllowMultiple{get{returnfalse;}}publicBasicAuthenticationFilter(stringrealm,Func<string,string,Task<ClaimsPrincipal>>validator){_validator=validator;_realm="realm="+realm;}publicasyncTaskAuthenticateAsync(HttpAuthenticationContextcontext,CancellationTokencancellationToken){varreq=context.Request;if(req.HasAuthorizationHeaderWithBasicScheme()){varprincipal=awaitreq.TryGetPrincipalFromBasicCredentialsUsing(_validator);if(principal!=null){context.Principal=principal;}else{// challenges will be added by the ChallengeAsynccontext.ErrorResult=newUnauthorizedResult(newAuthenticationHeaderValue[0],context.Request);}}}publicTaskChallengeAsync(HttpAuthenticationChallengeContextcontext,CancellationTokencancellationToken){context.Result=newActionResultDelegate(context.Result,async(ct,next)=>{varres=awaitnext.ExecuteAsync(ct);if(res.StatusCode==HttpStatusCode.Unauthorized){res.Headers.WwwAuthenticate.Add(newAuthenticationHeaderValue("Basic",_realm));}returnres;});returnTask.FromResult<object>(null);}}
ASP.NET Web API 2.0 also includes a concrete IAuthenticationFilter implementation, named HostAuthenticationFilter, that uses Katanaâs authentication middleware, via the Katana authentication manager.
On the AuthenticateAsync method, this filter starts by trying to obtain the Katana authentication manager from the request context.
If the authentication manager is present, the filter then uses it to authenticate the request, passing the configured authentication type.
Internally, the authentication manager checks if a compatible middleware was registered and, if so, invokes it to authenticate the request (passive mode) or returns the result of the previous authentication already done on the middleware pipeline (active mode).
Similarly, the HostAuthenticationFilter.ChallengeAsync method also tries to obtain the Katana authentication manager and uses it to add the challenge information, which will then be used by Katanaâs authentication middleware to add the challenge WWW-Authenticate header.
Token-Based Authentication
Unfortunately, the password-based HTTP basic authentication method described and used in the previous sections has several problems. The first set results from the password having to be sent on every request:
- The client must store the password or obtain it from the user on every request, which is rather impractical. Notice also that this storage must be done in clear text or through a reversible protection method, which increases the risk of password exposure.
- Similarly, the server has to validate the password on every request, which can have a significant cost.
- The validation information is typically stored on external systems.
- The validation process has a high computational cost due to the techniques used to protect against dictionary attacks.
- The probability of accidental exposure to an unauthorized party is increased.
Passwords also typically have low uncertainty and are subject to dictionary attacks. This means that any publicly available system that validates passwords must have protections against this type of attack, for instance by limiting the number of incorrect validations that are performed in a given time period.
Passwords also typically have broad scopes, meaning that the same password is used to authenticate a client when accessing any resource on a given system. Most of the time, it would be useful to have a credential thatâs usable only on a resource or HTTP method subset.
Password-based mechanisms are also not compatible with distributed scenarios, where the authentication process is delegated to external systems, such as organizational or social identity providers. Finally, they are not adequate for delegation scenarios, which we will see in Chapter 16.
A better approach to Web API authentication is to use security tokens, which are defined by RFC 4949 as âa data object (â¦) used to verify an identity in an authentication process.â A concrete token example is the use of authentication cookies on a typical web application:
- An initial bootstrap authentication is performed, eventually using a password-based mechanism, which results in the creation of a cookie that is returned to the client.
- Every subsequent request made by the client is authenticated via this cookie and does not require the bootstrapping credentials.
Security tokens are a rather general and abstract concept; they may be instantiated in different ways and possess different characteristics. Next we present some of the most relevant design alternatives.
First, security tokens can contain the represented security information or just be a reference to that information. In the latter case, a token simply contains a nonforgeable reference to a security store entry, typically managed by the token issuer. These reference-based tokens are also called artifacts and have two main benefits:
- They have shorter dimensions, which is important when they have to be embedded in URIs.
- They are easier to revoke or cancel; the issuer just has to delete the referenced store entry.
However, they are not self-contained: obtaining the represented security information typically requires an query to the token issuer or external store. Thus, they are more commonly used when the issuing and consuming entities are the same or when there are length restrictions.
A nonforgeable reference token can be made of a random bit string with sufficient length (e.g., 256 bits), created by the token issuer. The associated token security information is then stored, keyed by the hash value of this reference. The use of a cryptographic hash function means that:
- It is easy to compute the store key and access the security information, given the token contents.
- It is hard to compute a valid token given the store key, which is an extra layer of defense in case an attacker can read the store contents.
The alternative option to references is for tokens to contain the security information, securely packaged for communication between two or more parties. This packaging requires the use of cryptographic mechanisms and ensures properties such as:
- Confidentiality
- Only the authorized receiver should be able to access the contained information.
- Integrity
- The consuming party should be able to detect any modifications to the token while in transit between the two parties.
These tokens are commonly called assertions and have the advantage of being self-contained: the token consumer can obtain the security information without having to access an external system or store. The downside is that they have higher dimensions, which can exceed the practical URI limits. They also require the use of cryptographic mechanisms for their production and consumption. The SAML (Security Assertion Markup Language) assertions are a broadly used example of self-contained tokens, where the security information is represented in a XML idiom and protected via XML-Signature and XML-Encryption. This type of security token is commonly used by classical federation protocols such as the SAML protocols, WS-Federation, or WS-Trust.
The JSON Web Token (JWT) is a more recent format for self-contained tokens, based on the JSON syntax. This token type aims to be usable in âspace constrained environments such as HTTP Authorization headers and URI query parameters.â
The following example represents a signed JWT token:
eyJ0eXAiOiJKV1QiLCJhbGciOiJIUzI1NiJ9.eyJpc3MiOiJodHRwOi8vaXNzdWVyLndlYmFwaWJvb
2submV0IiwiYXVkIjoiaHR0cDovL2V4YW1wbGUubmV0IiwibmJmIjoxMzc2NTcxNzAxLCJleHAiOjE
zNzY1NzIwMDEsInN1YiI6ImFsaWNlQHdlYmFwaWJvb2submV0IiwiZW1haWwiOiJhbGljZUB3ZWJhc
Glib29rLm5ldCIsIm5hbWUiOiJBbGljZSJ9.fCO6l0k_hey40kqEVuvMfiM8LeXJtsYLfNWBOvwbU-I
The JWT token is composed of a sequence of parts, separated by the . character. Each part is the base64url encoding of an octet stream: the first two octet streams result from the UTF-8 encoding of two JSON objects and the last one is the output of a signature scheme. The first object (encoded in the first part) is the JWT header:
{"typ":"JWT","alg":"HS256"}It defines the token type and applied cryptographic protection. In this case, only integrity protection was added via a MAC scheme (HS256 stands for HMAC-SHA256). However, the JWT header also supports the encryption of its contents.
The second object is the JWT claims set (line breaks added for clarity):
{
  "iss":"http://issuer.webapibook.net",
  "aud":"http://example.net",
  "nbf":1376571701,
  "exp":1376572001,
  "sub":"alice@webapibook.net",
  "email":"alice@webapibook.net",
  "name":"Alice"
}
The JWT claims set object contains claims for a subject asserted by an issuer and intended to be used by an audience. Each property corresponds to the claim type and the propertyâs value contains the claim value, which can be any JSON value (e.g., a string or an array). Some claim types are defined by the JWT specification, namely:
-
iss(issuer) identifies the token issuer. -
sub(subject) is an unique identifier for the token subjectâthat is, the entity to which the token claim applies. -
aud(audience) identifies the allowed claim consumers. -
exp(expiration) andnbf(not before) define a valid time period.
Example 15-11 shows how a JWT token can be created and consumed, using the JwtSecurityTokenHandler class available in the System.IdentityModel.Tokens.Jwt NuGet package.
[Fact]publicvoidCan_create_and_consume_jwt_tokens(){conststringissuer="http://issuer.webapibook.net";conststringaudience="the.client@apps.example.net";constintlifetimeInMinutes=5;vartokenHandler=newJwtSecurityTokenHandler();varsymmetricKey=GetRandomBytes(256/8);varsigningCredentials=newSigningCredentials(newInMemorySymmetricSecurityKey(symmetricKey),"http://www.w3.org/2001/04/xmldsig-more#hmac-sha256","http://www.w3.org/2001/04/xmlenc#sha256");varnow=DateTime.UtcNow;varclaims=new[]{newClaim("sub","alice@webapibook.net"),newClaim("email","alice@webapibook.net"),newClaim("name","Alice"),};vartoken=newJwtSecurityToken(issuer,audience,claims,newLifetime(now,now.AddMinutes(lifetimeInMinutes)),signingCredentials);vartokenString=tokenHandler.WriteToken(token);varparts=tokenString.Split('.');Assert.Equal(3,parts.Length);varvalidationParameters=newTokenValidationParameters(){AllowedAudience=audience,SigningToken=newBinarySecretSecurityToken(symmetricKey),ValidIssuer=issuer,};tokenHandler.NameClaimType=ClaimTypes.NameIdentifier;varprincipal=tokenHandler.ValidateToken(tokenString,validationParameters);varidentity=principal.Identities.First();Assert.Equal("alice@webapibook.net",identity.Name);Assert.Equal("alice@webapibook.net",identity.Claims.First(c=>c.Type==ClaimTypes.NameIdentifier).Value);Assert.Equal("alice@webapibook.net",identity.Claims.First(c=>c.Type==ClaimTypes.).Value);Assert.Equal("Alice",identity.Claims.First(c=>c.Type=="name").Value);Assert.Equal(issuer,identity.Claims.First().Issuer);}
On the validation side, TokenValidationParameters defines the token consumption parameters, such as the allowed destinations (audiences) and issuers.
These parameters also define the signature validation key.
Since the example uses a symmetrical signature scheme, the same key must be used both on the production and consumption sides.
If the validation is successful, a claims principal with the tokenâs claims is also produced.
Another token classification characteristic is the way they are bound to a message. The two most common alternatives are bearer and holder-of-key.
Bearer tokens are defined by RFC 6750 as:
A security token with the property that any party in possession of the token (a âbearerâ) can use the token in any way that any other party in possession of it can. Using a bearer token does not require a bearer to prove possession of cryptographic key material (proof-of-possession).
A bearer token is simply added to a message without any additional binding between the two. This means that any party that has access to the plain-text message can get the contained token and use it on another message without any additional knowledge. In this regard, bearer tokens are similar to bearer checks: they can be used by a subject without any additional identity proof.
Bearer tokens are easy to use; however, their security fully depends on:
- The confidentiality of the message where they are contained
- The guarantee that they are never sent to the wrong parties
An alternative approach is the holder-of-key method, where, for each authenticated message, the client must prove the knowledge of a cryptographic key bound to the token. The client typically does this by adding a symmetric signature (a message authentication code) of selected parts of the message, computed with the cryptographic key.
As in the basic authentication scheme, a secret is also shared between the client and the server. However, this secret is really a key that is used to sign and validate messages and is never transmitted:
- The client uses the shared key to sign some carefully chosen parts of the request message and then attaches this signature to the message before sending it to the server, alongside the token (similar to a username).
- The server uses the token to retrieve the clientâs shared secret and then uses it to validate the signature.
This scheme is based on the assumption that, for a cryptographic signature mechanism, only a party that knows the shared key can produce valid signatures. This way, the client proves the knowledge of a shared secret, without having to reveal it.
A malicious third party that manages to observe the request message has access only to the signature value, not to the shared secret, so it cannot authenticate new messages. It can, however, replay the observed message since the same signature will be valid. To protect against this, you use a combination of timestamps and nonces.
A timestamp is a temporal value indicating the moment when the original message was produced. The timestamp is added to the sent message and is also protected by the signature. On the server side, messages are accepted only if the timestamp is in an acceptance window (e.g., current time plus or minus five minutes). This window exists to tolerate message transmission delays and clock deviations.
A nonce (contraction of the sentence ânumber used only onceâ) is typically a random number that is used only one time. Nonces are used in conjunction with timestamps to avoid replays inside the server acceptance window: the nonces of all received messages are stored and a message is refused if its nonce already exists in the store. When used with timestamps, nonces only have to be stored for the duration of the acceptance window.
Signature mechanisms can be divided into two types. Asymmetric mechanisms use different keys for the signature production and the signature validation algorithmsâthe signature production uses a private key and the signature verification uses a public key. Symmetric mechanisms, usually designated by message authentication codes, use the same key for both the signature production and the signature validation. This symmetry means that any party able to verify the signatures can also produce them, which is different from what happens with conventional signatures. As a consequence of this symmetry, nonrepudiation isnât provided. However, symmetric mechanisms exhibit much better performance characteristics and so are typically used when the extra properties provided by asymmetrical mechanisms are not needed. When the key holding proof is based on message authentication codes, these tokens are designated as MAC tokens. Symmetric mechanisms are also typically deterministic: the signature of the same message with the same key always produces the same value. This means that we can verify the signature by computing the signature value and comparing it with the value in the received message.
A popular method of building MAC algorithms is HMAC (hash-based message authentication code), defined by RFC 2104, which internally uses a cryptographic hash function. For instance, Amazon S3 uses a combination of HMAC with the SHA-1 function, designated by HMAC-SHA1. Windows Azure Blob Service also uses the HMAC algorithm, but with the more recent SHA-256 hash function (HMAC-SHA256).
The MAC token technique is used by several authentication schemes, namely:
All four schemes use artifact tokens, meaning that the token is just an unique identifier used by the server to retrieve the clientâs identity claims as well as the token key.
Figure 15-10 illustrates the signature-based authentication process. The sending side extracts a message representative (defined shortly) from the message and signs it using the shared key. The resulting signature value is inserted in the sent request message. The receiving side validates this signature by extracting the message representative, signing it, and comparing the signature values.
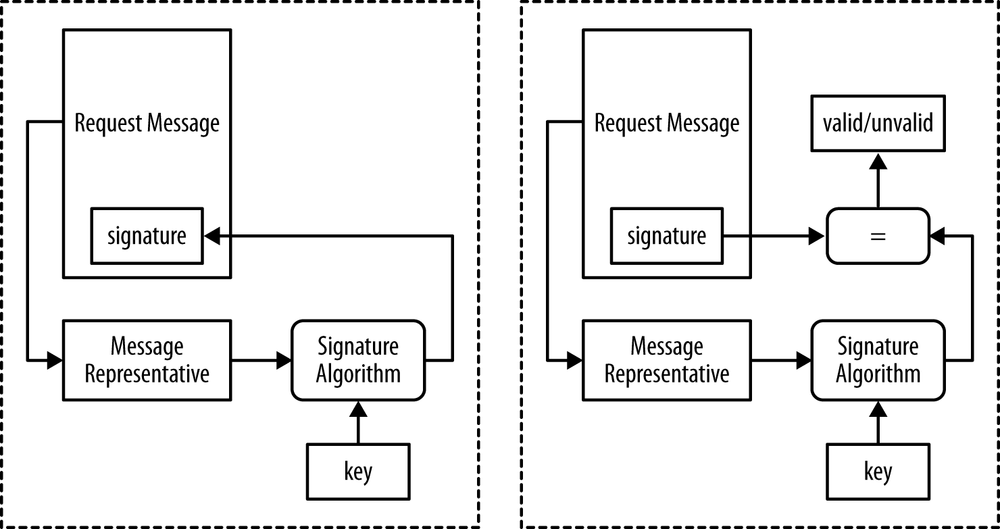
Due to the presence of HTTP intermediaries that can change parts of the request message (e.g., remove proxy headers), the signature cannot be performed over the complete message. Instead, it is performed over the message representative, which is a string built from the message such that:
- It is not affected by the message changes typically performed by HTTP intermediaries.
- It captures all the important parts of the message; it should not be possible to have two semantically different messages with the same representative.
The Hawk Authentication Scheme
To make things more concrete, in this section we provide a brief description of the Hawk authentication scheme. In this scheme, the message representative is composed on the client side of the concatenations of the following elements, separated by a newline character:
-
The constant string
"hawk.1.header" - A timestamp string representing the number of seconds since January 1, 1970, 00:00:00 GMT
- A nonce
- The request HTTP method
- The request URI path and query
- The request URI host name (excluding the port)
- The request URI port
- The optional payload hash or the empty string
- The optional application-specific extension data or the empty string
After being constructed, this message representative is converted into a byte sequence through UTF8 encoding and then supplied to the MAC scheme, configured with the tokenâs key. In contrast with the Amazon and Azure schemes, the Hawk authentication scheme supports multiple MAC algorithms (currently HMAC-SHA1 and HMAC-SHA256). The output of the MAC scheme (a byte sequence) is then converted back into a string through the Base64-encoding algorithm.
The Authorization header uses the Hawk scheme string, followed by this set of key/value pairs:
-
id - The token ID
-
ts - The used timestamp
-
nonce - The used nonce
-
mac - The Base64 encoding of the MAC output
-
hash - (Optional) The hash of the payload representative
-
ext - (Optional) The optional extension data
The timestamp, nonce, and extension data must be explicitly added to the message Authorization header in order to allow the server to re-create the message representative.
Using this message representative, the server recomputes the MAC output, using the key identified by the id field, and compares it with the received mac field.
If the MAC values are diferent, that means that the message was tampered with and should be rejected.
However, comparing the MAC values is not sufficient, because the attacker may be replying to past valid messsages.
To protect against this, the server should:
- Check that the received nonce wasnât used on a previous message.
- Check that the received timestamp is inside an acceptance time window, which by default is more or less one minute.
The server should also store the received nonce, at least for the length of the acceptance time window.
The Hawk scheme allows for optional protection of the request message payload by allowing the message representative to include a hash of the payload representative, computed as the newline separated concatenation of:
-
The constant string
"hawk.1.payload" -
The request content type (e.g.,
application/xml), with the parameters removed - The request payload, prior to any content or transfer encoding
When using payload protection, the hash of the payload representative string is also included in the Authorization header (hash field).
This allows the server to verify the message representative before computing the payload hash.
For more detailed information about the Hawk scheme, refer to the https://github.com/hueniverse/hawk repository, which contains both the Hawk informal description and a Node.JS-based implementation. This bookâs GitHub repository also includes a C# implementation called HawkNet.
The following chapter, focusing on the OAuth 2.0 Framework, provides more concrete examples of token-based authentication, namely protocols for obtaining and using these tokens.
Authorization
As weâve seen, authentication deals with the problem of collecting and validating information about a subject, namely its identity claims. Authorization, on the other hand, deals with the complementary problem of controlling the actions that these subjects may perform over protected resources. Figure 15-11 illustrates this problem, identifying the core concepts of subject, action, and resource.

What constitutes a subject, action, and resource depends largely on the context. For instance, the .NET Framework includes a code access authorization model where the resources are class methods, actions correspond to method invocations, and the subjects are the identities associated with the running thread. On the other hand, in the context of Web APIs the mapping of this concept is rather straightforward:
- Protected resources correspond to the HTTP resources targeted by request messages.
-
The actions are the HTTP methods (e.g.,
GETorDELETE). - Finally, subjects correspond to the HTTP clients performing the HTTP requests.
It is often useful to divide authorization into the following parts: policy, decision, and enforcement. Authorization policy is the specification of what is allowed. For instance, the following statements are examples of an authorization policy expressed in natural language:
- âNonsafe HTTP methods cannot be performed by anonymous subjects.â
- âIssues can only be closed by their creators or by project managers.â
- âThe ticket title can only be changed by its creator.â
Authorization decision is the process of evaluating whether an access, characterized by a (subject, action, resource) triple, is allowed by the defined policy. Finally, authorization enforcement is the mechanism used to ensure that only allowed accesses are performed. Authorization enforcement is typically coupled with the runtime mechanisms available to intercept accesses (e.g., Web API filters), whereas authorization decision is dependent on the policy. Figure 15-12 illustrates these concepts and their relationships.
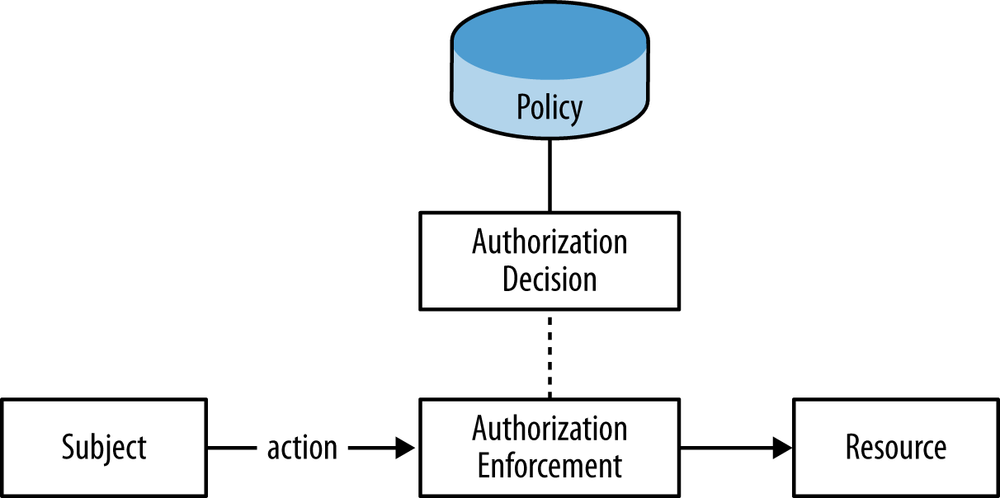
In a distributed system, the decision and enforcement components may be performed by different nodes or at multiple levels. For instance, when using the OAuth 2.0 Framework (presented in the following chapter), you can make the authorization decisions on an external authorization server, leaving to the resource server the task of ensuring that only allowed accesses are performed.
Authorization can also be performed at multiple levels, namely near the connector to the external world (the Web API) or near the domain objects and methods. These multiple levels are often complementary. Authorization performed at the Web API level allows unauthorized requests to be terminated as early as possible, but the policy decision point may not have access to all the domain information required to make a final decision. On the other hand, authorization performed at the domain level has access to a richer set of information. However, this also means that unauthorized requests use more computational resources. In this chapter, the focus is given to authorization at the Web API level.
Authorization Enforcement
ASP.NET Web API provides multiple ways of intercepting HTTP requests.
One of these ways is authorization filters, which are located in the controller layer, after authentication filters but before model binding and action filters.
As the name suggests, authorization filters can be used to perform authorization enforcement.
ASP.NET Web API includes a concrete authorization filter, named AuthorizeAttribute, which can be used to annotate controller classes or actions.
This AuthorizeAttribute class has two properties for defining the authorization policy:
-
Usersis a comma-separated list of usernames; when not empty, the access is allowed only if the userâs name belongs to that list. -
Rolesis a comma-separated list of roles; when not empty, the access is allowed only if the user has a role in that list.
Example 15-12 shows this attribute in use:
-
The
AuthorizeAttribute, targeting theResourceControllerclass, requires all requests to be authenticated. The only exception isGETrequests, since theGetaction is annotated withAllowsAnonymous. -
Authorize(Roles = "ProjectManager"), targetingDeleteactions, requires allDELETErequests to be performed by subjects in theProjectManagerrole.
[Authorize]publicclassResourceController:ApiController{[AllowAnonymous]publicHttpResponseMessageGet(){returnnewHttpResponseMessage{Content=newStringContent("resource representation")};}publicHttpResponseMessagePost(){returnnewHttpResponseMessage(){Content=newStringContent("result representation")};}[Authorize(Roles = "ProjectManager")]publicHttpResponseMessageDelete(stringid){returnnewHttpResponseMessage(HttpStatusCode.NoContent);}}
Unfortunately, having the authorization policy directly defined in the AuthorizeAttribute ties the authorization policy to the resource controller class.
As a consequence, any change on the policy (e.g., âQA engineers also can delete ticketsâ) implies a change and recompilation in the code.
A better approach would be to have the authorization attribute delegate the authorization decision to an external component, which could then be evolved and deployed independently.
One way to achieve this is by using the claims authorization manager concept, provided in .NET 4.5 via the ClaimsAuthorizationManager base class and summarized in Example 15-13.
The main role of this task is to perform authorization decisions via its CheckAccess method.
By default, it always returns true, but derived classes can override it to implement custom authorization policies.
publicclassClaimsAuthorizationManager:ICustomIdentityConfiguration{publicvirtualboolCheckAccess(AuthorizationContextcontext){returntrue;}...}
The CheckAccess method receives an AuthorizationContext class, described in Example 15-14, representing an access via the (subject, action, resource) triple, where the subject is represented by a ClaimsPrincipal.
Interestingly, both the action and the resource are also represented as claims.
Note also that this class is decoupled from the authorization enforcement mechanism.
Namely, it is not tied to Web API or other similar technology.
publicclassAuthorizationContext{publicClaimsPrincipalPrincipal{get{...}}publicCollection<Claim>Action{get{...}}publicCollection<Claim>Resource{get{...}}publicAuthorizationContext(ClaimsPrincipalprincipal,Collection<Claim>resource,Collection<Claim>action){...}}
The Thinktecture.IdentityModel.45 library provides a ClaimsAuthorizeAttribute that uses this strategy: when the Web API runtime calls this attribute to check whether the request is allowed, the attribute delegates this decision to the registered singleton ClaimsAuthorizationManager.
The call to the ClaimsAuthorizeAttribute contains an authorization context with the requestâs claims principal, action name, and controller name.
Example 15-15 shows a custom authorization manager, evaluating the same authorization policy as the one defined in Example 15-12.
The main difference is that the policy is now externalized to a separate component that can be evolved and built independently.
publicclassCustomPolicyClaimsAuthorizationManager:ClaimsAuthorizationManager{publicoverrideboolCheckAccess(AuthorizationContextcontext){varsubject=context.Principal;varmethod=context.Action.First(c=>c.Type==ClaimsAuthorization.ActionType).Value;varcontroller=context.Resource.First(c=>c.Type==ClaimsAuthorization.ResourceType).Value;if(controller=="ClaimsResource"){if(method.Equals("GET",StringComparison.OrdinalIgnoreCase))returntrue;if(method.Equals("DELETE",StringComparison.OrdinalIgnoreCase)&&!subject.IsInRole("ProjectManager"))returnfalse;returnsubject.Identity.IsAuthenticated;}returnfalse;}}
We will return to the subject of authorization in the next chapter, where we describe the OAuth 2.0 Framework. Until then, we shift our focus to a different kind of authorization: controlling browser access to cross-origin resources.
Cross-Origin Resource Sharing
User agents, such as browsers, combine and process content (e.g., HTML documents and script programs) from multiple sources. Typically, these sources have different trustworthiness levels, and may include malicious sites trying to compromise both the confidentiality and integrity of other sitesâ content. The same-origin policy is a set of security polices enforced by user agents, which uses the contentâs origin to impose restrictions on how these contents can interact, namely via the user agent internal APIs (e.g., DOM access and networking).
The origin concept, described by RFC 6454, groups URIs based on their scheme, host, and port. Simplifying a little, two URIs have the same origin if they have the same (scheme, host, port) triple. For instance, http://example.com/ and http://example.com:80/path have the same origin; however, http://example.com and http://www.example.com have different origins.
The XMLHttpRequest API is an example of a user agent API using the same-origin policy.
When a request is initiated via the open method, the XMLHttpRequest object compares the origin of both:
- The requested URI
-
The URI of the document that instantiated the
XMLHttpRequest
The request is allowed only if these two URIs have the same origin, thereby forbidding cross-origin requests.
Same-origin policies are particularly important for browser contexts, due to the way cookie-based credentials are automatically attached to every sent request. For instance, if a browser has valid authentication cookies for https://banking.example.net, these cookies will be automatically attached to any request to that origin. As a consequence, if a malicious script from an external origin were allowed to perform a request on https://banking.example.net, that request would automatically be authenticated and the script would have access to protected resources on https://banking.example.net. Same-origin policies are a method to protect against this type of attack.
However, the cross-origin request limitation also forbids some legitimate scenarios, where a resource would like to authorize access by contents from other origins.
Cross-Origin Resource Sharing (CORS) is a W3C recommendation that enables this scenario, by defining a mechanism to permit cross-origin requests subject to authorization by the accessed resource.
It is based on additional HTTP request and response headers, as well as a set of processing rules for user agents, namely for CORS-enabled XMLHttpRequest implementations.
Briefly, the CORS specification stipulates that a cross-origin request should be executed by XMLHttpRequest in one of two ways.
With the simple cross-origin request algorithm, requests are preemptively sent but the results are made visible to the calling script only if explicitly authorized by the resource.
With the cross-origin request with preflight algorithm, a OPTIONS request (the preflight) is previously performed to query the resource if it authorizes the cross-origin request.
The original request is performed only if the response to this query is positive.
The simple algorithm is an optimization applied only to cross-origin requests that could already be made by a script even without CORS.
For instance, a script program can use dynamically generated and submitted HTML forms to initiate cross-origin GET or POST requests.
This means that resources must already be prepared to correctly handle attacks based on this feature, commonly named cross-site request forgery (CSRF) attacks.
In this case, a CORS-enabled XMLHttpRequest just has to ensure that the requestâs response is not visible to the script, except if explicitly authorized by the resource.
A cross-origin request can use the simple algorithm if:
-
The request method is
GET,HEAD, orPOST(the so-called simple methods). -
The headers explicitly added by the script to the request are all simple headers (
Accept,Accept-Language,Content-Language, orContent-Type). -
The content type is
application/x-www-form-urlencoded,multipart/form-data, ortext/plain.
For instance, consider a script running on a document loaded from http://www.example.net that wants to access a resource located at https://api.example.net, using the XMLHttpRequest API (different origin because the hostname and the scheme are different).
If all the simple algorithm restrictions are met, then a CORS-enabled user agent preemptively sends the request, adding an Origin header with the documentâs origin (http://www.example.net):
GEThttps://api.example.net/api/resource HTTP/1.1Host:api.example.netOrigin:http://www.example.netReferer:http://www.example.net/
It is now the responsibility of the resource to evaluate whether the access is authorized for the http://www.example.net/ origin.
If so, the response must contain an Access-Control-Allow-Origin granting access to that origin:
HTTP/1.1200OKContent-Length:23Content-Type:text/plain;charset=utf-8Access-Control-Allow-Origin:http://www.example.netresourcerepresentation
When the user agent receives this response and confirms that it contains an Access-Control-Allow-Origin with the requesterâs origin, it presents the response to the calling script.
If the responseâs Access-Control-Allow-Origin is absent or does not include the callerâs origin, then a network error is signaled to the calling script.
Note that if the resource is not CORS-aware, the response will not contain the Access-Control-Allow-Origin and the user agent will interpret that as a denied authorization.
If any of the simple algorithm conditions does not hold (e.g., the request uses the PUT or DELETE method), the CORS specification uses a preflight request, wherein the user agent first performs an OPTIONS request on the resource to check whether a cross-origin request is authorized.
This request contains an Origin header with the caller origin as well as an Access-Control-Request-Method with the required HTTP method:
OPTIONS https://api.example.net/api/resource HTTP/1.1
Host: api.example.net
Access-Control-Request-Method: PUT
Origin: http://www.example.net
Access-Control-Request-Headers: origin
Referer: http://www.example.net/
A CORS-aware resource uses this origin and method information to evaluate if the cross-origin is allowed.
If so, it produces a response message containing both the Access-Control-Allow-Origin and the Access-Control-Allow-Methods headers:
HTTP/1.1 200 OK
Access-Control-Allow-Origin: http://www.example.net
Access-Control-Allow-Methods: PUT
Content-Length: 0
Only after receiving this response allowing the access does the user agent perform the original request:
PUT https://api.example.net/api/resource HTTP/1.1
Host: api.example.net
Connection: keep-alive
Origin: http://www.example.net
Referer: http://www.example.net/
Once again, the response is made visible to the calling script only if it includes the Access-Control-Allow-Origin header with the scriptâs origin.
HTTP/1.1 204 No Content
Access-Control-Allow-Origin: http://www.example.net
For optimization purposes, the resource can also include an Access-Control-Max-Age in the preflight response, allowing the user agent to cache this response on a preflight result cache for the time defined by this header.
This feature helps to reduce the number of preflight requests needed.
CORS Support on ASP.NET Web API
ASP.NET Web API version 2.0 adds support for the CORS specification by providing abstractions to define cross-origin policies and mechanisms to enforce them.
Globally, you activate cross-origin support by calling the EnableCors extension method on the HttpConfiguration object:
config.EnableCors();
Then, you can use the EnableCorsAttribute to explicitly annotate the controllers or actions on which CORS support should be enabled:
[EnableCors(...)]publicclassResourceController:ApiController{...}
You can also define the cross-origin support globally by passing an EnableCorsAttribute instance to the EnableCors method:
config.EnableCors(newEnableCorsAttribute(...));
The EnableCorsAttribute not only enables but also defines the allowed cross-origin policy (for instance, the set of allowed origins or request methods).
For that, this attribute is parameterized in its constructor with the allowed origins, the allowed request methods, and the allowed and exposed headers.
It is also possible to define the preflight max age:
[EnableCors(origins:"https://localhost", headers:"*", methods:"GET",PreflightMaxAge = 60)]publicclassResourceController:ApiController{...}
As expected, the policies defined by attributes targeting actions have higher precedence that those defined by attributes targeting controller classes.
The attribute passed into config.EnableCors will define the default policy, applied when the requestâs controller and action donât have any associated policy.
Despite this simple attribute model, under the hood Web API has an extensible infrastructure, displayed in Figure 15-13, allowing alternate ways for cross-origin policy definition.
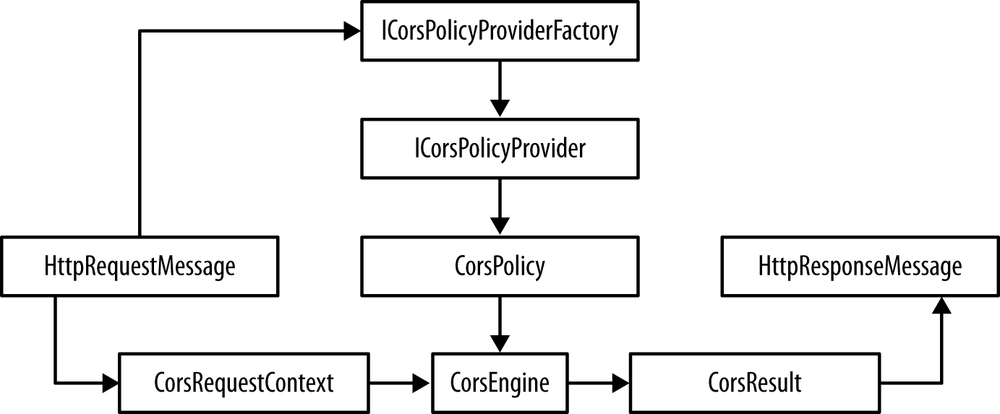
Cross-origin policy is enforced by the CorsMessageHandler, inserted in the request pipeline by the EnableCors method.
When an HTTP request reaches it, this handler checks the Origin header to see if it is CORS enabled.
If so, the handler builds a CorsRequestContext with the CORS-related request information:
publicclassCorsRequestContext{publicUriRequestUri{get;set;}publicstringHttpMethod{get;set;}publicstringOrigin{get;set;}publicstringHost{get;set;}publicstringAccessControlRequestMethod{get;set;}publicboolIsPreflight{get;}// ...}
Afterward, it uses the ICorsPolicyProviderFactory registered in the configuration to try to locate the policy provider, which then provides the policy for the request:
publicinterfaceICorsPolicyProviderFactory{ICorsPolicyProviderGetCorsPolicyProvider(HttpRequestMessagerequest);}publicinterfaceICorsPolicyProvider{Task<CorsPolicy>GetCorsPolicyAsync(HttpRequestMessagerequest,CancellationTokencancellationToken);}
This double indirection is required because the factory is statically defined, while the policy provider may be different for each request.
The cross-origin policy is just an instance of the following value class:
publicclassCorsPolicy{publicboolAllowAnyHeader{get;set;}publicboolAllowAnyMethod{get;set;}publicboolAllowAnyOrigin{get;set;}publicIList<string>ExposedHeaders{get;privateset;}publicIList<string>Headers{get;privateset;}publicIList<string>Methods{get;privateset;}publicIList<string>Origins{get;privateset;}publiclong?PreflightMaxAge{get;set;}publicboolSupportsCredentials{get;set;}}
The CorsMessageHandler uses this CorsPolicy to convert the requestâs CorsRequestContext into a CorsResult that will then be applied to the HTTP response.
So, by defining a new ICorsPolicyProviderFactory and registering it in the configuration (thereâs a SetCorsPolicyProviderFactory extension method for that), it is possible to completely change the way the CORS policy is defined.
By default, the ICorsPolicyProviderFactory interface is implemented by the AttributeBasedPolicyProviderFactory class, which looks into the controller and action descriptors for the presence of the EnableCorsAttribute instances.
The way this is done depends on the CORS request type.
For nonpreflight requests, the handler first forwards the request up the stack to its inner handler.
When the response is finally returned, it uses the selected action descriptor (saved into a request property) to find out if there is any EnableCorsAttribute associated with the action or the controller.
If so, it uses it to obtain the policyâEnableCorsAttribute implements ICorsPolicyProviderâand then applies the resulting CorsResult into the returned response.
This will enrich the returned response message with the extra CORS headers.
However, for preflight requests, the behavior is slightly different.
Remember that these are requests using the Options HTTP method, meant to probe the server for CORS support on a given request URI and method pair (the method is passed on the Access-Control-Request-Method).
Namely, no action should be ever called when handling such requests.
So, when a preflight request is received, the CorsMessageHandler replaces the OPTIONS method with the one in the Access-Control-Request-Method, and then uses the Web API resolution services to find the controller and action mapped to the request.
However, this controller and action are never called.
Instead, they are just used to locate and extract the CORS policy (provided by the EnableCorsAttribute).
Finally, the preflight response is created and returned, short-circuiting any upper stack processing.
In short, these preflight requests never reach the controller layer.
Conclusion
In this chapter, we described some of the security concerns that you must address when designing, implementing, and consuming Web APIs. Our focus was on the security concepts and technologies that are specific to Web APIs: transport security, authentication, and authorization. We continue with the security theme in the next chapter, where we address the OAuth 2.0 Framework. However, there are other security subjects that shouldnât be neglected, despite not being a subject of this book. Similar to web applications, most of the time a Web API is a connector between the public Internet and business-critical internal systems. So, secure coding practices such as input validation, proper output encoding, and *-injection mitigation (e.g., SQL injection) are still critically important.
Get Designing Evolvable Web APIs with ASP.NET now with the O’Reilly learning platform.
O’Reilly members experience books, live events, courses curated by job role, and more from O’Reilly and nearly 200 top publishers.

