Ah, the flash. If ever there was a photographic function that not enough people consider, this is it.
You can understand why it's there, of course. Cameras love light. Light is everything to a photograph: It provides the color, sharpness, and shadow.
And if there's not enough light for a decent exposure, well, by golly, your camera stands ready to provide that light all by itself.
What most people don't consider, though, is that the flash generally provides horrible light. It's harsh, it's white, it's direct, and it comes from a single point: your camera.
The results are usually nothing like what you're seeing with your eye. If you're close to the subject, the flash can blow out the picture, giving your best friend a ghost face that looks like it was photographed during a nuclear test. Worse, the flash illuminates only about the first 10 feet of the scene; everything beyond that comes out black.
The flash on small cameras can also produce redeye, the disturbing phenomenon where your dearly beloved's pupils turn red like the devil's (see Notes on Redeye). And forget trying to take pictures through glassâat aquariums, in art museums, and through windows. Most of the time, you wind up with nothing but a big white splash of flash reflection. Enjoy, for example, this once-in-a-lifetime glimpse of the rare Estonian bifurcated snout shark:

To make matters worse, most consumer cameras are flash-happy. Unless you step in, they fire the flash way too often.
In any case, most people make two mistakes with the flash: using it when they shouldn't, and not using it when they should.
Your camera's flash probably has a range of about 10 feet. Beyond that distance, it does nothing at allâexcept waste battery power and annoy people.
You know when thousands of flashes go off at a rock concert, football game, or school play? Don't be one of those clueless people. They're all firing their flashes for nothing. Do they really think they're going to illuminate a singer, football player, or actor from 200 yards away? Remember: Beyond about 10 feet, the flash does absolutely nothing.
(Some of those people probably realize that the flash is pointless at that distanceâbut they don't know how to turn it off. More on this in a moment.)
The second time to avoid using the flash is, well, whenever possible. A no-flash picture is just about always better-looking and more realistic than a flash picture.
Now, plenty of times, you have no choice. Small cameras in particular may not be able to take certain pictures at all without the flash, like nighttime pictures and indoor shots where people are moving. (Without the flash, you'd get blur.) And sometimes the flash is essential for certain special effects, as described in Chapter 6.
But there are dozens of edge cases: situations where your camera is convinced that it needs the flash but in fact could do without it. If you can learn to identify these situations, you'll get much more realistic, attractive pictures.
For example, suppose you're in someone's garage, looking at a beautifully restored antique car with wood-spoke wheels. You take a shot in auto mode, and your flash fires. Well, guess what? The car isn't moving, and neither are you. So if you can keep the camera steady, or maybe bump up the ISO (Goose the ISO), you should be able to get away with turning off the flash. (See the next chapter for more on blur and ways to annihilate it.)
Or take two. Shoot one with the flash, and then try another with the flash off, holding the camera as still as possible. That way, you'll have a backup if the second one is blurry.
Note
To make sure your flash doesn't fire, see "Flash Modes," Flash Modes.
This may sound nuts. But there's a very good reason to use the flash even on a bright, sunny day.
Suppose, for example, that you're taking a picture of a person outdoors. (Heyâit could happen.)
You aim the camera and half press the shutter button; the camera "reads" the scene and concludes that there's tons of sunlight. It would never dream of using the flash.
And it's correct that there's enough light in the entire frame. But it's not smart enough to recognize that the face you're photographing is in shadow.
The solution is to force the flash onâa very common photographer's trick. The flash can provide just the right amount of fill light to brighten your subject's faceâwithout affecting the exposure of the background. (This presumes, of course, that you're standing within flash rangeâeight to 10 feet.)
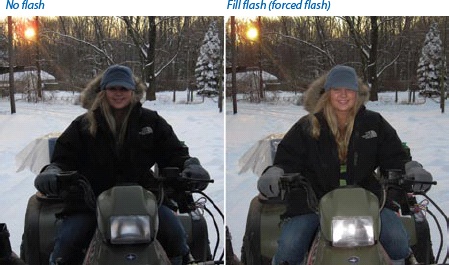
A fill flash like this makes outdoor portraits look a lot better. It eliminates the silhouette effect when your subject is standing in front of a bright background. Better yet, it provides very flattering front light. It softens smile lines and wrinkles, and it puts a nice twinkle in the eyes. (It also lets you ignore the old "rule" about taking photos on a sunny day: "Stand with the sun behind you.")
Note
To force the flash, see "Flash Modes," Flash Modes.
These instructions, of course, apply primarily to cameras with a built-in flash. If you're using an SLR and you've bought an external flash, use that for your fill flash instead. Its more powerful light provides better illumination and flash range. It lets you supply light from any angle. And it lets you shoot people wearing glasses without getting a reflection.
There are some ways to finesse the flash. If your camera has a face recognition feature, it's usually smart enough to throttle back the flash's power to avoid nuking your subjects' faces. On some cameras, you can actually adjust the strength of the flash using manual controls. As a last resort, you may even get away with blocking part of your camera's flash with your finger.
Note
These disparaging remarks refer mainly to pocket cameras. An SLR's flash is much better. First, it pops up high above the lens, which reduces the likelihood that you'll get redeye, described below. Second, you have manual control over its brightness.
Professional photographers, of course, don't use the camera's on-board flash at all. (In fact, high-end digital don't even have a built-in flash.) The pros generally use an external flash, which they hold or mount off to the side. The resulting off-axis light is a lot more flattering and natural than Ol' Lightning Bolt.
In fact, when possible, the pros even use white, gauzy reflectors, like those weird white discs or umbrellas, to soften and diffuse the flash's light, which is more flattering yet. (You can simulate the effect byâno jokeâdraping a piece of Kleenex over your flash.) And in the studio, they use several flashesâbehind you, beside you, in front of youâfor maximally amazing lighting.
You've snapped the perfect family portrait. The focus is sharp, the composition is balanced, everyone's smiling. And then you notice it: The 10-year-old standing dead center in the picture looks like a vampire bat. His eyes are glowing red, as though illuminated by the evil within.
You've been victimized by redeye, a common problem in flash photography. This creepy possessed-by-aliens look has ruined many an otherwise-great photo.
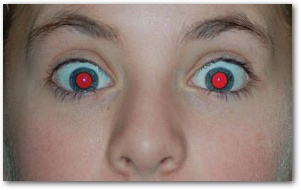
Redeye is actually light reflected back from your subjects' eyes. (On animals, it's more like green-eye or white-eye.) The bright light of your flash passes through the pupil of each eye, illuminating the blood-red retinal tissue at the back of the eye. Redeye problems worsen when you shoot pictures in a dim room, because your subject's pupils are dilated wider, allowing even more light from the flash to illuminate the retinas. Redeye is also a problem primarily with pocket cameras, where the flash is sitting within an inch of the lens. As a result, the flash's light goes out and back along roughly the same line.
Here are the solutions the world has come up with so far:
Don't use the flash. Kind of obvious, but the truth is, you may do yourself a big favor by stifling the flash. Turn on some lights. Move closer to the window. Goose the ISO (Goose the ISO). Do something to give the camera more light to work with so it doesn't need the flash at all.
Use redeye-reduction flash. You've almost certainly seen this feature in action: Instead of just flashing once, the camera emits a series of bright, strobing flashes right before the picture is taken. The subject's pupils are supposed to shrink in reaction to those blinding flashes, thereby admitting less light, so there will be less reflection.
Unfortunately, there are two problems with the redeye-reduction mode: (a) It doesn't work very well, and (b) it's highly annoying.
Tip
If you do decide to use the redeye-reduction mode, don't make the common mistake of dropping your hands too soon, thinking that the camera's job is done. The photo isn't taken until the last flash, and it's hard to predict which one that will beâat least until you get to know your camera very well.
Move the flash away from the lens. That way, the reflection from the retina doesn't bounce directly back at the camera. Unfortunately, on small cameras, it's a little tough to achieve much separation of flash and lens.
As noted above, redeye is much less of an issue on SLRs. They have a greater separation of lens and flashâespecially if it's an external, separate flash unit.
Fix it in software. If you transfer your photos to the computer and discover, too late, that you've got redeye in some of your pictures, all is not lost. Photo-editing programs like iPhoto and Picasa (Chapter 8) have redeye-removal tools. They don't work perfectly, and they turn everybody's pupils jet black. But as a last resort, they're not bad.
All right: Now you know that you're not a slave to the whims of your camera's flash. You can make it fire when the camera doesn't consider it necessary, or make it stay off when the camera's inclined to use it.
So what, exactly, are the steps?
To control your flash's behavior, press the flash mode button. It's a dedicated physical button, marked by the universal lightning-bolt-with-an-arrow-on-one-end symbol. Use it to open a menu of the camera's flash modes, or, on some cameras, press it repeatedly to cycle through the different flash modes.
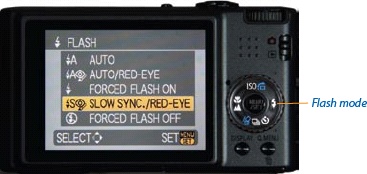
Here's what you'll probably have to choose from:
Auto. The camera chooses when to fire the flash. (It's wrong about half the time.) Usually denoted by the word "Auto" or the letter A.
No flash. Usually represented by a circle with a slash through it. Great for whenever you can get away with it.
Forced flash. This is the mode for outdoor portraits. It's usually marked by a lightning bolt or the words "Flash on," "Force flash on," or "Fill flash."
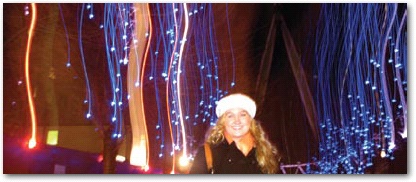
Slow-synchro flash. This mode, also known as front curtain sync, isn't as common as the previous four, but it's available on most of the nicer cameras. (On pocket cams, it may be called Nighttime mode, and its icon usually looks like a star or a moon over someone's shoulder.)
The idea here is to flash once, illuminating your companion nicelyâbut then to leave the shutter open for a moment while it drinks in some light from the surrounding background. If it didn't do that, you'd get just a totally inky black background. This way, though, you can see the city lights, the campfire, the dusky street, or whatever's beyond your subject.
As you can imagine, however, slow-synchro flash requires a steady camera. A tripod (or another immovable object) helps, although you can get away with a handheld shot if the subject is within about six feet away.
Second-curtain flash. This one, also called rear curtain sync, is probably the least-used flash effect, chiefly because (a) it's hard to understand what it does and (b) it's hard to understand when it might be useful.
In essence, it's the same thing as the slow-synchro flash, but in the reverse sequence. That is, the shutter opens up to soak up the background firstâand then the flash fires at the end of that interval.
The usual example people give for second-curtain flash is reversing the direction of moving lights (car taillight trails, for example). With slow-synchro flash, the trails seem to extend forward from the cars; with second-curtain flash, they seem to trail from behind the cars.
Tip
Usually, you can't control the flash in Auto mode. It goes off if the camera wants it to go off, which can be frustrating. In that case, consider switching to Portrait or Program mode, which are similar to Auto but let you control the flash.
If you have an SLR, you can control the built-in flash. You can throttle it down when you don't need quite so much light, for example. (Check the manual.)
Get David Pogue's Digital Photography: The Missing Manual now with the O’Reilly learning platform.
O’Reilly members experience books, live events, courses curated by job role, and more from O’Reilly and nearly 200 top publishers.

