Silverlight 2 supports binding lists of items to target controls
through the same mechanisms as those you would use to bind to a single
item, such as an entity. Binding to lists also is similar to binding to
single entities. Entities can implement the INotifyPropertyChanged interface to
communicate with the target controls to notify them when a property value
has changed. List-based controls can also benefit from notifications if
they are bound to lists created with the ObservableCollection<T> or collection
classes that implement the INotifyCollectionChanged interface.
You can bind controls directly to an object source or to a list of
objects. This is especially useful for binding a list of objects to a
list-based control such as ItemsControl, ListBox, or DataGrid, or to a third-party list-based
control. Like the INotifyPropertyChanged interface, the INotifyCollectionChanged interface provides a
way for the collection to notify the bindings when the contents have
changed.
List-based controls in Silverlight 2 have an ItemTemplate property that defines how each row
in a list-based control will be presented. The ItemTemplate can refer to a DataTemplate resource,
which you can then reuse to apply the same template to different
list-based controls. The templateâs contents can be data-binding targets
so that they can benefit from the data-bound sourceâs property values.
This chapter will build on the binding techniques weâve already discussed,
and will show you how to bind to lists of entities, implement event
notifications, and design item templates for lists.
List-based binding begins with a list of items. These items can be
represented by, for example, a List<T> or any IEnumerable derived class. Once the list of
items is obtained, the list can be bound to an appropriate target
control such as a ListBox, ItemsControl, ComboBox, or DataGrid.
Note
Because the concepts of binding apply to all of these types of
list-based controls in much the same way, the examples in this chapter
will use the ListBox control.
ItemsControl is similar to ListBox, which inherits from ItemsControl.
The ListBox control can display
items in a standard and straight list, or it can have its item template
completely overridden and replaced with a custom set of XAML. Either
way, a list of items that is bound to the ListBox control can be displayed item by item
within the ListBox.
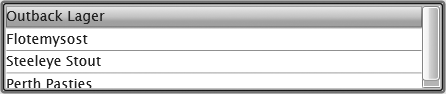
Figure 4-1 shows a basic
ListBox bound to a list of
products. This ListBox is bound by
setting the ListBox controlâs
ItemsSource property to the
List<Product>. The previous
examples in this book bind a property of a target control to a source
objectâs property. In the examples, the source object is set to the
DataContext (either directly or
through an inherited DataContext).
The target controls in the previous examples had a value that they
needed to display, and that value was derived from the data-binding
source. For example, a TextBox
control that displays a productâs name from an entity has the TextBoxâs Text property bound to the source. A
ListBox control differs from these
examples in that the ListBox will display several items, and
binding the source to a single property of the ListBox (the ItemsSource) is not enough to make the
ListBox display the item
values.
The ListBox control in Figure 4-1 has its ItemsSource property bound to the DataContext. This
associates the List<Product>
to the ListBox, but the display of
the items must also be set up. Otherwise, if the ItemsSource is bound and the contents of the
ListBox are not established, the
ListBox will display the ToString() contents of each item in the
List<Product>, as shown in
Figure 4-2.
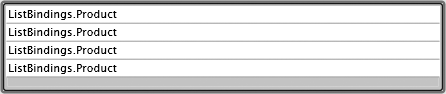
The ListBox shown in Figure 4-2 does not display the
contents of each item, because it is not being told what to display or
how to display it. The âhow to display itâ part is determined by
creating controls that will visually display the desired content. In
this case, the ListBoxâs items can
simply be displayed as a TextBlock
that shows the name of each product. The display could also be much
more elaborate, as you can represent the content of each ListBox item using templates of your own
design. For the example shown in Figure 4-1, the ListBox items (displayed via the ItemTemplate property) are represented by a
DataTemplate that contains a single
TextBlock.
Example 4-1 shows the XAML for
the ListBox shown in Figure 4-1. Two main bindings are
functioning here. First, the List<Product> is bound to the ListBoxâs ItemsSource property. Second, each row in
the ListBox is bound to a Product from the ItemsSource binding and will be
displayed using the DataTemplate.
Example 4-1. ListBox with a template
<ListBox x:Name="lstProducts" Height="88" HorizontalAlignment="Left"
    VerticalAlignment="Bottom" Margin="20,20,20,5" Width="440"
    Style="{StaticResource ListBoxStyle}" ItemsSource="{Binding}" >
    <ListBox.ItemTemplate>
        <DataTemplate>
            <StackPanel Orientation="Horizontal">
                <TextBlock Text="{Binding ProductName, Mode=OneWay}"
                Style="{StaticResource TextBlockCaptionStyle}"
                FontSize="14"/>
            </StackPanel>
        </DataTemplate>
    </ListBox.ItemTemplate>
</ListBox>
Notice that the TextBlock is
using data binding to bind the Text
property to the ProductName property of the binding
source. The binding source refers to the objects in the ItemsSource, which gets the data source from
the DataContext. The DataContext will be set at runtime in the
.NET code to a List<Product>
which is bound to the ItemsSource property of the ListBox. Each row in the ListBox is bound to one instance of a
Product. This symbiotic
relationship between the source object, the DataContext, and the bound target control
properties enables developers to declare what will be bound, and how,
at design time in the XAML.
The ListBox controlâs
ItemsSource shown in Example 4-1 is set to the Binding keyword. This indicates that the
ItemsSource will be bound to the
inherited DataContext. You could
set the DataContext for the
ListBox or a parent control of the
ListBox to the List<Product>, and the ItemsSource would inherit that List<Product>. The code in Example 4-2 shows how to do this inside the
Loaded event handler for the
Silverlight control.
Example 4-2. Setting the DataContext
C#
List<Product> productList = CreateProductList();
lstProducts.DataContext = productList;
VB
Dim productList As List(Of Product) = CreateProductList()
lstProducts.DataContext = productList;Note
The CreateProductList
method creates a List<Product> inside the Silverlight
2 control. Chapters 5â11 will demonstrate how to retrieve records and fill them from
server-based services using Windows Communication Foundation (WCF)
and REST. You can find the source for CreateProductList and all of the source
code for this chapter in the sample code in the ListBindings solution.
An alternative method is to set the ItemsSource directly in the code. Either
way, the ListBox gets the
collection of items, which then leaves it up to the template to
determine how to display the Product entity information. The code in
Example 4-3 shows how to do
this inside the Loaded event
handler for the Silverlight control.
Example 4-3. Setting the ItemsSource directly
C#
    List<Product> productList = CreateProductList();
    lstProducts.ItemsSource = productList;
VB
Dim productList As List(Of Product) = CreateProductList()
lstProducts.ItemsSource = productListWhatever binding technique you use, it is important to be
consistent throughout the application. For example, it is a poor
coding practice to bind an ItemsSource property to the DataContext in one place and to bind an
ItemsSource property directly to a
specific List<T> someplace
else. Consistency is a good rule to stick with in development.
However, it could be argued that using the DataContext technique is a better approach,
as all other nonlist-based bindings rely on it as well.
Notice that the binding mode for the TextBox shown in Example 4-1 is set to OneWay. This indicates that the TextBox will listen for notifications that
tell it when the value that it is bound to changes. This means that if
the value changes in the source object, that new value will be
presented in the TextBox
immediately.
Consider that this application is extended so that a set of
TextBox controls below the ListBox will represent the details of each
product. These TextBox controls
that represent the details are bound to the selected Product using the TwoWay binding mode. If you want the changes
a user types to automatically update the ListBox contents, OneWay does the job. However, if you want
the changes to never be updated in the ListBox, the OneTime binding mode might be better suited
to this task.
Choosing the appropriate binding mode is important and depends
on the applicationâs requirements. A good rule of thumb to follow is
to set the binding mode for ListBox
items to OneTime when dealing with
most master detail scenarios. Also, you should use OneWay binding for ListBox items only when you need to have the
items updated, as the values in the source object change, which may be
when another control loses focus. Often, ListBox items or DataGrid items are interpreted as
representing what has come out of a data source, such as a database.
Thus, if a user changes a value and has not yet clicked Save, and the
value is changed in the ListBox
(due to OneWay binding in the
ListBox items), the user could
become confused.
Get Data-Driven Services with Silverlight 2 now with the O’Reilly learning platform.
O’Reilly members experience books, live events, courses curated by job role, and more from O’Reilly and nearly 200 top publishers.

