Chapter 1. Rethinking HTML for CSS
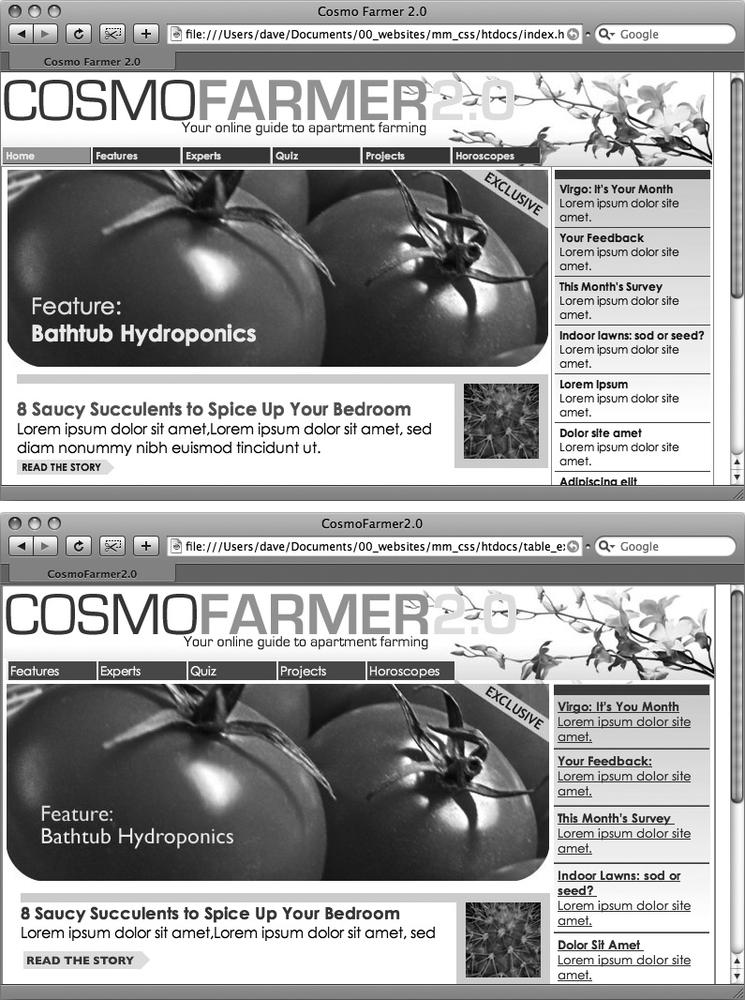
To get the most out of CSS, your HTML code needs to provide a solid, well-built foundation. This chapter shows you how to write better, more CSS-friendly HTML. The good news is that when you use CSS throughout your site, HTML actually becomes easier to write. You no longer need to worry about trying to turn HTML into the design maven it was never intended to be. Instead, CSS offers most of the graphic design touches you’ll likely ever want, and HTML pages written to work with CSS are easier to create since they require less code and less typing. They’ll also download faster—a welcome bonus your site’s visitors will appreciate (see Figure 1-1).
HTML: Past and Present
As discussed in the Introduction, HTML (or XHTML) provides the foundation for every page you encounter on the World Wide Web. When you add CSS into the mix, the way you use HTML changes. Say goodbye to repurposing awkward HTML tags merely to achieve certain visual effects. Some HTML tags and attributes—like the <font> tag—you can forget completely.
Note
Throughout this chapter, everything you read about HTML applies equally to XHTML. There are almost as many variants of HTML and XHTML as there are colors in the rainbow, though, and in the end you must pick a type and make sure your web page identifies which one you’re using. Otherwise, your visitors’ browsers may gunk up your painstakingly crafted page. You’ll learn how to tell CSS which flavor of HTML/ XHTML you’re using later in this chapter.
HTML Past: Whatever Looked Good
When a bunch of scientists created the Web to help share and keep track of technical documentation, nobody called in the graphic designers. All the scientists needed HTML to do was structure information for easy comprehension. For example, the <h1> tag indicates an important headline, while the <h2> tag represents a lesser heading, usually a subheading of the <h1> tag. Another favorite, the <ol> (ordered list) tag, creates a numbered list for things like “Top 10 reasons not to play with jellyfish.”
But as soon as people besides scientists started using HTML, they wanted their web pages to look good. So web designers started to use tags to control appearance rather than structure information. For example, you can use the <blockquote> tag (intended for material that’s quoted from another source) on any text that you want to indent a little bit. You can use heading tags to make any text bigger and bolder—regardless of whether it functions as a heading.
In an even more elaborate workaround, designers learned how to use the <table> tag to create columns of text and accurately place pictures and text on a page. Unfortunately, since that tag was intended to display spreadsheet-like data—research results, train schedules, and so on—designers had to get creative by using the <table> tag in unusual ways, sometimes nesting a table within a table within a table to make their pages look good.
Meanwhile, browser makers introduced new tags and attributes for the specific purpose of making a page look better. The <font> tag, for example, lets you specify a font color, typeface, and one of seven different sizes. (If you’re keeping score at home, that’s about 100 fewer sizes than you can get with, say, Microsoft Word.)
Finally, when designers couldn’t get exactly what they wanted, they often resorted to using graphics. For example, they’d create a large graphic to capture the exact font and layout for web page elements and then slice the Photoshop files into smaller files and piece them back together inside tables to recreate the original design.
While all of the above techniques—using tags in creative ways, taking advantage of design-specific tag attributes, and making extensive use of graphics—provide design control over your pages, they also add a lot of additional HTML code (and more wrinkles to your forehead than a lifetime in the sun).
HTML Present: Scaffolding for CSS
No matter what content your web page holds—the fishing season calendar, driving directions to the nearest IKEA, or pictures from your kid’s birthday party—it’s the page’s design that makes it look like either a professional enterprise or a part-timer’s hobby. Good design enhances the message of your site, helps visitors find what they’re looking for, and determines how the rest of the world sees your website. That’s why web designers went through the contortions described in the previous section to force HTML to look good. By taking on those design duties, CSS lets HTML go back to doing what it does best—structure content.
Using HTML to control the look of text and other web page elements is obsolete. Don’t worry if HTML’s <h1> tag is too big for your taste or bulleted lists aren’t spaced just right. You can take care of that later using CSS. Instead, think of HTML as a method of adding structure to the content you want up on the Web. Use HTML to organize your content and CSS to make that content look great.
Writing HTML for CSS
If you’re new to web design, you may need some helpful hints to guide your forays into HTML (and to steer clear of well-intentioned, but out-of-date HTML techniques). Or if you’ve been building web pages for a while, you may have picked up a few bad HTML-writing habits that you’re better off forgetting. The rest of this chapter introduces you to some HTML writing habits that will make your mother proud—and help you get the most out of CSS.
Think Structure
HTML adds meaning to text by logically dividing it and identifying the role that text plays on the page: For example, the <h1> tag is the most important introduction to a page’s content. Other headers let you divide the content into other, less important, but related sections. Just like the book you’re holding, for example, a web page should have a logical structure. Each chapter in this book has a title (think <h1>) and several sections (think <h2>), which in turn contain smaller subsections. Imagine how much harder it would be to read these pages if every word just ran together as one long paragraph.
Note
For a good resource on HTML/XHTML check out HTML & XHTML: The Definitive Guide by Chuck Musciano and Bill Kennedy (O’Reilly), or visit www.w3schools.com for online HTML and XHTML tutorials. For a quick list of all available HTML and XHTML tags, visit www.w3schools.com/tags/.
HTML provides many other tags besides headers for marking up content to identify its role on the page. (After all, the M in HTML stands for markup.) Among the most popular are the <p> tag for paragraphs of text and the <ul> tag for creating bulleted (non-numbered) lists. Lesser-known tags can indicate very specific types of content, like <abbr> for abbreviations and <code> for computer code.
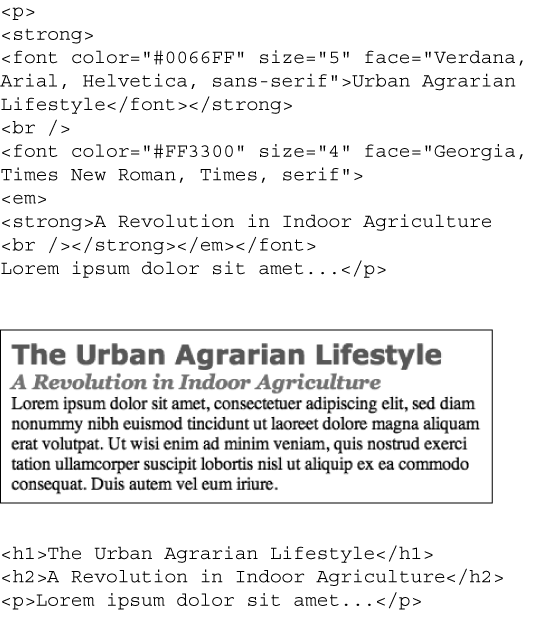
When writing HTML for CSS, use a tag that comes close to matching the role the content plays in the page, not the way it looks (see Figure 1-2). For example, a bunch of links in a navigation bar isn’t really a headline, and it isn’t a regular paragraph of text. It’s most like a bulleted list of options, so the <ul> tag is a good choice. If you’re saying, “But items in a bulleted list are stacked vertically one on top of the other, and I want a horizontal navigation bar where each link sits next to the previous link,” don’t worry. With CSS magic you can convert a vertical list of links into a stylish horizontal navigation bar as described in Chapter 9.
Two New HTML Tags to Learn
HTML’s motley assortment of tags doesn’t cover the wide range of content you’ll probably add to a page. Sure, <code> is great for marking up computer program code, but most folks would find a <recipe> tag handier. Too bad there isn’t one. Fortunately, HTML provides two generic tags that let you better identify content, and, in the process, provide “handles” that let you attach CSS styles to different elements on a page.
The <div> tag and the <span> tag are like empty vessels that you fill with content. A div is a block, meaning it has a line break before it and after it, while a span appears inline, as part of a paragraph. Otherwise, divs and spans have no inherent visual properties, so you can use CSS to make them look any way you want. The <div> (for division) tag indicates any discrete block of content, much like a paragraph or a headline. But more often it’s used to group any number of other elements, so you can insert a headline, a bunch of paragraphs, and a bulleted list inside a single <div> block. The <div> tag is a great way to subdivide a page into logical areas, like a banner, footer, sidebar, and so on. Using CSS, you can later position each area to create sophisticated page layouts (a topic that’s covered in Part III of this book).
The <span> tag is used for inline elements; that is, words or phrases that appear inside of a larger paragraph or heading. Treat it just like other inline HTML tags such as the <a> tag (for adding a link to some text in a paragraph) or the <strong> tag (for emphasizing a word in a paragraph). For example, you could use a <span> tag to indicate the name of a company, and then use CSS to highlight the name using a different font, color, and so on. Here’s an example of those tags in action, complete with a sneak peek of a couple of attributes—id and class—frequently used to attach styles to parts of a page.
<div id="footer"><p>Copyright 2006,<span class="bizName">CosmoFarmer.com</span></p> <p>Call customer service at 555-555-5501 for more information</p></div>
This brief introduction isn’t the last you’ll see of these tags. They’re used frequently in CSS-heavy web pages, and in this book you’ll learn how to use them in combination with CSS to gain creative control over your web pages (see the box on ID Selectors: Specific Page Elements).
HTML to Forget
CSS lets you write simpler HTML for one big reason: You can stop using a bunch of tags and attributes that only make a page better looking. The <font> tag is the most glaring example. Its sole purpose is to add a color, size and font to text. It doesn’t do anything to make the structure of the page more understandable.
Here’s a list of tags and attributes you can easily replace with CSS:
Ditch <font> for controlling the display of text. CSS does a much better job with text. (See Chapter 6 for text-formatting techniques.)
Stop using <b> and <i> to make text bold and italic. CSS can make any tag bold or italic, so you don’t need these formatting-specific tags. However, if you want to really emphasize a word or phrase, then use the <strong> tag (browsers display <strong> text as bold anyway). For slightly less emphasis, use the <em> tag (browsers italicize content inside this tag).
Skip the <table> tag for page layout. Use it only to display tabular information like spreadsheets, schedules, and charts. As you’ll see in Part III of this book, you can do all your layout with CSS for much less time and code than the table-tag tango.
Eliminate the awkward <body> tag attributes that enhance only the presentation of the content: background, bgcolor, text, link, alink, and vlink set colors and images for the page, text, and links. CSS gets the job done better (see Chapter 7 and Chapter 8 for CSS equivalents of these attributes). Also trash the browser-specific attributes used to set margins for a page: leftmargin, topmargin, marginwidth, marginheight. CSS handles page margins easily (see Chapter 7).
Don’t abuse the <br> tag. If you grew up using the <br> tag (<br /> in XHTML) to insert a line break without creating a new paragraph, then you’re in for a treat. (Browsers automatically—and sometimes infuriatingly—insert a bit of space between paragraphs, including between headers and <p> tags. In the past, designers used elaborate workarounds to avoid paragraph spacing they didn’t want, like replacing a single <p> tag with a bunch of line breaks and using a <font> tag to make the first line of the paragraph look like a headline.) Using CSS’s margin controls you can easily set the amount of space you want to see between paragraphs, headers, and other block-level elements.
Note
In the next chapter, you’ll learn about a technique called a “CSS Reset” which eliminates the gaps browsers normally insert between paragraphs and other tags (see Starting with a Clean Slate).
As a general rule, adding attributes to tags that set colors, borders, background images, or alignment—including attributes that let you format a table’s colors, backgrounds, and borders—is pure old-school HTML. So is using alignment properties to position images and center text in paragraphs and table cells. Instead, look to CSS to control text placement (see Indenting the First Line and Removing Margins), borders (Adding Borders), backgrounds (Determining Height and Width), and image alignment (CSS and the <img> Tag).
Tips to Guide Your Way
It’s always good to have a map for getting the lay of the land. If you’re still not sure how to use HTML to create well-structured web pages, then here are a few tips to get you started:
Use only one <h1> tag per page, and use it to identify the main topic of the page. Think of it as a chapter title: You only put one title per chapter. Using <h1> correctly has the added benefit of helping the page get properly indexed by search engines (see the box on Two New HTML Tags to Learn).
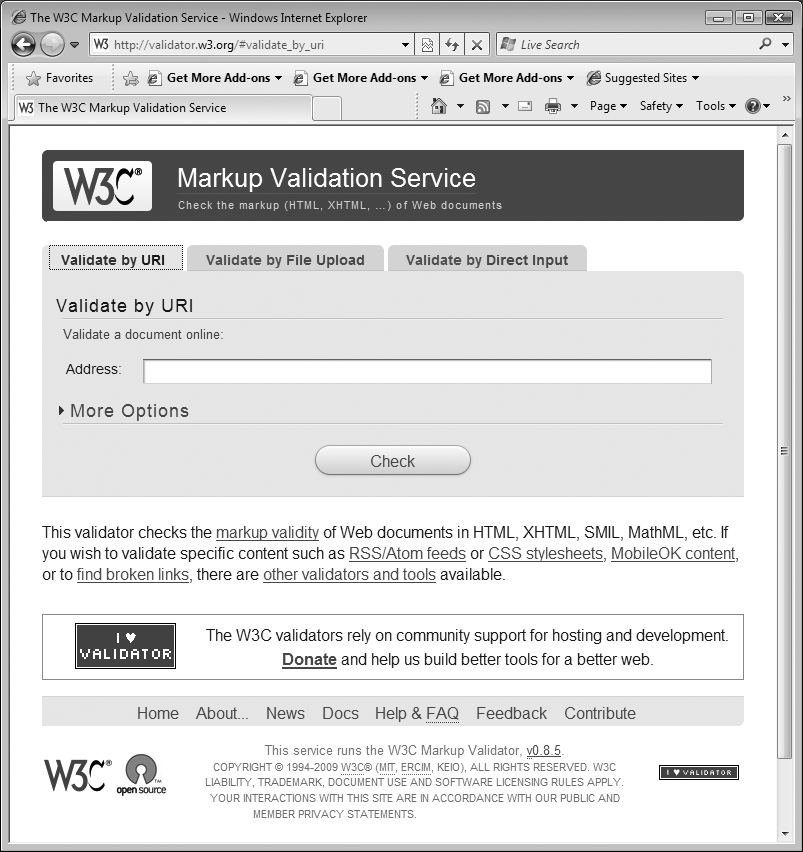
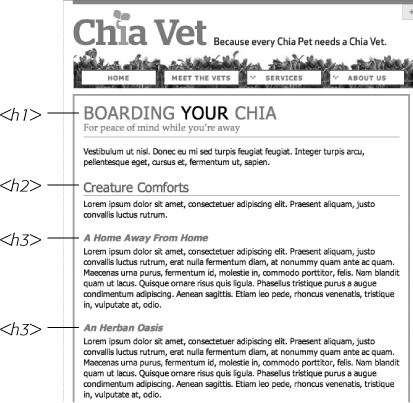
Figure 1-3. The W3C HTML validator located at http://validator.w3.org lets you quickly make sure the HTML in a page is sound. You can point the validator to an already existing page on the Web, upload an HTML file from your computer, or just type or paste the HTML of a web page into a form box and then click the Check button.Use headings to indicate the relative importance of text. Again, think outline. When two headings have equal importance in the topic of your page, use the same level header on both. If one is less important or a subtopic of the other, then use the next level header. For example, follow an <h2> with an <h3> tag (see Figure 1-4). In general, it’s good to use headings in order and try not to skip heading numbers. For example, don’t follow an <h2> tag with an <h5> tag.
Use unordered lists when you’ve got a list of several related items, such as navigation links, headlines, or a set of tips like these.
Use numbered lists to indicate steps in a process or define the order of a set of items. The tutorials in this book (see Formatting Lists) are a good example, as is a list of rankings like “Top 10 websites popular with monks.”
To create a glossary of terms and their definitions or descriptions, use the <dl> (definition list) tag in conjunction with the <dt> (definition term) and <dd> (definition description) tags. (For an example of how to use this combo, visit www.w3schools.com/tags/tryit.asp?filename=tryhtml_list_definition.)
If you want to include a quotation like a snippet of text from another website, a movie review, or just some wise saying of your grandfather’s, try the <blockquote> tag for long passages or the <q> tag for one-liners.
Take advantage of obscure tags like the <cite> tag for referencing a book title, newspaper article, or website, and the <address> tag to identify and supply contact information for the author of a page (great for a copyright notice).
As explained in full on HTML to Forget, steer clear of any tag or attribute aimed just at changing the appearance of a text or image. CSS, as you’ll see, can do it all.
When there just isn’t an HTML tag that fits the bill, but you want to identify an element on a page or a bunch of elements on a page so you can apply a distinctive look, use the <div> and <span> tags (see The Importance of the Doctype). You’ll get more advice on how to use these in later chapters (for example, Don’t Forget Margins and Padding).
Don’t overuse <div> tags. Some web designers think all they need are <div> tags, ignoring tags that might be more appropriate. For example, to create a navigation bar, you could add a <div> tag to a page and fill it with a bunch of links. A better approach would be to use a bulleted list (<ul> tag). After all, a navigation bar is really just a list of links.
Remember to close tags. The opening <p> tag needs its partner in crime (the closing </p> tag), as do all other tags, except the few self-closers like <br> and <img> (<br /> and <img /> in XHTML).
Validate your pages with the W3C validator (see Figure 1-3 and the box on Tips to Guide Your Way). Poorly written or typo-ridden HTML causes many weird browser errors.
The Importance of the Doctype
As discussed in the box on Tips to Guide Your Way, HTML follows certain rules—these rules are contained in a Document Type Definition file, otherwise known as a DTD. A DTD is a a text file that explains what tags, attributes, and values are valid for a particular type of HTML. And for each version of HTML, there’s a corresponding DTD. By now you may be asking, “But what’s all this got to do with CSS?”
Everything—if you want your web pages to appear correctly and consistently in web browsers. You tell a web browser which version of HTML or XHTML you’re using by including what’s called a doctype declaration at the beginning of a web page. This doctype declaration is the first line in the HTML file, and not only defines what version of HTML you’re using (such as HTML 4.01 Transitional) but also points to the appropriate DTD file on the Web. When you mistype the doctype declaration, you can throw most browsers into an altered state called quirks mode.
Quirks mode is browser manufacturers’ attempt to make their software behave like browsers did circa 1999 (in the Netscape 4 and Internet Explorer 5 days). If a modern browser encounters a page that’s missing the correct doctype, then it thinks “Gee, this page must have been written a long time ago, in an HTML editor far, far away. I’ll pretend I’m a really old browser and display the page just as one of those buggy old browsers would display it.” That’s why, without a correct doctype, your lovingly CSS-styled web pages may not look as they should, according to current standards. If you unwittingly view your web page in quirks mode when checking it in a browser, you may end up trying to fix display problems that are related to an incorrect doctype and not the incorrect use of HTML or CSS.
Note
For more (read: technical) information on quirks mode, visit www.quirksmode.org/css/quirksmode.html and http://hsivonen.iki.fi/doctype/.
Fortunately, it’s easy to get the doctype correct. All you need to know is what version of HTML you’re using. In all likelihood, you’re already creating web pages using HTML 4. You may even use XHTML for your websites (see XHTML: HTML for the New Era?).
The most popular versions of HTML and XHTML these days are HTML 4.01 Transitional and XHTML 1.0 Transitional. These types of HTML still let you use presentational tags like the <font> tag, thereby providing a transition from older HTML to the newer, stricter types of HTML and XHTML. Although it’s best not to use these tags at all, they still work in the Transitional versions, so you can phase out these older tags at your own pace. In the strict versions of HTML and XHTML, some older tags don’t work at all.
Note
In general, the strict versions of both HTML and XHTML disallow tags and attributes aimed at making a page look good, like the <font> tag and a paragraph’s center attribute. They also disallow a number of once-popular properties like a link’s target property, which lets you make a link open in a new window.
If you’re using HTML 4.01 Transitional, type the following doctype declaration at the very beginning of every page you create:
<!DOCTYPE HTML PUBLIC "-//W3C//DTD HTML 4.01 Transitional//EN" "http://www.
w3.org/TR/html4/loose.dtd">
The doctype declaration for XHTML 1.0 Transitional is similar, but it points to a different DTD. It’s also necessary to add a little code to the opening <html> tag that’s used to identify the file’s XML type—in this case, it’s XHTML—like this:
<!DOCTYPE html PUBLIC "-//W3C//DTD XHTML 1.0 Transitional//EN" "http://www.
w3.org/TR/xhtml1/DTD/xhtml1-transitional.dtd">
<html xmlns="http://www.w3.org/1999/xhtml">
Note
If you’re using frames for your web pages, then you need to use a doctype intended for framesets. See the W3C site for a list of proper doctypes: www.w3.org/QA/2002/04/valid-dtd-list.html.
If this entire discussion is making your head ache and your eyes slowly shut, just make sure you use the proper doctype listed above, and always make it the first line of your HTML file (before even the opening <html> tag). Also it’s easy to make a typo in this long-winded bit of code, so always make sure you validate the page (see the box on External Style Sheets) to make sure your doctype is correct. In fact, it’s a good idea to have a blank HTML page with the proper doctype somewhere on your computer, so you can make a copy of it whenever you need to create a new web page. In the tutorial files available from www.sawmac.com/css2e, you’ll find four basic HTML files—one for each of the four main doctypes in use on the Web today.
Getting the Most out of Internet Explorer 8
Thanks to Microsoft’s auto-update feature, the new Internet Explorer 8 has gained a healthy share of the browser market. Fortunately for web designers, IE 8 is the most standards-compliant version of the browser yet. It fixes the bugs that have plagued IE 6 and even IE 7, and works almost perfectly with version 2.1 of CSS. That means your carefully crafted web designs should look nearly the same in IE 8, Firefox, Safari, and Opera with little or no tinkering. As you’ll read later in this book (for example, pages Fixing the Browser Bugs and Going Further), you can’t say the same about IE 6 or IE 7, which require some browser-specific code to make many designs look right.
However, IE 8 is sort of like a chameleon: It can take on the appearance of a different version. If you’re not careful, it may not display your web pages the way you want it to. For example, and most importantly, you must include a proper doctype. As mentioned in the previous section, without a doctype, browsers switch into quirks mode. Well, when IE 8 goes into quirks mode, it tries to replicate the look of IE 5 (!?).
But wait—there’s more! IE 8 can also pretend to be IE 7. When someone viewing your site in IE 8 clicks a "compatibility view” button, IE 8 goes into IE 7 mode, displaying pages without IE 8’s full CSS 2.1 goodness. The same thing happens if Microsoft puts your website onto its Compatibility View List—a list of sites that Microsoft has determined look better in IE 7 than in IE 8. If you’re designing a site using the guidelines in this book, you won’t want IE 8 to act like IE 7…ever.
Fortunately, there’s a way to tell IE 8 to stop all this nonsense and just be IE 8. Adding a single META tag to a web page instructs IE 8 to ignore Compatibility View and the Compatibility View List and always display the page using its most standards-compliant mode:
<meta http-equiv="X-UA-Compatible" content="IE=edge" />
Put this instruction in the page’s <head> section (below the <title> tag is a good place). This tag will work for future versions of IE, too: The “IE=edge” part of the tag will instruct versions of Internet Explorer that are released after IE 8 to also display web pages in their standard mode. Unfortunately, you must do this on every page of your site.
Now that your HTML ship is steering in the right direction, it’s time to jump into the fun stuff (and the reason you bought this book): Cascading Style Sheets.
Get CSS: The Missing Manual, 2nd Edition now with the O’Reilly learning platform.
O’Reilly members experience books, live events, courses curated by job role, and more from O’Reilly and nearly 200 top publishers.

