Chapter 2. Getting Started
To help you start creating applications as quickly as possible, this chapter presents two “Hello World” examples that demonstrate the beginning stages of Mozilla application development.
The first example is a simple XUL file that is loaded into the browser window. This example is then expanded on by adding additional features to the XUL file, such as imported stylesheets and JavaScript functions. The second “Hello World” example shows how to turn files like these into packages, which are the modular, bundled sets of files that fit together to make Mozilla applications or new modules for the Mozilla browser.
These examples provide a context for discussing the development of Mozilla applications. The first example focuses on creating and editing the basic file types, and the second focuses on the organization and distribution of applications on the Mozilla platform.
2.1. Simple XUL Example
Like all good “Hello World” applications, Example 2-1 shows one of the simplest possible examples of XUL. Although it is small, it demonstrates some important aspects of XUL programming, including the use of event handlers to add behavior and the use of a box to lay out elements properly within the window. This example also provides a context for discussing more general features of the language, such as the file format, the namespace, and some XUL programming conventions.
Example 2-1. Hello xFly
<?xml version="1.0"?>
<!-- Sample XUL file -->
<window xmlns="http://www.mozilla.org/keymaster/gatekeeper/there.is.only.xul">
<box align="center">
  <button label="hello xFly” onclick="alert('Hello World');" />
</box>
</window>
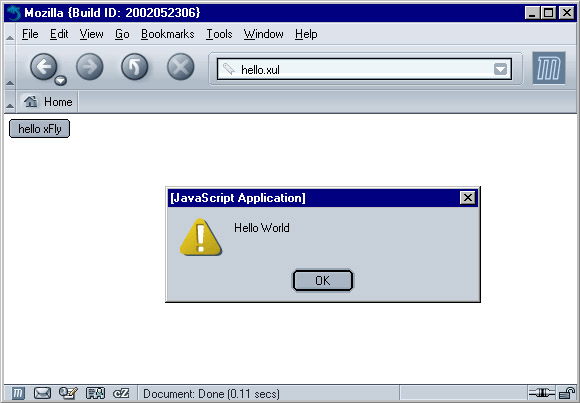
Use your text editor to save the code in Example 2-1 in a file called hello.xul and then load the file in Mozilla (you can do this by using File > Open File from the browser window and browsing to where you saved the file). You should see a button in the upper-left corner of the browser window that brings up an alert box when clicked. Figure 2-1 shows an example of the alert pop-up window that appears.
Figure 2-1. The first Hello xFly example
The next few sections describe this sample file in more detail. The covered topics include the file itself, the syntax of the markup, XUL namespaces, and the basic layout of a XUL file.
The xFly Examples
The best way to understand the possible uses of the Mozilla framework is to look more closely at a number of various existing applications. This book highlights several Mozilla development projects, such as ChatZilla and JSLib, as examples of how some people have already started using Mozilla's XPFE technologies.
Along with these applications, you'll note the use of the name “xFly” in many examples in this chapter and elsewhere in this book. The xFly examples are used throughout Chapter 2 to Chapter 6 to show how to create and package a simple Mozilla application. An installable version of the complete xFly application can be found at http://xfly.mozdev.org.
This simple application is useful because it provides a place to start exploring the new information that you will learn about in this book. As you read more about XUL, CSS, JavaScript, and the other parts of Mozilla's development framework, you can create and edit the xFly files to see how these technologies work in practice.
2.2. Basic XUL Concepts
You have already seen many of XUL's basic features at work. When you load the example in the previous example, the browser identifies it as a XUL file, parses the data, creates a new window and draws the button widget, and executes the function you've defined when the button is clicked.
These activities are part of the basic and often transparent interaction between your application files and Mozilla. However, the format of your XUL files, their syntax and namespace, the XUL layout, and the windowing system are all basic to successful XUL programming.
2.2.1. The XUL File Format
A XUL file is a simple text file that contains proper XML syntax and has a .xul file extension. Mozilla expects to draw UI widgets when it encounters a file with a .xul extension or when it encounters the XUL namespace in other markup files that it recognizes, including HTML and XML.
The MIME type registered for XUL files is application/vnd.mozilla.xul+xml. When editing and using XUL files locally, you shouldn't need to worry about setting this on your computer; however, sometimes you may need to set the MIME type, such as when you host XUL files on a server. Chapter 12 provides additional information about how you can set the correct file type for your system.
2.2.2. Conventions
XUL has to follow certain conventions (as does XHTML or any other XML-based file) in order to be valid. Mozilla generates an error when it encounters an invalid XUL file.
The first thing required in a XUL document is the XML declaration.
<?xml version="1.0"?>
Any comments used to introduce your file can begin on the line after the declaration. Comments in XUL follow the same format used in HTML and XML, delimited by <!-- and -->.
All tag sets must be closed. Empty tags are allowed for some elements, such as the <label> element, that are used without nested elements or content. Note that a trailing slash at the end of the tag is required to denote an empty element.
<label value="Getting Started" />
Another thing to remember is that XUL is case-sensitive. Closing a XUL <window> tag with </Window> renders it invalid.
These conventions ensure that the rendering engine can parse the XUL file successfully and display the elements defined there. Mozilla does not validate XML files, such as XUL, and it does not resolve externally parsed entities, but it does check for document well-formedness.
Following the XML specification, Mozilla ignores well-formed tags that it does not recognize, which can give your applications extra flexibility, particularly as you begin to use technologies such as XBL. But it can also make debugging a little more difficult, as when you create an element named <botton> and don't see why your XUL button doesn't have the typical borders or three-dimensional style.
A good practice to follow when creating XUL files is to use comments, copious whitespace, indentations (but not tabbed indentations where you can avoid them), and XUL widgets you are familiar with.
2.2.3. The XUL Namespace
Like other markup vocabularies, XUL uses a namespace declaration to define the particular elements that may be included in a valid file. Example 2-2 shows a sample of the required namespace declaration. The namespace is an attribute of the root window element. The lack of any suffix on the XML namespace declaration (i.e., xmlns:xul) indicates that XUL is the default namespace for this file.
Example 2-2. The XUL namespace declaration
<window
  xmlns="http://www.mozilla.org/keymaster/gatekeeper/there.is.only.xul">
  <description>Illustrating the XUL namespace</description>
</window>
If you want to include XUL content in documents that use other types of markup, you need to declare more than one namespace. Common namespace declarations for getting other language elements into your code include HTML and RDF, but you can invent your own as well. If you wanted to put the button from Example 2-1 into a vanilla XML file, for example, you could place it into an XML document by using the xmlns:xul attribute, as shown in Example 2-3.
Example 2-3. Mixed namespaces in an XML document
<flies:flies
  xmlns:flies="http://www.flies.com/come.fly.with.me.xml#"
  xmlns:html="http://www.w3.org/1999/xhtml"
  xmlns:xul="http://www.mozilla.org/keymaster/gatekeeper/there.is.only.xul">
  <flies:wings>
    <xul:box align="center">
      <xul:button label="hello xFly" onclick="alert('hello.');" />
    </xul:box>
    <html:img src="wings.jpg" />
  </flies:wings>
</flies:flies>
This file has three types of content: XUL, HTML, and customized markup called flies. When you use mixed namespaces, you have to prefix the XUL elements with xul: to distinguish them from markup in other namespaces, as with the xul:box and xul:button shown in Example 2-3.
2.2.4. Basic XUL Layout
Example 2-1 features some very common XUL elements. In this section, each element is dissected to show what it does and how it interacts with other elements. The <window> element is the root of individual primary XUL documents (in contrast to dialogs that pop up from windows, which can use <dialog> as the root, and XUL documents loaded within other XUL containers, which can use <page>).
As in HTML, the root element defines the document into which all elements are drawn, but in XUL, that document is a piece of an application interface and not a web page. We'll have more to say about the window and some of its features in the second example.
A <box> element that contains a <button> is inside the window in Example 2-1. Although you can use attributes on the window element to lay out and position window children, it's never a bad idea to use the <box> as a container, particularly when you add new layout to your document, such as rows of buttons, grids, tabs, or other elements that need to be arranged precisely within the space of the window. The box is the basic element for layout in XUL.
The align attribute on the box specifies that the children do not stretch and center themselves in the middle of the available space. If the box was omitted and there were multiple children of the root window, they would be laid out vertically by default, one under the other. This setting can be overridden by adding the orient attribute to <window> and giving it a value of “horizontal.”
2.2.5. Using XUL Windows
The foundation of an XPFE application is a window. Each XUL document has to have at least one XUL <window> element, and it must be the root of the document -- the surrounding, outermost element in the XML document, set apart from the XML declaration itself and other processing “preambles.” A basic window with no content looks like this:
<?xml version="1.0"?>
<!DOCTYPE window>
<window
    xmlns:html="http://www.w3.org/1999/xhtml"
    xmlns="http://www.mozilla.org/keymaster/gatekeeper/there.is.only.xul">
</window>
Commonly, an application has more than one window, with a number of dialogs and secondary windows. Each window is also contained within a <window> element (though recent additions to the XUL specification include the dialog and page elements, which are derived from window and can be used in its place as root elements in your XUL files).
As your application becomes more complex, you need a way to keep track of the windows and ensure that they can communicate with one another. In Mozilla, there is a way to do this by using the type attribute identifier, which allows you to use special window-opening functions like toOpenWindowByType( ) to manage particular window types.
As with any existing Mozilla functions referred to in this book, you can look up toOpenWindowByType by using the LXR web-based source code viewer, described in Appendix A and available at http://lxr.mozilla.org/.
2.2.5.1. Window features
An id attribute is present on the <window> element. Using this attribute is not necessary to run the windows system, but it is a good idea to give each window a unique identifier because it makes nodes easier to find from script (see the DOM method getElementByID in Chapter 5 for information about how to get elements by identifier). This is how to set up an ID attribute:
<window
    xmlns:html="http://www.w3.org/1999/xhtml"
    xmlns="http://www.mozilla.org/keymaster/gatekeeper/there.is.only.xul"
    id="xflyMain">
Load event handlers such as onload and onunload are useful and necessary if you want to add behavior to a window, pass input to it, or manipulate its content depending on context:
<window
    xmlns:html="http://www.w3.org/1999/xhtml"
    xmlns="http://www.mozilla.org/keymaster/gatekeeper/there.is.only.xul"
    id="xfly-main"
    onload="startUp( )"
    onunload="shutdown( )"
    onclose="onClose( )">
When you load a XUL file that begins in this way, the event handler attributes onload and onunload carry out the functions listed as values (startUp( ) and shutdown( )). In addition, Mozilla provides an onclose event handler that intercepts the upcoming window closure to carry out any extra processing you need. The close event is fired before the unload event, so you can stop the window from closing in the onclose event handler if necessary. To stop window closure, the close event must return false.
Additional handlers are available for dialog windows. They are listed and their use is outlined in the section Section 3.2 in Chapter 3.
2.2.5.2. Window properties
The window declaration is expanding, but there is still plenty of room for more features. In addition to the attributes -- the event handlers, the ID, and the namespace that appear within the <window> tag itself -- a XUL window also has all of the properties of the DOM window object from HTML. These properties are listed below, along with additional properties for application specific tasks.
![]()
Special properties of the XUL window object include:
window.content
Using this property is a quick way to access the content area of your window, if one exists. This property is useful only if your window uses one of the content elements, namely <iframe>, <browser>, and <editor>. Refer to the section Section 3.8 in Chapter 3 for a more detailed discussion. The content property is linked only to the frame you have explicitly declared as the primary area.
<browser type="content-primary" ...>
Subsequently, you can access and manipulate the content.
window.content.focus( );
window.sizeToContent( )
This property is used to ensure intrinsic sizing, which is important in XUL application development, especially in dialog windows. Intrinsic sizing ensures that the window adapts and morphs to fit the content. This is preferable to constraining your window with a fixed width and height when the onload handler anticipates changeable content, depends on context, or takes input from another window. The colorpicker in the Mozilla Editor, for example, uses this function to make sure that the window displaying the chosen palette shrinks to fit that palette:
function ChangePalette(palette)
{
  gDialog.ColorPicker.setAttribute("palettename", palette);
  window.sizeToContent( );
}
2.2.5.3. Interaction between windows
The nsIWindowMediator XPCOM component provides several routines for interacting with different windows. Though it's a little too early to discuss using a component like this in the Hello World examples, these routines include:
- Getting the most recent window of a particular type
- Enumerating all open windows
- Registering and unregistering the window
- Updating the window timestamp
- Updating the window title
- Setting the Z-order position
Chapter 8 provides full details of how to understand and use XPCOM components.
2.2.5.4. Window behavior
Mozilla supports the standard window.open JavaScript function, which has its origins in the world of browser scripting and the launching of new browser windows. Mozilla extends the function to provide some features for application development. It also provides the window.openDialog function for opening windows in the XPFE scripting environment. The latter function has become the more commonly used method to open a new XUL window, although the two are interchangeable.
The usage of window.open is:
window.open (url, name, features);
window.openDialog extends this functionality with a new argument list passed to it, which is optional and can be any number of arguments as needed:
window.openDialog (url, type, features, argument1, argument2);
Here is a list of some of the features of a XUL window opened using window.openDialog:
close
The window can be created with or without a close widget.
chrome
The new window has to be treated as a window within the chrome context, rather than in the browser context. It gets its own top-level window. The window itself is the chrome URL passed to the function, and is not to be loaded in a browser window.
dependent
The new window belongs to the calling window on operating systems that support this behavior. It “floats” on top of the opening window, and you can still access the parent window. It is minimized with its parent.
modal
The window will be run modally. Control is not given back to the parent window until this window has closed.
titlebar
The window can be created with or without a titlebar.
centerscreen
Open the window centered on screen.
A comma delimits the features list and the entire list must be in quotes. The script that handles the new window accesses the arguments list:
window.openDialog("chrome://xfly/content/utils/prompt.xul",
                  "xFly_prompt",
                  "chrome,dialog,modal",
                  message);
The window created in this example will be modal and use the message that was passed to it in the variable message. By default, Mozilla assumes that the chrome feature is on when you use either window.open or window.openDialog in a chrome environment, and creates a new window in the window hierarchy.
2.3. Making Mozilla Work for You
The second “Hello World” sample, shown in Example 2-4, adds some important application features and begins to take advantage of the resources that Mozilla provides for you. This section goes over the ways you can import stylesheets and Mozilla scripts to make your XUL more sophisticated and modular. It also prepares you to make an actual application.
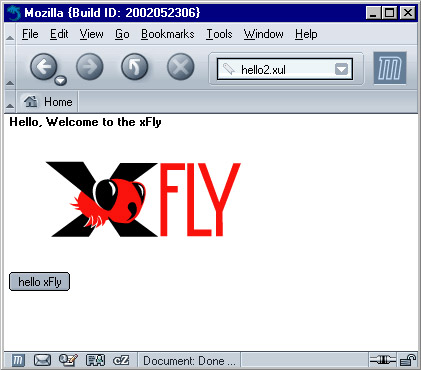
You can see this example in action by saving the code in Example 2-4 to a file, hello2.xul, and then launching Mozilla and selecting File > Open File from the browser. This displays the example as content in the Mozilla browser, as shown in Figure 2-2.
Example 2-4. Sample XUL window
<?xml version="1.0"?>
<?xml-stylesheet href="chrome://global/skin" type="text/css"?>
<!DOCTYPE window>
<window title="Hello xFly"
  xmlns:html="http://www.w3.org/1999/xhtml"
  xmlns="http://www.mozilla.org/keymaster/gatekeeper/there.is.only.xul"
  style="background-color: white;"
  width="300"
  height="215"
  onload="centerWindowOnScreen( )">
<script type="application/x-javascript"
  src="chrome://global/content/dialogOverlay.js" />
<vbox align="left">
  <label style="font-weight: bold;"
      value="Hello, Welcome to the xFly" />
  <image src="http://books.mozdev.org/xfly.gif" />
  <button label="hello xFly" oncommand="alert('Hello World');" />
</vbox>
</window>
The difference between Example 2-4 and the first example is the addition of new elements, including the script element that brings in Mozilla JavaScript functions for use, additional box layout properties, inline style rules and processing instructions to import stylesheets, and the DOCTYPE declaration, which we describe later in this chapter in the section Section 2.5.5.3.
These extras make your XUL file work more like an application by giving you access to services and features that already exist in Mozilla. They can also help you organize your own work into reusable parts, such as application stylesheets, widgets, and script libraries, as described later in this chapter in the section Section 2.5.
Figure 2-2. The second Hello xFly example loaded in the browser
2.3.1. Importing Resources from Mozilla
The code in Example 2-4 uses scripts and styles that are already defined in Mozilla. As you'll see in examples in this book and in the Mozilla source code, the global.css stylesheet is where many basic styles are defined for XUL widgets. Most XUL widgets have some inherent style, as you can see in Example 2-1, where the button has a button-like look without any explicit style rules or stylesheet imports.
As the XPFE has evolved, XUL widgets have used XBL internally to define some of these inherent looks and behaviors, which has taken some of the responsibility away from global.css and other CSS files. But this stylesheet still contains important rules for displaying basic XUL widgets. It's usually a good idea to import this main stylesheet into your application, as described here, and see what it gets you in terms of presentation. If you load Example 2-4 with and without the global.css line, you can see the way that the rules in the stylesheet provide styles for the widgets in the XUL.
Similarly, scripts like globalOverlay.js, tasksOverlay.js, and dialogOverlay.js, imported in Example 2-4, provide basic functions you can use in your applications.
2.3.1.1. Loading stylesheets
In the second line of Example 2-4, the stylesheet declaration uses a chrome:// URL to refer to and load the global.css file. The style rules in that file give the button widget its “widgetness.” You can use the stylesheet processing instruction to load Mozilla stylesheets like global.css, navigator.css, and toolbar.css, or you can use it to load your own application stylesheet. In both cases, the chrome:// URL allows you to refer to packaged files in a flexible way.
<!--import the navigator.css stylesheet
    from the Mozilla navigator component-->
<?xml-stylesheet href="chrome://navigator/skin" type="text/css"?>
<!--import xfly.css stylesheet from the xFly package-->
<?xml-stylesheet href="chrome://xfly/skin" type="text/css"?>
Also note the use of an inline style in Example 2-4. The style property on the label widget gives you a place to define CSS rules directly on widgets. In this case, the label is given a bold font so that it shows up better in the window. You could also define this style rule in an external stylesheet and make that stylesheet part of the package for your application, as we do later in this chapter in the section Section 2.5.5.
2.3.1.2. Accessing script in XUL
To access a script in XUL, use the script element and a URL value for its src attribute:
<script type="application/x-javascript"
   src="chrome://xfly/content/xfly.js" />
The dialogOverlay.js script imported into your XUL file in Example 2-4 provides access to the CenterWindowOnScreen( ) function. This function is made available to your XUL file with the line:
<script type="application/x-javascript"
  src="chrome://global/content/dialogOverlay.js" />
All functions in dialogOverlay.js are imported into the scope of the XUL file and can be called directly, as CenterWindowOnScreen( ) is in the onload event handler for the XUL window. Note that the functions contained in an imported JavaScript file are not broadcast in any particular way (though you can see them if you use the JavaScript Debugger). You may need to look around in the source code or see how other applications import files to find the functions you need, but the routines you want to use in your application code are probably already available in Mozilla.[1]
Notes
2.4. Displaying XUL Files as Chrome
Figure 2-2 shows the XUL file in Example 2-4 loaded into the browser's main content area. The example features a label widget and an image, both situated within a vbox that lays them out properly in the available space. These widgets make up the chrome of your application, the Mozilla user interface that can refer to itself and its resources with the special chrome:// URL.
This example is starting to show off some of the nice features of XPFE programming, but it still isn't an application yet. Among other things, you probably don't want your code to live inside the browser window forever. As it grows, you may also want to divide it into sensible parts -- a XUL file, a separate stylesheet, and a script file, for example. The rest of this chapter explains how to organize and package the code in Example 2-4 and launch it as a standalone window by using the -chrome option when launching Mozilla.
Launching a XUL file by using the chrome switch requires that you register your application in the chrome registry so that Mozilla sees and recognizes it. The Section 2.5.6 section later in this chapter provides more information about the chrome environment and how to register this sample application.
Although this example hasn't been registered yet, we want to give you a preview of what it will look like when launched in a standalone window so you can compare it with how the same XUL file looks when loaded into the browser window. When you do launch the example by using the -chrome option (as described later in this chapter in the section Section 2.6), you will see the window displayed in Figure 2-3.
Figure 2-3. The second Hello xFly example launched in its own window
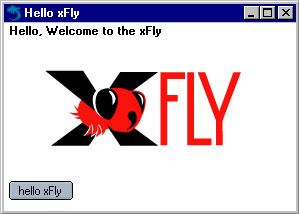
Using the -chrome option tells Mozilla to display the specified file (in this case, the code from Example 2-4) as a standalone application rather than as content within a browser window. The file itself is the same regardless of how it is loaded, but the results differ depending on what you tell Mozilla to do with the file.
Displaying a XUL file in its own chrome window makes it more independent and breaks the link to the browser content area that is present when you use the File > Open File... method. Launching standalone windows, accompanied by the JavaScript window.openDialog function explained later in this chapter, opens up much more flexible window display options for your application.
2.5. Creating a Package
The previous two main sections introduced the concept of chrome and the prospect of creating standalone application windows. The next step is to make the example into an actual package -- a modularized collection of files that can be installed in Mozilla as a new application.
In the earlier section Section 2.3, you added features and complexity to your XUL file. In this section, you pull those features into separate files -- a CSS file, JS file, and a DTD file -- register these files together, and make them installable as a single package.
Only when you have packaged your work will your files have access to Mozilla files, such as CSS and scripts, be accessible from the special chrome:// type URLs, be able to accept new themes, and be able to get to the XPCOM objects in which much of the application for Mozilla is defined.
Tools are available that help set up the files that form the basis of a new package. Appendix B provides information about XULKit, which is a collection of scripts that automates part of the package creation process. It is recommended that you try to set up your own package by hand first to understand how packages are put together before using the XULKit scripts.
2.5.1. Architecture of a Chrome Package
The architecture of the Mozilla XPFE is component- or layer-based. One of the primary aims of the design was the separation of each different component of an application, namely content, functionality, and layout. This design results in greater modularization, making it easy to create and change a UI -- to change skins for your application, for example, update the language in which the user interface is presented, or bring in new script elements.
When a package is modularized like it can be in Mozilla, design determinations can be left to the designer, language in the user interface can be left to writers, and the application framework itself can be handled by software developers (though the programmer handles all of these in many small- to medium-sized projects). The next several sections provide more detail about each component and its content and file types. The way basic packages fit components together can be the basis for your own application development.
A package is a group of directories and related files that make up a Mozilla application. A small, typical package may include a single XUL file, a script file (currently JavaScript, with implementations for Perl, Python, Ruby, and other languages being developed), and a CSS file. However, a single package might include dozens of these files, and may also include XBL files, Image File Types (PNG, JPG, GIF), DTD, HTML, and RDF files. Each has an important role to play in the application.
2.5.2. Package Components
As you will discover, each component in a package is independent. It is possible for your application to exist with just one or two of these components. Yet they all tie together when necessary to create a full featured application, and they are all at your disposal to take advantage of.
2.5.2.1. Chrome content
The content is the XUL and XBL data, contained in one or more files. This content is pulled in at runtime from files, overlays, and bindings, for display in the window system. The cross-platform implementation ensures consistency in the native system, and fits into the “write once, run anywhere” model. The XUL defines a single set of UI elements for all platforms. The XUL parser is much less tolerant than many HTML parsers; in fact, it's completely intolerant. However, it needs to be because every element in XUL impacts others and affects the layout of the UI -- especially in the context of the Box Model, which Chapter 3 describes in detail.
The widget set consists of simple widgets that display by drawing themselves absolutely in their allotted space, and of more complex widgets that act as containers, draw on top of others, or accept input. A <label> widget is an example of the former, while <stack> is of the latter, more complex group. If the parser does not find an element in the content files, it fails to load and returns an error. Errors vary by type. An XML syntax error, for example, displays in the window in place of the expected content. It gives you the file the error originated in, along with the line number and column number.
Built as a complementary description language to XUL, XBL allows you to create your own widgets or add new behavior to existing XUL widgets. You may attach scripting and create (anonymous) content in a single binding or in many. With a little imagination, you can extend the content available to you infinitely by adding your own styling and behavior with XBL.
2.5.2.2. Chrome appearance
Loading up a XUL file with no styles attached to the XUL elements will render the UI as a plain, disproportioned group of widgets. While plain text on a web page can be effective for simply relaying information, the situation is not analogous in user interfaces.
Mozilla user interfaces without style are not very usable. Even to achieve the traditional plain gray interface that so many applications use, you must use CSS to style the Mozilla front end, and subtle effects, such as color grades or 3D button effects, often make even the most basic interface look and work better.
Themes and the ability to customize the look of an application are becoming more prominent. Mozilla developers realized this prominence during the design phase of Mozilla, and it's reflected in the architecture: the appearance of the interface is almost entirely separate from the structural representation in the content.
2.5.2.3. Chrome behavior
Mozilla currently supports only JavaScript as the bridge between the UI and the application code. JavaScript is the glue that binds the UI and the back end functionality, which is almost entirely written in C++.
Much of the infrastructure is in place for the support of other programming languages, however, and Python and Perl are currently being proposed as the next languages to fit into the framework. Currently, you will see JavaScript associated with XUL content via the following declaration:
<script type="application/x-javascript" src="xfly.js" />
type replaces the now deprecated language attribute and expects a MIME type for its value. As Mozilla matures and support for other languages arrives, this value may become interchangeable -- which fits in with the philosophy, common in open source projects, of there being More Than One Way To Do It. Note that the behavior component of a Mozilla application usually sits in the content subdirectory of a package, as described later in the section Section 2.5.3.
2.5.2.4. Chrome locale
Localization is the modification of software to meet the language of a location and the adaptation of resources, such as user interface and documentation, for that region. Widgets such as menu items, buttons, window titlebars, and alert dialogs commonly need to be localized. Beyond these widgets, there can be other localizable content in an application, from HTML pages to install packages.
The formats used by Mozilla are:
- DTD (.dtd) files, which contain entities that host the strings to be included in your XUL content.
- Property files (.properties), which contain string bundles that are accessed by dynamic content in JavaScript and C++ files or, theoretically, any language.
- HTML files for certain pages installed with the application -- e.g., About Mozilla.
- RDF files.
2.5.3. Directory Structure
Files can be organized in many different ways. If your application is small -- say a single window with a simple structure that needs to be available only in one language -- then having all your files in one directory may be easier. As the size of an application goes over a certain threshold, however, logically grouping your files into subdirectories is a good practice to make the files more accessible.
Most applications use a directory structure that mirrors the package component descriptions described earlier: XUL and JavaScript in a content subdirectory, CSS and images in a skin subdirectory, and DTDs and other resources for localizing the interface in a locale subdirectory. Figure 2-4 shows this common grouping.
Figure 2-4. A sample package layout in the directory system
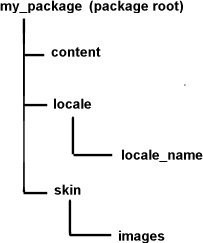
These three different directories usually contain the following type of files:
content
The content directory is the home for the XUL files that contain the widgets to be drawn for you application. It is common practice to also place files related to behavior, namely JavaScript files, in this directory.
locale
This directory contains the files that contain localized strings for your package. Most files are DTD files that contain the entities referenced in XUL files. There is a subdirectory for each language, and the naming convention is code-region, such as en-US.
skin
The term “skin” is an internal name for a theme. The skin directory contains all CSS files and images that contribute to the appearance of the windows. This is a good place to put the application images -- in their own subdirectory.
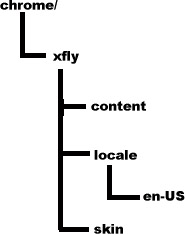
2.5.3.1. The xFly application directory structure
The structure of the directories in which an application is defined (whether those directories are in the filesystem or subdirectories in an archive such as a JAR file) is an important part of that application's design and relationship to Mozilla. Use the following steps to make your xFly package self-contained, registerable, and adaptable.
- On your computer, go to the directory where you have installed Mozilla and create a new directory underneath the chrome directory called “xfly.”
All Mozilla applications live in the chrome directory.
- Under that directory, create the three new directories, content, locale, and skin, as shown in Figure 2-5. The locale directory will have the default ‘en-US’ language pack structure.
Figure 2-5. xFly package directory structure
2.5.4. Package Manifests
Now that you have created the directories for your package, you must tell Mozilla about them. All Mozilla packages must include manifests that describe their contents and make it possible to register them with Mozilla. A manifest is an RDF file (or series of RDF files) that sits within the package and interacts with Mozilla's chrome directory. RDF files are XML files that describe data in a machine-readable form.
Each xFly package subdirectory needs its own manifest file. Mozilla uses these files (in each case, called contents.rdf) when registering the application. These files are listed in Examples Example 2-5, Example 2-6, and Example 2-7. Create these files in your xFly content, skin, and locale subdirectories, respectively.
Example 2-5. chrome/xfly/content/contents.rdf file
<?xml version="1.0"?>
<RDF:RDF xmlns:RDF="http://www.w3.org/1999/02/22-rdf-syntax-ns#"
         xmlns:chrome="http://www.mozilla.org/rdf/chrome#">
  <!-- list all the packages being supplied -->
  <RDF:Seq about="urn:mozilla:package:root">
    <RDF:li resource="urn:mozilla:package:xfly"/>
  </RDF:Seq>
  <!-- package information -->
  <RDF:Description about="urn:mozilla:package:xfly"
        chrome:displayName="xFly"
        chrome:author="xfly.mozdev.org"
        chrome:name="xfly">
  </RDF:Description>
 </RDF:RDF>
In the content manifest in Example 2-5, note the chrome:name, chrome:author, and the other metadata that the manifest provides to Mozilla. This information can be used by others to identify what your application is and who wrote it. For example, the name, author, and short description information for each browser theme you have installed is viewable by going to Preferences and selecting Appearance > Themes.
In Example 2-6, which describes the skin for xFly only, note that new skin resources for the Classic theme are all that is supplied, as indicated in the RDF:Seq, which lists only classic as affected by this new package.
Example 2-6. chrome/xfly/skin/contents.rdf file
<?xml version="1.0"?>
<RDF:RDF xmlns:RDF="http://www.w3.org/1999/02/22-rdf-syntax-ns#"
         xmlns:chrome="http://www.mozilla.org/rdf/chrome#">
  <RDF:Seq about="urn:mozilla:skin:root">
    <RDF:li resource="urn:mozilla:skin:classic/1.0" />
  </RDF:Seq>
  <RDF:Description about="urn:mozilla:skin:classic/1.0">
    <chrome:packages>
      <RDF:Seq about="urn:mozilla:skin:classic/1.0:packages">
        <RDF:li resource="urn:mozilla:skin:classic/1.0:xfly"/>
      </RDF:Seq>
    </chrome:packages>
  </RDF:Description>
</RDF:RDF>
In Example 2-7, which shows the third kind of manifest, for new locale information, the English language pack (en-US) is augmented with the localizable resources in the xFly package named there. The RDF:Seq structure in a manifest states, “to the package listed here (i.e., the en-US language pack), add the following.”
Example 2-7. chrome/xfly/locale/contents.rdf file
<?xml version="1.0"?>
<RDF:RDF xmlns:RDF="http://www.w3.org/1999/02/22-rdf-syntax-ns#"
         xmlns:chrome="http://www.mozilla.org/rdf/chrome#">
  <RDF:Seq about="urn:mozilla:locale:root">
    <RDF:li resource="urn:mozilla:locale:en-US"/>
  </RDF:Seq>
  <!-- locale information -->
  <RDF:Description about="urn:mozilla:locale:en-US"
        chrome:displayName="English(US)"
        chrome:author="xfly.mozdev.org"
        chrome:name="en-US"
        chrome:previewURL="http://www.mozilla.org/locales/en-US.gif">
    <chrome:packages>
      <RDF:Seq about="urn:mozilla:locale:en-US:packages">
        <RDF:li resource="urn:mozilla:locale:en-US:xfly"/>
      </RDF:Seq>
    </chrome:packages>
  </RDF:Description>
</RDF:RDF>
Manifests are detailed in Chapter 6. For now, it's enough to see that each manifest describes the subdirectory in which it is located, and that the contents of those subdirectories make up the package collectively.
The content describes the content of the xFly package, the XUL, and the JavaScript. The skin describes the theme of xFly, or the CSS and images used to lay out the XUL. The third part describes the locale, or the strings in the UI that can be localized or adapted for various languages or locales.
2.5.5. Separating the Files
Once you have a subdirectory structure set up in accordance with the package component structure of your application, you can pull the pieces of your XUL file out into their own files and modularize your application. These separate files -- the basic XUL file and separate CSS, JS, and DTD files -- are registered as a single package and can then be launched as a standalone application.
Though the files contain the information you've already seen in the “Hello World” sample shown in Example 2-4, their interaction demonstrates how packages can work together in Mozilla. Each step taken to separate the different components requires editing the base XUL file.
2.5.5.1. The xFly CSS file
The inline style rule on the label widget can go almost unadulterated into a separate text file called xfly.css. Save the code in Example 2-8 in the chrome/xfly/skin/ directory.
Example 2-8. The contents of the xfly.css file
#xlabel { font-weight: bold; }
window  { background-color: white; }
Using style rules from an external file is different because you have to specify some way for the style rule to associate itself with the appropriate tags in the XUL file. CSS provides a rich collection of selectors, which bind style data to elements. In this case, where you have two separate elements that need to pick up rules, the id attribute on the XUL element is used to bind a unique element to an external style rule and the other style rule is bound by referring to the XUL element directly. Example 2-8 includes the selectors for the two elements, and Example 2-9 shows the updated XUL that uses xfly.css.
Example 2-9. XUL using external style data
<?xml version="1.0"?>
<?xml-stylesheet href="chrome://global/skin" type="text/css"?>
<?xml-stylesheet href="chrome://xfly/skin" type="text/css"?>
<!DOCTYPE window>
<window title="Hello xFly"
  xmlns:html="http://www.w3.org/1999/xhtml"
  xmlns="http://www.mozilla.org/keymaster/gatekeeper/there.is.only.xul"
  width="300"
  height="215"
  onload="centerWindowOnScreen( )">
 <script type="application/x-javascript"
  src="chrome://global/content/dialogOverlay.js" />
 <vbox align="left" id="vb">
  <label id="xlabel"
      value="Hello, Welcome to the xFly" />
  <image src="http://books.mozdev.org/xfly.gif" />
  <button label="hello xFly" oncommand="alert('hello.');" />
 </vbox>
</window>
Note the extra stylesheet import statement at the top and the use of the new id attribute on the label. When you register the new files in your package with Mozilla, the xfly directory in that stylesheet processing instruction will point into your application directory structure (at the skin subdirectory, and at a file named after the directory itself, xfly.css). The label will pick up the style information in the file that was previously defined directly in its style attribute.
2.5.5.2. The xFly script file
The next step is to take the scripting portion, as simple as it is, out of the XUL file and put it into an external JavaScript file. Example 2-10 shows a XUL file that gets a function for the button from an external script file, given here as xfly.js.
Example 2-10. XUL using an external script
<?xml version="1.0"?>
<?xml-stylesheet href="chrome://global/skin" type="text/css"?>
<?xml-stylesheet href="chrome://xfly/skin" type="text/css"?>
<!DOCTYPE window>
<window title="Hello xFly"
  xmlns:html="http://www.w3.org/1999/xhtml"
  xmlns="http://www.mozilla.org/keymaster/gatekeeper/there.is.only.xul"
  width="300"
  height="215"
  onload="centerWindowOnScreen( )">
<script type="application/x-javascript"
  src="chrome://global/content/dialogOverlay.js" />
<script type="application/x-javascript”
  src="chrome://xfly/content/xfly.js” />
 <vbox align="left" id="vb">
  <label id="xlabel"
      value="Hello, Welcome to the xFly" />
  <image src="http://books.mozdev.org/xfly.gif" />
  <button label="hello xFly" oncommand="greet( );" />
 </vbox>
</window>
Note that the function greet( ) is used to name the action that is performed when the button is clicked. The greet( ) function is now defined in the xfly.js file that the XUL file picks up with the script import statement:
<script type="application/x-javascript"
  src="chrome://xfly/content/xfly.js" />
Example 2-11 contains all of the code needed for the xfly.js file.
Save xfly.js in the content subdirectory of the xFly application (chrome/xfly/content/). The script import statement above uses the chrome:// URL to locate scripts from directories that were registered with Mozilla.
2.5.5.3. The xFly DTD
The final step in a basic application setup is to generalize parts of the interface that are written in a particular language, such as English. When you create a locale subdirectory for your package and place a DTD file that contains the English strings in the user interface, you can refer to and load that DTD just as you do with the CSS and script files.
For example, to localize the text of the label and button elements in the “hello xFly” example, you can use a special syntax to tell Mozilla to use an entity rather than a string. Because that entity is defined in xfly.dtd and located in the locale subdirectory, it can easily be swapped for an entity from a different language pack when the user switches languages in Mozilla.
Once again, the external file you create can be very simple. Example 2-12 contains the code needed for the xfly.dtd file, which you create and save in the locale subdirectory.
Example 2-12. The contents of the xfly.dtd file
<!ENTITY label.val       "Hello, Welcome to the xFly " >
<!ENTITY btn.lbl         "hello xFly " >
The updated XUL file that uses this external DTD, then, appears in Example 2-13. Once you have made the final changes in the XUL to refer to the external files you've created, save the code in Example 2-13 as xfly.xul in the chrome/xfly/content/ directory.
Example 2-13. XUL using an external DTD file
<?xml version="1.0"?>
<?xml-stylesheet href="chrome://global/skin" type="text/css"?>
<?xml-stylesheet href="chrome://xfly/skin" type="text/css"?>
<!DOCTYPE window SYSTEM "chrome://xfly/locale/xfly.dtd" >
<window title="Hello xFly"
  xmlns:html="http://www.w3.org/1999/xhtml"
  xmlns="http://www.mozilla.org/keymaster/gatekeeper/there.is.only.xul"
  width="300"
  height="215"
  onload="centerWindowOnScreen( )">
<script type="application/x-javascript"
  src="chrome://global/content/dialogOverlay.js" />
<script type="application/x-javascript"
  src="chrome://xfly/content/xfly.js" />
 <vbox align="left" id="vb">
  <label id="xlabel"
      value="&label.val;" />
  <image src="http://books.mozdev.org/xfly.gif" />
  <button label="&btn.lbl;" oncommand="greet( );" />
 </vbox>
</window>
Like the CSS and script file imports, the updated DOCTYPE definition at the top of the file tells Mozilla to load additional entities as part of the xFly package. Those entities -- the English strings that display in the user interface -- are defined so they can be localized or internationalized without affecting the application's structure.
All three of these imports use the chrome:// URL to refer to resources that are internal to the xFly package. These type of URLs can also refer to resources elsewhere in Mozilla, such as image resources, strings that have already been defined in entities, and functions from scripts such as centerWindowOnScreen( ).
When you finish setting things up in the package directories, you should have a structure that looks like the tree structure in Example 2-14.
Example 2-14. Tree structure of a completed sample xFly package
chrome/
       xfly/
           content/
                  xfly.xul
                  xfly.js
                  contents.rdf
           locale/
                 en-US/
                      xfly.dtd
                      contents.rdf
           skin/
                  xfly.css
                  contents.rdf
2.5.6. Registering a Package
Registering packages in Mozilla can be confusing at first, so don't worry about understanding everything at this point. Later chapters provide more detailed information about packaging and registration, and you can always copy the examples given here to install your own application. In general, to make your package registerable, create manifests that describe your package in terms that Mozilla can understand.
Although it's customary to make registration a part of the installation process by using the XPInstall API and installation scripts, you need a simple way to register the xFly application so you can see your work and test it as it develops. For this purpose, hacking the installed-chrome.txt file living in Mozilla's chrome directory will do.
The installed-chrome.txt file is a list of packages and package parts that Mozilla should find and register on start up. When you add entries to this file, you point to your package and tell Mozilla to register that package when it starts up.
Append the entries in Example 2-15 to the bottom of the installed-chrome.txt file in the main chrome directory.
Example 2-15. Additions to the installed-chrome.txt file
content,install,url,resource:/chrome/xfly/content/
skin,install,url,resource:/chrome/xfly/skin/
locale,install,url,resource:/chrome/xfly/locale/en-US/
When Mozilla starts up, it looks for the package manifests, reads them, and registers the xFly package.
When others install your application and use it on their machines (but do not use the hack to installed-chrome.txt), you can provide them with a JavaScript installation file that downloads and registers your package from a web page. See Chapter 6 for more information about these installation files and the XPInstall technology they are based upon.
2.6. Launching the Application
Once your package is registered, you can use these startup options to access your package directly.
2.6.1. Windows launch
In the Mozilla install directory, launch xFly at the command prompt with:
mozilla -chrome chrome://xfly/content/
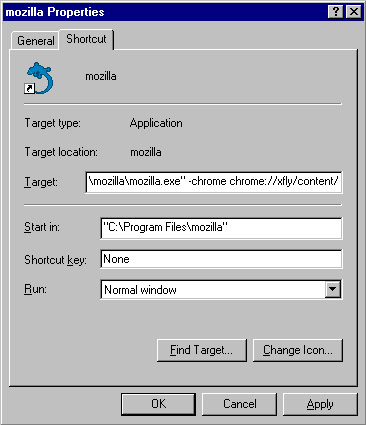
You can also launch xFly from a shortcut on your desktop by right-clicking on the existing Mozilla icon and selecting Properties. In the Target area of the Properties box, add the following text at the end of the line:
-chrome chrome://xfly/content/
Figure 2-6 shows what the new properties box should look like.
Figure 2-6. Modified shortcut properties
2.6.1.1. Unix launch
In the Mozilla install directory, launch xFly with:
./mozilla -chrome chrome://xfly/content/
2.6.1.2. Macintosh launch
Start xFly by creating a text file on your desktop with the following content:
-chrome chrome://xfly/content/
You can either drag this text file onto your Mozilla icon to launch the application or set the text file's creator type to MOZZ. If you change the creator type, you should be able to double-click on the text file to launch Mozilla.
Once you register your application, you are free to continue developing it in the various component subdirectories and relaunching it as it progresses. You can add new XUL files in the content directory, for example, that are invoked from buttons using window.openDialog( ) event handlers.
You can add new widgets to xfly.xul, add new styles to xfly.css that apply to the XUL, add new functions to xfly.js, or use existing functions in the Mozilla source code that you can find new ways to use in your own application.
If you have trouble editing and relaunching the xFly application, there are a couple of platform specific culprits to look into. On Windows, the Quick Launch feature may prevent you from seeing changes to your files. On Unix, file permission conflicts can also cause problems viewing your files. Making sure that Quick Launch is disabled and double checking file permissions may help get xFly working on your system.
The steps described in this chapter -- creating a basic XUL file, adding features, displaying that XUL file as a standalone window, organizing the code into separate files and a package structure, and registering and launching that package -- are the basic building blocks of all Mozilla applications. When you get a feel for what's going on here, you'll be able to quickly understand and use the topics described in the rest of the book.
[1] Unfortunately, no good reference exists for the functions defined in the various scripts files you can import. The functions and their locations within the files continue to change, so finding and using the right ones is sometimes a matter of luck, sometimes a matter of whom you know, and often a matter of testing, determination, and patience.
Get Creating Applications with Mozilla now with the O’Reilly learning platform.
O’Reilly members experience books, live events, courses curated by job role, and more from O’Reilly and nearly 200 top publishers.

