Chapter 1. Creating Your First Page
Every website is a collection of web pages, so it should come as no surprise that your journey to build a complete site starts here, with the writing of a single web page.
Technically, a web page is a special type of document written in a computer language called HTML (that’s short for HyperText Markup Language). Web pages are written for web browsers—programs like Internet Explorer, Google Chrome, and Safari. These browsers have a simple but crucially important job: they read the HTML in a web page document and display the perfectly formatted result for you to read.
This chapter will introduce you to HTML. You’ll see how a basic web page works and learn how to create one of your own. For now, you’ll be working with web pages you store on your computer, visible only to you. Later on, in Chapter 9, you’ll learn to put web pages online so anyone with a web connection can see them.
HTML: The Language of the Web
HTML is the single most important standard in web design—and the only one that’s absolutely required if you plan to create a web page. Every web page is written in HTML. It doesn’t matter whether your page contains a series of blog entries, a dozen pictures of your pet lemur, or a heavily formatted screenplay—odds are that, if you’re looking at it in a browser, it’s an HTML page.
HTML plays a key role in web pages: It tells browsers how to display the contents of a page, using special instructions called tags that tell a browser when to start a paragraph, italicize a word, or display a picture. To create your own web pages, you need to learn to use this family of tags.
HTML is such an important standard that you’ll spend a good portion of this book digging through its features, frills, and occasional shortcomings. Every web page you build along the way will be a bona fide HTML document.
Note
The HTML standard doesn’t have anything to do with the way a web browser retrieves a page on the Web. That task is left to another standard, called HTTP (HyperText Transport Protocol), which is a communication technology that lets two computers exchange data over the Internet. To use the analogy of a phone conversation, the telephone wires represent HTTP, and the juicy tidbits of gossip you exchange with Aunt Martha are the HTML documents.
Cracking Open an HTML File
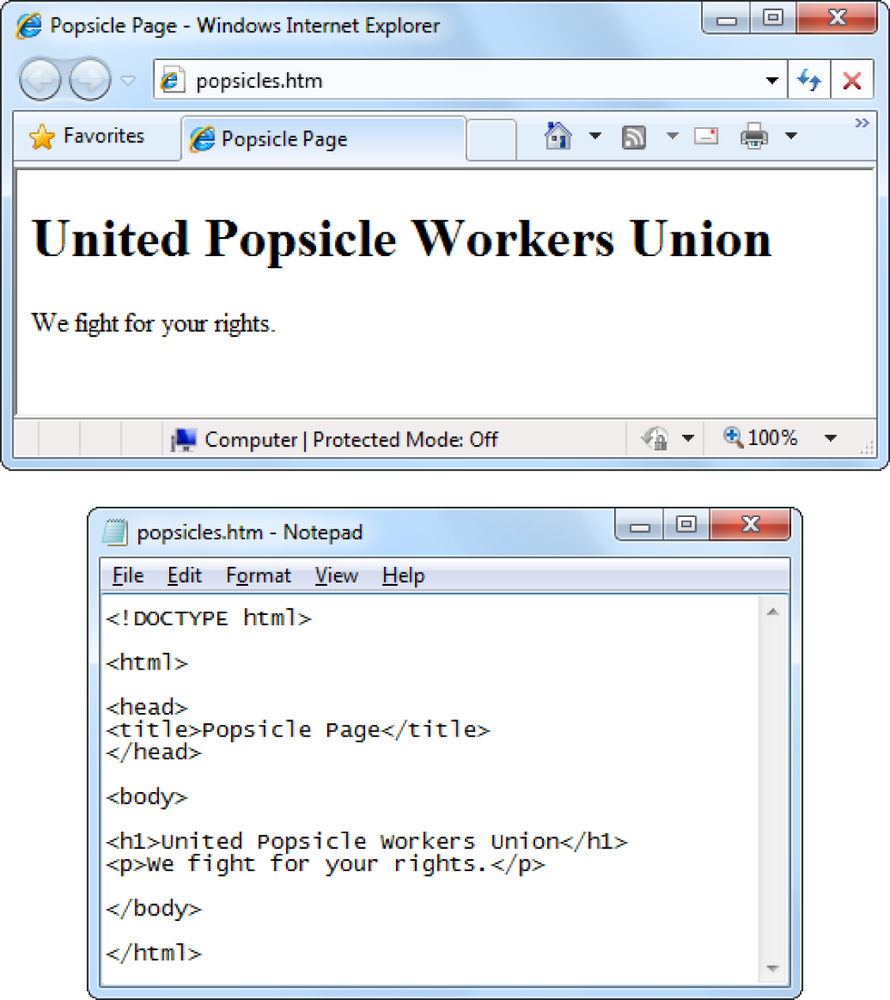
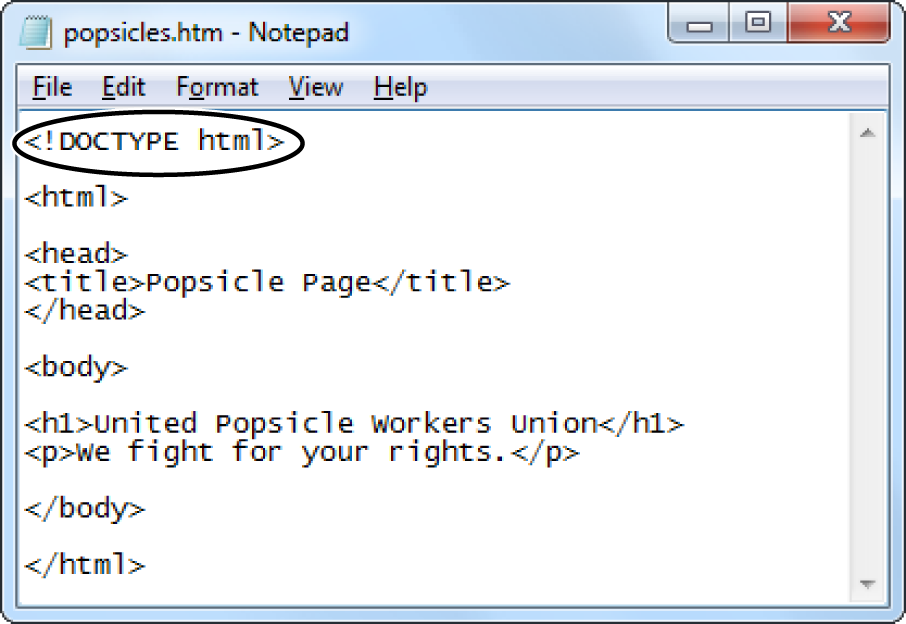
On the inside, an HTML page is actually nothing more than a plain-vanilla text file. That means that the raw code behind every web page you create will consist entirely of letters, numbers, and a few special characters (like spaces, punctuation marks, and everything else you can spot on your keyboard). Figure 1-1 dissects an ordinary (and very simple) HTML document.
Here’s one of the secrets of web page writing: You don’t need a live website to start creating your own web pages. That’s because you can easily build and test pages using only your own computer. In fact, you don’t even need an Internet connection. The only tools you need are a basic text editor and a standard web browser.
Your Text Editor
A text editor lets you create or edit an HTML file (in a window like the one you can see in Figure 1-1, bottom). Even many professional web designers stick with simple text-editing tools. There are plenty of fancier editing tools that are designed specifically for editing websites, but you don’t actually need any of them. And if you start using them too soon, you’re likely to end up drowning in a sea of extra frills and features before you really understand how HTML works.
< >. These HTML tags convey information about the document’s structure and formatting.The type of text editor you use depends on your computer’s operating system:
If you have a Windows computer, you use the bare-bones Notepad editor. Sail on to the next section.
If you have a Mac computer, you use the built-in TextEdit editor. But first, you need to make the adjustments described below.
Mac fans need to tweak the way TextEdit works because the program has an “HTML view” that hides the tags in an HTML file and shows you the formatted page instead. This behavior is aimed at making life simpler for newbies, but it presents a serious danger for anyone who wants to write a real web page. To avoid confusion and to make sure you write real, raw HTML, you need to turn HTML view off. Here’s how:
Choose TextEdit→Preferences.
This opens a tabbed window of TextEdit options (Figure 1-2).
Click “New Document” and then, in the Format section, choose “Plain text.”
This tells TextEdit to start you out with ordinary, unformatted text and to dispense with the formatting toolbar and ruler that would otherwise appear onscreen, which aren’t relevant to creating HTML files.
Click “Open and Save” and switch on the first option, “Display HTML files as HTML code instead of formatted text.”
This tells TextEdit to let you see (and edit) the real HTML markup, tags and all, not the formatted version of the page as it would appear in a web browser.
Close the Preferences window, and then close TextEdit.
Now, the next time you start TextEdit, you’ll begin in the plain-text mode that every self-respecting web developer uses.

Your Web Browser
As you no doubt know, a web browser is a program that lets you navigate to and display web pages. Without browsers, the Web would still exist, but you wouldn’t be able to look at it.
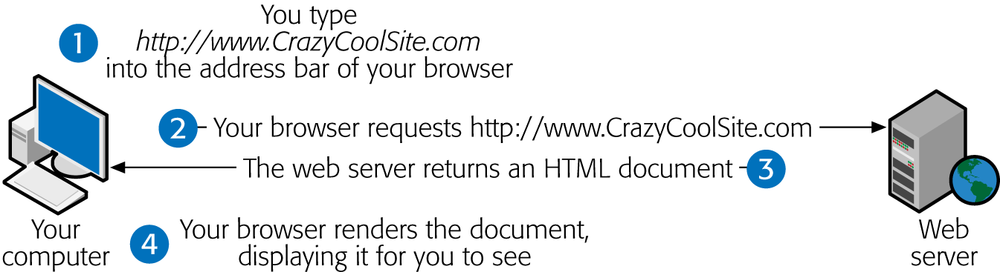
A browser’s job is surprisingly simple—in fact, the bulk of its work consists of two tasks. First, it requests web pages, which happens when you type in a website address (like www.google.com) or click a link in a web page. The browser sends that request to a far-off computer called a web server. A server is typically much more powerful than a home computer because it needs to handle multiple browser requests at once. The server heeds these requests and sends back the content of the desired web pages.
When the browser gets that content, it puts its second skill into action and renders, or draws, the web page. Technically, this means the browser converts the plain text it receives from the server into a display document based on formatting instructions embedded in the page. The end result is a graphically rich page with different typefaces, colors, and links. Figure 1-3 illustrates the process.
Although you usually ask your browser to retrieve pages from the Web, you can also use it to view a web page that’s stored on your computer, which is particularly handy when you’re practicing your HTML skills. In fact, your computer already knows that files that end in .htm or .html have web page content. So if you double-click one of these files, your computer launches your web browser automatically. (You can get the same result by dragging a web page file and dropping it on an already-open browser window.)
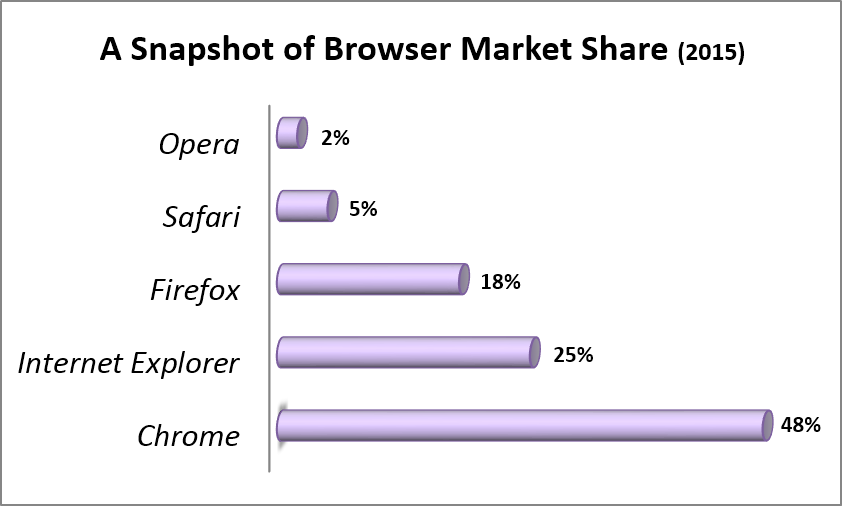
Although ordinary people need only a single web browser, it’s a good idea for web developers-in-training (like yourself) to become familiar with the most common browsers out there (see Figure 1-4). That’s because, when you design your website, you need to prepare for a wide audience of people with different browsers. To make sure your nifty pages don’t turn funky when other people look at them, you should test your site using a variety of browsers, screen sizes, and operating systems.
The following list describes the most popular browsers of today:
Google Chrome is the current king of web browsers, despite the fact that it’s the newest kid on the block. Tech-savvy web fans love its features, like bookmarks you can synchronize across different computers, and its blistering speed.
Get with Google Chrome at www.google.com/chrome.
Internet Explorer is the longest-lived browser and the official standard in many corporate and government environments. It’s also the browser that comes pre-installed on Windows, so it’s the one non-techie people use if they don’t want (or don’t know how) to install something new. Even hotshot web designers need to check that Internet Explorer understands their pages, because even old versions of IE, like IE 8, remain popular.
To download the most recent version of Internet Explorer, visit www.microsoft.com/ie.
Figure 1-4. Browser usage statistics, which estimate the percentage of people using each major browser, vary depending on what sites you examine and how you count visitors, but at the time of this writing, this is one reasonable estimate. (For current browser usage statistics, check out http://tinyurl.com/stats-browsers.)Firefox started life as the modern response to Internet Explorer. It’s still ahead of the game with its incredibly flexible add-ons, tiny programs that other people develop to enhance Firefox with extra features, like a web mail notifier and thumbnails of the sites that show up in a page of search results. Best of all, an army of volunteer programmers keep Firefox rigorously up to date.
Give Firefox a go at www.mozilla.org/firefox.
Safari is an Apple-designed browser that comes with current versions of the Mac OS operating system. Apple products like the iPhone, the iPad, and the iPod Touch also use the Safari browser (albeit a mobile version that behaves a bit differently). The fine folks at Apple created an incarnation of Safari for Windows computers but have since abandoned it, making Safari an Apple-only option.
Go on Safari at www.apple.com/safari.
Opera is a slimmed-down, easy-to-install browser that’s been around for well over a decade, serving as an antidote to the bloated size and pointless frills of Internet Explorer. For years, Opera was held back by an unfortunate detail—if you wanted an ad-free version, you needed to pay. Today, Opera is free and ad-free, too, just like the other browsers on this list. It has a small but loyal following but runs a distant fifth in web browser standings.
Check out Opera at www.opera.com.
Tutorial: Creating an HTML File
Now that you’ve prepped your web kitchen, you’re ready to create your very own web page. In this tutorial, you’ll build the basic page that you saw in Figure 1-1.
Tip
Like all the tutorials in this book, you’ll find the solution for this exercise on the companion site at http://prosetech.com/web. Just look in the folder named Tutorial-1-1 (which stands for “Chapter 1, first tutorial,” if you’re curious).
Ready to begin? Here’s what to do:
Fire up your text editor.
On a Windows computer, that’s Notepad. To open Notepad, click the Start button, type “notepad,” and then click the Notepad icon that appears.
On a Mac, that’s TextEdit. To launch it, go to the Applications folder and then double-click TextEdit.
When you load up your text editor, it starts you out with a new, blank document, which is exactly what you want.
Start writing your HTML code.
This task is a little tricky because you haven’t explored the HTML standard yet. Hang on—help is on the way in the rest of this chapter. For now, you can use the following very simple HTML snippet. Just type it in exactly as it appears, text, slashes, pointy brackets, and all:
<h1>United Popsicle Workers Union</h1>
<p>We fight for your rights.</p>
Technically, this two-line document is missing a few structural details that self-respecting web pages should have. However, every browser can read this HTML fragment and correctly interpret what you want: the two lines of formatted text shown in Figure 1-1, top.
When you finish your web page, choose File→Save.
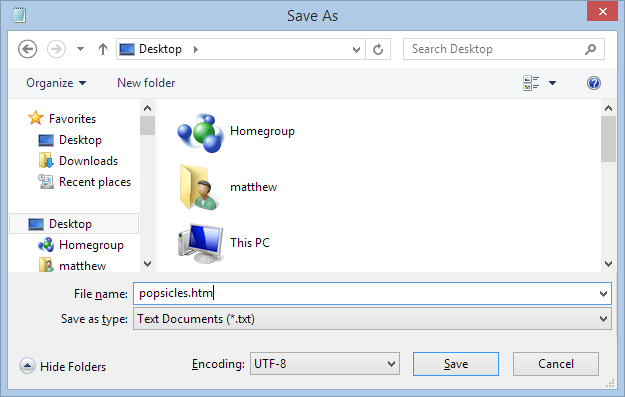
That brings up the Save or Save As window, where you fill in the details for your new file (Figure 1-5).
Pick a save location for your file, and give it the name popsicles.htm.
If you’re not sure where to stash your file, you can save it right on your desktop for now.
When you name your file, make sure you include the extension .htm or .html at the end of the filename. For example, by using the name popsicles.htm or popsicles.html, you ensure that your computer will recognize your document as an HTML file.
Note for the paranoid: There’s no difference between .htm and .html files. Both are 100% the same—text files that contain HTML content.
Note
Technically speaking, you can use any file extension you want. However, using .htm or .html saves confusion (you immediately know the file is a web page) and helps avoid common problems. For example, using an .htm or .html file extension ensures that when you double-click the filename, your computer will know to open it in a web browser and not some other program. It’s also important to use the .htm or .html extension if you plan to upload your files to a web server; prickly servers may refuse to hand out pages that have nonstandard file extensions.
If necessary, change the way your text editor encodes your file to UTF-8.
This is the TextEdit standard, so Mac users can skip this step. But in Notepad, you need to choose UTF-8 in the Encoding list at the bottom of the Save As window.
Your web page will work even if you don’t take this step, but doing so ensures that you won’t run into problems if you use special characters or a different language in your page.
Click Save to make it official.
If you use TextEdit, the program may ask if you really want to use the .htm or .html extension instead of .txt, the text file standard; click “Use .htm.” No such step is required in Notepad. However, you won’t actually see your HTML files in the list unless you choose “All Files (*.*)” in the “Save as type” box (which initially has “Text Documents (*.txt)” selected).
To view your work, open the file in a browser (Figure 1-6).
If you use the extension .htm or .html, opening a page is usually as easy as double-clicking the filename. Or you can drag your web page file and drop it onto an open browser window.
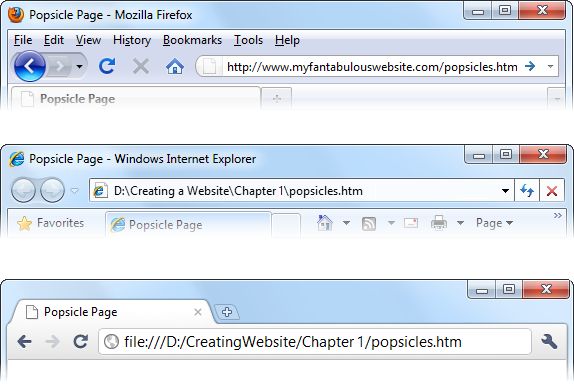
Figure 1-6. A browser’s address bar reveals where the current web page is really located. If you see “http://” in the address, it comes from a web server on the Internet (top). If you look at a web page that resides on your own computer, you see just an ordinary local file address (middle, showing a Windows file location in Internet Explorer), or you see a URL that starts with the prefix “file:///” (bottom, showing a file location in Chrome).When you finish editing, close your text editor.
The next time you want to change your document, just fire up your text editor, choose File→Open, and then pick the file you want, or drag the file and drop it on an already-open text editor window.
Tip
Here’s a trick that can help you open HTML files in a hurry. Find your file, and then right-click it (Control-click on a Mac) and choose “Open with.” This pops open a list of programs you can use to open the file. Click Notepad (or TextEdit) in the list to launch a new text editor window and open your HTML file in one fell swoop.
If you leave your web browser window open while you edit your HTML file in a text editor, the browser will hold on to the old version of your file. To see your recent changes, save your text file again (choose File→Save) and then refresh the page in your browser (usually, that’s as easy as right-clicking the page and choosing Refresh or Reload).
Seeing the HTML of a Live Web Page
Most text editors don’t let you open a web page that’s on the Internet. However, web browsers do give you the chance to sneak a peek at the raw HTML that sits behind any web page.
If you’re using Internet Explorer, Chrome, Firefox, or just about any browser other than Safari, you can use a shortcut. Once you navigate to the web page you want to examine, right-click anywhere on the page and choose View Source or View Page Source (the exact wording depends on the browser). A new window appears, showing you the raw HTML that underlies the page.
If you’re using Safari on a Mac, you have to jump through an extra hoop to see a web page’s HTML. First, switch on the Develop menu by choosing Safari→Preferences→Advanced and then turning on the “Show Develop menu in menu bar” checkbox. Once you do, visit the page you want to dissect and choose Develop→Show Page Source.
Tip
Firefox has a handy feature that lets you home in on just part of the HTML in a complex web page. Just select the text you’re interested in on the page itself, right-click the text, and then choose View Selection Source.
Most web pages are considerably more complex than the popsicles.htm example shown in Figure 1-1, so you need to wade through many more HTML tags when you look at the web page markup. You’re also likely to find a dense thicket of JavaScript code stuffed at the top of the page, stripped of all its spacing and almost impossible to read. But even if the markup looks like gibberish, don’t panic. By the time you finish this book, you’ll be able to scan through a jumble of HTML to find the bits that interest you. In fact, professional web developers often use the View Source technique to check their competitors’ work.
A Closer Look at HTML Tags
Now that you know how to peer into existing HTML files and how to create your own, the next step is to understand what goes inside the average HTML file. It all revolves around a single concept—tags.
HTML tags are formatting instructions that tell a browser how to transform ordinary text into something visually appealing. If you were to take all the tags out of an HTML document, the resulting page would consist of nothing more than plain, unformatted text.
What’s in a Tag
You can recognize a tag by looking for angle brackets, two special characters that look like this: < >. When creating a tag, you type HTML code between the brackets. This code is for the browser’s eyes only; web visitors never see it (unless they use the View Source command to peek at the HTML). Essentially, the code is an instruction that conveys information to the browser about how to format the text that follows.
For example, one simple tag is the <b> tag, which stands for “bold” (by convention, tag names are usually written in lowercase). When a browser encounters this tag, it switches on boldface formatting, which affects all the text that follows the tag. Here’s an example:
This text isn't bold. <b>This text is bold.
On its own, the <b> tag isn’t quite good enough; it’s known as a start tag, which means it switches on some effect (in this case, bold lettering). You pair most start tags with a matching end tag that switches off the effect.
You can easily recognize an end tag. They look the same as start tags, except that they begin with a forward slash. That means they start like this </ instead of like this <. So the end tag for bold formatting is </b>. Here’s an example:
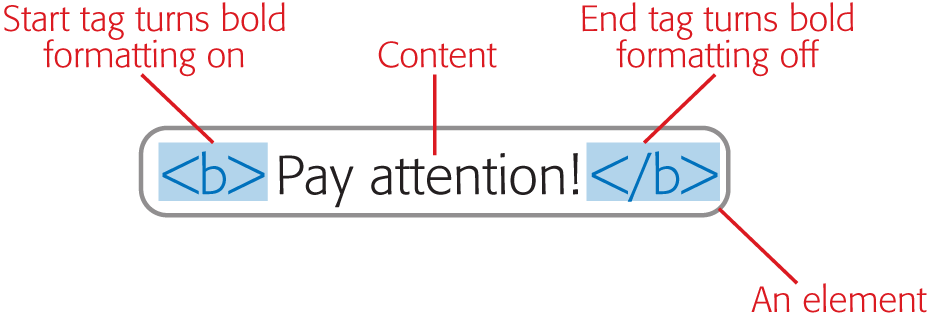
This isn't bold. <b>Pay attention!</b> Now we're back to normal.
Which a browser displays as:
This isn’t bold. Pay attention! Now we’re back to normal.
This example reflects another important principle of browsers: They always process tags in the order in which you place them in your HTML. To get the bold formatting in the right place, you need to make sure you position the <b> and </b> tags appropriately.
As you can see, the browser has a fairly simple job. It scans an HTML document, looking for tags and switching on and off various formatting settings. It takes everything else (everything that isn’t a tag) and displays it in the browser window.
Understanding Elements
Most tags come in pairs. When you use a start tag (like <b>), you have to include the matching end tag (</b>). This combination of start and end tags, along with the text in between, makes up an HTML element.
Here’s the basic idea: A pair of tags creates a container (see Figure 1-7). You place content (like text) inside that container. For example, when you use the <b> and </b> tags, you create a container that applies bold formatting to the text inside the container. As you create web pages, you’ll use different containers to wrap different pieces of text. If you think about elements this way, you’ll never forget to include an end tag.
Note
When someone refers to the <b> element, she means the whole shebang—start tag, end tag, and the content in between. When someone refers to a <b> tag, she usually means the start tag that triggers the effect.
Of course, life wouldn’t be much fun (and computer books wouldn’t be nearly as thick) without exceptions. When you get right down to it, there are really two types of elements:
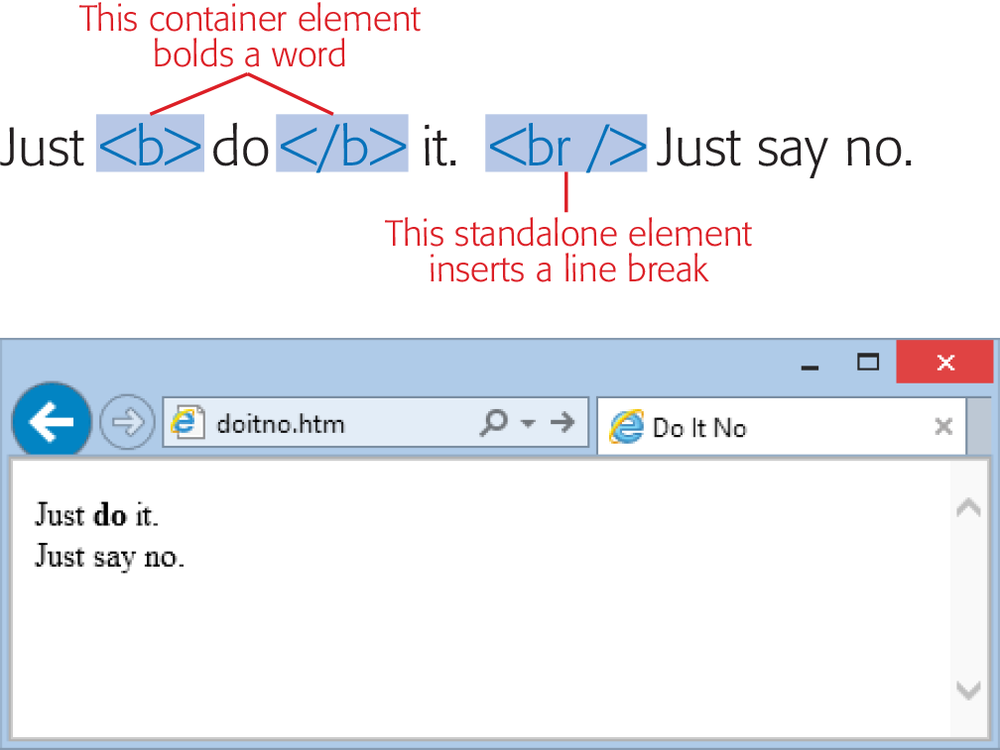
Container elements are, by far, the most common type of element. They apply formatting to the content nestled between the start and end tags.
Standalone elements don’t turn formatting on or off. Instead, they insert something, like an image, into a page. One example is the
<br>element, which inserts a line break in a web page. Standalone elements don’t come in pairs, as container elements do, and you may hear them referred to as empty elements because you can’t put any text inside them.
In this book, all standalone elements include a slash character before the closing >, sort of like an opening and closing tag all rolled into one. So you’ll see a line break written as <br /> instead of <br>. This form, called the empty element syntax, is handy because it clearly distinguishes container elements from standalone elements. That way, you’ll never get confused.
Note
In the not-so-distant past, web developers were forced to use the empty element syntax—that is, tags that end with a forward slash—because it was an official part of the (now superseded) XHTML language. Today, the trailing slash is optional, so standalone elements can use the same syntax as start tags (which means you can use either <br /> or <br> to insert a line break, for instance).
Figure 1-8 puts the two types of elements in perspective.
Nesting Elements
In the previous example, you applied a simple <b> element to get bold formatting. You put the text between the <b> and </b> tags. However, text isn’t the only thing you can put between a start and an end tag. You can also nest one element inside another. In fact, nesting elements is common practice in building web pages. It lets you apply more detailed style instructions to text by combining all the formatting elements in the same set of instructions. You can also nest elements to create more complicated page components, like bulleted lists (see Structuring Your Text).
To see nesting in action, you need another element to work with. For this example, consider what happens if you want to make a piece of text bold and italicized. HTML doesn’t include a single element for this purpose, so you need to combine the familiar <b> element (to put your text in boldface) with the <i> element (to italicize it). Here’s an example:
This <b><i>word</i></b> has bold and italic formatting.
When a browser chews through this scrap of HTML, it produces text that looks like this:
This word has bold and italic formatting.
Incidentally, it doesn’t matter if you reverse the order of the <i> and <b> tags. The following HTML produces exactly the same result.
This <i><b>word</b></i> has italic and bold formatting.
However, you should always make sure that you close tags in the reverse order from which you opened them. In other words, if you apply italic formatting and then bold formatting, you should switch off bold formatting first, and then italic formatting. Here’s an example that breaks this rule:
This <i><b>word</i></b> has italic and bold formatting.
Browsers can usually sort this out and make a good guess about what you really want, but it’s a dangerous habit to get into as you write more complex HTML.
As you’ll see in later chapters, HTML gives you many more ways to nest elements. For example, you can nest one element inside another, and then nest another element inside that one, and so on, indefinitely.
Note
If you’re a graphic-design type, you’re probably itching to get your hands on more powerful HTML tags to change alignment, spacing, and fonts. Unfortunately, in the web world, you can’t always control everything you want. Chapter 2 has the lowdown, and Chapter 3 introduces the best solution, called style sheets.
Understanding HTML Documents
So far, you’ve considered snippets of HTML—portions of a complete HTML document. This gave you a taste of how HTML works, but you’ll need to step up your game before you can conquer the Web. In this section, you’ll learn about the structure that makes the difference between a scrap of HTML and an official HTML document.
The Document Type Definition
In the early days of the Internet, web browsers were riddled with quirks. When people designed web pages, they had to take these quirks into account. For example, browsers might calculate the margins around floating boxes of text in subtly different ways, causing pages to look right in one browser but appear odd in another.
Years later, the rules of HTML (and CSS, the style sheet standard you’ll learn about in Chapter 3) were formalized. Using these new rules, every browser could display the same page in exactly the same way. But this change caused a serious headache for longstanding browsers, like Internet Explorer, that had lived through the dark ages of HTML. It had to somehow support the new standards while still being able to properly display existing web pages—including those that relied on old quirks.
The web community settled on a simple solution. When designing a new, modern web page, you indicate this fact by adding a code called a document type definition (DTD) or doctype, which goes at the very beginning of your HTML document (Figure 1-9).
When a browser encounters a doctype, it switches into standards mode and renders the page in the most consistent, standardized way possible. The end result is that the page looks virtually identical in every modern browser.
But when a browser encounters an HTML document that doesn’t have a doctype, all bets are off. Internet Explorer, for example, switches into the dreaded quirks mode, where it attempts to behave the same way it did 10 years ago, quirks and all. This ensures that really old web pages retain the look they had when they were first created, even if they rely on ancient browser bugs that have long since been fixed. Unfortunately, different browsers behave differently when you view a page without a doctype. You’re likely to get varying text sizes, inconsistent margins and borders, and improperly positioned content. For that reason, web pages without doctypes are bad news, and you should avoid creating them.
In the past, web designers used different doctypes to indicate different versions of HTML markup (for example, XHTML, HTML5, or truly old HTML 4.01). But today, web developers almost always use the simple, universal HTML5 doctype:
<!DOCTYPE html>
Even though this doctype was formalized as part of HTML5, every browser supports it—even old versions of IE that have never heard of HTML5. That’s because the universal doctype doesn’t indicate anything about the HTML version you prefer. Instead, it just indicates that the language is HTML. This one-line doctype simply reflects the true philosophy of HTML—to support documents old and new.
For comparison, here’s the much wordier doctype for XHTML 1.0, which you may still stumble across in older web pages:
<!DOCTYPE html PUBLIC "-//W3C//DTD XHTML 1.0 Strict//EN"
"http://www.w3.org/TR/xhtml1/DTD/xhtml1-strict.dtd">
Even seasoned web developers had to copy the XHTML 1.0 doctype from an existing web page to avoid typing it in wrong.
In this book, all the examples use the HTML5 doctype not only because it’s the current standard, but because it prepares your pages for the future, too. But just because you use this doctype doesn’t mean you can use all of HTML5’s features. In fact, you should avoid most of them for the time being, unless you’re sure they’re well supported by all the browsers that people use today.
The Basic Skeleton
Now you’re ready to fill in the rest of your web page.
To create a true HTML document, you start with three container elements: <html>, <head>, and <body>. These three elements work together to describe the basic structure of your page:
<html>This element wraps everything (other than the doctype) in your web page.
<head>This element designates the header portion of your document, which includes some information about your web page. The first detail is the title—open your page in a browser, and this title shows up as the caption on the tab. Optionally, the <head> section can also include links to style sheets (which you’ll learn about in Chapter 3) and JavaScript files (Chapter 14).
<body>This element holds the meat of your web page, including the actual content you want displayed to the world.
There’s only one right way to use these three elements in a page. Here’s their correct arrangement, with the HTML5 doctype at the beginning of the page:
<!DOCTYPE html>
<html>
<head>
...
</head>
<body>
...
</body>
</html>
Every web page uses this basic framework. The ellipses (…) show where you insert additional information. The spaces between the lines aren’t required—they’re just there to help you see the element structure more easily.
Once you have the HTML skeleton in place, you need to add two more container elements to the mix. Every web page requires a <title> element, which goes in the header section of the page, and you need to create a container for text in the <body> section of the page. One all-purpose text container is the <p> element, which represents a paragraph.
Here’s a closer look at the elements you need to add:
<title>This element sets the title for your web page. The title plays several roles. First, web browsers display it in the browser tab or at the top of the browser window. Second, when a visitor bookmarks your page, the browser uses the title as the bookmark’s label. Third, when your page turns up in a web search, the search engine usually displays this title as the first line in the results, followed by a snippet of content from the page.
<p>This indicates a paragraph. Web browsers don’t indent paragraphs, but they do add a little space between consecutive paragraphs to keep them separated.
Here’s the web page with these two new ingredients (in bold):
<!DOCTYPE html> <html> <head><title>Everything I Know About Web Design</title></head> <body><p></p></body> </html>
If you open this document in a web browser, you’ll find that the page is blank, but the title appears (as shown in Figure 1-10).

As it stands right now, this HTML document is a good template for future pages. The basic structure is in place; you simply need to change the title and add some text. That’s the task you’ll undertake next.
Tutorial: Building a Complete HTML Document
In this tutorial, you’ll learn to assemble your first genuine web page. You’ll be creating an online resumé (skip ahead to The 10 Most Important Elements (and a Few More) to see the final result), but the details apply to any page you create.
Tip
Like all the tutorials in this book, you can find the solution for this exercise on the companion site at http://prosetech.com/web. Just look in the folder named Tutorial-1-2 (short for “Chapter 1, second tutorial”). As you craft this page, adding a list, picture, and headings, it goes through several iterations. The tutorial files include a separate file for each stage of improvement.
Adding Your Content
No matter what sort of page you want to create, you always start out the same way:
Launch your text editor.
That’s Notepad or TextEdit.
Type the HTML skeleton into a new file.
That’s the doctype, the root
<html>element, and the two major sections of every web page:<head>and<body>. It looks like this:<!DOCTYPE html> <html> <head> </head> <body> </body> </html>
To save yourself some time in the future, save this page and then copy and paste this HTML skeleton each time you create a new file. The tutorial folder includes a file named skeleton.htm that helps you do just that—it contains the doctype and the three standard elements of an HTML page, but no content.
Add a title to the
<head>section.Add the
<title>element on a new line, between the opening<head>tag and the closing</head>tag:<title>Hire Me!</title>Add your content to the <body> section.
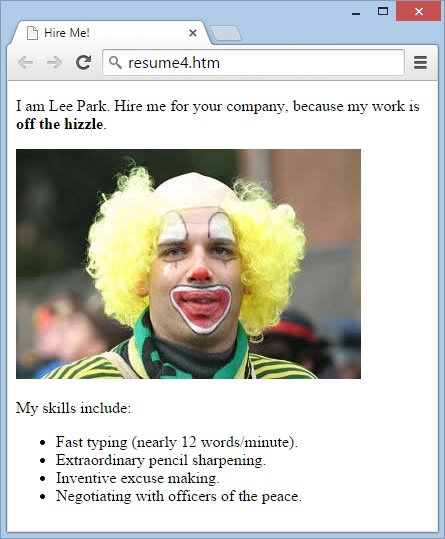
For example, suppose you want to write a simple resumé page. Here’s a very basic first go at it:
<!DOCTYPE html> <html> <head>
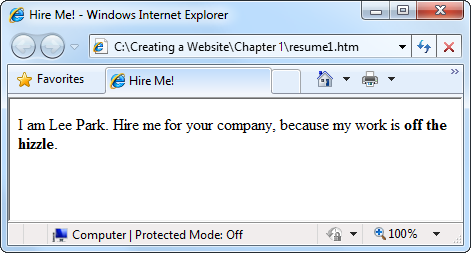
<title>Hire Me!</title></head> <body><p>I am Lee Park. Hire me for your company, because my work is<b>off the hizzle</b>.</p></body> </html>This example highlights (in bold) the modifications made to the basic HTML skeleton—a changed title and a single line of text. This example uses a single
<b>element inside the paragraph, just to dress up the page a little.Save your HTML file as resume.htm, and open it in a web browser.
If your page displays properly (see Figure 1-11), you can be reasonably certain you’re off to a good start.
Using the HTML techniques described in the following sections, you can build on this example and give Lee a better resumé. Each time you make changes to your document in the text editor, refresh the page in your web browser to see if you’re still on track.
Structuring Your Text
As you start to create more detailed web pages, you’ll quickly discover that building a page isn’t as straightforward as, say, creating a page in Microsoft Word. For example, you may decide to enhance the resumé page by creating a list of skills. Here’s a reasonable first try:
<!DOCTYPE html> <html> <head> <title>Hire Me!</title> </head> <body> <p>I am Lee Park. Hire me for your company, because my work is <b>off the hizzle</b>.My skills include:*Fast typing (nearly 12 words/minute).*Extraordinary pencil sharpening.*Inventive excuse making.*Negotiating with officers of the peace.</p></body> </html>
The trouble appears when you open this seemingly innocent document in your web browser (Figure 1-12).
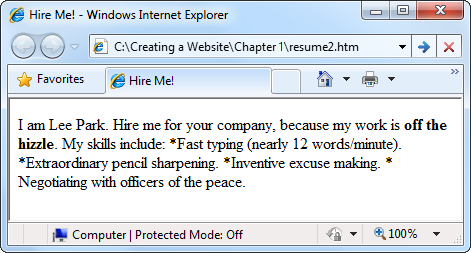
The problem is that HTML ignores extra white space. That includes tabs, line breaks, and extra spaces (anything more than one consecutive space). The first time this happens, you’ll probably stare at your screen dumbfounded and wonder why web browsers are designed this way. But it actually makes sense when you consider that HTML needs to work as a universal standard.
Say you customize your hypothetical web page with the perfect spacing, indenting, and line width for your computer monitor. The hitch is, this page may not look as good on someone else’s monitor. For example, some of the text may scroll off the right side of the page, making it difficult to read. And different monitors are only part of the problem. Today’s web pages need to work on different types of devices. Lee Park’s future boss might view Lee’s resumé on anything from the latest widescreen laptop to a tablet computer or smartphone.
To deal with this range of display options, HTML uses elements to define the structure of your document. Instead of telling the browser, “Here’s where you go to the next line and here’s where you add four extra spaces,” HTML tells the browser, “Here are two paragraphs and a bulleted list.” It’s up to the browser to display the page, using the instructions you include in your HTML.
To correct the resumé example, you need to use more paragraph elements and two new container elements:
<ul>Indicates the start of a bulleted list, called an unordered list in HTML lingo. A list is the perfect way to detail Lee’s skills.
<li>Indicates an individual item in a bulleted list. Your browser indents each list item and, for sentences that go beyond a single line, properly indents subsequent lines so they align under the first one. In addition, it precedes each item with a bullet (•). You can use a list item only inside a list element like
<ul>. In other words, every list item (<li>) needs to sit within a list element (<ul>).
Here’s the corrected web page (shown in Figure 1-13), with the structural elements highlighted in bold:
<!DOCTYPE html> <html> <head> <title>Hire Me!</title> </head> <body><p>I am Lee Park. Hire me for your company, because my work is <b>off the hizzle</b>.</p><p>My skills include:</p><ul><li>Fast typing (nearly 12 words/minute).</li><li>Extraordinary pencil sharpening.</li><li>Inventive excuse making.</li><li>Negotiating with officers of the peace.</li></ul></body> </html>
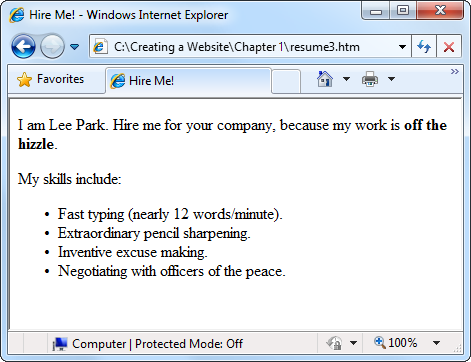
You can turn a browser’s habit of ignoring line breaks to your advantage. To help make your HTML documents more readable, add line breaks and spaces wherever you want. Web experts often use indentation to make the structure of nested elements easier to understand. In the resumé example, you can see this style in practice. Notice how the list items (the lines starting with the <li> element) are indented. This has no effect on the browser, but it makes it easier for you to see the structure of the HTML document and to gauge how a browser will render it.
Figure 1-14 analyzes the HTML document using a tree model. The tree model is a handy way to get familiar with the anatomy of a web page, because it shows the page’s overall structure at a glance. However, as your web pages get more complicated, they’ll probably become too complex for a tree model to be useful.
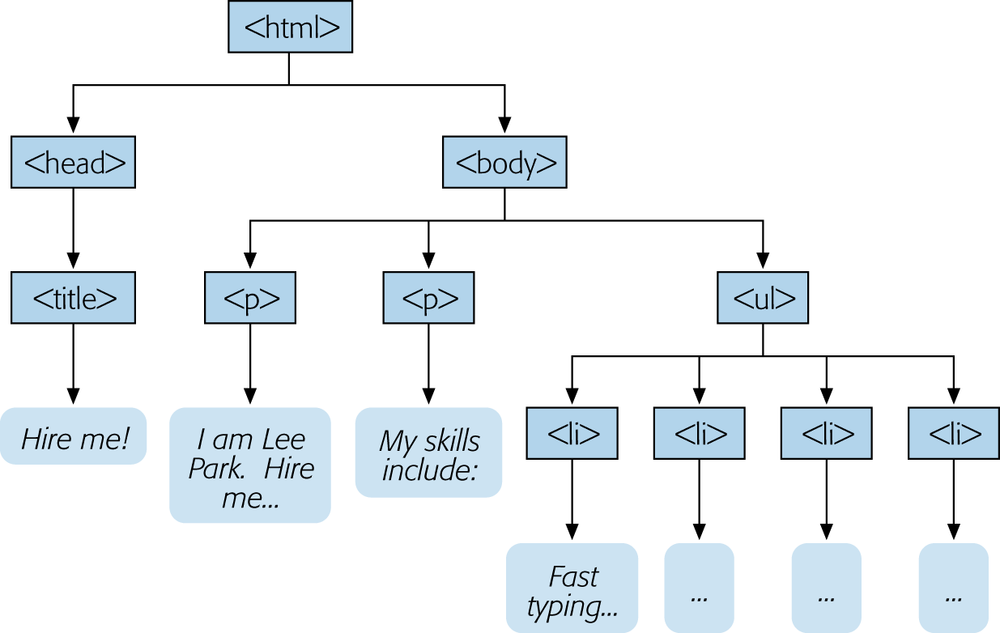
<html> element contains <head> and <body> elements. Inside the <head> element is the <title> element, and inside the <body> element are two paragraphs and a bulleted list with four items in it. If you stare at the tree model long enough, you’ll understand why HTML calls all these elements “container elements.”If you’re a masochist, you don’t need to use any spaces. The previous example is exactly equivalent to the following much-less-readable HTML document:
<!DOCTYPE html><html><head><title>Hire Me!</title></head><body><p>I am
Lee Park. Hire me for your company, because my work is <b>off the hizzle
</b>.</p><p>My skills include:</p><ul><li>Fast typing (nearly 12
words/minute).</li><li> Extraordinary pencil sharpening.</li><li>Inventive
excuse making.</li><li> Negotiating with officers of the peace.</li></ul>
</body></html>
Of course, it’s nearly impossible for a human to write HTML like this without making a mistake.
Where Are All the Pictures?
Whether it’s a stock chart, a logo for your underground garage band, or a doctored photo of your favorite celebrity, the Web would be pretty drab without pictures. So far, you’ve seen how to put text into an HTML document, but what happens when you need an image?
Although it may seem surprising, you can’t store a picture inside an HTML file. There are plenty of good reasons why you wouldn’t want to anyway—your web page files would become really large, it would be hard to modify your pictures or do other things with them, and you’d have a fiendish time editing your pages in a text editor because the image data would make a mess. The solution is to store your pictures as separate files, and then link your HTML document to them. This way, your browser pulls up the pictures and positions them exactly where you want them on your page.
The linking tool that inserts pictures is the <img> element (short for “image”). It points to an image file, which the browser retrieves and inserts into the page. You can put the image file in the same folder as your web page (which is the easiest option), or you can put it on a completely different website.
Although you’ll learn everything you ever wanted to know about web graphics in Chapter 4, it’s worth considering a simple example now. To try this out, you need a web-ready image handy. (The most commonly supported image file types are JPEG, GIF, and PNG.) If you don’t have an image handy, you can download the sample picture leepark.jpg from the Tutorial-1-2 folder. Here’s an example of an <img> element that uses the leepark.jpg file:
<img src="leepark.jpg" alt="Lee Park Portrait" />
Like the <br> element discussed earlier, <img> is a standalone element with no content. For that reason, it makes sense to use the empty element syntax and add a forward slash before the closing angle bracket.
However, there’s an obvious difference between the <br> element and the <img> element. Although <img> is a standalone element, it isn’t self-sufficient. In order for the element to mean anything, you need to supply two more pieces of information: the name of the image file and some alternate text, which is used in cases where a browser can’t download or display the picture (see Alternate Text). To incorporate this extra information into the image element, HTML uses attributes, extra pieces of information that appear after an element name, but before the closing > character.
The <img> example includes two attributes, separated by a space. Each attribute has two parts—a name (which tells the browser what the attribute does) and a value (a piece of information you supply). The name of the first <img> attribute is src, which is shorthand for “source”; it tells the browser where to get the image you want. In this example, the value of the src attribute is leepark.jpg, which is the name of the file with Lee Park’s headshot.
The name of the second <img> attribute is alt, which is shorthand for “alternate text.” It tells a browser that you want it to show text if it can’t display the image. Its value is the text you want to display, which is “Lee Park Portrait” in this case.
Once you understand the image element, you’re ready to use it in an HTML document. Just place it wherever it makes sense, inside or after an existing paragraph:
<!DOCTYPE html>
<html>
<head>
<title>Hire Me!</title>
</head>
<body>
<p>I am Lee Park. Hire me for your company, because my work is <b>off the
hizzle</b>.
<img src="leepark.jpg" alt="Lee Park Portrait" />
</p>
<p>My skills include:</p>
<ul>
  <li>Fast typing (nearly 12 words/minute).</li>
  <li>Extraordinary pencil sharpening.</li>
  <li>Inventive excuse making.</li>
  <li>Negotiating with officers of the peace.</li>
</ul>
</body>
</html>
Figure 1-15 shows exactly where the picture ends up.
Note
You’ll learn many more techniques for web graphics, including how to change their size and wrap text around them, in Chapter 4.
The 10 Most Important Elements (and a Few More)
You’ve now reached the point where you can create a basic HTML document, and you already have several elements under your belt. You know the fundamentals—all that’s left is to expand your knowledge by learning how to use more elements.
HTML has a relatively small set of elements. You’ll most likely use fewer than 25 on a regular basis. This is a key part of HTML’s success, because it makes HTML a simple, shared language that anyone can understand.
Note
You can’t define your own elements and use them in an HTML document, because web browsers won’t know how to interpret them.
Some elements, like the <p> element that formats a paragraph, are important for setting out the overall structure of a page. These are called block elements. Block elements get extra space—when you add one to a page, the browser starts a new line (separating this block element from the preceding one). The browser also adds a new line at the end of the block element, separating it from the following element.
You can place block elements directly inside the <body> section of your web page or inside another block element. Table 1-1 provides a quick overview of some of the most fundamental block elements, several of which you’ve already seen. It also points out which of these are container elements and which are standalone elements. (As you learned on Understanding Elements, container elements require start and end tags, but standalone elements get by with just a single tag.) You’ll study all of these elements more closely in Chapter 2.
ELEMENT | NAME | TYPE OF ELEMENT | DESCRIPTION |
| Paragraph | Container | As your high school English teacher probably told you, the paragraph is the basic unit for organizing text. When you use more than one paragraph element in a row, a browser inserts space between the two paragraphs—just a bit more than a full blank line. |
| Heading | Container | Heading elements are a good way to add structure to your page and make titles stand out. They display text in large, boldfaced letters. The lower the number, the larger the text, so |
| Horizontal line (or horizontal rule in HTML-speak) | Standalone | A horizontal line can help you separate one section of your web page from another. The line automatically matches the width of the browser window. (Or, if you put the line inside another element, like a cell in a table, it takes on the width of its container.) |
| Unordered list, list item | Container | These elements let you build basic bulleted lists. The browser automatically puts individual list items on separate lines and indents each one. For a quick change of pace, you can substitute |
Other elements are designed to deal with smaller structural details—for example, snippets of bold or italicized text, line breaks, links that lead to other web pages, and images. These elements are called inline elements. You can put an inline element in a block element, but you should never put a block element inside an inline element. Table 1-2 lists the most useful inline elements.
NAME | TYPE | DESCRIPTION | |
| Bold and italic | Container | These two elements apply character styling—either bold or italic text. (Technically, |
| Line break | Standalone | Sometimes, all you want is text separated by simple line breaks, not separate paragraphs. This keeps subsequent lines of text closer together than when you use a paragraph. |
| Image | Standalone | To display an image inside a web page, use this element. Make sure you specify the |
<a> | Anchor | Container | The anchor element is the starting point for creating hyperlinks that let website visitors jump from one page to another. You’ll learn about this indispensable element in Chapter 6. |
To make the sample resumé look more respectable, you can use a few of the ingredients from Table 1-1 and Table 1-2. Figure 1-16 shows a revised version of the web page that throws some new elements into the mix.

Here’s the pumped-up HTML, with the new headings and the horizontal rule highlighted in bold:
<!DOCTYPE html> <html> <head> <title>Hire Me!</title> </head> <body> <h1>Hire Me!</h1> <p>I am Lee Park. Hire me for your company, because my work is <b>off the hizzle</b>. As proof of my staggering computer skills and monumental work ethic, please enjoy this electronic resume.</p><h2>Indispensable Skills</h2><p>My skills include:</p> <ul> <li>Fast typing (nearly 12 words/minute).</li> <li>Extraordinary pencil sharpening.</li> <li>Inventive excuse making.</li> <li>Negotiating with officers of the peace.</li> </ul> <p>And I also know HTML!</p><h2>Previous Work Experience</h2><p>I have had a long and illustrious career in a variety of trades. Here are some highlights:</p> <ul> <li>2008-2009 - Worked as a typist at <i>Flying Fingers</i></li> <li>2010-2013 - Performed cutting-edge web design at <i>Riverdale Farm</i></li> <li>2014-2015 - Starred in Chapter 1 of <i>Creating a Website: The Missing Manual</i></li> </ul><hr /></body> </html>
Don’t worry if this example has a bit too much markup for you to digest at once. In the next chapter, you’ll get some more practice turning ordinary text into structured HTML.
Checking Your Pages for Errors
Even a web designer with the best intentions can write bad markup and break the rules of HTML. Although browsers really should catch these mistakes, virtually none of them do. Instead, they do their best to ignore mistakes and display flawed documents.
At first glance, this seems like a great design—after all, it smooths over any minor slip-ups you might make. But there’s a dark side to tolerating mistakes. In particular, this behavior makes it all too easy for serious errors to lurk undetected in your web pages. What’s a serious error? A problem that’s harmless when you view the page in your favorite browser but makes an embarrassing appearance when someone views the page in another browser; a mistake that goes undetected until you edit the code, which inadvertently exposes the problem the next time your browser displays the page; or an error that has no effect on page display but prevents an automated tool (like a search engine) from reading the page.
Fortunately, there’s a way to catch problems like these. You can use a validation tool that reads through your web page and checks its markup. If you use a professional web design tool like Dreamweaver, you can use its built-in error-checker (Chapter 5 has the details). If you create pages by hand in a text editor, you can use a free online validation tool (see below).
Here are some potential problems that a validator can catch:
Missing mandatory elements (for example, the <title> element).
A container start tag without a matching end tag.
Incorrectly nested tags.
Tags with missing attributes (for example, an
<img>element without thesrcattribute).Elements or content in the wrong place (for example, text that’s placed directly in the
<head>section).
You can find plenty of validation tools online. The following steps show how to use the popular validator provided by the W3C standards organization (the official owners of the HTML language). Try it out with the resume.htm file you created in the second tutorial (Tutorial: Building a Complete HTML Document). Or give the validator something to complain about with the popsicles.htm file you created in the first tutorial (Tutorial: Creating an HTML File). Because it’s an HTML snippet, not a full HTML document, the validator is quick to complain about the missing bits, like the required <html>, <head>, and <body> elements.
Once you decide what you want to validate, here’s what to do:
Make sure your document has a doctype (Understanding HTML Documents).
The doctype tells the validator what rules to use when validating your document. In this book, we stick with the universal HTML5 doctype (The Basic Skeleton).
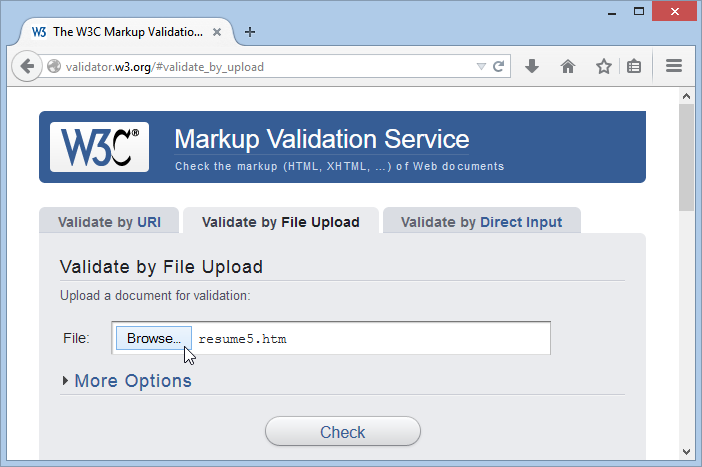
In your web browser, go to http://validator.w3.org (Figure 1-17).
The W3C validator gives you three choices, represented by three tabs: Validate by URI (for a page that’s already online), Validate by File Upload (for a page that’s stored on your computer), and Validate by Direct Input (for markup you type directly into the provided box).
Figure 1-17. The website http://validator.w3.org gives you three options for validating HTML. You can fill in the address of a page on the Web, you can upload a file of your own (shown here), or you can type the markup in directly.Click the tab you want, and supply your HTML content.
Validate by URI lets you validate an existing web page. Simply enter the URL (that’s the full Internet address) for the page in the Address box (like www.MySloppySite.com/FlawedPage.html).
Validate by File Upload lets you upload any file from your computer. First, click the Browse button (called Choose File in Chrome) to see the standard Open dialog box. Browse to the location of your HTML file, select it, and then click Open. This is the easiest way to make sure you got everything right with the resume.htm page you built earlier.
Validate by Direct Input lets you validate any markup—you just need to type it into the large box provided. The easiest way to use this option is to copy the markup from your text editor and paste it into the box.
Before continuing, you can click More Options in any of the tabbed windows to set other options, but you probably won’t. It’s best to let the validator automatically detect the document type; that way, the validator will use the doctype specified in your web page. Similarly, leave the Character Encoding option set to “detect automatically” unless you wrote your page in something other than English and the validator has trouble determining the correct character set.
Click the Check button.
After a brief delay, the validator reports whether your document passed the validation check or, if it failed, what errors the validator detected (see Figure 1-18).
The validator also may offer a few harmless warnings for a perfectly valid HTML document, including a warning that the character encoding was determined automatically and a warning that the HTML5 validation service is considered to be an experimental, unfinished feature.
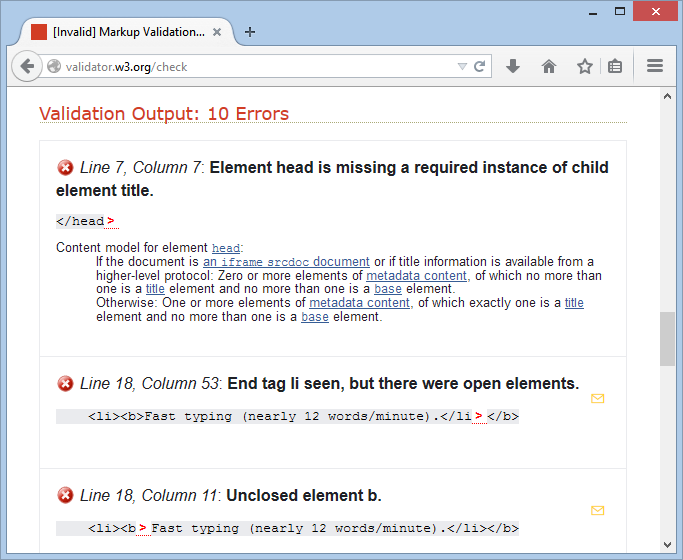
<title> element. Second, it closes the <li> element before closing the <b> element nested inside. (To solve this problem, you would replace </li></b> with </b> </li>.) Incidentally, this file is still close enough to correct that browsers can display it correctly.Get Creating a Website: The Missing Manual, 4th Edition now with the O’Reilly learning platform.
O’Reilly members experience books, live events, courses curated by job role, and more from O’Reilly and nearly 200 top publishers.

