Chapter 4. Time and Temperature: Cooking’s Primary Variables
EVER SINCE CAVEMEN FIRST SET UP CAMPFIRES AND STARTED ROASTING THEIR KILL, MANKIND HAS ENJOYED A WHOLE NEW SET OF FLAVORS IN FOOD. Cooking is the application of heat to ingredients to transform them via chemical and physical reactions that improve flavor, reduce chances of foodborne illness, and increase nutritional value.
From a culinary perspective, the more interesting and enjoyable changes are brought about when compounds in food undergo the following chemical reactions:
- Protein denaturation
The native form of a protein is the three-dimensional shape (conformation) assumed by the protein that is required for normal functioning. If this structure is disrupted (typically by heat or acid), the protein is said to be denatured. Changes in the shapes of proteins also alter their taste and texture.
Different proteins denature at different temperatures; most proteins in food denature in the range of 120–160°F / 49–71°C. Egg whites, for example, begin to denature at 141°F / 61°C and turn white because the shape of the denatured protein is no longer transparent to visible light. In meat, the protein myosin begins to denature around 122°F / 50°C; another protein, actin, begins to denature around 150°F / 65.5°C. Most people prefer meat cooked such that myosin is denatured while keeping the actin native.
- Maillard reaction
A Maillard reaction is a browning reaction that gives foods an aromatic and mouth-watering aroma. Usually triggered by heat, this occurs when an amino acid and certain types of sugars break down and then recombine into hundreds of different types of compounds. The exact byproducts and resulting smells depend upon the amino acids present in the food being cooked, but as an example, imagine the rich smell of the crispy skin on a roasted chicken.
For culinary purposes, the reaction generally becomes noticeable around 310°F / 154°C, although the reaction rate depends on pH, chemical reagents in the food, and amount of time at any given temperature. Many meats are roasted at or above 325°F / 160°C—at temperatures lower than this, the Maillard reaction hardly occurs.
- Caramelization
Caramelization is the result of the breakdown of sugars, which, like the Maillard reaction, generates hundreds of compounds that smell delicious. Pure sucrose (the type of sugar in granulated sugar) caramelizes at between 320–400°F / 160–204°C, with only the middle range of 356–370°F / 180–188°C generating rich flavors.
In baking, those goods that are baked at 375°F / 190° C generally have a noticeably browned exterior, while those baked at or below 350°F / 175°C remain lighter-colored.
“Great,” you’re probably thinking, “but how does knowing any of this actually help me cook?”
You can tell when something is done cooking by understanding what reactions you want to trigger and then detecting when those reactions have occurred. Cooking a steak? Check the internal temperature with a thermometer; once it’s reached 140°F / 60°C, the myosin proteins will have begun to denature. Baking crispy chocolate chip cookies at 375°F / 190°C? Open your eyes and keep your nose online; the cookies will be just about done when they begin to turn brown and you’re able to smell the caramelization occurring. Really, it’s that simple. Foods are “done” when they achieve a certain state, once they have undergone the desired chemical reactions. As soon as the reactions have occurred, pop the food out; it’s done cooking.
Note
A small but critical detail: as we’ll discuss elsewhere, proteins don’t simultaneously denature at a given temperature. Denaturation is a function of duration of exposure at a given temperature. And there are many different types of proteins in different foods, each with its own temperature/time response rate.
Smell, touch, sight, sound, taste: learn to use all of your senses in cooking. Meat that has been cooked until it is medium rare—a point at which myosin has denatured and actin has yet to denature—will feel firmer and also visibly shrink. The bubbling sound of a sauce that’s being boiled and reduced will sound different once the water is mostly evaporated, as bubbles pushing up through the thicker liquid will have a different sound. Bread crust that has reached the temperatures at which Maillard reactions and caramelization occur will smell wonderful, and you’ll see the color shift toward golden brown. By extension, this also means that the crust of the bread must reach a temperature of 310°F / 155°C before it begins to turn brown, which you can verify using an IR thermometer. (Bread flour has both proteins and sugars, so both caramelization and Maillard reactions occur during baking.)
This chapter shows you when and how these changes occur so that you can become comfortable saying, “It’s done!” We’ll start by looking at the differences between the common sources of heat in cooking and how differences in the type of heat and temperatures impact cooking. Since one of the main reasons for cooking is reducing the chances of foodborne illness, we’ll also discuss the key issues in food safety, including a look at how to manage bacterial contamination and parasites, along with some example recipes to demonstrate the principles behind food safety. The remainder of the chapter will then examine a number of key temperature points, starting with the coldest and ending with the hottest, discussing the importance of each temperature point and giving example recipes to illustrate the reactions that occur at each of these temperatures.
As with most recipes in this book, the recipes here are components, not necessarily entire dishes or meals unto themselves. Create your own combinations as you like! It’s usually easier to take each of the components in a dish and cook them separately: veggies in one pan, meats or proteins in another, and starches in a third. This allows you to isolate the variables for each component, then combine them at the end. Eggplant Parmesan might be your favorite dish, but if you’re new to cooking, it’s probably not the best place to start to learn about the reactions taking place.
Finally, cooking and baking share an axiom with coding and product development: it’s done when it’s done—not when the timer goes off. One of the best tips I can offer for improving your skills in the kitchen is to “calibrate” yourself: take a guess if something is done and then check, taking note of what your senses, especially smell and sight, notice in the process.
Note
Timers are great guides for reminding you to check on a dish and a good safety net in case you’re like me and absentmindedly wander off occasionally. But timers are only a proxy for monitoring the underlying reactions. Given a fillet of fish that is done when its core temperature reaches 140°F / 60°C—which might take about 10 minutes—the primary variable is temperature, not time. If the fish is slow to heat up, regardless of the timer going off at the 10-minute mark, it won’t be done yet. Not to knock timers entirely: they’re a great tool, especially in baking, where the variables are much more controlled and thus the time needed to cook can be more accurately prescribed. But don’t be a slave to the timer.
Cooked = Time * Temperature
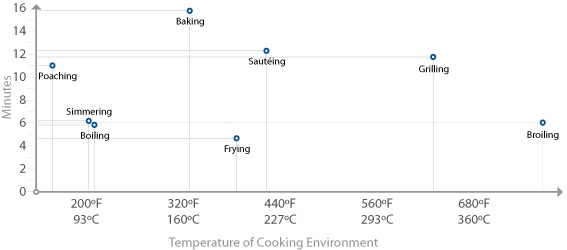
Since the primary chemical reactions in cooking are triggered by heat, let’s take a look at a chart of the temperatures at which the reactions we’ve just described begin to occur, along with the temperatures that we commonly use for applying heat to food:
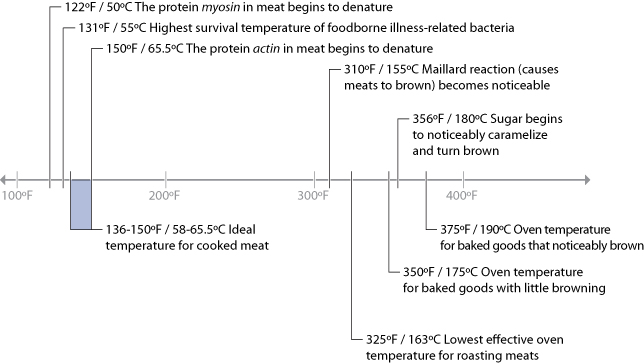
There are a few “big picture” things to notice about these common temperatures in cooking. For one, notice that browning reactions (Maillard reactions and caramelization) occur well above the boiling point of water. If you’re cooking something by boiling it in a pot of water or stewing it in liquid, it’s impossible for high-heat reactions to occur, because the temperature can’t go much above 216°F / 102°C, the boiling point of moderately salted water. If you’re cooking a stew, such as the simple beef stew recipe in Chapter 2 (Simple Beef Stew), sear the meats and caramelize the onions separately before adding them to the stew. This way, you’ll get the rich, complex flavors generated by these browning reactions into the dish. If you were to stew just the uncooked items, you’d never get these high-heat reactions.
Another neat thing to notice in the temperature graph is the fact that proteins denature in relatively narrow temperature ranges. When we cook, we’re adding heat to the food specifically to trigger these chemical and physical reactions. It’s not so much about the temperature of the oven, grill, or whatever environment you’re cooking in, but the temperature of the item of food itself.
Which brings us to our first major aha! moment: the most important variable in cooking is the temperature of the food itself, not the temperature of the environment in which it’s being cooked. When grilling a steak, the temperature of the grill will determine how long it takes the steak to come up to temperature, but at the end of the day, what you really want to control is the final temperature of the steak, to trigger the needed chemical reactions. For that steak to be cooked to at least medium rare, you need to heat the meat such that the meat itself is at a temperature of around 135°F / 57°C.
What’s all this talk about “denaturing” proteins? It’s all about structure.
Denaturing refers to a change in the shape of a molecule (molecular conformation). Proteins are built of a large number of amino acids linked together and “pushed” into a certain shape upon creation. Since the function of a protein is related to its shape, changing the shape changes the protein’s ability to function, usually rendering it useless to the organism.
Think of a protein as a bit like the power cable between a laptop and an outlet: while it has a particular primary structure (the cord and wires inside it), the cord itself invariably gets all tangled up and twisted into some secondary structure. (If it’s anything like mine, it spontaneously “retangles” itself regardless of attempts to straighten it out, but proteins don’t actually do this.)
On the molecular level, the cable is the protein structure, and the tangles in the cable are secondary bonds between various atoms in the structure. Atoms can be relocated to different bonding spots, changing the overall shape of the molecule, but not actually changing the chemical composition. With its new shape, however, the molecule isn’t always able to perform its original function. It might no longer fit into places that it used to be able to go, or given the new conformation, other molecules might be able to form new bonds with the molecule and prevent it from functioning as it used to.
Heat Transfer and Doneness
The idea that you can just cook a steak any old way until it reaches 135°F / 57°C sounds too easy, so surely there must be a catch. There are a few.
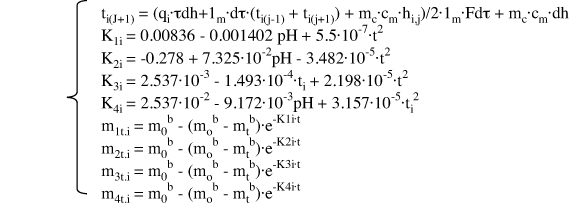
For one, how you get the heat into a piece of food matters. A lot. Clearly the center of the steak will hit 135°F / 57°C faster when placed on a 650°F / 343°C grill than in a 375°F / 190°C oven. The hotter the environment, the faster the mass will heat up, thus the rule of thumb: “cooking = time * temperature.” Consider the internal temperatures of steak cooked two ways, grilled and oven-roasted:
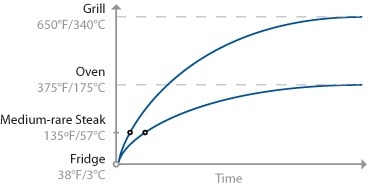
Cooking a steak on a grill takes less time than in an oven, because energy is transferred faster in the hotter environment of the grill. Note that the error tolerance of when to pull the meat off the grill is smaller than pulling the meat from the oven, because the slope of the curve is steeper. That is, if t1 is the ideal time at which to pull the steak, leaving it for t1+2 minutes will allow the temperature of the grilled steak to overshoot much more than one cooked in the oven.
This is an oversimplification, of course: the graph shows only the temperature at the center of the mass, leaving out the “slight” detail of the temperature of the rest of the meat. (It also doesn’t consider things like rate of heat transfer inside the food, water in the meat boiling off, or points where proteins in the meat undergo phase changes and absorb energy without a change in temperature.)
Another thing to realize about heat transfer is that it’s not linear. Cooking at a higher temperature is not like stepping on the pedal to get to the office faster, where going twice as fast will get you there in half the time. Sure, a hotter cooking environment like a grill will heat up the outer portions of the steak faster than a relatively cooler environment like an oven. But the hotter environment will continue to heat the outer portions of the steak before the center is done, resulting in an overcooked outer portion compared to the same size steak cooked in an oven to the same level of internal doneness.
What’s the appeal of cooking on a hot grill, then? For the right cut of meat, you can keep a larger portion of the center below the point at which proteins become tough and dry (around 170°F / 77°C) while getting the outer portion up above 310°F / 154°C, allowing for large amounts of Maillard reactions to occur. That is, the grill helps give the outside of the steak a nice brown color and all the wonderful smells that are the hallmark of grilling—aromas that are the result of Maillard reactions. The outside portion of grilled meat will also have more byproducts from the Maillard reactions, resulting in a richer flavor.
Juggling time and temperature is a balancing act between achieving some reactions in some portions of the meat and other reactions in other parts of the meat. If you’re like me, your ideal piece of red meat is cooked so that the outer crust is over 310°F / 155°C and the rest of the meat is just over 135°F / 57°C, with as little of the meat between the crust and the center as possible being above 135°F / 57°C. The modern technique of sous vide cooking can be used to achieve this effect; we’ll cover this in Chapter 7.
This has to be one of the hand-waviest formulas ever. I hereby apologize. To make up for it, here’s an actual mathematical model for temperature change as a function of heat being applied. Remember to cook until medium-rare...
SOURCE: M. A. BELYAEVA (2003), “CHANGE OF MEAT PROTEINS DURING THERMAL TREATMENT,” CHEMISTRY OF NATURAL COMPOUNDS 39 (4)
Temperature gradients
This balancing act—getting the center cooked while not overcooking the outside—has to do with the rate at which heat energy is transferred to the core of a food. Since cooking applies heat to foods from the outside in, the outer portions will warm up faster, and because we want to make sure the entire food is at least above a minimum temperature, the outside will technically be overcooked by the time the center gets there. This difference in temperature from the center to outer edges of the food is referred to as a temperature gradient.
Note
Choose the method of cooking to match the properties of the food you are cooking. Smaller items—skirt steak, fish fillets, hamburgers—work well at high heats. Larger items—roasts, whole birds, meatloaf—do better at moderate temperatures.
All parts of our example steak are not going to to reach temperature simultaneously. Because grill environments are hotter than ovens, the temperature delta between the environment and the food is larger, so foods cooked on the grill will heat up more quickly and have a steeper temperature gradient.
Carryover
Carryover in cooking refers to the phenomenon of continued cooking once the food is removed from the source of heat. While this seems to violate a whole bunch of laws of thermodynamics, it’s actually straightforward: the outer portion of the just-cooked food is hotter than the center portion, so the outer portion will transfer some of its heat into the center. You can think of it like pouring hot fudge sauce on top of ice cream: even though there’s no external heat being added to the system, the ice cream melts because the hot fudge raises its temperature.
The amount of carryover depends upon the mass of the food and the heat gradient, but as a general rule, I find carryover for small grilled items is often about 5°F / 3°C. When grilling a steak or other “whole muscle” meat, pull it when it registers a few degrees lower at its core than your target temperature and let it rest for a few minutes for the heat to equalize.
Note
To see how this works, try using a kitchen probe thermometer to record the temperature of a steak after removing it from the grill once it reaches 140°F / 60°C, recording data at 30-second intervals. You should see the core temperature peak at around 145°F / 63°C three minutes into the rest period for a small steak.
Methods of Heat Transfer
There are three methods of transferring heat into foods: conduction, convection, and radiation. While the heating method doesn’t change the temperature at which chemical reactions occur, the rate of heat transfer is different among them, meaning that the length of time needed to cook identical steaks via each method will be different. The table below shows the common cooking techniques broken out by their primary means of heat transfer.
Conduction
Conduction is the simplest type of heat transfer to understand because it’s the most common: it’s what you experience whenever you touch a cold countertop or grasp a warm cup of coffee. In cooking, those methods that transfer heat by direct contact between food and a hot material, such as the hot metal of a skillet, are conduction methods. Dropping a steak onto a hot cast iron pan, for example, causes thermal energy from the skillet to be transferred to the colder steak as the neighboring molecules distribute kinetic energy in an effort to equalize the difference in temperature. For more on thermal conductivity, see the Metals, Pans, and Hot Spots in Chapter 2.
Conduction | Convection | Radiation | |
Description | Heat passes by direct contact between two materials | Heat passes via movement of a heated material against a colder material | Heat is transferred via electromagnetic radiation |
Example | Steak touching pan; pan touching electric burner | Hot water, hot air, or oil moving along outside of food | Infrared radiation from charcoal |
Uses | Sautéing Searing | Dry heat methods: - Baking/roasting - Deep-fat frying Wet heat methods: - Boiling - Braising/water bath - Pressure cooking - Simmering/poaching - Steaming | Microwaving Broiling Grilling |
Convection
Convection methods of heat transfer—baking, roasting, boiling, steaming—all work by circulating a hot material against a cold one, causing the two materials to undergo conduction to transfer heat. In baking and roasting, the hot air of the oven imparts the heat; in boiling and steaming, it’s the water that does this.
Those heat methods that involve water are called wet heat methods; all others fall into the dry heat category. One major difference between these two categories is that wet methods don’t reach the temperatures necessary for Maillard reactions or caramelization (with the exception of pressure cooking, which does get up to temperature while remaining moist). The flavorful compounds produced by Maillard reactions in grilled or oven-roasted items won’t be present in braised or stewed foods: steamed carrots, for example, won’t undergo any caramelization, leaving the food with a subtler flavor. Brussels sprouts are commonly boiled and widely hated. Next time you cook them, quarter them, coat with olive oil and sprinkle with salt, and cook them under a broiler set to medium.
Note
Water is an essential material in cooking, and not just for its heat transfer properties. Rice cookers work by noticing when the temperature rises above 212°F / 100°C. At that point, there’s no water left, so they shut off.
Another key difference between most of the dry versus wet methods is the higher speed of heat transfer typical in wet methods. Water conducts heat roughly 23 times faster than air (air’s coefficient of thermal conductivity is 0.026, olive oil’s is 0.17, and water’s is 0.61), which is why hard-cooked eggs finish faster in a wet environment even at a lower temperature.
Note
Try it! Cook one egg for 30 minutes in a 325°F / 165°C oven and another for 10 minutes in a 212°F / 100°C water bath. You need to leave the egg in the oven for 20 minutes longer to get the same results.
One exception to this wet-is-faster-than-dry rule is deep-fat frying. Oil is technically dry (there’s no moisture present), but for culinary purposes it acts a lot like water: it has a high rate of heat transfer with the added benefit of being hot enough to trigger a large number of caramelization and Maillard reactions. (Mmm, donuts!)
Wet methods have their drawbacks (including, depending on the desired result, the lack of the aforementioned chemical reactions). While the subtler flavors achieved without browning reactions can be desirable, as in a gently cooked piece of fish, it’s also much easier to overcook foods with wet methods. When cooking meat, the hot liquid interacting with it can quickly raise its temperature above 160°F / 71°C, the point at which a significant percentage of the actin proteins in meats are denatured, giving the meat a tough, dry texture. For pieces of meat with large amounts of fat and collagen (such as ribs, shanks, or poultry legs), this isn’t as much of an issue, because the fats and collagen (which converts to gelatin) will mask the toughness brought about by the denatured actin. But for leaner cuts of meat, especially fish and poultry, take care that the meat doesn’t get too hot! The trick for these low-collagen types of meats is to keep your liquids at a gentle simmer, around 160°F / 71°C, and minimize the time that the meat spends in the liquid.
Note
Even water in its gaseous form—steam—can pack a real thermal punch. While it doesn’t conduct heat anywhere nearly as quickly as water in its liquid form, steam gives off a large amount of heat due to the phase transition from gas to liquid, something that air at the same temperature doesn’t do. As the steam comes into contact with colder food, it condenses, giving off 540 calories (not to be confused with “food calories,” which are technically kilocalories) of energy per gram of water, causing the food to heat up that much more quickly (1 calorie raises the temperature of 1 gram of water by 1°C).
Steamed vegetables, for example, cook quickly not just because they’re in a 212°F / 100°C environment, but also because the water vapor condensing on the food’s surface imparts a lot of energy. Cheetos, like most “extruded brittle foams” we eat, gain their puff by being expelled under pressure and heat, which causes them to “steam puff.” (Think of it as the industrial version of popping popcorn.) There’s a lot of energy in steam. For this reason, when pouring boiling water through a colander over a sink, you should be sure to pour away from yourself so that the steam cloud (and any splashed liquid) doesn’t condense on your face!
Radiation
Radiant methods of heat transfer impart energy in the form of electromagnetic energy, typically microwaves or infrared radiation. The warmth you feel when sunlight hits your skin is radiant heat.
In cooking, radiant heat methods are the only ones in which the energy being applied to the food can be either reflected or absorbed by the food. You can use this reflective property to redirect energy away from parts of something you’re cooking. One technique for baking pie shells, for example, includes putting foil around the edge, to prevent overcooking the outer ring of crust. Likewise, if you’re broiling something, such as a chicken, and part of the meat is starting to burn, you can put a small piece of aluminum foil directly on top of that part of meat. It might be a hack, but in a pinch it’s a decent way to avoid burning part of a dish, and nobody but you, me, and everyone else who reads this book will ever know.
Combinations of heat
The various techniques for applying heat to food differ in other ways than just the mechanisms of heat transfer. In roasting and baking we apply heat from all directions, while in searing and sautéing heat is applied from only one side. This is why we flip pancakes (stovetop, heat from below) but not cakes (oven, heat from all directions). The same food can turn out vastly different under different heat conditions. Batter for pancakes (conduction via stovetop) is similar to that for muffins (convection via baking) and waffles (conduction), but the end result differs widely.
To further complicate things, most cooking methods are actually combinations of different types of heat transfer. Broiling, for example, primarily heats the food via thermal radiation, but the surrounding air in the oven also heats up as it comes in contact with the oven walls, then comes in contact with the food and supplies additional heat via convection. Likewise, baking is primarily convection (via hot air) but also some amount of radiation (from the hot oven walls). “Convection ovens” are nothing more than normal ovens with a blower inside to help move the air around more quickly. All ovens are, by definition, convection ovens, in the sense that heat is transferred by the movement of hot air. Adding a fan just moves the air more quickly, leading to a higher temperature difference at the surface of the (cold) food you’re cooking.
To a kitchen newbie, working with combinations of heat might be frustrating, but as you get experience with different heat sources and come to understand how they differ, you’ll be able to switch methods in the middle of cooking to adjust how a food item is heating up. For example, if you like your lasagna like I do—toasty warm in the middle and with a delicious browned top—the middle needs to get hot enough to melt the cheese and allow the flavors to meld, while the top needs to be hot enough to brown. Baking alone won’t generate much of a toasted top, and broiling won’t produce a warm center. However, baking until it’s almost done and then switching to the broiler achieves both results.
Note
The convenience food industry cooks with combinations of heat, too, cooking some foods in a hot oven while simultaneously hitting them with microwaves and infrared radiation to cook them quickly.
When cooking, if something isn’t coming out as you expect—too hot in one part, too cold in another—check to see whether switching to a different cooking technique can get you the results you want.
If you’re an experienced cook, try changing heat sources as a way of creating a challenge for yourself: adapt a recipe to use a different source of heat. In some cases, the adaptation is already common—pancake batter, when deep-fat fried, is a lot like funnel cakes. But try pushing things further. Eggs cooked on top of rice in a rice cooker? Chocolate cookies cooked in a waffle iron? Fish cooked in a dishwasher? (See Cooking in the...Dishwasher?.) Why not?
It might be unconventional, but heat is heat. Sure, different sources of heat transfer energy at different rates, and some are better suited to transitioning the starting thermal gradient (edge to center) of the food to the target thermal gradient. But there are invariably similar enough heat sources worth trying. And you can push it pretty far: fry an egg on your CPU, or cook your beans and sausage on an engine block like some long-haul truck drivers do! As a way of getting unstuck—or just playing around—it’s fun to try.
Cooking methods plotted by rate of heat transfer. This plot shows the amount of time it took to heat the center of uniformly sized pieces of tofu from 40°F / 4°C to 140°F / 60°C for each cooking method. Pan material (cast iron, stainless steel, aluminum) and baking pan material (glass, ceramic) had only minor impact on total time for this experiment and are not individually listed.
Foodborne Illness and Staying Safe[3]
The American food supply is one of the most interconnected and interdependent ones in the world. As I write this, I’m eating my morning bowl of cereal, yogurt, bananas, and almonds. The muesli cereal is from Switzerland, the yogurt local to New England, the bananas from Costa Rica, and the almonds from California. The only direction from which food hasn’t come 3,000 miles is north, and that’s probably only because not much grows at the North Pole!
As our food system has become more interconnected, the number of people that can be affected by a mistake in handling food has also increased. Today, a single bad batch of water sprayed onto a field of spinach can sicken hundreds of American consumers because that crop can be transported thousands of miles and make its way into so many dishes before the contamination is noticed.
Handling food carefully—taking note of what has been washed in the case of produce and cooked in the case of meats, and being careful to avoid cross-contamination—is among the easier ways of keeping yourself healthy.
Bacteria related to common foodborne illnesses begin to multiply above 40°F / 4.4°C. The standard food safety rule provided by the FDA for mitigating foodborne illnesses from bacteria states that food should not be held between the temperatures of 40°F / 4.4°C and 140°F / 60°C for more than two hours. Below 40°F / 4.4°C, the bacteria remain viable but won’t have a chance to multiply to a sufficient quantity to bother us. Above 140°F / 60°C, the bacteria won’t be able to survive long. (Bacterial spores, however, can.)
This is called the “danger zone rule,” and as you’d probably imagine, a vast simplification of what’s really going on in the bacterial world. Still, as an easy safety rule there’s really no reason to violate it, because there are few dishes that I can think of that actually need to violate it to be made.
Note
For those recipes that say to marinate meat at room temperature: don’t! Let it marinate in the fridge.
Keep in mind that it’s cumulative time here that matters. Say you buy a chicken at the store, and that it was kept chilled the entire time before you picked it up. Between the time you put it in the cart and when you stick it in your fridge, it’ll be in a warmer environment, and any time it spends above the temperature at which bacteria begin to multiply will increase the bacterial count in the meat.
While cooking food kills off most of the bacteria, a minor (yet safe) number can survive even post-cooking. Given the right temperature range, they can reproduce back up into unsafe quantities. When cooking, stick any leftovers in the fridge right away, as opposed to letting them sit around until post-meal cleanup. The bacterial level is all about exposure—the amount of time and rate of multiplication at a given temperature.
Note
This is why you should defrost large pieces of meat in the fridge overnight. Letting it thaw, even under cold running water, can take too long to be safe—unless your cold water happens to be below 40°F / 4.4°C!
One detail this rule glosses over is that some bacteria can reproduce at lower temperatures. Luckily, most bacteria related to foodborne illness don’t multiply very quickly at near-freezing temperatures, but other types of bacteria do. Spoilage-related bacteria, for example, are happy breeding down to freezing temperatures. These are the ones that cause milk to go bad even below 40°F / 4.4°C and break down the flesh in things like raw chicken, causing uncooked meats to go bad after a few days. The danger zone rule addresses only the common pathological bacteria, which don’t reproduce very quickly at the temperature of your fridge.
Another area that the danger zone rule glosses over is the different rates of reproduction at different temperatures. Salmonella, for example, is happiest breeding around 100°F / 37.8°C. It’s not like the bacteria go from zero multiplication at 40°F / 4.4°C to full-on party mode at 41°F / 5°C; it’s a gradual ramp up to an ideal breeding temperature. The two-hour window is given for the worst-case scenario: that the food is being held at the ideal breeding temperature for the most aggressive of the common bacteria, Bacillus cereus.
Since food safety codes are currently adopted on a state-by-state level, some states still use a danger zone rule of “40 to 140 for four hours,” on the basis that B. cereus accounts for only a minor amount of foodborne illness and that a four-hour exposure isn’t likely to produce much risk. If you’re getting the impression that food safety is a probability game, you’re right. The rules reduce the odds to an acceptable level. Still, that lunch you took to work and forgot to toss in the fridge is probably safe, given that the total amount of bacterial multiplication is likely to be well below the level necessary to trigger any sort of foodborne illness.

The danger zone rule suggests that bacteria multiply right up until 140°F / 60°C, whereas the real multiplication rates of foodborne illness-related bacteria follow a curve with an ideal breeding range in the middle. Of the foodborne pathogens listed in the FDA’s “Bad Bug Book,” Bacillus cereus has the highest survival temperature, at 131°F / 55°C.
“But wait,” you might be saying. “What about all that food in the pantry? Why doesn’t it go ‘bad’?” There are other factors that bacteria need in order to multiply. The acronym FAT TOM is commonly used to describe the six factors necessary for multiplication:
- F = Food
Bacteria need proteins and carbohydrates to multiply. No food, no multiplication.
- A = Acidity
Bacteria can only survive in certain pH ranges. Too acidic or basic, and the proteins in the bacteria denature.
- T = Temperature
Too cold, and the bacteria effectively sleep. Too hot, and they die.
- T = Time
Bacteria have to have enough time to multiply to a sufficient quantity to overwhelm our bodies.
- O = Oxygen
As with pH levels, bacteria will reproduce only if sufficient oxygen is present, or, for anaerobic bacteria (e.g., Clostridium botulinum), if no oxygen is present. Keep in mind that vacuum-packed bags are not necessarily devoid of oxygen.
- M = Moisture
Bacteria need water to reproduce. Food scientists use a scale called water activity, which is a measure of the freely available water in a material (from 0 to 1). Bacteria need a water activity value of 0.85 or greater to multiply.
The reason so many pantry goods are “shelf stable” is either low moisture content (crackers, dry goods like beans and grains, oils, even jams and jellies in which the sugar is hygroscopic and “holds on to” the water) or acidity (pickled items, vinegars). Given these six variables, you can see why some foods don’t need refrigeration. When in doubt, though, stick it in the fridge, which you should keep on the chilly side (34–36°F / 1–2°C).
Note
Keep basic physics in mind. Placing a large pot of hot soup into the fridge will warm up all the contents of the fridge until the evaporator has a chance to transfer the heat back out. Refrigerators are made to keep things cool, not to chill things, so when you’re storing a large quantity of hot food, place it in an ice bath first to chill it and then transfer it to the fridge once it’s cooled down.
There’s one variable that deserves special mention, because of the potentially fatal consequences, and that’s the oxygen level needed for bacterial growth. Specifically, anaerobic environments—ones without oxygen—are necessary for some types of bacteria to multiply. Oil creates an anaerobic environment, but by itself doesn’t provide any moisture for bacteria to grow. But with the addition of something like a raw clove of garlic, an anaerobic environment is created, and the garlic provides the food and moisture necessary for anaerobic bacteria to thrive when given sufficient time at the right temperatures.
A garlic clove stored in oil can become the perfect breeding ground for botulism, the illness caused by Clostridium botulinum. And since C. botulinum doesn’t produce any noticeable odor, there’s little to tip you off that the food is teeming with bacteria and their toxins. The toxins generated by C. botulinum are much more heat stable than the bacteria themselves and might remain active through the cooking process. And now to scare you senseless, the botulinum toxin is the most acutely toxic substance known: a dose as small as ~250 nanograms—1/120,000th the weight of a grain of rice—will do you in.
If you’re going to make something like duck confit or homemade jam the traditional way—cooking it and then sealing it for storage at room temperature—make darn sure you get the food hot enough to sterilize it and that you avoid recontaminating it after it’s cooked and before it’s sealed. To be safe, stick it in the fridge and treat it as perishable. Note that sterilization means completely eradicating any bacteria, as opposed to pasteurization, which reduces bacteria to “safe” levels for near-term consumption. Sterilized milk can be left at room temperature indefinitely; pasteurized milk cannot.
There’s one last aspect I should mention in this brief primer on food safety, and that’s the risk/consequences equation. While following food safety rules reduces the risk of illness, it doesn’t completely eliminate risk. For most of us, the consequence of contracting most foodborne illnesses is gastrointestinal distress—diarrhea, vomiting, muscle spasms, and the like. However, for those who are in an at-risk group—anyone for whom having foodborne illness can lead to further complications—the consequences of a bout of foodborne illness can be much, much greater, so the acceptable risks are accordingly much lower. If you are cooking for someone who is elderly, extremely young, pregnant, or immunocompromised, be extra vigilant with regard to food safety issues and skip dishes that have higher risks (e.g., raw egg in Caesar salads, unpasteurized cheeses, suspect meats that might be past their expiration dates).
For additional information on food safety and bacteria, check out the FDA’s “Bad Bug Book,” available online at http://www.fda.gov/Food/FoodSafety/FoodborneIllness/. Also, Texas A&M University’s Department of Horticultural Sciences maintains a good overview page at http://aggie-horticulture.tamu.edu/extension/poison.html.
While bacteria are the most common and easiest-to-manage cause of foodborne illnesses, they’re not alone: viruses, molds, toxins, and contaminants are also of concern. Toxins and contaminants are primarily issues for producers of foods, so as a consumer you’re (mostly) off the hook for those. (If you grow your own veggies, test your soil for contaminants.) Besides proper cooking, the best way to combat bacteria, mold, and viruses is good washing and avoiding cross-contamination:
Wash your hands! And don’t double-dip with the same spoon when tasting a dish.
Nuke your sponges (rinse them and give them two minutes on high) or run them through the dishwasher weekly. Better yet, use towels and allow them to dry completely between uses.
When working with raw meats, be careful not to use the same towel for wiping your hands that you then use to wipe with post-cooking.
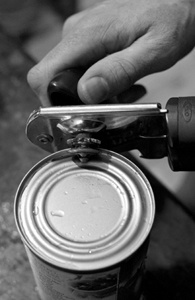
Wash can lids before opening them. Wash the can opener, too. The blade picks up food while cutting through the lid.
How to Prevent Foodborne Illness Caused by Bacteria
Salmonella: it’s the poster child of foodborne illness. And for good reason. Salmonella accounts for a full 30% of the roughly 1,800 deaths due to foodborne illnesses per year in the U.S.—more than any other cause in this category. Salmonella’s ideal breeding temperature? Around 100°F / 38°C—close to body temperature. Clearly it likes us. And according to some reports, the most likely food that’ll harbor the bacteria in our modern food supply isn’t chicken or meats, but produce. Wash your veggies!
The odds of dying from foodborne illness are actually surprisingly low, especially considering the media attention given to it. But the media attention isn’t unmerited: 1 in 8 of us will contract illnesses from foods in any given year, and about 1% of those cases will require hospitalization, according to the U.S. Centers for Disease Control and Prevention (CDC).
Contracting a foodborne illness is a game of probabilities: a single bacterium of salmonella isn’t likely to cause a problem, but given a few dozen cells, the odds change. E. coli is similar: only a few bacteria are necessary for the possibility of infection. A few strains are decidedly nasty, O157:H7 being the most talked about.
It’s not always “just a handful” of cells, though. Contracting listeriosis requires ingesting somewhere around 1,000 organisms of Listeria monocytogenes, which tends to be present in animal products and multiplies at temperatures as low as 34°F / 1°C. Luckily, listeriosis isn’t an issue for many of us, but it can cause complications for at-risk groups—especially pregnant women, where the baby is at risk. This is why pregnant women are told to avoid foods such as soft and surface-ripened cheeses, deli salads, raw milk, hot dogs, and shrimp; to ensure that chicken is thoroughly cooked; and to be careful with previously cooked ready-to-eat foods.
GRAPH BASED ON E. ANDERSEN, M. JUL, AND H. RIEMANN (1965), “INDUSTRIEL LEVNEDSMIDDEL-KONSERVERING,” COL. 2, KULDEKONSERVERING, COPENHAGEN: TEKNISK FORLAG)
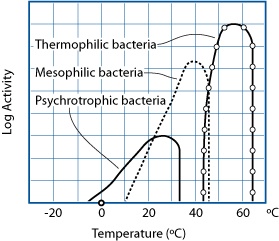
Bacteria can be grouped into three broad categories, based on the temperature at which they are most active. There are bacteria that remain active in food above 122°F / 50°C, but these are only beneficial (e.g., Bacillus coagulans) or spoilage bacteria, and not related to foodborne illness. From a taste perspective, we’re extremely lucky that no thermophilic bacteria cause foodborne illness; otherwise, we’d have to cook foods to higher temperatures to kill them.
Salmonella gets most of the limelight in the media for a couple of reasons, though: it’s hardy—that is, able to survive in the environment for longer periods of time and at temperatures above what most other common-to-food bacteria can tolerate—and it’s surprisingly prevalent, affecting 1.4 million Americans a year on average.
Caliciviruses—a family of viruses, norovirus being the best known—are also getting more attention these days, and deservedly so; these are typically spread by a sick individual preparing food for others. If you’ve spent a night “praying to the porcelain god”—diarrhea, vomiting, chills, headache—you can probably thank salmonella or norovirus for the experience.
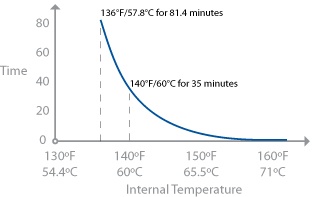
Now, pay attention, because this is important. Salmonella is killed at 136°F / 58°C only when held for a sufficient length of time. Seeing your thermometer register an even hotter temperature—say, 140°F / 60°C—does not guarantee that the food will be free of salmonella. Think of it like being in a hot desert: you can survive 136°F / 58°C heat for a while, but if you’re exposed to it for too long, eventually you will die. The same is true for bacteria like salmonella: given a short amount of time at a particular temperature, the bacteria might survive, but given a longer exposure, they will eventually die.
Salmonella actually lives in a temperature range of 35–117°F / 2–47°C according to the FDA’s “Bad Bug Book.” The 136°F / 58°C temperature is based on what the FDA Food Code gives as the lower bound for pasteurization.
Back to the desert analogy. Let’s say an average human can survive for four hours in 136°F / 58°C heat. Given 100 people in a desert, though, this doesn’t mean all 100 people will be alive at 3 hours, 59 minutes and all suddenly drop dead one minute later. The same is true for bacteria that might be hitching a ride on that chicken you’re about to cook: the proteins in the bacteria don’t all spontaneously denature at a specific temperature. It’s a probability thing: as the temperature goes up, the probability of the molecular structure of each kind of protein denaturing increases. There’s not an exact temperature at which this occurs, like there is when a solid melts into a liquid.
Note
When talking about reducing the number of bacteria in food, scientists use the term log10 reductions. A single log10 reduction is simply the reduction of the number of bacteria present by a factor of 10; a 7 log10 reduction is a 10,000,000-fold reduction. The USDA’s Food Safety and Inspection Service (FSIS) division is responsible for providing guidelines relating to the number of log reductions necessary to achieve an acceptable quantity of bacteria. Given that different kinds of meats have different properties—different amounts of fats, water, etc.—the number of log reductions necessary to reduce the bacterial count from a potential starting amount to an acceptable number differs. Hold time for sufficient pasteurization is also affected by variables such as how smooth the surface of the food is and its chemical composition (e.g., nitrite levels).
One important caveat about pasteurization: sometimes it’s not the bacteria themselves that are the issue, but the toxins they produce. While appropriate cooking might safely reduce the bacterial count, the toxins themselves, such as those produced by B. cereus, can be heat-stable. Refrigeration of meats is therefore critical to prevent the multiplication of bacteria in the meat tissue. Remember the simple food safety rule mentioned earlier: avoid holding foods at temperatures between 40°F / 4°C and 140°F / 60°C for more than two hours. This includes the amount of time it takes to bring the food from fridge temperature to a safe hot temperature! While it is true that the 40-to-140°F / 4-to-60°C rule for two hours is a vast simplification of the real multiplication rates of bacteria, it’s a simple rule accepted by the food industry, and rarely is there any need to skirt it.
At 140°F / 60°C, a hold time of 35 minutes is necessary for chicken with 12% fat to achieve a 7-log10 reduction. The time drops in leaner chickens; chicken meat with 1% fat requires 25.2 minutes at 140°F / 60°C. Longer hold times are okay; these times are minimum times. Chicken meats can be infected with salmonella throughout the tissue. While sick birds are supposed to be culled, it’s still possible for them to go unnoticed. (Data from http://www.fsis.usda.gov/OPPDE/rdad/FSISNotices/RTE_Poultry_Tables.pdf.)
“Why then,” I bet you’re thinking, “do ‘they’ say to cook chicken to a temperature of 165°F / 74°C?” “They” happen to be the fine folks at the CDC, and what they say specifically is:
All poultry should be cooked to reach a minimum internal temperature of 165°F [74°C].
Why 165°F / 74°C? One reason is that this is the temperature at which salmonella dies a quick death. From a “keeping it simple” perspective, seeing 165°F / 74°C on the thermometer is an easy guideline. Even if your thermometer is miscalibrated or you misprobe the meat and it’s only reached a temperature of 155°F / 68°C, the pasteurization time for chicken at this temperature is less than a minute, which you’re likely to exceed. The 165°F / 74°C guideline effectively removes the variable of time, making it an easier to follow (harder to screw up) rule.
Since none of the bacteria related to foodborne illness can survive, let alone reproduce, at moderate temperatures, holding food above 140°F / 60°C indefinitely is safe. This is why the soup at your local lunch counter can be kept hot all day long in a heat-controlled container and why hot buffets use steam baths to keep the foods warm. While you might be perplexed by the idea of storing foods hot, from a bacterial control perspective, it’s actually safer than storing them in the fridge: bacteria are unable to survive in the hot environment, while storing them in the fridge generally only slows their reproduction.
Note

The serving spoons, by the way, are supposed to stay in the food, so that they too stay above 140°F / 60°C. Otherwise, that mashed potato clinging to the serving spoon at room temperature will be a potential hangout spot for bacteria.
In the U.S., the FSIS and the FDA run testing programs to monitor the food supply. Both agencies have the ability to hold foods at processing plants, to request voluntary recalls, and to outright seize product through court order if it comes to that. Still, there’s a lot of food going through the system, and lapses in protocol happen (probably more than we want to know about). A lot of work is done in identifying hazard points in the food system (HACCP—Hazard Analysis & Critical Control Points), but still, errors happen. What’s a nervous food geek to do?
The most common vector for foodborne illness is surface contamination, either from contaminated water sprayed on vegetables during farming or from fecal contamination in meats during slaughter and processing. How does this affect you when cooking? Since it’s the surface of most products that becomes contaminated, it’s the surface that needs to be pasteurized. Pan searing a steak heats the outer portion well beyond any temperature that bacteria can survive. Likewise, steaming vegetables thoroughly heats their surface.
Note
When cooking vegetables in the microwave, use a container with the lid mostly closed and with a small amount of water inside: the microwave will boil the water, and the container will keep the steam in contact with the vegetables.
What about hamburgers? Well, they’re all outside, in the sense that surface contamination will have been ground throughout the meat. Industry calls things like steak whole-muscle intact meat, as opposed to ground meat. When looking at consumer cooking guidelines, the temperatures given are lower for whole-muscle intact than ground meats, presumably because the outside of a whole muscle cut will be well beyond pasteurized by the time the middle comes to temperature.
In a clean bowl, work together using your fingers:
1 pound (500g) ground beef or hamburger
1 teaspoon (6g) Worcestershire sauce (optional)
1 teaspoon (5g) salt
½ teaspoon (1g) ground pepper (fresh, not preground)
Form into three or four patties. Using either a grill (radiant heat from below) or broiler (radiant heat from above), cook on each side for about 5 minutes, until the internal temperature registers at 160°F / 71°C.
If grilling, add cheese (try mild cheddar or Provolone) after flipping the first time. If broiling, add the cheese after reaching temperature and return to broiler for half a minute or so, until the cheese has melted.

Notes
Yes, you can haz cheezburger. Just cook it properly. Use a digital thermometer and make sure the internal temperature reaches 160°F / 71°C. You can pull it off the grill when it is a few degrees lower, because carryover will take it up to temperature.
Fun fact: “hamburger” can have beef fat added to it; “ground beef” cannot.
Note
For a little light reading, pull up the FDA’s 2009 Food Code (http://www.fda.gov/Food/FoodSafety/RetailFoodProtection/FoodCode/) and look at section 3-401.11: Raw Animal Foods.
When cooking a hamburger, the USDA says to heat the meat to 160°F / 71.1°C—high enough to kill any common bacteria but also high enough that both actin and myosin proteins will denature, leading to a drier burger. Since fats help mask dryness in meat, using ground beef that has more fat in it will lead to a juicer burger. Alternatively, if you have a way of cooking your burger to a lower temperature and then holding it at temperature long enough to pasteurize it, you could avoid denaturing the actin proteins while still pasteurizing the meat. Take a look at the section on sous vide cooking in Sous Vide Cooking of Chapter 7 for more on this.
Note that change in color is not an accurate indicator of doneness. Myoglobin, oxymyoglobin, and metmyoglobin can begin to turn grey starting around 140°F / 60°C, and they can also remain pink at 160°F / 71°C if the pH is at or about 6.0. Use a thermometer when cooking ground meats and poultry!
How to Prevent Foodborne Illness Caused by Parasites
Not long ago, I overheard the fishmonger at one of my local grocery stores (which shall remain nameless to protect the guilty) tell a customer that it was okay to use the salmon he was selling for making sushi. Given that the fish wasn’t labeled as “previously frozen” and that it was in direct contact with other fish in the case, there wasn’t any real guarantee that it was free from harmful parasites or bacteria, two of the biggest concerns that consumers need to manage for food safety. What’s a shopper to do in response to the disappearance of the true fishmonger?
For one, start by understanding where the risks actually are. Not all fish and meats share the same set of risks for foodborne pathogens. Salmonella, for example, tends to show up in land animals and improperly handled vegetables, while bacteria such as Vibrio vulnificus show up in fish that are exposed to the brackish waters of tidal estuaries, such as salmon. Deep-water fish, such as tuna, are of less concern. Because of these differences, you should consider the source of your ingredients when thinking about food safety, focusing on the issues that are present in the particular food at hand.
With uncooked and undercooked fish, one concern is parasites. Parasites are to fish as bugs are to veggies: really common (if you’ve eaten fish, you’ve eaten worms). But on the plus side, most parasites in seafood don’t infect humans. However, there are those that do, Anisakis simplex and tapeworms (cestodes) being the two parasites of general concern. A. simplex will give you abdominal pains, will possibly cause you to vomit and generally feel like crap, and will possibly take your doc a while to figure out. It’s not appendicitis, Crohn’s disease, nor a gastric ulcer, and with only around 10 cases diagnosed per year in the United States, chances are your doc won’t have encountered it before. On the plus side, humans are a dead-end host for A. simplex. The bacteria will die after about 10 days, at which point you’ll go back to feeling normal. (Unless you have an extreme infection, in which case, it’s off to surgery to remove ’em.) That leaves tapeworms as the major parasitic concern in fish.
For cooked dishes—internal temperature of 140°F / 60°C—there is little risk from these parasites directly. Cooking the fish also cooks the parasite, and while the thought of eating a worm might be unappetizing, if it’s dead there’s little to worry about other than the mental factor. (Just think of it as extra protein.)
Of course, raw and undercooked seafood is another matter entirely. Cod, halibut, salmon? Fish cooked rare or medium rare? Ceviche, sashimi, cold-smoked fish? All potential hosts for roundworm, tapeworms, and flukes. Fortunately, like most animals, few parasites can survive freezing.
Note
Some parasites do survive freezing. Trichomonas—parasitic microorganisms that infect vertebrates—can survive temperatures as cold as liquid nitrogen. Yikes!
For the FDA to consider raw or undercooked fish safe to eat, it must be frozen for a period of time to kill any parasites that might be present:
FDA 2005 Food Code, Section 3-402.11: “[B]efore service or sale in ready-to-eat form, raw, raw-marinated, partially cooked, or marinated-partially cooked fish shall be: (1) Frozen and stored at a temperature of –20°C (–4°F) or below for a minimum of 168 hours (7 days) in a freezer; [or] (2) Frozen at –35°C (–31°F) or below until solid and stored at –35°C (–31°F) or below for a minimum of 15 hours...”
The second concern with undercooked fish is bacteria. While freezing kills parasites, it does not kill bacteria; it just puts them “on ice.” Researchers store bacterial samples at –94°F / –70°C to preserve them for future study, so even super-chilling food does not destroy bacteria. Luckily, most bacteria in fish can be traced to surface contamination due to improper handling—that is, cross-contamination from surfaces previously exposed to contaminated items.
Note
Don’t put cooked fish or meat on the same plate as the raw food! In addition to being potentially dangerous, that’s just gross.
If your grocery store sells both raw and “sashimi-grade” fish, the difference between the two will be in the handling and care related to the chances of surface contamination, and in most cases the sashimi-grade fish should have been previously frozen. The FDA doesn’t actually define what “sashimi grade” or “sushi grade” means, but it does explicitly state that fish not intended to be completely cooked before serving must be frozen before being served.
If you don’t have access to a good fish market or find the frozen fish available at your local grocery store unappealing, and you plan on serving undercooked fish, you can kill any parasites present in the fish by freezing: check that your freezer is at least as cold as –4°F / –20°C, and follow the FDA rule of keeping the fish frozen for a week. If you happen to have a supply of liquid nitrogen around—you know, just by chance—you can also flash-freeze the fish, which should result in better texture and cut the hold time down to less than a day.
 Luckily for oyster lovers, the FDA excludes
molluscan shellfish, as well as some types of tuna and some
farm-raised fish (those that are fed only food pellets that wouldn’t
contain live parasites) from the freezing requirement.
Luckily for oyster lovers, the FDA excludes
molluscan shellfish, as well as some types of tuna and some
farm-raised fish (those that are fed only food pellets that wouldn’t
contain live parasites) from the freezing requirement.
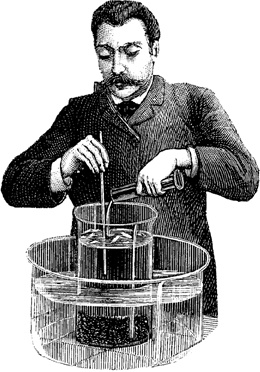
PHOTOS USED BY PERMISSION OF DOUG POWELL
Doug Powell is an associate professor at Kansas State University’s Department of Diagnostic Medicine and Pathobiology. His blog, “barfblog: musings about food safety and things that make you barf,” is at http://www.barfblog.com.
Is there a tension between safety and quality in cooking, and if so, are there methods to achieve both?
Safety and quality are two very different things. Quality is something that people love talking about, whether it’s wine, or organic food, or how it was grown, and people can talk themselves to death about all that. My job is to make sure they don’t barf.

For somebody cooking at home, it’s easy for them to see a difference in quality. It’s very hard for them to see a difference in safety until they get sick, I imagine?
There are tremendous nutritional benefits to having a year-round supply of fresh fruits and vegetables. At the same time, the diet rich in fruits and vegetables is the leading cause of foodborne illness in North America because they’re fresh, and anything that touches them has the potential to contaminate. So how do you balance the potential for risk against the potential benefits? Be aware of the risks and put in place safety programs, beginning on the farm.
If you look at cancer trends in the 1920s, the most predominant cancers were stomach cancers. All everyone ate during the winter were pickles and vinegar and salt. Now that’s almost completely eradicated because of fresh food. But now you have to prevent contamination from the farm to the kitchen, because more food is eaten fresh. There are trade-offs in all of these things. In preparing hamburger and chicken, there is an issue with cooking it thoroughly and validating that with a thermometer, but most of the risk is actually associated with cross-contamination. Potatoes are grown in dirt, and birds crap all over them, and bird crap is loaded with salmonella and campylobacter. When you bring a potato into a kitchen or a food service operation, it’s just loaded with bacteria that get all over the place.
What’s the normal time between ingestion and symptoms?
It’s around one to two days for salmonella and E. coli. For things like listeria, it can be up to two months. Hepatitis A is a month. You probably can’t remember what you had yesterday or the day before, so how can you remember what you ate a month ago? The fact that any outbreak actually gets tracked to the source I find miraculous. In the past, if a hundred people went to a wedding or a funeral, they all had the same meal. They all showed up at emergency two days later, and they would have a common menu that investigators would look at to piece it together. Nowadays, through DNA fingerprinting, it’s easier. If a person in Tennessee and a person in Michigan and a person in New York have gotten sick from something, they take samples and check against DNA fingerprints. There are computers working 24/7 along with humans looking to make these matches. And they can say these people from all across the country, they actually have the same bug, so they ate the same food.
Think of spinach contamination in 2006. There were 200 people sick, but it was all across the country. How did they put those together? Because they had the same DNA fingerprint and they were able to find the same DNA fingerprint in E. coli in a bag of spinach from someone’s kitchen. Then they were able to find the same DNA fingerprint from a cow next to the spinach farm. It was one of the best cases with the most conclusive evidence. Normally, you don’t have that much evidence.
What to do about it isn’t very clear-cut, but when you look at most outbreaks, they’re usually not acts of God. They’re usually such gross violations of sanitation that you wonder why people didn’t get sicker earlier. With a lot of fresh produce outbreaks, the irrigation water has either human or animal waste in it, and they’re using that water to grow crops. These bugs exist naturally. We can take some regulatory precautions, but what are we going to do, kill all the birds? But we can minimize the impact.
When farmers harvest crops, they can wash them in a chlorinated water system that will reduce the bacterial loads. We know that cows and pigs and other animals carry these bacteria and they’re going to get contaminated during slaughter. So we take other steps to reduce the risk as much as possible, because by the time you get it home and go to make those hamburgers, we know you’re going to make mistakes. I’ve got a PhD, and I’m going to make mistakes. I want the number of bacteria as low as possible so that I don’t make my one-year-old sick.
Is there a particular count of bacteria that is required to overwhelm the system?
It depends on the microorganism. With something like salmonella or campylobacter, we don’t know the proper dose response curves. We work backward when there is an outbreak. If it’s something like a frozen food, where they might have a good sample because it’s in someone’s freezer, we can find out more. With something like salmonella or campylobacter, it looks like you need a million cells to trigger an infection. With something like E. coli O157, you need about five.
You have to take into account the lethality of the bug. For 10% of the victims, E. coli O157 is going to blow out their kidneys and some are going to die. With listeria, 30% are going to die. Salmonella and campylobacter tend not to kill, but it’s not fun. So all of these things factor into it. A pregnant woman is 20 times more susceptible to listeria. That’s why they are warned to not eat deli meat, smoked salmon, and refrigerated, ready-to-eat foods. Listeria grows in the refrigerator and they’re 20 times more susceptible and it can kill their babies. Most people don’t know that either.
Are there any particular major messages that you would want to get to consumers about food safety?
It’s no different than anything else, like drunk driving or whatever other campaign: be careful. The main message about food in our culture today is dominated by food pornography. Turn on the TV and there are endless cooking shows, and all these people going on about all these foods. None of that has anything to do with safety. You go to the supermarket today, you can buy 40 different kinds of milk and 100 different kinds of vegetables grown in different ways, but none of it says it’s E. coli –free. Retailers are very reluctant to market on food safety, because then people will think, “Oh my god, all food is dangerous!” All they have to do is read a newspaper, and they’ll know that food is dangerous.
A lot of the guidelines I see talk about the danger zone of 40–140°F / 4–60°C.
A lot of those guidelines are just complete nonsense. The danger zone is nice and it’s important not to leave food in the danger zone, but at the same time it doesn’t really get into any details. People learn by telling stories. Just telling people “Don’t do this with your food” doesn’t work; they say, “Yeah, okay, why?” I can tell you lots of stories of why or why not. The guidelines aren’t changing what people do and that’s why we do research on human behavior, how to actually get people to do what they’re supposed to do. As Jon Stewart said in 2002, if you think those signs in the bathrooms (“Employees must wash hands”) are keeping the piss out of your food, you’re wrong! What we want to do is come up with signs that work.
I’m wondering what your signs look like?
We have some good ones! Our favorite picture is the skull in the bed of lettuce! The dead person from carrot juice is pretty good, too.

The safest way of preventing bacterial and parasitic infections from seafood and meats is with proper cooking. The USDA recommends cooking fish to a minimum internal temperature of 145°F / 63°C, ground beef to a minimum internal temperature of 160°F / 71°C, and poultry to 165°F / 74°C.
If you enjoy your fish cooked only to a rare point or even raw in the middle and you’re concerned about parasites, give frozen fish a chance. I’ve found distinct differences in the quality of frozen fish. Some stores sell frozen product that’s downright bad—mushy, bland, uninspiring—but this isn’t because the fish was frozen. Some of the best sushi chefs in Japan are finding that quick-frozen tuna is exceptionally good. Frozen at sea right after it’s caught (in a slurry of liquid nitrogen and dry ice), the tuna doesn’t have much time to break down and so maintains its quality during transportation.
One last comment on keeping yourself safe in the kitchen: the biggest issue isn’t contaminated food from the store, but cross-contamination while preparing it at home. Avoid cross-contamination by washing your hands often, especially both before and after working with raw meat. Use hot water and soap, and wash for a good 20 seconds.
Key Temperatures in Cooking
Most discussions of cooking are structured around the different heat transfer methods listed at the beginning of this chapter. Instead of looking at sources of heat, the rest of this chapter is going to take a different approach and talk about what reactions happen when each of the critical temperatures in the following table is reached, briefly touching on cooking techniques that relate to each temperature as they come up.
Temperature | What happens |
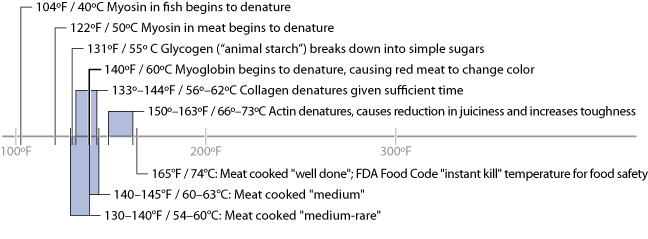
104°F / 40°C and 122°F / 50°C | Proteins in fish and meat begin to denature |
144°F / 62°C | Eggs begin to set |
154°F / 68°C | Collagen denatures (Bovine Type I) |
158°F / 70°C | Vegetable starches gelatinize |
310°F / 154°C | Maillard reactions become noticeable |
356°F / 180°C | Sugar (sucrose) begins to caramelize visibly |
104°F / 40°C and 122°F / 50°C: Proteins in Fish and Meat Begin to Denature
Chances are, you haven’t given much thought to the chemical reactions that happen to a piece of meat when the animal supplying it is slaughtered. The primary change is, to put it bluntly, that the animal is dead, meaning the circulatory system is no longer supplying the muscle tissue with glycogen from the liver or oxygen-carrying blood. Without oxygen, the cells in the muscle die, and preexisting glycogen in the muscle tissue dissipates, causing the thick and thin myofilaments in the muscle to fire off and bind together (resulting in the state called rigor mortis).
Somewhere around 8 to 24 hours later, the glycogen supply is exhausted and enzymes naturally present in the meat begin to break down the bonds created during rigor mortis (postmortem proteolysis). Butchering before this process has run its course will affect the texture of the meat. Sensory panels have found that chicken breasts cut off the carcass before rigor mortis was over have a tougher texture than meat left on the bone longer. And since time is money, much mass-produced meat is slaughtered and then butchered straightaway. (I knew there was a reason why roasted whole birds taste better!)
Proteins in meat can be divided into three general categories: myofibrillar proteins (found in muscle tissue, these enable muscles to contract), stromal proteins (connective tissue, including tendons, that provide structure), and sarcoplasmic proteins (e.g., blood). We’ll talk about myofibrillar proteins here and save the stromal proteins for the section on collagen later in the chapter. (We’re going to ignore sarcoplasmic proteins altogether, because understanding them doesn’t help in cooking many dishes, blood-thickened soups aside.)
Muscle tissue is primarily composed of only a few types of proteins, with myosin and actin being the two most important types in cooking. About two-thirds of the proteins in mammals are myofibrillar proteins. The amount of actin and myosin differs by animal type and region. Fish, for example, are made up of roughly twice as much of these proteins as mammals.
Lean meat is mostly water (65–80%), protein (16–22%), and fat (1.5–13%), with sugars such as glycogen (0.5–1.3%) and minerals (1%) contributing only a minor amount of the mass. When it comes to cooking a piece of fish or meat, the key to success is to understand how to manipulate the proteins and fats. Although fats can be a significant portion of the mass, they are relatively easy to manage, because they don’t provide toughness. This leaves proteins as the key variable in cooking meats.
Of the proteins present in meat, myosin and actin are the most important from a culinary texture perspective. If you take only one thing away from this section, let it be this: denatured myosin = yummy; denatured actin = yucky. Dry, overcooked meats aren’t tough because of lack of water inside the meat; they’re tough because on a microscopic level, the actin proteins have denatured and squeezed out liquid in the muscle fibers. Myosin in fish begins to noticeably denature at temperatures as low as 104°F / 40°C; actin denatures at around 140°F / 60°C. In land animals, which have to survive warmer environments and heat waves, myosin denatures in the range of 122–140°F / 50–60°C (depending on exposure time, pH, etc.) while actin denatures at around 150–163°F / 66–73°C.
Food scientists have determined through empirical research (“total chewing work” and “total texture preference” being my favorite terms) that the optimal texture of cooked meats occurs when they are cooked to 140–153°F / 60–67°C, the range in which myosin and collagen will have denatured but actin will remain in its native form. In this temperature range, red meat has a pinkish color and the juices run dark red.
The texture of some cuts of meat can be improved by tenderizing. Marinades and brines chemically tenderize the flesh, either enzymatically (examples include bromelain, an enzyme found in pineapple, and zingibain, found in fresh ginger) or as a solvent (some proteins are soluble in salt solutions). Dry aging steaks works by giving enzymes naturally present in the meat time to break down the structure of collagen and muscle fibers. Dry aging will affect texture for at least the first seven days. Dry aging also changes the flavor of the meat: less aged beef tastes more metallic, more aged tastes gamier. Which is “better” is a matter of personal taste preference. (Perhaps some of us are physiologically more sensitive to metallic tastes.) Retail cuts are typically 5 to 7 days old, but some restaurants use meat aged 14 to 21 days.
 Then there are the mechanical methods for
“tenderizing,” which aren’t actually so much tenderizing as they are
masking toughness: for example, slicing muscle fibers against the
grain thinly, as is done with beef carpaccio and London broil, or
literally grinding the meat, as is done for hamburger meat. (Some
industrial meat processors “tenderize” meat by microscopically slicing
it using very thin needles, a method called jacquarding.) Applying
heat to meats “tenderizes” them by physically altering the proteins on
the microscopic scale: as the proteins denature, they loosen up and
uncurl. In addition to denaturing, upon uncurling, newly exposed
regions of one protein can come into contact with regions of another
protein and form a bond, allowing them to link to each other. This
process is called coagulation, and while it
typically occurs in cooking that involves protein denaturation, it is
a separate phenomenon.
Then there are the mechanical methods for
“tenderizing,” which aren’t actually so much tenderizing as they are
masking toughness: for example, slicing muscle fibers against the
grain thinly, as is done with beef carpaccio and London broil, or
literally grinding the meat, as is done for hamburger meat. (Some
industrial meat processors “tenderize” meat by microscopically slicing
it using very thin needles, a method called jacquarding.) Applying
heat to meats “tenderizes” them by physically altering the proteins on
the microscopic scale: as the proteins denature, they loosen up and
uncurl. In addition to denaturing, upon uncurling, newly exposed
regions of one protein can come into contact with regions of another
protein and form a bond, allowing them to link to each other. This
process is called coagulation, and while it
typically occurs in cooking that involves protein denaturation, it is
a separate phenomenon.
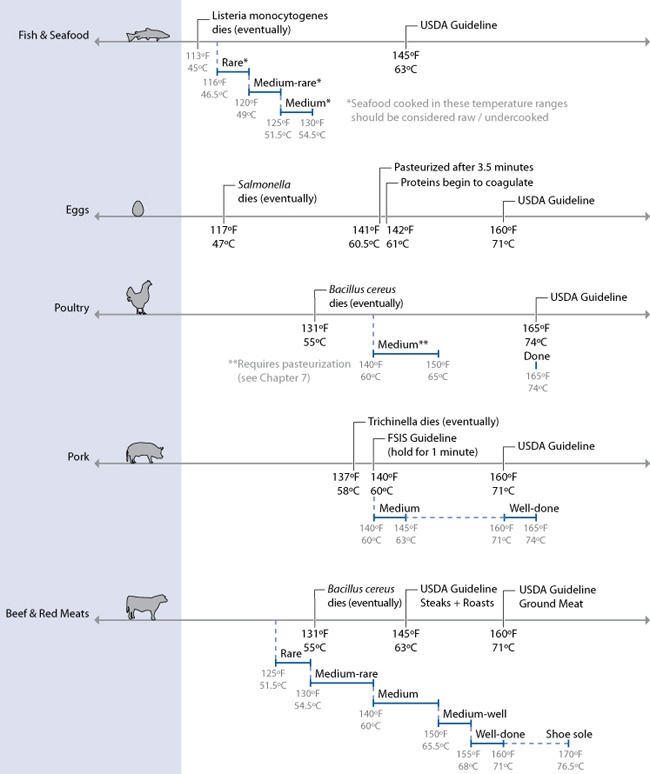
Temperatures required for various levels of doneness. Note that seafood cooked very rare or medium rare and chicken cooked medium must be held for a sufficiently long period of time at the stated temperature in order to be properly pasteurized. See the section on Sous Vide Cooking in Chapter 7 for time and temperature charts.
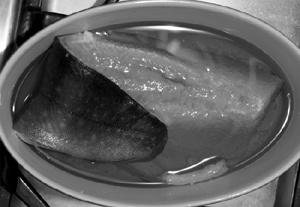
Fish, such as salmon and Atlantic char, becomes dry and loses its delicate flavor when cooked too hot. The trick with poaching fish is to not overcook it. Poaching fish is an easy way to control the rate of heat being applied, and it is amazingly easy and tasty.
Place a fillet of fish, skin side down, in an oven-safe bowl just large enough for the fish to fit. Sprinkle a small amount of salt on top of fish. Cover with olive oil until the fillet is submerged. Using a bowl that “just fits” the fish will cut down on the amount of olive oil needed.
Place into a preheated oven, set to medium heat (325–375°F / 160–190°C).
Use a probe thermometer set to beep at 115°F / 46°C and remove the fish when the thermometer goes off, letting carryover bring the temperature up a few more degrees.
Note
Consider this fish as raw/undercooked. See Chapter 7’s section on sous vide cooking for a discussion on pasteurization and time-at-temperature rules.
Notes
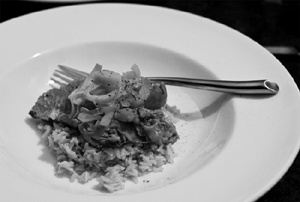
Try serving on top of a portion of brown or wild rice and spooning sautéed leeks, onions, and mushrooms on top. (A squirt of orange juice in the leeks is really good.) Or serve with string beans sautéed with red pepper flakes and white rice, with a splash of soy sauce drizzled on top.
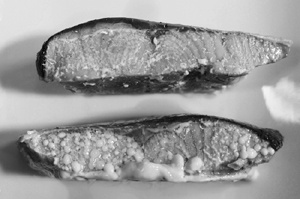
Salmon contains a protein, albumin, that generates a white congealed mess on the outside of the flesh, as shown on the bottom piece in the following photo. This is the same protein that leeches out of hamburgers and other meats, typically forming slightly gray “blobs” on the surface. You can avoid this by brining the fish in a 5–10% salt solution (by weight) for 20 minutes, which will set the proteins. The top piece in the first photo below was brined; you can see the difference.
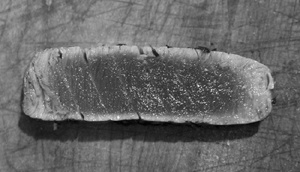
Pan searing is one of those truly simple cooking methods that produces a fantastic flavor and also happens to take care of bacterial surface contamination in the process. The key to getting a rich brown crust is to use a cast iron pan, which has a higher thermal mass than almost any other kind of pan (see the Metals, Pans, and Hot Spots sidebar in Chapter 2). When you drop the tuna onto the pan, the outside will sear and cook quickly while leaving as much of the center as possible in its raw state.
You’ll need 3–4 oz (75–100 grams) of raw tuna per person. Slice the tuna into roughly equal-sized portions, since you’ll be cooking them one or two at a time.
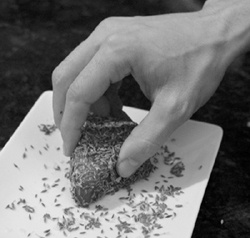
On a flat plate, measure out 1 tablespoon cumin seed and ½ teaspoon (2g) salt (preferably a flaky salt such as Malden sea salt) per piece of tuna. On a second plate, pour a few tablespoons of a high-heat-stable oil, such as refined canola, sunflower, or safflower oil.
Place a cast iron pan on a burner set as hot as possible. Wait for the pan to heat up thoroughly, until it just begins to smoke.
For each serving of tuna, dredge all sides in the cumin/salt mix, and then briefly dip all sides in the oil to give the fish a thin coating.
Sear all sides of the fish. Flip to a new side once the current facedown side’s cumin seeds begin to brown and toast, about 30 to 45 seconds per side.
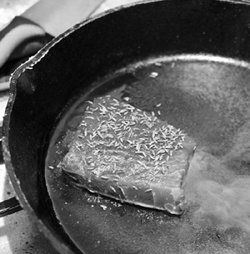
Slice into ⅓” (1 cm) slices and serve as part of a salad (place fish on top of mixed greens) or main dish (try serving with rice, risotto, or Japanese udon noodles).
Notes
Keep in mind that the temperature of the pan will fall once you drop the tuna in it, so don’t use a piece of fish too large for your pan. If you’re unsure, cook the fish in batches.
Use coarse sea salt, not rock (kosher) salt or the table salt you’d find in a salt shaker. The coarse sea salt has a large, flaky grain that prevents all of the salt from touching the flesh and dissolving.
144°F / 62°C: Eggs Begin to Set
The lore of eggs is perhaps greater than that of any other food item, and more than one chef has gone on record judging others based on their ability—or inability—to cook an egg. Eggs are the wonder food of the kitchen—they have a light part, a dark part, and bind the culinary world together. Used in both savory and sweet foods, they act as binders holding together meatloaf and stuffing; as rising agents in soufflés, certain cakes, and cookies like meringues; and as emulsifiers in sauces like mayonnaise and hollandaise. Eggs provide structure to custards and body to ice creams. And all of this so far doesn’t even touch on their flavor or the simple joys of a perfectly cooked farm egg. Simply put, I cannot think of another ingredient whose absence would bring my cooking to a halt faster than the simple egg.
Egg whites are composed of dozens of different types of proteins, and each type of protein begins to denature at a different temperature. In their natural “native” state, you can think of the proteins as curled-up little balls. They take this shape because portions of the molecular structure are hydrophobic—the molecular arrangement of the atoms making up the protein is such that regions of the protein are electromagnetically repulsed by the polar charge of water.
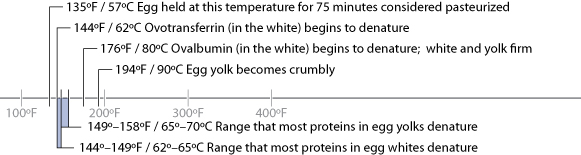
Because of this aversion to water, the protein structure folds up on itself. As kinetic energy is added to the system—in the form of heat or mechanical energy (e.g., whipping egg whites)—the structure starts to unfold as kinetic energy overtakes potential energy. The unfolded proteins then get tangled together, “snagging” around other denatured proteins and coagulating to form a linked structure. This is why a raw egg white is liquid, but once cooked becomes solid. (Well, technically, raw egg white is a gel that coagulates into a solid-like substance when heated. We’ll get to gels in Chapter 6.)
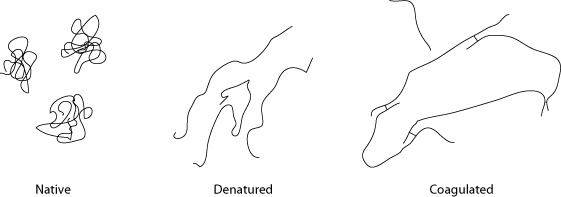
Hydrophobic proteins in their native state (left) remain curled up to avoid interacting with the surrounding liquid. Under heat, they denature (center) and uncurl as the kinetic energy exceeds the weaker level of energy generated by water molecules and regions of the proteins that repel each other. Once denatured and opened up, the hydrophobic parts of the protein that were previously unexposed can interact and bond with other proteins.
The most heat-sensitive protein is ovotransferrin, which begins to denature at around 144°F / 62°C. Another protein, ovalbumin, denatures at around 176°F / 80°C. These two proteins also are the most common in egg whites: ovotransferrin accounts for 12% of the proteins in an egg white and ovalbumin 54%. This explains the difference between soft-boiled and hard-boiled (“hard-cooked”) eggs. Get that egg up to about 176°F / 80°C for sufficient time, and voilà, the white is hard cooked; below that temperature, however, the ovalbumin proteins remain curled up, leaving the majority of the egg white in its “liquid” state.
Note
Most of the proteins in egg yolks set at between 149°F / 65°C and 158°F / 70°C, although some set at lower temperatures.
 Proteins in foods such as eggs don’t denature
instantaneously once they reach denaturation temperature. This is an
important point. Some cooking newbies have the mental model that
cooking an egg or a piece of meat is something like melting an ice
cube: all ice below a certain temperature, ice and water at the
freezing/melting point, and all water above that temperature. From a
practical perspective in the kitchen, it’s not an entirely incorrect
picture, because heat pours into the foods so quickly that the subtle
differences between a few degrees aren’t obvious. But as heat is
transferred into the food more slowly, the subtleties of these
chemical reactions become more noticeable. And unlike melting an ice
cube, where increasing the heat transfer by a factor of two causes the
ice to melt in half the time, cooking foods do not respond to
additional energy in a linear fashion.
Proteins in foods such as eggs don’t denature
instantaneously once they reach denaturation temperature. This is an
important point. Some cooking newbies have the mental model that
cooking an egg or a piece of meat is something like melting an ice
cube: all ice below a certain temperature, ice and water at the
freezing/melting point, and all water above that temperature. From a
practical perspective in the kitchen, it’s not an entirely incorrect
picture, because heat pours into the foods so quickly that the subtle
differences between a few degrees aren’t obvious. But as heat is
transferred into the food more slowly, the subtleties of these
chemical reactions become more noticeable. And unlike melting an ice
cube, where increasing the heat transfer by a factor of two causes the
ice to melt in half the time, cooking foods do not respond to
additional energy in a linear fashion.
You might find it easiest to think of the different proteins in foods as having particular temperatures at which they denature, and try to shoot for a target temperature just above that of the proteins you do want denatured. Just remember: there’s more to a piece of meat or egg than one type of protein or connective tissue, and the different proteins have different temperature points at which they’re likely to denature.
Here are some examples of cooking eggs that show how to take advantage of the thermal properties of different portions of the egg.
Hard-Cooked Eggs, Shock and Awe Method
There’s a silent war of PC-versus-Mac proportions going on over the ideal way to make hard-cooked eggs. Should you start in cold water and bring the water up to a boil with the eggs in them, or should you drop the eggs into already boiling water? The cold-start approach yields eggs that taste better, while the boiling-water approach yields eggs that are easier to peel. But can you have both?
Thinking about the thermal gradient from shell to center of egg, it would make sense that cooking an egg starting in cold water would result in a more uniform doneness. The delta between the center and outer temperatures will be smaller, meaning that the outer portion won’t be as overcooked once the center is set compared to the boiling-water method.
The conjecture for ease of peeling in the boiling water approach is that the hot water “shocks” the outer portion of the egg. Into industrial-grade cooking? Steam ’em at 7.5 PSI over atmospheric pressure and quick-release the pressure at the end of cooking to crack the shell. (Hmm, I wonder if one could do this in a pressure cooker...) But what about the rest of us? What if we shock the outside, and then cook in cold water?
Try it. Place your eggs into rapidly boiling water. After 30 seconds, transfer the eggs to a second pot containing cold tap water, bring to a boil, and then simmer. The second-stage cooking time will take about two minutes less than the normal cold-start approach. Cook for 8 to 12 minutes, depending upon how well cooked you like your eggs.
The 30-Minute Scrambled Egg
This method involves ultra-low heat, continuous stirring, and a vigilant eye. I wouldn’t suggest this as an everyday recipe, because it takes a while to make, but after however many years of eating eggs, it’s nice to have them cooked a new way. Cooking the eggs over very low heat while continuously stirring breaks up the curds and allows for cooking the eggs to a point where they’re just cooked, giving them a flavor that can be described as cheese or cream-like. It’s really amazing, and while the thought of “cheese or cream-like” eggs might not have you racing off to the kitchen, it’s really worth a try!
In a bowl, crack two or three eggs and whisk thoroughly to combine the whites and yolks. Don’t add any salt or other seasonings; do this with just eggs. Transfer to a nonstick pan on a burner set to heat as low as possible.
Stir continuously with a silicone spatula, doing a “random walk” so that your spatula hits all parts of the pan. And low heat means really low heat: there’s no need for the pan to exceed 160°F / 71°C, because enough of the proteins in both the yolks and whites denature below that temperature and the proteins will weep some of their water as they get hotter. If your heat source is too hot, pull the pan off the stovetop for a minute to keep it from overheating. If you see any curds (lumps of scrambled eggs) forming, your pan is getting too hot.
Continue stirring until the eggs have set to a custard-like consistency. When I timed myself, this took about 20 minutes, but you might reach this point in as few as 15 minutes or upward of half an hour.
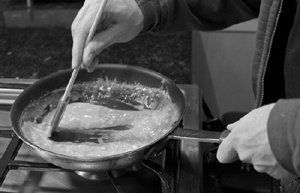
Oven-Poached Eggs
Here’s a simple way to cook eggs for a brunch or appetizer. In an individually sized oven-safe bowl (ideally, one that you can serve in), add:
Breakfast version | Dinner version |
1 cup (30g) fresh chopped spinach | ½ cup (100g) crushed tomatoes |
3 tablespoons (20g) grated mozzarella cheese | ¼ cup (50g) black beans (canned are easiest) |
3 tablespoons (40g) heavy cream | ½ cup (50g) grated mozzarella cheese |
4 teaspoons (20g) butter |
Create a “well” in the center of the ingredients by pushing the food into a ring around the edges of the bowl. Crack two eggs into the well, add a pinch of salt and some fresh ground pepper, cover with aluminum foil, and bake in a preheated oven set to 350°F / 180°C until the egg is set, about 25 minutes. (You can use a probe thermometer set to beep at 140°F / 60°C.) Try adding some crushed red pepper flakes to the breakfast version or sriracha sauce to the dinner version.
Pasteurized Eggs
While salmonella is quite rare in uncooked eggs, with estimates being somewhere around 1 in 10,000 to 20,000 eggs carrying the bacteria, it does occur in the laying hen populations of North America. If you’re cracking a few dozen eggs into a bowl for an omelet brunch at your local hacker house every week, let’s just say that odds are you’ll eventually crack a bad egg. Luckily, this isn’t a problem if those eggs are properly cooked and cross-contamination is avoided.
The real risk for salmonella in eggs is in dishes that use undercooked eggs that are then served to at-risk populations (e.g., infants, pregnant women, elderly or immunocompromised people). If you’re making a dish that contains raw or undercooked eggs—Caesar salad, homemade eggnog, mayonnaise, raw cookie dough—and want to serve that dish somewhere where there might be at-risk individuals, you can pasteurize the eggs (assuming your local store doesn’t happen to carry pasteurized eggs, but most don’t). Pasteurized eggs do taste a little different, and the whites take longer to whip into a foam, so don’t expect them to be identical to their raw counterparts.
Since salmonella begins to die at a noticeable rate around 136°F / 58°C and the proteins in eggs don’t begin to denature until above 141°F / 61°C, you can pasteurize eggs to reduce the quantity of salmonella, should it be present, to an acceptable level by holding the egg at a temperature between these two points. The FDA requires a 10,000-fold reduction (5 log10 in food safety lingo), which can be achieved by holding the egg at 141°F / 61°C for 3.5 minutes (according to Margaret McWilliams’s Foods: Experimental Perspectives, Fifth Edition, from Pearson Publishing). Most consumers won’t have the necessary hardware to do this at home, but if you do have a sous vide setup, as described in Chapter 7, you’re golden.
The 60-Minute Slow-Cooked Egg
Going back to our earlier discussion of time and temperature, when food is left in an environment long enough, its temperature will come to match that of its environment. Therefore, if we immerse an egg in water held at 145°F / 62.7°C, it follows that the proteins in the white and the yolk that denature at or below that temperature will denature and coagulate, and those that denature above that temperature will remain unaltered.
The added benefit of this method is that the egg cannot overcook. “Cooking” is effectively the occurrence of chemical reactions in the food at different temperature points, and holding the egg at 145°F / 62.7°C will not trigger any reactions that don’t occur until higher temperatures are reached. This is the fundamental concept of sous vide cooking. We’ll cover the details of sous vide in Chapter 7, so you may want to take a peek at that chapter now or make a mental note to come back to this section when you get there. For a sous vide–style cooked egg, immerse an egg in water that is maintained at 145°F / 62.7°C for one hour. As you’ll see, sous vide cooking has some incredible properties that greatly simplify the time and temperature rule.
Note
Your average, run-of-the-mill (or is that run-of-the-yard?) chicken laid only 84 eggs per year a century ago. By the turn of the millennium, improvements in breeding and feed had pushed this number up to 292 eggs per year—almost 3.5 times more. And, no, science has not yet figured out which came first.
154°F / 68°C: Collagen (Type I) Denatures
An animal’s connective tissues provide structure and support for the muscles and organs in its body. You can think of most connective tissues—loose fascia and ligaments between muscles as well as other structures such as tendons and bones—as a bit like steel reinforcement: they don’t actively contract like muscle tissue, but they provide structure against which muscles can pull and contract.
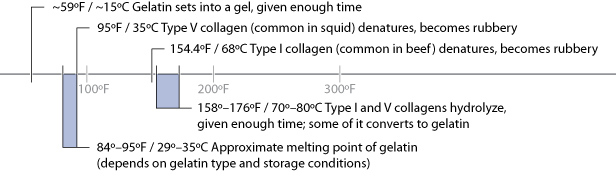
The most common type of protein in connective tissue is collagen, and while there are several types of collagen in animals, from a culinary perspective, the main chemical difference between the different types of collagen is the temperature at which they denature. In cooking, collagen shows up in two different ways: either as discrete chunks (e.g., tendons, silverskin) outside of the muscle, or as a network that runs through the muscle. Regardless of its location, collagen is tough (it provides structure, after all) and becomes palatable only given sufficient time at sufficiently high temperatures.
It’s easy to deal with collagen that shows up as discrete pieces: get rid of it by cutting it off. For cuts of meats that have a thin layer of connective tissue on them (called silverskin, presumably because of its somewhat iridescent appearance), cut off as much as possible and discard it. Beef tenderloin cuts commonly have a side with this layer; trim off as much as possible before cooking.
Chicken breasts also have a small but noticeable tendon connected to the chicken tenderloin. Uncooked, it’s a pearlescent white ribbon. After cooking, it turns into that small white rubber-band-like thing that you can chew on endlessly yet never get any satisfaction from. Generally, this type of collagen is easy to spot, and if you miss it, it’s easy to notice while eating and can be left on the plate.
However, for the other kind of collagen found in some cuts of meat—collagen that forms a 3D network through the muscle tissue—the only way to remove it is to convert it to gelatin via long, slow cooking methods. Unlike muscle proteins—which in cooking are either in a native (i.e., as they are in the animal), denatured, or hydrolyzed state—collagen, once hydrolyzed, can enter a coagulated (gelled) state. This property opens up an entirely new world of possibilities, because gelatin gives meats a lubricious, tender quality and provides a lip-smacking goodness.
In its native form, collagen is like a rope: it’s a linear molecule composed of three different strands that are twisted together. The three strands are held together by weak secondary bonds (but there are a lot of them!) and stabilized by a small number of crosslinks, which are stronger covalent bonds.
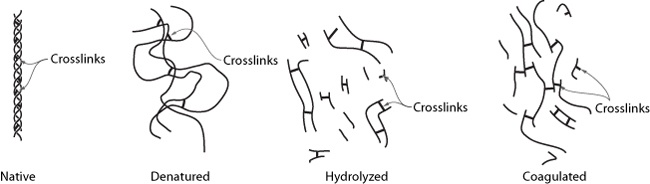
Collagen in its native form is a triple helix, held together in its helical structure by secondary bonds (left) and stabilized by crosslinks. Under heat, the secondary bonds break and the protein becomes denatured, but the crosslinks between the strands continue to hold the structure together (second from left). Given sufficient heat and time, the strands in the triple helix themselves break down via hydrolysis (third from left) and, upon cooling, convert to a loose network of molecules (right) that retains water (a gel).
Note
Covalent bonds are bonds where the electrons from an atom in one location are shared with another atom.
In addition to being crosslinked, the strands also form a helical structure because of secondary bonds between different regions of the same molecules. You can think of it something like a braided rope, where each strand wraps around the other two strands. It has a “curl” to it because the internal structure finds its optimal resting place in that shape.
Under the right conditions—usually, exposure to heat or the right kinds of acids—the native form of collagen denatures, losing its linear structure and untwisting into a random mess. With the addition of sufficient heat, the molecules in the structure will vibrate enough to overcome the electromagnetic energy that caused the structure to twist up in the first place, leading it to lose its helical structure and denature.
Acids can also denature the collagen protein: their chemical properties provide the necessary electromagnetic pull to disrupt the secondary bonds of the helical structure. It’s only the twisting that goes away during denaturing in collagen; the crosslinks remain in place and the strands remain intact. In this form, collagen is like rubber—it actually is a rubber from a material science point of view—and for this reason, you’ll find its texture, well, rubbery.
Given even more heat or acid, though, the collagen structure undergoes another transformation: the strands themselves get chopped up and lose their backbone, and at this point the collagen has no real large-scale structure left. This reaction is called hydrolysis: thermal hydrolysis in the case of heat, acid hydrolysis in the case of, you guessed it, acid. (Think ceviche. See the section on Acids and Bases in Chapter 6 for more.)
It’s possible to break up the collagen chemically, too: lysosomal enzymes will attack the structure and “break the covalent bonds” in chem-speak, but this isn’t so useful to know in the kitchen.
Note
For fun, try marinating a chunk of meat in papaya, which contains an enzyme, papain, that acts as a meat tenderizer by hydrolyzing collagen.
One piece of information that is critical to understand in the kitchen, however, is that hydrolysis takes time. The structure has to literally untwist and break up, and due to the amount of energy needed to break the bonds and the stochastic processes involved, this reaction takes longer than simply denaturing the protein.
Hydrolyzing collagen not only breaks down the rubbery texture of the denatured structure, but also converts a portion of it to gelatin. When the collagen hydrolyzes, it breaks into variously sized pieces, the smaller of which are able to dissolve into the surrounding liquid, creating gelatin. It’s this gelatin that gives dishes such as braised ox tail, slow-cooked short ribs, and duck confit their distinctive mouthfeel.
Since these dishes rely on gelatin for providing that wonderful texture, they need to be made with high-collagen cuts of meat. Trying to make a beef stew with lean cuts will result in tough, dry meat. The actin proteins will denature (recall that this occurs at temperatures of 150–163°F / 66–73°C), but the gelatin won’t be present in the muscle tissue to mask the dryness and toughness brought about by the denatured actin. Don’t try to “upgrade” your beef stew with a more expensive cut of meat; it won’t work!
“Great,” you might be thinking, “but how does any of this tell me whether I need to slow-cook a piece of meat?” Think about the piece of meat (or fish or poultry) that you’re working with and consider what part of the animal it comes from. For a land-based animal, those regions of the animal that bear weight generally have higher levels of collagen. This should make sense: because the weight-bearing portions have a higher load, they need more structure, so they’ll have more connective tissue. This isn’t a perfect rule of thumb, though, and cuts of meat generally have more than one muscle group in them.
For animals like fish, which don’t have to support their weight on land, the collagen levels are much lower. Squid and octopus are notable exceptions to this weight-bearing rule, because their collagen provides the equivalent support that bone structures do for fish.
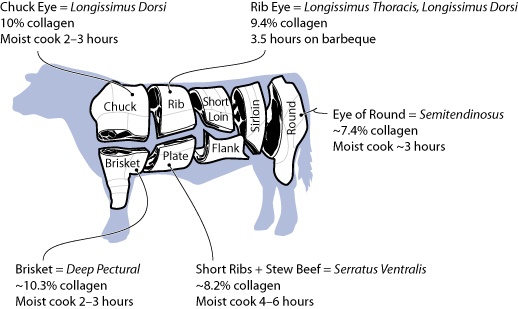
Note
Older animals have higher levels of collagen. As animals age, the collagen structure has more time to form additional crosslinks between the strands in the collagen helix, resulting in increased toughness. This is why older chickens, for example, are traditionally cooked in long, slow roasts. (The French go so far as to use different words for old versus young chickens: poule instead of poulet.) Most commercial meat, however, is young at time of slaughter, so the age of the animal is no longer an important factor.
The other easy rule of thumb for collagen levels is to look at the relative price of the meat: because high-collagen cuts require more work to cook and come out with a generally drier texture, people tend to favor other cuts, so the high-collagen cuts are cheaper.
Squid was a culinary mystery to me for a long time. You either cook it for a few minutes or an hour; anywhere in between, and it becomes tough, like chewing on rubber bands. (Not that I chew on rubber bands often enough to say what that’s like.) Why is this?
The collagen in squid and octopus is enjoyable in either its native state or hydrolyzed state, but not in its denatured state. It takes a few minutes to denature, so with just a quick pan sear it remains in its native state (tossed with some fresh tomatoes and dropped on top of bruschetta, it’s delicious). And hydrolysis takes hours to occur, so a slowly simmered braised octopus turns out fine. Braising it in tomatoes further helps by dropping the pH levels, which accelerates the hydrolysis process.
To make a simple squid bruschetta, start by preparing a loaf of French or Italian bread by slicing it into ½” (1 cm) slices. You can create larger slices by cutting on a bias. (Save the triangular end piece for munching on when no one is looking.) Lightly coat both sides of the bread with olive oil (this is normally done with a pastry brush, but if you don’t have one, you can either fold up a paper towel and “brush” with it or pour olive oil onto a plate and briefly dip the bread into the oil). Toast the bread. A broiler works best (the slices of bread should be 4–6” / 10–15 cm from the heat). Flip as soon as they begin to turn golden brown. If you don’t have a broiler, you can use an oven set to 400°F / 200°C. For small batches, a toaster also works.
Once your bread is toasted, place it on a plate and store it in the oven (with the heat off) so that it remains warm.
Prepare the squid:
1 lb (500g) squid (either a mix of bodies and tentacles or just bodies)
Slice the squid with a knife or, better yet, cut it into bite-sized pieces using kitchen shears.
Bring a sauté pan up to medium heat. You want the pan hot enough so that the squid will quickly come to temperature. Add a small amount of olive oil—enough to coat the pan thinly when swirled—and drop the squid into the pan.
Use a wooden spoon or silicone spatula to stir the squid. Take note when it starts to turn white—it should become subtly less translucent—and cook for another 30 seconds or so. Add to the pan and toss to combine:
1 cup (250g) diced tomato (about 2 medium tomatoes, seeds removed)
1 tablespoon (2g) fresh herbs such as oregano or parsley
¼ teaspoon sea salt
Ground pepper to taste
Transfer squid and tomato topping to a bowl and serve with toasted bread.

Short ribs and other high-collagen cuts of meat aren’t difficult to work with, they just require time at temperature (collagen takes many hours to hydrolyze). The trick is to cook this type of meat “low and slow”—for a long time at low temperature. Too cold, and the collagen won’t break down; too hot, and the water in the meat will evaporate, drying it out. Using a slow cooker cooks the meat in the ideal temperature range. After all, this is what they’re designed for!
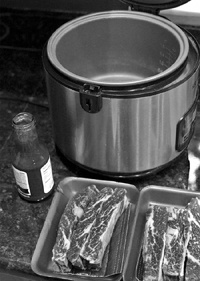
This is an intentionally easy recipe, but don’t let this fool you: slow-cooked meats can be amazingly good, and if you’re cooking for a dinner party, they make for easy work when you go to assemble the dinner. If you have a rice cooker, check to see if it has a “slow-cook” setting. In this mode, the rice cooker will heat foods to a temperature typically between 170–190°F / 77–88°C, which is warm enough to be safe from bacterial contamination and cool enough to not steam-dry the meat.
Pour a bottle of barbeque sauce into the bowl of the rice cooker or slow cooker. Add the short ribs, arranging them in a layer so that the barbeque sauce covers the meat.
Slow-cook for at least four hours (longer is fine). Try starting this in the morning before going to work—the slow cooker will keep the food safe, and the extra time will help ensure that the collagen is fully dissolved.
Notes
Ideally, you should pan sear the short ribs (in a cast iron pan) for a minute or two before cooking. As discussed at the beginning of this chapter, this will cause browning reactions, bringing a richness to the final product.
Keep in mind the danger zone rule covered earlier. Don’t load up a slow cooker with so much cold meat that the cooker will be unable to raise the temperature above 140°F / 60°C within a two-hour period.
Try adding other ingredients to the sauce, or making your own sauce if you like. I’ll often pour a tablespoon or so of wine or port into the empty BBQ sauce jar to “rinse out” the thick sauce, then pour the port-sauce slurry into the slow cooker.
Duck confit—duck legs cooked in fat—tastes entirely different from duck cooked almost any other way. It’s like bacon and pork—to quote Homer Simpson, they’re from “some wonderful, magical animal.” Good duck confit is succulent, flavorful, tender, mouth-watering, and perhaps a bit salty. Even if you’re not otherwise a fan of duck, give duck confit a chance.
As you can probably tell, I’m a pragmatic cook. Traditional recipes for duck confit prescribe a long, drawn-out affair, which is fine for a leisurely Sunday afternoon spent in the company of friends and a bottle of good wine, but doesn’t line up well with my idea of keeping things simple.
Cooking duck “confit-style” is all about converting tough collagen proteins into gelatin. While this isn’t a fast chemical reaction, it’s a simple one to trigger: hold the meat at a low temperature for long enough, and the collagen proteins denature and eventually hydrolyze.
The secret to duck confit is in the time and temperature, not the actual cooking technique. The upshot? You can make duck confit in a slow cooker or in an oven set at an ultra-low temperature. The fat that the duck is cooked in doesn’t matter either; some experiments have shown that duck confit cooked in water and then coated in oil is indistinguishable from traditionally cooked duck confit. Regardless, definitely skip the exotic block of duck fat; duck legs are expensive enough as it is.

Rub salt into the outside of the duck legs, covering both the side with skin and the side with meat exposed. I use roughly 1 tablespoon (18g) of salt per duck leg; you want enough to coat the outside thoroughly.
Place the salted duck legs in a bowl or plastic bag and store them in the fridge for several hours to brine.
Note
Remember: store raw meats in the bottom of the fridge so if they drip the runoff won’t contaminate fresh produce or ready-to-eat foods.
Salting the meat adds flavor and draws out a little bit of the moisture, but if you’re in a real rush, you can skip this step and just lightly coat the duck legs with a few pinches of salt.
After dry-brining the duck legs, wash off all the salt. At this point, you have a choice of heat sources. Duck confit is about cooking via convection heat with the energy being imparted into the meat by the surrounding fat. Regardless of heat source, the duck legs should be entirely submerged in oil. With careful arrangement and the right size pan, you’ll find that it doesn’t take much oil to cover them. I generally use olive or canola oil and save the oil after cooking for use in other dishes.
Note
Note that the oil after cooking will be a blend of duck fat and your starting oil. You can also use it for things like sautéing greens and shallow-frying potatoes.
- Slow-cooker method
Arrange duck legs in bowl of slow cooker or multipurpose rice cooker. Cover with oil and set to slow-cook mode for at least 6 hours (preferably 10 to 12).
- Oven method
Arrange duck legs in an oven-safe pan and cover with oil. Place in oven set at 170°F / 77°C for a minimum of six hours. (200°F / 95°C will work, but avoid anything hotter to prevent steaming the meat.)
The duck legs will become more tender with longer cook times. I’ve cooked batches of 36 duck legs overnight using a large pot held at temperature in an oven. If you do cook a large batch, remember that the core temperature needs to get to about 140°F / 60°C within two hours. In this case, heat the oil up to ~250°F / 120°C before placing the duck legs in it. This way, the hot oil will impart a solid thermal kick to get the cold legs up to temperature faster.
After cooking, the duck skin will still be flabby and, frankly, gross. But the meat should be tender and yield with a bit of poking. You can either remove the skin (pan sear it by itself for duck lardons!) or score the skin with a knife and then pan sear the skin side of the duck to crisp it up.
If you are not going to use the duck legs straightaway, store them in the fridge.
Notes
Traditional recipes call for duck fat instead of olive oil. One advantage to the duck fat is that, upon cooling to room temperature, it solidifies, encasing and sealing the duck leg in a sterilized layer of fat, somewhat like how some jams are preserved with a wax seal. If you were living in France a century ago, this would’ve been a great way to preserve duck legs for a long winter, but with the invention of refrigeration and modern grocery stores, there’s no need for the duck fat to store the meat safely for the few days it might last. Use olive oil. It’s cheaper and healthier.
If you pour off the oil and liquid into another container, a layer of gelatin will separate out on the bottom once it cools. Use that gelatin! Try tossing it into soups.
158°F / 70°C: Vegetable Starches Break Down
Whereas meat is predominately proteins and fats, plants are composed primarily of carbohydrates such as cellulose, starch, and pectin. Unlike proteins in meat, which are extremely sensitive to heat and can quickly turn into shoe leather if cooked too hot, carbohydrates in plants are generally more forgiving when exposed to higher temperatures. (This is probably why we have meat thermometers but not vegetable thermometers.)
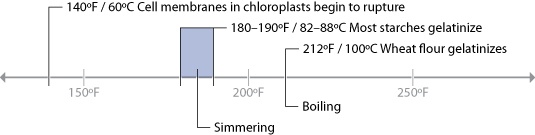
Cooking starchy vegetables such as potatoes causes the starches to gelatinize (i.e., swell up and become thicker). In their raw form, starches exist as semicrystalline structures that your body can only partially digest. Cooking causes them to melt, absorb water, swell, and convert to a form that can be more easily broken down by your digestive system.
As with most other reactions in cooking, the point at which starch granules gelatinize depends on more than just the single variable of temperature. The type of starch, the length of time at temperature, the amount of moisture in the environment, and processing conditions all impact the point at which any particular starch granule swells up and gelatinizes. See the section Making gels: Starches in Chapter 6 for more about starches and gelatinization.
Leafy green vegetables also undergo changes when cooked. Most noticeably, they lose their green color as the membranes around the chloroplasts in the cells rupture. This same rupturing and damage to the cell structure is what improves the texture of tougher greens such as Swiss chard and kale.
For starchy plants (think potatoes), cook them so that they reach the temperature at which they gelatinize, typically in the range of 180–190°F / 92–99°C. For green leafy plants, sauté the leaves above 140°F / 60°C to break down the plant cell structure.
Note
Cellulose—a.k.a. fiber—is completely indigestible in its raw form and gelatinizes at such a high temperature, 608–626°F / 320–330°C, that we can ignore it while discussing chemical reactions in cooking.
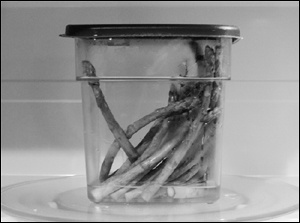
Microwave ovens make quick work of cooking veggies. In a microwave-safe container, place asparagus stalks with the bottoms trimmed or snapped off, and add a thin layer of water to the bottom. Put the lid on, but leave it partially open so that steam has a place to escape. Microwave for two to four minutes, checking for doneness partway through and adding more time as necessary.
Notes
This technique cooks the food using two methods: radiant heat (electromagnetic energy in the form of microwaves) and convection heat (from the steam generated by heating the water in the container). The steam circulates around the food, ensuring that any cold spots (areas missed by the microwave radiation) get hot enough to both cook the food and kill any surface bacteria that might be present.
Try adding lemon juice, olive oil, or butter and sautéed, crushed garlic to the asparagus.
Pectin is a polysaccharide found in the cell walls of land plants that provides structure to the plant tissue. It breaks down over time, which is why riper fruits become softer.
Cooking also breaks down pectin, and as a kitchen chemistry experiment, you can capture the pectin from cooked fruits. It’s an easy way to see that some food additives aren’t so industrial after all, at least not in their sources.
The pectin we use in cooking—primarily in jams and jellies, as a thickener—is divided into two broad types: low- and high-methoxyl. High-methoxyl pectin requires a high concentration of sugar in order to gel; low-methoxyl pectin will gel in the presence of calcium. (The difference between the two types has to do with the number of linkages in the molecular structure.)
If you’re making jams or jellies, using a low-methoxyl pectin (such as Pomona’s Pectin) removes the variable of sugar concentration. See Tim O’Reilly’s tips for making jam in Chapter 5 in Tim O’Reilly’s Scones and Jam.
Making your own pectin is similar to making your own gelatin: start with a couple of pounds of tissue, boil away, and then filter it out. Instead of animal bones, pectin comes from the “bones” of cell walls in plant tissue.
Start with a few pounds of crisp apples. (The firmer the better! They don’t need to be ripe.) Chop them into quarters and place the pieces in a stockpot. Cover with water and simmer on low for several hours, stirring occasionally. (This is exactly the way stock is made.) After several hours, you should have a slushy sauce. Filter this through a strainer. (See the section on filtration in Chapter 7 for tips.) The slimy liquid that you filter out is the pectin.
Using homemade pectin will be a bit trickier than Pomona’s Pectin, for two reasons. First, it’s high-methoxyl pectin, so you’ll need to have a proper balance of sugar in whatever you’re attempting to gel. And secondly, the concentration of pectin to water will be unknown, so you will have to experiment some. Add a small quantity and test if it gels; if not, add more. If the liquid pectin seems too thin, you can boil it down further to create a more concentrated pectin.
For more ideas and tips on testing homemade pectin, see http://www.wildflowers-and-weeds.com/The_Forager/pectin.htm.
In a sauté or nonstick pan preheated over medium heat, add:
1 bunch Swiss chard, collard greens, or other hardy leafy green vegetable; stems and thick veins removed, and sliced into 1” strips
2 tablespoons (26g) olive oil (enough to coat the pan)
Using tongs, quickly toss the greens to coat them with oil. Your pan should be reasonably hot so that the greens quickly heat, but not so hot that the oil burns. Continue tossing while cooking so that the greens wilt evenly. Add salt and pepper to taste.
Notes
Depending upon your tastes, extend this by adding one of these combinations:
5 cloves garlic, minced; juice from half a small lemon (about a teaspoon)
2 teaspoons balsamic vinegar, and possibly a pinch of sugar
1 teaspoon sherry vinegar, ¼ teaspoon crushed red pepper flakes, 1 can cannellini beans, 3 cloves garlic
¼ red onion, sliced thin and sautéed to cook; ½ apple sliced into bite-sized pieces and cooked; handful of chopped walnuts, toasted
The same technique can be applied to spinach (it’s great with sesame seeds). Or try cooking some strips of bacon, removing the bacon, and then sautéing the spinach in the rendered bacon fat, adding a teaspoon or so of balsamic vinegar. Dice the bacon and combine the two, and optionally add some blue (or other) cheese. Quantity of ingredients is really down to personal preference, so experiment!
You can strip the stem and thicker veins from hardy greens such as Swiss chard by grabbing the stalk with one hand and the green leaf portion with the other hand, and pulling the stalk out.
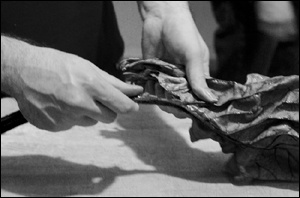
Poached pears are easy, tasty, and quick. And, at least compared to most desserts, they’re relatively healthy, or at least until the vanilla ice cream and caramel sauce are added. Much of our enjoyment of fruit comes from not just their flavor but also their texture. Consider an apple that’s lacking in crispiness or a banana that’s been bruised and become mushy: without their customary texture, their appeal is lost. But this isn’t always the case. Poaching fruits such as pears causes similar changes in the structure of the fruit’s flesh, breaking down cell walls and affecting the bonds between neighboring cells to create a softer texture that’s infused with the flavor of the poaching liquid.
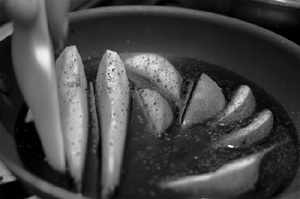
In a shallow saucepan or frying pan, place:
2 medium (350g) pears, sliced lengthwise (longitudinally) into eighths or twelfths, and core removed
1 cup (240ml) red wine
¼ teaspoon ground pepper
Set the pan over low to medium heat, bringing the wine to a simmer and then poaching the pears for 5 to 10 minutes, until soft. Flip them halfway through, so that both sides of the slices spend some time facedown in the liquid. Remove the pears and discard the liquid. (You can also reduce the liquid down into a syrup.)
Notes
Fun chemistry fact: the boiling point of wine is lower than that of water. The exact temperature depends upon the sugar and alcohol levels, and as the wine simmers, the ratios shift. It’ll start somewhere around 194°F / 90°C. It’s doubtful that this will actually help you avoid overcooking the pears, though.
Pears are one of those fruits that are underripe until you look away and then go rotten before you can look back. To encourage them to ripen, you can keep underripe pears in a paper bag so the plant tissue will be exposed to the ethylene gas they give off. I find I can get away with poaching pears that are a little more underripe than I might want to eat fresh, but your pears should be at least a little soft.
Try serving this with caramel sauce (see Caramel Sauce) and vanilla ice cream. Or try poaching other fruits, like fresh figs, and using other liquids. Figs poached in port or a honey/water syrup with a small amount of lemon juice and lemon zest added after poaching are sweet and tasty.
You don’t need to actually measure out the ingredients. As long as the pears have enough liquid to poach in, they’ll turn out great. Add freshly ground pepper to suit your tastes.
Grilling is as American as apple pie, which is to say that while it’s part of our culture, its roots can be traced back to somewhere on the other side of the Atlantic Ocean. Grilling became an American tradition after World War II, when one of the owners of Weber Brothers Metal Works came up with the Weber Grill and ignited a backyard pastime. What self-respecting geek wouldn’t have a good time playing with fire?
Whether a propane or charcoal grill is “better” depends on your usage. Propane grills are easier to fire up if you just want to cook a quick burger or roast a few veggies. Charcoal grills, on the other hand, take a bit more work to get going but create a hotter cooking environment that can lead to better flavor development (more Maillard reactions). Regardless of what you go for, grilling is a great way to cook relatively thin items such as skirt steaks, burgers, or sliced vegetables. You can also slow-cook larger items on a grill—I’ve enjoyed a few summertime afternoons drinking with friends while waiting for an entire hog to cook.
The second major difference between propane and charcoal grills is temperature. While propane itself burns at somewhere around 3100°F / 1700°C, by the time the heat dissipates around the grill, it cools down to about 650°F / 340°C. Using a generous but reasonable amount of wood or charcoal generates a heat source with a much higher amount of thermal radiation. When I’ve metered wood and charcoal grills, I’ve gotten temperatures around 850°F / 450°C.
Grilled veggies are a fantastic treat, and easy, too. While someone might yet find a way to make cucumber/lettuce kabobs work, it’s easier to stick with the classics: choose sturdy vegetables low in water content (e.g., asparagus, squash, bell peppers, onions).
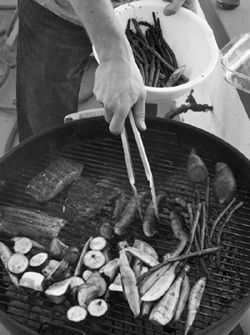
Slice your vegetables into large pieces and toss them into a bowl with a small quantity of olive oil and a few pinches of salt. You can get fancy with marinades and sauces, but if you’re working with great produce, it seems like a shame to mask the flavor.
I generally grill my burgers or whatever meat I’m cooking first, and grill the vegetables while the meat rests. Grill the veggies for a few minutes, flipping halfway through.
Slice a sweet potato into wedges. (Can’t find sweet potatoes? Look for yams. Americans use the word yam when they really mean Ipomoea batatas.)

Coat the outside with olive oil and sprinkle with coarse sea salt. Place on the grill for 10 minutes, flip, and grill until tender, about another 10 minutes. Serve while hot.
Instead of the olive oil/salt coating, you can make a sweet coating by brushing the wedges with a mixture of roughly equal parts of butter and honey melted together. Or try sprinkling red pepper flakes on the cooked wedges for a spicy version.
Aki Kamozawa and Alex Talbot write about their experiences with food on their blog (http://www.ideasinfood.com). A husband-and-wife team, they met while working at one of Boston’s premier restaurants, Clio, in 1997, and in recent years have run their own consulting business, educating chefs in new techniques and creative ideas.

How has having the blog changed your cooking?
It made us more meticulous about paying attention to what we were doing and recording recipes. People would constantly ask us questions, so we needed to have a good answer. Just throwing things in a pan and trying to explain that to someone else really didn’t work. Also, we get questions about a lot of different techniques, I think because we work with a lot of chefs. They’re more interested in how things work than they are with specific recipes.
Where does the inspiration for some of the more unusual approaches you blog about come from, such as using liquid nitrogen to freeze and shatter beets?
When you have stuff in your kitchen and you’re working with it, you just try. You try to figure out what you can do with it and what’s possible. With liquid nitrogen, back in science class they did the demonstration where they put the ball in the liquid nitrogen and then smashed it. So when you have it in your own kitchen, you try to break everything with it.
What advice would you give somebody who wants to learn to cook?
Really just to get in there and start cooking and not be afraid to fail. You probably learn more from failure than you do from success because when something goes right you don’t really think about how you did it or why it worked. But when something goes wrong and you have to fix it, then you learn a lot more about what’s happening.
Why do you think people have a fear of failure in the kitchen?
Because they have a fear of failure in life. Nobody wants to fail. Most people who are cooking at home and trying a new recipe are usually cooking for someone else. And if you screw up in the kitchen, it’s expensive—to ruin a whole thing of food and then you don’t have anything to eat? You have to have a sense of humor in the kitchen. You have to be able to laugh at yourself. You can always order a pizza.
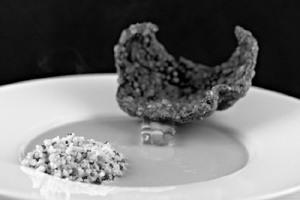
Sweet Corn and Miso Soup
Cleaned squid
3 pounds (1360g) whole squid
Separate the heads and bodies of the squid. Rinse the bodies under cold water to clean the interior and exterior. Remove the cartilage piece from inside each squid body. When the bodies are clean, pat dry and reserve in the refrigerator. Rinse the squid heads under cold water to remove any gritty material. Lay each head on a cutting board with the tentacles extending to the left. Cut the eyes and interior beak off the righthand side of the head. Discard the beak and eyes. Reserve the tentacles in the refrigerator.
~⅔ cup (145g) cleaned squid tentacles
~⅓ cup (80g) cleaned squid bodies
1 teaspoon (5g) squid ink
2 ½ cups (260g) tapioca flour
6 ½ cups (1.5 liters) canola oil for frying
Salt
Purée the squid tentacles, bodies, and ink in a food processor until it forms a smooth paste. Add the tapioca flour and pulse the mixture to evenly combine the tapioca into the squid paste. Turn the machine on and purée the mixture to form a sticky dough. Divide the dough between two large vacuum bags and seal on high pressure.
Use a rolling pin to spread the dough to the inside edges of the bag so that a uniform thickness is achieved. The dough should be about 1/10” / 2 mm thick. Place both bags in a steamer large enough to hold them and gently steam the dough for 25 minutes. After 25 minutes, remove the bags and cut them open. Carefully pull the dough out of the bags and lay it on dehydrator trays.
Dehydrate the sheets for several hours until the dough is completely dry and brittle. The dough will take on a shiny matte appearance. When the dough is dry, remove it from the dehydrator and break the sheet into pieces roughly 1½” / 4 cm wide and 3” / 8 cm long. This recipe makes more calamari crackers than are needed for the dish. You can reserve the dried cracker base in its dry form in a zip-top bag for several weeks.
In a medium-sized pot, heat 6 cups (1.5 liters) of canola oil to 350°F / 177°C. Slide the crackers two at a time into the oil. The crackers will sink to the bottom of the oil and then begin to puff and expand. Fry the crackling until it is completely puffed and there are no dark spots of unexpanded cracker dough. Remove the puffed cracklings from the oil and drain on a paper-towel-lined tray. Sprinkle with salt while still hot from the fryer.
Calamari couscous
~3 ½ cups (725g) cleaned squid bodies
5 cloves (20g) fresh garlic
Use a microplane grater to zest the garlic. Place the zested garlic and the cleaned squid bodies in a food processor. Purée the mixture into a coarse paste. When the mixture takes on a creamy texture and is almost homogenous, stop processing.
Heat a large, nonstick pan on medium heat. When the pan is heated, add the squid mixture. Stir the squid paste in the pan and continue to cook. The mixture will begin to stick to the pan. Use a heatproof rubber spatula to scrape the bottom of the pan and keep the mixture from sticking.
Continue to cook and stir the mixture. The squid will begin to lose its creamy texture and begin to firm up and form small squid pieces, which will resemble cooked sausage. As the squid continues to cook, it will exude liquid. Continue to cook the squid, allowing the moisture to evaporate until the mixture is dry.
Remove from heat. Place the squid in a shallow pan sitting on an ice bath to cool it quickly. When the cooked squid is cold, place it a food processor. Pulse the food processor to chop the squid nuggets into fine granules resembling couscous. Reserve the calamari couscous in the refrigerator.
Broiled corn planks
8 ears of corn, with husks
Lay the corn out on a sheet tray and broil on high heat for five minutes on each side. The husks will blacken. Keep watch over the corn to make sure that they do not catch on fire. Let the corn cool on top of the stove for 10 minutes.
Peel the husks and the silk from the corn. Cut each piece of corn in half. Stand each piece up vertically on the cut end and, using a sharp knife, slice the kernels away from the cobs. They will come away in large pieces and loose kernels. Set aside the 16 largest chunks.
Cut the large pieces of corn into planks ¾” / 2 cm wide and 2” / 5 cm long. The width may be adjusted so that the planks are three kernels wide. Place on a small plate or tray, cover with plastic wrap, and place in the refrigerator. Reserve the trim with the rest of the corn kernels in a covered bowl in the refrigerator. Reserve the cobs for corn stock.
Corn stock
8 corncobs
½ cup (150g) white miso paste
~2 cups (250g) sliced onion
6 ½ cups (1.5 liters) water
Cut the top tip and bottom end off each corncob and discard. Cut each corncob in half. Combine the corncobs, miso, onion, and water in a 6-quart pressure cooker. Cook at high pressure for 25 minutes. Allow the pressure to dissipate naturally.
Alternatively, combine all ingredients in a heavy-bottomed pot and bring to a simmer over medium heat. Cook for one hour, skimming as needed. Remove from the heat, cover, and let steep for 30 minutes. Strain the finished stock through a fine mesh conical strainer. Chill and reserve until needed.
Prepare the corn soup:
5 cups (1150g) corn stock
~7 cups (975g) broiled corn
⅔ (200g) white miso paste
Combine the cold corn stock and miso in a bowl and whisk gently to blend. Add the broiled corn. Transfer batches of this mixture to the blender. Purée each batch until it is completely smooth. Strain the soup through a fine mesh conical strainer. Refrigerate the soup in a covered container until needed.
Sliced chives
1 cup (50g) chives
Slice the chives into very thin (1 mm) rounds. Reserve.
Assembly
Place the soup in a large pot and gently bring to a simmer, stirring occasionally. Place the corn planks in a sauté pan over low heat and spoon several spoonfuls of warm soup over the planks. Gently cook until the planks are heated through, flipping once to make sure the top and bottom are both hot. In a small pot, heat the calamari couscous. Stir occasionally to prevent the couscous from sticking. When the couscous is hot, fold in the sliced chives.
In each bowl, stack two of the corn planks at the nine o’clock position extending into the center of the bowl. Spoon two spoonfuls of the calamari couscous on the inside edge of the bowl at the five o’clock position. Pour the soup into the bowls, leaving the second half of the top corn plank exposed. Place a calamari crackling on the edge of the bowl and the corn planks so that the corn planks are partially exposed and the crackling rests between the edge of the bowl and the corn planks. Serve immediately.
310°F / 154°C: Maillard Reactions Become Noticeable
The Maillard reaction turns foods brown and generates mostly pleasant volatile aromatic compounds. You can thank Maillard reactions for the nice golden-brown color and rich aromas of a Thanksgiving turkey, Fourth of July hamburger, and Sunday brunch bacon. If you’re still not able to conjure up the tastes brought about by Maillard reactions, take two slices of white bread and toast them—one until just before it begins to turn brown, the second until it has a golden-brown color—and taste the difference.
The nutty, toasted, complex flavors generated by the Maillard reaction are created by the hundreds of compounds formed when amino acids and certain types of sugars combine and then break down. Named after the French chemist Louis Camille Maillard, who first described it in the 1910s, the Maillard reaction is specifically a reaction between amino acids (from proteins) and reducing sugars, which are sugars that form aldehydes or ketone-based organic compounds in an alkaline solution (which allows them to react with the amines). Glucose, the primary sugar in muscle tissue, is a reducing sugar; sucrose (common table sugar) is not.
Maillard reactions aren’t solely dependent on temperature. Besides temperature, there are a number of other variables that affect the reaction rate. More alkaline foods undergo Maillard reactions more easily. Egg whites, for example, can undergo Maillard reactions at the lower temperatures and higher pressure found in a pressure cooker. The amount of water and the types and availability of reactants in the food also determine the rate at which Maillard reactions will occur. It’s even possible for Maillard reactions to happen at room temperature, given sufficient time and reagents: self-tanning products work via the same chemical reaction!
All things considered, though, in culinary applications—cooking at moderately hot temperatures for short periods of time—the 310°F / 154°C temperature given here serves as a good marker of when Maillard reactions begin to occur at a noticeable rate, whether you’re looking through your oven door or sautéing on the stovetop.
You might be the type who prefers to let the butcher do the butchering, but it’s worth learning how to butterfly a chicken (this is also known as spatchcocking), even if you’re squeamish about raw meat. A butterflied chicken is easy to cook, and the crispy brown skin of a well-cooked chicken has a very satisfying flavor from the Maillard reactions. It’s economical, too, yielding four to six meals for not much money and a few minutes of surgery.
A chicken that’s been cleaned and gutted is topologically a cylinder. It’s basically a big, round piece of skin and fat (outer layer), meat (middle layer), and bone (inner layer). Cooking a whole bird intact is harder than a butterflied bird, because invariably that cylinder is going to get heated from different directions at different rates. That is, unless you have a rotisserie grill, which heats the outside uniformly, cooks it uniformly, and makes it uniformly yummy.
By snipping the spine out of the chicken, you transform that cylinder into a plane of chicken—skin on top, meat in the middle, bone on the bottom. And the topology of such a surface is well suited to heat coming from a single direction (i.e., broiling), meaning it’s much easier to cook to develop a nice, brown, crispy skin.
Prepare your working space. I do this in a roasting pan, because it’s going to get dirty anyway. Unwrap the chicken, removing the organ meats (discard or save for something else), and fetch a pair of heavy-duty kitchen scissors. The chicken should be dry; if it’s not, pat dry with paper towels.
Flip the bird around so that the neck flap is facing you. With the scissors, cut down to the right side of the spine (or left side, if you’re left-handed). You shouldn’t have to apply that much force. Make sure you’re not cutting the spine itself, just to the side of it.
Once you’ve made the first cut, flip the bird around again—it’s easier to cut on the outer side of the spine—and cut down the second side.
Once the spine is removed (trash it, or save it in the freezer for making stock), flip the bird over, skin side up, and using both hands—left hand on left breast, right hand on right breast—press down to break the sternum so that the chicken lies flat. Formally speaking, you should remove the keel bone as well, but it’s not necessary. (The keel bone is what connects the two halves of the butterflied chicken together.)
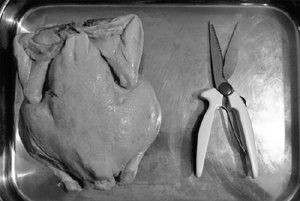
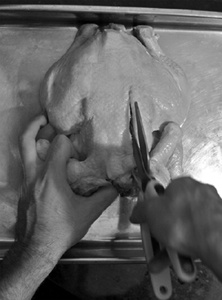
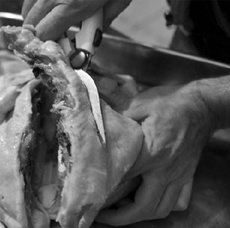

Now that you have a butterflied chicken, cooking it is straightforward. Because the skin is on one side and the bone on the other, you can use two different heat sources to cook the two sides to their correct level of doneness. That is, you can effectively cook the skin side until it’s brown from Maillard reactions, and then flip the bird over and finish cooking until a probe thermometer or manual inspection indicates that it is done.
Rub the outside of the butterflied chicken with olive oil and sprinkle it with salt. (The oil will prevent the skin from drying out while cooking.) Place the bird on top of a wire roasting tray in a roasting pan, skin side up. (The wire tray raises the bird up off the pan so that it doesn’t stew in the drippings that come out.) Tuck the wings up, over and under the breasts so that they’re not exposed to the broiler.
Broil at medium heat for about 10 minutes, or until the skin develops a nice level of brownness. Keep a good 6” / 15 cm between the bird and the heating element of your oven. If your broiler is particularly strong and parts of it begin to burn, you can create a “mini-heat shield” with aluminum foil.
Once the skin side has browned, flip the bird over (I use folded-over paper towels instead of tongs to avoid tearing the skin). Switch the oven to bake mode, at around 350°F / 177°C. Ideally, use a probe thermometer set to beep at 160°F / 71°C (carryover will take it up to 165°F / 74°C). If you don’t have a probe thermometer, check for doneness after around 25 minutes by cutting off one leg and checking that the juices run clear and the flesh looks cooked. If it’s not done, set the two halves back together and return it to the oven, checking periodically.
Notes
Some people like to brine their chickens. At the very least, it adds salt into the meat, changing the flavor. Try brining the chicken in a salt solution for half an hour or so (½ cup / 150g salt, 2 liters ice water—but really, you can just dump salt in water until it’s saturated). If you’re going to brine it for longer than an hour or so—longer times yield saltier chicken—use cold water (add ice!) and store it in the fridge to keep the chicken below 40°F / 4°C while it brines.
Alton Brown’s TV show Good Eats has an episode on butterflying a chicken. He creates a garlic/pepper/lemon zest paste to stuff under the skin, and roasts the chicken above a bed of cellar veggies (carrots, beets, potatoes). It’s a great recipe, as the paste brings a lot of flavor to the bird and the cellar roots pick up the chicken drippings. For another variation, try putting chopped garlic and aromatic herbs such as rosemary under the skin.
 For further inspiration, look
at Julia Child et al.’s Mastering the Art of French
Cooking, Volume 2 (Knopf), which has an excellent
description of Volaille
Demi-Désossée—half-boned chicken—starting in Chapter 6. She removes the breastbone
(leaving the spine intact), stuffs the bird (foie
gras, truffles, chicken livers, and rice), sews it
back up, and roasts it. As discussed in Chapter 3, looking
at historical recipes—both recent and older—is a great way to
understand food better.
For further inspiration, look
at Julia Child et al.’s Mastering the Art of French
Cooking, Volume 2 (Knopf), which has an excellent
description of Volaille
Demi-Désossée—half-boned chicken—starting in Chapter 6. She removes the breastbone
(leaving the spine intact), stuffs the bird (foie
gras, truffles, chicken livers, and rice), sews it
back up, and roasts it. As discussed in Chapter 3, looking
at historical recipes—both recent and older—is a great way to
understand food better.
Scallops are one of those surprisingly easy but often-overlooked items. Sure, fresh scallops can be expensive, but you only need a few for a quick appetizer or part of a meal.
Prepare the scallops for cooking by patting them dry with a paper towel and placing them on a plate or cutting board. If your scallops still have their bases attached, peel them off using your fingers and save them for some other purpose.
Note
Not sure what to do with those little side muscles attached to the main body of the scallop (scallop bases)? Pan fry them after you cook the scallop bodies and nibble on them when no one is looking.
Place a frying pan over medium-high heat. Once the pan is hot, melt about 15g / 1 tablespoon of butter—enough to create a thick coating—in the pan. Using a pair of tongs, place the scallops, flat side down, into the butter. They should sizzle when they hit the pan; if they don’t, turn the heat up.
Let them sear until the bottoms begin to turn golden brown, about two minutes. Don’t poke or prod the scallops while they’re cooking; otherwise, you’ll interfere with the heat transfer between the butter and scallop flesh. Once the first side is done cooking (you can use the tongs to pick one up and inspect its cooked side), flip the scallops to cook on the second flat side, again waiting until golden brown, about two minutes. When you flip them, place the scallops on areas of the pan that didn’t have scallops on them before. These areas will be hotter and have more butter; you can take advantage of this to cook the scallops more readily.
Once cooked, transfer the scallops to a clean plate for serving.
Notes
Try serving these scallops on top of a small simple salad—say, some arugula/rocket tossed with a light balsamic vinegar dressing and some diced shallots and radishes.
If you’re not sure if the scallops are done, transfer one to a cutting board and cut it in half. You can hide the fact that you checked for doneness by slicing all of the pieces in half and serving them this way. This lets you check that they’re all done as well.
You can dredge the uncooked scallops in breadcrumbs or another light, starchy coating. If you have wasabi peas, use either a mortar and pestle or blender to grind and transfer them to a plate for dredging the scallops.
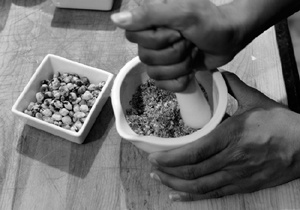
Sautéing vegetables will bring a pleasant nutty, toasted flavor to dishes such as braised short ribs.
In a skillet, cook at medium heat until browned, about 5 minutes:

Carrots, sliced into thin rounds or wedges no thicker than around ¼”/ 0.5 cm
Olive oil or butter to coat pan generously
Notes
Don’t overcrowd the pan. You need the outside of the carrots to get hot enough for the sugars to caramelize. If you put too many in the pan, they’ll end up steaming.
The olive oil or butter helps transfer heat. The oil creates a thin layer between the carrot and the pan surface, convecting heat between the two within that very thin layer.
You’ll probably want to add a pinch of salt as well. Try grinding on a hefty dose of black pepper. Glazed carrots are made by cooking them with sugar (try adding a tablespoon of brown sugar and a tablespoon of water), or by finishing the carrots with maple syrup. Fresh sage or other aromatic herbs can be julienned and tossed in at the end as well.
Skillet-Fried Potatoes
Frying potatoes in a heavy cast iron pan develops rich flavors from the starches breaking down and caramelizing. Try serving these potatoes with the butterflied chicken or as part of breakfast accompanied by eggs and bacon.
In a medium-sized pot, bring salted water to a boil and cook for 5 minutes:
3–4 medium (700g) potatoes, diced into “forkable” bite-sized pieces
Drain the potatoes and transfer to a heavy cast iron or enamel pan on a burner set to medium heat. Add:
2–4 tablespoons (25–50g) olive oil or other fat (leftover chicken, duck, or bacon fat tastes great)
1 teaspoon (6g) kosher salt
Stir every few minutes, flipping the potatoes so that the face-down sides have enough time to brown but not burn. Once most of the potatoes are browned on most sides, about 20 minutes, turn the heat down to low, add more oil or fat if necessary, and add:
2 teaspoons (4g) paprika
2 teaspoons (2g) dried oregano
1 teaspoon (2g) turmeric powder
Notes
This recipe uses two types of heat: first, boiling, to raise the temperature of the entire potato to quickly cook the starches, and then sautéing, to raise the temperature of the outside.
If you’re cooking this as part of a breakfast or brunch, try adding diced red bell peppers, yellow onions, and small chunks of bacon.
356°F / 180°C: Sugar Begins to Caramelize Visibly
Unlike the Maillard reaction, which requires the presence of both amino acids and sugars and has a number of interdependent variables influencing the particular temperature of reaction, caramelization (the decomposition via dehydration of sugar molecules such as sucrose) is relatively simple, at least by comparison. Pure sucrose melts at 367°F / 186°C; decomposition begins at lower temperatures (somewhere in the range of 320–340°F / 160–170°C) and continues up until around 390°F / 199°C. (Melting is not the same thing as decomposition—sucrose has a distinct melting point, which can be used as a clever way of calibrating your oven. For more, see The Two Things You Should Do to Your Oven RIGHT NOW of Chapter 2.)
Like the Maillard reaction, caramelization results in hundreds of compounds being generated as a sugar decomposes, and these new compounds result in both browning and the generation of enjoyable aromas in foods such as baked goods, coffee, and roasted nuts. For some foods, these aromas, as wonderful as they might be, can overpower or interfere with the flavors brought by the ingredients, such as in a light gingersnap cookie or a brownie. For this reason, some baked goods are cooked at 350°F / 177°C or even 325°F / 163°C so that they don’t see much caramelization, while other foods are cooked at 375°F / 191°C or higher to facilitate it.
When cooking, ask yourself if what you are cooking is something that you want to have caramelize, and if so, set your oven to at least 375°F / 191°C. If you’re finding that your food isn’t coming out browned, it’s possible that your oven is running too cold. If items that shouldn’t be turning brown are coming out overdone, your oven is probably too hot.
Fructose, a simpler form of sugar found in fruit and honey, caramelizes at a lower temperature than sucrose, starting around 230°F / 110°C. If you have other constraints on baking temperature (say, water content in the dough prevents it from reaching a higher temperature), you can add honey to the recipe. This will result in a browner product, because the largest chemical component in honey is fructose (~40% by weight; glucose comes in second at ~30%).

Here’s an easy experiment to do with kids (or on your own), and regardless of the results, the data is delicious! Since sugar caramelizes in a relatively narrow temperature range, foods cooked below that temperature won’t caramelize. Thus, when making sugar cookies, you can determine whether they will come out a light or dark brown.
Try cooking four batches of sugar cookies at 325°F, 350°F, 375°F, and 400°F (163°C, 177°C, 190°C, and 204°C). Those cooked below the 356–370°F / 180–188°C range will remain light-colored, and those cooked at a temperature above sucrose’s caramelization point will turn a darker brown. It’s nice when science and reality line up!
This isn’t to say hotter cooking temperatures make for better results than cooler ones. It’s a matter of personal preference. If you’re like some of my friends, you may think sugar cookies are “supposed” to be light brown and chewy, maybe because that’s the way your mom made them when you were growing up. Or maybe you like them a bit browner on the outside, like a rich pound cake.
Note that the flour used in sugar cookies contains some amount of proteins, and those proteins will undergo Maillard reactions, so cookies baked at 325°F / 163°C and 350°F / 177°C will develop some amount of brownness independent of caramelization.
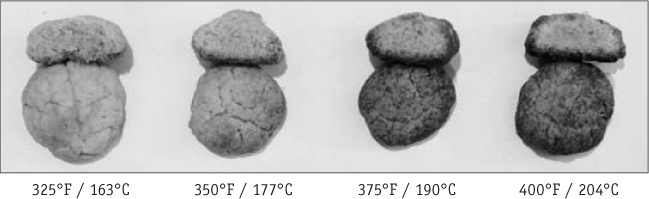
Goods baked at 325–350°F / 163–177°C | Goods baked at 375°F / 191°C and higher |
Brownies | Sugar cookies |
Chocolate chip cookies (chewy) | Peanut butter cookies |
Sugary breads: banana bread, pumpkin bread, zucchini bread | Chocolate chip cookies |
Cakes: carrot cake, chocolate cake | Flour and corn breads Muffins |
Temperatures of common baked goods, divided into those below and above the temperature at which sucrose begins to visibly brown. | |
Caramel sauce is one of those components that seems complicated and mysterious until you make it, at which point you’re left wondering, “Really, that’s it?” Next time you’re eating a bowl of ice cream, serving poached pears, or looking for a topping for brownies or cheesecake, try making your own.
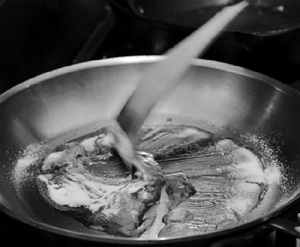
Traditional methods for making caramel sauce involve starting with water, sugar, and sometimes corn syrup as a way of preventing sugar crystal formation. This method is necessary if you are making a sugar syrup below the melting point of pure sucrose, but if you are making a medium-brown caramel sauce—above the melting point of sucrose—you can entirely skip the candy thermometer, water, and corn syrup and take a shortcut by just melting the sugar by itself.
In a skillet or large pan over medium-high heat, heat:
1 cup (240g) granulated sugar
Keep an eye on the sugar until it begins to melt, at which point turn your burner down to low heat. Once the outer portions have melted and begin to turn brown, use a wooden spoon to stir the unmelted and melted portions together to distribute the heat more evenly and to avoid burning the hotter portions.
Once all the sugar is melted, slowly add while stirring or whisking to combine:
1 cup (240g) heavy cream
Notes
This thing is a calorie bomb: 1,589 calories between the cup of heavy cream and cup of sugar. It’s good, though!
Some recipes call for adding corn syrup to the sugar as you heat it. This is because the sucrose molecules, which have a crystalline structure, can form large crystals and chunk up in the process of heating. The corn syrup inhibits this. If you heat the plain sugar with a watchful eye and don’t stir it until it gets hot enough, the corn syrup isn’t necessary. (It would be necessary, however, if you were only heating the sugar to lower temperatures—temperatures below the melting point—for other kinds of candy making.)
Try adding a pinch of salt or a dash of vanilla extract or lemon juice to the resulting caramel sauce.
Different temperature points in the decomposition range yield different flavor compounds. For a more complex flavor, try making two batches of caramel sauce, one in which the sugar has just barely melted and a second where the caramel sauce is allowed to brown a bit more. The two batches will have distinctly different flavors; mixing them together (once cooled) will result in a fuller, more complex flavor.
Sucrose has a high latent heat—that is, the sugar molecule is able to move and wiggle in many different directions. Because of this, sucrose gives off much more energy when going through the phase transition from liquid to a solid, so it will burn you much, much worse than many other things in the kitchen at the same temperature range. There’s a reason pastry chefs call this stuff “liquid Napalm.”
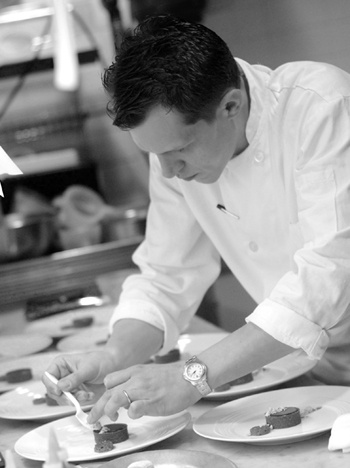
PHOTO USED BY PERMISSION OF MICHAEL LAISKONIS
Michael Laiskonis is the executive pastry chef at Le Bernardin, one of only four three-star Michelin restaurants in New York City. A self-proclaimed “accidental pastry chef,” he traveled around the United States extensively before working in a bakery, where he had his first big “aha” moment working with bread and discovered a passion for cooking.
What turned out to matter more than you expected? Just in the process of actually learning to cook.
I guess that when I started cooking it was just something to do and once I developed a passion for it, I realized that—and I don’t want to overromanticize it or attach some sort of Anthony Bourdain sort of thing to it, but you kind of enter a culture and it’s a completely different culture. I’m sure other professions have it. I’m sure software guys have it. It’s just a weird subculture and once you kind of enter that it becomes a lifestyle, not really a job.
That’s truly how I feel. With other professional cooks there are obviously colloquialisms and certain physical characteristics that they could have. And then there’s also the reality of long hours, bad hours. You’re working when everyone is playing; I’ve come to embrace it and now it’s just ingrained in the fabric of my being that it’s just—I’m a cook before anything else. It kind of informs everything I do and everything I see. I see through that lens of food. For an outsider that might sound a little creepy, but it’s the truth. So when I started cooking, I had no idea that it would take over my life or present so many opportunities to experience other things. I can’t imagine giving anything up.
Being from a software background—from one weird subculture to another weird subculture—I hear you. I would be curious how you would describe your weird subculture.
And actually I’ve spent time thinking about this: what is it about the actual craft of cooking or the act of cooking that does it, and a lot of it is the stress. Granted, it’s a self-imposed stress, meaning we’re not brain surgeons. We’re making people dinner, but dinner is important to a lot of people and especially at the highest ends there is a constant quest for perfection. You’re never going to attain perfect, but you can always push further. So I think it’s more of the environment of restaurant worlds that kind of informs a lot of that.
I think there is a lot to be said for the power of almost the meditative state that you get, even if you’re cooking alone, because you’re connecting with nature. You’re connecting with things. You’re making something with your hands. You’re hopefully making something greater than the sum of its parts. It’s something that you can’t fully describe in words.
It’s just what I do. My wife works in a different restaurant. She runs the front of the house, so my work and home life—there’s really no separation. We have the same schedule, we come home, and we talk about the business. We wake up and we talk about the business. So it’s a lifestyle.
As a pastry chef, are you more of a “by the recipe, exact measurements” type of cook or one who adds an ingredient and tastes, and makes course corrections as you go?
Both. I started in bread and kind of worked in pastry, but I bounced back and forth between each side of the kitchen, between sweet and savory, for a little over five years before I decided to stick with the pastry thing. There is a cliché that pastry chefs are the calm, measured, exacting, precise kind of person and the line cook or the savory chef is the spontaneous one. There is some truth to that. I think the lines are blurring a little bit, but it’s really cross- training that gave me a solid foot in both, being spontaneous and being precise. Too much spontaneity, and it’s just cook-and-see and you’re ultimately lucky if you get the results that you want, but there is that joy in being spontaneous or even taking it further and taking an attitude of well, if it’s not broken, let’s break it and see what happens. That curiosity and spontaneity are not quite the same thing, but to me, they’re of the same spirit.
So if someone is learning how to cook, it’s not really a question of them thinking about their own temperament and trying to match it up with baking or cooking; they should really do a bit of both to balance things out?
Yes. It almost sounds like I’m talking out of both sides of my mouth. Because I rely on a recipe, especially in a restaurant situation, consistency is king. Everything has to be the same from batch to batch, day to day. Recipes are useful.
I actually just finished reading The Craftsman, by a sociologist, Richard Sennett, who wrote a whole chapter on how-to manuals in the form of recipe writing. I think recipe writing is ultimately flawed. Compare your recipe with “how to set up a computer” or “how to build a shelf” or whatever: you have to tailor the instruction to the experience, to the emotional state, to the personality of the person who is going to be reading and following your recipe.
Recipes are important, but they’re also just guidelines or can serve as inspiration. I think it’s a natural evolution for a cook—whether it’s a professional cook obviously or a home cook—that with confidence, the recipe means less and less, that it can be used as simple inspiration. I still pull books off the shelf all the time, but rarely do I actually write it down. I’ll try to wrap my head around what somebody was trying to do, but that really can only come with confidence and experience.
What are your favorite books that you go to?
I would have to say that the Internet is probably my “go to” source right now. It almost feels like I’m being lazy, but I think the Internet has changed everything. It has certainly changed professional cooking—the evolution of it and the speed at which things have progressed. Granted, there is a lot of static you have to sift through to find something of use, increasingly so. But in terms of instant access and comparing and asking different things, I’ve almost come to favor just an Internet search.
What would you tell somebody who is just learning to bake to keep in mind?
First and foremost: cleanliness and organization are key, and they’re always going to save you. Pay attention, especially with baking, which is firmly dictated by the chemical and physical realms that you can’t always undo. Also, have that sense of fun and that sense of play and learn from mistakes rather than stressing out about them. It sounds kind of mystical, but I do have this belief that happy people make better-tasting food. I also tell young people: just absorb as much information as you can. It doesn’t feel like it’s sinking in or you’re comprehending it all. Cleanliness, organization, a sense of fun, a sense of play, and always reminding yourself that there is more to learn.
There are certain ways of doing things that ultimately find their way into the dish, whether they’re perceivable or not. Sometimes it’s about things like cleanliness and organization. When you’re eating a dish in a dining room, you’re not going to know whether the cook who made it has a dirty apron, but I like to think that that does work its way into it.
Can you give me an example of how you go about thinking about a recipe and putting a dish together?
I have two. They both go toward understanding your ingredients and composition.
We used to make brown butter ice cream, but to give it enough brown butter flavor, we would have to add a ton of fat to the ice cream, which makes the ice cream really texturally challenging. Then I learned about the reaction and the composition of different kinds of dairy products. It’s actually just the milk solids in the butter that give us the flavor, but the butter by weight is only 2% solids. We stepped back and looked at heavy cream, which we produce butter from. That heavy cream has three times the milk solids that give us the flavor of butter. So if we take heavy cream and reduce it down to the point where we’re left with milk solids and clarified butter, we actually produce more extractable and arguably better-tasting brown butter solids than we could from butter. Then we separate it from the fat and add that to the ice cream.
We also do a lot with caramelized white chocolate. Sometimes I describe it as “roasted chocolate.” It sounds kind of counterintuitive, that you’d never want to scorch your chocolate. But if you do it in a controlled way you get an almost dolce de leche–like flavor. Dolce de leche is usually made by cooking condensed milk; usually, people just boil the can for three or four hours. This gives you more complex flavors, because the proteins and the sugars in the milk and the added sugar are cooking together. If you look at the composition of white chocolate, it’s about 40% sugar and 23% milk solids. I researched the composition of condensed milk; the proportion of milk solids and the proportion of sugar are nearly identical. This was a huge connection for me to make personally in terms of substituting ingredients. From there, we’ve gone on to do all kinds of stuff with caramelized chocolate.
Inspired by Valrhona’s L’Ecole du Grand Chocolat
The extent to which the white chocolate is “roasted” will determine the color and flavor of the finished cream. Also, depending on the final application, the amount of gelatin needed will vary. Add more gelatin for a freestanding component, less for a cream that will be put into a shell or glass. Like many similar preparations, the blending phase is vital for achieving the ideal texture.
Caramelize 1 cup (170g) of white chocolate by placing the white chocolate in a sauté pan and heating it over medium-low heat, keeping a watchful eye on it. Stir occasionally, taking care to prevent any bits from turning darker than medium brown. Remove from heat. Add 1.5 teaspoons (10g) of glucose (or corn syrup).
In a separate pan, bring ½ cup (125g) whole milk to a boil. Stir in 2 to 3 sheets of bloomed gelatin (i.e., presoaked in cold water; you can use 2 teaspoons of powdered gelatin, although sheet gelatin is of higher quality). Remove from heat and slowly incorporate into the white chocolate mixture.
 Add ¾ cup (175g) of heavy cream (36% fat) to
the white chocolate mixture. Emulsify for a few minutes with an
immersion blender. Transfer to a container and chill, allowing to
crystallize, or dispense into desired forms.
Add ¾ cup (175g) of heavy cream (36% fat) to
the white chocolate mixture. Emulsify for a few minutes with an
immersion blender. Transfer to a container and chill, allowing to
crystallize, or dispense into desired forms.
Beurre Noisette Ice Cream
Create a batch of browned milk solids by reducing a quart of heavy cream in a saucepan over low heat, stirring occasionally. After a while—possibly as long as an hour—the heavy cream will separate into clarified butter and the milk solids. Save the clarified butter for some other purpose.
In a clean saucepan, measure out, whisk together to rehydrate the dry milk, and bring to a boil:
1 quart (1000g) skim milk
50g browned milk solids
½ cup (60g) nonfat dry milk
¾ cup (150g) granulated sugar
60g glucose powder
40g trimoline (inverted sugar syrup)
In a separate bowl, measure out and whisk together:
¼ cup (50g) granulated sugar
8g ice cream stabilizer
200g egg yolks (yolks of about 3 large eggs)
Temper the hot milk into the yolk mixture by pouring a quarter of the hot liquid into the yolk mixture and whisking to combine. Add another quarter and whisk to combine. Pour the yolk mixture back into the saucepan, mix thoroughly, and return to low heat and cook, stirring, until slightly thickened (184°F / 84°C).
Remove from heat and whisk in:
⅔ cup (150g) heavy cream
Chill the ice cream base in an ice-water bath, and then transfer to your fridge and allow to mature for at least 12 hours. Transfer the base to an ice cream maker and follow the manufacturer’s instructions.
RECIPES USED BY PERMISSION OF MICHAEL LAISKONIS
Get Cooking for Geeks now with the O’Reilly learning platform.
O’Reilly members experience books, live events, courses curated by job role, and more from O’Reilly and nearly 200 top publishers.

