The best way to become acquainted with the Component Services Explorer and basic COM+ terminology is to do a trivial example. This section walks you through the COM+ equivalent of the canonical “Hello World” program. You will build a COM+ application containing a COM component that displays a message box saying “Hello COM+”.
When developing your “Hello COM+” application, follow these steps:
Create a classic COM component. All COM+ components start their life as classic COM components, developed with such tools as ATL, MFC, or Visual Basic 6.0.
Create a new COM+ application to host the component.
Add the component to the application.
Write a client and test the component.
The rest of this chapter uses this “Hello COM+” example to demonstrate various COM+ features and capabilities. The example is also available as part of the source files provided with this book (see the Preface for information on how to access these files).
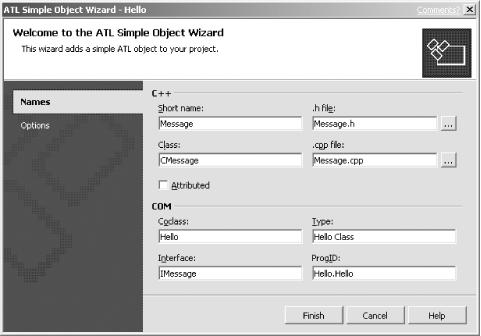
We will use ATL 7.0 to generate a classic COM component, although you can also do it in Visual Basic 6.0 with almost the same ease. Start a new ATL project in Visual Studio.NET and name it Hello. For simplicity, do not use Attributed project (deselect Attributed in the ATL Project Wizard under Application Settings). Also, do not select COM+ 1.0 support. This selection adds a few interfaces explained in subsequent chapters that are not relevant to this example. Bring up the Add Class dialog ATL and select the Simple ATL Object item. This step should bring up the ATL Simple Object Wizard dialog (see Figure 1-2). Type the following entries, in order:
In the Short Name field, enter
Message.In the CoClass field, enter
Hello.
Your completed dialog should look like Figure 1-2. There is no need to access the Options selection in the dialog (just use the defaults). Click OK when you’re done.
Right-click the IMessage interface icon in the Class View, and select
Add and then Add Method... from the pop-up context menu. This step
brings up the Add Method Wizard. Enter
ShowMessage as the method name and click OK.
After following these steps, the ATL Object Wizard will generate a new interface definition in the project IDL file, and the new method wizard will add a method to that interface. Verify that the interface definition in the IDL file looks like this:
[
   //various IDL attributes
]
interface IMessage : IDispatch
{
    [id(1), helpstring("method ShowMessage")] HRESULT ShowMessage(  );
};
Also make sure that the IDL file contains a type library section with the CoClass definition:
[
    //you will have a different CLSID here:
    uuid(C530E78E-9EE4-47D3-86CC-3B4EE39CBD26),
    helpstring("Message Class")
]
coclass Hello
{
   [default] interface IMessage;
};
Next, go to the message.cpp file and implement
the ShowMessage( ) method of the
CMessage class:
STDMETHODIMP CMessage::ShowMessage(  )
{
   ::MessageBox(::GetActiveWindow(  ),"Hello COM+","First COM+ Application",MB_OK);
   return S_OK;
}
You can now compile and build the
DLL. Every COM+
component must reside in a DLL, and that DLL must contain a type
library embedded in it as a resource. ATL will compile and build the
DLL for you and add a reference to the type library in the project
resource file, the hello.rc file. COM+ does not
require you to register your component, although the ATL build
process will register it for you. As you will see later, COM+
maintains its own components registration and configuration
repository.
Open the Component Services Explorer and expand My Computer → COM+ Applications folder. Right-click the COM+ Applications folder and select New → Application from the pop-up context menu. This step brings up the Application Install Wizard. Click Next on the first wizard screen.
In the next wizard screen, select the Create an Empty Application
option in the next wizard screen. Now the wizard will let you specify
the new application name and its application type, which can be
either a library or a server type (see Figure 1-3).
Enter Hello
COM+ for
the application name, and change the application type from the
default Server application to Library application. A
library application
indicates that the components in
the application will be loaded directly in the process of their
clients (like a classic COM in-proc server). A server
application
indicates that the components will
run in their own process (similar to a classic COM local server). You
can always change the application name and its activation type later
with the Component Services Explorer. Click Next and Finish in the
last wizard screen. You have just created your first COM+
application.
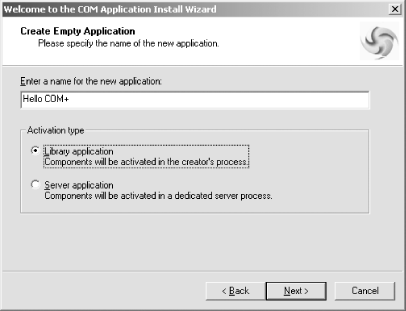
Figure 1-3. Naming your new COM+ application and configuring it to be a library or a server application
If you examine the Applications folder now, you will see your Hello COM+ application. Right-click its icon and select Properties from the pop-up context menu. The application’s properties page —a collection of tabs that let you configure the application—will now appear. In fact, every item in the Component Services Explorer (applications, components, interfaces, methods, roles, and subscriptions) has a properties page accessible in the same way (by selecting Properties on the item’s context menu or the properties button on the Component Services Explorer toolbar). The Hello COM+ application’s properties page is shown in Figure 1-4. The General tab contains the application name, which you can change here if you’d like, and a description field. The description field is a useful place to put a few sentences documenting the application’s purpose, its owner, etc. Each COM+ application is uniquely identified by a GUID, called the Application ID , shown at the bottom of the General tab. You will almost never use the Application ID directly, but COM+ uses it internally.
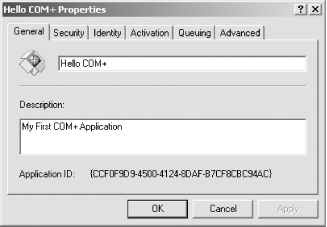
Other tabs on the application properties page let you configure the application activation mode, support for queued components, security settings, and idle-time management. Later chapters describe these application-level configurations in depth.
Close the properties page and examine the application’s Components folder. As you might expect, it is empty now. You will now add a new component to this application.
You
can add a new component to your
application (not surprisingly) by using another wizard. Right-click
the Components folder, select New from the
pop-up context menu, and click Component. The
Component Install Wizard will now appear.
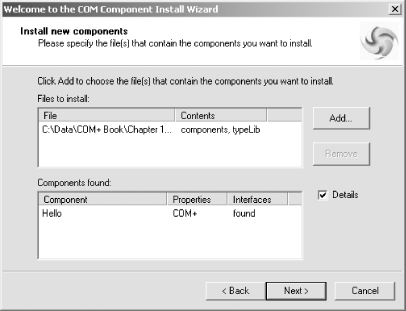
Click Next on the first screen. On the next screen, select Install
New Component from the three choices. The wizard will open a standard
file-open dialog box. Look for the folder where you built
hello.dll and select it. The wizard will present
you with all the components it could find in the specified DLL. In
the case of hello.dll, the wizard shows only the
single component contained in it (see Figure 1-5).
The wizard actually loads the embedded type library in the DLL and
looks for CoClass definitions. You can use the Add button to specify
additional DLLs. Note that all the components in the selected
DLL will be added. If you
want to add just a subset of them, you must add them all first and
then remove the ones that do not belong in the application manually.
Click Next, and then click Finish in the last wizard screen. Your
component is now part of the Hello COM+ application.
Warning
Avoid using the “Import component(s) that are already registered” option in the Component Install Wizard. This option has a bug and will not retrieve information about the component(s) interfaces. You will not see the component(s) interfaces and methods in the Component Services Explorer and will not be able to configure them.
Because type information is embedded in the DLL, COM+ knows about
your component’s interfaces and methods. You can expand the
Interfaces and Methods
folders (under the Hello.Message component) to verify that COM+ has
imported the component correctly. As shown in Figure 1-6, the IMessage interface and
the ShowMessage method were both imported.
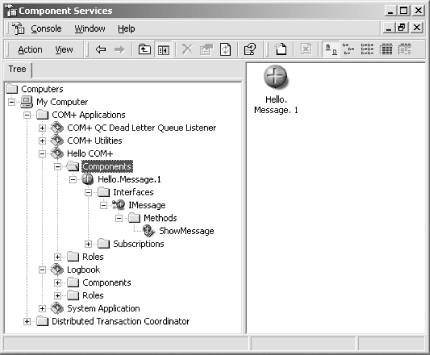
The Interfaces folder contains one entry for each interface your component supports. The interfaces on the CoClass definition in the type library determine the number of entries. The Methods folder contains one item for each method in that interface, again based on the interface definition in the type library.
Clients
can create the component using the class
ID CLSID_Hello (C++) or Hello
(Visual Basic 6.0). Although the component is now a COM+ component
and is part of a COM+ application, the client-side code is the same
as if the component were still a classic COM component. To prove this
point (and test your component), write a short C++ client, such as
the code in Example 1-1.
Example 1-1. A simple COM+ client
#import "Hello.dll" no_namespace named_guids
::CoInitialize(NULL);
HRESULT hres = S_OK;
IMessage* pMessage = NULL;
hres = ::CoCreateInstance(CLSID_Hello,NULL,CLSCTX_ALL,
IID_IMessage,(void**)&pMessage);
hres = pMessage->ShowMessage( );
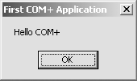
pMessage->Release( );
::CoUninitialize( );When you run the client, you will see the “Hello COM+” message box (see Figure 1-7).
Alternatively, you can write the client side in Visual Basic 6.0. Add
the component type library Hello.TLB, the Visual
Basic project references browser, and write:
Dim obj As Hello

Set obj = New Hello
obj.ShowMessage
set obj = Nothing
Visual Basic 6.0 clients can also create the object using its prog-ID. In that case, the type-library is not required (at the expense of type-safety):
Dim obj As Object
Set obj = CreateObject("Hello.Message.1")
obj.ShowMessage
set obj = Nothing
Because the client side remains constant, regardless of the component configuration and application type, COM+ helps decouple the client from the server. This point is discussed in depth in the next chapter.
Get COM & .NET Component Services now with the O’Reilly learning platform.
O’Reilly members experience books, live events, courses curated by job role, and more from O’Reilly and nearly 200 top publishers.

