Closure is a collection of tools for building rich web applications in JavaScript. Each tool in the suite is open-sourced under the Apache 2.0 license, and is created, maintained, and made available for free by Google. Closure is used in the development of many web applications at Google, including Gmail, Google Maps, and Google Docs. The performance and scale of these web applications is a testament to the strength and sophistication of the Closure Tools suite.
Some developers might balk at the thought of expanding the role of JavaScript in their web applications. Why should the codebase of a language that relies on global variables and has no support for namespaces get bigger and more complex? Others may point out that Google simultaneously offers the Google Web Toolkit (GWT) so that web developers do not even have to concern themselves with JavaScript. Why do we need new tools for JavaScript when the tools for avoiding it already exist?
Whether you like it or not, JavaScript is the lingua franca of the Web. Although tools such as GWT do a reasonable job of abstracting away JavaScript, they also create barriers between you and the metal of the browser. Instead of creating tools to circumvent JavaScript, why not build tools to address its problems head-on?
This is where Closure comes in: the tools make it significantly easier to maintain a large JavaScript codebase. Using Closure essentially extends JavaScript to include features available in other programming languages, such as namespaces, type checking, and data hiding. Furthermore, it does so without incurring the runtime overhead of previous approaches (see Appendix B). More importantly, it does not sacrifice the good parts of JavaScript (prototypal inheritance, regular expression literals, first-class functions) that are not available in other programming languages, such as Java. This transforms JavaScript from a language one must “deal with” into one that is fun and productive.
In addition to making your development team happier, using Closure will also make your users happier. The crown jewel of the suite, the Closure Compiler, can significantly reduce the amount of JavaScript that users will have to download when visiting your site. It does this by replacing long variable names with shorter ones, removing unused code, and by applying a variety of other optimizations. In addition to making your web application faster, shrinking code will also save you money because it reduces bandwidth costs. Further, it helps protect your IP because renaming variables serves to obfuscate your code, making it more difficult for other websites to copy your functionality.
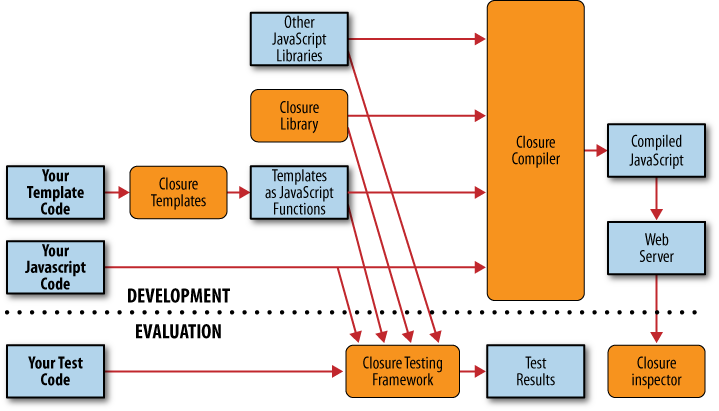
In addition to the Closure Compiler, there are currently four other tools available in the Closure suite. Figure 1-1 shows the common workflow when using all of the tools together. This section provides a brief description of each tool in the order in which it is encountered in this book.
The Closure Library is a comprehensive JavaScript library analogous to other contemporary offerings, such as jQuery, Dojo, and MooTools. The coding style and use of annotations in the Closure Library are tailored for use with the Closure Compiler, which is its main distinguishing feature when compared to other JavaScript libraries. This can have dramatic effects on the Compiler’s ability to minify code, as a simple minification experiment finds that Closure Library code can be 85 percent smaller when using the Closure Compiler in place of the YUI Compressor (http://blog.bolinfest.com/2009/11/example-of-using-closure-compiler-to.html).
The Closure Library is also implemented with a strong emphasis on performance and readability. It is frugal in creating objects, but generous in naming and documenting them. It also has an elegant event system, support for classes and inheritance, and a broad collection of UI components, including a rich text editor. Closure Library code is regularly tested across browsers, and to the extent that it can, will also work in non-browser JavaScript environments, such as Rhino (http://www.mozilla.org/rhino/) and the Microsoft Windows Script Host. Because the Library is a resource for Google engineers first and an open source project second, it is a safe bet that every line of code in the Library was developed to support at least one Google product. The style of the Library will first be introduced in Chapter 2, and the functionality of the Library will be covered in the following eight chapters.
Closure Templates provide an intuitive syntax for creating efficient JavaScript functions (or Java objects) that generate HTML. This makes it easier to create a large string of HTML that can in turn be used to build up the DOM. Unfortunately, most programming languages do not have native support for templates, so creating a separate templating solution is a common practice for web frameworks (J2EE has JSP, Python developers frequently use Django’s template system, etc.). A unique aspect of Closure Templates is that the same template can be compiled into both Java and JavaScript, so those running servers written in Java (or JavaScript!) can use the same template on both the server and the client. The benefits of this, along with Closure Templates, will be covered in Chapter 11.
The Closure Compiler is a JavaScript optimizing compiler: it takes JavaScript source code as input and produces behaviorally equivalent source code as output. That is, when the output code is used in place of the input code, the observable effect will be the same (though the output code is likely to execute faster than the original). As a simple example, if the input code were:
/**
 * @param {string} name
 */
var hello = function(name) {
  alert('Hello, ' + name);
};
hello('New user');
then the Compiler would produce the following behaviorally-equivalent output:
alert("Hello, New user");Executing either code snippet will have the same effect: an alert
box will display with the text "Hello, New user". However,
the output code is more concise, so it can be downloaded, parsed, and
executed faster than the input code.
Furthermore, the Compiler can detect a large class of errors by performing static checks at compile time, much like JSLint. This helps find bugs earlier, dramatically speeding up JavaScript development. Using the Compiler to identify problems is not a substitute for unit testing, but it certainly helps.
For existing JavaScript applications, the Closure Compiler is likely to be the Closure Tool that is most immediately useful. Although it will be most effective when used to compile code written in the style of the Closure Library, replacing an existing dependency on jQuery or Dojo with that of the Library could be time-consuming. By comparison, the Closure Compiler can be used in place of existing JavaScript minifiers (such as JSMin or YUI Compressor) with much less effort. The Compiler will be introduced in Chapter 12.
The Closure Testing Framework is a unit-testing framework that runs in the browser, much like JsUnit. Most Closure Library code has a corresponding test that runs in the Framework. It is good programming practice to create tests for your own code and to run them regularly to identify regressions. Because the Closure Testing Framework runs inside the browser, additional software is needed to automate the process of starting up a browser, running the tests, and recording the results. Selenium is likely the best solution for that purpose. The Closure Testing Framework will be explained in Chapter 15.
The Closure Inspector is an extension to Firebug to aid in debugging compiled JavaScript. Firebug is an extension for Firefox (which is not developed by Google) that brings together a number of web development tools, including a JavaScript debugger, available through the browser. When using the Firebug debugger with obfuscated code produced by the Closure Compiler, it is hard to trace a runtime error back to its position in the original source code. The Closure Inspector facilitates debugging by exposing the mapping between the original and compiled code in the Firebug UI. It will be discussed in more detail in Chapter 16.
Before diving into the code, it is important to understand the design goals and principles that motivate the implementation of the Closure Tools. Much of the design of the toolkit is motivated by the capabilities of the Compiler and the style of the Library.
The primary objective of the Closure Compiler is to reduce the size of JavaScript code. Because Google serves so many pages with JavaScript and prides itself on speed (Google engineers have T-shirts that say “Fast is my favorite feature”), it is imperative that the JavaScript required to display a page is as small as possible. Even when JavaScript is cached by the browser, it must still be parsed and executed again when the page that uses it is reloaded. The smaller the JavaScript, the less time this takes.
Specifically, the Compiler favors reducing the size of gzipped JavaScript over uncompressed JavaScript. For example, it might be tempting to have the Compiler rewrite the following function:
Line.prototype.translate = function(distance) {
  this.x1 += distance;
  this.y1 += distance;
  this.x2 += distance;
  this.y2 += distance;
};
so that it creates a temporary variable for this
before compiling the code:
Line.prototype.translate = function(distance) {
  var me = this;
  me.x1 += distance;
  me.y1 += distance;
  me.x2 += distance;
  me.y2 += distance;
};
The motivation here is that the Compiler can rename
me but cannot rename this because
this is a JavaScript keyword. Although using the temporary
variable results in smaller uncompressed code when run through the
Compiler, the gzipped size of the compiled code is larger when using the
temporary variable. Because the overwhelming majority of browsers can
accept gzipped JavaScript, the Compiler focuses on optimizations that
will benefit the gzipped code size. Most optimizations are wins for both
compressed and gzipped JavaScript, but there are occasionally
exceptions, such as this one.
JavaScript code should be written in a way that can be compiled
efficiently by the Compiler. This is fundamental to understanding the
design of the Closure Library: the verbosity of the code is not
representative of its size after being processed by the Compiler. If
more code (or annotations) need to be written to result in smaller
compiled code, then that is preferable to writing less code that results
in larger compiled code. For example, writing comprehensive utility
libraries is acceptable as long as the unused parts can be removed by
the Compiler. Complementary methods should be replaced with a single
parameterized method (e.g., prefer setEnabled(enable) to
enable() and disable()). This reduces the
number of method declarations and is more amenable to function currying.
Therefore, to fully understand the Closure Library, one must also
understand how the Compiler rewrites JavaScript code.
One may wonder if any emphasis is placed on using the Compiler to produce JavaScript with better runtime performance. The short answer is yes, but because runtime performance is so much harder to measure than code size, more engineering time has been spent on improving minification. Fortunately, many reductions in code size also improve performance, as many optimizations result from evaluating expressions at compile time rather than runtime.
The Compiler is designed to compile all code that could be run during the course of the application at once. As shown in Figure 1-1, there are many potential sources of input, but the Compiler receives all of them at the same time. This is in contrast to other languages, in which portions of source code are compiled into reusable modules. In Closure, it is the opposite: source code is initially compiled together and is then carved up into modules that may be progressively loaded by a web application. This is done to ensure that the variable names used in individual modules are globally unique.
As the Gmail team explained on their blog (http://gmailblog.blogspot.com/2008/09/new-gmail-code-base-now-for-ie6-too.html), they encountered a performance problem with Internet Explorer 6 (IE6) with respect to memory management that prevented IE6 users from getting a newer version of Gmail until Microsoft provided a patch to IE6 users. Although this caused the Gmail engineers a considerable amount of pain, it did force them to invest extra effort into managing memory on the client.
Like most modern programming languages, JavaScript manages its own
memory. Unfortunately, this does not preclude the possibility of a
memory leak, as failing to release references to objects that are no
longer needed can still cause an application to run out of memory. The
Closure Library uses goog.Disposable to ensure that
references are released as soon as possible so that objects may be
garbage collected. goog.Disposable will be introduced in
Chapter 5, and managing event listeners (another common
source of memory leaks) will be explained in Chapter 6.
The issues with IE6’s garbage collection are so severe that the
Closure Library offers goog.structs.Map as an abstraction
around JavaScript’s native Object to reduce the number of
string allocations when iterating over the keys of an object. The
justification is revealed in a comment in the
goog.structs.Map source code:
/**
 * An array of keys. This is necessary for two reasons:
 *   1. Iterating the keys using for (var key in this.map_) allocates an
 *      object for every key in IE which is really bad for IE6 GC perf.
 *   2. Without a side data structure, we would need to escape all the keys
 *      as that would be the only way we could tell during iteration if the
 *      key was an internal key or a property of the object.
 *
 * This array can contain deleted keys so it's necessary to check the map
 * as well to see if the key is still in the map (this doesn't require a
 * memory allocation in IE).
 * @type {!Array.<string>}
 * @private
 */
this.keys_ = [];
Now that Microsoft has provided a patch for the problem with IE6, such micromanagement of string allocation is less compelling. However, as more mobile devices are running web browsers with fewer resources than their desktop equivalents, attention to memory management in general is still merited.
The Closure Compiler is not the first tool to try to identify problems in JavaScript code by performing static checks; however, there is a limit to how much can be inferred by the source code alone. To supplement the information in the code itself, the Compiler makes use of developer-supplied annotations which appear in the form of JavaScript comments. These annotations are explained in detail in Chapter 2.
By annotating the code to indicate the parameter and return types of functions, the Compiler can identify when an argument of the incorrect type is being passed to a function. Similarly, annotating the code to indicate which data are meant to be private makes it possible for the Compiler to identify when the data are illegally accessed. By using these annotations in your code, you can use the Compiler to increase your confidence in your code’s correctness.
Although the Compiler provides many beneficial transformations to its input, the code for the Closure Library is also expected to be able to be run without being processed by the Compiler. This not only ensures that the input language is pure JavaScript, but also makes debugging easier, as it is always possible to use the deobfuscated code.
The Closure Library is designed to abstract away browser
differences and should work in all modern browsers (including IE6 and
later). It should also work in non-browser environments, such as Rhino
and the Windows Script Host (though historically the motivation behind
creating a browser-agnostic library was to support WorkerPools in Google
Gears). This means that common browser objects such as
window and navigator are not assumed to
exist.
This does not mean that the Closure Library lacks utilities for dealing with browser-specific APIs such as the DOM. On the contrary, the Library provides many methods for working within the browser. However, Library code that works with objects that are universally available in all JavaScript environments (strings, arrays, functions, etc.) does not rely on APIs that are available only to the browser. This makes the Closure Library a good candidate for use with server-side JavaScript, as well.
Built-in object prototypes, such as Object, Function, Array, and String should not be modified. This makes it possible to use Closure alongside other JavaScript libraries, such as jQuery. In practice, however, using Closure with other libraries is generally inefficient. Each library will have its own logic for event management, string manipulation, etc., which means that duplicate logic will likely be included, increasing the amount of JavaScript code that will be loaded.
The Closure Library is designed to be loaded once per frameset
(though it is designed so that multiple instances of the Library should
not “step on each other” if it is loaded more than once). The Library
recognizes that built-in objects, such as Arrays, may be constructed in
different frames and therefore will have distinct prototypes. For web
applications that use multiple frames (such as using a separate
<iframe> in design mode for rich text editing),
loading the Library only once rather than once per frame can result in
significant performance savings.
Each tool in the Closure suite can be used independently of the others. This is largely because the decision to use a particular Closure tool is made by an individual engineering team at Google, so there is no guarantee that a team that is using the Compiler is also using the Library. Now that Closure is more mature, the main reason to adopt one tool but not another is because of a dependency on legacy code that already depends on a similar tool. You may find yourself in a similar situation when deciding how best to incorporate Closure into an existing project.
Nevertheless, even though it is possible to compile jQuery with
the Compiler or to use Templates to create functions that can be called
from Dojo, the entire Closure suite should be adopted to achieve the
maximum benefit from the tools. It is indeed the case with Closure that
the whole is greater than the sum of its parts. For example, although
the Library and the Compiler can be used independently, they are only
moderately effective when used on their own. In some cases, the Library
is outright unusable without the Compiler (see
datetimesymbols.js). Both must be used together in order to
get the most out of Closure.
Currently, each tool in the Closure suite must be downloaded and installed separately. As the tools are independent of one another, each is maintained as its own project on code.google.com. Most projects include a “Featured downloads” section where the tool and its documentation can be downloaded as some sort of zip file. Unfortunately, the Closure Library does not offer such a bundle, so the only way to get the code is to check it out of the Subversion repository associated with the project.
Tip
Because all of the Closure Tools are designed to be used independently, it takes a bit of effort to get them set up and working together. Fortunately, Appendix C introduces plovr, which is a single build tool that integrates all of the Closure Tools in a single download (the code for all of the Closure Tools is included in the plovr jar). Using plovr eliminates the need for many of the scripts required to build the example in the following section, as well as the dependency on Python. Once you have gone through the example and understand the fundamentals of how building in Closure works, it is worth visiting the plovr website (http://plovr.com) to see how the equivalent could be done using plovr.
At the time of this writing, the tools also lack version numbers (with the exception of the Closure Inspector). Because each is stored in Subversion, they do have revision numbers, but those are simply incremented every time a change is checked in. This is less significant than a version number, which is an explicit branding that generally reflects achieving a particular milestone or achieving some level of stability. Fortunately, each project has a number of tests to prevent regressions in new releases. Therefore, although all of the examples in this book were created using the Closure Tools built from the revision numbers listed in Table 1-1, it is probably safe to use the latest version of each tool to reproduce the results in the examples.
Table 1-1. Revision numbers for Closure Tools used to produce the examples in this book. Each is the latest version as of July 4, 2010. Clearly, some of the tools are updated more frequently than others.
| Tool | Revision number | Date revision was checked in |
|---|---|---|
| Closure Library | 155 | June 25, 2010 |
| Closure Templates | 15 | April 26, 2010 |
| Closure Compiler | 264 | July 3, 2010 |
| Closure Inspector | 5 | April 8, 2010 |
This section will walk through downloading and configuring each
tool, whereas the next section will provide a comprehensive code example
that will demonstrate how each is used. If you are a Mac or Linux user,
this section expects that you are familiar with the Terminal and have
Subversion installed. Mac users should have Subversion installed by
default, but Linux users may have to run sudo apt-get install
svn to get it (apt-get is used to install packages on
Ubuntu and Debian, so the package management system of your Linux
distribution may differ). In either case, running which svn
in the Terminal will print the location of the Subversion executable if it
is installed.
If you are a Windows user, you will need to install Subversion if you have not done so already. The most popular Subversion client for Windows is TortoiseSVN, and it is freely available at http://tortoisesvn.tigris.org. Unlike the command-line versions for Mac and Linux, TortoiseSVN is an extension to Windows Explorer. This means that it can be used on Windows without using the Command Prompt.
Caution
Many of the examples in this book include commands that can be run
from a terminal on Mac or Linux. Running the equivalent script from the
Windows command prompt is often a simple matter of replacing the line
continuation character for a bash script (which is
a backslash: \) with the line continuation character for a
Windows batch script (which is a caret:
^). Alternatively, you can install Cygwin (http://www.cygwin.com), which provides a Linux-like
terminal on Windows. When using Cygwin, the shell scripts in this book
that are designed for Mac and Linux can be run as-is.
These instructions assume that each project will be downloaded in
its own directory under a common directory, such as
C:\closure\ on Windows or ~/closure/ on Mac and
Linux. For simplicity, each directory name will match the project name on
code.google.com, so the Closure
Library will be downloaded into
C:\closure\closure-library\.
As mentioned at the beginning of this section, the Closure Library
cannot be downloaded as a zip file, so it must be downloaded by checking
the code out of Subversion. The location of the repository is
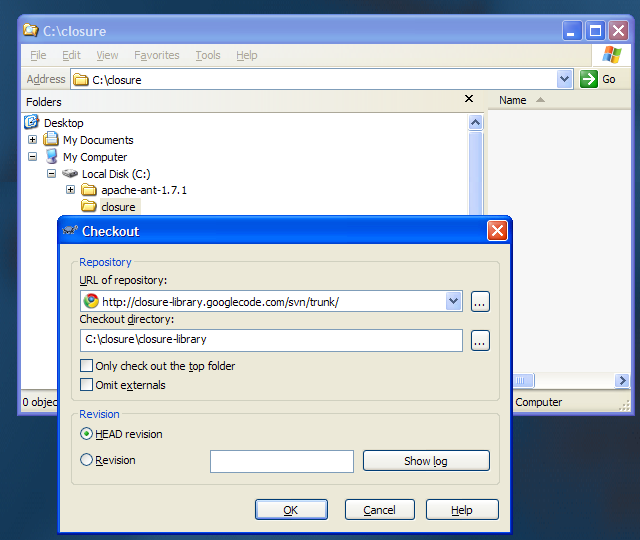
http://closure-library.googlecode.com/svn/trunk/, so that
is the value to use for “URL of repository” when using TortoiseSVN on
Windows, as shown in Figure 1-2.
Mac and Linux users can run the following commands from Terminal to download the Closure Library:
mkdir ~/closure
cd ~/closure
svn checkout http://closure-library.googlecode.com/svn/trunk/ closure-library
The Closure Library also contains the Closure Testing Framework.
Open the URI file:///C:/closure/closure-library/all_tests.html
in a web browser and press the “Start” button to kick off the test
suite. At the time of this writing, not all of the tests pass, so do not
be worried that you downloaded a “bad” version of the Library if you see
several test failures. The status of each failure is tracked as an issue
on http://code.google.com/p/closure-library/issues/list.
The primary binary for Closure Templates is used to compile templates into JavaScript. It can be downloaded from http://closure-templates.googlecode.com/files/closure-templates-for-javascript-latest.zip.
It is also fairly easy to build the Templates binary from source.
Download the code using Subversion by following the
Closure Library example, but use
http://closure-templates.googlecode.com/svn/trunk/ as the
URL of the repository to check out and closure-templates as
the destination. All Closure Templates binaries can be built using
Apache Ant (http://ant.apache.org). The binary for
compiling templates into JavaScript is named
SoyToJsSrcCompiler.jar and can be built using Ant as
follows:
cd ~/closure/closure-templates/
ant SoyToJsSrcCompiler
The result will be available at
~/closure/closure-templates/build/SoyToJsSrcCompiler.jar.
The simplest way to get the Compiler is to download http://closure-compiler.googlecode.com/files/compiler-latest.zip
and extract compiler.jar from the zipfile.
It is also fairly easy to build the Compiler from source. Download
the code using Subversion by
following the Closure Library example, but use
http://closure-compiler.googlecode.com/svn/trunk/ as the
URL of the repository to check out and closure-compiler as the
destination. The Compiler can then be built using Apache Ant:
cd ~/closure/closure-compiler/
ant jar
The result will be in
~/closure/closure-compiler/build/compiler.jar.
The Closure Inspector is a Firefox extension, so to install it, you must first download the Firefox web browser from http://getfirefox.com. Next, install the Firebug extension for Firefox from http://getfirebug.com.
Once you have Firefox running with Firebug, download http://code.google.com/p/closure-inspector/downloads/detail?name=closureinspector095.xpi and open it in Firefox using File→Open File.... This will prompt you to install the extension.
In case any of these URLs change, it is worth cross-checking these installation instructions with those provided by Google at http://code.google.com/closure/compiler/docs/inspector.html.
This section will walk through a simple example to demonstrate how all of the Closure Tools can be used together. Before following the instructions in this section, make sure all of the Tools are installed as described in the previous section. Also, both Java 6 (the JDK) and Python 2.6.5 (or later) must be installed and available from the command line. A simple web search should yield appropriate instructions for installing Java and Python on your computer if you do not have them already.
The first step will exercise the Closure Library by creating a web
page that loads the kernel of the Library and then some of its DOM
utilities to insert the text Hello World! into the page.
Assuming you have all of the tools checked out as described in the
previous section, first create a subdirectory of your
closure directory named hello-world. Then
create the following file named hello.js in your
hello-world directory with the following JavaScript
code:
goog.provide('example');

goog.require('goog.dom');

example.sayHello = function(message) {
  goog.dom.getElement('hello').innerHTML = message;
};
In the same directory, also create a file named
hello.html with the following HTML:
<!doctype html>
<html>
<head>
  <title>Example: Hello World</title>
</head>
<body>
  <div id="hello"></div>

  <script src="../closure-library/closure/goog/base.js"></script>
  <script src="hello.js"></script>
  <script>
    example.sayHello('Hello World!');
  </script>

</body>
</html>
Open hello.html in a web browser and you should see a
page that says Hello World!. The details of how
goog.provide() and goog.require() work will be
explained in Chapter 3, but for now, all you need to
know is that they are responsible for managing dependencies in Closure.
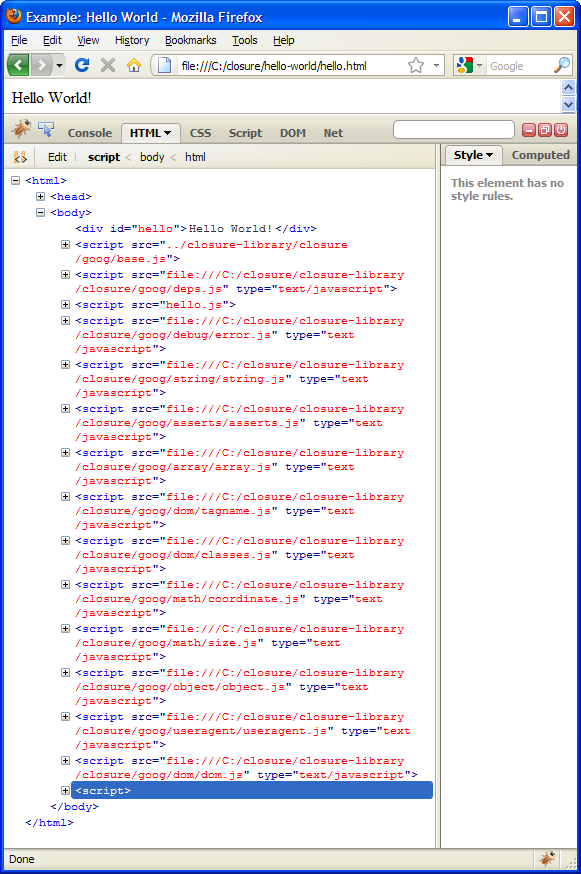
If you examine this page in Firefox using Firebug (which you should have
installed along with the Closure Inspector) and expand the
<body> element, you can see that 12 additional
JavaScript files from the Closure Library have been loaded behind the
scenes (Figure 1-3).
These <script> elements are used to load
goog.dom and all of its dependencies. This may seem like a lot of code to load in order to do
the equivalent of document.getElementById(), but remember that the focus
is on minifying the size of the compiled code, not the source
code.
Although “Hello World!” is a classic example, it is also fairly
boring, so Closure Templates can be used to spice things up by making it
easier to insert some HTML into the page. In the
hello-world directory, create a new file named
hello.soy that will define a Closure Template:
{namespace example.templates}

/**
 * @param greeting
 * @param year
 */
{template .welcome}
  <h1 id="greeting">{$greeting}</h1>
  The year is {$year}.
{/template}
Assuming that SoyToJsSrcCompiler.jar is in
closure-templates/build/, run the following command from your
hello-world directory in the Command Prompt on Windows or
the Terminal on Mac or Linux:
java -jar ../closure-templates/build/SoyToJsSrcCompiler.jar \
    --outputPathFormat hello.soy.js \
    --shouldGenerateJsdoc \
    --shouldProvideRequireSoyNamespaces hello.soy
This should generate a file named hello.soy.js with
the following content:
// This file was automatically generated from hello.soy.
// Please don't edit this file by hand.

goog.provide('example.templates');

goog.require('soy');
goog.require('soy.StringBuilder');


/**
 * @param {Object.<string, *>=} opt_data
 * @param {soy.StringBuilder=} opt_sb
 * @return {string|undefined}
 * @notypecheck
 */
example.templates.welcome = function(opt_data, opt_sb) {
  var output = opt_sb || new soy.StringBuilder();
  output.append('<h1 id="greeting">', soy.$$escapeHtml(opt_data.greeting),
      '</h1>The year is ', soy.$$escapeHtml(opt_data.year), '.');
  if (!opt_sb) return output.toString();
};
Now update hello.js so it uses the function available
in hello.soy.js and includes another
goog.require() call to reflect the dependency on
example.templates:
goog.provide('example');

goog.require('example.templates');
goog.require('goog.dom');

example.sayHello = function(message) {
  var data = {greeting: message, year: new Date().getFullYear()};
  var html = example.templates.welcome(data);
  goog.dom.getElement('hello').innerHTML = html;
};
In order to use hello.soy.js, both it and its
dependencies must be loaded via <script> tags in the
hello.html file:
<!doctype html>
<html>
<head>
  <title>Example: Hello World</title>
</head>
<body>
  <div id="hello"></div>

  <script src="../closure-library/closure/goog/base.js"></script>
  <script>goog.require('goog.string.StringBuffer');</script>
  <script src="../closure-templates/javascript/soyutils_usegoog.js"></script>
  <script src="hello.soy.js"></script>
  <script src="hello.js"></script>
  <script>
    example.sayHello('Hello World!');
  </script>

</body>
</html>
Now loading hello.html should look like Figure 1-4.
Although everything is working, maintaining these dependencies
manually is very tedious.
Fortunately, the Closure Library contains a Python script named
calcdeps.py that can be used to write dependency
information into a file of JavaScript code that Closure can use to
dynamically load dependencies:
python ../closure-library/closure/bin/calcdeps.py \
    --dep ../closure-library \
    --path ../closure-templates/javascript \
    --path hello.soy.js \
    --path hello.js \
    --output_mode deps > hello-deps.js
The hello-deps.js file must be loaded to instruct
Closure where to find the source code to support its dependencies. (The
details of how calcdeps.py works and the contents of the
hello-deps.js file it produces will be discussed in Dependency Management.) Now several of the
<script> tags from the previous example can be
replaced with a single <script> tag that loads
hello-deps.js:
<!doctype html>
<html>
<head>
  <title>Example: Hello World</title>
</head>
<body>
  <div id="hello"></div>

  <script src="../closure-library/closure/goog/base.js"></script>
  <script src="hello-deps.js"></script>
  <script>
    goog.require('example');
  </script>
  <script>
    example.sayHello('Hello World!');
  </script>

</body>
</html>
To make sure that your dependencies are loading correctly, verify
that loading hello.html still looks like Figure 1-4 after replacing the explicit template
dependencies with hello-deps.js.
To change the content of the template, edit hello.soy
and run the java command used to generate
hello.soy.js again. If hello.soy.js is not
regenerated, then changes to hello.soy will not be
reflected in hello.html.
Now that we have created a giant heap of JavaScript, it is time to
shrink it down using the Closure Compiler. Even though
calcdeps.py is a utility from the Closure Library, it uses
the Closure Compiler via its --compiler_jar argument. (Make
sure that the Closure Compiler jar is available at
../closure-compiler/build/compiler.jar before running the
script.) This command compiles hello.js and all of its
dependencies into a single file named
hello-compiled.js:
python ../closure-library/closure/bin/calcdeps.py \
    --path ../closure-library \
    --path ../closure-templates/javascript/soyutils_usegoog.js \
    --path hello.soy.js \
    --input hello.js \
    --compiler_jar ../closure-compiler/build/compiler.jar \
    --output_mode compiled \
    --compiler_flags="--compilation_level=ADVANCED_OPTIMIZATIONS" \
    > hello-compiled.js
Now that
hello-compiled.js is available, create a new file named
hello-compiled.html that uses it:
<!doctype html>
<html>
<head>
  <title>Example: Hello World</title>
</head>
<body>
  <div id="hello"></div>

  <script src="hello-compiled.js"></script>
  <script>
    example.sayHello('Hello World!');
  </script>

</body>
</html>
Unfortunately, loading hello-compiled.html fails to
display “Hello World!”. Instead, it yields a JavaScript error:
example is not defined. This is because
example has been renamed by the Compiler in order to save
bytes, but the final <script> tag still refers to
example.sayHello(). The simplest solution is to make sure
that example.sayHello() still refers to the original
function after compilation by adding the following line to the bottom of
hello.js:
goog.exportSymbol('example.sayHello', example.sayHello);The Compiler must be run again on the updated version of
hello.js that includes the call to
goog.exportSymbol(). Once hello-compiled.js
has been regenerated, loading hello-compiled.html should
appear as hello.html did in Figure 1-4 because hello-compiled.js
should behave the same as hello.js does when it loads the
Closure Library. However, now that hello-compiled.js is
used, it is the only JavaScript file that needs to be loaded to run
hello-compiled.html.
Looking at hello-compiled.js, it may come as a
surprise that it is a little over 2K when all it does is insert some
HTML into a <div>, but that is because it contains a
bit of bootstrapping code that will be necessary for all applications
built with Closure.
Most of that logic deals with browser and platform detection that can be eliminated by specifying the target environment at compile time. In the following code, additional flags are used to specify a Gecko-based browser running on Windows, which removes almost a kilobyte from the compiled code:
python ../closure-library/closure/bin/calcdeps.py \
  --path ../closure-library \
  --path ../closure-templates/javascript/soyutils_usegoog.js \
  --path hello.soy.js \
  --input hello.js \
  --compiler_jar ../closure-compiler/build/compiler.jar \
  --output_mode compiled \
  --compiler_flags="--compilation_level=ADVANCED_OPTIMIZATIONS" \
  --compiler_flags="--define=goog.userAgent.ASSUME_GECKO=true" \
  --compiler_flags "--define=goog.userAgent.ASSUME_WINDOWS=true" \
  --compiler_flags="--define=goog.userAgent.jscript.ASSUME_NO_JSCRIPT=true" \
  > hello-compiled-for-firefox-on-windows.js
Although many of the compiler flags in this example will be
discussed later in this book, one that is worth highlighting now is the
one that specifies the use of ADVANCED_OPTIMIZATIONS. This
runs the Compiler in Advanced mode, the mechanics
of which are explained in great detail in Chapter 13. For now, the only thing you have to
know about Advanced mode is that it is able to dramatically optimize
JavaScript code written in a particular style, so many of the upcoming
chapters on the Closure Library will cite Advanced mode as the reason
why code is written in a certain way. After reading all of the chapters
on the Closure Library, you will be able to fully appreciate all of the
optimizations that the Compiler can perform in Advanced mode.
Although the code appears to work fine when run in the browser, it
is a good idea to create a unit test to ensure the correct behavior is
preserved. In this case, example.templates.welcome should
be tested to ensure that its input is escaped properly. The first step
is to create a web page named hello_test.html that will
host the test:
<!doctype html>
<html>
<head>
  <title>Unit Test for hello.js</title>
  <script src="../closure-library/closure/goog/base.js"></script>
  <script src="hello-deps.js"></script>
  <script src="hello_test.js"></script>
</head>
<body>
  <div id="hello"></div>
</body>
</html>
The next step is to create hello_test.js, which
contains the test code itself. This test verifies that the string
'<b>greeting</b>'
goog.require('goog.testing.jsunit');
goog.require('example');
goog.require('goog.dom');
goog.require('goog.dom.NodeType');
var testHtmlEscaping = function() {
example.sayHello('<b>greeting</b>');
var greetingEl = goog.dom.getElement('greeting');
assertEquals('The <h1 id="greeting"> element should only have one child node',
1, greetingEl.childNodes.length);
assertEquals('The <h1 id="greeting"> element should only contain text',
goog.dom.NodeType.TEXT, greetingEl.firstChild.nodeType);
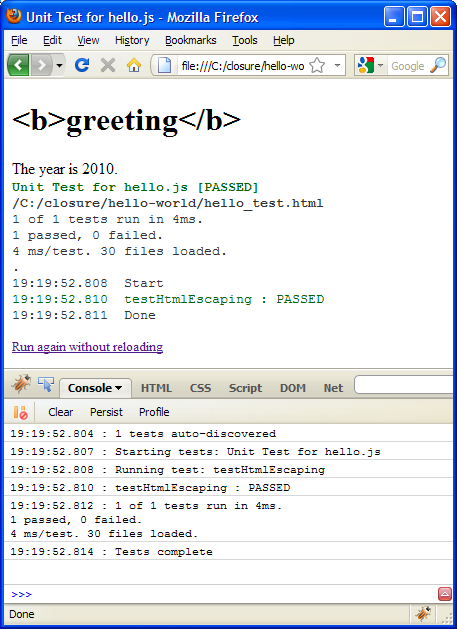
};Loading hello_test.html in the browser will run the
test and display the results as shown in Figure 1-5.
Note how information is also logged to the Firebug console while the test is running to help with debugging.
Because the Closure Inspector is used to help with debugging
compiled JavaScript, hello.js must be recompiled with a bug
in it to demonstrate how the Inspector can be used. Though rather than
create an actual bug, simply insert a debugger statement in
hello.js as follows:
goog.provide('example');

goog.require('example.templates');
goog.require('goog.dom');

example.sayHello = function(message) {
  var data = {greeting: message, year: new Date().getFullYear()};
  var html = example.templates.welcome(data);
  debugger;
  goog.dom.getElement('hello').innerHTML = html;
};

goog.exportSymbol('example.sayHello', example.sayHello);
Because hello.js has changed,
hello-compiled.js must also be regenerated, but an
additional flag, --create_source_map, must be supplied to
the Compiler to generate the metadata used by the Inspector:
python ../closure-library/closure/bin/calcdeps.py \
    --path ../closure-library \
    --path ../closure-templates/javascript/soyutils_usegoog.js \
    --path hello.soy.js \
    --input hello.js \
    --compiler_jar ../closure-compiler/build/compiler.jar \
    --output_mode compiled \
    --compiler_flags="--compilation_level=ADVANCED_OPTIMIZATIONS" \
    --compiler_flags="--create_source_map=./hello-map" \
    > hello-compiled.js
In addition to hello-compiled.js, this will also
create a file named hello-map. Although the data in
hello-map may look like JavaScript, only its individual
lines are valid JSON, not the file as a whole.
When a web page hits a debugger statement while a
JavaScript debugger is enabled, such as Firebug, the program will
suspend so that the program state can be inspected using the debugger.
Reloading hello-compiled.html with the newly compiled
version of hello-compiled.js in Firefox with the Script tab
enabled in Firebug should suspend execution and look something like
Figure 1-6.
When the Closure Inspector is installed, there will be an extra
tab in the Firebug debugger named “Source Mapping” where the path to the
source map can be entered. Click “Open Local File” to select
hello-map from your computer. When you use the Closure
Inspector for the first time, it will also ask you to choose a file
where your settings for the Inspector can be saved. Something like
inspector-settings.js is a reasonable default to use, as
the contents of the file are JSON.
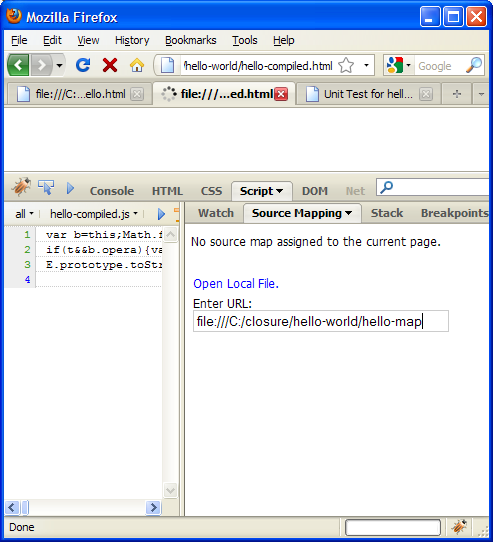
Once you have set the source map in the Inspector, refresh
hello-compiled.html with the Firebug panel open and you
should see the program stopped on the line that contains the
debugger statement, as shown in Figure 1-7.
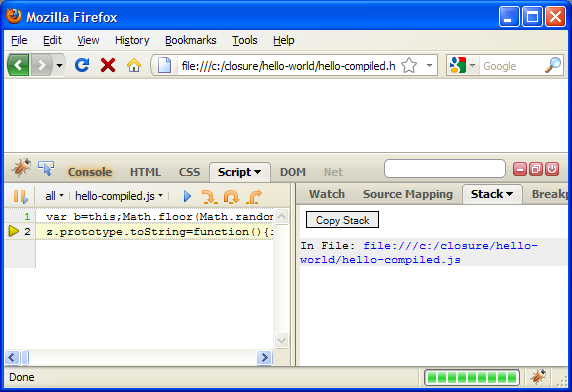
With the “Stack” tab selected in Firebug, pushing the “Copy Stack” button adds the following contents to the clipboard, which identify the current stacktrace:
In file: file:///c:/closure/hello-world/hello-compiled.js
    A | Line 2 | Original Name: goog.string.StringBuffer
In file: file:///c:/closure/hello-world/hello-compiled.html/event/seq/1
    onload | Line 2 | Original Name: goog.string.StringBuffer
By using the deobfuscated stack trace provided by the Closure Inspector, it is possible to look at the program and determine where the current point of execution is. Chapter 16 contains more information about the Inspector.
Get Closure: The Definitive Guide now with the O’Reilly learning platform.
O’Reilly members experience books, live events, courses curated by job role, and more from O’Reilly and nearly 200 top publishers.

