10. Gateways to Internet Information Servers
10.1 Overview
You have probably heard of information servers on the Internet such as Archie (which lets you search FTP sites) and NNTP (the Usenet news server). Like the Web itself, these services run as protocols on top of TCP/IP. To make these services available over the Web, you can develop CGI applications that act as clients to other Internet information servers using the TCP/IP network protocol.
Let's start by looking at how a server functions. Take an electronic mail application (though the theory can apply to any other server). Most mail programs save the user's messages in a particular file, typically in the /var/spool/mail directory. When you send mail to someone on a different host, the mail program must find the recipient's mail file on that machine and append the message to it. How exactly does the mail program achieve this task, since it cannot manipulate files on a remote host directly?
The answer to this question is interprocess communication (IPC). A process on the remote host acts as a messenger for the mail process on that machine. The local process communicates with this remote agent across a network to “deliver” mail. As a result, the remote process is called a server (it “services” an issued request), and the local process is referred to as a client. The Web works along the same philosophy: the browser is the client that issues a request to an HTTP server that interprets and executes the request.
The most important thing to remember here is that the client and the server must “speak the same language.” In other words, a particular client is designed to work with a specific server. So, for example, an Archie client cannot communicate with a Web server. But if you know the stream of data expected by a server, and the stream produced as output, you can write a CGI program that communicates with it, as we showed in the previous chapter.
One very useful application we will show in this chapter is one where you create both the client and the server. This will be a cookie handler, which helps you keep track of data when it is entered into multiple forms.
The communication protocols depend on the type of UNIX system. The version of UNIX from AT&T, called System V, provides STREAMS to communicate with processes across a network. On the other hand, the BSD flavor of UNIX, from the University of California at Berkeley, implements objects called sockets for network communication. In this chapter, we will look only at BSD sockets (also adopted by the PC world), which are, by far, the most popular way to handle network communications.
10.2 What Are Sockets?
Most companies these days have a telephone switchboard that acts as a gateway for calls coming in and going out. A socket can be likened to a telephone switchboard. If you want to connect to a remote host, you need to first create a socket through which the communications occur. This is similar to dialing “9” to go through the switchboard to the outside world.
Similarly, if you want to create a server that accepts connections from remote (or local) hosts, you need to set up a socket that “listens” periodically for connections. The socket is identified on the Internet by the host's IP address and the “port” that it listens on. Once a connection is established, a new socket is created to handle this connection, so that the original socket can go back and listen for more connections. The switchboard works in the same manner: as it handles outside phone calls, it routes them to the appropriate extension and goes back to accept more calls.
10.3 Socket I/O in Perl
The functions used to set up sockets in Perl have the same names as the corresponding UNIX system functions, but the arguments to the socket functions are slightly different, because of the way Perl works. Let's look at an example that implements a client to the finger server.
Please note that this not a CGI script. However, it should be very easy to convert this to a CGI script if so desired. It is meant to be run from the command line and to be passed one argument, the name of the user you want information about:
% finger_client username[@host]
As you can see, the calling format is identical to that of the UNIX finger command. In fact, this program works in the same exact manner.
#!/usr/local/bin/perl
require "sys/socket.ph";
The Perl header file “ socket.ph” contains definitions pertaining to different types of sockets, their addressing schemes, etc. We will look at some of these definitions in a moment.
If this file is not found, you (or the system administrator) need to run the h2ph Perl script that converts all the C/C++ header files into a format that Perl can understand. Now, let's continue.
chop ($hostname = `bin/hostname`);
$input = shift (@ARGV);
The current hostname is retrieved with the UNIX hostname command. And the input to the script is stored in the input variable. The shift statement simply returns the first element of an array.
($username, $remote_host) = split (/@/, $input, 2);
The specified username and remote host are split from the input variable.
unless ($remote_host) {
    $remote_host = $hostname;
}
If no host is specified, it defaults to the local host.
$service = "finger";
Once you create a socket, it is usually bound (or attached) to a port on the machine. In order to send a message--or request--to the server, you have to send it to the port the server is running on. Generally, most of the common servers (like FTP, Archie, Gopher, HTTP, and Finger) run on specific ports, and are usually the same on nearly all hosts across the Net. Otherwise, clients on different machines would not be able to access the servers, because they would not know what port the server is bound to. A list of all the ports and the servers attached to them are listed in the /etc/services file.
In this case, we are specifying the server's name, and not the port number. In case you are curious, the finger server runs on port 79. Later on, the getservbyname function converts the service “finger” to the correct port number.
$socket_template = "S n a4 x8";
This represents a 16-byte structure that is used with sockets for interprocess communications on the Internet. The first two bytes represent the numeric codes for the Internet address family in the byte order the local machine uses for short integers. The next two bytes represent the port number you want to connect to, in Internet standard byte order (i.e., big endian--the high byte of the integer is stored in the leftmost byte, while the low byte is stored in the rightmost byte). Bytes four through eight represent the IP address, and the last eight contain “\0” characters. We will see this in action soon.
$tcp = (getprotobyname("tcp"))[2];
Since the finger server is set up as a TCP protocol (don't worry about what this means!), we need to get a numeric code that identifies this protocol. The getprotobyname functions returns the name, alias, and number of the specified protocol. In our case, we are storing just the third element, as we do not need the others. As a side note, the constant AF_NS (from the sockets.ph header file) can be used instead of calling the getprotobyname function.
if ($service !~ /^\d+$/) {
    $service = (getservbyname ($service, "tcp"))[2];
}
If the service specified in the variable is not a numeric value, the getservbyname function uses the /etc/services file to retrieve the port number.
$current_address = (gethostbyname ($hostname))[4];
$remote_address  = (gethostbyname ($remote_host))[4];
The gethostbyname function converts a host name into a packed string that represents the network location. This packed string is like a common denominator; it needs to be passed to many functions. If you want to convert this string into the IP address, you have to unpack the string:
@ip_numbers = unpack ("C4", $current_address);
$ip_address = join (".", @ip_numbers);
unless ($remote_address) {
    die "Unknown host: ", $remote_host, "\n";
}
If the packed string representing the remote host is not defined, it signifies that the location does not exist.
$current_port = pack ($socket_template, &AF_INET, 0, $current_address);
$remote_port = pack ($socket_template, &AF_INET, $service, $remote_address);
These two lines are very important! Using the socket template we discussed earlier, three values representing the Internet addressing scheme, the port number, and the host name, are packed to create the socket structure that will be used to actually create the socket. The &AF_INET is a subroutine defined in the socket header file that refers to the Internet addressing (i.e., 128.197.27.7) method. You can also define other addressing schemes for sockets, such as &AF_UNIX, which uses UNIX pathnames to identify sockets that are local to a particular host.
socket (FINGER, &AF_INET, &SOCK_STREAM, $tcp) || die "Cannot create socket.\n";
The socket function creates a TCP/IP (Internet Protocol) socket called FINGER, which can actually be used as a file handle (as we will soon see). That is one of the simple beauties of sockets: Once you get through the complicated connecting tasks, you can read and write them like files.
The &SOCK_STREAM (another subroutine defined in the header file) value indicates that data travels across the socket as a stream of characters. You can also choose the &SOCK_DGRAM paradigm in which data travels in blocks, or datagrams. However, SOCK_STREAM sockets are the easiest to use.
bind (FINGER, $current_port)   || die "Cannot bind to port.\n";
connect (FINGER, $remote_port) || die "Cannot connect to remote port.\n";
The bind statement attaches the FINGER socket to the current address and port. Finally, the connect function connects the socket to the server located at the address and port specified by remote_port. If any of these functions fail, the script terminates.
$current_handle = select (FINGER);
$| = 1;
select ($current_handle);
This group of statements is used to unbuffer the socket, so the data coming in and going out of the socket is displayed in the correct order.
print FINGER $username, "\n";
The specified username is sent to the socket. The finger server expects a username only. You can test to see how the finger server works by using telnet to connect to port 79 (where the server resides):
% telnet acs.bu.edu 79
Trying 128.197.152.10 ...
Connected to acs.bu.edu.
Escape character is '^]'.
shishir
.
.
. (information returned by the server for user "shishir")
.
.
To complete our program:
while (<FINGER>) {
    print;
}
close (FINGER);
exit (0);
The while loop simply reads the information output by the server, and displays it. Reading from the socket is just like reading from a file or pipe (except that network errors can occur). Finally, the socket is closed.
If you found the explanation of socket creation confusing, that is OK. You will not have to write code like this. An easier set of functions will be explained shortly.
10.4 Socket Library
To make the whole task of creating clients and servers easier, a socket library was developed that encapsulates the various socket and network information functions. Here is the same finger client using the library:
#!/usr/local/bin/perl
require "sockets.pl";
$service = "finger";
chop ($hostname = `/bin/hostname`);
$input = shift (@ARGV);
($username, $remote_host) = split (/@/, $input, 2);
unless ($remote_host) {
        $remote_host = $hostname;
}
Most of the code here is the same as that used in the previous example, with one exception. The require command includes the sockets.pl library.
&open_connection (FINGER, $remote_host, $service)
    || die "Cannot open connection to: $remote_host", "\n";
The open_connection library subroutine performs the following tasks:
- Check to see if the remote host is an IP number (128.197.152.10) or an IP name (acs.bu.edu), and perform the appropriate conversion to a packed address string.
- Create a socket.
- Bind the socket to the current host.
- Connect the socket to the remote address and port.
- Unbuffer the socket.
Now, here is the rest of the program.
print FINGER $username, "\n";
while (<FINGER>) {
    print;
}
&close_connection (FINGER);
exit (0);
The close_connection subroutine flushes the socket so that all the remaining information in the socket is released, and then closes it. As you can see, this library makes the whole process of communicating with network servers much easier. Now, let's look at a simple example that interacts with an HTTP server.
10.5 Checking Hypertext (HTTP) Links
If you look back at the guestbook example in Chapter 7, Advanced Form Applications, you will notice that one of the fields asked for the user's HTTP server. At that time, we did not discuss any methods to check if the address given by the user is valid. However, with our new knowledge of sockets and network communication, we can, indeed, determine the validity of the address. After all, web servers have to use the same Internet protocols as everyone else; they possess no magic. If we open a TCP/IP socket connection to a web server, we can pass it commands it recognizes, just as we passed a command to the finger daemon (server). Before we go any further, here is a small snippet of code from the guestbook that outputs the user-specified URL:
if ($FORM{'www'}) {
            print GUESTBOOK <<End_of_Web_Address;
<P>
$FORM{'name'} can also be reached at:
<A HREF="$FORM{'www'}">$FORM{'www'}</A>
End_of_Web_Address
        }
Here is a subroutine that utilizes the socket library to check for valid URL addresses. It takes one argument, the URL to check.
sub check_url
{
local ($url) = @_;
local ($current_host, $host, $service, $file, $first_line);
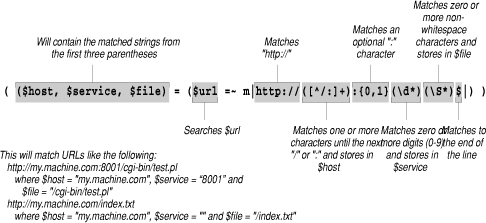
if (($host, $service, $file) =
($url =~ m|http://([^/:]+):{0,1}(\d*)(\S*)$|)) {
This regular expression parses the specified URL and retrieves the hostname, the port number (if included), and the file.
Let's continue with the program:
chop ($current_host = `\bin\hostname`);
        $host = $current_host  if ($host eq "localhost");
        $service = "http"      unless ($service);
        $file = "/"            unless ($file);
If the hostname is given as “localhost”, the current hostname is used. In addition, the service name and the file are set to “http”, and “/”, respectively, if no information was specified for these fields.
&open_connection (HTTP, $host, $service) || return (0);
        print HTTP "HEAD $file HTTP/1.0", "\n\n";
A socket is created, and a connection is attempted to the remote host. If it fails, an error status of zero is returned. If it succeeds, the HEAD command is issued to the HTTP server. If the specified document exists, the server returns something like this:
HTTP/1.0 200 OK
Date: Fri Nov  3 06:09:17 1995 GMT
Server: NCSA/1.4.2
MIME-version: 1.0
Content-type: text/html
Last-modified: Sat Feb  4 17:56:33 1995 GMT
Content-length: 486
All we are concerned about is the first line, which contains a status code. If the status code is 200, a success status of one is returned. If the document is protected, or does not exist, error codes of 401 and 404, respectively, are returned (see Chapter 3, Output from the Common Gateway Interface). Here is the code to check the status:
chop ($first_line = <HTTP>);
        if ($first_line =~ /200/) {
            return (1);
        } else {
            return (0);
        }
        close (HTTP);
    } else {
        return (0);
    }
}
This is how you would use this subroutine in the guestbook:
if ($FORM{'www'}) {
            &check_url ($FORM{'www'}) ||
                &return_error (500, "Guestbook File Error",
                "The specified URL does not exist. Please enter a valid URL.");
            print GUESTBOOK <<End_of_Web_Address;
<P>
$FORM{'name'} can also be reached at:
<A HREF="$FORM{'www'}">$FORM{'www'}</A>
End_of_Web_Address
        }
Now, let's look at an example that creates a gateway to the Archie server using pre-existing client software.
10.6 Archie
Archie is a database/index of the numerous FTP sites (and their contents) throughout the world. You can use an Archie client to search the database for specific files. In this example, we will use Brendan Kehoe's Archie client software (version 1.3) to connect to an Archie server and search for user-specified information. Though we could have easily written a client using the socket library, it would be a waste of time, since an excellent one exists. This Archie gateway is based on ArchiPlex, developed by Martijn Koster.
#!/usr/local/bin/perl
$webmaster = "Shishir Gundavaram (shishir\@bu\.edu)";
$archie = "/usr/local/bin/archie";
$error = "CGI Archie Gateway Error";
$default_server = "archie.rutgers.edu";
$timeout_value = 180;
The archie variable contains the full path to the Archie client. Make sure you have an Archie client with this pathname on your local machine; if you do not have a client, you have to telnet to a machine with a client and run this program there.
The default server to search is stored. This is used in case the user failed to select a server.
Finally, timeout_value contains the number of seconds after which an gateway will return an error message and terminate. This is so that the user will not have to wait forever for the search results.
%servers = (
  'ANS Net (New York, USA)',         'archie.ans.net',
  'Australia',                       'archie.au',
  'Canada',                          'archie.mcgill.ca',
  'Finland/Mainland Europe',         'archie.funet.fi',
  'Germany',                         'archie.th-darmstadt.de',
  'Great Britain/Ireland',           'archie.doc.ac.ac.uk',
  'Internic Net (New York, USA)',    'ds.internic.net',
  'Israel',                          'archie.ac.il',
  'Japan',                           'archie.wide.ad.jp',
  'Korea',                           'archie.kr',
  'New Zealand',                     'archie.nz',
  'Rutgers University (NJ, USA)',    'archie.rutgers.edu',
  'Spain',                           'archie.rediris.es',
  'Sweden',                          'archie.luth.se',
  'SURANet (Maryland, USA)',         'archie.sura.net',
  'Switzerland',                     'archie.switch.ch',
  'Taiwan',                          'archie.ncu.edu.tw',
  'University of Nebrasksa (USA)',   'archie.unl.edu' );
Some of the Archie servers and their IP names are stored in an associative array. We will create the form for this gateway dynamically, listing all of the servers located in this array.
$request_method = $ENV{'REQUEST_METHOD'};
if ($request_method eq "GET") {
    &display_form ();
The form will be created and displayed if this program was accessed with the browser.
} elsif ($request_method eq "POST") {
    &parse_form_data (*FORM);
    $command = &parse_archie_fields ();
All of the form data is decoded and stored in the FORM associative array. The parse_archie_fields subroutine uses the form data in constructing a query to be passed to the Archie client.
$SIG{'ALRM'} = "time_to_exit";
    alarm ($timeout_value);
To understand how this array is used, you have to understand that the UNIX kernel checks every time an interrupt or break arrives for a program, and asks, “What routine should I call?” The routine that the program wants called is a signal handler. Perl associates a handler with a signal in the SIG associative array.
As shown above, the traditional way to implement a time-out is to set an ALRM signal to be called after a specified number of seconds. The first line says that when an alarm is signaled, the time_to_exit subroutine should be executed. The Perl alarm call on the second line schedules the ALRM signal to be sent in the number of seconds represented by the $timeout_value variable.
open (ARCHIE, "$archie $command |");
    $first_line = <ARCHIE>;
A pipe is opened to the Archie client. The command variable contains a “query” that specifies various command-line options, such as search type and Archie server address, as well as the string to search for. The parse_archie_fields subroutine makes sure that no shell metacharacters are specified, since the command variable is “exposed” to the shell.
if ($first_line =~ /(failed|Usage|WARNING|Timed)/) {
        &return_error (500, $error,
            "The archie client encountered a bad request.");
    } elsif ($first_line =~ /No [Mm]atches/) {
        &return_error (500, $error,
        "There were no matches for <B>$FORM{'query'}</B>.");
    }
If the first line from the Archie server contains either an error or a “No Matches” string, the return_error subroutine is called to return a more friendly (and verbose) message. If there is no error, the first line is usually blank.
print "Content-type: text/html", "\n\n";
    print "<HTML>", "\n";
    print "<HEAD><TITLE>", "CGI Archie Gateway", "</TITLE></HEAD>", "\n";
    print "<BODY>", "\n";
    print "<H1>", "Archie search for: ", $FORM{'query'}, "</H1>", "\n";
    print "<HR>", "<PRE>", "\n";
The usual type of header information is output. The following lines of code parse the output from the Archie server, and create hypertext links to the matched files. Here is the typical format for the Archie server output. It lists each host where a desired file (in this case, emacs) is found, followed by a list of all publicly accessible directories containing a file of that name. Files are listed in long format, so you can see how old they are and what their sizes are.
Host amadeus.ireq-robot.hydro.qc.ca
    Location: /pub
      DIRECTORY drwxr-xr-x        512  Dec 18 1990  emacs
Host anubis.ac.hmc.edu
    Location: /pub
      DIRECTORY drwxr-xr-x        512  Dec  6 1994  emacs
    Location: /pub/emacs/packages/ffap
      DIRECTORY drwxr-xr-x        512  Apr  5 02:05  emacs
    Location: /pub/perl/dist
      DIRECTORY drwxr-xr-x        512  Aug 16 1994  emacs
    Location: /pub/perl/scripts/text-processing
           FILE -rwxrwxrwx         16  Feb 25 1994  emacs
We can enhance this output by putting in hypertext links. That way, the user can open a connection to any of the hosts with a click of a button and retrieve the file. Here is the code to parse this output:
while (<ARCHIE>) {
        if ( ($host) = /^Host (\S+)$/ ) {
            $host_url = join ("", "ftp://", $host);
            s|$host|<A HREF="$host_url">$host</A>|;
            <ARCHIE>;
If the line starts with a “Host”, the specified host is stored. A URL to the host is created with the join function, using the ftp scheme and the hostname--for example, if the hostname were ftp.ora.com, the URL would be ftp://ftp.ora.com. Finally, the blank line after this line is discarded.
} elsif (/^\s+Location:\s+(\S+)$/) {
            $location = $1;
s|$location|<A HREF="${host_url}${location}">$location</A>|;
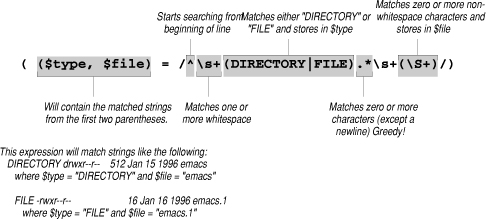
} elsif ( ($type, $file) = /^\s+(DIRECTORY|FILE).*\s+(\S+)/) {
s|$type|<I>$type</I>|;
s|$file|<A HREF="${host_url}${location}/${file}">$file</A>|;
} elsif (/^\s*$/) {
print "<HR>";
}
print;
}
One subtle feature of regular expressions is shown here: They are “greedy,” eating up as much text as they can. The expression (DIRECTORY|FILE).*\s+ means match DIRECTORY or FILE, then match as many characters as you can up to whitespace. There are chunks of whitespace throughout the line, but the .* takes up everything up to the last whitespace. This leaves just the word “emacs” to match the final parenthesized expression (\S+).
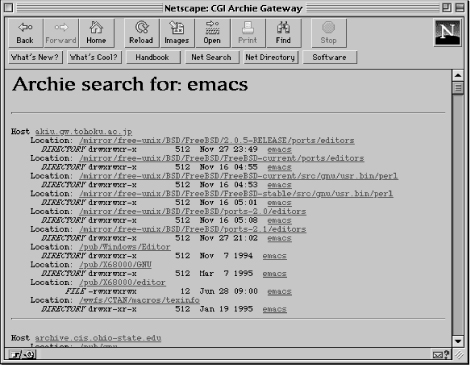
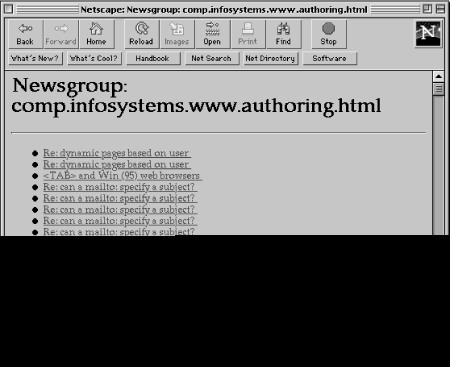
The rest of the lines are read and parsed in the same manner and displayed (see Figure 10.1). If the line is empty, a horizontal rule is output--to indicate the end of each entry.
$SIG{'ALRM'} = "DEFAULT";
    close (ARCHIE);
    print "</PRE>";
    print "</BODY></HTML>", "\n";
Finally, the ALRM signal is reset, and the file handle is closed.
} else {
    &return_error (500, $error, "Server uses unspecified method");
}
exit (0);
Remember how we set the SIG array so that a signal would cause the time_to_exit subroutine to run? Here it is:
sub time_to_exit
{
    close (ARCHIE);
    &return_error (500, $error,
        "The search was terminated after $timeout_value seconds.");
}
When this subroutine runs, it means that the 180 seconds that were allowed for the search have passed, and that it is time to terminate the script. Generally, the Archie server returns the matched FTP sites and its files quickly, but there are times when it can be queued up with requests. In such a case, it is wise to terminate the script, rather than let the user wait for a long period of time.
Now, we have to build a command that the Archie client recognizes using the parse_archie_fields subroutine:
sub parse_archie_fields
{
    local ($query, $server, $type, $address, $status, $options);
    $status = 1;
    $query = $FORM{'query'};
    $server = $FORM{'server'};
    $type = $FORM{'type'};
    if ($query !~ /^\w+$/) {
          &return_error (500, $error,         "Search query contains invalid characters.");
If the query field contains non-alphanumeric characters (characters other than A-Z, a-z, 0-9, _), an error message is output.
} else {
        foreach $address (keys %servers) {
            if ($server eq $address) {
                $server = $servers{$address};
                $status = 0;
            }
        }
The foreach loop iterates through the keys of the servers associative array. If the user-specified server matches the name as contained in the array, the IP name is stored in the server variable, and the status is set to zero.
if ($status) {
            &return_error (500, $error, "Please select a valid archie host.");
A status of non-zero indicates that the user specified an invalid address for the Archie server.
} else {
            if ($type eq "cs_sub") {
                $type = "-c";
            } elsif ($type eq "ci_sub") {
                $type = "-s";
            } else {
                $type = "-e";
            }
If the user selected “Case Sensitive Substring”, the “-c” switch is used. The “-s” switch indicates a “Case Insensitive Substring”. If the user did not select any option, the “-e” switch (“Exact Match”) is used.
$options = "-h $server $type $query";
            return ($options);
        }
    }
}
A string containing all of the options is created, and then returned to the main program.
Our last task is a simple one--to create a form that allows the user to enter a query, using the display_form subroutine. The program creates the form dynamically because some information is subject to change (i.e., the list of servers).
sub display_form
{
    local ($archie);
print <<End_of_Archie_One;
Content-type: text/html
<HTML>
<HEAD><TITLE>Gateway to Internet Information Servers</TITLE></HEAD>
<BODY>
<H1>CGI Archie Gateway</H1>
<HR>
<FORM ACTION="/cgi-bin/archie.pl" METHOD="POST">
Please enter a string to search from: <BR>
<INPUT TYPE="text" NAME="query" SIZE=40>
<P>
What archie server would you like to use (<B>please</B>, be considerate
and use the one that is closest to you): <BR>
<SELECT NAME="server" SIZE=1>
End_of_Archie_One
    foreach $archie (sort keys %servers) {
        if ($servers{$archie} eq $default_server) {
            print "<OPTION SELECTED>", $archie, "\n";
        } else {
            print "<OPTION>", $archie, "\n";
        }
    }
This loop iterates through the associative array and displays all of the server names.
print <<End_of_Archie_Two;
</SELECT>
<P>
Please select a type of search to perform: <BR>
<INPUT TYPE="radio" NAME="type" VALUE="exact" CHECKED>Exact<BR>
<INPUT TYPE="radio" NAME="type" VALUE="ci_sub">Case Insensitive Substring<BR>
<INPUT TYPE="radio" NAME="type" VALUE="cs_sub">Case Sensitive Substring<BR>
<P>
<INPUT TYPE="submit" VALUE="Start Archie Search!">
<INPUT TYPE="reset"  VALUE="Clear the form">
</FORM>
<HR>
</BODY>
</HTML>
End_of_Archie_Two
}
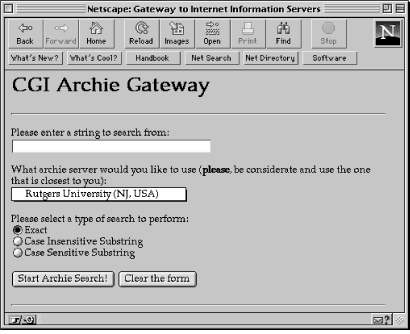
The dynamic form looks like that in Figure 10.2.
This was a rather simple program because we did not have to deal with the Archie server directly, but rather through a pre-existing client. Now, we will look at an example that is a little bit more complicated.
10.7 Network News on the Web
NNTP (Network News Transfer Protocol) is the most popular software used to transmit Usenet news over the Internet. It lets the receiving (client) system tell the sending (server) system which newsgroups to send, and which articles from each group. NNTP accepts commands in a fairly simple format. It sends back a stream of text consisting of the articles posted and occasional status information.
This CGI gateway communicates with an NTTP server directly by using socket I/O. The program displays lists of newsgroups and articles for the user to choose from. You will be able to read news from the specified newsgroups in a threaded fashion (all the replies to each article are grouped together).
#!/usr/local/bin/perl
require "sockets.pl";
$webmaster = "Shishir Gundavaram (shishir\@bu\.edu)";
$error = "CGI NNTP Gateway Error";
%groups = ( 'cgi',     'comp.infosystems.www.authoring.cgi',
            'html',    'comp.infosystems.www.authoring.html',
            'images',  'comp.infosystems.www.authoring.images',
            'misc',    'comp.infosystems.www.authoring.misc',
            'perl',    'comp.lang.perl.misc' );
The groups associative array contains a list of the newsgroups that will be displayed when the form is dynamically created.
$all_groups = '(cgi|html|images|misc|perl)';
The all_groups variable contains a regular expression listing all of the keys of the groups associative array. This will be used to ensure that a valid newsgroup is specified by the user.
$nntp_server = "nntp.bu.edu";
The NNTP server is set to “nntp.bu.edu”. If you do not want users from domains other than “bu.edu” to access this form, you can set up a simple authentication scheme like this:
$allowed_domain = "bu.edu";
$remote_host = $ENV{'REMOTE_HOST'};
($remote_domain) = ($remote_host =~ /([^.]+\.[^.]+)$/);
if ($remote_domain ne $allowed_domain) {
    &return_error (500, $error, "Sorry! You are not allowed to read news!");
}
The regular expression used above extracts the domain name from an IP name or address.

Or, you can allow multiple domains like this:
$allowed_domains = "(bu.edu|mit.edu|perl.com)";
$remote_host = $ENV{'REMOTE_HOST'};
if ($remote_host !~ /$allowed_domains$/o) {
    &return_error (500, $error, "Sorry! You are not allowed to read news!");
}
To continue with the program:
&parse_form_data (*NEWS);
$group_name = $NEWS{'group'};
$article_number = $NEWS{'article'};
There is no form front end to this CGI gateway. Instead, all parameters are passed as query information (GET method). If you access this application without a query, a document listing all the newsgroups is listed. Once you select a newsgroup from this list, the program is invoked again, this time with a query that specifies the newsgroup you want. For instance, if you want the newsgroup whose key is “images”, this query is passed to the program:
http://some.machine/cgi-bin/nntp.pl?group=images
The groups associative array associates the string “images” with the actual newsgroup name. This is a more secure way of handling things--much like the way the Archie server names were passed instead of the actual IP names in the previous example. If the program receives a query like the one above, it displays a list of the articles in the newsgroup. When the user chooses an article, the query information will look like this:
http://some.machine/cgi-bin/nntp.pl?group=images&article=18721
This program will then display the article.
if ($group_name =~ /\b$all_groups\b/o) {
   $selected_group = $groups{$group_name};
This block of code will be executed only if the group field consists of a valid newsgroup name, as stored in all_groups. The actual newsgroup name is stored in the selected_group variable.
&open_connection (NNTP, $nntp_server, "nntp") ||
          &return_error (500, $error, "Could not connect to NNTP server.");
    &check_nntp ();
A socket is opened to the NNTP server. The server usually runs on port 119. The check_nntp subroutine checks the header information that is output by the server upon connection. If the server issues any error messages, the script terminates.
($first, $last) = &set_newsgroup ($selected_group);
The NNTP server keeps track of all the articles in a newsgroup by numbering them in ascending order, starting at some arbitrary number. The set_newsgroup subroutine returns the identification number for the first and last articles.
if ($article_number) {
        if (($article_number < $first) || ($article_number > $last)) {
            &return_error (500, $error,
                 "The article number you specified is not valid.");
        } else {
            &show_article ($selected_group, $article_number);
        }
If the user selected an article from the list that was dynamically generated when a newsgroup is selected, this branch of code is executed. The article number is checked to make sure that it lies within the valid range. You might wonder why we need to check this, since the list that is presented to the user is based on the range generated by the set_newsgroup subroutine. The reason for this is that the NNTP server lets articles expire periodically, and articles are sometimes deleted by their author. If sufficient time passes between the time the list is displayed and the time the user makes a selection, the specified article number could be invalid. In addition, I like to handle the possibility that a user hardcoded a query.
} else {
        &show_all_articles ($group_name, $selected_group, $first, $last);
}
If no article is specified, which happens when the user selects a newsgroup from the main HTML document, the show_all_articles subroutine is called to display a list of all the articles for the selected newsgroup.
print NNTP "quit", "\n";
    &close_connection (NNTP);
Finally, the quit command is sent to the NNTP server, and the socket is closed.
} else {
    &display_newsgroups ();
}
exit (0);
If this program is accessed without any query information, or if the specified newsgroup is not among the list stored in the groups associative array, the display_newsgroups subroutine is called to output the valid newsgroups.
The following print_header subroutine displays a MIME header, and some HTML to display the title and the header.
sub print_header
{
    local ($title) = @_;
    print "Content-type: text/html", "\n\n";
        print "<HTML>", "\n";
    print "<HEAD><TITLE>", $title, "</TITLE></HEAD>", "\n";
        print "<BODY>", "\n";
    print "<H1>", $title, "</H1>", "\n";
    print "<HR>", "<BR>", "\n";
}
The print_footer subroutine outputs the webmaster's address.
sub print_footer
{
    print "<HR>", "\n";
    print "<ADDRESS>", $webmaster, "</ADDRESS>", "\n";
        print "</BODY></HTML>", "\n";
}
The escape subroutine “escapes” all characters except for alphanumeric characters and whitespace. The main reason for this is so that “special” characters are displayed properly.
sub escape
{
    local ($string) = @_;
    $string =~ s/([^\w\s])/sprintf ("&#%d;", ord ($1))/ge;
    return ($string);
}
For example, if an article in a newsgroup contains:
From: joe@test.net (Joe Test)
Subject: I can't get the <H1> headers to display correctly
The browser will actually interpret the “<H1>”, and the rest of the document will be messed up. This subroutine escapes the text so that it looks like this:
From: joe@test.net (Joe Test)
Subject: I can't get the <H1> headers to display correctly
A web client can interpret any string in the form &#n, where n is the ASCII code of the character. This might slow down the display slightly, but it is much safer than escaping specific characters only.
The check_nntp subroutine continuously reads the output from the NNTP server until the return status is either a success (200 or 201) or a failure (4xx or 5xx). You might have noticed that these status codes are very similar to the HTTP status code. In fact, most Internet servers that follow a standard use these codes.
sub check_nntp
{
    while (<NNTP>) {
        if (/^(200|201)/) {
            last;
        } elsif (/^4|5\d+/) {
            &return_error (500, $error, "The NNTP server returned an error.");
        }
    }
}
The set_newsgroup subroutine returns the first and last article numbers for the newsgroup.
sub set_newsgroup
{
    local ($group) = @_;
    local ($group_info, $status, $first_post, $last_post);
    print NNTP "group ", $group, "\n";
The group command is sent to the NNTP server. In response to this, the server sets its current newsgroup to the one specified, and outputs information in the following format:
group comp.infosystems.www.authoring.cgi
211 1289 4776 14059 comp.infosystems.www.authoring.cgi
The first column indicates the status of the operation ( 211 being a success). The total number of articles, the first and last articles, and the newsgroup name constitute the rest of the line, respectively. As you can see, the number of articles is not equal to the numerical difference of the first and last articles. This is due to article expiration and deletion (as mentioned above).
$group_info = <NNTP>;
    ($status, $first_post, $last_post) = (split (/\s+/, $group_info))[0, 2, 3];
The server output is split on whitespace, and the first, third, and fourth elements are stored in status, first_post, and last_post, respectively. Remember, arrays are zero based; the first element is zero, not one.
if ($status != 211) {
        &return_error (500, $error,
                            "Could not get group information for $group.");
    } else {
        return ($first_post, $last_post);
    }
}
If the status is not 211, an error message is displayed. Otherwise, the first and last article numbers are returned.
In the show_article subroutine, the actual news article is retrieved and printed.
sub show_article
{
    local ($group, $number) = @_;
    local ($useful_headers, $header_line);

    $useful_headers = '(From:|Subject:|Date:|Organization:)';
    print NNTP "head $number", "\n";
    $header_line = <NNTP>;
The head command displays the headers for the specified article. Here is the format of the NNTP output:
221 14059 <47hh6767ghe1$d09@nntp.test.net> head
Path: news.bu.edu!decwrl!nntp.test.net!usenet
From: joe@test.net (Joe Test)
Newsgroups: comp.infosystems.www.authoring.cgi
Subject: I can't get the <H1> headers to display correctly
Date: Thu, 05 Oct 1995 05:19:03 GMT
Organization: Joe's Test Net
Lines: 17
Message-ID: <47hh6767ghe1$d09@nntp.test.net>
Reply-To: joe@test.net
NNTP-Posting-Host: my.news.test.net
X-Newsreader: Joe Windows Reader v1.28
.
The first line contains the status, the article number, the article identification, and the NNTP command, respectively. The status of 221 indicates success. All of the other lines constitute the various article headers, and are based on how and where the article was posted. The header body ends with the “.” character.
if ($header_line =~ /^221/) {
        &print_header ($group);
        print "<PRE>", "\n";
If the server returns a success status of 221, the print_header subroutine is called to display the MIME header, followed by the usual HTML.
while (<NNTP>) {
            if (/^$useful_headers/) {
                $_ = &escape ($_);
                print "<B>", $_, "</B>";
            } elsif (/^\.\s*$/) {
                last;
            }
        }
This loop iterates through the header body, and escapes and displays the From, Subject, Date, and Organization headers.
print "\n";
        print NNTP "body $number", "\n";
<NNTP>;
If everything is successful up to this point, the body command is sent to the server. In response, the server outputs the body of the article in the following format:
body 14059
222 14059 <47hh6767ghe1$d09@nntp.test.net> body
I am trying to display headers using the <H1> tag, but it does not
seem to be working. What should I do? Please help.
Thanks in advance,
-Joe
.
There is no need to check the status of this command, if the head command executed successfully. The server returns a status of 222 to indicate success.
while (<NNTP>) {
            last if (/^\.\s*$/);
            $_ = &escape ($_);
            print;
        }
The while loop iterates through the body, escapes all the lines, and displays them. If the line starts with a period and contains nothing else but whitespace, the loop terminates.
print "</PRE>", "\n";
        &print_footer ();
    } else {
        &return_error (500, $error,
            "Article number $number could not be retrieved.");
    }
}
If the specified article is not found, an error message is displayed.
The following subroutine reads all of the articles for a particular group into memory, threads them--all replies to a specific article are grouped together for reading convenience--and displays the article numbers and subject lines.
sub show_all_articles
{
    local ($id, $group, $first_article, $last_article) = @_;
    local ($this_script, %all, $count, @numbers, $article,
           $subject, @threads, $query);
    $this_script = $ENV{'SCRIPT_NAME'};
    $count = 0;
This is the most complicated (but the most interesting) part of the program. Before your eyes, you will see a nice web interface grow from some fairly primitive output from the NNTP server.
print NNTP "xhdr subject $first_article-$last_article", "\n";
    <NNTP>;
The xhdr subject lists all the articles in the specified range in the following format:
xhdr subject 4776-14059
221 subject fields follow
4776 Re: CGI Scripts (guestbook ie)
4831 Re: Access counter for CERN server
12769 Re: Problems using sendmail from Perl script
12770 File upload, Frames and BSCW
-
- (More Articles)
-
.
The first line contains the status. Again, there is no need to check this, as we know the newsgroup exists. Each article is listed with its number and subject.
&print_header ("Newsgroup: $group");
    print "<UL>", "\n";
    while (<NNTP>) {
        last if (/^\.\s*$/);
        $_ = &escape ($_);
        ($article, $subject) = split (/\s+/, $_, 2);
        $subject =~ s/^\s*(.*)\b\s*/$1/;
        $subject =~ s/^[Rr][Ee]:\s*//;
The loop iterates through all of the subjects. The split command separates each entry into the article number and subject. Leading and trailing spaces, as well as “Re:” at the beginning of the line are removed from the subject. This is for sorting purposes.
if (defined ($all{$subject})) {
            $all{$subject} = join ("-", $all{$subject}, $article);
        } else {
            $count++;
            $all{$subject} = join ("\0", $count, $article);
        }
    }
This is responsible for threading the articles. Each new subject is stored in an associative array, $all, keyed by the subject itself. The $count variable gives a unique number to start each value in the array. If the article already exists, the article number is simply appended to the end to the element with the same subject. For example, if the subjects look like this:
2020 What is CGI?
2026 How do you create counters?
2027 Please help with file locking!!!
2029 Re: What is CGI?
2030 Re: What is CGI?
2047 Re: How do you create counters?
.
.
.
Then this is how the associative array will look:
$all{'What is CGI?'} = "1\02020-2029-2030";
$all{'How do you create counters?'} = "2\02026-2047";
$all{'Please help with file locking!!!'} = "3\02027";
Note that we assigned a $count of 1 to the first thread we see (“What's CGI?”), 2 to the second thread, and so on. Later we sort by these numbers, so the user will see threads in the order that they came in to the newsgroup.
@numbers = sort by_article_number keys (%all);
What you see here is a common Perl technique for sorting. The sort command invokes a subroutine repeatedly (in this case, one that I wrote called by_article_number). Using a fast algorithm, it passes pairs of elements from the $all array to the subroutine.
foreach $subject (@numbers) {
        $article = (split("\0", $all{$subject}))[1];
The loop iterates through all of the subjects. The list of article numbers for each subject is stored in article. Thus, the $article variable for “What is CGI?” would be:
2020-2029-2030
Now, we work on the string of articles.
@threads = split (/-/, $article);
The string containing all of the articles for a particular subject are split on the “-” delimiter and stored in the threads array.
foreach (@threads) {
            $query = join ("", $this_script, "?", "group=", $id,
                       "&", "article=", $_);
            print qq|<LI><A HREF="$query">$subject</A>|, "\n";
        }
    }
    print "</UL>", "\n";
    &print_footer ();
}
The loop iterates through each article number (or thread), and builds a hypertext link containing the newsgroup name and the article number (see Figure 10.3).
The following is a simple subroutine that compares two values of an associative array.
sub by_article_number
{
    $all{$a} <=> $all{$b};
}
This statement is identical to the following:
if ($all{$a} < $all{$b}) {
    return (-1);
} elsif ($all{$a} == $all{$b}) {
    return (0);
} elsif ($all{$a} > $all{$b}) {
    return (1);
}
The $a and $b constitute two values in the associative array. In this case, Perl uses this logic to compare all of the values in the associative array.
The display_newsgroups subroutine creates a dynamic HTML document that lists all the newsgroups contained in the groups associative array.
sub display_newsgroups
{
    local ($script_name, $keyword, $newsgroup, $query);
    &print_header ("CGI NNTP Gateway");
    $script_name = $ENV{'SCRIPT_NAME'};
    print "<UL>", "\n";
    foreach $keyword (keys %groups) {
        $newsgroup = $groups{$keyword};
        $query = join ("", $script_name, "?", "group=", $keyword);
        print qq|<LI><A HREF="$query">$newsgroup</A>|, "\n";
    }
    print "</UL>";
    &print_footer ();
}
Each newsgroup is listed as an unordered list, with the query consisting of the specific key from the associative array. Remember, the qq|...| notation is exactly like the “...” notation, except for the fact that “|” is the delimiter, instead of the double quotation marks.
10.8 Magic Cookies
In Chapter 8, we introduced you to some of the problems of working with multiple forms, and presented a few possible solutions. In this chapter, we approach the problem again, using our new familiarity with clients and servers.
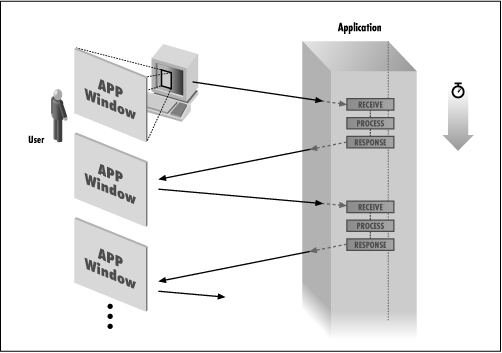
An interface consisting of multiple forms presents thorny problems for CGI. How do you remember the information stored on different forms? A normal graphical interface application (running on a local machine) simply displays forms and stores results, as shown in Figure 10.4.
Figure 10.4: A local application handling multiple forms
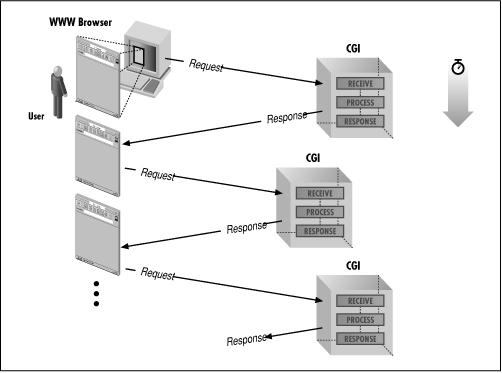
It is easy to store information from successive forms when a client and a server are not involved. But when you use CGI, the server invokes the program repeatedly each time a form is submitted. Instead of a single running program, you have multiple instances, as shown in Figure 10.5.
Figure 10.5: Multiple forms over a server
The problem you face is how to tell each instance of the program what data was retrieved by the previous runs.
Temporary files are a simple solution, but a messy one. The program has to know which file to read and write each time. Knowing the right file is complicated when multiple users are running the program at the same time. Furthermore, the information is not very secure, because the files are visible on the system. The time required to access the files can slow down the operation. Finally, you have to remember to clean up the files, when the user goes away and does not finish the session.
A much more elegant solution involves a special server whose job is to maintain state for CGI programs. This server runs continuously, like any other server. CGI programs of all types and purposes can use this server to store information. The big advantage that a server has over temporary files is that the data remains in memory. This makes operations faster and keeps the data much more secure.
The heart of the server approach is that a CGI program knows how to retrieve data that a previous instance of the program sent to the server. Each instance of the program needs a kind of handle so it can find the data. To furnish this access, the server associates a unique identifier with each user who runs the CGI program. The program supplies the identifier when it stores the data, and another instance of the program supplies the identifier again to retrieve the data. Given to colorful language, computer people like to call such identifiers “magic cookies.” Using a single cookie, a CGI program can keep track of any amount of data. So the server is called a cookie server, while the CGI program is called the cookie client.
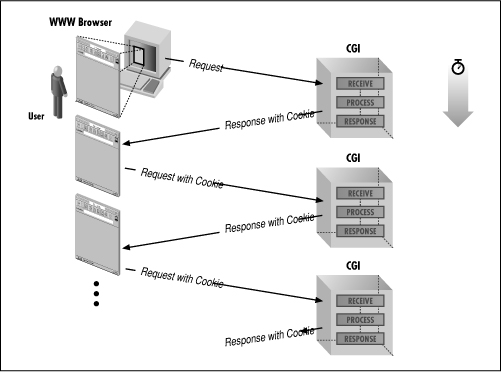
Another major problem has to be solved to use cookies. One instance of the CGI program has to pass the cookie to the next instance. If you look at Figure 10.5, you may see the solution in the arrows: Pass the cookie to the next form, and have the form pass it back. This is the solution we will use in this book. When the CGI program builds each form, it embeds the cookie in a hidden field. When the user submits the form, it passes back the hidden field. The new instance of the program, when it starts up, can retrieve the cookie like any other field, and ask the server for the data. The procedure is shown in Figure 10.6.
Figure 10.6: Cookie server interaction with a Web client and server
Let's trace a cookie, and the data associated with it, through a complete session.
- The user fills out the first form, and the CGI program is invoked for the first time.
- The CGI program contacts the server for the first time. The server creates a cookie and passes it to the program. The program also passes data to the server, using the cookie given to it by the server.
- The program creates the next form for the user, embeds the cookie in a hidden field, and sends the form to the browser.
- The browser displays the form, which is filled out by the user and submitted. The form passes back the hidden field with the cookie.
- A new instance of the CGI program begins. It gets the cookie from the form data, and starts contacting the server all over again. This time, the program passes the existing cookie instead of creating a new one.
This is our strategy. Understanding this, you should not have much trouble following the code that is about to follow.
10.9 Maintaining State with a Server
In Chapter 8, Multiple Form Interaction, we looked at several techniques for keeping track of information between multiple forms. They involved using temporary files, hidden variables, and Netscape Persistent Cookies. Now, we will look at yet another method to keep state. This involves communicating with a server--The Cookie Server--to store and retrieve information.
It will help you understand how cookies work if you see real programs use them. So we will examine a CGI program that displays two forms, and that stores the information returned by calling the cookie server. Here is the first form:
<HTML>
<HEAD><TITLE>College/School Survey</TITLE></HEAD>
<BODY>
<H1>Interests</H1>
<HR>
<FORM ACTION="/cgi-bin/cookie_client.pl?next=/location.html” METHOD="POST">
The ACTION attribute specifies the next form in the series as a query string. The filename is relative to the document root directory.
<INPUT TYPE="hidden" NAME="Magic_Cookie" VALUE="-*Cookie*-">
The string “-*Cookie*-” will be replaced by a random cookie identifier when this form is parsed by the CGI program. This cookie is used to uniquely identify the form information.
What subject are you interested in? <BR>
<INPUT TYPE="text" NAME="subject" SIZE=40>
<P>
What extra-curricular activity do you enjoy the most? <BR>
<INPUT TYPE="text" NAME="interest" SIZE=40>
<P>
<INPUT TYPE="submit" VALUE="See Next Form!">
<INPUT TYPE="reset"  VALUE="Clear the form">
</FORM>
<HR>
</BODY>
</HTML>
Here is the second form in the series. It should be stored in a file named location.html because that name was specified in the ACTION attribute of the first form.
<HTML>
<HEAD><TITLE>College/School Survey</TITLE></HEAD>
<BODY>
<H1>Location</H1>
<HR>
<FORM ACTION="/cgi-bin/cookie_client.pl" METHOD="POST">
Since this is the last form in the series, no query information is passed to the program.
<INPUT TYPE="hidden" NAME="Magic_Cookie" VALUE="-*Cookie*-">
Where would you like to go to school? <BR>
<INPUT TYPE="text" NAME="city" SIZE=40>
<P>
What type of college do you prefer? <BR>
<INPUT TYPE="text" NAME="type" SIZE=40>
<P>
<INPUT TYPE="submit" VALUE="Get Summary!">
<INPUT TYPE="reset"  VALUE="Clear the form">
</FORM>
<HR>
</BODY>
</HTML>
We will do something unusual in this example by not looking at the program that handles these programs right away. Instead, we will examine the cookie server--the continuously running program that maintains state for CGI programs. Then, we will return to the program that parses the forms--the cookie client--and see how it interacts with the server.
Cookie Server
Here I will show a general purpose server for CGI programs running on the local systems. Each CGI program is a cookie client. When it connects, this server enters a long loop accepting commands, as we will see in a moment. Please note that this is not a CGI script. Instead, it provides a data storage service for CGI scripts.
#!/usr/local/bin/perl
require "sockets.pl";
srand (time|$$);
The srand function sets the random number seed. A logical OR of the current time and the process identification number (PID) creates a very good seed.
$HTTP_server = "128.197.27.7";
The IP address of the HTTP server from where the CGI scripts will connect to this server is specified. This is used to prevent CGI programs running on other HTTP servers on the Web to communicate with this server.
$separator = "\034";
$expire_time = 15 * 60;
The expire_time variable sets the time (in seconds) for which a cookie is valid. In this case, a cookie is valid for 15 minutes.
%DATA = ();
$max_cookies = 10;
$no_cookies = 0;
The DATA associative array is used to hold the form information. The max_cookies variable sets the limit for the number of cookies that can be active at one time. And the no_cookies variable is a counter that keeps track of the number of active cookies.
$error = 500;
$success = 200;
These two variables hold the status codes for error and success, respectively.
$port = 5000;
&listen_to_port (SOCKET, $port) || die "Cannot create socket.", "\n";
The listen_to_port function is part of the socket library. It “listens” on the specified port for possible connections. In this case, port number 5000 is used. However, if you do not know what port to set the server on, you can ask the socket library to do it for you:
( ($port) = &listen_to_port (SOCKET) ) || die "Cannot create socket.", "\n";
print "The Cookie Server is running on port number: $port", "\n";
If the listen_to_port function is called in this manner (with one argument), an empty port is selected. You will then have to modify the cookie client (see the next section) to reflect the correct port number. Or, you can ask your system administrator to create an entry in the /etc/services file for the cookie server, after which the client can simply use the name “cookie” to refer to the server.
while (1) {
    ( ($ip_name, $ip_address) = &accept_connection (COOKIE, SOCKET) )
        || die "Could not accept connection.", "\n";
This starts an infinite loop that continually accepts connections. When a connection is established, a new socket handle, COOKIE, is created to deal with it, while the original file handle, SOCKET, goes back to accept more connections. The accept_connection subroutine returns the IP name and address of the remote host. In our case, this will always point to the address of the HTTP server, because the CGI program (or the client) is being executed from that server.
This cookie server, as implemented, can only “talk” to one connection at a time. All other connections are queued up, and handled in the order in which they are received. (Later on, we'll discuss how to implement a server that can handle multiple connections simultaneously.)
select (COOKIE);
    $cookie = undef;
The default output file handle is set to COOKIE. The cookie variable is used to hold the current cookie identifier.
if ($ip_address ne $HTTP_server) {
        &print_status ($error, "You are not allowed to connect to server.");
If the IP address of the remote host does not match the address of the HTTP server, the connection is coming from a host somewhere else. We do not want servers running on other hosts connecting to this server and storing information, which could result in a massive system overload! However, you can set this up so that all machines within your domain can access this server to store information.
} else {
        &print_status ($success, "Welcome from $ip_name ($ip_address)");
A welcome message is displayed if the connection is coming from the right place (our HTTP server). The print_status subroutine simply outputs the status number and the message to standard output.
while (<COOKIE>) {
            s/[\000-\037]//g;
            s/^\s*(.*)\b\s*/$1/;
The while loop accepts input from the socket continuously. All control characters, as well as leading and trailing spaces, are removed from the input. This server accepts the following commands:
new remote-address
cookie cookie-identifier remote-address
key = value
list
delete
We will discuss each of these in a moment.
if ( ($remote_address) = /^new\s*(\S+)$/) {
The new command creates a new and unique cookie and outputs it to the socket. The remote address of the host that is connected to the HTTP server should be passed as an argument to this command. This makes it difficult for intruders to break the server, as you will see in a minute. Here is an example of how this command is used, and its typical output (with the client's command in bold):
new www.test.net
200: 13fGK7KIlZSF2
The status along with a unique cookie identifier is output. The client should parse this line, get the cookie, and insert it in the form, either as a query or a hidden variable.
if ($cookie) {
                    &print_status ($error,
                                    "You already have a cookie!");
If the cookie variable is defined, an error message is displayed. This would only occur if you try to call the new command multiple times in the same session.
} else {
                    if ($no_cookies >= $max_cookies) {
                        &print_status ($error,
                                        “Cookie limit reached.");
                    } else {
                        do {
                            $cookie = &generate_new_cookie
                                    ($remote_address);
                        } until (!$DATA{$cookie});
If a cookie is not defined for this session, and the number of cookies is not over the pre-defined limit, the generate_new_cookie subroutine is called to create a unique cookie.
$no_cookies++;
                        $DATA{$cookie} = join("::", $remote_address,
                                                    $cookie, time);
                        &print_status ($success, $cookie);
                    }
                }
Once a cookie is successfully created, the counter is incremented, and a new key is inserted into the DATA associative array. The value for this key is a string containing the remote address (so we can check against it later), the cookie, and the time (for expiration purposes).
} elsif ( ($check_cookie, $remote_address) =
                /^cookie\s*(\S+)\s*(\S+)/) {
The cookie command sets the cookie for the session. Once you set a cookie, you can store information, list the stored information, and delete the cookie. The cookie command is generally used once you have a valid cookie (by using the new command). Here is a typical cookie command:
cookie 13fGK7KIlZSF2 www.test.net
200: Cookie 13fGK7KIlZSF2 set.
The server will return a status indicating either success or failure. If you try to set a cookie that does not exist, you will get the following error message:
cookie 6bseVEbhf74 www.test.net
500: Cookie does not exist.
And if the IP address is not the same as the one that was used when creating the cookie, this is what is displayed:
cookie 13fGK7KIlZSF2 www.joe.net
500: Incorrect IP address.
The program continues:
if ($cookie) {
                    &print_status ($error, "You already specified a cookie.");
If the cookie command is specified multiple times in a session, an error message is output.
} else {
                if ($DATA{$check_cookie}) {
                    ($old_address) = split(/::/, $DATA{$check_cookie});

                    if ($old_address ne $remote_address) {
                        &print_status ($error, "Incorrect IP address.");
                    } else {
                        $cookie = $check_cookie;
                        &print_status ($success, "Cookie $cookie set.");
                    }
                } else {
                    &print_status ($error, "Cookie does not exist.");
                 }
            }
If the cookie exists, the specified address is compared to the original IP address. If everything is valid, the cookie variable will contain the cookie.
} elsif ( ($variable, $value) = /^(\w+)\s*=\s*(.*)$/) {
The regular expression checks for a statement that contains a key and a value that is used to store the information.
Here is a sample session where two variables are stored:
cookie 13fGK7KIlZSF2 www.test.net
200: Cookie 13fGK7KIlZSF2 set.
name = Joe Test
200: name=Joe Test
organization = Test Net
200: organization=Test Net
The server is stringent, and allows only variables composed of alphanumeric characters (A-Z, a-z, 0-9, _).
if ($cookie) {
                    $key = join ($separator, $cookie, $variable);
$DATA{$key} = $value;
                    &print_status ($success, "$variable=$value");
                } else {
                    &print_status ($error, "You must specify a cookie.");
                }
The variable name is concatenated with the cookie and the separator to create the key for the associative array.
} elsif (/^list$/) {
                if ($cookie) {
                    foreach $key (keys %DATA) {
                        $string = join ("", $cookie, $separator);
                        if ( ($variable) = $key =~ /^$string(.*)$/) {
                            &print_status ($success, "$variable=$DATA{$key}");
                        }
                    }
                    print ".", "\n";
                } else {
                    &print_status ($error, "You don't have a cookie yet.");
                }
The list command displays all of the stored information by iterating through the DATA associative array. Only keys that contain the separator are output. In other words, the initial key containing the cookie, the remote address, and the time is not displayed. Here is the output from a list command:
cookie 13fGK7KIlZSF2 www.test.net
200: Cookie 13fGK7KIlZSF2 set.
list
200: name=Joe Test
200: organization=Test Net
.
The data ends with the “.” character, so that the client can stop reading at that point and an infinite loop is not created.
} elsif (/^delete$/) {
                if ($cookie) {
                    &remove_cookie ($cookie);
                    &print_status ($success, "Cookie $cookie deleted.");
                } else {
                    &print_status ($error, "Select a cookie to delete.");
                }
The delete command removes the cookie from its internal database. The remove_cookie subroutine is called to remove all information associated with the cookie. Here is an example that shows the effect of the delete command:
cookie 13fGK7KIlZSF2 www.test.net
200: Cookie 13fGK7KIlZSF2 set.
list
200: name=Joe Test
200: organization=Test Net
.
delete
200: Cookie 13fGK7KIlZSF2 deleted.
list
.
The program continues:
} elsif (/^exit|quit$/) {
                $cookie = undef;
                &print_status ($success, "Bye.");
                last;
The exit and quit commands are used to exit from the server. The cookie variable is cleared. This is very important! If it is not cleared, the server will incorrectly assume that a cookie is already set when a new connection is established. This can be dangerous, as the new session can see the variables stored by the previous connection by executing the list command.
} elsif (!/^\s*$/) {
                &print_status ($error, "Invalid command.");
            }
        }
    }
An error message is output if the specified command is not among the ones listed.
&close_connection (COOKIE);
    &expire_old_cookies();
}
exit(0);
The connection between the server and the client is closed. The expire_old_cookies subroutine removes any cookies (and the information associated with them) that have expired. In reality, the cookies are not necessarily expired after the predefined amount of time, but are checked (and removed) when a connection terminates.
The print_status subroutine simply displays a status and the message.
sub print_status
{
    local ($status, $message) = @_;
    print $status, ": ", $message, "\n";
}
The generate_new_cookie subroutine generates a random and unique cookie by using the crypt function to encrypt a string that is based on the current time and the remote address. The algorithm used in creating a cookie is arbitrary; you can use just about any algorithm to generate random cookies.
sub generate_new_cookie
{
    local ($remote) = @_;
    local ($random, $temp_address, $cookie_string, $new_cookie);
    $random = rand (time);
    ($temp_address = $remote) =~ s/\.//g;
    $cookie_string = join ("", $temp_address, time) / $random;
    $new_cookie = crypt ($cookie_string, $random);
    return ($new_cookie);
}
The expire_old_cookies subroutine removes cookies after a pre-defined period of time. The foreach loop iterates through the associative array, searching for keys that do not contain the separator (i.e., the original key). For each original key, the sum of the creation time and the expiration time (in seconds) is compared with the current time. If the cookie has expired, the remove_cookie subroutine is called to delete the cookie.
sub expire_old_cookies
{
    local ($current_time, $key, $cookie_time);
    $current_time = time;
    foreach $key (keys %DATA) {
        if ($key !~ /$separator/) {
            $cookie_time = (split(/::/, $DATA{$key}))[2];
            if ( $current_time >= ($cookie_time + $expire_time) ) {
               &remove_cookie ($key);
            }
        }
    }
}
The remove_cookie subroutine deletes the cookie:
sub remove_cookie
{
    local ($cookie_key) = @_;
    local ($key, $exact_cookie);
    $exact_cookie = (split(/::/, $DATA{$cookie_key}))[1];

    foreach $key (keys %DATA) {
        if ($key =~ /$exact_cookie/) {
            delete $DATA{$key};
        }
    }
    $no_cookies--;
}
The loop iterates through the array, searches for all keys that contain the cookie identifier, and deletes them. The counter is decremented when a cookie is removed.
Now, let's look at the CGI program that communicates with this server to keep state.
Cookie Client
Let's review what a cookie client is, and what it needs from a server. A client is a CGI program that has to run many times for each user (usually because it displays multiple forms and is invoked each time by each form). The program needs to open a connection to the cookie server, create a cookie, and store information in it. The information stored for one form is retrieved later when the user submits another form.
#!/usr/local/bin/perl
require "sockets.pl";
$webmaster = "Shishir Gundavaram (shishir\@bu\.edu)";
$remote_address = $ENV{'REMOTE_ADDR'};
The remote address of the host that is connected to this HTTP server is stored. This information will be used to create unique cookies.
$cookie_server = "cgi.bu.edu";
$cookie_port = 5000;
$document_root = "/usr/local/bin/httpd_1.4.2/public";
$error = "Cookie Client Error";
&parse_form_data (*FORM);
$start_form = $FORM{'start'};
$next_form = $FORM{'next'};
$cookie = $FORM{'Magic_Cookie'};
Initially, the browser needs to pass a query to this program, indicating the first form:
http://some.machine/cgi-bin/cookie_client.pl?start=/interests.html
All forms after that must contain a next query in the <FORM> tag:
<FORM ACTION="/cgi-bin/cookie_client.pl?next=/location.html" METHOD="POST">
The filename passed in the name query can be different for each form. That is how the forms let the user navigate.
Finally, there must be a hidden field in each form that contains the cookie:
<INPUT TYPE="hidden" NAME="Magic_Cookie" VALUE="-*Cookie*-">
This script will replace the string “-*Cookie*-” with a unique cookie, retrieved from the cookie server. This identifier allows one form to retrieve what another form has stored.
One way to think of this cookie technique is this: The cookie server stores all the data this program wants to save. To retrieve the data, each run of the program just needs to know the cookie. One instance of the program passes this cookie to the next instance by placing it in the form. The form then sends the cookie to the new instance of the program.
if ($start_form) {
    $cookie = &get_new_cookie ();
    &parse_form ($start_form, $cookie);
If the specified form is the first one in the series, the get_new_cookie subroutine is called to retrieve a new cookie identifier. And the parse_form subroutine is responsible for placing the actual cookie in the hidden field.
} elsif ($next_form) {
    &save_current_form ($cookie);
    &parse_form ($next_form, $cookie);
Either $start_form or $next_form will be set, but the browser should not set both. There is only one start to a session! If the form contains the next query, the information within it is stored on the cookie server, which is accomplished by the save_current_form subroutine.
} else {
    if ($cookie) {
        &last_form ($cookie);
    } else {
        &return_error (500, $error,
                "You have executed this script in an invalid manner.");
    }
}
exit (0);
Finally, if the form does not contain any query information, but does contain a cookie identifier, the last_form subroutine is called to display all of the stored information.
That is the end of the main program. It simply lays out a structure. If each form contains the correct start or next query, the program will display everything when the user wants it.
The open_and_check subroutine simply connects to the cookie server and reads the first line (remove the trailing newline character) that is output by the server. It then checks this line to make sure that the server is functioning properly.
sub open_and_check
{
    local ($first_line);
    &open_connection (COOKIE, $cookie_server, $cookie_port)
        || &return_error (500, $error, "Could not connect to cookie server.");
    chop ($first_line = <COOKIE>);
    if ($first_line !~ /^200/) {
        &return_error (500, $error, "Cookie server returned an error.");
    }
}
The get_new_cookie subroutine issues the new command to the server and then checks the status to make sure that a unique cookie identifier was output by the server.
sub get_new_cookie
{
    local ($cookie_line, $new_cookie);
    &open_and_check ();
    print COOKIE "new ", $remote_address, "\n";
    chop ($cookie_line = <COOKIE>);
    &close_connection (COOKIE);
    if ( ($new_cookie) = $cookie_line =~ /^200: (\S+)$/) {
        return ($new_cookie);
    } else {
        &return_error (500, $error, "New cookie was not created.");
    }
}
The parse_form subroutine constructs and displays a dynamic form. It reads the entire contents of the form from a file, such as location.html. The only change this subroutine makes is to replace the string “-*Cookie*-” with the unique cookie returned by the cookie server. The form passes the cookie as input data to the program, and the program passes the cookie to the server to set and list data.
sub parse_form
{
    local ($form, $magic_cookie) = @_;
    local ($path_to_form);
    if ($form =~ /\.\./){
        &return_error (500, $error, "What are you trying to do?");
    }
    $path_to_form = join ("/", $document_root, $form);
    open (FILE, "<" . $path_to_form)
        || &return_error (500, $error, "Could not open form.");
    print "Content-type: text/html", "\n\n";
    while (<FILE>) {
        if (/-\*Cookie\*-/) {
            s//$magic_cookie/g;
        }
        print;
    }
    close (FILE);
}
The save_current_form subroutine stores the form information on the cookie server.
sub save_current_form
{
    local ($magic_cookie) = @_;
    local ($ignore_fields, $cookie_line, $key);
    $ignore_fields = '(start|next|Magic_Cookie)';
    &open_and_check ();
    print COOKIE "cookie $magic_cookie $remote_address", "\n";
    chop ($cookie_line = <COOKIE>);
The cookie command is issued to the server to set the cookie for subsequent add, delete, and list operations.
if ($cookie_line =~ /^200/) {
        foreach $key (keys %FORM) {
            next if ($key =~ /\b$ignore_fields\b/o);

            print COOKIE $key, "=", $FORM{$key}, "\n";
            chop ($cookie_line = <COOKIE>);
            if ($cookie_line !~ /^200/) {
                &return_error (500, $error, "Form info. could not be stored.");
            }
        }
    } else {
        &return_error (500, $error, "The cookie could not be set.");
    }
    &close_connection (COOKIE);
}
The foreach loop iterates through the associative array containing the form information. All fields, with the exception of start, next, and Magic_Cookie, are stored on the cookie server. These fields are used internally by this program, and are not meant to be stored. If the server cannot store the information, it returns an error.
The last_form subroutine is executed when the last form in the series is being processed. The list command is sent to the server. The display_all_items subroutine reads and displays the server output in response to this command. Finally, the cookie is deleted.
sub last_form
{
    local ($magic_cookie) = @_;
    local ($cookie_line, $key_value, $key, $value);
    &open_and_check ();
    print COOKIE "cookie $magic_cookie $remote_address", "\n";
    chop ($cookie_line = <COOKIE>);
    if ($cookie_line =~ /^200/) {
        print COOKIE "list", "\bn";
        &display_all_items ();
        print COOKIE "delete", "\n";
    } else {
        &return_error (500, $error, "The cookie could not be set.");
    }
    &close_connection (COOKIE);
}
The display_all_items subroutine prints a summary of the user's responses.
sub display_all_items
{
    local ($key_value, $key, $value);
    print "Content-type: text/html", "\n\n";
    print "<HTML>", "\n";
print "<HEAD><TITLE>Summary</TITLE></HEAD>", "\n";
    print "<BODY>", "\n";
    print "<H1>Summary and Results</H1>", "\n";
    print "Here are the items/options that you selected:", "<HR>", "\n";
    while (<COOKIE>) {
        chop;
        last if (/^\.$/);
        $key_value = (split (/\s/, $_, 2))[1];
        ($key, $value) = split (/=/, $key_value);

        print "<B>", $key, " = ", $value, "</B>", "<BR>", "\n";
    }
The while loop reads the output from the server, and parses and displays the key-value pair.
foreach $key (keys %FORM) {
        next if ($key =~ /^Magic_Cookie$/);
        print "<B>", $key, " = ", $FORM{$key}, "</B>", "<BR>", "\n";
    }
        print "</BODY></HTML", "\n";
}
The key-value pairs from this last form are also displayed, since they are not stored on the server.
Finally, the familiar parse_form_data subroutine concatenates the key-value pairs from both the query string (GET) and from standard input (POST), and stores them in an associative array.
sub parse_form_data
{
    local (*FORM_DATA) = @_;
    local ($query_string, @key_value_pairs, $key_value, $key, $value);
    read (STDIN, $query_string, $ENV{'CONTENT_LENGTH'});
    if ($ENV{'QUERY_STRING'}) {
            $query_string = join("&", $query_string, $ENV{'QUERY_STRING'});
    }
    @key_value_pairs = split (/&/, $query_string);
    foreach $key_value (@key_value_pairs) {
        ($key, $value) = split (/=/, $key_value);
        $key   =~ tr/+/ /;
        $value =~ tr/+/ /;
        $key   =~ s/%([\dA-Fa-f][\dA-Fa-f])/pack ("C", hex ($1))/eg;
        $value =~ s/%([\dA-Fa-f][\dA-Fa-f])/pack ("C", hex ($1))/eg;
        if (defined($FORM_DATA{$key})) {
            $FORM_DATA{$key} = join ("\0", $FORM_DATA{$key}, $value);
        } else {
            $FORM_DATA{$key} = $value;
        }
    }
}
10.10 Forking/Spawning Child Processes
Before we end this chapter, let's look at a very powerful feature found on the UNIX operating system: concurrent processes.
The cookie server we discussed can accept only one connection at a time, although it will queue up to five connections, which it will handle sequentially, one after the other. Because of the way the server operates--storing information in variables--it cannot be designed to handle multiple connections simultaneously. Let's look at the reason for this.
In UNIX, a process (parent) has the ability to create another process (child) that executes some given code independently. This can be really useful for programs that need a lot of time to finish. For example, if you have a CGI program that needs to calculate some complex equation, search large databases, or delete and cleanup a lot of files, you can “spawn” a child process that performs the task, while the parent returns control to the browser. In such a case, the user does not have to wait for the task to finish, because the child process is running in the background. Let's look at a simple CGI program:
#!/usr/local/bin/perl
$| = 1;
print "Content-type: text/plain", "\n\n";
print "We are about to create the child!", "\n";
if ($pid = fork) {
        print <<End_of_Parent;
I am the parent speaking. I have successfully created a child process.
The Process Identification Number (PID) of the child process is: $pid.
The child will be cleaning up all the files in the directory. It might
take a while, but you do not have to wait!
End_of_Parent

} else {
        close (STDOUT);

        system ("/usr/bin/rm", "-fr", "/tmp/CGI_test", "/var/tmp/CGI");
        exit(0);
}
print "I am the parent again! NOAow it is time to exit.", "\n";
print "My child process will work on its own! Good Bye!", "\n";
exit(0);
The fork command actually creates a child process, and returns the PID of the process to the parent, and a value of zero to the child. In this example, the first block of code is executed by the parent, while the second block is executed by the child. The one thing you have to note is that the child process gets a copy of all the variables and subroutines that are available to the parent. However, if the child process makes any modifications at all, they are simply discarded when it exits; they do not affect the parent process.
This is the main reason why the cookie server cannot handle multiple connections. There are two issues here. The first is that multiple connections are not supported. Once the CGI program connects to the server, the server handles requests from the program, and so cannot accept any more connections until the program breaks the connection. The only way to allow multiple connections is to fork a process every time there is a connection, so there is a new process to handle each connection.
This leads us to the second issue. If there is a separate child process to handle each connection, then each process would have its own variable namespace (along with a copy of the parent's data). If a child process modifies or stores new data (in variables), then that data is gone once the process terminates, and there is no way to pass that data back to the parent. That's why we only have one server that keeps track of the data one connection at a time.
The system command that we have been using to execute UNIX commands is implemented in the following way:
unless (fork) {
    exec ("command");
}
wait;
This is identical to:
system ("command");
Basically, the child process--the unless block executes only if the return value from fork is zero--executes the specified command, while the parent waits for it to finish. Here is how we could implement a server that handles multiple connections simultaneously (although this approach will not work for our cookie server):
$SIG{'CHLD'} = "wait_for_child_to_die";
while (1) {
    ( ($ip_name, $ip_address) = &accept_connection (COOKIE, SOCKET) )
        || die "Could not accept connection.", "\n";

    if (fork) {
        #
        # Parent Process (do almost nothing here)
        #
    } else {
        #
        # Child Process (do almost everything here)
        #
    }
    &close_connection (COOKIE);
}
sub wait_for_child_to_die
{
    wait;
}
One important note: If a parent does not wait for a child process to die, certain “zombie” processes will be left on the system.
Get CGI Programming on the World Wide Web now with the O’Reilly learning platform.
O’Reilly members experience books, live events, courses curated by job role, and more from O’Reilly and nearly 200 top publishers.

