Sending a file as an attachment is easy. To add attachments to an outgoing message:
Set the AttachmentIndex property of the MAPIMessages control appropriately (0 for the first attachment, 1 for the second attachment, etc.).
Set the AttachmentPathName property to the fully qualified path of the file you would like to send. This is the path of the file as it exists on the sending system. This path is not communicated to the receiving mail client.
Set the AttachmentName property to a short name for the file. This is typically the filename and extension of the file, but it can be any string. The receiving mail client uses this string to name the file on the receiving system, so setting it to a reasonable filename and extension, such as
"MyResume.doc", is helpful.Set the AttachmentType property to
mapData, which indicates that the attached file is a data file (as opposed to an embedded OLE object, to be discussed shortly).Set the AttachmentPosition property to indicate at which character position the attachment should appear. Some mail clients display a representation of the file within the body of the message at the character position indicated by AttachmentPosition. (However, some ignore this value and display the attachments separately.)
Note the following in regard to the AttachmentPosition property:
This property is zero-based, meaning that the first character in the message is at position 0, and the last character in the message is at
Len(MAPIMessages1.MsgNoteText) - 1.It is not permissible for AttachmentPosition to be outside of the above range.
It is not permissible to have two attachments at the same position.
The Microsoft documentation states that the character at the indicated position is lost. This is not correct. The message text is unchanged by the inclusion of attachments. How the attachments are displayed is up to the receiving mail client. Microsoft Outlook 98, for example, displays an icon representing the attachment within the text body, immediately before the character corresponding to the attachment’s AttachmentPosition.
Repeat Steps 1 through 5 as needed for additional attachments.
If you change your mind about an attachment and want to delete it,
you can do so by calling the MAPIMessages control’s Delete
method, passing an argument of
mapAttachmentDelete. This deletes the currently
indexed attachment (that is, the attachment at the position defined
by the AttachmentIndex property in the message defined by the
MsgIndex property), decrements the AttachmentCount property, and, if
the deleted attachment was the last attachment in the set, decrements
the AttachmentIndex property. Note that when deleting an attachment
from a message in the compose buffer, the actual attachment file is
not deleted from the user’s system.
Example 4-3 shows sending two files from start to finish, including signing onto and off of MAPI. The attachment-specific code is in boldface. The received message is shown in Figure 4-6.
Example 4-3. Sending Two Files as Attachments
' Set up the MAPI session control and sign on.
With MAPISession1
   .DownLoadMail = False
   .LogonUI = True
   .NewSession = True
   .Password = ""
   .UserName = "MyProfile"
   .SignOn
End With

' Set up the MAPIMessages control and send the message.
With MAPIMessages1

   ' Hook the MAPIMessages control to the MAPI session.
   .SessionID = MAPISession1.SessionID

   ' Start a new message.
   .Compose
   .MsgSubject = "Here are my files."
   .MsgNoteText = "Attached are config.sys and autoexec.bat." _
      & Chr(13) & "  " ' Leave space for attachments.

   ' Set the recipient.
   .RecipIndex = 0
   .RecipType = 1
   .RecipDisplayName = "Dave"
   .ResolveName

   ' Set up the attachments.
   .AttachmentIndex = 0
   .AttachmentPathName = "c:\config.sys"
   .AttachmentName = "config.sys"
   .AttachmentType = mapData
   .AttachmentPosition = Len(MAPIMessages1.MsgNoteText) - 2

   .AttachmentIndex = 1
   .AttachmentPathName = "c:\autoexec.bat"
   .AttachmentName = "autoexec.bat"
   .AttachmentType = mapData
   .AttachmentPosition = Len(MAPIMessages1.MsgNoteText) - 1

   ' Send the message.
   .Send

End With

' Close the MAPI session.
MAPISession1.SignOff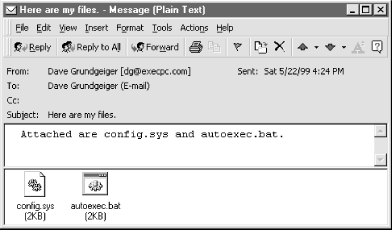
Get CDO & MAPI Programming with Visual Basic: now with the O’Reilly learning platform.
O’Reilly members experience books, live events, courses curated by job role, and more from O’Reilly and nearly 200 top publishers.

