Any sufficiently advanced technology is indistinguishable from magic.
I’ve always loved magic. For as long as I can remember, I have enjoyed watching master magicians performing their craft. As I grew up, I read every book I could find on how to master the tricks that astounded me through the years. I quickly found that I enjoyed learning how to perform magic tricks even more than I enjoyed watching them.
As Sir Arthur Charles Clarke states, technology can often feel like magic. Maybe that is why I love technology so much. F# falls into this category more so than many of the other languages I have used throughout my programming exploits. The features that it provides bring great power that can occasionally feel like magic. Sometimes it can be difficult to determine how best to apply that magic in practical ways to achieve better, faster, and more scalable web, cloud, and mobile solutions. This book will show you how to leverage the full power of F# to solve your everyday development problems.
In this chapter you will start your journey by exploring F# combined with ASP.NET MVC 4. You will learn how to quickly kick-start one of these projects, do some basic ASP.NET MVC development in F#, and apply a few of the more advanced F# features to improve the code you write. Additionally, several topics and techniques that are not specifically related to ASP.NET MVC 4, but are commonly used in conjunction with this framework, will be exemplified. Throughout the chapter, features of F# that may seem magical will be demystified.
The rest of the book will explore additional platforms, technologies, libraries, and features that you can use with F# to create cutting-edge web, cloud, and mobile solutions.
The developer preview of ASP.NET MVC 4 was officially announced after the Build conference in the latter half of 2011. In February 2012, the beta release of ASP.NET MVC 4 was announced and the release candidate followed at the end of May 2012. Version 4 brought many new improvements and enhancements to the already full-featured ASP.NET MVC offering. To learn more about ASP.NET MVC 4, visit their website.
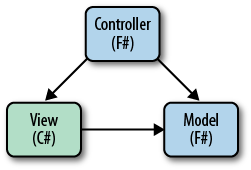
The most efficient way to use F# with ASP.NET MVC 4 is to take advantage of the inherent separation of concerns built into the MVC design pattern. You can then utilize the provided boundaries to leverage the strengths of the C# ecosystem and the F# language features, respectively. In the case of the ASP.NET MVC framework, this is accomplished by establishing a C# ASP.NET MVC project to house the views and all client-side concerns, while using an F# project for the models, controllers, and any other server-side concerns. Figure 1-1 shows the typical MVC pattern implemented in ASP.NET MVC with a designation of component to project type.
While you can manually create a boilerplate solution with the aforementioned project structure, the process will quickly become tedious. Additionally, these mundane setup steps cause an unnecessary barrier to entry to using F# in your ASP.NET MVC solutions. To help eliminate these issues, a project template has been created and made available through Visual Studio Gallery.
Note
If, for whatever reason, you are not running ASP.NET MVC 4, templates are also available for ASP.NET MVC 3 and ASP.NET MVC 2. A list of many of the available project templates can be found here.
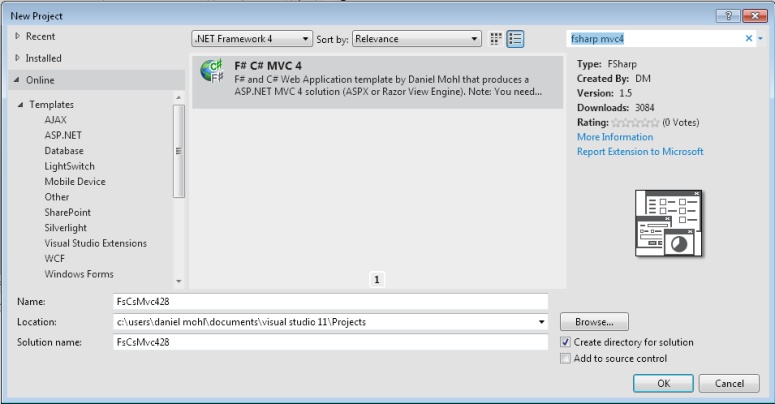
Thanks to Visual Studio Gallery, finding and installing the ASP.NET MVC 4 F# project templates couldn’t be easier. Simply launch the Project Creation Wizard through whichever method your prefer—my favorite is the Ctrl-Shift-N keyboard shortcut—select Online in the lefthand navigation pane, search for “fsharp mvc4” in the search box at the upper-right corner, select the “F# C# MVC 4” template, and click OK. Figure 1-2 shows an example of the Project Creation Wizard just before OK is to be clicked.
Note
While you could use the approach mentioned here every time you wish to create a new F# ASP.NET MVC 4 project, you really only have to do this once. After the initial installation, a new template will become available under the Installed category in the lefthand navigation pane. The template is named “F# and C# Web Application (ASP.NET MVC 4)” and you can access it by selecting Visual F#→ASPNET.
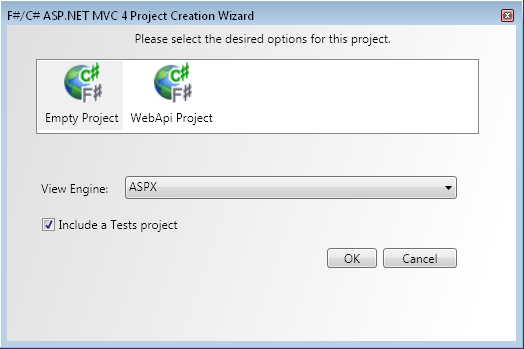
After you click OK, a dialog (shown in Figure 1-3) will display from which you can select the type of solution you want to generate and the view engine you want to use, as well as whether you want to include a project you can use to write unit tests. Once you make your selections and click OK, the projects are generated and the applicable NuGet packages are automatically installed. For many of the rest of the examples in this chapter, I will assume you selected the Razor view engine during this process.
If you have created any C#-only ASP.NET MVC projects, the C# solution should look very familiar to you. There are really only three primary differences:
The primary reason for these changes is that each has been pushed to the F# project that was generated along with this C# project. We’ll look at this F# project in more detail in the next section. The Global.asax file is a little interesting in that it still requires some programmatic method for association to the F# class. The following code from the Global.asax markup shows how this is done:
<%@ Application Inherits="FsWeb.Global" Language="C#" %><scriptLanguage="C#"RunAt="server">// Defines the Application_Start method and calls Start in// System.Web.HttpApplication from which Global inherits.protectedvoidApplication_Start(Objectsender,EventArgse){base.Start();}</script>
If you selected the “Empty Project” template on the Project Creation Wizard, then the resultant F# project is very simple. The project is generated with all necessary MVC assembly references and two .fs files: Global.fs and HomeController.fs. I already briefly mentioned the Global.fs file and I’m sure you can guess what HomeController.fs is. I’ll review them in detail in this section.
As previously mentioned, the Global.fs file contains most of the code
that would normally go into the Global.asax.cs file, but with a few F#
twists. The first thing you may notice is the Route type. This is an F# record
type that is being used to contain routing definitions.
Record types are immutable by default. Because of this, they go very
well with the highly concurrent and stateless nature of the Web. I’ll
talk more about uses for record types throughout this book. The
Route record type is as
follows:
typeRoute={controller:stringaction:stringid:UrlParameter}
Note
The Route type is only used
for the standard controller/action/ID route. Custom types are needed
to accommodate other routing patterns.
After declaring the Route
type, a class named Global is
defined, which inherits from System.Web.HttpApplication. The code within
Global looks pretty similar to the
C# equivalent, with the exception of the MapRoutes method call and the use of
significant whitespace rather than braces to define scope. The main
difference associated with the MapRoutes method call is directly related to
the Route record. Instead of
“newing up” an anonymous type to pass the route information to
MapRoutes, F# type inference is
being leveraged to create a new Route record. This record creation syntax is
known as a record expression. The Global class is shown in the following
example with the Route record
creation code emphasized:
typeGlobal()=inheritSystem.Web.HttpApplication()staticmemberRegisterRoutes(routes:RouteCollection)=routes.IgnoreRoute("{resource}.axd/{*pathInfo}")routes.MapRoute("Default","{controller}/{action}/{id}",{ controller = "Home"; action = "Index" id = UrlParameter.Optional })memberthis.Start()=AreaRegistration.RegisterAllAreas()Global.RegisterRoutes(RouteTable.Routes)
The HomeController.fs file contains
the definition for the HomeController class. This class inherits
from Controller and implements a
single action named Index. We will
explore controllers in more detail later in this chapter. Here are the
contents of the HomeController.fs
file:
namespaceFsWeb.ControllersopenSystem.WebopenSystem.Web.Mvc[<HandleError>]typeHomeController()=inheritController()memberthis.Index()=this.View():>ActionResult
You may be curious about the :> symbol that is emphasized in the
preceding example. This symbol indicates an
upcast to type ActionResult of the result from this.View(). In this example, the cast to
ActionResult isn’t really
necessary, but it would be required in certain circumstances, so the
template adds the upcast for example purposes. If you were to instead
explicitly specify the return type of the Index method like this:
memberthis.Index():ActionResult=…
then the cast could have been written as:
upcastthis.View()
Since the cast isn’t really needed in this specific case, you can simply change this method to the following:
memberthis.Index()=this.View()
Note
Type checking for an upcast occurs at compile time to ensure
validity of the cast. A downcast (i.e.,
:?>), on the other hand, is
only checked at runtime. If there is any chance that the downcast
will fail, it is recommended that you use a type test in a match
expression. You could also wrap the expression in a try/with
statement, then catch the InvalidCastException, but this is less
efficient than the type test approach.
Since the primary focus of this book is on how to use F# to best complement the larger technology stack, I will be spending a lot more time talking about controllers and models than views. F# provides several unique features that lend themselves well to the creation of various aspects of controllers and models. I’ll show you a few of these in this section and cover more advanced features in later sections.
To help facilitate the discussion of controllers and models, I will walk you through the creation of a new page in the web application, paying special attention to the code used to create the model and controller. This new page will display a simple jQuery Mobile list view that is driven and populated by a new controller and model.
To kick things off, you need to create a new View. To do this, create a new folder under the
Views folder named Guitars and
add a new ASP.NET MVC view to the folder, named
Index. Make sure to uncheck the “Use a layout or
master page:” option in the ASP.NET MVC view item template wizard. You can
now change the view markup to match the following:
@model IEnumerable<FsWeb.Models.Guitar><!DOCTYPE html><html><head><title>@ViewBag.Title</title><metaname="viewport"content="width=device-width, initial-scale=1"/><linkrel="stylesheet"href="http://code.jquery.com/mobile/1.0.1/jquery.mobile-1.0.1.min.css"/></head><body><divdata-role="page"data-theme="a"id="guitarsPage"><divdata-role="header"><h1>Guitars</h1></div><divdata-role="content"><uldata-role="listview"data-filter="true"data-inset="true">@foreach(var x in Model) {<li><ahref="#">@x.Name</a></li>}</ul></div></div><scriptsrc="http://code.jquery.com/jquery-1.6.4.min.js"></script><scriptsrc="http://code.jquery.com/mobile/1.0.1/jquery.mobile-1.0.1.min.js"></script><script>$(document).delegate("#guitarsPage",'pageshow',function(event){$("div:jqmData(role='content') > ul").listview('refresh');});</script></body></html>
Note
Since the focus of this section is not on the view, I’ve
consolidated everything into a single cshtml file for the purpose of simplicity. In
production code, you would want to create a separate module for the
JavaScript code (and likely use something like RequireJS to help load
and manage the JavaScript modules). Also, you would want to create a
separate Layout page for reuse by all
mobile pages. Additionally, ASP.NET MVC 4 includes a convention-based
approach for mobile development that involves adding “.Mobile” or
something more device-specific to the names of views. You can learn more
about the best practices for view creation here.
To create the basic controller for the new view, add a new F# source file to the F# project, name it GuitarsController.fs, and populate it with code that matches the following:
namespaceFsWeb.ControllersopenSystem.Web.MvcopenFsWeb.Models[<HandleError>]typeGuitarsController()=inheritController()memberthis.Index()=// The sequence is hardcoded for example purposes only.// It will be switched out in a future example.seq { yield Guitar(Name = "Gibson Les Paul") yield Guitar(Name = "Martin D-28") } |>this.View
This looks very similar to the HomeController with the exception of the
sequence expression and the
pipe-forward operator. For this example, the
sequence expression is providing a collection of Guitar model instances to be passed to the
view. This “hard-coded” data will be replaced with a call to a
repository in a future example.
The second point of interest is the use of the pipe-forward
operator. In this example, the pipe-forward operator is being used to
pipe the sequence of Guitar as the
model argument for the overloaded method of View, which takes a single obj argument.
Note
The obj keyword is an F#-type
alias for object. I will talk more
about type aliases in Chapter 2.
Models can be created with either F# record types or classes. Out
of the box, F# records work well for read-only data and allow the models
to be slightly simpler. In F# 3.0, a new attribute called CLIMutable has been added that makes F#
records an excellent option for read/write scenarios as well. I will
talk more about the CLIMutable
attribute in Chapter 4. Here is an
example of a Guitar model built with
an F# record:
namespaceFsWeb.ModelstypeGuitar={Id:Guid;Name:string}
Note
Prior to F# 3.0, F# record usage in both read-only and read/write situations was possible, but more difficult. This is because F# records do not have a parameterless constructor. The best solution to this problem (prior to F# 3.0) was to use a custom model binder.
The second option for building models with F# is to create the
models as classes. The controller example that I showed in the preceding
section assumes that the class approach is used. The code example that
follows demonstrates how to build a Guitar model class in F# (this class, as well
as most of the examples in this book, was written with F# 3.0; the
syntax would be slightly different in F# 2.0 since auto-properties is a
new feature in F# 3.0):
namespaceFsWeb.ModelstypeGuitar()=membervalName=""withget,set
You can also add any desired Data
Annotations to the model class. The following adds the
Required data annotation attribute to
the Name property:
openSystem.ComponentModel.DataAnnotationstypeGuitar()=[<Required>]membervalName=""withget,set
Note
The Required attribute
doesn’t provide value in this example, but it will be useful for the
many scenarios where changes are being made from the UI.
Here is the model we will use for the Entity Framework example in the next section:
namespaceFsWeb.ModelsopenSystemopenSystem.ComponentModel.DataAnnotationstypeGuitar()=[<Key>]membervalId=Guid.NewGuid()withget,set[<Required>]membervalName=""withget,set
If you were to run the web application right now you would see a simple screen that displays a collection of guitar names. However, it’s still not very useful due to the data being hardcoded. Luckily, you have several choices when it comes to using F# to interact with a database for storage and/or retrieval of data.
Entity Framework (EF) is probably the most
common way to interact with an SQL Server database when working in
ASP.NET MVC. Adoption is continuing to grow, especially now that EF
supports a code-first approach. The F#/C# ASP.NET MVC 4 template already
added all of the assembly references you need in order to start working
with EF. With this done, you start using it by creating a class that
inherits from DbContext. The
following code shows an example of this:
namespaceFsWeb.RepositoriesopenSystem.Data.EntityopenFsWeb.ModelstypeFsMvcAppEntities()=inheritDbContext("FsMvcAppExample")doDatabase.SetInitializer(newCreateDatabaseIfNotExists<FsMvcAppEntities>())[<DefaultValue()>]valmutableguitars:IDbSet<Guitar>memberx.Guitarswithget()=x.guitarsandsetv=x.guitars<-v
There isn’t anything too crazy going on here. We’re simply using
some of the out-of-the-box EF API features, defining an IDbSet of guitars, and creating a Guitars property with both a getter and a
setter.
Note
You can learn more about the EF API here.
Now you need to add a repository class to allow retrieval of all the guitars from the database.
Note
The repository class isn’t technically needed; however, it is considered by many to be a best practice and has become a standard in most applications.
Here’s the code that shows the creation of a GuitarsRepository class:
namespaceFsWeb.RepositoriestypeGuitarsRepository()=memberx.GetAll()=usecontext=newFsMvcAppEntities()query{forgincontext.Guitarsdoselectg}|>Seq.toList
Note
If you need to use EF in F# 2.0, the query syntax in the
preceding example will not work (since it’s new to F# 3.0). For F#
2.0, you can do similar things by installing the FSPowerPack.Linq.Community NuGet package,
opening Microsoft.FSharp.Linq.Query, and changing
the syntax to something similar to the code that follows:
query<@seq{forgincontext.Guitars->g}@>|>Seq.toList
This functionality from the F# PowerPack uses a feature of F# called quoted expressions, which allows you to generate an abstract syntax tree (AST) and process and evaluate it as needed. While there are many uses for quoted expressions, one common use case is to generate F# code or code in other languages.
The first thing the GetAll
method does is instantiate a DbContext. Notice how the use keyword takes the place of the standard
let keyword. This ensures that the
object will be disposed appropriately after use—it’s similar to wrapping
code in a using statement in C#, but
doesn’t require that you wrap any additional code.
The GetAll method then performs
a query against the database. The query syntax
used to accomplish this is a new feature in F# 3.0 that makes data
manipulation a bit easier. While the syntax acts like it’s a new
compiler feature, it is actually an implementation of an F# feature
called computation expressions. I’ll show you an
example of how to build your own custom computation expressions later in
this chapter. In the next section, we’ll explore the query computation
expression in more detail.
With those two steps complete, all that is left to do is to switch
out the hardcoded data that we originally added to the Index action in GuitarsController:
[<HandleError>]typeGuitarsController(repository : GuitarsRepository)=inheritController()new() = new GuitarsController(GuitarsRepository())memberthis.Index()=repository.GetAll()|>this.View
In some ways this change simplifies the code (especially the
Index action), but it also adds a
little complexity with the new overloaded constructor. This serves a few
purposes:
By allowing the repository to be passed into the constructor, it opens the door for the use of Inversion of Control (IoC) containers. For the sake of simplicity, the preceding example does not include all of the changes that would be necessary to make optimal use of an IoC container.
It makes the controller more testable. By providing an overloaded constructor, you have the ability to pass in a fake repository class that allows the controller actions to be tested without requiring database interaction.
Since out-of-the-box ASP.NET MVC requires the controller to have a constructor that takes no parameters, you also have to include this line of code:
new()=newGuitarsController(GuitarsRepository())
This provides the needed constructor and then calls the main
constructor with a new GuitarsRepository.
To wrap this up and try out your new database interaction, make sure the web.config in the C# Web Application project has an appropriately named connection string, such as:
<addname="FsMvcAppExample"connectionString="YOUR CONNECTION STRING"providerName="System.Data.SqlClient"/>
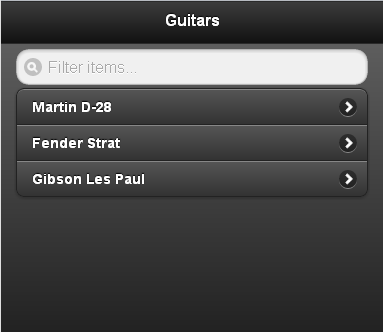
You can now run the application to have EF automatically create
the database and table. Add some records to the Guitars table and put on your party hat. An
example of what the web page should look like when you go to
http://localhost:[port]/Guitars
is shown in Figure 1-4.
The new query syntax that you saw in the preceding section looks and feels a bit like LINQ in C#/VB.NET. Here are a few more quick examples of how it can be used:
- Get a guitar by name.
memberx.GetByNamename=usecontext=newFsMvcAppEntities()query{forgincontext.Guitarsdowhere(g.Name=name)}|>Seq.toList- Sort the guitars by name.
memberx.GetAllAlphabetic()=usecontext=newFsMvcAppEntities()query{forgincontext.GuitarsdosortByg.Name}|>Seq.toList- Get the top X records.
memberx.GetToprowCount=usecontext=newFsMvcAppEntities()query{forgincontext.GuitarsdotakerowCount}|>Seq.toList
A number of additional examples are available here.
Note
You can also use many of the previous examples with the F# PowerPack Linq approach, though the
syntax is not as clean.
F# 3.0 has another new feature called type
providers, which makes interacting with the database even
easier. To use a type provider to access the database, you first need to
add a reference to FSharp.Data.TypeProviders. You can then use
one of the database-related
out-of-the-box type providers such as SqlDataConnection. This type of provider gets
the database schema and generates appropriate types on the fly. Here’s
an example:
openMicrosoft.FSharp.Data.TypeProviderstypeDbConnection=SqlDataConnection<ConnectionStringName="FsMvcAppExample",ConfigFile="web.config">typeGuitarsRepository2()=memberx.GetAll()=usecontext=DbConnection.GetDataContext()query{forgincontext.Guitarsdoselect(Guitar(Id=g.Id,Name=g.Name))}|>Seq.toList
Note
An extra step is needed to get IntelliSense for context inside the F# WebApp project. To
accomplish this, simply create a web.config file in the F# WebApp project
and add appropriate database connection string elements.
Once this is done, you can query the results with the same query
syntax I showed you in Entity Framework. This may not
seem all that different from the previous Entity Framework approach, but
the great thing here is that the FsMvcAppEntities type is not needed and can be
completely eliminated. Additionally, the Guitar model class is now simpler as the
[<Key>] attribute is no longer
needed.
Going into extensive detail about how type providers work is beyond the scope of this book, but at a high level the following is occurring:
A magic fairy generates pixie dust that swirls and twirls into your computer.
By using the query computation expression you can now interact with the database.
Note
If you want to learn about the “real” inner workings of type providers, I suggest checking out the documentation for creating type providers on MSDN. Additionally, I have created a sample custom type provider on my blog. Note that I created the example from my blog with the developer preview of F# 3.0. It is likely that things have changed since then.
Luckily for us, the specifics of how this stuff works aren’t all that important. All you need to know is the simple syntax you just learned. The out-of-the-box SQL-related type providers are packed with a number of benefits as long as the database you’re interacting with already exists. However, the rest of the examples in this chapter take a code-first approach. Because of this, I will use the previously shown Entity Framework approach for these examples. In Chapter 2, I will show an example that uses the type provider approach.
You now have the tools and techniques you need in order to build a simple web app with F# and C# ASP.NET MVC 4. You’ve also seen a few of the great features that F# has to offer to help you on your journey, such as record types, sequence expressions, the pipe-forward operator, and one of the out-of-the-box computation expressions. However, this barely scratches the surface of what F# can do for you. The next few sections will provide several more “magical” F# features that will help you on your way.
The first thing you may have noticed in the examples thus far is that we are still building the ASP.NET MVC code using a mostly object-oriented approach. This is all well and good, and you can certainly use this approach to build solid web solutions that accomplish the majority of your goals; however, there are several advantages that you can gain by moving to a more functional paradigm.
You may have noticed a couple of things about the guitar
controller and repository. The repository has a separate class that
designates a GuitarRepository. If a
new repository is required in the future, to retrieve something like
trumpets, you would likely have to create a very similar repository
class called TrumpetRepository.
Having to do this often will result in a lot of code that breaks the
Don’t Repeat Yourself (DRY) best practice. One
way to solve this using a functional paradigm is to create a generic
module with reusable functions that take other functions as arguments.
Functions that take or return other functions are known as
higher-order functions. The following shows an
example:
namespaceFsWeb.RepositoriesopenSystemopenSystem.LinqmoduleRepository=letget(source:IQueryable<_>)queryFn=queryFnsource|>Seq.toListletgetAll()=funs->query{forxinsdoselectx}
This code defines a Repository
module—which provides a named grouping of F# constructs such as
functions. The functions in the Repository module are fairly generic and
reusable due to F#’s support of functions as a first-class citizen. The
get function takes two
arguments:
An object named
sourcethat must be of typeIQueryable<_>.A function that takes
sourceas an argument. This function, which could be anything that takessourceas the last argument and that can then be passed intoSeq.toListafter the function is evaluated, will execute the query computation expression.
Note
The Repository module is
similar in concept to the generic repository pattern in C# that uses
IRepository<T> and/or
Repository<T>. While some
consider this to be an unnecessary abstraction layer, I feel this
approach improves readability and reduces code duplication. Although
several of the examples in this book use a generic repository
approach, the query computation expression can certainly be used
without the additional abstraction.
With the get function defined,
we can create any number of additional query functions that can be
passed into get as the second
argument. The getAll function in the
example shows how to do this. Other examples include the
following:
letfindfilterPredFn=filterPredFn|>funfns->query{forxinsdowhere(fn())}letgetToprowCount=rowCount|>funcnts->query{forxinsdotakecnt}
Note
If your background is in C#, you can do similar types of things
with Func<T, TResult>, but
the syntax can quickly become less than ideal.
To take advantage of this generic repository you also have to make a few changes in the controller code. The great news is that these changes actually allow your code to be more testable as a byproduct. Before I show you how to implement these changes in the controller, I need to explain a few additional functional concepts.
Function composition is one of the key weapons available to the F# developer. To put it simply, function composition is the chaining together of small, single responsibility functions to form more complex, multidimensional processes and algorithms. This technique allows you to create applications that accomplish complex tasks, while keeping out bugs, reducing maintenance concerns, and increasing the ability to understand the code.
You’ve already seen several examples of function composition in this book as any time the pipe-forward operator is used, a form of this concept is being applied. The pipe-forward operator causes the function or method that is first in the chain to be evaluated with the result of that evaluation passed as an argument to the next function or method in the chain. The code that follows provides a simple example:
letfunction1()="Hello "letfunction2firstString=firstString+"Daniel "letfunction3combinedString=combinedString+"Mohl"letresult=function1()|>function2|>function3printfn"%s"result
This code defines three functions cleverly named function1, function2, and function3. Next, each function is called and
the final output is assigned to result. Lastly, the result is printed to the screen. The
interesting aspects here are that function1 is evaluated and the result of that
function is then passed into function2 as an argument. Once function2 is evaluated, the result of that
evaluation is passed in as the argument to function3. This ultimately produces a typical
“Hello world!” result with “Hello Daniel Mohl” printed to the
screen.
This may seem a little elementary if you have been doing much F# development, but it’s important to have a solid understanding of this foundational functionality before moving on to more advanced concepts.
Note
F# provides other composition-related operators that I have not
mentioned here. More information on operators such as ||>, <||, <|, >>, and << is available here. We will
discuss a few of these here and there throughout this book.
The next concept related to function composition that you need to understand before moving on is that of partial function application. F# allows functions that can be partially applied—known as curried functions—to be created by simply separating the function arguments by a space. Here’s an example:
letfunction1firstStringsecondStringthirdString="Hello "+firstString+secondString+thirdString
This function allows you to pass some or all of the arguments. If only some of the arguments are provided, then a new function will be returned that expects the additional arguments that were not included in the first call.
For example, the partiallyAppliedFunc in the following code
will result in a new function that expects a single string
argument:
letpartiallyAppliedFunc=function1"Daniel""Mohl"
You can now take advantage of these concepts to allow the GuitarsController to use a more functional
approach.
Using function composition and partially applied functions allows
you to modify the GuitarsController
to take advantage of the new Repository module. I’ll show the modified
controller in full and then break it down:
namespaceFsWeb.ControllersopenSystemopenSystem.Web.MvcopenFsWeb.ModelsopenFsWeb.Repositoriesopen Repository[<HandleError>]typeGuitarsController(context:IDisposable, ?repository)=inheritController()let fromRepository = match repository with | Some v -> v | _ -> (context :?> FsMvcAppEntities).Guitars |> Repository.getnew()=newGuitarsController(new FsMvcAppEntities())memberthis.Index()=getAll() |> fromRepository|>this.Viewoverride x.Dispose disposing = context.Dispose() base.Dispose disposing
The first change simply opens the Repository module in much the same way a
namespace would be opened. This step is really only needed to improve
the readability of the code. The next change is that the main
constructor now takes an object that implements IDisposable and an optional repository. The
biggest difference here is that the repository is now a function rather
than an object. Type inference helps out a lot in this scenario by
identifying the appropriate signature of the function based on usage.
This keeps everything nice and concise. The use of a function instead of
an object allows for any function that matches the signature to be
passed in as the repository. This greatly simplifies isolated unit
testing, which can be a pain point when using Entity
Framework.
The next change you will notice is the fromRepository definition. This piece of code
checks the incoming repository parameter. If nothing was provided for
that parameter (which is the case for normal execution), a little prep
work is done to generate a function that will then be used to retrieve
data in the various controller operations. This showcases a practical
example of both function composition via the pipe-forward operator as
well as partial application of a curried function. The pipe-forward
aspect is associated with the passing of context.Guitars to the Repository.get function. This causes Repository.get
to be partially applied with the first parameter (i.e., context.Guitars) with a new function
being returned that expects the final parameter to be applied
at a future time.
Note
You could have written Repository.get as simply get since we previously opened the Repository module; however, I think the
current approach makes the code more readable.
The parameterless constructor comes
next, which instantiates a new FsMvcAppEntities and
passes it to the main constructor. A repository is not passed in this
case. This works to our advantage, since the default repository-related functionality is desired
when running the web application.
The final interesting change uses the fromRepository function that came in through
the main constructor as well as the getAll function in the Repository module to retrieve the data. The
results are then passed to the view in the same way you passed them in
the previous examples. One other interesting benefit of using F# that is
shown in this example is how the flexibility that the language provides
can make your code more readable. getAll |>
fromRepository reads very much like how I would write or say
this in English. I could have just as
easily switched this up by using fromRepository(getAll()) or
fromRepository <| getAll(), but
that would not have been as readable. F# gives ample options
that allow you to choose the best approach to accomplish the job at
hand.
You now have a controller and repository that read well, are easy to maintain, and follow a slightly more functional paradigm, but F# has many other features that can provide even more benefits. In this section I’ll show you just a little bit of the power of pattern matching with F#.
Pattern matching is a feature that allows you to control program execution and/or transform data based on defined rules or patterns. F# supports a number of different pattern types. You can find a full list here.
To explain how pattern matching can help in your ASP.NET MVC
projects, I will walk you through the creation of a new page. This page
is used to create a new Guitar
record. To accomplish this, you will need to add a new ASP.NET MVC view
as well as a few new controller methods. The following example provides
the markup associated with the new view that is in a new file named
Create.cshtml:
@model FsWeb.Models.Guitar<!DOCTYPE html><html><head><title>Create a guitar</title><metaname="viewport"content="width=device-width, initial-scale=1"/><linkrel="stylesheet"href="http://code.jquery.com/mobile/1.0.1/jquery.mobile-1.0.1.min.css"/><scriptsrc="http://code.jquery.com/jquery-1.6.4.min.js"></script><scriptsrc="http://code.jquery.com/mobile/1.0.1/jquery.mobile-1.0.1.min.js"></script></head><body><divdata-role="page"data-theme="a"id="guitarsCreatePage"><divdata-role="header"><h1>Guitars</h1></div><divdata-role="content">@using (Html.BeginForm("Create", "Guitars", FormMethod.Post)) {<divdata-role="fieldcontain">@Html.LabelFor(model => model.Name) @Html.EditorFor(model => model.Name)<div>@Html.ValidationMessageFor(m => m.Name)</div></div><div><buttontype="submit"data-role="button">Create</button></div>}</div></div></body></html>
Place this new file in the Views\Guitars folder of the C# web application project. As with the previous ASP.NET view example, this view-related markup is for explanation purposes only and should not be taken as an example of something that is “production-ready.”
You need to add two new methods to the GuitarsController class. This is where the
pattern matching magic comes into play. The following shows the new
methods. The emphasized code showcases the pattern match
expression:
[<HttpGet>]memberthis.Create()=this.View()[<HttpPost>]memberthis.Create(guitar:Guitar):ActionResult=match base.ModelState.IsValid with | false -> upcast this.View guitar // … Code to persist the data will be added later | true -> upcast base.RedirectToAction("Index")
Let’s concentrate on the second method. This method will handle a
POST that includes the information
needed to create a guitar. The
interesting thing here is the pattern match expression that is
determining flow based on the validity of the passed-in model class,
which is guitar in this case. You can
basically think of the pattern match expression for this example as a
switch or case statement. (This simple match expression
could have been written as an if…then…else
expression. You can learn more about such expressions here.)
Note
You may have noticed that the HttpPost version of Create requires a cast to ActionResult. You can make this read a bit
better by providing a simple function to do the upcast, such
as:
letasActionResultresult=result:>ActionResult
The function can then be used as follows:
guitar|>this.View|>asActionResult
This is great, but what if you need to check multiple things, such
as model validity as well as validation of something specific to a
property on the model? As a contrived example, perhaps you need to check
for model validity as well as verify that the word “broken” isn’t in
guitar.Name. The only way to
accomplish this with a switch
statement is to implement nested checks. This can quickly cause code to
get out of hand and make maintenance a nightmare.
With F# pattern matching we can easily solve this with code such as the following:
letisNameValid=Utils.NullCheck(guitar.Name).IsSome&¬(guitar.Name.Contains("broken"))match base.ModelState.IsValid, isNameValid with | false, false | true, false | false, true ->upcastthis.Viewguitar|_->upcastbase.RedirectToAction("Index")
The important thing that I want to point out about this code is
how the pattern match expression has become much more than just a
switch statement. The first line now
defines a tuple that contains the first value of base.ModelState.IsValid and the second value
of isNameValid. We can now pattern
match against that tuple.
Note
The Utils.NullCheck(guitar.Name).IsSome code in
the preceding pattern match example determines whether the provided
guitar object is null. Based on this, an F# Option type is returned that indicates
Some if the guitar object is not
null or None if the object is null. Here is the code for the Utils.NullCheck function that provides this
functionality, and represents another pattern match example that has
slightly different syntax from what has been seen so far:
letNullCheck=function|vwhenv<>null->Somev|_->None
The first pattern in the preceding example is matching against the
previously described tuple. It also is using OR logic, which makes the code more succinct.
The match will succeed if the tuple equals (false, false), (true, false), or (false, true).
Note
The name validation check in this example is here to showcase a few of the capabilities of F# pattern matching. A real requirement such as this would be better served with a custom validation attribute that could be placed on the model and potentially checked client-side as well.
Pattern matching has a whole host of other great features, including the ability to bind input data to values for transformation, implement more complex guard logic, and match against F# record types.
Note
The ability to pattern match against F# records is one reason to prefer records over classes when possible. Other reasons include immutability, conciseness, and improved features for creating new records that vary from the original.
I’ve shown you several ways to start taking advantage of F# in your ASP.NET MVC applications. Your controllers and models should now be succinct, readable, and more functional in nature. Some of the benefits shown provide subtle improvements. Others can greatly improve the readability and reliability of your application. One thing that you may not realize just yet is how F# can improve the maintainability of your code. One example of this is related to the code transformation process I took you through for making the application more functional. Throughout the process I made a number of changes to types associated with various methods and functions. Thanks to type inference, I generally only had to change the type or signature in one location and the rest of the code automatically picked up the change. This can be a big win!
In the next section, I will walk you through a few more advanced concepts that are not directly related to ASP.NET MVC solutions, but are often used in conjunction with F# ASP.NET MVC solutions.
It’s been long known that asynchrony is one of the keys to achieving responsive websites. F# provides a feature, called asynchronous workflows (also known as async workflows), that makes it very easy to make asynchronous calls from the server. The basic syntax is as follows:
async{letclient=newWebClient()return!client.AsyncDownloadString(Uri("http://www.yahoo.com"))}
The astute observer will notice that the async syntax looks a bit like the query syntax. This is because async is a computation expression just like query. There is a ton of power in computation expressions.
Note
The ! (pronounced “bang”)
operator in the preceding example is telling the computation
expression that this line will be doing something to the underlying
implementation by calling specific functions (Bind and Return, in this case). An example of how to
build a custom computation expression is provided later in this
chapter.
This simple async example creates a new WebClient inside an async
block. It then downloads the content from the provided URI without
blocking the current thread. It should be noted that the async block returns a task generator that will
not actually be executed until explicitly told to do so. You can execute
the previous code with something like Async.Start.
Note
Tomas Petricek has an excellent series of blog posts where he talks about the differences between async in F# and C# 5.0. It’s a great read!
How could you use this in ASP.NET MVC? Well, for starters you
could make any external calls from within controllers use this feature.
A more common usage is to create an asynchronous controller. Tomas
Petricek and Jon Skeet provide an example
of this. Yet another example is to use async workflows in
combination with MailboxProcessors to
allow lightweight processes that can be used for a whole host of
different tasks. The next section provides an example of this.
The MailboxProcessor feature in
F# is one of those things that feels like pure magic. The more you play
with it, the more uses you will find for it. MailboxProcessor—which is commonly aliased as
agent—combined with asynchronous
workflows, provide the ability to spin up tens of thousands of isolated
processes that can be strategically positioned to do your bidding. This
means you can divvy out work to various MailboxProcessors, similar to how you might
use threads, without having to incur the overhead associated with
spinning up a new thread. Additionally, MailboxProcessors primarily (though not
exclusively) communicate through message passing, which allows you to
eliminate the problems associated with multiple threads using shared
state.
To accomplish its intended task, each MailboxProcessor has a virtual “message queue”
that is monitored for incoming messages. When a message arrives, it can
be retrieved from the message queue and processed however you choose.
Generally, pattern matching is used to determine the type of message
that has arrived so that it can be processed appropriately. Once the
message has been processed, an optional reply can be sent to the sender
of the message (either synchronously or asynchronously).
The following example uses a MailboxProcessor to hold cached data:
namespaceFsWeb.RepositoriesmoduleCacheAgent=// Discriminated Union of possible incoming messagestypeprivateMessage=|Getofstring*AsyncReplyChannel<objoption>|Setofstring*obj// Core agentletprivateagent=MailboxProcessor.Start(funinbox->letrecloop(cacheMap:Map<string,obj>)=async{let!message=inbox.Receive()matchmessagewith|Get(key,replyChannel)->Map.tryFindkeycacheMap|>replyChannel.Reply|Set(key,data)->do!loop((key,data)|>cacheMap.Add)do!loopcacheMap}loopMap.empty)// Public function that retrieves the data from cache as an Optionletget<'a>key=agent.PostAndReply(funreply->Message.Get(key,reply))|>function|Somev->v:?>'a|>Some|None->None// Public function that sets the cached dataletgetkeyvalue=Message.Set(key,value)|>agent.Post
This may seem a little intimidating at first, but with a little explanation it will all be clear.
The first type that is defined in the CacheAgent module, which is named Message, defines all of the messages that
are valid to send to the cache agent. This type is using a feature of
F# called discriminated unions, which provides
the ability to specify related groups of types and values. In this
specific scenario, the feature is especially well suited as it allows
you to define the message contracts that can be handled by the agent.
Discriminated unions also allow each defined type to contain a
different signature, which provides a ton of additional power.
Discriminated unions have many use cases, and I will show more
examples of them throughout the book.
In the previous example, only the input message is being defined
in the Message discriminated union
type. If necessary, you could easily define reply message types with
varying signatures, as shown in the following example:
typeprivateMessageExample2=|Getofstring*AsyncReplyChannel<Reply>|Setofstring*objandReply=|Failureofstring|Dataofobj
The core agent is defined directly after the Message type. It creates and immediately
starts a new MailboxProcessor that
constantly watches for incoming messages. An anonymous function is
then defined that contains a recursive function named loop. This loop function takes a single parameter named
cacheMap, which will be repeatedly
passed to the function to provide the needed state management. The use
of the async workflow provides the ability for the agent to
continuously loop without blocking any of the other application
functionality. It is within this asynchronous workflow that the
agent’s message queue is checked for new messages.
If a new message is found, pattern matching is used to determine
the message type so that appropriate processing can be done. In the
case of a get message type, the
cacheMap is searched for an entry
that contains the specified key. If the key is found in
cacheMap, then the associated value is returned as
Some(value), else None is returned. Finally, the result is
returned to the sender of the message.
Note
Once again we see an Option
type in use. Using an Option type
for values that would otherwise be null makes your application more robust
since it helps prevent null
reference exceptions. You’ll see a consistent theme within F#
related to explicitly over implicitly. The Option type allows explicit definition of
something having an assignment or not having an assignment, whereas
null can mean either the value
doesn’t have an assignment or it’s just in a default
state.
If the message is of type set, then the provided key/value pair is
added to cacheMap and the new
cacheMap is passed as the parameter
in the recursive call to the loop
function.
Lastly, the recursive loop is kicked off with an empty Map.
Note
The cacheMap value in the
MailboxProcessor example is using
the F# type named Map, which is
an immutable data structure that provides basic dictionary types of
features.
The rest of the code is primarily defining the public API that allows interaction with the agent. It’s basically just a facade on top of the agent’s API that arguably makes it a little easier to work with.
Note
More information and a few more MailboxProcessor examples are available
here.
Taking advantage of this new CacheAgent is quick and easy. Simply call
the public get or set functions. You could easily add this
directly to the desired action of any of the controllers, but it would
be better to write this once in the Repository and provide flexibility to
determine whether the cache should be used. The following updates to
the Repository module do the trick,
with the emphasized code showcasing what is new:
moduleRepository=let withCacheKeyOf key = Some key let doNotUseCache = Noneletget(source:IQueryable<_>)queryFncacheKey=let cacheResult = match cacheKey with | Some key -> CacheAgent.get<'a list> key | None -> None match cacheResult, cacheKey with | Some result, _ -> result | None, Some cacheKey -> let result = queryFn source |> Seq.toList CacheAgent.set cacheKey result result | _, _ ->queryFnsource|>Seq.toListletgetAll()=funs->query{forxinsdoselectx}letfindfilterPredFn=filterPredFn|>funfns->query{forxinsdowhere(fn())}letgetToprowCount=rowCount|>funcnts->query{forxinsdotakecnt}
The first two functions provide a readable way to indicate whether cache should be used. If it is to be used, then the specific cache key string is included. Here are some examples of the use of these functions:
lettop2Guitars=getTop2|>fromRepository<|doNotUseCachegetAll()|>fromRepository<|withCacheKeyOf("AllGuitars")|>this.View
Note
The use of the backward pipe (i.e.,
<| ) operator in the preceding
example causes the result of the value to the right to be passed as
input to the function on the left.<?xml version='1.0'?>
<indexterm><primary><| (pipe-backward)
operator</primary></indexterm>
The code changes in the get
function allow results to be retrieved from cache (if desired and
available), retrieved from the database with the cache being set to
speed up future requests, or always pulled from the database. The
first pattern match checks to see if caching is desired. If Some key was provided, an attempt to
retrieve the cache from the CacheAgent is conducted. The result of that
attempt is bound to cacheResult. If
no caching functionality is desired, then None is bound.
The next pattern match expression is checking for three scenarios:
Some value came back from the cache, in which case that value is returned to the caller.
No cache was found in the
CacheAgent, but the caching functionality is enabled. This causes the query to be run against the database, the result to be stored in theCacheAgent, and the result to be returned to the caller.Caching is not desired for this call. This causes all requests to go to the database and nothing to be retrieved from or set in cache.
A full book could be written on the uses for the MailboxProcessor. This CacheAgent example alone could easily be
extended to include features such as auto-cache expiration, failover,
auto-refresh of cached data, distributed processing, eventing when
data changes, cache removal, and so on. Examples of use cases outside
of this CacheAgent include, but are
certainly not limited to, any background processing for which you
might normally use a background thread, daemons, CQRS type
architectures, notification engines, and web socket server
implementations.
You already built a MailboxProcessor, so you have a head start
when it comes to writing F# code in your ASP.NET MVC application that
sends and receives messages. In this section, I will expand on this
concept by talking about how to use F# in combination with a message
bus. A message bus provides a number of advantages, ranging from
scalability to a naturally decoupled system to multiplatform
interoperability. Message-based architectures that utilize a message bus
focus on common message contracts and message passing. Does this sound
familiar? It should, since MailboxProcessors basically do the same thing,
but at a smaller, more focused level. While there certainly isn’t enough
space in this chapter to cover this topic in exhaustive detail, the
examples provided in the following sections will get you
started.
To keep things simple, I’ve created a small library called
SimpleBus that will be referenced
throughout the rest of this chapter. It should be noted that while
SimpleBus works well for the basic
examples in this book, it is missing several key features, such as full
publish/subscribe capability, transactional queues, request−response
capability, correlated messages, multiple message types per queue, and
much more. For production applications, I recommend using one of the
numerous message/service bus options available via a quick and easy
Internet search. While SimpleBus
would need a few enhancements to be production-ready, the F# code used
to interact with the bus and the concepts described could certainly be
used as is to build a robust production application.
The primary goal of SimpleBus
is to allow the publishing of messages to a specified MSMQ endpoint,
which can then be watched and consumed by another process. This lays
the groundwork for a highly scalable, decoupled, message-based system.
To handle the publishing of messages, I’ve defined a function named
publish that takes a queueName and a type that will be serialized
(using a BinaryMessageFormatter)
and sent to the queue:
letpublishqueueNamemessage=usequeue=newMessageQueue(parseQueueNamequeueName)newMessage(message,newBinaryMessageFormatter())|>queue.Send
The function first creates a new MessageQueue, taking care to ensure that the
memory associated with the MessageQueue instance will be marked for
release after use. The desired queue name is provided as an argument
to a parseQueueName helper
function, which will be described later in this section. The output of
the parseQueueName function is then
provided as a constructor argument to MessageQueue. A Message type—which is in the System.Messaging namespace—is then
instantiated with the body of that Message type set to the generic message
object that was passed in as an argument. The Message constructor is also provided a new
BinaryMessageFormatter instance,
which will cause the message to be serialized to binary form. If this
formatter were not provided, the default would be XmlMessageFormatter. BinaryMessageFormatter is used here to
provide better performance and to allow
the sending of F# record types. The new Message is
then piped to the Send method of
the MessageQueue
instance.
Two helper functions assist during a call to publish:
letprivatecreateQueueIfMissing(queueName:string)=ifnot(MessageQueue.ExistsqueueName)thenMessageQueue.CreatequeueName|>ignoreletprivateparseQueueName(queueName:string)=letfullName=matchqueueName.Contains("@")with|truewhenqueueName.Split('@').[1]<>"localhost"->queueName.Split('@').[1]+"\\private$\\"+queueName.Split('@').[0]|_->".\\private$\\"+queueNamecreateQueueIfMissingfullNamefullName
The createQueueIfMissing
function checks for the queue, and if it doesn’t exist, it then
creates a nontransactional queue. MSMQ allows messages to be published
to local queues as well as to queues on remote machines. This is
determined by the provided queue name. The parseQueueName function looks at the
provided queue name, determines whether the queue is local or remote,
and formats the queue name appropriately. It then calls the createQueueIfMissing function to verify that
the queue actually does exist and creates the queue if needed.
With the publish function and
associated helpers defined, you have all that is needed to start
pumping messages into a queue. Before I show an example of this, I’ll
quickly show and describe the subscribe function:
letsubscribe<'a>queueNamecallback=letqueue=newMessageQueue(parseQueueNamequeueName)queue.ReceiveCompleted.Add(fun(args)->args.Message.Formatter<-newBinaryMessageFormatter()args.Message.Body:?>'a|>callbackqueue.BeginReceive()|>ignore)queue.BeginReceive()|>ignorequeue
The subscribe function
provides a way to consume messages from a queue. It allows the
distinction of a type that will be used to determine what type the
deserialized message should be cast to. Like the publish function, it also takes a queueName as the first argument.
Additionally, it takes a callback function that will be called
whenever a new message is found in the queue.
The first thing subscribe
does is create a new MessageQueue
in much the same way as what was done for publish. The only real difference is that
queue is bound with the let keyword rather than the use keyword. This is important because it
means the function will not clean up after itself, causing you to have
to explicitly call Dispose() on the
returned queue when subscribe is
used. This additional cleanup step is required since the ReceiveCompleted event potentially needs to
have access to the queue long after the initial call to subscribe.
The subscribe function then creates an event
handler that will be raised by System.Messaging.MessageQueue.BeginReceive
whenever a message comes into the queue that is being
watched. This event handler sets the message formatter. It then casts
the body of the message to the designated type and passes it as an
argument to the callback function. The BeginReceive() method is then called to
allow the queue to continue to be monitored. You don’t really care
about the IAsyncResult value that
is returned from BeginReceive(), so
it is ignored.
Note
As I mentioned at the beginning of this section, this SimpleBus is not production-ready. For
example, it would not currently handle multiple subscriptions in the
same assembly. I intentionally left this out to reduce complexity. A
simple example of a message bus F# implementation that is used in a
production application is available here.
Separation of concerns is important in all aspects of software development, and solutions built on message-based architectures are no exception. One common approach for achieving this is to follow a principle called Command Query Responsibility Segregation (CQRS). A key tenet of CQRS is to clearly separate commands (operations that cause state change) from queries (requests that simply provide data for read-only activities). This approach fits very nicely into concepts associated with a functional-first language like F#.
Note
Just to be clear, use of a message-based architecture is not strictly related to CQRS or vice versa. However, these do often coexist, and a number of the concepts associated with CQRS and/or other architectures that use message buses are excellent companions to many of the core tenets of F#.
To test out the publish
functionality, you can follow the concepts of CQRS by creating a type
that will be used as a command to create a new guitar record. Since message types will need
to be available to both the publisher and the subscriber, it’s best to
place them in a separate assembly. In this example, I’ve named the new
assembly Messages. The CreateGuitarCommand record that will be
published is as follows:
namespaceMessagestypeCreateGuitarCommand={Name:string}
You can now easily publish this message with SimpleBus.publish. To see this in action,
you can finish up the Create method
in the GuitarsController. The
modified method is shown in the following code, with the new code
emphasized:
[<HttpPost>]memberthis.Create(guitar:Guitar)=matchbase.ModelState.IsValidwith|false->guitar|>this.View|>asActionResult|true->{Messages.CreateGuitarCommand.Name = guitar.Name} |> SimpleBus.publish "sample_queue"base.RedirectToAction("Index")|>asActionResult
Note
You will need to make sure MSMQ is installed on the machine. Additionally, you will need to run Visual Studio in admin mode (at least once) in order to have the application create the needed queue.
This new code simply creates a new CreateGuitarCommand record, with Name set to the provided guitar.Name, and pipes it to SimpleBus.publish. In this particular case,
the record expression could be shortened to {Name = guitar.Name} as type inference would
have taken care of the rest. However, it’s common for multiple
commands to exist with the same value
names, so it’s best to qualify them. For example, a DeleteGuitarCommand might
look like this:
typeDeleteGuitarCommand={Name:string}
Consuming messages from the queue isn’t much harder than publishing them. Often messages are consumed and processed via appropriate code that is deployed in Windows services; however, the messages could just as easily be consumed and processed by a web application. To keep things simple, you can consume the messages that were just published via a console application. The code looks like this:
openMessagesopenSystemprintfn"Waiting for a message"let queueToDispose = SimpleBus.subscribe<CreateGuitarCommand> "sample_queue" (fun cmd -> printfn "A message for a new guitar named %s was consumed" cmd.Name)printfn"Press any key to quite\r\n"Console.ReadLine()|>ignorequeueToDispose.Dispose()
This console application subscribes to the queue expecting
messages that will deserialize to
a CreateGuitarCommand. A function
is passed as the second argument to the subscribe function, which will
simply print some text to the console including the guitar
name value from the message. The last line of the code disposes the
MessageQueue object.
Although the consumer of the messages works well if nothing goes
wrong, what happens if an error occurs while the message from the queue
is being processed inside the subscribe function? As it exists right now,
the subscription process would simply stop working, throw away the
message, and not tell anyone. This obviously is not what we want. At the
very least, we need to allow the message retrieval to continue, and
notify the message consumer of the problem.
One way to accomplish this goal is through something called
continuation-passing style (CPS). At the risk of
oversimplification, continuation-passing style is an approach that
causes functions (specifically actions, thus inverting the control flow)
to call other functions on completion rather than returning immediately
to the caller. The simplest example of this
is a callback function, similar to what is already being done in the
subscribe function—this is actually an
explicitly passed continuation.
Can we use this approach to handle the error message scenario?
Absolutely; by simply passing in a failure callback function that is
called from the subscribe function
when an exception occurs, the message consumer can be notified and can
handle the scenario appropriately. To accomplish this, the subscribe method is modified as follows (the
changes are emphasized):
letsubscribe<'a>queueNamesuccess failure=letqueue=newMessageQueue(parseQueueNamequeueName)queue.ReceiveCompleted.Add(fun(args)->tryargs.Message.Formatter<-newBinaryMessageFormatter()args.Message.Body:?>'a|>success with | ex -> failure ex args.Message.Bodyqueue.BeginReceive()|>ignore)queue.BeginReceive()|>ignorequeue
The subscribe function is now
accepting two functions as arguments. The first will be called on
success and the second will be called on failure. The only change
required to call the subscribe
function is to pass in the function to execute on failure:
letqueueToDispose=SimpleBus.subscribe<CreateGuitarCommand>"sample_queue"(funcmd->printfn"A message for a new guitar named %s was consumed"cmd.Name)(fun(ex:Exception)o->printfn"An exception occurred with message %s"ex.Message)
I’ll show several more examples of this concept in use in Chapter 2, including how to use
Async.StartWithContinuations to
handle success, failure, and cancellation of asynchronous
workflows.
I’ve shown a few different computation expressions throughout this chapter that are provided out of the box in F#. These computation expressions give F# a lot of power, but it doesn’t stop there. F# also gives you the ability to create your own custom computation expressions. Before getting into this, though, it’s worth taking a second to boil down the definition of a computation expression to its simplest form.
It’s easiest to think about a computation expression as a type wrapper that has a pipeline of operations that can be executed on a given set of F# code. The operations in the pipeline are applied at different points during execution of the wrapped code. Additionally, specific operations within that pipeline can be instructed to execute based on how the wrapped code is called. This allows for the creation of composable building blocks that can contain very complex pipelines, but that are trivial to use.
To show how to build a simple computation expression, I will walk
you through the creation of one named publish. Yep, you guessed it; this custom
computation expression will publish messages to the queue much like the
direct call to the publish function
of the SimpleBus that we discussed in
the preceding section. Before showing you how to build a custom
computation expression, I’ll show you what the syntax will look like
during usage:
publish{do!SendMessageWith("sample_queue",{Messages.CreateGuitarCommand.Name=guitar.Name})}
While computation expressions can quickly become very complex, the one that allows the preceding syntax is quite simple. The code is as follows:
modulePublishMonad// Define the SendMessageWith Discriminated UniontypeSendMessageWith<'a>=SendMessageWithofstring*'a// Define the PublishBuilder builder typetypePublishBuilder()=memberx.Bind(SendMessageWith(q,msg):SendMessageWith<_>,fn)=SimpleBus.publishqmsgmemberx.Return(_)=true// Create the builder-nameletpublish=newPublishBuilder()
The first piece of this code that we should discuss is the
PublishBuilder type. You can give
this type whatever name you prefer; however, the general convention is
to name it as shown in this example, where the builder
name (i.e., publish) is
changed to Pascal-case and appended with the word Builder. The builder
type (i.e., PublishBuilder) can define various methods,
which can change the way the builder works. The Bind method is called when the let! or do!
(pronounced “let-bang” and “do-bang”) symbols are used in the
computation expression. The Return
method is required and is called in most cases. Since it is not really
being used by the logic in this code, a simple hardcoded Boolean value is returned.
The real work in the PublishBuilder is happening in the Bind method. This method takes two arguments.
The first is a value and the second is a function. For this example,
only the first argument needs to be considered. This argument contains a
value of the SendMessageWith
discriminated union type that specifies both the desired queueName and the message to send to that
queue. The Bind method then uses
those values to call the SimpleBus.publish function.
The Create action in the
GuitarsController that is used during
an HTTP POST can now be changed to
this:
[<HttpPost>]memberthis.Create(guitar:Guitar)=matchbase.ModelState.IsValidwith|false->guitar|>this.View|>asActionResult|true->publish{do!SendMessageWith("sample_queue",{Messages.CreateGuitarCommand.Name=guitar.Name})}base.RedirectToAction("Index")|>asActionResult
While this example is similar in concept to the trace computation expression provided on the
MSDN
documentation web page, the typical custom computation
expression is implemented in order to accommodate more complex
scenarios. Examples of common usages are available here.
More information on building custom computation expressions is available
here.
This chapter covered a large number of topics in a fairly short
amount of space. You went from finding and setting up your first ASP.NET
MVC 4 application with C# and F# to building a custom computation
expression that pushes messages onto a message bus. You also learned how
to use a number of different F# features to build better web applications.
Some of these include discriminated unions, the Option type, MailboxProcessors, pattern matching, async
workflows, the query computation expression, and more. You will see how to
use many of these features in other scenarios throughout the rest of this
book, so if you don’t feel 100% comfortable with them just yet, there will
be more examples to come.
In the next chapter, I will walk you through several approaches and options for building services with F#. Primary focal areas will include WCF (SOAP), ASP.NET Web API, and various web micro-frameworks. Unit testing in F# will also be covered. As the great Bob Seger song states, “Turn the page.”
Get Building Web, Cloud, and Mobile Solutions with F# now with the O’Reilly learning platform.
O’Reilly members experience books, live events, courses curated by job role, and more from O’Reilly and nearly 200 top publishers.

