Chapter 4. Python and the Search API
Once you have enough data, no amount of organization will make everything easy to find. As Google has taught us, the only system that works at this scale is a search box. When you use GitHub, youâre exposed to both sides of this phenomenon: the repositories you have direct access toâwhich are relatively small in numberâare given a single level of hierarchy, so you can keep them straight in your head. For the rest, the uncountable millions of public repositories that belong to other people, thereâs a search box, with powerful features to help you find what youâre looking for.
Helpfully, GitHub also exposes this capability as an API you can consume from your own applications.
GitHubâs Search API gives you access to the full power of the built-in search function.
This includes the use of logical and scoping operators, like "or" and "user".
By integrating this feature with your application, you can provide your users a very powerful way of finding what theyâre looking for.
In this chapter weâll take a close look at this API, and try building a useful application with it. Weâll see how the Search API is structured, what kind of results come back, and how it can help us create a feature for someone on our team.
Search API General Principles
The Search API is split into four separate parts: repositories, code, issues, and users. These APIs all have different subject matter, and have different formats for their results, but they all behave the same in a few key ways. Weâre covering these first, because theyâll help you understand the results coming back from the specific API calls that we cover later. There are four major areas of commonality.
Authentication
Your identity as a user can determine the result set from a search query, so itâs important to know about authentication. We cover GitHub authentication fully in âAuthenticationâ, but this API is also available without logging in. However, there are a few limitations to this approach.
First, youâll only be able to search public repositories. This is probably fine if youâre primarily working with open source software, but users of your application will probably expect to have access to their private code, as well as that of any organizations they belong to. Also, since all Enterprise repositories are private, anonymous search is completely useless there.
Secondly, authenticating opens up your rate limit. The limits on search are stricter than other APIs anyway, because search is computationally expensive, but anonymous searches are stricter still. As of this writing, and according to the documentation, anonymous searches are limited to 5 per minute, and you can do 20 authenticated queries per minute. Take a look at âGitHub API Rate Limitsâ for more on how to work with rate limits.
Hereâs that same information in tabular form:
| Anonymous | Authenticated | |
|---|---|---|
Results include private repositories |
No |
Yes |
Use with Enterprise |
No |
Yes |
Rate limit |
5/minute |
20/minute |
Result Format
No matter what youâre searching for, the return value from the API follows a certain format. Hereâs a sample result from a query, which has been heavily edited to focus only on the parts youâll always see:
{"total_count":824,"incomplete_results":false,"items":[{â¦"score":3.357718}]}
Starting from the top: the total_count field represents the total number of search results that turned up from this query.
Itâs not uncommon for a fairly specific search to turn up thousands of resultsâremember, there are millions of repositories on GitHub.
By default, only the first 30 are returned, but you can customize this with page and per_page query parameters in the URL.
For example, a GET request to this URL will return 45 items, starting with the 46th result:
search/repositories?q=foobar&page=2&page_size=45
Page sizes are generally limited to 100.
The incomplete_results field refers to a computational limit placed on the Search API.
If your search takes too long, the GitHub API will stop it partway through executing, return the results that did complete, and set this flag to true.
For most queries this wonât be a problem, and the total_count will represent all the results from the search, but if your query is complicated, you might only get a partial result set.
Search results are returned in the items array, and each item always has a score field.
This field is numeric, but itâs only a relative measure of how well a result matches the query, and is used for the default sort orderâhighest score first.
If you do pay attention to it, remember it only has meaning when compared to other results from the same query; a result with a score of 50 isnât necessarily ten times âbetterâ than a result scored 5.
Hereâs a summary of the important fields:
| Field | Meaning |
|---|---|
|
Total search result count |
|
|
|
List of search results |
|
Relevance of this item as a search result |
Search Operators and Qualifiers
Of course, itâs always better if you can avoid pagination altogether, or at least get the best results in the first page. Qualifiers and operators can help narrow your search results to fewer pages, hopefully allowing the right result to float to the top.
With the Search API, all searches are done through a search query, which is encoded and passed in the URL as the q parameter.
Most of the query will be free text, but the API also supports some powerful syntax, such as these forms:
-
x AND y, as well asORandNOT -
user:<name>, wherenameis a user or organization -
repo:<name> -
language:<name> -
created:<date(s)> -
extension:<pattern>matches file extensions (like py or ini)
Numerical values and dates can have ranges:
-
2015-02-01will match only the given date -
<2015-02-01will match any date previous to the one given -
2015-02-01..2015-03-01will match dates within the given range, including the endpoints
For example, to find code written by the user tpope during July of 2012, you would write "user:tpope created:2012-07-01..2015-07-31" for the query parameter.
That would be encoded in a URL like so:
search/repositories?q=user%3Atpope+created%3A2012-07-01..2015-07-31
To constrain this search to only Python code, we could add ` language=python`,
URL encoded as +language%3Apython, to the end of the URL.
There are many other options. Check out https://github.com/search/advanced for a UI that can help you construct a query.
Sorting
If search query operators canât narrow down a result set to just the most important items, perhaps sorting them can.
Search results are returned in a definite order, never at random.
The default order is âbest match,â which sorts your results based on their search score, best score first.
If you want to override this, you can pass stars, forks, or updated in the sort query parameter, as in search/repositories?q=foobar&sort=stars.
You can also reverse the sort order using the order parameter, like search/repositories?q=foobar&sort=stars&order=desc.
The default is desc (âdescendingâ), but asc is also accepted, and will reverse the order.
Search APIs in Detail
Now that weâve covered how all these APIs behave the same, letâs discuss their specifics.
The Search API is compartmentalized into four categories: repositories, code, issues, and users.
The basic mechanism is the same for all four: send a GET request to the endpoint, and provide a URL-encoded search term as the q parameter.
Weâll show an abridged response from each of the four, along with some discussion of what to expect.
Repository Search
The search/repositories endpoint looks in the repository metadata to match your query.
This includes the projectâs name and description by default, though you can also search the read me file by specifying in:readme in the query.
Other qualifiers are documented at https://developer.github.com/v3/search/#search-repositories.
A query such as search/repositories?q=foobar might result in a response that looks something like this:
{"total_count":824,"incomplete_results":false,"items":[{"id":10869370,"name":"foobar","full_name":"iwhitcomb/foobar","owner":{"login":"iwhitcomb","id":887528,"avatar_url":"https://avatars.githubusercontent.com/u/887528?v=3",â¦},"private":false,"html_url":"https://github.com/iwhitcomb/foobar","description":"Drupal 8 Module Example","fork":false,â¦"score":59.32314},â¦]}
Each item in items is the description of a repository.
All sorts of useful information is included, such as a URL to the UI for this repository (html_url), the ownerâs avatar (owner.avatar_url), and a URL suitable for cloning the repository using Git (git_url).
Code Search
The search/code endpoint is for searching the contents of a repository.
You can try matching the contents of the files themselves, or their paths (using in:path).
(For complete documentation on the other available qualifiers, check out https://developer.github.com/v3/search/#search-code.)
This API is subject to several limits that donât affect the other search endpoints, because of the sheer amount of data the server must sort through to find matches.
First, it requires that you provide a general search term (a phrase to match); specifying a query with only operators (like language:python) is valid with other APIs, but not here.
Second, any wildcard characters in the query will be ignored.
Third, files above a certain size will not be searched.
Fourth, it only searches the default branch of any given project, which is usually master.
Fifth, and possibly most importantly, you must specify a repository owner using the user:<name> qualifier; you cannot search all repositories with one query.
The JSON returned looks something like this:
{"total_count":9246,"incomplete_results":false,"items":[{"name":"migrated_0000.js","path":"test/fixtures/ES6/class/migrated_0000.js","sha":"37bdd2221a71b58576da9d3c2dc0ef0998263652","url":"â¦","git_url":"â¦","html_url":"â¦","repository":{"id":2833537,"name":"esprima","full_name":"jquery/esprima","owner":{"login":"jquery","id":70142,"avatar_url":"https://avatars.githubusercontent.com/u/70142?v=3",â¦},"private":false,â¦},"score":2.3529532},â¦]}
Each item has some data about the file that turned up, including its name and URLs for a couple of representations of it. Then thereâs the blob of data about its repository, followed by a score, which is used for the default âbest matchâ sorting.
Issue Search
Repositories contain more than just code.
The search/issues endpoint looks for matches in the issues and pull requests attached to a project.
This endpoint responds to a wide variety of search qualifiers, such as:
type-
Either âprâ for pull requests, or âissueâ for issues (the default is both).
team-
Match issues whose discussions mention a specific team (only works for organizations you belong to).
no-
Match issues that are missing a piece of data (as in âno:labelâ).
There are many more; see https://developer.github.com/v3/search/#search-issues for complete documentation.
The result of a call to this endpoint looks like this:
{"total_count":1278397,"incomplete_results":false,"items":[{"url":"â¦","labels_url":"â¦","comments_url":"â¦","events_url":"â¦","html_url":"â¦","id":69671218,"number":1,"title":"Classes","user":{"login":"reubeningber","id":2552792,"avatar_url":"â¦",â¦},"labels":[â¦],"state":"open","locked":false,"assignee":null,"milestone":null,"comments":0,"created_at":"2015-04-20T20:18:56Z","updated_at":"2015-04-20T20:18:56Z","closed_at":null,"body":"There should be an option to add classes to the ul and li...","score":22.575937},]}
Again, each item in the list looks like the result of a call to the issued API.
There are a lot of useful bits of data here, such as the issueâs title (title), labels (labels), and links to information about the pull-request data (pull_request.url), which wonât be present if the result isnât a pull request.
User Search
All the other Search APIs are centered around repositories, but this endpoint searches a different namespace: GitHub users.
By default, only a userâs login name and public email address are searched; the in qualifier can extend this to include the userâs full name as well, with in:fullname,login,email.
There are several other useful qualifiers available; see https://developer.github.com/v3/search/#search-users for complete documentation.
Querying the search/users endpoint gives you this kind of response:
{"total_count":26873,"incomplete_results":false,"items":[{"login":"ben","id":39902,"avatar_url":"â¦","gravatar_id":"","url":"â¦","html_url":"â¦",â¦"score":98.24275},{"login":"bengottlieb","id":53162,"avatar_url":"â¦","gravatar_id":"","url":"â¦","html_url":"â¦",â¦"score":35.834213},]}
The list of items in this case look like the results from a query of the users/<name> endpoint.
Useful items here are the userâs avatar (avatar_url), several links to other API endpoints (repos_url, url), and the type of result (user or organization, in type).
Our Example Application
Now that we know a bit about how this API behaves, letâs do something useful with it.
Imagine that your development team uses GitHub to store their Git repositories, and that there are lots of little repositories for parts of the application that work together at runtime. This kind of situation ends up being fairly difficult to work with for your nontechnical colleagues; if they want to report an issue, they donât know where to go, and they donât know how to find issues that already exist.
Search can make this possible, but doing a search across an entire organizationâs repositories involves using the user:<organization> operator, which is obtusely named, and kind of scary for nonprogrammers.
Plus, the user would have to remember to add that option every single time they wanted to search for issues.
The Search API can make this a bit easier. Letâs make a GUI application with just a single search box, which makes it dead simple for a nontechnical user to search all the issues in all the repositories in a single organization. Itâll end up looking a bit like Figures 4-1, 4-2, and 4-3.
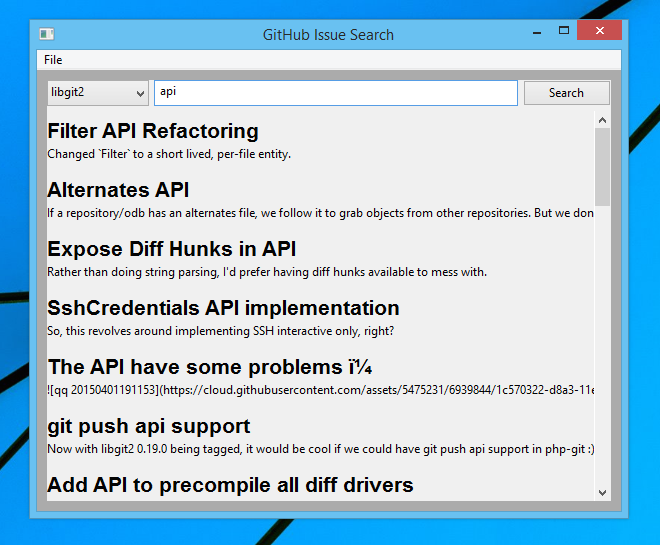
Figure 4-1. GitHub search application on Windows

Figure 4-2. GitHub search application on Mac
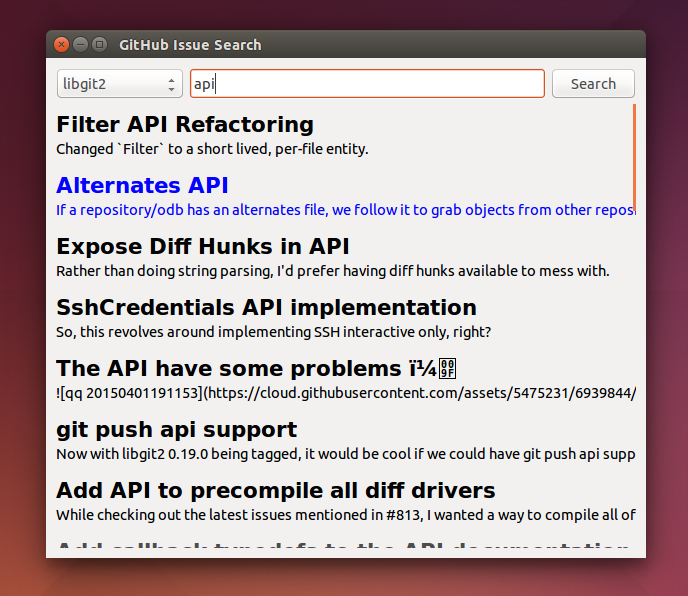
Figure 4-3. GitHub search application on Linux
User Flow
Thatâs the overall goal, but letâs dig in to more detail about how the user experiences the application.
The first thing weâll do is require the user to log in with GitHub credentials. Why? Partly because the Search API is throttled pretty aggressively, and the rate limits are higher with authenticated access. But also because our user is going to need the ability to search issues in private repositories. To make this easier, our program will try to get GitHub credentials from Gitâs credential store, but itâll fall back to a login form, which looks like Figure 4-4.
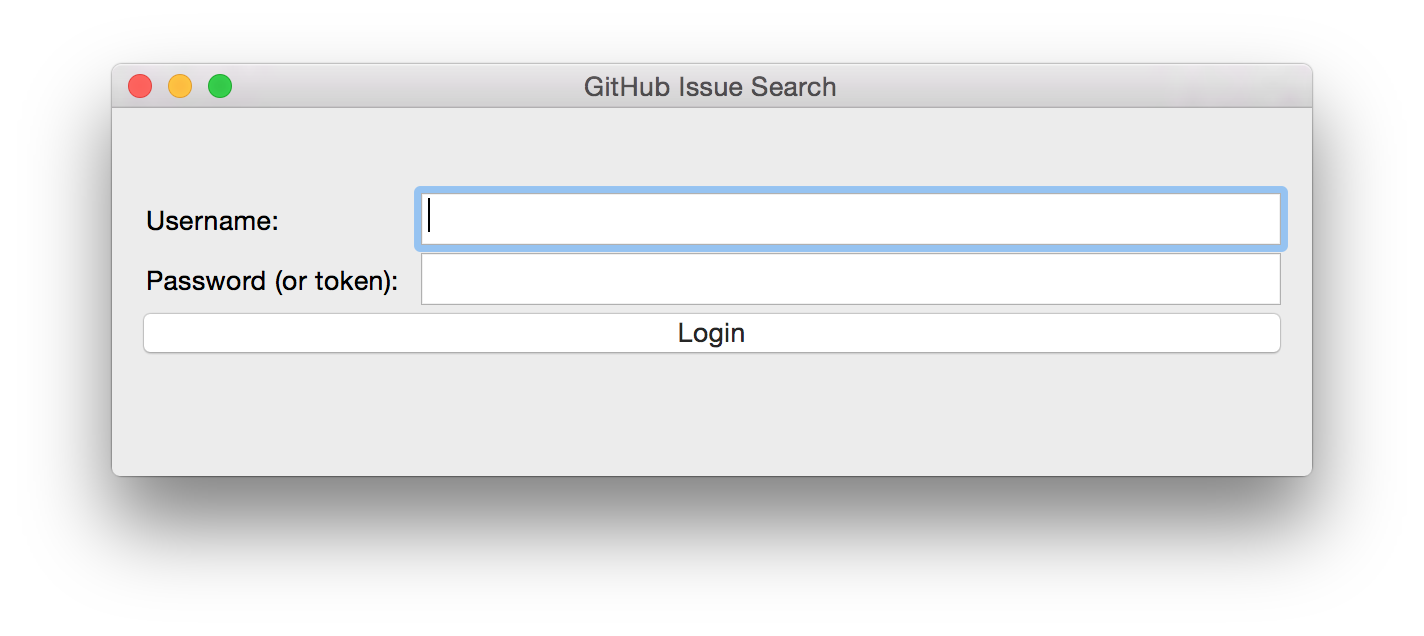
Figure 4-4. Login UI
Once the user logs in, theyâll be shown a search box. Typing in a search query and hitting Enter will result in a scrollable list of search results, with titles and the first line of the description. Clicking a search result opens the issue in the userâs browser.
Thatâs about it. This application only has two main screens from the userâs point of view. Itâs a simple, focused tool to solve a very tightly defined problem, so the code shouldnât be too hard.
Python
Now that we know how the program should act, letâs decide how it should work.
Weâll use Python for our implementation language, for several reasons. First, because we havenât yet seen it in this book, and we like to expose you to a wide variety of languages. One of our goals is to help the reader explore technologies they might not have seen before.
Secondly, thereâs a Python library for building GUI applications that run without modification on Mac OS X, Linux, and Windows. Surprisingly, this is a fairly unique feature among modern high-level programming languages. If you want this capability elsewhere, you usually have to use a high-complexity framework, a lower-level language like C++, or both.
Thirdly, this will help make it easy to distribute. There is a Python package that bundles an entire Python program and all of its dependencies into a single file (or .app bundle on OS X). So giving this program to a colleague is as easy as emailing her a ZIP file, which will help with our use case: a nontechnical user might not be totally comfortable clicking through an installer (or even have permissions to do so on their machine).
Letâs take a quick look at the libraries weâll be using in our applicationâs code. Weâll see them in action later on, but a quick overview will help you understand what each one is trying to do. As is unfortunately typical with Python development, installation methods vary from package to package, so weâll also tell you how to get each one onto your machine.
AGitHub
The first thing we should mention is the library weâll use to talk to the GitHub API, which is called agithub.
agithub is a very thin layer that converts GitHubâs REST API into method calls on objects, resulting in delightfully readable code.
agithub can be found at https://github.com/jpaugh/agithub, and the âinstallationâ is simply to download a copy of the agithub.py source file and place it alongside your project files.
WxPython
WxPython is how weâll create the graphical interface for our application. Itâs an object-oriented Python layer over the top of a toolkit called WxWidgets, which is itself a common-code adapter for native UI toolkits. WxWidgets supports Linux, Mac, and Windows operating systems with native controls, so you can access all of those platforms with the same Python code.
Information about the WxPython project can be found at http://www.wxpython.org, and youâll find a download link for your platform on the lefthand side of the page. The next version of WxPython (code-named âPhoenixâ) will be installable via PIP, but at the time of this writing Phoenix is still prerelease software, so itâs probably safer to use the stable version.
A bit of background on Python: itâs undergoing a transition. Currently there are two actively used versions: Python 2.7 and Python 3 (3.5 at the time of this writing). Most of the details are unimportant, but in order to follow along with this example, youâll have to be running Python 2.7, because WxPython doesnât currently support Python 3. Support for Python 3 is planned for the upcoming Phoenix release, so most of the following code is written in a âpolyglotâ fashion, so you shouldnât run into any trouble running it under Python 3 if Phoenix has arrived by the time you read this.
PyInstaller
PyInstaller will be our distribution tool. Its main function is to read your Python code, analyze it to discover all its dependencies, then collect all these files (including the Python interpreter) and put them in one directory. It can even wrap all of that up in a single package that, when double-clicked, runs your program. It does all this without needing much input from you, and there are only a few configuration options. If youâve written GUI applications before, youâll know how hard each of these problems are.
For information on this project, you can visit http://pythonhosted.org/PyInstaller.
You can install it using Pythonâs package manager by running pip install pyinstaller.
The Code
Alright, now you have an idea of which parts of the Python ecosystem will be helping us on our journey. Letâs get started looking at the code that brings them all together. Weâll start with this skeleton file:
#!/usr/bin/env pythonimportos,subprocessimportwxfromagithubimportGithubclassSearchFrame(wx.Frame):passif__name__=='__main__':app=wx.App()SearchFrame(None)app.MainLoop()
Letâs take a look at a few key things:

The âshebangâ specifies that this is a Python 2.7 program.

Here we import our handy libraries. We import WxPython (
wx) whole cloth, but withagithubwe only need theGithub(note the capitalization) class.osandsubprocesscome from the Python standard library.
This is the class for our main window. Weâll walk through the particulars later on when we discuss the real implementation.

In Python, you create the main entry point of an application using this syntax.

And this is how you write a âmainâ function in WxPython. We instantiate an
Appinstance, create an instance of our top-level frame, and run the appâs main loop.
If you run this program right now, your command line will appear to hang, but itâs actually waiting for GUI input.
This is because the wx library wonât create a âframeâ window that has no contents.
Letâs correct that, but first a quick diversion into Git internals to make our experience a bit nicer.
Git Credential Helper
Thatâs how most of the UI code is going to be structured, but before we go any further, we should define a function to help us get the userâs GitHub credentials. Weâll be cheating a bit, by asking Git if it has the userâs login and password.
Weâll leverage the git credential fill command.
This is used internally by Git to avoid having to ask the user for their GitHub password every time they interact with a GitHub remote.
The way it works is by accepting all the known facts about a connection as text lines through stdin, in the format <key>=<value>.
Once the caller has supplied all the facts it knows, it can close the stdin stream (or supply an empty line), and Git will respond with all the facts it knows about this connection.
With any luck, this will include the userâs login and password.
The whole interaction looks a bit like this:
$echo"host=github.com"|gitcredentialfillhost=github.comusername=benpassword=(redacted)
This passes a single line to
git credentialand closesstdin, which Git will recognize as the end of input.Git responds with all the facts it knows about the connection. This includes the input values, as well as the username and password if Git knows them.
One other thing you should know about git-credential is that by default, if it doesnât know anything about the host, itâll ask the user at the terminal.
Thatâs bad for a GUI app, so weâre going to be disabling that feature through the use of the GIT_ASKPASS environment variable.
Hereâs what our helper looks like:
GITHUB_HOST='github.com'defgit_credentials():os.environ['GIT_ASKPASS']='true'p=subprocess.Popen(['git','credential','fill'],stdout=subprocess.PIPE,stdin=subprocess.PIPE)stdout,stderr=p.communicate('host={}\n\n'.format(GITHUB_HOST))creds={}forlineinstdout.split('\n')[:-1]:k,v=line.split('=')creds[k]=vreturncreds
Here we set
GIT_ASKPASSto the string'true', which is a UNIX program that always succeeds, which will in turn causegit-credentialto stop trying to get credentials when it gets to the âask the userâ stage.subprocess.Popenis the way you use a program withstdinandstdoutin Python. The first argument is a list of arguments for the new program, and we also specify that we wantstdinandstdoutto be captured.p.communicatedoes the work of writing tostdinand returning the contents ofstdout. It also returns the contents ofstderr, which we ignore in this program.Here we process the
stdoutcontents by splitting each line at the=character and slurping it into a dictionary.So the return value from this call should be a dictionary with
'username'and'password'values. Handy!
Windowing and Interface
Okay, so now we have something that can help us skip a login screen, but we donât have a way of showing that login screen to the user. Letâs get closer to that goal by filling in the main frameâs implementation:
classSearchFrame(wx.Frame):def__init__(self,*args,**kwargs):kwargs.setdefault('size',(600,500))wx.Frame.__init__(self,*args,**kwargs)self.credentials={}self.orgs=[]self.create_controls()self.do_layout()self.SetTitle('GitHub Issue Search')# Try to pre-load credentials from Git's cacheself.credentials=git_credentials()ifself.test_credentials():self.switch_to_search_panel()self.Show()
Thereâs a bit of syntax here that might be confusing. The
*argsand**kwargsentries here are ways of capturing multiple arguments into one parameter. For now, just know that weâre only capturing them here so we can pass them to the parent class constructor two lines down.
The __init__ method is the constructor, so this is where we start when the main function calls SearchFrame().
Hereâs whatâs happening at a high levelâweâll dig into the details in a bit:
-
Set up some layout dimensions and pass to the parent classâs constructor
-
Create the UI controls
-
Retrieve the credentials from the user using the credential helper we described earlier
-
Change the title and display the application to the user
Before we get to how all those things are done, letâs step back a bit and talk about this classâs job. Itâs responsible for maintaining the top-level frame (a window with a title bar, a menu, and so on), and deciding whatâs displayed in that frame. In this case, we want to show a login UI first, and when we get valid credentials (either from Git or the user), weâll switch to a searching UI.
Alright, enough background. Letâs walk through the code for getting and checking credentials:
deflogin_accepted(self,username,password):self.credentials['username']=usernameself.credentials['password']=passwordifself.test_credentials():self.switch_to_search_panel()deftest_credentials(self):ifany(knotinself.credentialsforkin['username','password']):returnFalseg=Github(self.credentials['username'],self.credentials['password'])status,data=g.user.orgs.get()ifstatus!=200:('bad credentials in store')returnFalseself.orgs=[o['login']foroindata]returnTruedefswitch_to_search_panel(self):self.login_panel.Destroy()self.search_panel=SearchPanel(self,orgs=self.orgs,credentials=self.credentials)self.sizer.Add(self.search_panel,1,flag=wx.EXPAND|wx.ALL,border=10)self.sizer.Layout()
The
agithublibrary always returns two values from every function call. Python lets us bind these directly to variables with thisa,b = <expr>syntax.agithubdecodes the JSON from the API call into a Python dictionary. Here weâre only really interested in the names of the organization, so we use a list comprehension, where we tell Python to only keep the value of the"login"field from each dictionary in thedatalist.
Each of these three methods comes in at a different point during our programâs execution.
If our credentials are coming from Git, we proceed straight to test_credentials; if theyâre coming from the login panel (see âGitHub Loginâ), they go through the login_accepted callback first, which then calls test_credentials.
Either way, what we do is try to fetch a list of the userâs organizations, to see if they work.
Here you can see the usage pattern for agithubâthe URL path is mapped to object-property notation on an instance of the Github class, and the HTTP verb is mapped to a method call.
The return values are a status code and the data, which has been decoded into a dictionary object.
If it failsâmeaning the returned status is not 200âwe send the user to the login panel.
If it succeeds, we call switch_to_search_panel.
Weâre doing a synchronous network call on the UI thread. This is usually a bad idea, because the UI will become unresponsive until the network call completes. Ideally weâd move this out onto another thread, and get the return value with a message. However, this would add length and complexity to a chapter already rife with both, so weâve decided not to include this advanced topic here. We hope youâll forgive us this small simplification; for this use case, the synchronous code will be just fine.
The last method handles the UI switch.
The login panel is referenced by two things: the SearchFrame instance (the parent window), and the sizer thatâs controlling its layout.
Fortunately, calling the Destroy() method cleans both of those up, so we can then create the SearchPanel instance and add it to our sizer.
Doing this requires a specific call to the sizerâs Layout() method; otherwise, the sizer wonât know that it needs to adjust the position and size of the new panel:
defcreate_controls(self):# Set up a menu. This is mainly for "Cmd-Q" behavior on OSXfilemenu=wx.Menu()filemenu.Append(wx.ID_EXIT,'&Exit')menuBar=wx.MenuBar()menuBar.Append(filemenu,'&File')self.SetMenuBar(menuBar)# Start with a login UIself.login_panel=LoginPanel(self,onlogin=self.login_accepted)defdo_layout(self):self.sizer=wx.BoxSizer(wx.VERTICAL)self.sizer.Add(self.login_panel,1,flag=wx.EXPAND|wx.ALL,border=10)self.SetSizer(self.sizer)
create_controls is fairly straightforward.
It instantiates a menu that only contains FileâExit, and a login panel, whose implementation weâll cover a bit later on.
Note that when we create a visible control, we pass self as the first parameter to the constructor.
Thatâs because the SearchFrame instance weâre constructing is the parent window of that control.
do_layout uses a WxWidgets feature called sizers to do some automated layout.
Sizers are a complex topic, but hereâs all you need to know about this snippet:
-
A
BoxSizerstacks widgets in a single direction, in this case vertically. -
The second parameter to
sizer.Addis a scaling factor. If itâs zero, the widget youâre adding will always stay the same size if the parent window resizes; if itâs anything else, all the things the sizer is controlling will adjust to fill their container. Thereâs only one control in this sizer, but we still want it to take up the full area of the window, so we pass1. -
The
borderparameter tells the sizer how much area to leave around the widget as padding. -
The
wx.EXPANDflag tells the sizer that we want the widget to expand in the direction the sizer isnât stacking. In this case, weâre stacking vertically, but we also want this widget to expand horizontally. -
The
wx.ALLflag specifies which edges of the widget should have the border area.
Letâs make sure weâre following good practices, and write some tests. There isnât a lot here we can verify automatedly, but what there is should be covered:
fromnose.toolsimporteq_,ok_,raisesclassTestApp:defsetUp(self):self.f=Noneself.app=wx.App()deftearDown(self):ifself.f:self.f.Destroy()self.app.Destroy()deftest_switching_panels(self):self.f=SearchFrame(None,id=-1)# Sub-panels should exist, and be of the right typeok_(isinstance(self.f.login_panel,LoginPanel))ok_(isinstance(self.f.search_panel,SearchPanel))# Already destroyedraises(RuntimeError,lambda:self.f.login_panel.Destroy())# Not already destroyedok_(self.f.search_panel.Destroy())
Here weâre using a testing tool called Nose. Install it with
pip install nose, and invoke it at the command line by typingnosetests app.py. It uses naming conventions to identify tests and fixtures, and is generally nice to work with.Nose will automatically find these
setUpandtearDownmethods, and call them before and after each test method is run. In this case, weâre just managing the frames we want to test, as well as anAppinstance for all of them to belong to.Hereâs a test method that Nose will find and run. We ensure the subpanels are the right type, and that weâve auto-transitioned to the
SearchPanelby finding credentials in Gitâs storage.
Thatâs it! Aside from managing a couple of fields, most of this code is managing the UI, which is almost exactly what weâd want from a UI class. Letâs write the first of the two panels we swap in and out.
GitHub Login
The LoginPanel class is similar in structure to the SearchFrame class, with a couple of key differences, which weâll describe after the wall of code:
classLoginPanel(wx.Panel):def__init__(self,*args,**kwargs):self.callback=kwargs.pop('onlogin',None)wx.Panel.__init__(self,*args,**kwargs)self.create_controls()self.do_layout()defcreate_controls(self):self.userLabel=wx.StaticText(self,label='Username:')self.userBox=wx.TextCtrl(self,style=wx.TE_PROCESS_ENTER)self.passLabel=wx.StaticText(self,label='Password (or token):')self.passBox=wx.TextCtrl(self,style=wx.TE_PROCESS_ENTER)self.login=wx.Button(self,label='Login')self.error=wx.StaticText(self,label='')self.error.SetForegroundColour((200,0,0))# Bind eventsself.login.Bind(wx.EVT_BUTTON,self.do_login)self.userBox.Bind(wx.EVT_TEXT_ENTER,self.do_login)self.passBox.Bind(wx.EVT_TEXT_ENTER,self.do_login)defdo_layout(self):# Grid arrangement for controlsgrid=wx.GridBagSizer(3,3)grid.Add(self.userLabel,pos=(0,0),flag=wx.TOP|wx.LEFT|wx.BOTTOM,border=5)grid.Add(self.userBox,pos=(0,1),flag=wx.EXPAND|wx.LEFT|wx.RIGHT,border=5)grid.Add(self.passLabel,pos=(1,0),flag=wx.TOP|wx.LEFT|wx.BOTTOM,border=5)grid.Add(self.passBox,pos=(1,1),flag=wx.EXPAND|wx.LEFT|wx.RIGHT,border=5)grid.Add(self.login,pos=(2,0),span=(1,2),flag=wx.EXPAND|wx.LEFT|wx.RIGHT,border=5)grid.Add(self.error,pos=(3,0),span=(1,2),flag=wx.EXPAND|wx.LEFT|wx.RIGHT,border=5)grid.AddGrowableCol(1)# Center the grid verticallyvbox=wx.BoxSizer(wx.VERTICAL)vbox.Add((0,0),1)vbox.Add(grid,0,wx.EXPAND)vbox.Add((0,0),2)self.SetSizer(vbox)defdo_login(self,_):u=self.userBox.GetValue()p=self.passBox.GetValue()g=Github(u,p)status,data=g.issues.get()ifstatus!=200:self.error.SetLabel('ERROR: '+data['message'])elifcallable(self.callback):self.callback(u,p)
Thereâs some structure thatâs similar to the preceding code. Weâll start with the constructor.
Recall that this panel is created with a keyword argument in SearchFrameâs create_controls method, like LoginPanel(self, onlogin=self.login_accepted).
In the constructor definition, we pull that callback out and store it for later.
Afterward, we just call the two other construction functions and return.
create_controls has more to it than SearchFrameâs version, because this panel has more controls.
Every static-text, text-input, and button control gets its own line of code.
The wx.TE_PROCESS_ENTER style tells the library we want an event to be triggered if the user presses the Enter key while the cursor is inside that text box.
The next block binds control events to method calls.
Every event in WxPython will call the handler with a single argument, an object that contains information about the event.
That means we can use the same function to handle any number of different kinds of events, so we doâthe ENTER handlers for both text boxes and the BUTTON handler for the button all go through self.do_login.
do_layout uses a different kind of sizerâa GridBagSizer.
Again, the topic of sizers is way outside the scope of this chapter, but just know that this kind arranges things in a grid, and you can allow some of the rows or columns to stretch to fill the container.
Here we drop all of the controls into their positions with the pos=(r,c) notation (here ârowsâ come first, which isnât like most coordinate systems), and cause one control to span two columns with the span parameter.
The flags and border parameters mostly mean the same things as before, and the AddGrowableCol function tells the layout engine which parts of the grid should be allowed to stretch.
Then we do something curious: we put the GridBagSizer into another sizer.
Sizer nesting is a powerful feature, and allows almost any window layout to be possibleâalthough perhaps not easy or simple.
The vertical box sizer also contains some bare tuples; this special form is called âadding a spacer.â
In this case, we sandwich the sizer with all the controls between two spacers with different weights, making it float about a third of the way down the window.
The effect is like Figure 4-5.
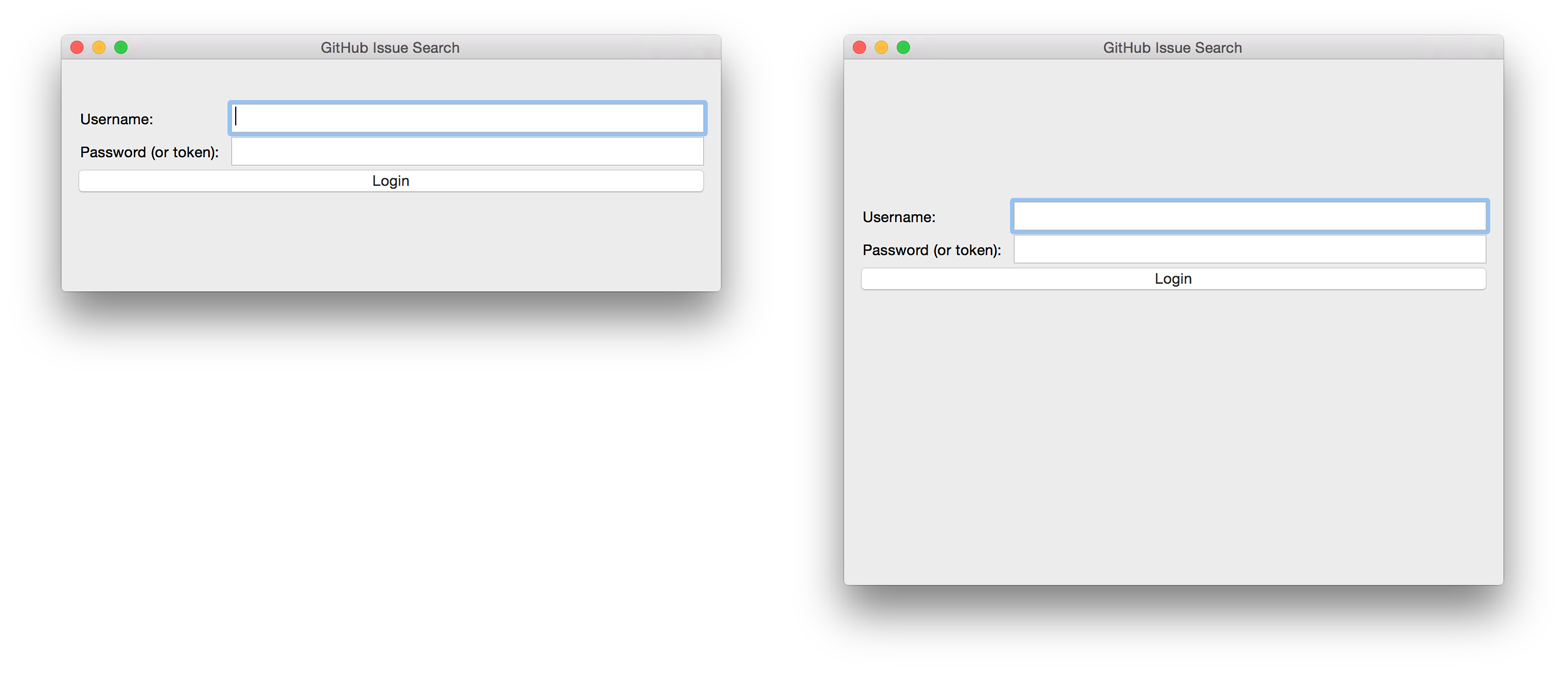
Figure 4-5. Resizing behavior of login UI
Then comes the do_login method, which tests out the given credentials, and if they work, passes them back through the callback set at construction time.
If they donât work, it sets the text of a label, whose foreground color has been set to a nice, alarming shade of red.
Letâs make sure this behavior is tested at least a little bit. Again, thereâs not much that itâs doing other than setting up WxPython stuff, but we can validate that a login error is displayed by adding this method to the test class:
deftest_login_panel(self):self.f=wx.Frame(None)lp=LoginPanel(self.f)eq_(lp.error.GetLabelText(),'')lp.do_login(None)ok_(lp.error.GetLabelText().startswith('ERROR'))
GitHub Search
Once the user has successfully logged in, we destroy the LoginPanel instance and show the SearchPanel:
classSearchPanel(wx.Panel):def__init__(self,*args,**kwargs):self.orgs=kwargs.pop('orgs',[])self.credentials=kwargs.pop('credentials',{})wx.Panel.__init__(self,*args,**kwargs)self.create_controls()self.do_layout()defcreate_controls(self):self.results_panel=Noneself.orgChoice=wx.Choice(self,choices=self.orgs,style=wx.CB_SORT)self.searchTerm=wx.TextCtrl(self,style=wx.TE_PROCESS_ENTER)self.searchTerm.SetFocus()self.searchButton=wx.Button(self,label="Search")# Bind eventsself.searchButton.Bind(wx.EVT_BUTTON,self.do_search)self.searchTerm.Bind(wx.EVT_TEXT_ENTER,self.do_search)defdo_layout(self):# Arrange choice, query box, and button horizontallyhbox=wx.BoxSizer(wx.HORIZONTAL)hbox.Add(self.orgChoice,0,wx.EXPAND)hbox.Add(self.searchTerm,1,wx.EXPAND|wx.LEFT,5)hbox.Add(self.searchButton,0,wx.EXPAND|wx.LEFT,5)# Dock everything to the top, leaving room for the resultsself.vbox=wx.BoxSizer(wx.VERTICAL)self.vbox.Add(hbox,0,wx.EXPAND)self.SetSizer(self.vbox)defdo_search(self,event):term=self.searchTerm.GetValue()org=self.orgChoice.GetString(self.orgChoice.GetCurrentSelection())g=Github(self.credentials['username'],self.credentials['password'])code,data=g.search.issues.get(q="user:{} {}".format(org,term))ifcode!=200:self.display_error(code,data)else:self.display_results(data['items'])defdisplay_results(self,results):ifself.results_panel:self.results_panel.Destroy()self.results_panel=SearchResultsPanel(self,-1,results=results)self.vbox.Add(self.results_panel,1,wx.EXPAND|wx.TOP,5)self.vbox.Layout()defdisplay_error(self,code,data):ifself.results_panel:self.results_panel.Destroy()if'errors'indata:str=''.join('\n\n{}'.format(e['message'])foreindata['errors'])else:str=data['message']self.results_panel=wx.StaticText(self,label=str)self.results_panel.SetForegroundColour((200,0,0))self.vbox.Add(self.results_panel,1,wx.EXPAND|wx.TOP,5)self.vbox.Layout()width=self.results_panel.GetSize().xself.results_panel.Wrap(width)
Thereâs quite a bit here, but some of it is familiar. Weâll skip the usual walkthrough to point out a couple of interesting features:
When creating the panel, we pass in the userâs credentials and list of organizations as keyword arguments, so they show up in the
kwargsdictionary. Here we usepopto make sure the parent classâs constructor doesnât get confused by them.Here we capture both the search buttonâs âclickâ event, as well as the text boxâs âenter keyâ event. Both should cause the search to be performed.
When we add the search bar to the sizer, we use
0as a scale factor. This means it shouldnât expand to fit the available size, but keep its own size instead, to leave room to add a results panel later on.Hereâs where the actual search is being done. We get the search term and organization, and send them to the
agithubinstance, which returns our results and an HTTP result code.We pass the search results into another class, then add it to the main sizer with parameters to fill the remaining available space.

If an error is returned from the search call instead, we display it here. Thereâs some code to adjust the wrap width of the text, based on the laid-out width of the control. This isnât a great approach, but doing it better is left as an exercise for the reader.
Again, thereâs a fair amount of code here, but most of it should look familiar. Hereâs the test code that covers the previous code:
deftest_search_panel(self):self.f=wx.Frame(None)sp=SearchPanel(self.f,orgs=['a','b','c'])eq_(0,sp.orgChoice.GetCurrentSelection())eq_('a',sp.orgChoice.GetString(0))sp.display_error(400,{'errors':[{'message':'xyz'}]})ok_(isinstance(sp.results_panel,wx.StaticText))eq_('xyz',sp.results_panel.GetLabelText().strip())
Displaying Results
So now we have our login panel, and a way for the user to enter a search query, but no way to display results. Letâs fix that.
Whenever search results are retrieved, we create a new instance of SearchResultsPanel, which then creates a series of SearchResult instances.
Letâs look at both of them together:
classSearchResultsPanel(wx.ScrolledWindow):def__init__(self,*args,**kwargs):results=kwargs.pop('results',[])wx.PyScrolledWindow.__init__(self,*args,**kwargs)# Layout search result controls inside scrollable areavbox=wx.BoxSizer(wx.VERTICAL)ifnotresults:vbox.Add(wx.StaticText(self,label="(no results)"),0,wx.EXPAND)forrinresults:vbox.Add(SearchResult(self,result=r),flag=wx.TOP|wx.BOTTOM,border=8)self.SetSizer(vbox)self.SetScrollbars(0,4,0,0)classSearchResult(wx.Panel):def__init__(self,*args,**kwargs):self.result=kwargs.pop('result',{})wx.Panel.__init__(self,*args,**kwargs)self.create_controls()self.do_layout()defcreate_controls(self):titlestr=self.result['title']ifself.result['state']!='open':titlestr+='({})'.format(self.result['state'])textstr=self.first_line(self.result['body'])self.title=wx.StaticText(self,label=titlestr)self.text=wx.StaticText(self,label=textstr)# Adjust the title fonttitleFont=wx.Font(16,wx.FONTFAMILY_DEFAULT,wx.FONTSTYLE_NORMAL,wx.FONTWEIGHT_BOLD)self.title.SetFont(titleFont)# Bind click and hover events on this whole controlself.Bind(wx.EVT_LEFT_UP,self.on_click)self.Bind(wx.EVT_ENTER_WINDOW,self.enter)self.Bind(wx.EVT_LEAVE_WINDOW,self.leave)defdo_layout(self):vbox=wx.BoxSizer(wx.VERTICAL)vbox.Add(self.title,flag=wx.EXPAND|wx.BOTTOM,border=2)vbox.Add(self.text,flag=wx.EXPAND)self.SetSizer(vbox)defenter(self,_):self.title.SetForegroundColour(wx.BLUE)self.text.SetForegroundColour(wx.BLUE)defleave(self,_):self.title.SetForegroundColour(wx.BLACK)self.text.SetForegroundColour(wx.BLACK)defon_click(self,event):importwebbrowserwebbrowser.open(self.result['html_url'])deffirst_line(self,body):returnbody.split('\n')[0].strip()or'(no body)'
The containing panel is simple enough that it only consists of a constructor. This classâs job is to contain the results and present them in a scroll window.
A
SearchResultis comprised of two static text controls, which contain the issueâs title and the first line of its body.Weâre not only binding the click handler for this entire panel, but also the mouse-enter and mouse-leave events, so we can make it behave more like a link in a browser.
Hereâs how you open the default browser to a URL in Python.
So now youâve seen the code for a simple WxPython application. Using this library tends to produce code of a certain style, which is kind of verbose. The positive side of this is that nothing is hidden; all the layout for your app is done right in the code, with no âmagic,â and the fact that it can run without modification on just about anybodyâs computer is a huge plus. WxPython may lack some facilities of newer frameworks, but thereâs nothing better for getting a basic cross-platform UI out the door quickly.
Thatâs all of the code! If youâve been following along and typing all this code into a file, you can run that file and do issue searches. However, our use case has a nontechnical user running this; letâs see what can be done to make it easier for them to get started.
Packaging
What weâre not going to do is require anyone to install Python 2.7 and a bunch of packages. Weâll use PyInstaller to bundle our application into something thatâs easy to distribute and run.
Letâs assume you wrote all the preceding code into a file called search.py, and agithub.py is sitting in the same directory. Hereâs how to tell PyInstaller to generate a single application for you:
$ pyinstaller -w search.pyThatâs it!
The -w flag tells PyInstaller to create a âwindowedâ build of your application, rather than the default console build.
On OS X, this generates a search.app application bundle, and on Windows this generates a search.exe file.
You can take either of these to a computer with no Python installed, and theyâll run perfectly.
Thatâs because PyInstaller has copied everything necessary for your program to run, from the Python interpreter on up, inside that file. The one I just generated is 67 MB, which seems large for such a simple program, but that number is more reasonable when you consider whatâs inside the package.
Summary
Whew! This chapter was quite a journey. Letâs take a breath, and look at what weâve learned.
The main bulk of the code in this chapter had to do with defining a graphical interface. Code for this task is always pretty verbose, because of the sheer complexity of the task. With WxPython in your tool belt, however, you can now write GUI applications using Python, with code thatâs no harder to write than with other toolkits, and get the ability to run on every major platform for free.
We saw how to ask Git for credentials to a Git server using git credential.
This feature is quite capable, and includes the ability to write a custom credential storage backend, but we at least saw a peek into how it works.
Using this knowledge, you can piggyback on your usersâ existing habits to avoid having to ask them for the same things over and over again.
We also saw a rather nice HTTP API abstraction with agithub.
We authenticated and queried the issue search API endpoint using what looked like object-method notation.
agithub is a great example of how a library package can be both future-proof and idiomaticâthe library constructs a query URL by looking at the chain of properties and methods used in the call.
This is a great jumping-off point for querying other REST APIs using the same pattern.
Finally, the main thrust of this chapter was using the GitHub Search API. Youâve learned about its general behavior, the different categories of search, how to interpret and sort results, and ways of focusing a search to reduce the number of uninteresting results. Using this knowledge you should be able to find anything youâre looking for on GitHub or GitHub Enterprise. You also know that the search UI on GitHub is just a thin layer over the Search API, so the same tricks and techniques will serve you whether youâre writing code or using a browser.
Time to switch gears a bit. The next chapter introduces the Commit Status API, which is a way of annotating individual commits in a Git repository with a âgoodâ or âbadâ flag. Weâll be using what only a few years ago would have been a polarizing choice: C# and the CLR.
Get Building Tools with GitHub now with the O’Reilly learning platform.
O’Reilly members experience books, live events, courses curated by job role, and more from O’Reilly and nearly 200 top publishers.

