Users of open source (http://opensource.org) Unix operating systems are an interesting breed. They like to poke under the surface of things, to find out how things work, and to figure out new and interesting ways of accomplishing common computing tasks. In short, they like to âhack.â
While this book concentrates on the BSDs, many of the hacks apply to any open source operating system. Each hack is simply a demonstration of how to examine a common problem from a slightly different angle. Feel free to use any of these hacks as a springboard to your own customized solution. If your particular operating system doesnât contain the tool used in the solution, use a tool that does exist, or invent your own!
This chapter provides many tools for getting the most out of your working environment. Youâll learn how to make friends with your shell and how to perform your most common tasks with just a few keystrokes or mouse clicks. Youâll also uncover tricks that can help prevent command-line disasters. And, above all, youâll discover that hacking BSD is fun. So, pull your chair up to your operating system of choice and letâs start hacking.
Become a speed daemon at the command line.
For better or for worse, you spend a lot of time at the command
line. If youâre used to administering a Linux system, you may be
dismayed to learn that bash is not
the default shell on a BSD system, for either the superuser or regular
user accounts.
Take heart; the FreeBSD superuserâs default tcsh shell is also brimming with shortcuts and little tricks
designed to let you breeze through even the most tedious of tasks. Spend
a few moments learning these tricks and youâll feel right at home. If
youâre new to the command line or consider yourself a terrible typist,
read on. Unix might be a whole lot easier than you think.
Tip
NetBSD and OpenBSD also ship with the C shell as their
default shell. However, it is not always the same tcsh, but often its simpler variant,
csh, which doesnât support all of
the tricks provided in this hack.
However, both NetBSD and OpenBSD provide a tcsh package in their respective package
collections.
I hate to live without three keys: up arrow, down arrow, and Tab. In fact, you can recognize me in a crowd, as Iâm the one muttering loudly to myself if Iâm on a system that doesnât treat these keys the way I expect to use them.
tcsh uses the up and down
arrow keys to scroll through your command history. If there is a
golden rule to computing, it should be: âYou should never have to type
a command more than once.â When you need to repeat a command, simply
press your up arrow until you find the desired command. Then, press
Enter and think of all the keystrokes you just saved yourself. If your
fingers fly faster than your eyes can read and you whiz past the right
command, simply use the down arrow to go in the other
direction.
The Tab key was specifically designed for both the lazy typist and the terrible speller. It can be painful watching some people type out a long command only to have it fail because of a typo. Itâs even worse if they havenât heard about history, as they think their only choice is to try typing out the whole thing all over again. No wonder some people hate the command line!
Tab activates auto-completion. This means that if you type
enough letters of a recognizable command or file, tcsh will fill in the rest of the word for
you. However, if you instead hear a beep when you press the Tab key,
it means that your shell isnât sure what you want. For example, if I
want to run sockstat and
type:
% sothen press my Tab key, the system will beep because multiple
commands start with so. However, if
I add one more letter:
% socand try again, the system will fill in the command for me:
% sockstatThere are many more shortcuts that can save you keystrokes. Suppose Iâve just finished editing a document. If I press my up arrow, my last command will be displayed at the prompt:
% vi mydocs/today/verylongfilenameIâd now like to double-check how many words and lines are in that file by running this command:
% wc mydocs/today/verylongfilenameI could pound on the backspace key until I get to the vi portion of the command, but it would be
much easier to hold down the Ctrl key and press a. That would bring me to the very beginning
of that command so I could replace the vi with wc. For a mnemonic device, remember that
just as a is the first letter of
the alphabet, it also represents the first letter of the command at a
tcsh prompt.
I donât have to use my right arrow to go to the end of the command in order to press Enter and execute the command. Once your command looks like it should, you can press Enter. It doesnât matter where your cursor happens to be.
Sometimes you would like your cursor to go to the end of the
command. Letâs say I want to run the word count command on two files,
and right now my cursor is at the first c in this command:
% wc mydocs/today/verylongfilenameIf I hold down Ctrl and press e, the cursor will jump to the end of the
command, so I can type in the rest of the desired command. Remember
that e is for end.
Finally, what if youâre in the middle of a long command and
decide youâd like to start from scratch, erase what youâve typed, and
just get your prompt back? Simply hold down Ctrl and press u for undo.
Tip
If you work in the Cisco or PIX IOS systems, all of the previous tricks work at the IOS command line.
Did you know that the cd command also
includes some built-in shortcuts? You may have heard of this one: to
return to your home directory quickly, simply type:
% cdThatâs very convenient, but what if you want to change to a
different previous directory? Letâs say that you start out in the
/usr/share/doc/en_US.ISO8859-1/books/handbook
directory, then use cd to change to
the /usr/X11R6/etc/X11 directory.
Now you want to go back to that first directory. If youâre anything
like me, you really donât want to type out that long directory path
again. Sure, you could pick it out of your history, but chances are
you originally navigated into that deep directory structure one
directory at a time. If thatâs the case, it would probably take you
longer to pick each piece out of the history than it would be to just
type the command manually.
Fortunately, there is a very quick solution. Simply type:
% cd -Repeat that command and watch as your prompt changes between the first and the second directory. What, your prompt isnât changing to indicate your current working directory? Donât worry, [Hack #2] will take care of that.
Now that you can move around fairly quickly, letâs fine-tune some of these hacks. How many times have you found yourself repeating commands just to alter them slightly? The following scenario is one example.
Remember that document I created? Instead of using the history to bring up my previous command so I could edit it, I might have found it quicker to type this:
% wc !$
  wc mydocs/today/verylongfilename
        19        97        620 mydocs/today/verylongfilename
The !$ tells the shell to
take the last parameter from the previous command. Since that command
was:
% vi mydocs/today/verylongfilenameit replaced the !$ in my new
command with the very long filename from my previous command.
The ! (or bang!) character has several other useful
applications for dealing with previously issued commands. Suppose
youâve been extremely busy and have issued several dozen commands in
the last hour or so. You now want to repeat something you did half an
hour ago. You could keep tapping your up arrow until you come across
the command. But why search yourself when ! can search for you?
For example, if Iâd like to repeat the command mailstats, I could give ! enough letters to figure out which command
to pick out from my history:
$ !ma! will pick out the most
recently issued command that begins with ma. If I had issued a man command sometime after mailstats command, tcsh would find that instead. This would fix
it though:
% !maiIf youâre not into trial and error, you can view your history by simply typing:
% historyIf youâre really lazy, this command will do the same thing:
% hEach command in this history will have a number. You can specify
a command by giving ! the
associated number. In this example, Iâll ask tcsh to reissue the mailstats command:
%h165 16:51 mailstats 166 16:51 sockstat 167 16:52 telnet localhost 25 168 16:54 man sendmail %!165
The last tip Iâll mention is for those of you who find the system bell irritating. Or perhaps you just find it frustrating typing one letter, tabbing, typing another letter, tabbing, and so on until auto-complete works. If I type:
% ls -l bthen hold down the Ctrl key while I press d:
backups/  bin/   book/  boring.jpg
% ls -l b
Iâll be shown all of the b
possibilities in my current directory, and then my prompt will return
my cursor to what Iâve already typed. In this example, if I want to
view the size and permissions of boring.jpg, Iâll need to type up to
here:
% ls -l borbefore I press the Tab key. Iâll leave it up to your own
imagination to decide what the d
stands for.
Make the shell a friendly place to work in.
Now that youâve had a chance to make friends with the shell, letâs use its configuration file to create an environment youâll enjoy working in. Your prompt is an excellent place to start.
The default tcsh prompt displays %
when youâre logged in as a regular user and hostname# when youâre logged in as the
superuser. Thatâs a fairly useful way to figure out who youâre logged
in as, but we can do much better than that.
Each user on the system, including the superuser, has a .cshrc file in his home directory. Here are my current prompt settings:
dru@~: grep prompt ~/.cshrc
if ($?prompt) then
        set prompt = "%B%n@%~%b: "
That isnât the default tcsh
prompt, as Iâve been using my favorite customized prompt for the past
few years. The possible prompt formatting sequences are easy to
understand if you have a list of possibilities in front of you. That
list is buried deeply within man
cshrc, so hereâs a quick way to zero in on it:
dru@~:man cshrc/prompt may include
Here Iâve used the / to
invoke the manpage search utility. The search string prompt may include brings you to the right
section, and is intuitive enough that even my rusty old brain can
remember it.
If you compare the formatting sequences shown in the manpage to my prompt string, it reads as follows:
set prompt = "%B%n@%~%b: "
Thatâs a little dense. Table 1-1 dissects the options.
Table 1-1. Prompt characters
Character | Explanation |
|---|---|
" | Starts the prompt string. |
| Turns on bold. |
| Shows the login name in the prompt. |
| I use this as a separator to make my prompt more visually appealing. |
| Shows the current working directory. It results
in a shorter prompt than |
| Turns off bold. |
: | Again, this is an extra character I use to separate my prompt from the cursor. |
" | Ends the prompt string. |
With this prompt, I always know who I am and where I am. If I
also needed to know what machine I was logged into (useful for remote
administration), I could also include %M or %m
somewhere within the prompt string.
I highly recommend you take some time to experiment with the various formatting sequences and hack a prompt that best meets your needs. You can add other features, including customized time and date strings and command history numbers [Hack #1] , as well as flashing or underlining the prompt.
Your prompt is an example of a shell variable. There are dozens of other shell variables you can set in .cshrc. My trick for finding the shell variables section in the manpage is:
dru@~:man cshrc/variables described
As the name implies, shell variables affect only the commands that are built into the shell itself. Donât confuse these with environment variables, which affect your entire working environment and every command you invoke.
If you take a look at your ~/.cshrc file, environment variables are
the ones written in uppercase and are preceded with the setenv command.
Shell variables are written in lowercase and are preceded with the
set command.
You can also enable a shell variable by using the set command at your
command prompt. (Use unset to
disable it.) Since the variable affects only your current login
session and its children, you can experiment with setting and
unsetting variables to your heartâs content. If you get into trouble,
log out of that session and log in again.
If you find a variable you want to keep permanently, add it to
your ~/.cshrc file in the section
that contains the default set
commands. Letâs take a look at some of the most useful ones.
If you enjoyed Ctrl-d from [Hack #1] , youâll like this even better:
set autolist
Now whenever you use the Tab key and the shell isnât sure what you want, it wonât beep at you. Instead, the shell will show you the applicable possibilities. You donât even have to press Ctrl-d first!
The next variable might save you from possible future peril:
set rmstar
Iâll test this variable by quickly making a test directory and some files:
dru@~:mkdir testdru@~:cd testdru@~/test:touch a b c d e
Then, Iâll try to remove the files from that test directory:
dru@~/test: rm *
Do you really want to delete all files? [n/y]
Since my prompt tells me what directory Iâm in, this trick gives me one last chance to double-check that I really am deleting the files I want to delete.
If youâre prone to typos, consider this one:
set correct=all
This is how the shell will respond to typos at the command line:
dru@~: cd /urs/ports
CORRECT>cd /usr/ports (y|n|e|a)?
Pressing y will correct the
spelling and execute the command. Pressing n will execute the misspelled command,
resulting in an error message. If I press e, I can edit my command (although, in this
case, it would be much quicker for the shell to go with its correct
spelling). And if I completely panic at the thought of all of these
choices, I can always press a to
abort and just get my prompt back.
If you like to save keystrokes, try:
set implicitcd
Youâll never have to type cd
again. Instead, simply type the name of the directory and the shell
will assume you want to go there.
Train your shell to run a command for you whenever you press a mapped key.
Have you ever listened to a Windows power user expound on the joys of hotkeys? Perhaps you yourself have been known to gaze wistfully at the extra buttons found on a Microsoft keyboard. Did you know that itâs easy to configure your keyboard to launch your most commonly used applications with a keystroke or two?
One way to do this is with the bindkey command, which is built into the
tcsh shell. As the name suggests,
this command binds certain actions to certain keys. To see your current
mappings, simply type bindkey. The
output is several pages long, so Iâve included only a short sample.
However, youâll recognize some of these shortcuts from [Hack
#1] .
Standard key bindings
"^A"           ->  beginning-of-line
"^B"           ->  backward-char
"^E"           ->  end-of-line
"^F"           ->  forward-char
"^L"           ->  clear-screen
"^N"           ->  down-history
"^P"           ->  up-history
"^U"           ->  kill-whole-line

Arrow key bindings
down           -> history-search-forward
up             -> history-search-backward
left           -> backward-char
right          -> forward-char
home           -> beginning-of-line
end            -> end-of-line
The ^ means hold down your Ctrl
key. For example, press Ctrl and then l, and youâll clear your screen more quickly
than by typing clear. Notice that it
doesnât matter if you use the uppercase or lowercase letter.
One of my favorite shortcuts isnât bound to a key by default:
complete-word-fwd. Before I do the
actual binding, Iâll first check which keys are available:
dru@~: bindkey | grep undefined

"^G"           ->  is undefined
"\305"         ->  is undefined
"\307"         ->  is undefined
<snip>
Although it is possible to bind keys to numerical escape sequences, I donât find that very convenient. However, I can very easily use that available Ctrl-g. Letâs see what happens when I bind it:
dru@~: bindkey "^G" complete-word-fwdWhen I typed in that command, I knew something worked because my
prompt returned silently. Hereâs what happens if I now type ls -l /etc/, hold down the Ctrl key, and
repeatedly press g:
ls -l /etc/COPYRIGHT
ls -l /etc/X11
ls -l /etc/aliases
ls -l /etc/amd.map
I now have a quick way of cycling through the files in a
directory until I find the exact one I want. Even better, if I know
what letter the file starts with, I can specify it. Here Iâll cycle
through the files that start with a:
ls -l /etc/a
ls -l /etc/aliases
ls -l /etc/amd.map
ls -l /etc/apmd.conf
ls -l /etc/auth.conf
ls -l /etc/a
Once Iâve cycled through, the shell will bring me back to the
letter a and beep.
If you prefer to cycle backward, starting with words that begin
with z instead of a, bind your key to complete-word-back instead.
When you use bindkey, you can
bind any command the shell understands to any understood key binding.
Hereâs my trick to list the commands that tcsh understands:
dru@~man csh/command is bound
And, of course, use bindkey
alone to see the understood key bindings. If you just want to see the
binding for a particular key, specify it. Hereâs how to see the
current binding for Ctrl-g:
dru@~: bindkey "^G"
"^G" -> complete-word-fwdWhatâs really cool is that youâre not limited to just the
commands found in man csh. The
s switch to bindkey allows you to specify any string. I
like to bind the lynx web browser
to Ctrl-w:
dru@~: bindkey -s "^W" "lynx\n"I chose w because it reminds
me of the World Wide Web. But why did I put \n after the lynx? Because that tells the shell to press
Enter for me. That means by simply pressing Ctrl-w, I have instant
access to the Web.
Note that I overwrite the default binding for Ctrl-w. This
permits you to make bindings that are more intuitive and useful for
your own purposes. For example, if you never plan on doing whatever
^J does by default, simply bind
your desired command to it.
There are many potential key bindings, so scrolling through the
output of bindkeys can be tedious.
If you only stick with âCtrl letterâ bindings, though, itâs easy to
view your customizations with the following command:
dru@~: bindkey | head -n 28
As with all shell modifications, experiment with your bindings
first by using bindkey at the
command prompt. If you get into real trouble, you can always log out
to go back to the defaults. However, if you find some bindings you
want to keep, make them permanent by adding your bindkey statements to your .cshrc file. Here
is an example:
dru@~:cp ~/.cshrc ~/.cshrc.origdru@~:echo 'bindkey "^G" complete-word-fwd' >> ~/.cshrc
Notice that I backed up my original .cshrc file first, just in case my fingers
slip on the next part. I then used >> to append the echoed text to the end of .cshrc. If Iâd used > instead, it would have replaced my
entire .cshrc file with just that
one line. I donât recommend testing this on any file you want to
keep.
Along those lines, setting:
set noclobber
will prevent the shell from clobbering an existing file if you
forget that extra > in your
redirector. Youâll know you just prevented a nasty accident if you get
this error message after trying to redirect output to a file:
.cshrc: File exists.
man tcsh
Take advantage of your terminalâs capabilities.
Itâs not just the tcsh shell
that is capable of understanding bindings. Your FreeBSD terminal
provides the kbdcontrol command to
map commands to your keyboard. Unfortunately, neither NetBSD nor OpenBSD
offer this feature. You can, however, remap your keyboard under X, as
described later.
Letâs start by experimenting with some temporary mappings. The
syntax for mapping a command with kbdcontrol is as follows:
kbdcontrol -fnumber"command"
Table 1-2 lists the possible numbers, each with its associated key combination.
Table 1-2. Key numbers
Number | Key combination |
|---|---|
1, 2, . . . 12 | F1, F2, . . . F12 |
13, 14, . . . 24 | Shift+F1, Shift+F2, . . . Shift+F12 |
25, 26, . . . 36 | Ctrl+F1, Ctrl+F2, . . . Ctrl+F12 |
37, 38, . . . 48 | Shift+Ctrl+F1, Shift+Ctrl+F2, . . . Shift+Ctrl+F12 |
49 | Home |
50 | Up arrow |
51 | Page Up |
52 | Numpad - (Num Lock off) |
53 | Left arrow (also works in editor) |
54 | Numpad 5 (without Num Lock) |
55 | Right arrow |
56 | Numpad + (without Num Lock) |
57 | End |
58 | Down arrow (affects c history) |
59 | Page Down |
60 | Ins |
61 | Del |
62 | Left GUI key (Windows icon next to left Ctrl) |
63 | Right GUI key (Windows icon next to right Alt) |
64 | Menu (menu icon next to right Ctrl) |
Those last three key combinations may or may not be present, depending upon your keyboard. My Logitech keyboard has a key with a Windows icon next to the left Ctrl key; that is the left GUI key. Thereâs another key with a Windows icon next to my right Alt key; this is the right GUI key. The next key to the right has an icon of a cursor pointing at a square containing lines; that is the Menu key.
Now that we know the possible numbers, letâs map lynx to the Menu key:
% kbdcontrol -f 64 "lynx"Note that the command must be contained within quotes and be in your path. (You could give an absolute path, but thereâs a nasty limitation coming up soon.)
If I now press the Menu key, lynx is typed to the terminal for me. I just
need to press Enter to launch the browser. This may seem a bit tedious
at first, but it is actually quite handy. It can save you from
inadvertently launching the wrong application if youâre anything like
me and tend to forget which commands youâve mapped to which
keys.
Letâs see what happens if I modify that original mapping somewhat:
% kbdcontrol -f 64 "lynx www.google.ca"
kbdcontrol: function key string too long (18 > 16)
When doing your own mappings, beware that the command and its arguments canât exceed 16 characters. Other than that, you can pretty well map any command that strikes your fancy.
Before going any further, Iâd like to pause a bit and compare shell-specific bindings, which we saw in [Hack #3] , and the terminal-specific bindings weâre running across here.
One advantage of using kbdcontrol is that your custom bindings work
in any terminal, regardless of the shell you happen to be using. A
second advantage is that you can easily map to any key on your
keyboard. Shell mappings can be complicated if you want to map them to
anything other than âCtrl letterâ.
However, the terminal mappings have some restrictions that donât
apply to the tcsh mappings. For
example, shell mappings donât have a 16 character restriction,
allowing for full pathnames. Also, it was relatively easy to ask the
shell to press Enter to launch the desired command.
Terminal bindings affect only the current userâs terminal. Any
other users who are logged in on different terminals are not affected.
However, if the mappings are added to rc.conf (which only the superuser can do),
they will affect all terminals. Since bindings are terminal specific,
even invoking su wonât change the
behavior, as the user is still stuck at the same terminal.
There are some other caveats to consider when choosing which key to map. If you use the tcsh shell and enjoy viewing your history [Hack #1] , youâll be disappointed if you remap your up and down arrows. The right and left arrows can also be problematic if you use them for navigation, say, in a text editor. Finally, if youâre physically sitting at your FreeBSD system, F1 through F8 are already mapped to virtual terminals and F9 is mapped to your GUI terminal. By default, F10 to F12 are unmapped.
If you start experimenting with mappings and find youâre stuck with one you donât like, you can quickly return all of your keys to their default mappings with this command:
% kbdcontrol -FOn the other hand, if you find some new mappings you absolutely
canât live without, make them permanent. If you have superuser
privileges on a FreeBSD system you physically sit at, you can
carefully add the mappings to /etc/rc.conf. Here, Iâve added two
mappings. One maps lynx to the Menu
key and the other maps startx to
the left GUI key:
keychange="64 lynx"
keychange="62 startx"
Since the superuser will be setting these mappings, the mapped
keys will affect all users on that system. If you want to save your
own personal mappings, add your specific kbdcontrol commands to the end of your shell
configuration file. For example, Iâve added these to the very end of
my ~/.cshrc file, just before the
last line which says endif:
%kbdcontrol -f 64 "lynx"%kbdcontrol -f 62 "startx"
This is all extremely handy, but what will happen if you try one of your newly mapped keys from an X Window session? You can press that key all you want, but nothing will happen. You wonât even hear the sound of the system bell beeping at you in protest. This is because the X protocol handles all input and output during an X session.
You have a few options if you want to take advantage of keyboard
bindings while in an X GUI. One is to read the documentation for your
particular window manager. Most of the newer window managers provide a
point and click interface to manage keyboard bindings. My favorite
alternative is to try the xbindkeys_config application, which is
available in the ports collection
[Hack #84] :
#cd /usr/ports/x11/xbindkeys_config#make install clean
This port also requires xbindkeys:
#cd /usr/ports/x11/xbindkeys#make install clean
Tip
Rather than building both ports, you could instead add this line to /usr/ports/x11/xbindkeys_config/Makefile:
BUILD_DEPENDS= xbindkeys:${PORTSDIR}/x11/xbindkeysThis will ask the xbindkeys_config build to install both
ports.
Once your builds are complete, open an xterm and type:
%xbindkeys --defaults > ~/.xbindkeysrc%xbindkeys_config
The GUI in Figure 1-1 will appear.
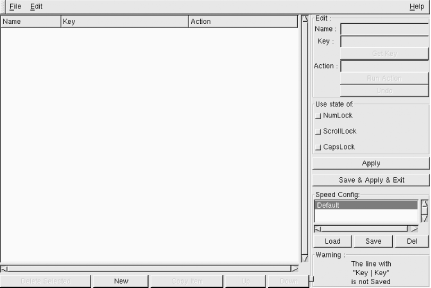
Creating a key binding is a simple matter of pressing the New button and typing a useful name into the Name: section. Then, press Get Key and a little window will appear. Press the desired key combination, and voilà , the correct mapping required by X will autofill for you. Associate your desired Action:, then press the Save & Apply & Exit button.
Any keyboard mappings you create using this utility will be saved to a file called ~/.xbindkeysrc.
man kbdcontrolman atkbdThe
xbindkeysweb site (http://hocwp.free.fr/xbindkeys/xbindkeys.html)
Use your mouse to copy and paste at a terminal.
If youâre used to a GUI environment, you might feel a bit out of your element while working at the terminal. Sure, you can learn to map hotkeys and to use navigational tricks, but darn it all, sometimes itâs just nice to be able to copy and paste!
Donât fret; your mouse doesnât have to go to waste. In fact,
depending upon how you have configured your system, the mouse daemon
moused may already be enabled. The
job of this daemon is to listen for mouse data in order to pass it to
your console driver.
Tip
Of course, if youâre using screen [Hack #12] , you can also take advantage of its copy and paste mechanism.
If you installed and configured X when you installed your
system, moused is most likely
started for you when you boot up. You can check with this:
% grep moused /etc/rc.conf
moused_port="/dev/psm0"
moused_type="auto"
moused_enable="YES"
Very good. moused needs to
know three things:
The mouse port (in this example, /dev/psm0, the PS/2 port)
The type of protocol (in this example,
auto)Whether to start at boot time
If you receive similar output, youâre ready to copy and paste.
To copy text, simply select it by clicking the left mouse button and dragging. Then, place the mouse where youâd like to paste the text and click the middle button. Thatâs it.
Tip
To select an entire word, double-click anywhere on that word. To select an entire line, triple-click anywhere on that line.
What if you donât have three mouse buttons? As the superuser, add the following line to /etc/rc.conf (assuming itâs not already there):
moused_flags="-m 2=3"
This flag tells moused to
treat the second, or right, mouse button as if it were the third, or
middle, mouse button. Now you can use the right mouse button to
paste your copied text.
To apply that change, restart moused:
# /etc/rc.d/moused restart
Stopping moused.
Starting moused:.
Test your change by copying some text with the left mouse button and pasting with the right mouse button.
You can achieve the same results on a system without X installed. Youâll have to add the lines to /etc/rc.conf manually, though.
The example Iâve given you is for a PS/2 mouse. If youâre using
another type of mouse, read the âConfiguring Mouse Daemonâ section of
man moused. It gives explicit
details on figuring out what type of mouse you have and what type of
protocol it understands. It even includes a section on configuring a
laptop system for multiple mice: one for when on the road and one for
when the laptop is attached to the docking station.
For example, if youâre using a USB mouse, the only difference is
that the port is /dev/usm0 instead
of /dev/psm0.
A serial mouse physically plugged into COM1 would be /dev/cuaa0. You may have to experiment with
the type, as auto doesnât work with
all serial mice. Again, the manpage is your best reference.
man mousedDocumentation on enabling mouse support in NetBSD at http://www.netbsd.org/Documentation/wscons/
Documentation on enabling mouse support in OpenBSD at http://www.openbsd.org/faq/faq7.html)
Brighten your day with some terminal eye candy.
As the saying goes, all work and no play makes Jack a dull boy. But whatâs a poor Jack or Jill to do if your days include spending inordinate amounts of time in front of a computer screen? Well, you could head over to http://www.thinkgeek.net/ to stock up on cube goodies and caffeine. Or, you could take advantage of some of the entertainments built into your operating system.
Letâs start by configuring some terminal eye candy. Does your system quote you a cheery, witty, or downright strange bit of wisdom every time you log into your terminal? If so, youâre receiving a fortune:
login: dru
Password:
Last login: Thu Nov 27 10:10:16 on ttyv7

"You can't have everything. Where would you put it?"
                -- Steven Wright
If youâre not receiving a fortune, as the superuser type
/stand/sysinstall. Choose Configure, then Distributions, and select games with your spacebar. Press Tab to
select OK, then exit out of
sysinstall when it is
finished.
Then, look for the line that runs /usr/games/fortune in your ~/.cshrc file:
% grep fortune ~/.cshrc
/usr/games/fortune
If for some reason it isnât there, add it:
% echo '/usr/games/fortune' >> ~/.cshrcDonât forget to use both greater-than signs; you donât want to
erase the contents of your .cshrc
file! To test your change, use the source shell command, which re-executes the
contents of the file. This can come in handy if youâve updated an
alias and want to take advantage of it immediately:
% source ~/.cshrc
Indifference will be the downfall of mankind, but who cares?
If youâd also like to receive a fortune when you log out of your terminal, add this line to the end of your .logout file. If you donât have one, and there isnât one by default, you can create it and add this line in one step:
% echo '/usr/games/fortune' > ~/.logoutNote that this time I used only one greater-than sign, as I was creating the file from scratch. If the file already exists, use two greater-than signs to append your new line to the end of the existing file.
Believe it or not, fortune
comes with switches, some of which are more amusing than others. Iâll
leave it to you to peruse man
fortune.
Iâm a trivia buff, so I love using the calendar command.
Contrary to logic, typing calendar
wonât show me this monthâs calendar (thatâs the job of cal). However, I will get an instant dose of
trivia, related to the current date:
% calendar
Nov 27         Alfred Nobel establishes Nobel Prize, 1895
Nov 27         Friction match invented, England, 1826
Nov 27         Hoosac Railroad Tunnel completed, 1873, in NW Massachusetts
Nov 28         Independence Day in Albania and Mauritania
Nov 28         Independence from Spain in Panama
Nov 28         Proclamation of the Republic in Chad
Nov 27         Jimi Hendrix (Johnny Allen Hendrix) is born in Seattle, 1942
Cool. I had forgotten it was the anniversary of the Hoosac tunnel, an event that put my hometown on the map.
Itâs an easy matter to automate the output provided by calendar. If you want to see your trivia
when you log in or log out, simply add a line to your .cshrc or
.logout file. Because the line
you add is really just a path to the program, use the output of the
which command to add that line for
you:
% echo `which calendar` >> .cshrcAgain, donât forget to append with >>, or have noclobber set in your .cshrc file [Hack
#2] .
Of course, there are several other date and time related mini-hacks at your disposal. Here are two you might enjoy.
Ever wonder what time it is while youâre working on the
terminal? Sure, you could use date, but the output is so small and
boring. Try this the next time you want to know what time it
is:
% grdcWhoa, you can see that one from across the room. Thatâs not a bad idea if you want to send your cubicle buddy a hint.
Iâve been known to add /usr/games/grdc to my ~/.logout. When I log out, my terminal displays the time until I press Ctrl-c and log in again. Thatâs sort of a built-in password protected screen saver for the terminal.
Have you ever read man pom?
It has one of the more useful descriptions Iâve
seen:
The pom utility displays the current phase of the moon. Useful for selecting software completion target dates and predicting managerial behavior.
Sounds like Dilbert had a hand in that one. If I add the line /usr/games/pom to my ~/.cshrc, Iâll learn a bit about astronomy when I log in:
% pom
The Moon is Waxing Gibbous (53% of Full)Thereâs a one-liner to promote water cooler conversation.
Have you ever tried this command?
% vidcontrol show

0                  8 grey
1 blue             9 lightblue
2 green           10 lightgreen
3 cyan            11 lightcyan
4 red             12 lightred
5 magenta         13 lightmagenta
6 brown           14 yellow
7 white           15 lightwhite
Gee, that reminds me of my old DOS days when I discovered ansi.sys. Yes, your terminal is capable of color and youâre looking at your possible color schemes! (It likely looks much more exciting on your terminal, since itâs not in color in this book.)
If you see some colors that appeal to you, add them to your terminal. For example, this command will set the foreground color to yellow and the background color as blue:
% vidcontrol yellow blueNote that you can use only colors 1 through 7 as background colors; youâll receive a syntax error if you try to use colors 8-15 in your background. Try out the various combinations until you find one that appeals to your sense of taste. You can even add a border if you like:
% vidcontrol -b redThese settings affect only your own terminal. If you want, add
the desired vidcontrol lines to
your ~/.cshrc file so
your settings are available when you log into your terminal.
If you have problems finding your cursor, try:
% vidcontrol -c blinkor:
% vidcontrol -c destructiveChanging the cursor affects all virtual terminals on the system. If other users complain about your improvement, this will bring things back to normal:
% vidcontrol -c normalSecure your unattended terminal from prying eyes.
If you work in a networked environment, the importance of locking your screen before leaving your workstation has probably been stressed to you. After all, your brilliant password becomes moot if anyone can walk up to your logged in station and start poking about the contents of your home directory.
If you use a GUI on your workstation, your Window Manager probably includes a locking feature. However, if you use a terminal, you may not be aware of the mechanisms available for locking your terminal.
As an administrator, you may want to automate these mechanisms as part of your security policy. Fortunately, FreeBSDâs screen locking mechanism is customizable.
FreeBSD comes with lock (and
itâs available for NetBSD and OpenBSD). Its default invocation is
simple:
%lockKey:1234Again:1234lock /dev/ttyv6 on genisis. timeout in 15 minutes. time now is Fri Jan 2 12:45:02 EST 2004 Key:
Without any switches, lock
will request that the user input a key which will be used to unlock
the terminal. This is a good thing, as it gives the user an
opportunity to use something other than her login password. If the
user tries to be smart and presses Enter (for an empty password), the
lock program will abort.
Once a key is set, it is required to unlock the screen. If a user instead types Ctrl-c, she wonât terminate the program. Instead, sheâll receive this message:
Key: lock: type in the unlock key. timeout in 10:59 minutes
Did you notice that timeout value of 15 minutes? At that time, the screen will unlock itself, which sorta diminishes the usefulness of locking your screen. After all, if you run into your boss in the hall, your 5-minute coffee break might turn into a 25-minute impromptu brainstorming session.
To lock the terminal forever, or at least until someone types
the correct key, use the -n switch.
If the system is a personal workstation, -v is also handy; this locks all of the
virtual terminals on the system, meaning a passerby canât use
Alt-Fn to switch to another terminal.
As an administrator, you can assist users in using the desired switches by adding an alias to /usr/share/skel/dot.cshrc [Hack #9] . This alias removes the timeout and locks all terminals:
alias lock /usr/bin/lock -nv
If you use the tcsh
shell, you also have the ability either to lock your
session or to be logged out of your session automatically after a set
period of inactivity. As an administrator, you can set your policy by
adding a line to /usr/share/skel/dot.cshrc.
Tip
Do be aware, though, that a user can edit her own ~/.cshrc file, which will negate your customized setting.
The autologout variable can
accept two numbers. The first number represents the number of minutes
of inactivity before logging out the user. The second number
represents the number of minutes of inactivity before locking the
userâs screen. Once the screen is locked, the user must input the
password to unlock it. If the screen is not unlocked in time, the user
will be logged out once the shell has been idle for the logout period
of minutes.
The manpage is pretty vague on how to set those two numbers. For example, if you try:
set autologout = 30 15
users will receive this error message when they try to log in:
set: Variable name must begin with a letter.
Thatâs a deceptive error message, as this variable does accept numerals. The correct invocation is to enclose the two numbers between parentheses:
set autologout = (30 15)
This particular setting will lock the screen after 15 minutes of inactivity. The user will know this happened as the terminal will resemble:
%
Password:
After 30 minutes of inactivity (or 15 minutes after the screen was locked), the user will be logged out and see this:
%
Password:auto-logout
Tip
Consider whether or not your users tend to run background jobs
before globally implementing autologout. Also see [Hack
#11] , which allows users to reattach to their
terminals.
What if you do want to enforce a logout policy that users canât change in their shell
configuration files? Consider using idled, which can be
installed from /usr/ports/sysutils/idled or built from
source. This utility was designed to log out users either after a
configured period of inactivity or after theyâve been logged in for a
certain amount of time.
Once youâve installed idled,
copy the template configuration file:
#cd /usr/local/etc/#cp idled.cf.template idled.cf
Open /usr/local/etc/idled.cf using your favorite editor. Youâll find this file to be well commented and quite straightforward. Youâll be able to configure the time before logout as well as when the user will receive a warning message. In addition, you can refuse logins, set session timeouts, and provide for exemptions.
man lockman tcshman idledman idled.cfThe
idledweb site (http://www.darkwing.com/idled/)
Save âdeletedâ files until youâre really ready to send them to the bit bucket.
One of the first things Unix users learn is that deleted files are really, really gone. This is especially true at the command line where there isnât any Windows-style recycling bin to rummage through should you have a change of heart regarding the fate of a removed file. Itâs off to the backups! (You do have backups, donât you?)
Fortunately, it is very simple to hack a small script that will send removed files to a custom trash directory. If youâve never written a script before, this is an excellent exercise in how easy and useful scripting can be.
Since a script is an executable file, you should place your scripts in a directory that is in your path. Remember, your path is just a list of directories where the shell will look for commands if you donât give them full pathnames. To see your path:
% echo $PATH
PATH=/sbin:/bin:/usr/sbin:/usr/bin:/usr/games:/usr/local/sbin:/usr/
local/bin:/usr/X11R6/bin:/home/dru/bin
In this output, the shell will look for executables in the
bin subdirectory of druâs home directory. However, it wonât look
for executables placed directly in my home directory, or /home/dru. Since bin isnât created by default, I should do
that first:
%cd%mkdir bin
As I create scripts, Iâll store them in /home/dru/bin, since I donât have permission to store them anywhere else. Fortunately, no one else has permission to store them in my bin directory, so itâs a good match.
The scripts themselves contain at least three lines:
#!/bin/sh
# a comment explaining what the script does
the command to be executed
The first line indicates the type of script by specifying the program to use to execute the script. Iâve chosen to use a Bourne script because that shell is available on all Unix systems.
Your script should also have comments, which start with the
# character. Itâs surprising how
forgetful you can be six months down the road, especially if you
create a lot of scripts. For this reason, you should also give the
script a name that reminds you of what it does.
The third and subsequent lines contain the meat of the script: the actual command(s) to execute. This can range from a simple one-liner to a more complex set of commands, variables, and conditions. Fortunately, we can make a trash script in a simple one-liner.
Letâs start with this variant, which I found as the result of a Google search:
% more ~/bin/trash
#!/bin/sh
# script to send removed files to trash directory
mv $1 ~/.trash/
You should recognize the path to the Bourne shell, the comment,
and the mv command. Letâs take a
look at that $1. This is known as a
positional parameter and specifically refers to
the first parameter of the trash
command. Since the mv commands
takes filenames as parameters, the command:
mv $1 ~/.trash/
is really saying, mv the
first filename, whatever it happens to be, to a directory called
.trash in the userâs home
directory (represented by the shell shortcut of ~). This move operation is our custom
ârecycle.â
Before this script can do anything, it must be set as executable:
% chmod +x ~/bin/trashAnd I must create that trash directory for it to use:
% mkdir ~/.trashNote that Iâve chosen to create a hidden trash directory; any
file or directory that begins with the . character is hidden from
normal listings. This really only reduces clutter, though, as you can
see these files by passing the -a
switch to ls. If you also include
the F switch, directory names will
end with a /:
% ls -aF ~
.cshrc    .history    .trash/
bin/ images/ myfileNow comes the neat part of the hack. I want this script to kick
in every time I use rm. Since it is
the shell that executes commands, I simply need to make my shell use
the trash command instead. I do
that by adding this line to ~/.cshrc:
alias rm trash
That line basically says: when I type rm, execute trash instead. It doesnât matter which
directory I am in. As long as I stay in my shell, it will mv any files I try to rm to my hidden trash directory.
Whenever you create a script, always test it first. Iâll start by telling my shell to reread its configuration file:
% source ~/.cshrcThen, Iâll make some test files to remove:
%cd%mkdir test%cd test%touch test1%rm test1%ls ~/.trashtest1
Looks like the script is working. However, it has a flaw. Have you spotted it yet? If not, try this:
%touch a aa aaa aaaa%rm a*%ls ~/.trashtest1 a %ls testaa aaa aaaa
What happened here? I passed the shell more than one parameter.
The a* was expanded to a, aa,
aaa, and aaaa before trash could execute. Those four parameters
were then passed on to the mv
command in my script. However, trash passes only the first parameter to the
mv command, ignoring the remaining
parameters. Fortunately, they werenât removed, but the script still
didnât achieve what I wanted.
You can actually have up to nine parameters, named $1 to $9.
However, our goal is to catch all parameters, regardless of the
amount. To do that, we use $@:
mv $@ ~/.trash/
Make that change to your script, then test it by removing multiple files. You should now have a script that works every time.
You should occasionally go through your trash directory and really remove the files you no longer want. If youâre really on your toes you may be thinking, âBut how do I empty the trash directory?â If you do this:
% rm ~/.trash/*your trash directory wonât lose any files! This time you really
do want to use rm, not trash. To tell your shell to use the real
rm command, simply put a \ in front of it like so:
% \rm ~/.trash/*Voila, empty recycling bin.
One obvious extension is to keep versioned backups. Use the
date command to find the time of
deletion and append that to the name of the file in the trash command. You could get infinitely more
complicated by storing a limited number of versions or deleting all
versions older than a week or a month. Of course, you could also keep
your important files under version control and leave the complexity to
someone
else!
Now that you know how to set up a useful environment for yourself, itâs time to share the wealth.
Itâs very easy for a system administrator to ensure that each newly created user starts out with the same configuration files. For example, every user can receive the same customized prompt, shell variables, or hotkeys.
Whenever you create a new user, several default (and hidden, or dot, files) are copied into the new userâs home directory. In FreeBSD, the source of these files is /usr/share/skel/. Any customizations you make to these files will be seen by all subsequently created users. Do note that youâll have to manually copy over any modified files to existing users.
Itâs useful to understand these files, as they apply to every user you create. Depending upon your needs, youâll probably end up removing some of the defaults, customizing others, and even adding a few of your own.
Letâs take a quick tour of the default files:
% ls -l /usr/share/skel
total 24
drwxr-xr-x   2 root  wheel  512 Jul 28 16:09 ./
drwxr-xr-x  27 root  wheel  512 Jul 28 16:06 ../
-rw-r--r--   1 root  wheel  921 Jul 28 16:09 dot.cshrc
-rw-r--r--   1 root  wheel  248 Jul 28 16:09 dot.login
-rw-r--r--   1 root  wheel  158 Jul 28 16:09 dot.login_conf
-rw-------   1 root  wheel  371 Jul 28 16:09 dot.mail_aliases
-rw-r--r--   1 root  wheel  331 Jul 28 16:09 dot.mailrc
-rw-r--r--   1 root  wheel  797 Jul 28 16:09 dot.profile
-rw-------   1 root  wheel  276 Jul 28 16:09 dot.rhosts
-rw-r--r--   1 root  wheel  975 Jul 28 16:09 dot.shrc
Note that each starts with the word dot. However, when the files are copied into
a userâs home directory, the dots
turn into literal dots (.). Also, the files in this directory are
owned by root, but when a new user
is created, the copied over files will change ownership as they are
placed in that userâs home directory.
Letâs examine each default file, starting with dot.cshrc. ( [Hack #2] introduced several .cshrc hacks.) If youâd like new users to receive your customizations, simply replace /usr/share/skel/dot.cshrc with your hacked version of .cshrc. Donât forget to rename the file as you copy it:
# cp /root/.cshrc /usr/share/skel/dot.cshrcHere, I overwrote the default dot.cshrc by copying over the superuserâs customized version of .cshrc. Although you could edit /usr/share/skel/dot.cshrc directly, you may find it more convenient to have a customized copy stored elsewhere.
All isnât lost if you already have existing users whom youâd like to receive this file. First, find out what users already exist and have home directories. This is a quick way to do so:
# ls /usr/home
dru    test
Since this system has only two existing users, itâs an easy
matter to copy over my customized .cshrc. Iâm also a lazy typist, so I use
~ instead of typing out /usr/home. Also note that I have to
remember to manually change ownership:
#cp /root/.cshrc ~dru/#chown dru ~dru/.cshrc#cp /root/.cshrc ~test/#chown test ~test/.cshrc
If your system already contains many users, youâll probably prefer to write a script. Here is an example:
#!/usr/bin/perl -w

# copydotfiles.pl
#    - copy default files to user directories
#    - change ownership of those files
# You may wish to change these constants for your system:

use constant HOMEDIR => '/usr/home';
use constant SKELDIR => '/usr/share/skel';
use constant PREFIX  => 'dot';

use strict;

use File::Copy;
use File::Spec::Functions;

die "Usage: $0 <files> <to> <copy>\n" unless @ARGV;

for my $user ( get_users( ) )
{
    for my $dotfile (@ARGV)
    {
        my $source = catfile( SKELDIR( ),         PREFIX( ) . $dotfile );
        my $dest   = catfile( $user->{homedir},              $dotfile );

        if (-e $dest)
        {
            warn "Skipping existing dotfile $dest...\n";
            next;
        }

        copy(  $source,      $dest )
            or die "Cannot copy $source to $dest: $!\n";
        chown( $user->{uid}, $dest );
    }
}

sub get_users
{
    local *DIRHANDLE;
    opendir( DIRHANDLE, HOMEDIR( ) )
        or die "Cannot open home directory: $!\n";

    my @users;

    while (my $directory = readdir( DIRHANDLE ))
    {
        next if $directory =~ /^\./;

        my $path = File::Spec->catdir( HOMEDIR( ), $directory );
        my $uid  = getpwnam( $directory );

        next unless -d $path;
        next unless $uid;

        push @users, { homedir => $path, uid => $uid };
    }

    return @users;
}
This script first examines all of the users with home directories, returning a list of those directories and the user IDs. It loops through that list, copying each dot file you provided on the command line to that userâs home directory and changing the ownership to the user.
If you run it as:
# copydotfiles.pl .cshrc
all users will receive a new .cshrc file, unless one already exists.
The next file, dot.login, is
used only by the csh and
tcsh shells. If
your users donât plan on using these shells, you can safely remove
this file from /usr/share/skel.
If your users do use those shells, consider whether there are any
commands you would like to run when users log in. Note that this
file is read after .cshrc.
By default, the only uncommented line in this file is:
% grep -v '#' /usr/share/skel/dot.login

[ -x /usr/games/fortune ] && /usr/games/fortune freebsd-tips
Here, I used the reverse filter switch -v to the grep search utility to look for all the
lines that do not begin with the # comment symbol.
The resulting line tells the shell to run the fortune program. If you chose to install
the games distribution when you installed FreeBSD, your fortune appears just before the MOTD whenever you login. Have you ever
noticed that you donât receive a fortune when you use su? Thatâs because .login is only
read when you log in, and the default invocation of su does not actually log you in.
Instead, it opens what is known as a nonlogin shell. You also get
one of those every time you open an xterm. Basically, the only time you get a
real login shell is when you type in your username and password at a
login prompt.
Herein lies the difference between .cshrc and .login. Place what you would like to
happen only when you log in into .login, and place what you would like to
happen whenever you use the csh
shell, even if it isnât a login shell, into .cshrc. If you donât see the need for a
difference, you donât need /usr/share/skel/dot.login.
Reading the default contents of dot.login_conf will give you an idea of its purpose and where to go for additional information:
% more /usr/share/skel/dot.login_conf
# $FreeBSD: src/share/skel/dot.login_conf,v 1.3 2001/06/10 17:08:53 ache Exp $
#
# see login.conf(5)
#
#me:\
#        :charset=iso-8859-1:\
#        :lang=de_DE.ISO8859-1:
Note that this file is commented by default, but shows the syntax a user can use to create a customized .login.conf. Usually such settings are set in the globally administrated /etc/login.conf file, and individual users can override only some of those settings. If your users donât have a need or the know-how to configure those settings, you can safely remove this file from /usr/share/skel.
The next two files work hand in hand and customize the
behavior of mail. Since it is
quite rare to find users who still rely on the original mail program, you can safely remove those
files.
The dot.profile file
is read by the Bourne, bash, and
Korn shells. It is the only file read when a
user logs into a Bourne shell, the first file read when a user logs
into the Korn shell, and is optional for bash users.
If your users donât use the Bourne or Korn shells, thereâs not much sense populating their home directories with this file. Depending upon your slant, you may wish to keep this file in order to place path statements and environment variables for use with Bourne shell scripts. However, most users tend to place those directly into the script itself to allow for portability.
If your users wish to use the bash shell, which isnât installed by
default, keep in mind that .profile allows
a user to override the settings found in the global /etc/profile
file. You may find it easier to make your edits to the global file
and then remove /usr/share/skel/dot.profile. More
sophisticated users can always create their own ~/.profile. However, most bash users tend to make their
modifications to ~/.bash_profile.
Did you happen to notice in the earlier long listing that this
file has different permissions from most of the other files? If you
read man rhosts, youâll see that this file is
ignored if it is writable by any user other than the owner of the
file.
So, when is this file used? Itâs used when a user types one of
the r* commands: rsh, rcp, or rlogin. I wonât show you how to set up
this file or use those commands, as they were designed for use back
in the days when networks were considered trusted. Theyâve pretty
well been replaced by ssh and
scp, which provide a much safer
way to log into remote systems and to transfer files. For this
reason, I always remove /usr/share/skel/dot.rhosts from my
systems.
Now that weâve had the opportunity to look at the default files, itâs time to consider any useful missing files.
Weâve already seen that ~/.login is read when a user logs into
the csh or tcsh shells. Not surprisingly, ~/.logout is read when a user logs out of their login shell. This is an excellent
place to put commands you would like to execute as a user logs out.
It could be something as simple as:
# more dot.logout
# this line clears your screen when you logout
clear
# add your own commands or scripts, one line at a time,
# which you would like to execute
# whenever you logout and leave your terminal
This dot.logout will clear the userâs terminal, making it much neater for the next person who logs in. Notice that I commented this file, so the user is aware of its use. When creating your own dot files, use lots of comments. If you intend for your users to customize their own dot files, use comments that explain the syntax they can use when they do their modifications.
dot.logout can run any command or script that suits a userâs needs. Here are some ideas to get your imagination rolling:
A script that backs up the userâs home directory
A script that shows how much time the user spent online
A script that displays other statistics, such as available disk space
I also find it very useful to create a custom dot.xinitrc. By
default, users receive the extremely lightweight twm window manager. Since I usually
install KDE, this line ensures that each user will receive that
window manager instead:
# more dot.xinitrc
exec startkde
You can also specify which programs you would like to launch
when a user types startx and
their ~/.xinitrc
file kicks in. For example, this is a popular line to add:
# more dot.xinitrc
exec xterm &
exec startkde
This starts an xterm in the
background. Notice the & at
the end of its lineâthis is to ensure that once xterm loads, it doesnât interfere with any
other programs that are still loading. When youâre creating your own
dot.xinitrc, you can start any
program you like. However, start your window manager
last. Start your other programs, one line at a
time, putting an & at the end
of each line. The only line that does not have an & will be the very last line, the one
that loads your window manager.
Since I prefer to start my browser instead of an xterm, here is my customized dot.xinitrc:
#to start another program when you "startx", type:
#exec path_to_program &
#before these lines
exec /usr/X11R6/bin/mozilla &
exec startkde
There are dozens of possibilities for customized dot files.
Take stock of your own systems, and ask yourself: âWhat programs do
my users use?â For example, if your users use bash, vim, screen, procmail, or fetchmail, why not start them off with a
customized configuration file that contains comments on how to add
their own customizations and URLs of where to go for further ideas?
A little homework and creativity on your part can help your users
get the most out of the utilities they use on a daily basis.
Letâs end this hack by examining where the default dot files in /usr/share/skel came from in the first place. Youâll find the answer here:
% ls /usr/src/share/skel
./            dot.login           dot.profile
../           dot.login_conf      dot.rhosts
Makefile      dot.mail_aliases    dot.shrc
dot.cshrc     dot.mailrc
That Makefile controls the installation of those files:
# more /usr/src/share/skel/Makefile

#        @(#)Makefile        8.1 (Berkeley) 6/8/93
# $FreeBSD: src/share/skel/Makefile,v 1.8 2002/07/29 09:40:13 ru Exp $

FILES1= dot.cshrc dot.login dot.login_conf dot.mailrc dot.profile dot.shrc
FILES2=        dot.mail_aliases dot.rhosts
MODE1=        0644
MODE2=        0600

NOOBJ=        noobj

all clean cleandir depend lint tags:

install:
        ${INSTALL} -o ${BINOWN} -g ${BINGRP} -m ${MODE1} ${FILES1} \
            ${DESTDIR}${BINDIR}/skel
        ${INSTALL} -o ${BINOWN} -g ${BINGRP} -m ${MODE2} ${FILES2} \
            ${DESTDIR}${BINDIR}/skel

.include <bsd.prog.mk>
Even if youâve never read a Makefile before, youâll find itâs not too
hard to figure out whatâs going on if you already know which results
to expect. In this Makefile,
FILES1 is simply a list of files to
install. Take a look at MODE1; it
tells the chmod command what
permissions to set on those files.
Similarly, FILES2 is another
list of files. Those two files had different permissions, which were
defined by MODE2.
Move down to the install
section. Donât worry so much about the syntax; rather, notice the
pattern. The first set of files are installed and their mode is
applied. Then the second set of files are installed with their
mode.
Itâs an easy matter to customize this file to reflect the dot files youâd like to see installed. In this example, I only want to install my custom versions of dot.cshrc, dot.login, and dot.xinitrc. Since they all require the first mode, Iâll remove any references to the second set of files:
#cd /usr/src/share/skel#cp Makefile Makefile.orig#vi Makefile# @(#)Makefile 8.1 (Berkeley) 6/8/93 # my customized dot files to be installed into /usr/share/skel FILES1= dot.cshrc dot.login dot.xinitrc MODE1= 0644 NOOBJ= noobj all clean cleandir depend lint tags: install: ${INSTALL} -o ${BINOWN} -g ${BINGRP} -m ${MODE1} ${FILES1} \ ${DESTDIR}${BINDIR}/skel .include <bsd.prog.mk>
Now letâs try a test run. Iâll replace the default dot files found in /usr/src/share/skel with my customized versions. Iâll then remove the contents of /usr/share/skel and see what happens when I run my customized Makefile:
#cd /usr/src/share/skel#rm dot.*#cp ~/mystuff/dot.* .#rm /usr/share/skel/*#ls /usr/share/skel#make installinstall -o root -g wheel -m 0644 dot.cshrc dot.login dot.xinitrc /usr/share/skel #ls /usr/share/skeldot.cshrc dot.login dot.xinitrc
I find it very handy to keep a copy of my customized Makefile and dot files in a separate directory, in this case ~/mystuff. This ensures they are backed up. Itâs easy for me to grab those files whenever I want to customize a particular system.
Itâs especially important to use a separate location if you use
cvsup to keep your system up-to-date. Otherwise, your next
update will notice your modified src and happily replace those missing
original source files. But donât worry; it wonât touch your new
/usr/share/skel.
Of course, sometimes this is a very useful trick in itself. If
you ever mess up a file located somewhere within /usr/src, a quick cvsup will put everything back the way it
was. See [Hack #80] for details on automating cvsup.
The sign of a true Unix guru is the ability to perform a task quickly when confronted with an unfamiliar shell, keyboard, terminal, window manager, or operating system.
A large part of using Unix systems effectively involves configuring a comfortable environment using familiar tools available from the Unix shell prompt. Itâs much easier to perform a task quickly when all of the shortcuts your fingers have learned work on the first try.
Even something as simple as setting up your prompt the way you like it can steal significant time from your productivity if you need to do it on several hosts. If youâre going to spend significant time in a Unix shell, itâs worth getting organized. A bit of onetime effort will reward you later, every time you sit down at the keyboard.
unison is a tool for
maintaining synchronized copies of directories. Iâve used it to maintain a central
repository of all of my dot files, shell scripts, signatures file,
SpamAssassin configurationâbasically any file Iâd like to have
available, regardless of which host I happen to be logged into.
You can install unison from
the NetBSD pkgsrc collection:
#cd /usr/pkgsrc/net/unison#make install clean
FreeBSD and OpenBSD ports also include net/unison.
Even better, this utility is available for most Unix and Windows
platforms. See the main unison web
site for details.
Whenever I configure a new Unix host or get a shell on another
system, I install unison. Then, I
create a directory to receive the files Iâve stored in the /usr/work/sync directory at
host.example.com. I call the local directory
~/sync.
To synchronize those two directories:
% unison ~/sync ssh://username@host.example.com://usr/work/sync
p = /home/david/.unison; bn = .unison
Contacting server...
p = /home/david/sync; bn = sync
username@host.example.com's password:
After ssh prompts for a
password or pass phrase, the unison
exchange begins. On a first-time synchronization, unison will ask only one question: whether
you wish to copy the remote directory to the local host.
Looking for changes
Warning: No archive files were found for these roots.  This can happen
either because this is the first time you have synchronized these roots,
or because you have upgraded Unison to a new version with a different
archive format.
Update detection may take a while on this run if the replicas are large.
unison will assume that the
last synchronized state of both replicas was completely empty. This
means that any files that are different will be reported as conflicts,
and any files that exist only on one replica will be judged as new and
propagated to the other replica. If the two replicas are identical,
then unison will report no
changes:
Press return to continue.
Waiting for changes from server
Reconciling changes

local          host.example.com
         <---- dir        /  [f]

Proceed with propagating updates? [  ] y
Propagating updates

UNISON started propagating changes at 11:44:39 on 02 Feb 2004
[BGN] Copying
from //host.example.com//usr/work/sync
to /home/david/sync
bin
dotfiles
spamassassin
bin/randomsig2.pl
bin/sy
bin/testaspam
dotfiles/.c
dotfiles/.cshrc
dotfiles/.login
dotfiles/.muttrc
dotfiles/.profile
dotfiles/.tcshrc
dotfiles/.xinitrc
spamassassin/user_prefs
[...]
[END] Copying
UNISON finished propagating changes at 11:44:41 on 02 Feb 2004
Saving synchronizer state
Synchronization complete
I now have a populated ~/sync directory on the new system, organized into subdirectories. Each subdirectory contains the files I find useful to carry around with my various accounts on multiple Unix machines.
Notice also that although my preferred shell is tcsh, I maintain a .cshrc and .profile for use on systems where tcsh is not available.
Iâve automated the process with a simple shell script called
sy in my bin directory. sy runs the unison command to synchronize the ~/sync directory.
#!/bin/sh
unison ~/sync ssh://username@host.example.com://usr/work/sync
Making good use of the sync directory requires some discipline. Itâs one thing to be able to copy files easily; itâs another thing to be able to use them without modification on several hosts.
To take advantage of this hack, when you copy the dot files to your home directory and notice that something doesnât work exactly the way you like it to, make sure you donât simply change it for the local host.
Instead, update the dot files so that they use conditional if
statements, shell backticks (e.g., `hostname`), or environment variables, to
make them behave correctly on the new hosts without breaking them on
the systems where you already use them. Then, copy the dot file back
into your ~/sync directory and
run the sy script. unison will prompt for a password or
passphrase for the ssh connection,
then ask you to verify that you want to update your files back to the
main server.
The first few times you do this, you may introduce breakage when the new dot file is used on another host. With a bit of practice youâll learn how to avoid that. The most important trick is to test. Open a shell to the host and update the dot file, and then open a second shell to the host without closing the first one. If you broke anything that affects your ability to log in, you can fix it with the first shell and test again.
Thereâs no need to resynchronize every other host you use for each file you change. I generally wait until Iâm logged onto a given host and need a newer script, or need to make some additional changes to the local copy of the dot file. Then I synchronize, make the changes in the sync directory, test them locally, and resync them back to the main host.
Using this approach means that I donât have to reinvent the
wheel every time I want to perform a procedure Iâve done before. Any
process useful enough to be done a couple of times becomes a script in
my toolkit, and is conveniently available anywhere I have a shell.
With unison, I donât have to keep
track of which files were modified on which end of the connection
since my last update.
Keep in mind that using a tool like unison can provide a mechanism for someone
to attempt to feed updates into your central file repository. When you
log into a host and run the update, be conscious of whether unison asks for approval to send back
changes. If you donât remember making those changes, you might be
helping an attacker feed a Trojan horse into your .login, which could end up giving the
attacker access to every system you use that script on. unison will ask for confirmation for every
file change. Presumably, your central host is secure, but you need to
be particularly conscious when permitting file uploads.
The
unisonhome page (http://www.cis.upenn.edu/~bcpierce/unison/)
Save and share an entire login session.
How many times have you either struggled with or tried to troubleshoot another user through a thorny problem? Didnât you wish you had another set of eyes behind you so you could simply type your command set, point at the troublesome output, and say, âThatâs the problem.â Well, if you canât bring another user to your output, you can still share that real-time output using an interactive shell.
There are actually several ways to share what is happening on your screen. Letâs start by recording all of your input and output to a file. Then weâll see how we can also allow another user to view that output from another terminal.
Your BSD system comes with the script command
which, not surprisingly, allows you to script your session. This
command is extremely simple to use. Simply type script:
% script
Script started, output file is typescript
By default, script will
create an output file named typescript in your current directory. If
you prefer, you can specify a more descriptive name for your script
file:
% script configure.firewall.nov.11.2003
Script started, output file is configure.firewall.nov.11.2003
Regardless of how you invoke the command, a new shell will be created. This means that you will see the MOTD and possibly a fortune, and your .cshrc will be reread.
You can now carry on as usual and all input and output will be written to your script file. When you are finished, simply press Ctrl-d. You will see this message:
Script done, output file is configure.firewall.nov.11.2003
If youâve ended a script and decide later to append some more
work to a previous session, remember the -a (append) switch:
% script -a configure.firewall.nov.11.2003This will append your current scripting session to the named file.
I find script extremely
useful, especially when Iâm learning how to configure something for
the first time. I can easily create a written record of which commands
I used, which commands were successful, and which commands caused
which error messages. It also comes in handy when I need to send an
error message to a mailing list or a programâs maintainer. I can
simply copy or attach my script file into an email.
The script utility is a very quick and dirty way to record a
session, and it does have its limitations. One of its biggest is that
it records everything, including escape characters. For example, here
is the first line from one of my script files:
[1mdru@~ [m: cd /s [K/ysr/ [K [K [K [K [Kusr/ports/security/sn o rt
Itâs a bit hard to tell, but this is what script was recording:
cd /usr/ports/security/snort
This isnât really scriptâs
fault; itâs ugly for several reasons. One, my customized prompt
contains control characters. Those display as [1m and [m around my username. Second, I had
problems typing that day. Instead of /usr, I typed /s and had to backspace a character. Then I
typed /ysr and had to backspace
three characters. Finally, I used tab completion. You can see that I
tried to tab at sn but received a
beep; I then tried to tab at sno
and had my input completed to snort.
Granted, if I had first used the file utility on my
script file, I would have received a warning about this
behavior:
% file configure.firewall.nov.11.2003
configure.firewall.nov.11.2003: ASCII English text, with CRLF, CR, LF line
terminators, with escape sequences
All is not lost, though. This command will get rid of most of the garbage characters:
%more configure.firewall.nov.11.2003 | \col -b > configure.firewall.nov.11.2003.clean
col is an
interesting little utility. It silently filters out what it doesnât
understand. Hereâs an example where this actually works to our
advantage. col doesnât understand
control characters and escape sequences, which is exactly what we wish
to get rid of. Including -b also
asks col to remove
backspaces.
The result is much more readable:
1mdlavigne6@~m: cd /usr/ports/security/snort

% file configure.firewall.nov.11.2003.clean
configure.firewall.nov.11.2003.clean: ASCII English textIâve found that using an editor during a script session also
produces very messy output into my script file. The preceding col -b command will clean up most of the
mess, but I still wonât have a very good idea of exactly what I typed
while I was in that editor. For this reason, I use the echo command to send little comments to
myself:
%echo # once you open up /etc/rc.conf%echo # change this line: linux_enable="NO"%echo # to this: linux_enable="YES"%echo # and add this line: sshd_enable="YES"
Tip
If you really want to get fancy, map one key to âstart echoâ and another to âend echoâ as in [Hack #4] .
Letâs look at an alternate way of recording a session. This time Iâll use the -i (or interactive) switch of my
shell:
% csh -i | & tee test_session.nov.12.2003Tip
tcsh is linked to csh in FreeBSD. It doesnât matter which
one I type; Iâll still end up with the tcsh shell.
In that command, I used -i to
start an interactive tcsh shell. I
then piped (|) both stdout and
stderr (&) to the tee command. If youâve ever looked at
physical pipe plumbing, youâll recognize the job of a âteeâ in a pipe:
whatever is flowing will start going in both directions when it hits
the âtee.â In my case, all stdout and stderr generated by my shell
will flow to both my monitor and to the test_session.nov.12.2003 file. When Iâm
finished recording my session, I can type Ctrl-c, Ctrl-d, or exit to quit.
Like the previous script
command, an interactive csh shell
will present me with a new shell. However, this method does not record
escape characters, meaning I wonât need to use the col -b command to clean up the resulting
file.
But if I try to use vi during
my session, the shell will refuse to open the editor and will instead
present me with this interesting error message:
ex/vi: Vi's standard input and output must be a terminal.
If I try to use ee, it will
open, but none of the commands will work. pico works nicely but still throws garbage
into the session file. So, if I need to use an editor during my
session, Iâll still echo some
comments to myself so I can remember what I did while I was in
there.
Appending works almost exactly like it does for script, again with the -a (append) switch:
% csh -i | & tee -a test_session.nov.12.2003Regardless of which method you choose to record a session, another user can watch your session as it occurs. In order for this to work, that user must:
Be logged into the same system
Know the name and location of your script file
For example, Iâve created a test account on my system and configured
sshd. Iâll now see if I can
ssh into my system as the user
test and watch the results of
druâs test_session.nov.12.2003.
% ssh -l test 192.168.248.4
Password:
%
Once I successfully log in, my customized prompt indicates Iâm
the test user. I can now use the
tail command to watch what is
happening in druâs session:
% tail -f ~dru/test_session.nov.12.2003My prompt will appear to change to indicate I am the user
dru. However, Iâm not. Iâm simply
viewing druâs session. In fact, I
can see everything that the user dru is seeing on her terminal. This includes
all of her input, output, and any error messages she is
receiving.
While tail is running, I
wonât be able to use my prompt. If I try typing anything, nothing will
happen. I also canât interact with the user or change what is
happening on her terminal. However, I do have a birdâs eye view of
what that user is experiencing on her terminal. When Iâm ready to
return to my own prompt, which will also end my view of the session, I
simply need to press Ctrl-c.
Running a graphical environment is great. You can have numerous applications and utilities running, and you can interact with all of them at the same time. Many people who have grown up with a GUI environment look down upon those poor souls who continue to work in a terminal console environment. âAfter all,â they say, âyou can only do one thing at a time and donât get the same information and control that you have in a desktop environment.â
Itâs true; they do say those things. (I am curious to know who they are, however.)
Itâs also true that the utility of a graphical environment diminishes when you need to administer machines remotely. Do you really want to squander network bandwidth just to maintain a GUI session?
Here are some more questions to ask yourself regarding remote administration:
Are you worried about making your services vulnerable just so you can administer them across the Internet?
Do you want a secure connection?
Do you want to run multiple terminal sessions from a single login?
Do you want to be able to password protect your session to prevent unauthorized access?
Do you want multiple windows with labels and of different sizes?
Do you want to copy and paste between the windows?
Are you prepared to lose a connection to your remote machine in the middle of a critical operation?
Would you like to be able keep the session active even after youâve lost it or youâve logged off the remote server?
Do you want to take over a session that you launched from another machine?
Would you like to keep a hardcopy log of your sessions?
You are indeed a poor soul if youâve reconciled yourself to the
standard ssh login without any hope
of resolving these questions. But all is not lostâthe solution is
screen.
screen is a terminal screen window manager. That means you can
use a console and run multiple terminals at the same time. The fancy
term for this ability is multiplexing.
Getting and installing screen
is straightforward using the ports facility:
#cd /usr/ports/misc/screen#make install clean
Iâm working with Version 4.00.01 (FAU) 18-Sep-03.
screen has many options,
settings, and commands. Although weâll attempt to address the major
features, the definitive reference is, of course, the manpage.
There are three methods of command-line invocation:
screen [ -options] [cmd[args] ]For invoking
screenfor the first time and running specific options and commandsscreen -r [[pid.]tty[.host]]For attaching to and detaching from running sessions
screen -rsessionowner/[[pid.]tty[.host]]For attaching to and detaching from existing sessions being run by other users
The best way to understand screenâs power is to give you an example of
how you can take advantage of it.
Suppose you are sitting at workstation alpha. You want to access your machine,
bravo, to download and compile the
latest PostgreSQL source code. Log into host bravo as user charlie using SSH:
% ssh -l charlie bravoInvoke screen. If you give it
a session name, with the -S flag,
you can address this session by name. This will pay off
shortly.
% screen -S AGo ahead and download the source code now:
% ftp ftp://ftp3.ca.postgresql.org/pub/source/v7.4/postgresql-7.4.tar.gzSo far, this has no advantage over a normal SSH login. Yet
suppose you need to send some email while youâre downloading.
Instead of putting the download into the background, create another
screen window with the key sequence C-a
c. This symbolizes that the Ctrl key is pressed with the
lowercase letter a and then,
after releasing them, you press a second key, in this case c.
At this point the console will go blank. Youâll be presented with a second window. Use your favorite email client to compose your message.
Youâll probably want to switch between the download and
mailer windows. Cycle forward in the window list with C-a n.
Cycle backward with C-a p,
although youâll likely see no difference with two windows.
Being the efficient person that you are, youâd like to compile the source code as soon as it has downloaded. Even though you havenât completed your email, go back to the original window and extract the tarball:
% tar -xzpvf postgresql-7.4.tar.gzWise administrators read the INSTALL file to make sure all the correct
options are invoked. Itâd be very handy to be able to read the
instructions as you compose the configure command in the same console.
screen comes to the rescue here,
too: split the window horizontally, running configure in the top half and reading the
documentation in the bottom half.
Type C-a S to split the
screen, where the S is uppercase.
You should see a wide horizontal bar in the middle of the screen.
The top window will show whatever existed when you split the window.
Youâll also see the windowâs ID on the left side of the middle bar,
along with the name of the shell.
The bottom window doesnât yet have a shell running. Set the
focus to the other window with C-a
Tab. Create a new window with C-a
c, as usual. Notice that the window has the ID of
2 (shown in the bottom lefthand
corner); thatâs because the email window that you created after
starting the download has the ID of 1.
To list all windows associated with this session, use the
command C-a â.
If cycling through windows is onerous, you can also switch
between windows by ID. For example, C-a '
1 will go to window 1.
Be prepared for a little confusion because the screen remains split and now shows the window of your choice in the currently focused window. You can quite easily show the same window in both the top and bottom halves.
Enter window 0 with C-a '
0, and extract the tarball into its own directory. Enter
window 2 with C-a ' 2, and
navigate to the uppermost directory of the source code to read the
INSTALL file.
ID numbers identify windows pretty well, but I prefer to use
names of my own choosing. Change a windowâs name with the command
C-a A. For example, C-a A email, C-a
A source, and C-a A doc
seem like a big improvement for the currently active windows.
Now, listing the active windows with C-a " will show the following:
NUM NAME
0   source
1   email
2   doc
At this point, you have one screen session with three windows. Your terminal is split such that it shows two windows at the same time.
Suppose you are called away from the workstation in the middle
of a sensitive operation (that is, you havenât yet sent your email).
Type C-a x to protect your session.
Depending on your configuration, you will either input a password for
the screen or use the default account password.
Now suppose you donât return to your workstation. What do you
do? You can ssh into bravo from a new location and attach to your
existing screen session with screen -dr
A. Remember, A was the
name of the screen session.
After finishing and sending your email, kill off that screen.
Type the command C-a k in the
email window.
With that business finished, scroll back through the INSTALL text file to find interesting
configuration switches. You could retype them,
but screen has a perfectly capable
copy mode. Type C-a ESC.
Use the cursor keys to navigate to the portions of the document you want to copy. Hit the space bar to mark the beginning of the text to copy. Scroll around to the end of the text with the cursor keys. The current selection will display in reverse video. When youâre satisfied, hit the space bar to copy the current selection into the buffer.
Switch to the source window
and use C-a ] to paste the copied
text.
You donât need the doc window
anymore, so switch into it and either exit the shell or use the key sequence
C-a k to kill it. You could also
merge the split screens together with the key sequence C-a X.
Once youâve started compiling, you can close the terminal but
leave the session active by detaching it; just type C-a d. One of the nice features about
detaching the screen is that it is done automatically if you lose
connection with the server, so you wonât lose your session. You can
reattach to the session later from the same location or from another
workstation altogether.
These are only the basics of what screen can do. Hereâs a quick listing of
other features you might enjoy:
Since the key bindings are not cast in stone, you change them as you see fit in the .screenrc resource file.
Itâs possible to authorize other users access to your screen session via an access control list.
More than one user can access the same screen session.
You can create any number of windows in a given screen session.
Itâs possible to hardcopy all activity in a screen session to a buffer and even a file.
An extensive system of copy and paste features exist within the screen session.
You can control all of these features with the .screenrc resource file. See man
screen for details.
man screenThe GNU Screen home page (http://www.gnu.org/software/screen)
Get BSD Hacks now with the O’Reilly learning platform.
O’Reilly members experience books, live events, courses curated by job role, and more from O’Reilly and nearly 200 top publishers.

