Chapter 4. The Internet and Other Networks
Hacks 37–50: Introduction
With the advent of the Mobile Data Service and TCP/IP on the BlackBerry [Hack #37] , an entire world of Internet services became accessible on the BlackBerry. Some of the best applications in existence are accessed by using some type of client software (perhaps just a browser), but the real power comes with its integration with a central service where users and data meet in interesting and exciting ways (think Amazon). Very few client-only software packages carry the same importance as one that integrates well with a web service. With your BlackBerry, you can track your to-dos [Hack #47] , corral your bookmarks [Hack #46] , and even use instant messaging [Hack #44] .
Configure Your BlackBerry for Internet Access
Unlock the PC in your BlackBerry by giving it a TCP/IP stack.
When you access your BlackBerry Browser, you are communicating in a limited way through a gateway of sorts. Your BlackBerry doesn’t need its own IP address to communicate in this fashion. You can, however, depending on your provider, enable TCP/IP on your device. This allows your device to communicate directly (well, almost directly) with machines on the Internet.
Enabling TCP/IP on your device gives you access to many of the network-enabled third-party applications for the BlackBerry, some of which are highlighted in this book. If you are not a BlackBerry Enterprise Server user, this hack will give you many of the functions of the BES and MDS without being BES enabled.
Enable TCP/IP on Your Device
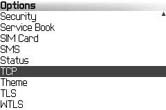
This hack requires that you have BlackBerry 4.0 or later installed on your device. If you have a version earlier than 4.0, you should install the latest version on your device [Hack #20] . Starting with 4.0, there is an additional item in your Options application called TCP, as shown in Figure 4-1.
Inside the TCP settings, you’ll find three fields that you will need to configure. These settings will be specific to your provider. The APN stands for Access Point Name. Every provider requires a value for the Access Point Name field. Some providers require that you fill in the username and password while others allow you to use null values for these fields. A good resource to find these settings is the Opera Access Point settings page available at http://www.opera.com/products/mobile/docs/connect/. Figure 4-2 shows the settings required for Cingular.

What Does This Do?
You won’t notice anything different about your device immediately upon enabling this. However, you have opened up a whole new world of network-enabled applications to use on your device! You can install and use different browsers [Hack #66] and email programs [Hack #67] , as well as instant messaging programs [Hack #44] that integrate nicely with your BlackBerry alerting; shop on Amazon.com [Hack #58] ; and even remote control your desktop machine with VNC [Hack #40] !
Blog from Your BlackBerry
Why should you blog only from your desktop computer?
You have just thought of a brilliant idea that you have to blog about right away, so like a caveman, you scribble it down on a piece of paper and hope you don’t lose it before you return to your computer. You might not even remember to blog when you return to your computer, and your precious idea is already turning stale anyway.
It doesn’t have to be this way. With most blogging software, you can turn on email-to-blog functionality so you can blog from any email-enabled device—a domain that is ruled [Hack #31] by your BlackBerry.
Turn On Email-to-Blog Functionality in Blogger
From within Blogger, Google’s popular blogging service, log in and go to your blog administration page. Click on the Settings tab, and then click on the Email heading and go to the Email-to-Blogger section.
Blogger has you create a “secret” email address that allows any messages that get sent to it to be automatically blogged. As shown in Figure 4-3, the email address is constructed with your Blogger name, followed by a string of your choosing. The Publish checkbox tells Blogger whether to go ahead and publish the content of messages as they are sent or to add it to your Blogger admin page without publishing, giving you the opportunity for review before your blog visitors see it.

Write by Email in Wordpress
Wordpress is another popular blogging software package that is written in PHP and runs on Apache and has a MySQL database backend. Along with a mountain of excellent plug-ins, it has a built-in feature that allows you to publish to your blog by email.
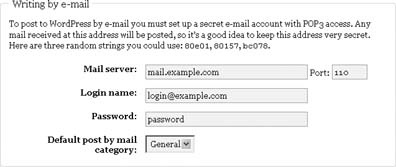
Log into your Wordpress administration page and click on Options → Writing. This brings you to the Writing Options page as shown in Figure 4-4.
This Wordpress functionality requires a little more work than Blogger’s does. You have to have already created an email account that is accessible via POP3 (a free, ad-hoc Gmail account is a good choice because of its built-in spam protection). You configure the POP3 settings to tell Wordpress where to retrieve messages from. Use the “Default post by mail category” option to choose one of your categories that all posts by email will go into. Of course, you can always go back and change the category and even add additional categories after a post has been published.
Once you’ve sent a message to the blog-by-email account you’ve set up, you’ll need to visit this page: http://your.blog.url/wp-mail.php (wp-mail.php is in the same directory as your main index.php, so the URL could vary depending on your setup). This scans your mail and posts any messages in your inbox to your blog.
Tip
Many Wordpress users choose to automate this step by using a scheduled job to make the request to http://your.blog.url/wp-mail.php on a regular basis. There are a variety of tools you can use to make HTTP requests. One tool is lwp-request, and it comes with ActiveState Perl, a tool that is used in several of the hacks in this book. (If it didn’t come with your Perl intallation, you can obtain lwp-request as part of the libwww-perl collection at http://lwp.linpro.no/lwp).
Blog Away
Once you’ve configured your blogging software to accept email, go ahead and compose a message from your BlackBerry. The subject line will become the title of your post, and the body of the message will become the post content. Figure 4-5 shows a composed email message I’ve sent to my Blogger blog.
Almost instantaneously, the blog appears on my blog, as if I posted it from my desktop browser (see Figure 4-6).

Warning
You don’t want spam finding its way onto your blog (what a nightmare that would be!), so you need to choose an email address that it not easily guessed and is longer than a few characters. Blogger enforces a length of at least four characters, but I would highly recommend one that is much longer. You’ll only have to type it once into your address book, and then you’ll just pick it from your list when you compose a message, so make it complex and lengthy, just as you should for an important password.
See Also
Bloxsom (http://www.blosxom.com/)
Nucleus (http://dev.nucleuscms.org/)
MovableType (http://www.sixapart.com/movabletype/)
Read News and Blogs on the BlackBerry
RSS and Atom feeds offer a smaller version of a web site, but some or all of the same content. By using an aggregator, you can cluster all sorts of related sites together and read news and other data from a variety of sources large and small.
There are a variety of ways to get your RSS feeds onto your BlackBerry, but my favorite is to use Bloglines (http://www.bloglines.com/).
Bloglines is a web-based RSS reader, which sounds kind of goofy in a way because you’re trying to leave the web browser behind when you’re scouring over your feeds. Fact is, Bloglines is quite brilliant due to one critical reason: it keeps track of what you’re reading no matter where you’re logged in from. When you log in via your desktop PC, your PowerBook, a computer at a friend’s, a public terminal, or your BlackBerry, you’ll never see the same article twice if you use Bloglines (unless you mark it “Keep New”). Using Bloglines will cut down dramatically on the flood of things you are confronted with at any given time, and certainly helps make your RSS feeds more useful on the go.
Using Bloglines via its default web interface isn’t the best way to view it on your BlackBerry, however. You may like using Bloglines Mobile (http://bloglines.com/mobile/) in the BlackBerry browser, which will work fine.
An alternative is using Berry Bloglines (http://www.thebogles.com/berry_bloglines.html), a fantastic utility that connects you to Bloglines via a little proxy server that converts news items into easier to read formats for the BlackBerry. It optimizes the content it receives via some magic with Python. Although Phillip Bogle did not toot his own horn about this application in this book, I’ll do it for him: Berry Bloglines is awesome.
There is a possible alternative to Bloglines Mobile called litefeeds, which is still undergoing development (see http://www.litefeeds.com/). They have a BlackBerry client application in the works, and, last I checked, it was a service with a lot of promise. Keep an eye on it. Litefeeds is specifically geared for mobile RSS, and it is always possible that Ask Jeeves (the current owner of Bloglines) will make Bloglines lame in some way, so it’ll be very nice to have a service to step up should the worst happen. Best case scenario, Bloglines isn’t the only game in town anymore and the two of them can keep each other on their toes.
If you prefer the traditional way of reading RSS feeds using a dedicated client application, try Newsclip from Virtual Reach (http://www.virtualreach.com/) and Berryvine RSS (http://www.berryvine.com/). In my opinion, they’re the best of the breed for dedicated RSS feed–reading on the BlackBerry. The other applications in this category just don’t even come close to it. Both Newsclip and Berryvine’s RSS have trial versions available, letting you examine all their features without any cost to you.
- Newsclip
Virtual Reach includes a nice index of possible RSS feeds for Newsclip users, much like NetNewsWire or other desktop RSS aggregators. You can also add your own RSS feeds to subscribe to, and read them on the go. What tends to work best for me is to put only the critical RSS feeds on my BlackBerry in Newsclip. This usually means a couple of my favorite Craigslist RSS feeds and some work-related feeds that let me feel like less of a slacker while in line at the DMV.
- Berryvine
You can differentiate feeds in Berryvine RSS by applying colors to them— green for General, orange for Entertainment, etc. You can also categorize feeds and view feeds by category, which is a helpful trick as well.
It’s quite easy to get your feeds on a BlackBerry. It is one of the areas where a lot of development hours are being burned, which is fortunate for all of us BlackBerry users!
—R. Emory Lundberg
Control Another Computer Remotely
Use this open source remote control software to access other machines from your device.
Wouldn’t it be nice to access the desktops of other computers when you only have access to your BlackBerry? It turns out you can by using Virtual Network Computing software, or VNC. VNC allows you to remotely control another computer across a network. You have access to the keyboard and mouse, and you can even send a Ctrl-Alt-Delete to a Windows computer to shut it down. For Windows and Linux, you should check out the free TightVNC program (http://www.tightvnc.com). It is compatible with most VNC clients, but will optimize bandwidth when used with TightVNC-compatible clients. Mac users can use the free OSXvnc (http://www.redstonesoftware.com/vnc.html). There is VNC support in recent versions of Mac OS X (check out Apple Remote Desktop in System Preferences → Sharing).
There are ports of the client and server components of VNC for practically any operating system in existence and, because it’s open source software, its features and stability continue to improve.
Install the Server
To use VNC, you have to install the server software on the machine you’d like to remote control. You can download and install the server software from the VNC web site at http://www.realvnc.com. Choose the appropriate software for the operating system you’d like to remotely control and follow the installation instructions.
Install the BlackBerry VNC Client
The VNC client for the BlackBerry device is available at http://www.ethell.com/j2mevnc/. There is no over-the-air install available, so you will have to download the archive and use Application Loader to install the software on your device. The latest version can be downloaded using this URL: http://www.ethell.com/j2mevnc/VNC-en-bb.zip.
Once installed, there will (oddly enough) be two icons for VNC on your Home screen, as shown in Figure 4-7. One icon runs the actual program and the other displays an About screen describing the program. So, this would be a good opportunity to hide the About VNC icon from the Home screen [Hack #5] .

Connect to a VNC Server
When you run the program from the Home screen, you’ll be taken to the VNC client that will allow you to connect to a remote computer running the VNC server component. To make a connection, enter the name or IP address of the computer to which you’d like to connect in the Host field. If the computer requires a password (and it should!), enter it in the Password field. Figure 4-8 shows the screen you’ll see when making a connection.
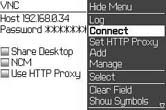
The Share Desktop option should be enabled if you’d like other VNC clients to be able to connect to your session on the VNC server at the same time you are connected. The NCM option stands for Nokia Compatibility Mode and can be ignored.
Use the trackwheel to bring up the menu and click Connect. The client then attempts to make a connection to the VNC server, as shown in Figure 4-9.
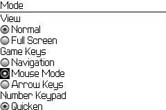
Once connected, you’ll be able to view the desktop and use the mouse on the remote computer. To use the mouse, click the trackwheel and select Mode. Under the Game Mode section (see Figure 4-10), enable the Mouse Mode option.
A mouse pointer will appear in the screen, as shown in Figure 4-11. If you’re used to using a standard desktop version of the VNC client, you’ll notice the familiar red dot that the remote mouse pointer follows around the screen.
I’m not exactly sure why, but there is a full screen mode included for those of you who have the vision of a hawk. I wouldn’t recommend trying to use it.
Warning
Because you are operating over a GPRS or other cellular-based network, you will notice a significant delay using the client. If you are used to the desktop version of VNC, you’ll probably grow weary waiting for the screen to refresh on your BlackBerry. Of course, when you are in a bind, this could come in handy.
If you’re willing to spend a little money, there is an excellent remote control client and server that works well on the BlackBerry called Remote Desktop for Mobiles (http://www.desktopmobiles.com/). It has better performance than VNC, although it works only on the Windows platform.
Use Google Maps
Although Google provides access to maps for handhelds through Google Local, this handy program works very similarly to the full browser implementation of Google Maps.
It’s hard to overestimate the impact on the online map industry that Google Maps (http://maps.google.com) has had. The crisp, readable maps, along with the integration with Google Local, have made quite a splash in the online community. But most agree that the most innovative feature of the Google Maps interface is its clever use of JavaScript to create a user experience in a simple web browser, rivaling the most polished of desktop software without requiring browser plug-ins.
Use Mobile GMaps
You can use a program called Mobile GMaps (http://www.mgmaps.com/) to access Google Maps from your BlackBerry. It is available for free and you can download it over the air right from your device by going to their WAP interface (http://wap.mgmaps.com/).
Once installed, use the MGMaps icon on the Home screen to open the program. You’re greeted with a map of the United States (see Figure 4-12), the same default view you’ll find on Google Maps (http://maps.google.com).

Use the trackwheel to access the menu and select Search to enter an address to search for. You can perform searches, such as restaurants in New York, NY, or you can search for a specific address in the Where field. You can also choose whether to view a regular street map or a satellite view. Once your search results are returned, use the trackwheel to highlight one of the results and choose Select from the trackwheel menu. This will download the appropriate images from Google Maps to your BlackBerry and display them as shown in Figure 4-13.
Use GMapViewer
Google Maps’s sophisticated use of JavaScript (a technique known as AJAX) is not yet available in any handheld browser, but there is a free program for handhelds called GMapViewer (http://www.sreid.org/GMapViewer/) that creates a look and feel that is similar to what the Google Maps interface provides to desktop browsers. Because it is written according to the J2ME specifications, you can run it on your BlackBerry!

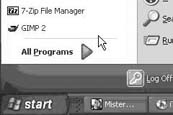
Go to the GMapViewer web site (http://www.sreid.org/GMapViewer/) and use the over-the-air download to install the application. After you install the program, click on its icon on the Home screen to execute it. Figure 4-14 shows the very simple screen that appears when you bring up GMapViewer.
View a Map
To view a map, click the trackwheel from the menu and select the Search menu option. This brings you to a screen to create searches for cities and addresses, as shown in Figure 4-15. Select New search from the menu and enter an address or city for a place for which you’d like to view a map. You’ll need to enter the address all on the same line.
Click the trackwheel and choose OK. The search you entered is sent to the service’s web interface (more on this later) and is validated. Once the search returns, use the trackwheel to choose Select from the menu, and you will be taken to the map for that location in another screen.
Navigate the Map
You will notice a similar look and feel to the click and drag interface you’re used to in your desktop browser. Use the trackwheel to scroll to the edges of the map, and the new sections will be filled in on the fly. Figure 4-16 shows the program as you scroll to the map’s edge. Notice the orange and blue blocks that appear for areas on the map that have yet to be downloaded. Also, the wireless activity arrows indicate that the missing images are being retrieved onto your device.

Add a Map Pin
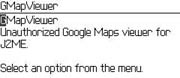
You can add new map pins, which will be stored in a menu for easy access. There is a crosshair in the middle of the map screen that stays centered as you scroll around the map. At any time if you would like to create a waypoint as a location bookmark, click on the trackwheel and choose New Map Pin from the menu. This brings up a text entry field in which to enter a string that identifies the location. After you’ve typed the text for your map pin, choose OK from the trackwheel menu. You’ll be returned to the map you were viewing, and you’ll see a red map pin with the text you entered on the map, as shown in Figure 4-17. The map pins you create are stored on your device. You can go to the Map pin menu to view all the pins you’ve created and go directly to that section on the map.

How Does This Work?
GMapViewer is used in conjunction with a web service. This web service acts as a gateway and runs as a PHP application that can be downloaded along with the source code for the J2ME client software. By default, the client points to a copy of the web service running at the author’s web site. Be sure and check the GMapViewer web site for updates—the author currently states that the gateway could be taken down at any time.
If the gateway was put out of service, I would anticipate another kind soul to provide a different gateway that clients could point to. Because both the client and gateway components are released under the GPL (GNU Public License), you could download the source code and run a GMapViewer gateway on your own web server!
Telnet or SSH to Internet Servers
Tail that logfile from anywhere you have cell coverage with the MidpSSH telnet/SSH client.
Once you’ve configured your device for TCP/IP, you can use open source Telnet and SSH clients to connect to a server on the Internet. No doubt you won’t be able to use your god-like vi skills on your BlackBerry keyboard, but this will give you the full SSH access you sometimes can’t live without.
Install and Use MidpSSH
Similar to most applications, MidpSSH (http://www.xk72.com/midpssh/) provides over-the-air installs and downloads for installing via Desktop Manager and Application Loader. MidpSSH also provides various versions of their software. You can get the full version that has support for any of the various protocols you’d need to use: Telnet, SSH1, SSH2, and various combinations of these. The space-conscious user will like the ability to install a version of the software that contains support only for the protocols they need and nothing more.
Warning
Be sure to choose the BlackBerry-specific version of MidpSSH. The generic SSH1 and SSH2 builds (full and lite) will probably not work on a BlackBerry.
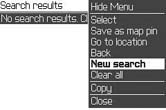
Once installed, select Sessions and use the trackwheel to choose Select from the menu. A screen appears, allowing you to define the settings for your connection, as shown in Figure 4-18. Scroll down to enter your username and password. Click the trackwheel once and choose Create from the menu to save your new connection settings.

After you’ve created a new session, use the trackwheel to bring up the menu and choose Connect, as shown in Figure 4-19.
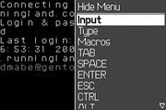
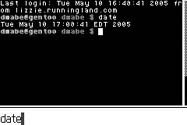
Enter Commands
MidpSSH connects to the remote computer and uses the username and password you defined in the connection to authenticate so you don’t have to type it (thank goodness!). Although it appears you should be able to start typing commands just as you would from a computer, MidpSSH forces you to use the trackwheel to choose Input from the menu. It gives you a blank screen in which to type your full command and, unlike the SSH client you’re probably used to, the characters you type aren’t immediately sent to the remote machine. MidpSSH allows you to type your command and then send it all at once to the remote computer. This gives you a little nicer interface for typing and allows you to correct the mistakes you’ll inevitably make before sending the command. Figures 4-20 and 4-21 illustrate the process of entering a command in MidpSSH.
Tip
The default font size for your connection is very tiny. You will probably want to change it to something a little larger. Go to Settings → Font to access that setting. Of course, as you increase the font size, you’ll lose valuable screen real estate. I found a setting of small to be the optimal setting for my use.
More Info
Although you can access Internet servers with MidpSSH, you won’t be able to reach your intranet computers (unless, of course, they’re accessible from the Internet). However, the price is right (free!) for this software. If you need access to intranet servers, use the Idokorro client [Hack #43] .
Telnet or SSH to Intranet Servers
Use the Idokorro client to Telnet/SSH to intranet servers through your BES’s Mobile Data Service.
The MidpSSH client [Hack #42] can be used to connect to computers on the Internet, but what about connecting to servers on your intranet? There is a client from Idokorro (http://www.idokorro.com/) called Idokorro Mobile SSH that can do just this. You must be a BES user to use this client on your intranet, since it uses the BlackBerry Enterprise Server’s Mobile Data Service (BES/MDS) to connect. If you’re a BlackBerry Web Client only user, you can set up TCP/IP [Hack #37] on your device and use this software in TCP-only mode.
Install and Configure Idokorro SSH
Idokorro Mobile SSH is installed the same as most other applications: there is an over-the-air install or a download to install with Application Loader. Once installed, select the icon from your Home screen. The first time the software runs on your device, it will ask you whether you want the program to use your BES/MDS or TCP/IP for its network communication, as in Figure 4-22.
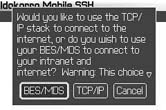
Warning
Notice the stern warning that is given for the connection type. It warns that the choice is permanent and the only way to change from BES/MDS to TCP/IP or vice versa is to reload the entire device. Whoa—that’s pretty ominous! Is this just bad software design by Idokorro? Actually, no. The Black- Berry operating system is designed with security in mind and it is able to detect when an application that uses TCP/IP later switches to BES/MDS. When this situation is detected, the operating system disables the third-party application forever, or until you reload the entire device. This is to prevent applications from accessing corporate data and then immediately being able to make a connection to the Internet, presumably to steal proprietary data. Most vendors distribute two versions of their software, one solely for BES/MDS users and another for TCP/IP users. Idokorro has chosen not to take this route and, quite frankly, has made it a little less convenient for its users.
Create a New Connection
The connection settings screen for the Idokorro software is similar to the MidpSSH client, although there are important differences. The Idokorro client lets you control settings that MidpSSH doesn’t. You can control line wrapping as well as the number of lines in the buffer for scrolling back. You can also specify your own colors for the foreground and background in your connection. You also have more control over which protocol you’d like to use when you connect. For example, the client lets you force the connection to connect using the SSH2 protocol.
Tip
You can use SSH2 with MidpSSH, but there will be quite a delay when the client negotiates the keys with the SSH server. Idokorro Mobile SSH overcomes this liability by using a built-in RIM library to perform the negotiation, which speeds up the key generation considerably.
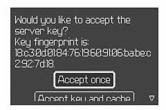
Like most modern SSH clients for your computer, Idokorro will let you know when the server’s key fingerprint is new or updated, as shown in Figure 4-23. This serves as an alert that there could be a security issue or DNS tomfoolery.
Connect to a Remote Computer
The Idokorro client seems more polished than the MidpSSH client when making connections. For one, it respects some of the usability conventions of the BlackBerry. For example, the client allows you to use the Enter key instead of having to use the trackwheel to access the menu when performing the default function. You’ll also notice familiar dialog boxes like Save, Discard, or Cancel when you’ve made a change without saving. This is a refreshing change from the far too many third-party BlackBerry applications that show no regard for these usability guidelines.
The software gives excellent status and feedback as you attempt to make a connection to a remote machine. There is also a nice label at the bottom of the connection screen reminding you which machine you’re currently connected to (see Figure 4-24).
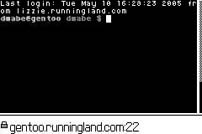
That label becomes your text input area when you type commands. Simply start typing a command and the label disappears and your command appears in its place (see Figure 4-25). Hit the Enter key when you’ve completed your command to send it to the remote machine. This is far more usable that the MidpSSH client in which you have to click the trackwheel a minimum of twice to enter a single command.
Chat over IM
IM is becoming an essential business tool. Use this program to stay logged into several IM clients at once while you’re on the go.
IM isn’t just for your teenage children anymore! There is no denying that instant messaging has come into the mainstream. In many businesses and industries, it has become as ubiquitous and as essential as email. If you’d like to stay connected on IM on your BlackBerry, you can use a program called VeriChat to connect to various IM services from your device. You may also want to check out the BlackBerry Messenger that RIM is including in the latest handheld software [Hack #20] —it is an instant messaging client that rides on top of PIN messaging [Hack #27] . You can use the BlackBerry Messenger only with other BlackBerry users, whereas you can use the VeriChat client to communicate with IM users on a variety of services and protocols.
Install and Configure VeriChat
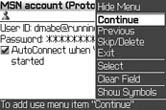
There is an over-the-air download of VeriChat available at http://www.pdaapps.com/ota/VeriChat.jad or, if you prefer to install using Application Loader, you can download the install from http://www.verichat.com/verichat_bby/index.html. Once installed, run the program from the Home screen, and you’ll immediately be able to set up your instant messaging accounts for MSN, Yahoo!, AIM, and ICQ. Figure 4-26 shows the configuration of the MSN client. For each protocol you configure, use the trackwheel to bring up the menu and choose Continue to proceed to the setting for the next protocol. If you don’t want to configure an account with a certain protocol, choose Skip/Delete from the menu.
Chat with Verichat
After you’ve configured your accounts, you can log in and begin chatting. Figure 4-27 shows the professional-looking login screen that displays as VeriChat logs you in to the various IM protocols you’ve set up.
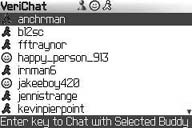
After logging in, your buddy lists are displayed (VeriChat pulls them down from the IM network you’ve logged into so you don’t have to type them all over again on your BlackBerry). You can control whether all your buddies appear in the list or whether only you’re online buddies are displayed. Given the size of the screen, you’ll find that displaying only your online buddies will save you valuable screen real estate.

As Figure 4-28 shows, your buddies appear in alphabetical order, regardless of the IM service through which you’re connected to them. The icon next to the buddy name indicates which service’s buddy list that user is on.
VeriChat integrates nicely with the BlackBerry and conforms to the standards you’re accustomed to. For example, most normal chat functions don’t require use of the trackwheel—just click the Enter key to start a chat with a particular user. Of course, if you prefer the trackwheel, you can use it for most functions as well.
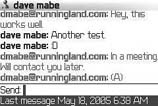
Once logged in, you can have VeriChat run in the background, and then you can continue your normal, everyday BlackBerry routine. When you get a message from someone, you’ll get a notification, as shown in Figure 4-29, no matter what BlackBerry program you happen to be using at the moment.
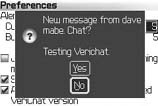
As you would hope, selecting No simply returns you to exactly what you were doing before. Selecting Yes on this screen takes you right into a chat session with your buddy, as shown in Figure 4-30, where you can chat much like you would on a desktop computer.
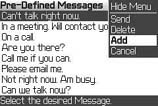
You have access to predefined messages that allow you to send a commonly used response without typing it. Figure 4-31 shows the ones that are available in the program by default. You can add your own by clicking the trackwheel and selecting Add from the menu. You can also use emoticons in your chats (see Figure 4-32). Note, however, that the actual icon won’t appear in your chat window—only the text that represents the emoticon.

See Also
There are a few other IM clients for BlackBerry that are worth looking into:
Causerie IM for BlackBerry (http://www.mantragroup.com)
IM+ for BlackBerry (http://www.shapeservices.com/eng/im/BLACKBERRY/)
Chat over IRC
Enter chat rooms from anywhere by using this free client software on your device.
Ah, IRC. Internet Relay Chat is a great tool to find information or a good place to get blasted for asking stupid questions with a response of “RTFM.” The great thing about the world of technology is that when you run into a problem, there is very little chance that you are the first one that has ever experienced it. In fact, there is probably a motivated user of the same software you are having a problem with lurking out on IRC that has the answer and is willing to share. Many high-profile techno-geeks hang out on IRC providing newbies with answers to common problems.
Good news! IRC is no longer just for your desktop computer. There are client versions that work on many J2ME phones—including your BlackBerry. There are a few versions to choose from, but the client that seems to be the most stable and has the most features is WLIrc (short for Wireless IRC), and is available for free from http://wirelessirc.sourceforge.net/.
Install WLIrc and Connect
Using your BlackBerry Browser, go to http://wirelessirc.sourceforge.net/ and click the over-the-air installation. There is also a zip archive for installing with Desktop Manager and Application Loader. Once installed, you’ll see a tiny icon on your Home screen, as shown in Figure 4-33.

WLIrc supports two types of connections: sockets to connect directly to an IRC server or HTTP to use a proxy to connect to an IRC server on your behalf. It is recommended to use sockets if your device and service supports it, although HTTP seems to work just as well.
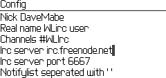
There are countless IRC servers available on the Internet for you to connect to. One of the most popular is irc.freenode.net. Once you’ve decided which server to connect to, use the trackwheel to access the menu and click the Configuration option. Enter your chosen IRC server in the “Irc server” field (see Figure 4-34) and choose Save from the menu using the trackwheel. You’ll also want to customize your nickname using the Nick field. If the nickname you’ve chosen is already taken, you’ll be prompted to enter a new one as you make your connection.
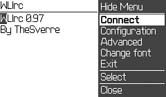
After you save your configuration settings, choose Connect from the trackwheel menu to make your connection and log on as shown in Figure 4-35.
After logging on, you’ll be connected to your default channel, which you can customize using the Configuration settings mentioned earlier.
Join Channels
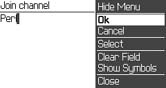
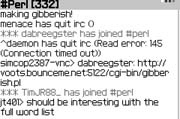
Choose Join from the trackwheel menu while connected and enter the channel you’d like to join. This brings you to the Join channel screen where you can type the name of the channel and choose Ok from the menu, as shown in Figure 4-36. There isn’t a way to bring up a list of all available channels to choose from directly as there are on desktop IRC clients, so you’ll need to know the exact channel name to join. Figure 4-37 shows a connection to the #Perl IRC channel. The number in brackets on the top beside the channel name is the number of users currently connected. You can use the Names option on the trackwheel menu to view that list of users.
One feature that sets WLIrc apart from other handheld IRC clients is the ability to stay connected to multiple channels at the same time. You just repeat the same technique to connect to more than one channel at once. After you’re connected to more than one channel, you can switch back and forth between them by clicking on the trackwheel and choosing Windows from the menu. This presents you with a list of the channels you’re currently connected to along with your current connection status window. Scroll to the channel you like to display on your screen and use the trackwheel to choose Select. The small rectangles in the top-right corner represent the current channels (or windows) you’re connected to.
Send Messages
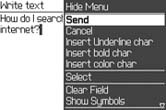
When you are in a channel, you have access to similar functionality as your desktop IRC client. Use the trackwheel to access the menu and select Msg. This puts you in a Write Text screen where you can type the message you’d like to send. When your message is complete, choose Send from the trackwheel menu, as shown in Figure 4-38. Sending messages on WLIrc is much the same as any IRC client.
Bookmark It on del.icio.us
You can use the excellent social bookmarking service to do a variety of things with your BlackBerry.
If you haven’t discovered del.icio.us yet, you have to go check it out at http://del.icio.us. It is not just a clever URL. It is a social bookmark service that allows you to add bookmarks and assign tags to them. You can then search for every link to which you’ve assigned a certain tag, or search for any link to which anybody has assigned a certain tag. It also allows you to store bookmarks in a single location that is accessible from any computer that has Internet access. As you’ll see, this comes in quite handy with your BlackBerry.
The del.icio.us service has gained a great deal of steam in the past few months. They’ve released an API that motivated users can exploit to create new ways to use del.icio.us. Expect to see more and more clever ways to use del.icio.us.
Start off by visiting http://del.icio.us in your desktop browser and create an account. Once created, familiarize yourself with the interface and posting new links to your bookmarks. There are tiny plug-ins that are available for use with most any modern browser that make posting new links to del.icio.us a breeze.
Post from Your Device
One of the situations I’ve found most useful is when I am browsing the Web using the BlackBerry Browser and come across a URL that I know I’d like to read, but because the site is naively formatted only for desktop browsers, it makes it nearly impossible to read on the device. When this arises, I post the URL to del.icio.us with a special tag called “desktop.” Because del.icio.us allows you to subscribe to RSS feeds for any tag, I’ve subscribed to my “desktop” tag feed using Bloglines. When I check Bloglines from my desktop computer, I’m automatically reminded that there was an interesting URL that I’d like to read.
To post to del.icio.us from your device, do the following. First, visit a site you’d like to post to del.icio.us. Click on the trackwheel to bring up the menu and select Page Address, as shown in Figure 4-39.

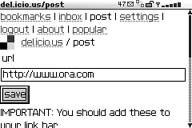
This brings up a dialog that shows the URL and the title of the site. Use your trackwheel to scroll down to the Copy Address option on the dialog to copy the URL to your device’s clipboard. Next, go to http://del.icio.us/post/ and log in if you aren’t already (you’ll probably want to add this URL to your BlackBerry bookmarks). Scroll to the URL field, click the trackwheel to bring up the menu, and select Paste. Figure 4-40 shows the pasted URL in the field on the del.icio.us posting page.
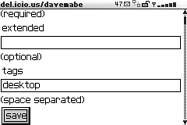
Click the save button and, on the next screen, enter a title for the page and scroll down to the tags field. Type “desktop” for the tag (see Figure 4-41), along with any other tags you’d like to assign to the link.
Click the save button, and your link will be added to del.icio.us and you will be redirected back to the site you were viewing. Later, when I’ve returned to my desktop computer, the link that I posted from my device appears as a new item in Bloglines (see Figure 4-42).
Manage Your Device Bookmarks from Your Desktop
Most people have hundreds of bookmarks in their desktop browsers, so you probably would like only a subset of your desktop bookmarks to be available on your BlackBerry. You can always manage them from your device either by manually creating a bookmark in the BlackBerry Browser by typing the name and URL or by visiting the site and using the trackwheel menu to select Add Bookmark to bookmark the current page. Neither of these options is too appealing.
The del.icio.us service provides an excellent way to manage your device bookmarks from your desktop computer, where typing isn’t quite the chore it is on your handheld. Just assign another special del.icio.us tag to all the links that you’d like to use on your BlackBerry—“myhandheld”—for instance (see Figure 4-43).
After setting up your links with your special tag, use the following URL on your device, where user is your del.icio.us username and myhandheld is your special tag.
| http://del.icio.us/html/user/myhandheld/?extended=body&tags=no&rssbutton=no |
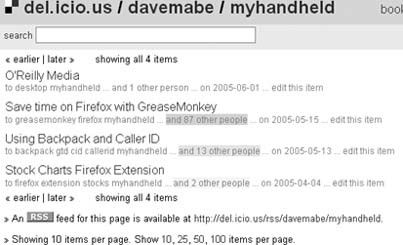
You can just type it in your device bookmarks or, better yet, post it to del.icio.us from your desktop browser and then go to http://del.icio.us/html/user and bookmark it from there. Once you’ve bookmarked the URL, you can go to that link to get a very nice handheld view of your bookmarks without typing them on your device (see Figure 4-44).

More del.icio.us
You should also check out Populicio.us (http://populicio.us/newlinks.html), which shows popular links over time on del.icio.us. And, if you’re a Firefox user, be sure to look at Foxylicious, which syncs your del.icio.us bookmarks with your Firefox bookmarks. See http://dietrich.ganx4.com/foxylicious/.
Use Backpack as Your Mobile Workspace
Add notes, to-do lists, and more directly from your device.
Have you ever tried to update a site using a form in your browser like many web applications require? For example, try updating a wiki page from your device. Usually it is not that easy, because most web sites were designed with a computer’s browser in mind, not your handheld’s.
The Backpack web service (http://www.backpackit.com) makes updating web sites easy using email. You just send the content you would like added to a secret email address, and the text is added to your page immediately.
What Exactly Is Backpack?
Backpack is a web service that allows you to get organized by storing your to-do lists, notes, photos, and files online. You can set up reminders that are sent via email. You can optionally share your content with others. The feature that makes Backpack so great for the BlackBerry is the ability to add content to your pages by sending emails.
To use Backpack, you need to create an account. Best of all, there is a basic account that is free and requires no credit card to sign up. Once you choose a username and register, you’ll be directed to your newly created section of Backpack, accessible using the URL: http://username.backpackit.com.
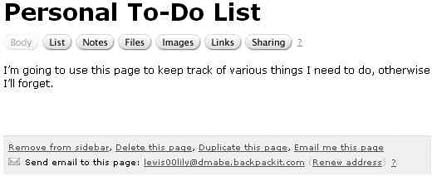
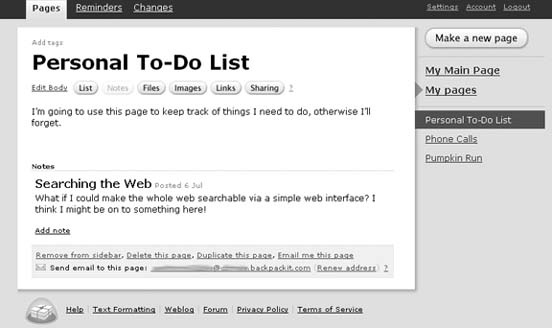
Click the Make a New Page button on the right to add another page to Backpack, as shown in Figure 4-45. Add a title and some content and click Create. You’ll be taken to your new page, where you can use Backpack’s very spiffy web interface to add lists, notes, files, images, and links to your page.

Send Email to Your Pages
Each page in Backpack has an email address. Look at the bottom of your newly created page, as shown in Figure 4-46. This particular page has an email address of lewis00lily@dmabe.backpackit.com.
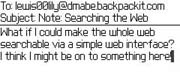
You can send any email to this address and it will appear on your page almost instantly. This turns out to be perfect for those moments when you think of a good idea and you need to write it down before you forget. Just send an email to your page, and then access it from your computer later. Figure 4-47 shows a new message from my device, and Figure 4-48 shows how it appears on my page.
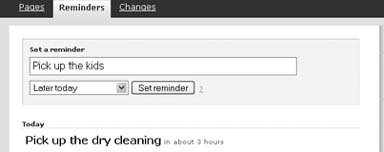
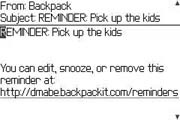
Have Reminders Sent to Your Device
Backpack also allows you to set up reminders that can be sent to you by email. The interface for adding reminders in your desktop browser is sleek and usable. It makes clever use of JavaScript using a method called Asynchronous JavaScript and XML (AJAX). Figures 4-49 and 4-50 show setting up a reminder and the email that is sent when it’s time. Notice that the formatting of the email allows you to easily use filters [Hack #30] to create a vibration or audible alert when a reminder is received. If you use a calendaring application that supports the iCal standard (for example, Apple’s iCal and Mozilla Sunbird), you can subscribe to your reminders so they appear within your calendar program automatically.
Access Backpack from Your Device
One of the nice things about Backpack is its ability to access your pages from a mobile device; just append /mob onto the end of your Backpack URL like so:
| http://username.backpackit.com/mob |
You can create reminders, new pages, to-do list items, and notes by using this trimmed-down HTML interface in your BlackBerry Browser.
Tip
You can also have the contents of a page emailed to you from the mobile or standard interfaces. Backpack uses a pseudo-wiki style formatting that provides shortcuts for creating new list items and links among other things. You can email the Backpack documentation to yourself and file it in a folder, so you always have access to a good “refresher” course on how to use these shortcuts to produce the markup you’d like in your page. You could also have the Backpack page emailed to you—the email will contain the actual markup Backpack uses to display the page.
Use Gmail as a Spam-Catcher
You started adding forwarding mail to your BlackBerry’s email address, and now all those spam messages you were getting are going to your BlackBerry. Keep your BlackBerry from turning into a vibrating advertisement platform for pornographers and discount medications.
Some of us have superfancy spam filters based on Spam Assassin, TMDA, and other content filters. We forward copies of all scrubbed email to our BlackBerry address, or we let the BWC or BIS pull the mail from our mail server. This cuts down dramatically on spam and even viruses, Trojans, and other crud that you don’t need to see.
Other users don’t have server-side filtering and instead rely on client-side or desktop-based methods to scrub and sanitize email. The most common among these are the Flag as Spam filters in Mozilla Thunderbird and other email clients. So while you’re filtering your exposure to spam at your local workstation, you’re still pulling it down and letting your software decide the spammy-ness of email and acting on it there. This also means that the spam and such stay on the server for delivery to your BlackBerry.
You can roll your own spam filter of sorts using a Google Gmail account. By making Gmail your final destination for emails, and forwarding all your other accounts there, you can set Gmail to trap the spam and send only messages you want onto your BlackBerry address for delivery.
You don’t even have to tell anyone you use Gmail, and you can continue using your contaminated primary email address just like you always did, but now you have a huge 2 GB+ archive of all email sent to your BlackBerry (sure beats the 10 to 20 MB T-Mobile USA gives BlackBerry users on the BIS/BWC), allowing for a complete archive of all emails ever received. There are a variety of ways to check your Gmail [Hack #29] , and there’s nothing that says you have to put your Gmail account as the From: line in the BlackBerry. Instead, configure BIS/BWC to use your primary email address as the From: address, configure your primary email server to forward everything to your Gmail account, and then configure BIS or BWC to retrieve all your mail from Gmail via POP3 (or simply configure Gmail to forward all your email to your BlackBerry’s email address, such as username@tmo.blackberry.net). Once you’ve done this, get ready to enjoy the sweet sound of spammers hitting the bit bucket!
Hack the Hack
To make this even more elegant, you can use the filters in Gmail to streamline operations. I like to keep an archive on Gmail, so I forward the email and cache a copy locally.
Log into Gmail and click Create a Filter.
Specify “in:inbox” for the Has the Words criteria, and click Next Step. Ignore the error message that pops up.
Check the box labeled Skip the Inbox (Archive It).
Specify your BlackBerry email address under Forward it To:.
Click Create Filter.
If you need to, you can also create a filter that saves you from seeing messages that you yourself send:
Log into Gmail and click Create a Filter.
Specify your BlackBerry’s From: email address for the From criteria, and click Next Step.
Check the box labeled Skip the Inbox (Archive It).
Specify Apply the Label: Sent From BlackBerry (or whichever label you choose).
Click Create Filter.
This will keep messages you’ve authored on your BlackBerry from being sent to you (you already have a copy on your BlackBerry for your reference).
By making Gmail your filtering, archiving, all-purpose deluxe mailbox, you don’t have to sift through spam emails all day on your BlackBerry. You can enjoy the benefits of having Google’s technology for indexing and searching all of your email without having to switch to using it full time.
—R. Emory Lundberg
Use Your BlackBerry Browser to…
There are a variety of eye-popping wireless-optimized sites that provide excellent information from anywhere. Here is a list of useful ones.
When new users first get a BlackBerry, the email function is usually what attracts the most attention. There is no denying that email is what makes the device great. However, the BlackBerry Browser is an excellent program that allows you to access a ton of useful information on the Web. Having been a relatively recent addition to the BlackBerry operating system [Hack #20] , even veteran users tend to pass it by not realizing its utility. Some users may have taken the browser for a quick test drive with their new device, only to have their high expectation unmet as they visited a poorly formatted site made exclusively for desktop browsers.
There are an abundance of sites to get very useful information (even entertainment!) using the BlackBerry Browser, but there is no central list where someone can visit to find out about them. There is a lot of trial and error in finding sites that work well on the BlackBerry. This hack highlights the most useful ones and then lists other sites that also work well and provide access to excellent data that you thought was available only on your desktop computer.
Search Google
Google provides a great XHTML interface (http://www.google.com/xhtml) for the BlackBerry Browser. When you access a link in a set of search results, Google actually proxies the request on your behalf and returns the page in a format that’s more readable on small screens. In addition to search results, you can access other Google services. Its main search page is accessible as well as the Google Local searches (http://local.google.com). Google’s local search is quite useful for a mobile user to get driving directions, local restaurant locations, and local maps. Google also provides a nice WML version of its search page (http://www.google.com/wml) that searches only sites that are formatted in WML. You can even access a WML version of Froogle, Google’s shopping comparison service (http://wml.froogle.com).
Log In to Yahoo!
Yahoo! offers an excellent version of its site for handhelds at http://wap.oa.yahoo.com. This WML version of the site allows you to log in with your regular Yahoo! ID and use a good deal of their services from WAP browser. You can view your stock portfolios, view sports scores, get weather reports, read the news, and even play several WAP-based games.
Stay in the Game with ESPN
ESPN has a great version of their site available to XHTML browsers at http://pocket.espn.go.com/. The front page is updated with the latest story from the regular version of their page. Each sport’s main page reflects the desktop version of its page as well. You can get news, standings, statistics, and results from a variety of sports that look excellent on your BlackBerry device.
Control the Universe with pdaPortal
pdaPortal (http://pdaportal.com) is just what the name implies—a customizable portal that you can access from your BlackBerry. You can access a ton of information, including RSS feeds in a nice format, a search engine, and even a random site. Probably the best feature of pdaPortal is its link library of well over 600 sites formatted for handhelds, organized by category. pdaPortal keeps track of hits to the various links it has posted on its site so it can organize its links by popularity.
Go Mobile at BlackBerry.com
BlackBerry’s version of a mobile portal (http://mobile.blackberry.com) is eye-catching; if you haven’t seen it before, check it out. It is formatted with SVG (or scalable vector graphics) using the tools from Plasmic. Its look and feel resembles that of a Macromedia Flash application on your computer’s browser. It provides links to various sites that are very usable on the BlackBerry. It also provides links to games and ringtones to download.
Geek Out with Slashdot
Every geek’s favorite news site has a version of its site available for handheld browsers. Point to http://slashdot.org/palm to access it. The problem with accessing the main version of Slashdot on your device is all the comments to each article make the site very large to pull over a GPRS network connection. The handheld version of the site contains no comments (although you can choose to view the top five comments for each article), no images, and no sidebars.
Shop at Amazon.com
You can easily access Amazon.com from your BlackBerry. You can browser and buy items and view the status of orders you’ve made whether you ordered the item on the desktop version of the site or the handheld version. If you’re a heavy Amazon.com user, you may want to try the ShopEdge third-party application for a streamlined interface in a native BlackBerry application [Hack #58] .
Control Your Home
If you’re into serious geekery, the Misterhouse home automation program (http://www.misterhouse.net) has a built-in WML interface that you can use to control your home from anywhere. Control your lighting, turn on your sprinklers, detect motion in your driveway—it’s amazing all the cool things you can do with this open source software. Throw your BlackBerry Browser into the mix, and you can do all these things from anywhere you have cell coverage.
Additional Sites
There are countless other useful sites to view from your BlackBerry with more and more popping up every day. Table 4-1 lists some of the noteworthy ones.
Find Your Way with a GPS
Use the BlackBerry 7520 to get driving directions and location-based services.
With the BlackBerry’s constant network connectivity and portability, it was only a matter of time before RIM introduced a device with a Global Positioning System (GPS). The 7520 from Nextel has a GPS chip that can be accessed by developers of third-party applications to create location-based services. TeleNav (http://www.telenav.com) is a product by TeleNavigation and is first out of the gate with a great offering for any GPS and BlackBerry enthusiast.
TeleNav can help you navigate to a particular address or airport by speaking the directions as you drive! You can also use it to find certain businesses within driving distance of your current location, wherever that may be. Once you select a local business, you can easily instruct TeleNav to calculate the optimal route to get there and give you directions as you drive. This excellent service costs $29.99 a month, and can be billed right to your Nextel monthly bill.
Get Started with TeleNav
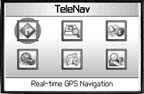
When you start TeleNav, you will be asked for your username and password to log onto the service. Your username will be your phone number on the device. Your BlackBerry will sense that a program is trying to access the GPS chip, and will ask whether you’d like to allow the access. This setting can be controlled by going to Options → Location Based Services and setting the Privacy Setting option to Unrestricted.
Once you’ve logged into TeleNav (see Figure 4-51), you can use the main screen to select the icon that reads “View a map around an address.” You can choose from a variety of locations, including “Here,” meaning wherever you happen to be at the moment. Use the Enter key to select Here. TeleNav reads the GPS chip to get the current location and then uses your BlackBerry’s TCP connection to communicate with its servers to retrieve the map given your current coordinates. A road map is displayed along with your current coordinates, as shown in Figure 4-52. You can use the U, N, K, and H keys to move around on the map and the number keys to set the zoom level.

Navigate to an Address
From the main TeleNav screen, choose the Real-Time GPS Navigation icon to navigate to an address. There are a variety of ways to enter the address to which you’d like to go. You can enter an address on your BlackBerry, or even call in the address to an automated attendant (so you don’t have to type anything!). TeleNav verifies the address by doing a live lookup and retrieves the GPS coordinates of the location you entered. You can also use the personalized section of http://www.telenav.com to enter addresses on your desktop computer to plan a trip ahead of time.
After TeleNav performs the lookup, verify the destination and choose Get route, and then select Start from here. TeleNav accesses your GPS and communicates with its server to determine the best route to take to get to your destination. Once the route is determined, TeleNav puts you in a navigation screen that shows the current road you’re on, the next road you should turn onto, the distance until your next turn, the total trip distance, and the total trip time at your current rate (see Figure 4-53).
As you approach your next turn, TeleNav uses a text-to-speech engine that speaks the directions through the Direct Connect speaker on the device.

You’ll hear it say “Prepare to turn right onto Jones Ferry Road in .3 miles” or “Veer right and merge onto Interstate 40 west bound.” Because of the text-to-speech function, you won’t even have to look at your device—just keep it parked in the passenger seat. If you do look at your device, you’ll see nice and accurate arrow icons showing the type of turn you’ll be making next. If the next turn is a 90 degree angle, you’ll see an arrow indicating it. If the intersection isn’t a right angle, you’ll see an icon depicting the direction and angle of the turn—quite useful information for some of the hairy turns you might come across in an unfamiliar location.
If (when) you get off the route that TeleNav has selected, there is an audible double beep, followed by a voice saying “New Route.” TeleNav senses you are off course and re-calculates the route. The new route could be a completely new set of driving directions or the first turn could be “Do a U-turn” to get you back on the original route—it all depends on your whereabouts and your proximity to your destination.
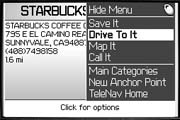
Find the Closest Coffee Shop
Have you ever been in a new place and needed a good cup of coffee? I’ve been in that situation plenty of times and would have paid good money for this feature. TeleNav lets you look up the closest businesses to your current coordinates by type! Go to the Find a Business icon from the main TeleNav screen and select a search point. The most common search point is “Here,” but you can also choose a search point from any waypoint you’ve created or any recent destination. You can also simply enter an address for your search point. You can look up coffee shops, ATMs, restaurants by cuisine, or the closest bed and breakfast. You can even search for gas stations by price per gallon! There is a lengthy list of business types to choose from, and the results are sorted by distance from your search point (probably your current location). You can easily navigate to any of the results with just a couple clicks, as shown in Figure 4-54.
Imagine the Places You’ll Go
It only takes a little bit of imagination to invent all sorts of cool tricks to do with a GPS-enabled BlackBerry. For example, imagine a custom application that accesses the GPS coordinates at time periods configurable by the user. It could communicate with a web service over HTTP [Hack #94] and upload a custom trip name, username, timestamp, and latitude and longitude coordinates. Using the Google Maps API (http://www.google.com/apis/maps/), you could code a web site to map the course of your various trips. The user could set the upload interval to a very small interval for short trips or a much longer interval for extended trips. The program could release control of the GPS between intervals to conserve the battery. The user could send a URL for the trip for others to view. (“Hey, Mom, click here to view the progress of our family vacation in real time. Here’s the username and password.”)
With all the press that maps and location-based services have been getting recently, having a GPS on your BlackBerry opens up some impressive possibilities for developers.
Get BlackBerry Hacks now with the O’Reilly learning platform.
O’Reilly members experience books, live events, courses curated by job role, and more from O’Reilly and nearly 200 top publishers.

