Chapter 4. Command-Line Fun
Mac OS X is gorgeous to look at but underneath all that eye candy is an old-school operating system: Unix. Unix was born in 1969 as a respelling of the already acronymized UNICS. Either way you spell it, the name is short for Uniplexed Information and Computing System. Not a very inspiring name but an inspiring computing platform that has branched into a dizzying array of operating systems including: Linux, Solaris, NeXTSTEP, and Mac OS X.
While the Unix roots of Mac OS X are hidden from the casual user, you can still get at the power behind the eye candy using the Terminal. Discover a new world of computing power when you discover the world of Unix.
HACK 29: Meet Unix
This hack reveals some information about the power behind Mac OS X Unix and details a powerful way to kill unruly programs and processes.
Unix was originally intended to be used from a text-only terminal console, and many of its features are still accessed via typed commands. To access the command line, users of Mac OS X fire up the Terminal. Mac OS X users never have to use the Terminal to get everyday work done. (At least not anymore; in early versions of Mac OS X, firing up the Terminal was sometimes required to empty Trash.) So the question is, why would anyone want to be bothered with something as mundane as the command line?
For hard-core hackers, the answer is obvious: to harness the power of the underlying system. But the command line isn’t just for the geekiest among us: the command line is a useful tool for everyone. Not only can otherwise unchangeable parts of Mac OS X be modified via the command line HACK 37: Customize the Login Window, but in certain situations, the command line can be a superior tool to the graphical user interface.
The easiest way to get to the command line is via an application called Terminal (you can find it in your Mac’s Applications→Utilities folder). After Terminal is running, you are presented with a shell, Unix-speak for a program that waits for your commands and executes them, sort of analogous to Mac OS X’s Finder. It is in this shell that you can navigate, copy files, create directories, and modify files in a nongraphical, generally non-intuitive, completely unMac-like, but powerful way.
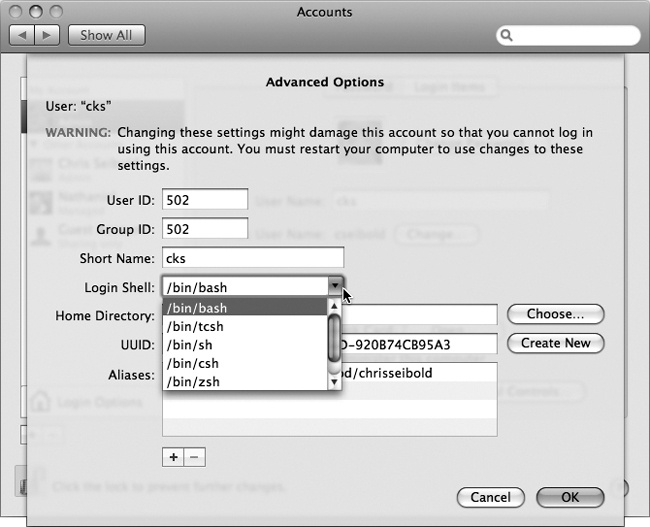
Almost all Unix features are configurable (which is how Apple engineers managed to shoehorn it into Mac OS X), so you actually have some choices when it comes to the shell. The default shell is bash (Bourne Again Shell), but there are plenty of choices. For most people, it is wise to stick with bash to ensure compatibility with the scripts you’ll see throughout the book and with scripts you’ll find online.
Time to get up and running with Unix. Launch the Terminal (Applications→Utilities→Terminal). Once the Terminal launches, you’ll see something along the lines of:
computer:~:username$
Where computer is the name of your Mac, and username is your login name. (The prompt is endlessly configurable. In this book, we’ll just use $ to indicate the command prompt.)
What you see is a Unix representation of the current directory (directory being the Unix way to say “folder”). The tilde (~) tells you that you’re in your home directory, and the $ represents the command prompt. You can prove this by typing:
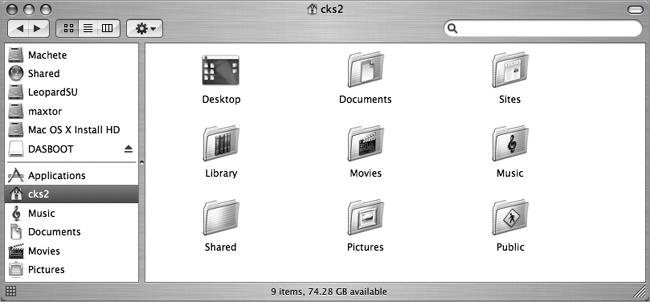
$ lsand hitting return. Wow, that list exactly mirrors your Home folder.
See the difference (and the similarity) between the Unix way and the Mac way in Figure 4-2 and Figure 4-3.

Now that the Terminal is running, it’s time for a few modifications to make things a little better. First thing to note is that Terminal supports multiple windows and multiple tabs (the tab feature is similar to Safari’s, but is only available in Leopard). This is a feature you’ll want to take advantage of because while Terminal can do many different things at once, the amount of information you get back is seriously limited. If you’re working in a terminal window writing a Perl script and suddenly (but predictably) want to access a man page (see sidebar), you’re in trouble, because there is no easy way to take care of all your needs in a single window. The solution is to use tabs or multiple windows. A typical (and the term is used loosely) setup might be to have one tab running a command-line text editor, another tab devoted to manpages, yet another tab for testing Perl scripts, and still another tab watching your network traffic.
Note
If you’re using a pre-Leopard version of Mac OS X, Terminal tabs aren’t an option. You’ll have to rely on multiple windows. That is, unless you give the free iTerm a try. It’s a tab-enabled Terminal replacement you can download from http://iterm.sourceforge.net.
Now that Terminal is a bit more familiar, time to find a way to exploit it!
It’s likely you’ve had a program hang before and used the Force Quit option found in the Apple menu to kill off a misbehaving application. The trouble is that there are a lot more processes running on your Mac than are revealed in the Force Quit application window. You can see all the running processes using the top command. To invoke top, type top at the Y prompt, and hit return (Figure 4-4).
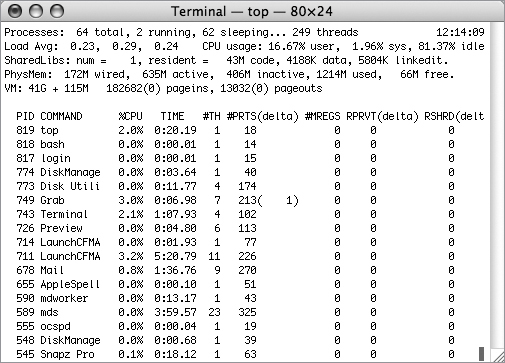
If you open up a Force Quit window and compare it to the output of top, you’ll note that top reveals many more processes than Force Quit. If something isn’t behaving properly, or if you just want to kill off a process that Force Quit won’t let you get at, it’s the Terminal to the rescue. Note the PID number of the process you want to quit and either hit Q (to quit top) or open a different tab in the Terminal (a new tab is much more useful if you plan on halting multiple processes), and type kill followed by the PID number. In this example, if you wanted to kill off Snapz Pro (it doesn’t show up in the Force Quit menu) simply type: kill 545 and hit return (note that this number is likely to be different on your computer and will probably be different each time you run whatever application you’re trying to shut down). Snapz Pro is no longer running. Now that you’re armed with the kill command and a way to watch things in the Terminal, you can track down those pesky performance drainers and banish them to the digital ether!
HACK 30: Getting Things Done with the Command Line
The command line is the path to the power behind Mac OS X. Investigate how to tap that power with this hack.
Killing processes with the command line is great fun and empowering HACK 29: Meet Unix but that example doesn’t even begin to hint at all the abilities of the command line. The first order of business is deciding how to move around using the command line. It isn’t as intuitive as the GUI of OS X, but the process is straightforward. Try:
$ cd DocumentsThe command changes the working directory to the documents folder of your home folder. Your working directory is the one you’re “in” at the moment. You can think of it as analogous to the active Finder window. You can see the results of the move by typing:
$ pwdThe output displays the path to the current destination: /Users/username/documents.
To get back to the home directory, type:
$ cdWhich is a lot like Dorothy’s red slippers inasmuch as it takes you back to your home directory no matter where you are in Unix space. You can, naturally, string things together. If you wanted to get to your iPhoto library, just keep extending the pathname of where you want to end up. To wit:
$ cd Pictures/iPhoto\ LibraryThere are a couple of things to note here. If you want Unix to understand where you want to go, you can’t skip ahead and type only iPhoto\ Library; you’ll have to follow the path from the directory where you currently sit. Secondly, if your destination contains a space, you’ll have to replace the space with “\” (forward slash and a space). It is enough to make you want to use underscores! For your iPhoto Library the path is: $ cd Pictures/iPhoto\.
Note
It is easy to forget that names don’t always translate from the Finder to Unix. In Unix, the file extension is visible even if you saved a file with the Hide Extension option. It is possible, though rare, to find files without extensions. It probably won’t happen to you but, if it does, you’ve been warned.. If you find yourself wondering why you can’t copy a file that is clearly present in the Finder, use the ls command to see if the name you’re typing matches the name the command line is looking for.
Navigating backwards a single level is easy enough: two dots tell Unix to move up to the parent directory:
$ cd ..If you’re not a big fan of moving about using the command line, you can always use a nifty OS X feature that automatically completes the path. Simply type cd at the command prompt, followed by a space, then drag a folder from a nearby Finder window over to your Terminal window. The path will be automatically completed. Typing cd, space, and then dragging the iPhoto Library folder onto the Terminal window results in (on my Mac, anyhow) the following:
ElChupacabra:everything cks2$ cd /Users/cks2/Pictures/iPhoto\ LibraryHitting return takes me to the desired directory:
ElChupacabra:iPhoto Library cks2$
With the fundamentals of traveling about using the command line covered, we can move on to creating directories. The command to create a directory (folder) is mkdir. On it’s own, mkdir won’t do anything; it needs the name of the new directory. Type:
$ mkdir bigbookWhatever directory you were in before now has a new folder in it called bigbook. Does this mean you can only create directories in wherever you’re in at that moment in time? Of course not; using the navigation method we used before replaces cd with mkdir, and the new directory can be created in the place of your choosing. This command, for example:
$ mkdir ~/Documents/bigbookResults in a folder called bigbook in the Documents folder.
What good is a directory without files in it? None at all. Moving files in Unix is accomplished using the mv command. Here’s what to do if you wish to move a file into the newly created bigbook folder:
$ mv monk.tif bigbook/The command moves the specified file (in this case monk.tif) into the bigbook folder. You can also use mv to rename a file:
$ mv monk.tif bigbook/monknew.tifThat changes the name of monk.tif to monknew.tif and also moves the file to the bigbook folder. But you could just as well have kept it in the same location with:
$ mv monk.tif monknew.tifOf course, you don’t always want to move a file; sometimes you want to copy a file. In Unix, the command for copying a file is cp. You have to specify the name of the file and the name of the copy:
$ cp monk.tif monkcopy.tifThis results in the original file and an identical file called monkcopy.tif residing in the working directory. It’s great, but most of the time, you want the file copied to some other location. No problem:
$ cp monk.tif bigbook/monkcopy.tifYou’ve generated a directory and some superfluous files. But who wants a bunch of worthless files lying around? Time to get rid of them!
Warning
We are about to invoke the rm command. This is the time to remember that in Unix spelling, spacing and capitalization all count.
Before using the rm command, it is a good idea to make sure you know where you are and what you’re about to remove. Until you feel very confident in your skills, use the ls command before the rm command, and you’ll see what files are in the directory before you banish them for eternity.
$ rm monkcopy.tifBam, monkcopy.tif is gone! And I mean gone. Don’t look for it in the Trash, because it’s not there.
You can extend the rm command by specifying multiple files for deletion. Put a space between the filenames. For example, the following:
$ rm monk.tif monkcopy.tifdeletes both files. You can add as many files as you wish, and they will all be gone as soon as you hit return.
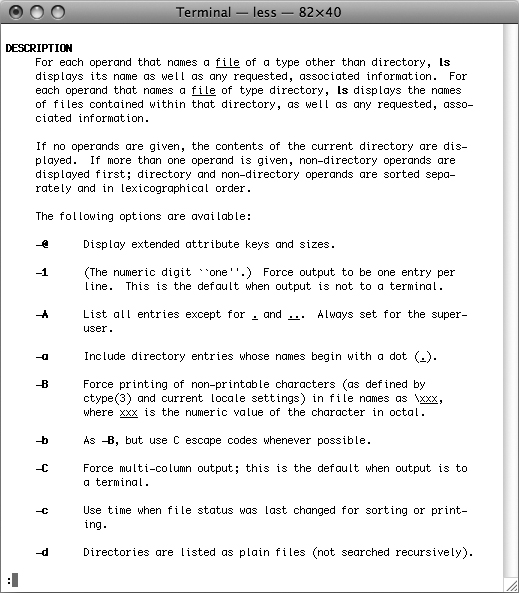
Moving files and creating directories is useful, but it is time to step things up a notch using the command line. It turns out that there is more power in these commands than is apparent from the way you’ve been using them. In general, commands have arguments and options. Arguments are usually the file you want the command to act upon (in the example of rm monkcopy.tif, the argument would be monkcopy.tif), and options are ways to specify how the command should work. The options vary from command to command. You can find a list of the options for any particular command by typing man followed by the command you are interested in. For example, typing man ls returns a list of the various options you can invoke when using the ls command (see Figure 4-5).
It is one thing to read the list of the options; it is another to actually use them. Try stringing together a command, an option, and an argument. Pick a folder (I’ll use Music) and type:
$ ls -F /usr/libexec/You’ve specified a command (ls) an option (-F), and a folder to inspect. Thanks to the option you supplied, ls won’t just return a list; ls now returns a list in which directories are identified with a trailing /; executables are identified with an *. Here’s the partial output of that command:
ApplicationFirewall/      gdb/                rexecd*
CCLEngine*                getNAME*            rlogind*
InternetSharing*          getty*              rpc.rquotad*
MiniTerm.app/             gnurmt*             rpc.yppasswdd*
The -F option modifies the behavior of the ls command. But there is more to adding options and arguments. You can string them together like so:
$ ls -F -a ~/Desktop/Chapter_4 ~/Desktop/bboah_buIn my case, that command roots through a folder called Chapter_4 and a folder called bboah_bu on my Desktop return the results according to the -F -a options of the ls command.
Finally, it turns out that there are a lot of hidden programs on your Mac. The Finder won’t reveal them but you can run them from the command line. One program included on the Mac is Emacs. Type:
emacsWhat happens is that a useful built-in text editor opens. Emacs is a funny animal. It’s a text editor, but it’s programmable, and over the years, lots of people have written lots of programs for it that have nothing to do with editing. Try hitting the escape key, then X. You’ll see an odd kind of prompt at the very bottom of the screen. Try typing:
doctor
If that’s not weird enough for you, press Escape-X again, then type:
tetris
or:
snake
or:
dunnet
and let the fun begin!
If you want to learn about how to use Emacs to do useful work, type Ctrl-H, then T, and you’ll be led through a tutorial, including a set of editing exercises.
Naturally there is a lot more Unix can do. Libraries of books have been written about the subject, but this is enough to get started on a hacking adventure.
HACK 31: Get More Out of Your Mac with Fink and MacPorts
There is a lot of software written explicitly for the Mac, but there is another world of software you can discover with a few tools and a little bit of planning. Expand your software library with this useful guide.
One of the smartest moves Apple made in the metamorphosis that was Mac OS X was to base it on BSD, a free Unix derivative almost as old as the personal computer. This new operating system, called Darwin, allowed Apple to tap into the preexisting developer community of the Unix/Linux world and expand their user base to include engineers of all stripes. Consequently, applications that are available to BSD or Linux users are available to you as well.
Fink and MacPorts are two projects that unleash the beast that is BSD Unix from underneath the gorgeous shell of Mac OS X. They are free and open source software (FOSS) projects that provide modified Unix software that compiles and runs on Mac OS X. They also provide a tool for easy installation and management of installed packages.
There are many good reasons to use Fink and MacPorts:
To update the open source software that came with your Mac, such as Perl and Python, to their latest available versions.
To install programs that don’t have equivalents on the Mac, such as Gnucash and ImageMagick.
To install free and open source alternatives to Mac applications such as Amarok instead of iTunes or Gimp instead of Photoshop.
To install tools, interpreters, and libraries to develop software for the Unix and Mac platform.
To have the opportunity to use software that is free as in “free beer” and free as in “free speech.”
The thing to keep in mind is to choose Fink or MacPorts, and stick with it. Open source software comes with many dependencies. Installing one piece of software may require the installation of many other pieces. It is best to leave these details in the hands of a capable package manager, which is what these programs are. Hence the choice of either Fink or MacPorts will keep things consistent. There is a lot of debate in the community about the benefits of one system over the other, but both MacPorts and Fink have their strengths. In most cases, the same person maintains the software in both projects. Their goal is to bring more open source software to the Mac OS X. They tweak, massage, and mold open source Unix software to behave on Mac OS X while providing a relatively simple method for users to obtain the software.
Before you install Fink or MacPorts, you need to prepare your computer. Your copy of OS X needs to be installed with the BSD Subsystem (automatically installed in Leopard). You will also need the Xcode development environment, which is available from the Apple Developer Connection (ADC) web site (http://developer.apple.com) or can be found on the discs that came with your machine. You will have to register on the ADC site in order to download the Xcode installation, but this is free and mostly painless. Xcode provides your Mac with the basic tools needed to compile and run most open source software. Finally, you will also need X11 (you won’t see the .app extension in Finder, but you’ll need to include it when you’re using the Terminal), which is included in the “Optional Installs” package on the Mac OS X install disk for older versions of OS X. If you’re using Leopard, this step is taken care of for you.
It would be useful at this point to familiarize yourself with Terminal HACK 30: Getting Things Done with the Command Line and X11, if you are not already. Terminal will be your window in to the world of command-line software. Fire it up, and try simple commands such as ls to list the contents of a directory or wc to show the number of lines, words, and characters in a text file.
X11.app provides a windowing system for GUI applications in the world of Unix and Linux. In order to launch the GUI of many open source applications, you need to have X11 running (or let it launch automatically in Leopard when you run an X11 program from the Terminal). You can find X11.app in your /Applications/Utilities directory.
Getting Started with Fink
Download Fink (http://fink.sourceforge.net) and install it. Towards the end of the installation, you will be asked for some system information. If you are comfortable using the command-line interface (Terminal), then run the following to get started:
$ fink scanpackages; fink indexTo install any package, type the following:
$ fink install package_nameFor example, fink install gaim will install the popular open source instant messaging client Gaim, including all the packages that Gaim depends on to run. To run Gaim, you would type gaim at the Mac OS X Terminal. Fink installs all of its software in the /sw directory by default, and the executable programs are installed in /sw/bin. This keeps the software installed through Fink separate from that which comes with Mac OS X and makes uninstalling all Fink packages a matter of simply deleting the /sw directory.
If you cringe at the thought of using the command line, there is a graphical alternative. The FinkCommander (http://finkcommander.sourceforge.net) is an open source GUI frontend to Fink. You can list, maintain, install, and update packages from this graphical interface. Download and install FinkCommander the way you would install any other OS X application. On first run, it will attempt a “self-repair” and then allow you to select packages to install.
FinkCommander will present you with a list of available packages for installation. This is just a graphical representation of the Fink command fink list. In Fink, you have the option of installing packages from binaries (prebuilt programs) or source (programs built on and for your system). Fink has literally thousands of packages to choose from. To install any one, select it from the list or search in the search box in the upper-right corner. To install from source, click on Source→Install from the menu. For binary, click on Binary→Install. For beginners, the binary installations are usually fine. Installing from the source allows you to build programs tailored to your system and may provide a slightly newer version of the software you’re installing. Fink will prompt you for your administrator password every time you need to install software if it has not asked you recently. Also, the bottom pane of the FinkCommander window displays the progress of the installation.
When new versions of the packages are available, you will want that to be reflected in Fink’s table. To refresh the Fink database, click Source→Selfupdate from the menu. This will update the list of packages so that you can see if any of your installed packages are outdated. You can find a lot more usage information in the Fink user guide, the Fink FAQ on its web site or by typing man fink on the command line.
MacPorts
MacPorts is similar to Fink in many respects. It also provides a large variety of open source packages for installation and a straightforward way to manage them. Once you have downloaded and installed it (http://www.macports.org), typing the following at the command line will install the package of your choice:
$ sudo port install packagenameJust as Fink has FinkCommander, MacPorts has PortAuthority, a GUI frontend for MacPorts. PortAuthority has a well-designed and self-explanatory interface for the installation and management of your packages. Of course, the repository for MacPorts is separate from that of Fink and is installed in the /opt/local directory. It is a good idea to pick either Fink or MacPorts as your package manager of choice to maintain consistency and ensure that software is not unnecessarily duplicated.
Example: Three Ways to Install Gimp
Let’s take the open source image-editing powerhouse, Gimp, as an example. The easiest method of doing so is to install it as you would any other OS X application—from a DMG (http://gimp-app.sourceforge.net). Many popular open source applications are available as OS X .app files, and Gimp is one of them. Gimp requires X11.app.
However, to practice the skills you learned here, you can install the same application as follows under MacPorts:
$ sudo port install gimp-appIf you decided to go with Fink, you can install Gimp with the command:
$ fink install gimp2The last method mentioned, using Fink, does not create a .app file (.apps are really semihidden folders containing lots of resources) in your Applications directory. It creates a binary in /sw/bin that can be executed from Terminal by typing:
$ gimpIf an open source package is not available in Fink or MacPorts, it may still be possible to install it in OS X. The package may be available directly from some web site, sometimes as compiled binaries, and sometimes as source code that needs to be compiled.
Software available as source code is usually compressed as a compressed archive (.tar.gz) file. The procedure for installation has become fairly standard. First, decompress the file like this:
$ tar -zxf packagename.tar.gzThis command usually creates a directory called filename that contains the source of the package. It may also include a README file or INSTALL (or both), containing instructions on installation and other useful information. If not, the most common way to install open source software on Unix-like systems is the following series of commands:
$ cd packagename
$ ./configure
$ make
$ sudo make install
Usually, the configure script will bring potential issues with installation to light. If you do not see any errors in these three commands, the software should be ready to use.
The community of developers working on ports for Mac OS X helps Macs remain a viable alternative not only to Windows but also to common forms of Unix and Linux. Having said that, there are some problems with Fink and MacPorts the way they exist today. There are issues with stability (the consensus as of this writing is that MacPorts is much better than Fink under Leopard, but this isn’t a static situation) and the ease of use for new users. They have improved a lot over time and can only get better as the Mac OS X user base grows, making now the perfect time to add one of them to your computing quiver.
— Devanshu Mehta
HACK 32: Make Life Easy With Shell Scripts
A Unix shell isn’t just a way to tell your Mac what to do. It’s actually a simple programming language that can automate almost any task you need to repeat.
After learning about the shell, you might wonder why anyone still uses such an archaic method to order their computer around. Haven’t those Unix users heard about graphical user interfaces? Well here’s what keeps people typing: wildcards, scripting, and automation.
Wildcards are simple. Want to look at all the JPEG files in some folder? Type this in your Pictures folder at the Terminal prompt:
$ ls –l *.jpgThe *.jpg expands to the list of all the files that end with .jpg, and sure enough, you’ll get a listing of the sizes of any such files that are sitting in your current directory.
In the folder that contains chapters from this book, I typed this:
$ grep Devanshu *.docAnd got this list of the chapters that contain hacks contributed by Devanshu Mehta;
Binary file BBoAH-04-Commandline.doc matches
Binary file BBoAH-06-Network-file.doc matches
Binary file BBoAH-14-Multimedia.doc matches
The program works on binary files, as you can see, but it works even better on plain text, including HTML and XML files, where it will show you the line that matches the pattern.
grep is a program that searches through a file for a pattern. It actually has a sophisticated way to describe the pattern, called a regular expression. Using a regular expression, you can match patterns that involve alternate letters, and classes of letters and numbers. For example, [sS]hell matches both “shell” and “Shell,” and [a-z]+ matches any sequence of one or more lowercase letters. Type man grep to learn more.
Used in conjunction with the find program, it’s sort of like using Spotlight, with the disadvantage that it really is best used on text files, and the advantage that it can look for much more complicated patterns. Here’s a find command that will come up with a list of all the files in a directory (including in the subdirectories) that contain mention of any ISO standard:
$ find . -type f -exec grep "ISO [0-9]+" {} \; -printThe find program sorts through the directories, checking out files, and feeding them to grep, which looks for the letters “ISO” followed by one or more digits. Looks like a mess, doesn’t it? I use this all the time, but I never type it. Read on to find out how.
Variables and Aliases
A shell has a couple of ways to remember stuff for you: aliases and variables. An alias is a simple way to abbreviate some command you use all the time. For example, I keep the folders of books I’m working on in directories sorted by year. This is convenient, but it makes it annoying to type ~/tech/08/oreilly/applehacks/draft repeatedly, and clicking in windows gets old, too. So I can do this:
$ alias ah='cd ~/tech/08/oreilly/applehacks/draft'Now, if I type ah at the command prompt, I move to that directory immediately. Better yet, I can put that line (not counting the $ which is the command prompt) into a special startup file called .bash_profile in my home directory, and the alias will be created whenever Terminal or any other program that runs the Bourne Again Shell starts up.
Shells also have variables you can define. These can substitute for any part of a command. The alias is a nice trick, but it’s a little limiting. For something more flexible, I could have done this:
$ export WORK=~/tech/08/oreilly/applehacks/draft
$ alias work='cd $WORK'
Now when I type:
$ workI go right to the directory I want to work in. The $ tells the shell that what follows is a variable name, and that what I want is that variable’s value, substituted right here. I can keep the $WORK variable updated, and then typing work gets me to where I left off, wherever that was.
Shells define a number of environment variables that make the system work. For example, $HOME is the same as ~, your home directory, usually something like /Users/username. Your current working directory is defined by a variable called $PWD. When you use the cd command, you’re changing only the value of that variable. The $PATH variable is an important one, too. It lists a bunch of directories in which the system looks for commands you type. Try this:
$ echo $PATHThe collection of variables in use at any time is called your environment. You can see the whole collection by typing this at the command prompt:
$ envThere are a lot of possibilities here, limited mostly by your imagination and your desire to spend a little time hacking for convenience’s sake.
Avoid Drudgery with Shell Scripting
I’m lazy. Remember that mess of a find command a few pages back? Who wants to type that? Not me. Well you don’t need to, either. Make a two-line text file that looks like this:
#!/bin/bash
find . -type f -exec grep $1 \{\} \; -print
Call your new file something like findfile and type the following, to tell the shell that it’s OK to execute the commands in this file:
$ chmod +x findfileNow you can do this:
$ ./findfile "ISO [0-9]+"The shell will open up the file, but not before defining a variable called $1 to be equal to ISO [0-9]+. The first line of the file tells the shell to use bash to interpret the rest of it. (The default is to use the original Bourne shell, so it might work, but the Bourne Again Shell, bash, is much better.) The second line of the script gives the find command to execute, including the variable to substitute.
But what’s the “./” at the beginning? This has to do with the $PATH variable, a colon-separated list of directories in which the shell looks for commands you type. If a command you type isn’t obviously a pathname, the shell will look through the directories listed in that variable. The ./ business looks enough like a pathname that the shell skips the $PATH and executes the file straightaway. (In Unixland, the period means the current directory.) By default, the current directory is not in that list for security reasons. If you have a command you want to use regularly, you can put it in /usr/local/bin or make a bin directory in your home directory. I did that, and told the shell to search there for commands by putting this in my .bash_profile startup file:
export PATH=~/bin:$PATH
I parked my findfile program there, and now I can just type:
$ findfile "ISO [0-9]+"Doing Real Work with Loops and Ifs
The cool thing about shell scripts is that the shell is a real programming language, complete with the control features you expect from any programming language. You’ve already seen how you can create variables. Now here are a couple of the missing pieces.
Suppose I want to rename all the Word files in a directory, by sticking “-old” on the end of them all. I could do this:
$ for file in *.doc; do mv $file $file-old; doneThis loops through all the files found with the ls *.doc command, and uses mv to change their name by putting –old on the end. Now all the .doc files end in .doc-old. There is a way to sneak the –old before the .doc part, but you’ll have to look it up in the bash manpage. I seldom type something like this at the command line; I’d more likely put it into a file, where the formatting can be a little freer.
Recently, I was writing something for a company that changed its name. I had to edit a bunch of XML files to change a name that appeared a couple of times in each file. There were about 120 of these files, and the idea of doing them all by hand was appalling. So I wrote a shell script like this:
#!/bin/bash
for file in *.xml; do
    mv $file $file.bak;
    sed -e s/OldName/NewName/g $file.bak >$file;
done
This loops through all the files, applying the sed command to each one. sed, or “stream edit” is another astonishingly useful Unix program you didn’t know about. It’s a text editor that operates entirely from the command line. Here, it’s being used to execute a single substitute command, changing all occurrences of OldName to NewName.
sed doesn’t change the original file, so I changed the name of the original file to add the .bak to the end, and then sent the output from sed to the original filename. This way I got to pretend to spend the entire day working on this laborious name change, but in fact it took about three minutes of work, and I spent the rest of the day napping.
Incidentally, I could have done it this way:
#!/bin/bash
for file in *.xml; do
    if (grep –q OldName $file); then
        mv $file $file.bak;
        sed -e s/OldName/NewName/g $file.bak >$file;
    fi;
done
This operates only on the files in which grep found the OldName string inside. Now when I’m done, I’ve only edited the files that needed editing.
So now you have a scripting language with variables, loops, and conditional statements—everything you need to make scripts to do exactly what you want them to do. This little introduction barely scratches the surface of what’s possible within bash. There are whole books about bash alone, and other books about other shells and other, more elaborate, scripting languages, such as Perl and Python. If you want your scripts to do more, they probably can.
Hacking the Hack
The real power of scripting is getting the computer to do something for you while you do something you really enjoy, like napping or eating. Now that you know how to write a script, how about arranging for it to be run automatically? Mac OS X provides four different ways to do this: two old-fashioned Unix-ish ways and two newfangled Mac ways.
Old-fashioned ways
If you want your program to run at some future time, just once, use the at program. Make up a script and name it test.sh. (Don’t name it “test,” because that’s a built-in name used by the shell. You’ll only make yourself miserable trying to figure out why your program isn’t running.) If you can’t think of one, use this:
#!/bin/bash
echo "hello" >>trash.txt
Don’t forget to run chmod +x on it. When you run the program, it will add a line to the file trash.txt that says “hello.”
Try typing:
$ at –f test.sh 1735Now wait until 5:35 in the afternoon, and look at the trash.txt file.
Would you like your script to be run routinely? Use cron. The cron program looks at a file called crontab, which specifies what to do at a particular time. To set up cron, you have to create a crontab file. To do that, try this at the Terminal prompt:
$ export EDITOR=/usr/bin/nano
$ crontab -e
This opens up a nano editor session, probably on a blank screen. Look at the bottom of the screen for a list of the commands you can use with nano. The ^ indicates the Control key, so ^G means to press Ctrl-G.
A crontab file contains a time specification and a command. Try this, or something like it:
15 * * * * $HOME/test.sh
30 12 * * * $HOME/test.sh
35 12 1 * * $HOME/test.sh
40 12 * * 1-5 $HOME/test.sh
The first line tells cron to run your job 15 minutes after each hour. The second line tells cron to run it at 12:30, every day. The third line says to run it at 12:35 on the first of every month, and the fourth line will run it at 12:40 on weekdays. Type Ctrl-X to exit nano, and answer “Yes” when it asks you whether you want to save this work. Each time the job runs, it will add another line to the output file, so you can watch its progress that way.
As you can see, cron is pretty flexible about its specifications. It’s a little confusing, too. At the Terminal prompt, you can type:
$ man 5 crontab
This will get you a complete explanation of cron files.
New-fangled ways
The problem with cron is that your computer probably isn’t always on. A program run via cron won’t be run if the computer is off at that time.
What if you have some job to do but you want it done at a specific time if the computer is on, but you still want it done eventually if the computer is off? (Backups come to mind here.) There are two ways.
First, you can just put your script into one of the directories in /etc/periodic. There are three: daily, weekly, and monthly. (You will need to be an administrator of your machine to do this. In fact, if you’re not an administrator, you should stick to the old-fashioned ways.) These will be run automatically at intervals you can probably guess at. (To be more specific, the daily jobs run at 3:15 in the morning, the weekly jobs run at 3:15 a.m. on Saturday, and the monthly jobs run at 5:30 a.m. on the first of every month.) The scripts in each directory are run in alphabetic order, so if you want one script to be run before another, make sure they are named properly.
If you find this schedule too confining, try checking out launchd. This is the modern way to run jobs at whatever intervals you care to specify, but it is way beyond the scope of a hack like this. Type this to read more:
$ man launchd
$ man launchd.plist
You’ll find examples of launchd property lists in /System/Library/LaunchDaemons.
— Tom Sgouros
HACK 33: Fun with MacFUSE, or Mount Nearly Everything as a Virtual Hard Drive
Use Google Mail as your personal storage bin or soup up Spotlight by extending your filesystem to include all sorts of unusual data sources.
A filesystem is a method for storing and organizing computer files to facilitate finding and using them. Many popular filesystems provide a way to access files by maintaining the physical location of the files. This includes Hierarchical File System (HFS+), the preferred filesystem of Mac OS X, in addition to NT File System (NTFS) and (File Allocation Table (FAT32). Filesystems may also be simply act as clients for a network protocol, allowing access to files on a server (e.g., NFS). Finally, there are “virtual” filesystems that provide a way to access data. For example, procfs under Unix provides information about processes in a directory-like structure.
MacFUSE makes it possible to implement a fully functional filesystem in a “user-space” program on Mac OS X. This means that the implemented filesystem code can be created and run by nonprivileged users without the need to write kernel code. The File System in Userspace (FUSE) module provides a bridge to the actual kernel. It attempts to be compliant with the original FUSE mechanism that originated on Linux. This allows users to compile and use many popular FUSE filesystems that have been developed on other platforms in addition to new ones built specifically for Mac OS X. This also enables developers to build filesystem definitions that will work on any platform as long as they meet the FUSE specifications.
MacFUSE was developed by Amit Singh, Manager of Macintosh Engineering at Google and is available on the MacFUSE web site hosted by Google Code (http://code.google.com/p/macfuse). MacFUSE requires Mac OS 10.4 Tiger or higher. To install it, download and open the MacFUSE Core package available on the web site. Once the installation is complete, your computer should be ready for some of the available FUSE filesystems. To install some of them, however, you may need the open source packages pkg-config, gettext, and especially glib. These packages can be installed using Fink, MacPorts, or the instructions provided in the HOWTO on the MacFUSE web site (http://code.google.com/p/macfuse/wiki/HOWTO).
FTPFS and SSHFS are FUSE filesystems that allow you to mount remote systems accessible using File Transfer Protocol (FTP) or Secure Shell (SSH) on your system. These will seamlessly appear as mounted drives that you can easily drag and drop files from. FTP is a common network protocol used to transfer files; SSH allows for encrypted communication with remote machines. SSHFS will allow you to securely mount a remote filesystem (such as the one on a file server at work, school, or the one hosting your web site) to transfer or access files using the SSH protocol. SSHFS is available on the MacFUSE web site and is easy to use with a fairly basic graphical user interface.
Normally, under Mac OS X, drives formatted with NTFS are read-only. NTFS is the favored format for modern Windows systems (including Macs running Boot Camp) and may be one that you come across quite often. The ntfs-3g FUSE file system allows you to read from and write to an NTFS drive.
Use Gmail for File Storage
Warning
If you’re a heavy user with lots of items to transfer, don’t use Gmail for file storage. Storing files on Google is one of the behaviors that will get your account flagged, and you’ll lose access for up to 24 hours.
There are also some very interesting virtual filesystems such as WikipediaFS and GmailFS. WikipediaFS allows you to virtually mount Wikipedia on your computer so that you can browse to different articles or edit them as if they were files on your computer. So, instead of browsing to http://en.wikipedia.org/wiki/Apple and clicking edit, you could simply open /Volumes/WikipediaFS/Apple in your favorite text editor and have the changes appear on the Wikipedia. GmailFS allows you to store files in your Gmail storage. Similarly, filesystems for many online services such as PicasaWeb, Flickr, RSS feeds, and Google docs have been created.
To prepare your system for the GmailFS (and many other popular FUSE filesystems), you need to install the following, in addition to MacFUSE:
- Python 2.4 or higher
This can be installed using MacPorts or Fink.
- Python-FUSE bindings
Also available in MacPorts (install fuse-bindings-python) and Fink (install fuse-py24 or fuse-py25).
- libgmail
Available through MacPorts (install py-libgmail) and Fink (install libgmail-py24 or libgmail-py25).
- GmailFS
Available through Fink and directly from the developer’s web site (http://richard.jones.name/google-hacks/gmail-filesystem/gmail-filesystem.html).
Since all of these components are available through Fink, that would be the easiest way to install GmailFS. If you already use MacPorts and are comfortable with it, you may install everything up to libgmail using MacPorts. After that, you can download the latest version of GmailFS from the developer’s web site.
If you have installed GmailFS using Fink, you can skip these instructions. Once you have downloaded it from the web site, you will have to open it and move the source files from the command line in Terminal as follows:
$ tar –zxvf  gmailfs-0.8.0.tar.gz
$ cd gmailfs-0.8.0/
The number 0.8.0 represents the version of GmailFS, which may change in the future. The following commands may prompt you for your OS X password:
$ sudo mv gmailfs.py /usr/local/bin/gmailfs.py
$ sudo mv mount.gmailfs /sbin/mount_gmail
Now you should have a working GmailFS installation, except for one last thing. In the gmailfs-0.8.0 directory, there will be a file called gmailfs.conf. Edit this file in your favorite text editor to change these lines:
[account]
username = gmailusername
password = gmailpassword
Set gmailusername to your actual Gmail username and gmailpassword to your Gmail password. Then save this file in the /private/etc directory of your computer (you’ll need to use sudo). It is time to try moving files to the storage space of your Gmail account. In Terminal, enter the following commands:
$ mkdir ~/gmailfs
$ mount -ovolname=bla -o username=gmailuser -o password=gmailpass \
  -o fsname=zOlRRa -t gmailfs /usr/local/bin/gmailfs.py ~/gmailfs
This mounts your Gmail account in your home directory at /Users/yourosxusername/gmailfs. (On the command line, ~ stands for your home directory.)
Now, if the last command was successful, any files you move to the ~/gmailfs/ directory will be stored in your Gmail account. You can access this through Finder, where your Gmail space should also appear as a mounted drive or through the command line.
The files you store on your Gmail drive will appear as strange emails in your Inbox. This is normal but may not be the desired effect. To make sure these emails do not show up in your Inbox, you can create a filter in Gmail to send every email that matches the search string zOlRRa directly to your archived email. The string zOlRRa is what is used in the mount command above as your filesystem name and can be replaced with any other word of your choice.
To install WikipediaFS, you will also need Python 2.4 or higher and the Python-FUSE bindings. As described above, these can be installed using Fink, MacPorts, or directly from the source, if you are so inclined.
WikipediaFS is not currently available through Fink or MacPorts, and so needs to be installed manually. The package is available at the developer’s web site (http://wikipediafs.sourceforge.net/) along with instructions for its use.
Get More Out of Spotlight
SpotlightFS is one of the more interesting FUSE filesystems developed for Mac OS X. It is also one of the first that was made available. SpotlightFS creates true Spotlight-driven smart folders, in which the contents of the folders are generated on the fly. These are more powerful than the built-in Mac OS X smart folders because they are actual folders. In Mac OS X, the smart folders are actually XML files that run your Spotlight query when opened. The advantage of having actual folders is that they can be used from any other application, including the command line. SpotlightFS can be obtained from the Downloads section of the MacFUSE web site. Once the disk image is installed, you should be able to use it immediately by launching SpotlightFS.app.
There are two fundamental ways to use SpotlightFS. The easiest is to use SmarterFolders, which, as the name suggests, are smarter than the smart folders that Mac OS X provides. These are folders that do not need to be created, just accessed, in order to view their contents. Once you are running SpotlightFS, click on Go→Open Folder in Finder and type in /Volumes/SpotlightFS/SmarterFolder/apple. This will bring you to a virtual folder that contains all the files returned by the Spotlight query “apple”. This allows you to use smart folders ad hoc, without creating them in advance and to use them in a variety of applications. From the command line, you can type:
$ ls -lrt /Volumes/SpotlightFS/SmarterFolder/appleThis lists all the files returned by the Spotlight query “apple”. If you are fluent with the command line, you can come up with many ways to perform bulk operations on similar files using SpotlightFS.
The second way to use SpotlightFS is to actually create a directory under /Volumes/SpotlightFS with the search string you are interested in. For example, you can create a directory called Apple Hacks, which will behave similarly to smart folders in Mac OS X, but as a real folder. At the command line, you can type:
$ mkdir /Volumes/SpotlightFS/Apple\ Hacks/
$ ls -lrt /Volumes/SpotlightFS/Apple\ Hacks/
FUSE provides many ways to make data more useful and accessible, in addition to providing implementations to filesystems that have historically not been supported under Mac OS X. While experimenting with virtual file systems is fairly harmless, make sure you have backed up your data and read the instructions carefully before you use fully functional filesystems such as ntfs-3g.
— Devanshu Mehta
HACK 34: Starting and Stopping Unix Daemons
If you’re used to the Unix and Linux way of starting up and stopping daemons, you are probably wondering why Mac OS X has nothing resembling an init.d directory.
Although Mac OS X 10.4 introduced a great facility, launchd, for starting and stopping daemons, there are some good reasons to use the approach used in Mac OS X 10.3 and earlier: StartupItems. This is because many of the Unix programs you are likely to find in the wild (or write yourself) do things the old-school Unix way, which is likely to annoy launchd. For example, the launchd.plist(5) manpage specifically warns against using launchd with applications that call daemon (a Unix utility that spawns a program that runs without a user) or act like it (by spawning a sub-program and exiting, for example).
What’s more, launchd would prefer that you don’t do any of these things:
Setup the user ID or group ID.
Setup the working directory.
chroot(2).
setsid(2).
Close “stray” file descriptors.
Change stdio(3) to /dev/null.
Setup resource limits with setrusage(2).
Setup priority with setpriority(2).
Ignore the SIGTERM signal.
It’s possible to modify many Unix daemons to behave themselves under launchd. If you peruse the Darwin source code at http://www.opensource.apple.com/darwinsource/, you’ll find launchd-specific patches for many of the Unix daemons, such as OpenSSH and cron. For example, Apple’s source code for cron.c contains this little snippet to make everything launchd-safe:
#ifdef __APPLE__
/* Don't daemonize when run by launchd */
  if (getppid() != 1 && daemon(1, 0) == -1) {
#else
  if (daemon(1, 0) == -1) {
#endif
As time goes on, you’ll probably find that very popular open source packages will incorporate Apple’s patches into their official code releases. So if you’ve read the launchd(8) and launchd.plist(5) manpages, and are certain that your daemon will play by Apple’s rules, then by all means, use launchd. For more information on launchd, see “Creating launchd Daemons and Agents” at: http://tinyurl.com/27l9mg.
However, there’s one more advantage of using StartupItems: although launchd knows how to kill a process, you can’t specify an explicit shutdown routine to be triggered when you’re powering the system down. However, StartupItems can handle it.
Consider the MySQL database server: to start it up, you use a program called mysqld_safe, which in turn starts the MySQL database server. However, to shut it down, you issue the command mysqladmin shutdown. If you use launchd to manage starting up and shutting down MySQL, it’s going to kill the MySQL server in a less-than-graceful manner. If you use StartupItems, you can define how the process gets shut down.
A startup item is controlled by three things: a folder (such as /Library/StartupItems/MyItem), a shell script with the same name as the directory (such as MyItem), and a property list named StartupParameters.plist. The shell script and the property list must appear at the top level of the startup item’s folder. You can also create a Resources directory to hold localized resources, but this is not mandatory.
To set up a MySQL startup item, create the directory /Library/StartupItems/MySQL as root HACK 05: Become an Administrator for a Moment Then, create two files in that directory: the startup script MySQL and the property list StartupParameters.plist. The MySQL file must be an executable because it is a shell script:
$ sudo mkdir /Library/StartupItems/MySQL
$ sudo touch /Library/StartupItems/MySQL/MySQL
$ sudo touch /Library/StartupItems/MySQL/StartupParameters.plist
$ sudo chmod +x /Library/StartupItems/MySQL/MySQL
After you put the right information into these two files as directed in the following sections, MySQL is launched at each boot. Use your favorite text-only editor to edit these files and put the information into them. Because the files are owned by root, you will have to authenticate to use them. Smultron and TextMate are two editors that will allow you to authenticate in order to edit them; if you use vi at the Terminal, you can run it under sudo, as in sudo vi /Library/StartupItems/MySQL/MySQL.
The Startup Script
The startup script should be a shell script with StartService(), StopService(), and RestartService() functions. The contents of /Library/StartupItems/MySQL/MySQL are shown in the next listing. The function call at the bottom of the script invokes the RunService() function from /etc/rc.common (this is a file that is part of Mac OS X), which in turn invokes StartService(), StopService(), or RestartService(), depending on whether the script was invoked with an argument of start, stop, or restart.
#!/bin/sh

# Source common setup, including hostconfig.
#
. /etc/rc.common

StartService()
{
  # Don't start unless MySQL is enabled in /etc/hostconfig
  if [ "${MYSQL:=-NO-}" = "-YES-" ]; then
    ConsoleMessage "Starting MySQL"
    /usr/local/mysql/bin/mysqld_safe --user=mysql &
  fi
}

StopService()
{
  ConsoleMessage "Stopping MySQL"
  # If you've set a root password within mysql, you may
  # need to add --password=password on the next line.
  /usr/local/mysql/bin/mysqladmin shutdown
}

RestartService()
{
  # Don't restart unless MySQL is enabled in /etc/hostconfig
  if [ "${MYSQL:=-NO-}" = "-YES-" ]; then
    ConsoleMessage "Restarting MySQL"
    StopService
    StartService
  else
    StopService
  fi
}

RunService "$1"
Because it consults the settings of the $MYSQL environment variable, the startup script won’t do anything unless you’ve enabled MySQL in the /etc/hostconfig file. To do this, edit /etc/hostconfig in a text editor, and add this line:
SQL=-YES-
Mac OS X does not recognize any special connections between hostconfig entries and startup scripts. Instead, the startup script sources the /etc/rc.common file, which in turn sources hostconfig. The directives in hostconfig are merely environment variables, and the startup script checks the value of the variables that control its behavior (in this case, $MYSQL).
The Property List
The property list (StartupParameters.plist) can be in XML or NeXT format, and the list contains attributes that describe the item and determine its place in the startup sequence. The NeXT format uses NeXTSTEP-style property lists, as shown in the following example:
{
  Description = "MySQL";
  Provides = ("MySQL");
  Requires = ("Network");
  OrderPreference = "Late";
}
The XML format adheres to the PropertyList.dtd Document Type Definition (DTD). You can use your favorite text editor or the Property List Editor (/Developer/Applications/Utilities) to create your own property list. Here is the property list in XML:
<?xml version="1.0" encoding="UTF-8"?>
<!DOCTYPE plist
SYSTEM "file://localhost/System/Library/DTDs/PropertyList.dtd">
<plist version="0.9">
  <dict>
  <key>Description</key>
  <string>MySQL</string>
  <key>Provides</key>
  <array>
    <string>MySQL</string>
  </array>
  <key>Requires</key>
  <array>
    <string>Network</string>
  </array>
  <key>OrderPreference</key>
  <string>Late</string>
  </dict>
</plist>
The following list describes the various keys you can use in a startup parameters property list:
DescriptionThis is a phrase that describes the item.
ProvidesThis is an array of services that the item provides (e.g., Apache provides Web Server). These services should be globally unique. In the event that SystemStarter finds two items that provide the same service, it starts the first one it finds.
RequiresThis is an array of services that the item depends on. It should correspond to another item’s
Providesattribute. If a required service cannot be started, the system won’t start the item.UsesThis is similar to
Requires, but it is a weaker association. If SystemStarter can find a matching service, it will start it. If it can’t, the dependent item still starts.OrderPreferenceThe
RequiresandUsesattributes imply a particular order, in that dependent items will be started after the services they depend on. You can specifyFirst,Early,None(the default),Late, orLasthere. SystemStarter does its best to satisfy this preference, but dependency orders prevail.
You can now manually start, restart, and stop MySQL by invoking SystemStarter from the command line:
$ sudo SystemStarter start MySQL
$ sudo SystemStarter restart MySQL
$ sudo SystemStarter stop MySQL
— Brian Jepson
HACK 35: Image Management with ImageMagick
Bulk process, transform, and otherwise manage your images with this extremely useful batch image-processing tool.
ImageMagick is an extraordinarily powerful open source package that contains many different utilities to edit and create images. With a single typed command, you can rotate, resize, merge, convert, and subtitle an entire collection of images in precisely consistent ways. You can get started right away—once you’ve installed ImageMagick—with fairly simple commands, such as the first convert example below. But once you get comfortable with it, it could even replace your trusty (bloated!) image editor.
To install ImageMagick, you will need either Fink, MacPorts HACK 31: Get More Out of Your Mac with Fink and MacPorts or install the Mac OS X Binary available on the ImageMagick web site (http://www.imagemagick.org).
Each of these commands needs to be run on the command line in an application like Terminal. To explore any command in detail, you can either use man (e.g., man convert) on the command line or visit the extensive ImageMagick help documents on the web site.
Converting File Formats
With ImageMagick, converting the file format is as simple as giving it a new file extension:
$ convert flower.jpg flower.pngReplace png with gif or the extension for any other supported image format (there are around a hundred) to convert it to that format.
Create Thumbnails in an Instant
Creating thumbnails of images in most image editors requires a few clicks, and editing them in bulk is harder than pulling each hair out of your scalp individually.
With ImageMagick, it is much simpler:
$ convert flower.jpg -resize 50% flower50.jpgThat changes the image flower.jpg to 50% its original size and names the newly created file flower50.jpg. The convert command always creates a new image file, and the last argument supplied to it is the new filename:
$ convert flower.jpg -resize 50x50 flower5050.jpgThe previous command creates a 50 x 50 thumbnail version of flower.jpg. You can combine different ImageMagick options, for example, to resize and convert the image format:
$ convert flower.jpg -resize 50% flower50.pngRotate a Set of Images
Rotating an image is just as simple. The following example (also see Figure 4-6) will rotate flower.jpg 30 degrees in the clockwise direction. The output image will be larger than the input, so that it can contain the entire original image, rotated.
$ convert flower.jpg -rotate 30 flower30r.jpg
Of course, it is more likely that you will want to rotate your photograph by 90 or 270 degrees, but no one is stopping you from being quirky.
To Add a Subtitle or Text Caption
Sometimes you just want to add a little text to your image. This can be done with most GUI image editing tools, but not quite as simply as with ImageMagick—especially if you want to add the same text to many images. Examples of such a situation would be a watermark with the source of the image, a subtitle with the album name or a copyright notice.
$ convert flower.jpg -draw 'text 10,10 "Nifty Text!"' flowerNifty.jpgThis command adds the text “Nifty Text!” to the image flower.jpg at the coordinates (10,10), which are calculated from the top-left corner. You can even specify font and point size to make your text more or less pronounced (see Figure 4-7).
$ convert flower.jpg  -font Courier-Regular -pointsize 35 \
-stroke white -draw 'text 40,40 "Nifty Text!"'  flowerNifty.jpg

With practice, you will be able to combine all of these tools without giving it much thought.
Create a Text Banner
Creating a banner in ImageMagick is also fairly simple. You can use the convert command without an actual source file to make one. The command synthesizes the banner on its own (see Figure 4-8).
$ convert -size 200x40 xc:transparent -font Courier-Regular \
  -pointsize 20 -channel RGBA -gaussian 0x6 -fill darkred \
  -stroke magenta -draw 'text 10,30 "My Nifty Banner!' \
  nifty-magick.png
This example will create a new transparent image sized 200 x 40, and type the magenta text “My Nifty Banner!” at coordinates (10,30). You can see how far you can get with a few options, and the convert command has many more.
Create a Montage
ImageMagick also comes with the montage command, which allows you to create—you guessed it—a montage of all the images you specify. In addition to simply creating a montage, you can give it a background, border and each image a caption (Figure 4-9).
$ montage -background gray -border 1 -label %f *.jpg montage.jpg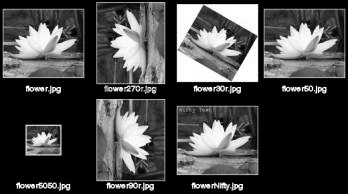
This command is almost self-explanatory, but in case you don’t agree, it creates a montage of every image that ends with .jpg in the current directory (*jpg), with a gray background and calls it montage.jpg. The -label %f gives each image a label with its filename, and -border 1 gives each image a thin border.
Get Information About an Image
Simply type the following to get some basic information about an image:
$ identify flower.jpgThis gives you basic information such as:
flower.jpg JPEG 1024x859 1024x859+0+0 DirectClass 8-bit 347.061kb
To get a really large amount of information, including EXIF data from your digital camera, try the following:
$ identify -verbose flower.jpgYou can even pull out individual pieces of information from the file:
$ identify -format "%f %wx%h\n" *.jpgThis command displays only the information we requested (%f is the filename, %w width, %h height) in the format specified. The output would be as follows:
flower.jpg 1024x859
flower270r.jpg 859x1024
flower30r.jpg 1316x1255
flower50.jpg 512x430
flower5050.jpg 50x42
flower90r.jpg 859x1024
flowerNifty.jpg 512x430
montage.jpg 520x288
Bulk Actions on Image Files
In many cases, the *.jpg type wildcard will suffice to perform actions on a large number of files. For example:
$ mogrify -resize 200x200 *.jpgThis resizes every single JPEG image in the directory to a 200 x 200 size and retain their name. The mogrify command is similar to convert, except that it overwrites the original image, so be careful. If you want to create a new file, you can use the convert command mentioned earlier, but in order to use convert on a large number of files, you will have to script a bit:
for image in *.jpg
do
  convert $image -resize 200x200 size200-$image
done
This should be easy to read if you have written a shell script before HACK 32: Make Life Easy With Shell Scripts. Basically, it takes every JPEG file in the current directory, resizes it to 200 x 200 and renames it with the prefix size200-. Edit it and test it on some images you can afford to mangle. This is great for creating thumbnails for a web site or smaller sized images to email.
Once you become more familiar with scripting languages, you can easily use ImageMagick as part of a much larger program or repeatable script to automate actions tedious processes.
— Devanshu Mehta
HACK 36: Tapping Into Mac OS X from the Command Line
The Unix and Mac OS X worlds are not so far apart as you might imagine. You can bridge them easily if you know the correct incantations.
Mac OS X and Unix seem like an odd pairing at first. Mac OS X is slick, intuitive, and for the most part, pretty friendly. Unix is, at least at first, looks gritty, counterintuitive (you want me to grep my what?), and surly at times. But just because they have really different personalities doesn’t mean they can’t cooperate nicely. Here are a few tricks you can use from the command line to bridge the two.
AppleScript
Mac OS X has a couple of spiffy new ways to automate things in Mac OS X: Automator and Quartz Composer. While both are fantastic, AppleScript has been with Mac OS since before the days of Mac OS X, and many applications support AppleScript automation. Apple made it really easy to issue AppleScript commands from the Terminal with the osascript command. Just give osascript the name of a script file, or use the -e option to run an AppleScript one-liner:
$ osascript -e 'say "Hello world"'You can use - and a special shell quoting style called the “here-doc” to pump a short script into osascript (the - tells osascript to read a script from the shell’s standard input, and everything between <<EOF; and EOF is treated as that input):
$ osascript - <<EOF;
tell application "Finder"
  activate
  open folder "Applications" of startup disk
end tell
EOF
Clipboard
If you’re doing a lot of work at the command line, you might eventually produce some output you need to paste into another program, such as a spreadsheet or an email message. You can highlight output in the Terminal window and use the usual copy/paste shortcuts, but you could also pipe the output into the clipboard. For example, you could put a list of all processes running on your Mac into the clipboard with this command:
$ ps -ef | pbcopySimilarly, if you want to send the contents of your clipboard into a Unix command, you can use pbpaste. This would search the contents of the clipboard for any lines that contain numbers of the form nn:nn (such as timestamps like 08:30):
$ pbpaste | grep '[0-9][0-9]:[0-9][0-9]'Some applications, such as Microsoft Word, store their text in the clipboard in a Unix-unfriendly format (using the old classic Mac OS line endings of a single carriage return). You can fix this with a trip through Perl (behaving here a lot like the sed utility and replacing \r, the carriage return with \n, the linefeed):
$ pbpaste | perl -pe 's/\r/\n/g' | grep '[0-9][0-9]:[0-9][0-9]'Open
Want to open something? How about a file or folder? This will open it in the Finder:
$ open ~/MusicYou can open applications with the -a switch:
$ open -a iTunesopen has a bunch of cool options, so be sure to check out its manpage by typing man open at the Terminal.
QuickLook
You can pop QuickLook up from the Terminal, too. To display a file:
$ qlmanage -p flower.jpgYou can also display a group of files:
$ qlmanage -p *jpgSpotlight
You can perform Spotlight searches from the shell. To search for a term:
$ mdfind N95If you know where you want to search, use the -onlyin option (try changing N95 to the model of camera or camera phone you use):
$ mdfind -onlyin ~/Pictures N95You can also use Spotlight’s keywords:
$ mdfind "kMDItemComposer == '*Garcia*'"Here’s how to inspect a file’s Spotlight metadata:
$ mdls ~/Pictures/iChat\ Icons/Planets/Pluto\ and\ Charon.gifTake a Screenshot from the Command Line
You can take a screenshot with the screencapture utility. Provide the filename you want, and it will be created:
$ screencapture cap.pngYou can even invoke screencapture remotely, when you’re not logged into the computer. HACK 37: Customize the Login Window explains how.
— Brian Jepson
Get Big Book of Apple Hacks now with the O’Reilly learning platform.
O’Reilly members experience books, live events, courses curated by job role, and more from O’Reilly and nearly 200 top publishers.

